
The beginners guide to buying lumber will help you pick our the right wood for your project and budget.
You have your new tools and you found the perfect DIY woodworking plans. But now you are standing in the isles staring at all the wood options.
How do you know what kind to buy for your project? And how do pick the best boards? Why are some boards so much more expensive than other ones?
Don’t worry, I have been there too. When you first get started with woodworking there is so much you do not know and that is okay. The beginners guide to buying lumber will help you get started on your woodworking journey.
This post may contain affiliate links. As an Amazon Associate I earn from qualifying purchases. Click here to read my full disclosure policy.


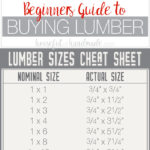
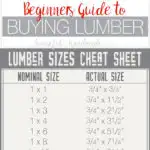
Why is the actual size of the board different than the stated size?
When you are looking at woodworking plans or at the store, you will see lumber listed by the depth and width (for example: 1×3, 2×4, 1×8, etc.). However, if you measure the boards, you will see the lumber is not the same size listed. This is what is called dimensional lumber.
This lumber is cut to size and then sawn and planed to make it straight(ish). So the actual size of the board ends up being smaller than the stated (nominal) size.
So if your plans call for a 1×4 board, the actual dimension is .75″ x 3 1/2″. And I wish there was a way for me to say that the actual size of the boards were always X smaller than the nominal size, but of course there is not.
Instead, I made this handy chart to help you when selecting standard lumber sizes. Also worth noting, the dimensional size is only for the width and depth of the lumber. The length is the actual length listed.


What kind of wood should you buy for your project?
There are so many different kinds of lumber. And some are much cheaper than others. But knowing what kind of wood will work for your project is important so you do not waste time and money working with the wrong wood.
If you visit your local big box home improvement store, you will probably see very inexpensive furring strips, more expensive common boards, pricier select pine boards, and very expensive hardwood boards.
Then of course there are outside wood options like redwood, cedar, and pressure treated boards. What does it all mean?
Furring strips
When looking for inexpensive lumber, these are very attractive because of their very cheap price point. However, when you start digging through the boards you will learn why.
Furring strips are usually very rough, with lots of imperfections and warping. They are made for use in construction when you need to raise or level things, but are not meant to be seen.
However, I have successfully used these in woodworking (I made the frame of the laundry room cabinet doors with 1×3 furring strips), you just have to be willing to put in more time picking your boards, and a lot more time sanding them.


Framing lumber and studs
Framing lumber are the 2x4s (and anther 2x boards) that are used to frame out a house. These boards are relatively cheap. The most inexpensive option for studs are made from whitewood (Douglas fir typically).
If you are adding a wall in your home, this is probably the ones you will use. A lot of woodworking plans online use 2x4s and I love using them too.
The frame of our outdoor dining table, frame for the slatted outdoor sofa, and legs of the upholstered barstool benches were all made from 2x studs.
The one main draw back of 2x studs is that they have a rounded edge. You can make these boards are made square by running them through a table saw to remove the rounding (but you will make the board smaller by doing so).
Common boards
These boards are a great option for beginning woodworkers because they are still quite inexpensive, but straighter and prettier than furring strips.
Common boards are typically made from pine and are considered a soft wood. I use these boards for a lot of woodworking projects and with great results.
I’ve even use them for outdoor projects like the kids patio chairs, treasure chest toy box, and nautical picnic table and they hold up well when painted and sealed properly for outdoor use.


Common boards usually do not come in 1×2 and 1×3 sizes (they start at 1×4 and get larger from there). So if you need the smaller wood for your project, you can rip the boards down with a table saw or circular saw with guide track (I love the Kreg AccuCut).
Select pine boards
These boards are a great option to keep a budget in check, but still give you beautiful results. These pine boards are the cream of the crop. Typically they are very straight (but always check your lumber before buying it) and have few imperfections.
Select pine is my current go-to wood choice for my woodworking projects. I can make furniture pieces that are inexpensive but look amazing. Our closet sliding barn doors and small console table were made with select pine and you can really tell the difference it makes.
Hardwood boards
Hardwood is probably the most expensive wood choice at the home improvement store. There are many different species of hardwood (walnut, cherry, and oak to name a few). These boards are typically sold by linear foot so make sure you look carefully before settling on a hardwood option.
I would not recommend these for beginner woodworking projects because you will make mistakes and at $4+ a foot, those mistakes can be costly.
However, hardwoods will give you amazing results that will last. But first, learn what you are doing then build your heirloom pieces with these amazing woods.
I love use hardwood in smaller projects (like this wood and steel serving tray). It gives the high end result without the high end price. They are also necessary for making cutting boards like this handmade marble cheese board.
If you want a harder wood on a budget, I love knotty alder. The knots give it the rustic character and it is about 1/2 the cost of other hardwoods. This is what we used to make our mission style open shelf bathroom vanity so it can hold up to the use and humidity of a bathroom.
Another great budget friendly hardwood option is poplar. This is what I used for the cabinet doors and face frames of our kitchen remodel. It is very commonly used in painted furniture because it can have a slight green undertone, but I have used it with stain (like this TV console) and love it.


Pressure treated lumber
Pressure treated lumber is your framing lumber that has been treated to resist terminates, rot and fungal decay. It is used for ground contact and great for things like decks. We used it for the deck of our outdoor playhouse and our patio pergola.
You can also use redwood and cedar for outdoor projects. They are naturally resistant to the decay and the elements, but at a much higher price tag.
Plywood
Plywood is a great option for woodworking. It is straight, inexpensive, and able to be any size you need for your project.
Plywood is a thin layer of hardwood on top of a pressed sandwich of wood and glue. This creates a strong wood with a pretty layer for staining or painting.
Typically the edges of the plywood are covered up, but I actually like showing them off sometimes for an industrial look (like I did for our plywood closet organizer).
Plywood is sold by thickness. However, 1/4″ plywood is not actually 1/4″. It’s more like 7/32 of an inch. This is true for all plywood thicknesses. Check the actual product thickness of any plywood before buying.
Plywood is typically sold in 4’x8′ sheets and 2’x4′ sheets. I almost never buy 2’x4′ sheets because they are around 1/2 the cost but 1/4 the size of the full 4’x8′ sheets. And since plywood is so versatile, I use it all the time so extra plywood is a welcome thing.
A lot of beginner woodworkers stay away from plywood because they think they need a table saw to cut it. But you can get a few cuts for free from the home improvement store or use less expensive tools like a circular saw to cut it.
Use a guide track like this to keep the saw straight and you will have wonderful results. This handmade dollhouse and stackable laundry basket storage was made with a sheet of plywood cut completely with a circular saw and this guide system.


How do you choose straight boards?
Once you know what wood you want to buy, it is imperative that you buy the straightest boards you can. Curves and warps in your boards will cause you tons of pain and stress while woodworking.
Always take the extra time at the store to check every single board before buying them.
To check a board for straight, hold it up to your nose and look down the length of the board. You will be able to see if the board curves or twists.
If it looks straight, rotate the board 1/4 turn and look down the next side. Continue to turn the board 1/4 turn and check all 4 sides of the board for straight before selecting it.


Also examine the entire board for splits, knots and other imperfections. Sometimes knots are great to add character to your woodworking project, but knots are super hard and can split out of the boards when cut or drilled through.
If you want to include knots, you may need extra wood to ensure the cuts are not going through them. Avoid buying boards that are split.
How to Store Boards to Minimize Warping
Once you have bought the perfect boards, bring them home and store them properly to keep them straight.
- Lay boards flat on the floor or on shelves that support the entire span of the board.
- Stack boards so they are flat and straight.
- Propping boards against the wall can cause them to bow.
Boards can warp or twist from improper storage (and it can happen fast if there is a lot of moisture in the air).
Now you are ready to start your project! Check out the woodworking tutorials to help you get started in your woodworking journey. And most importantly, enjoy!


Liz Miller
Monday 11th of April 2022
I’m seeking a lightweight wood board that’s quite wide. I’ve seen these stored/displayed in hardware/lumber stores inside of sectioned-wood-cabinets to make the sections of this small, light-weight wood panels very accessible [displayed in the way that circular (approx. 3/4” thick) wood tops (often 18”, 20”, 24”, maybe 30” diameter) circles which can be used for small table tops. ] This item of wood is rectangular, in sizes as small as 2’x2’, or 2’x3’. The alignment of the wood is from randomly arranged strips of wood all which have identical widths - about 2”wide; but the strips are different lengths - about 6”-14”long. The wood grain is generally in only one direction.
The surface is flat and very smooth in light colored wood.
What is this item called, please? It is not plywood; it is probably glued together to give the length and the wide width.
Jenna Margraves
Friday 10th of July 2020
This was a fantastic read!! Im pretty confident walking into Home Depot soon. Thank you for your time and specifics! Excited!!!!!
Kati
Tuesday 28th of July 2020
I am so happy to hear. Go forth and feel confident buying lots of lumber!!!
Rod
Monday 29th of June 2020
I loved this article, thank you! I just started woodworking and posted a work table project I did to a private FB group, I got some positive feedback but one suggestion mentioned that I should stay away from 1x3 furring strips.
I have to confess I had no clue what that meant, so I started to google it up and found this. In a quick read, I feel my understanding has increased quite a bit :) I do feel that for a working table in which I will toss my tools around, it was fine to use those.
Anyway, thank you again, great article!
Kati
Tuesday 28th of July 2020
I have used 1x3 furring strips for many things (even cabinet doors, shocker I know!). But knowing what you are getting and choosing straight boards can make all the difference. I am so glad you learned something!
Stephen Malloy
Wednesday 21st of August 2019
I just bought some cedar lumber for an outdoor project - a bit of a rookie, but trying my hand at building some benches and planters. The lumber store near me had to special order it, and now that I picked it up it seems to be fresh cut, rough hewn and very green. Any guidance on what to do? Am I really sitting on this now to dry?
Kati
Tuesday 27th of August 2019
That is a very tough question. Typically to air dry rough cut lumber, you need to lay it flat with spacers for airflow and dry it 1 yr per inch. If you build with lumber that is not dry, it will move a lot as it dries and can ruin all your hard work. I would turn to the local lumber yard for guidance for your particular climate. They can help you understand if the wood needs more drying and how to do it in your climate.
Daphne Gilpin
Monday 12th of August 2019
Thanks for explaining that cedar and redwood may be a bit more expensive, but they're good for outdoor projects because they naturally resist decay. My husband and I want to find a timer supplier so we can purchase the lumber to build a deck. I'm glad I read your article because we want to invest in high quality materials, and you helped me see why cedar timber would be a good choice!
Kati
Tuesday 13th of August 2019
A little more money for the right wood for your deck will pay for itself over time! Good luck on the build!