
Build a beautiful handmade dollhouse with these easy DIY plans.
Use these handmade dollhouse build plans to make the perfect Christmas present this year.
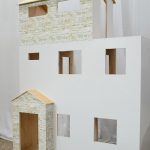
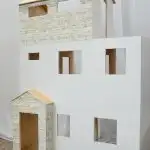
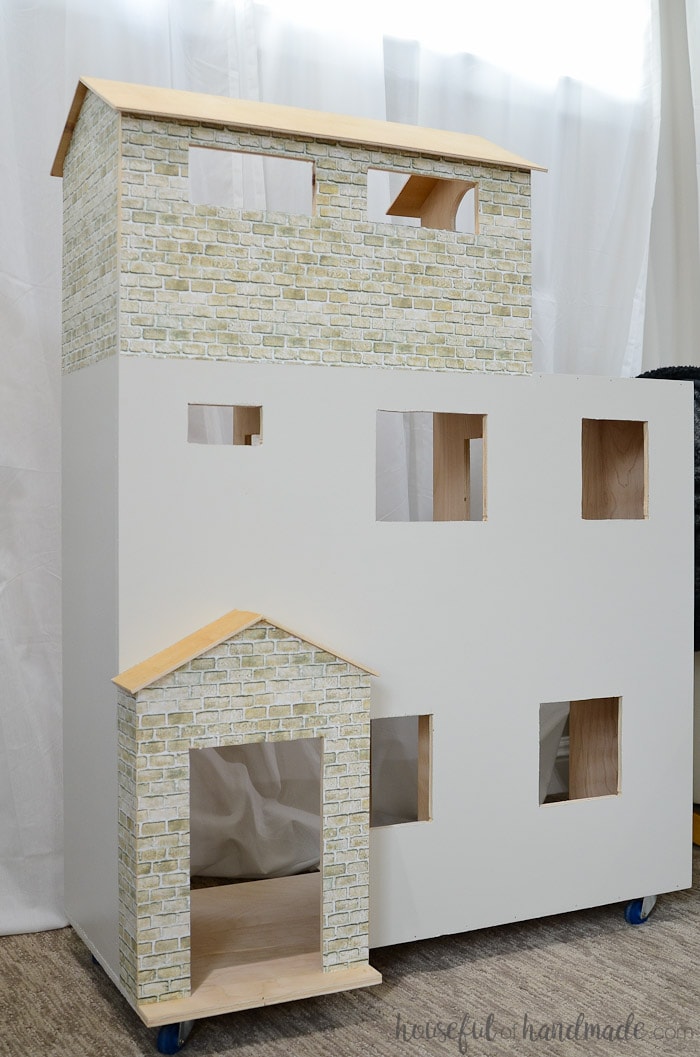
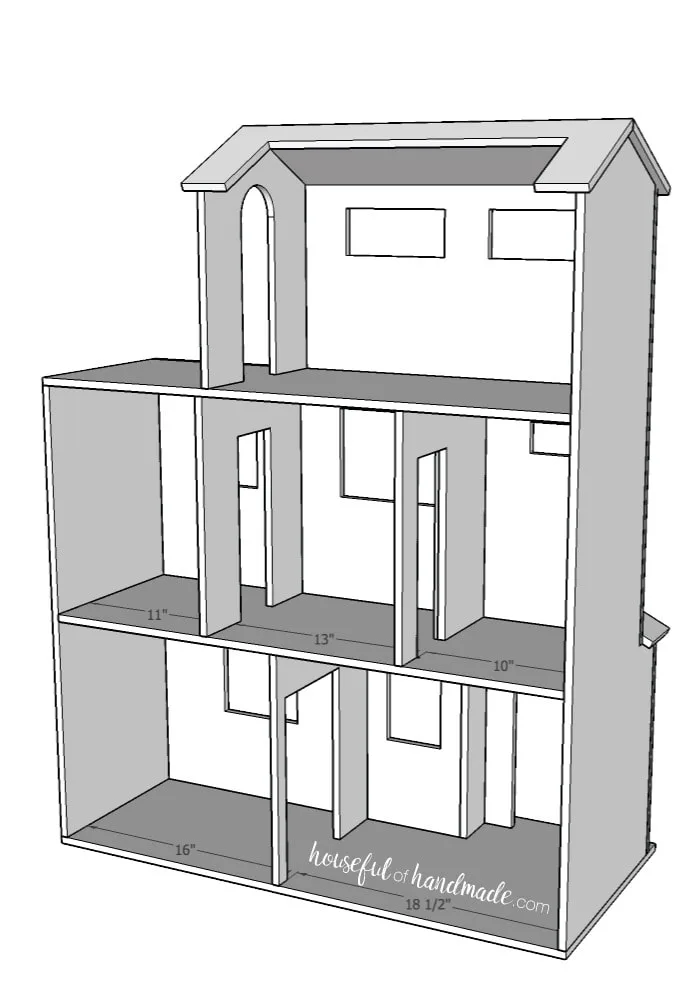
The easy to build 4′ dollhouse is made out of plywood for a sturdy house that will last.
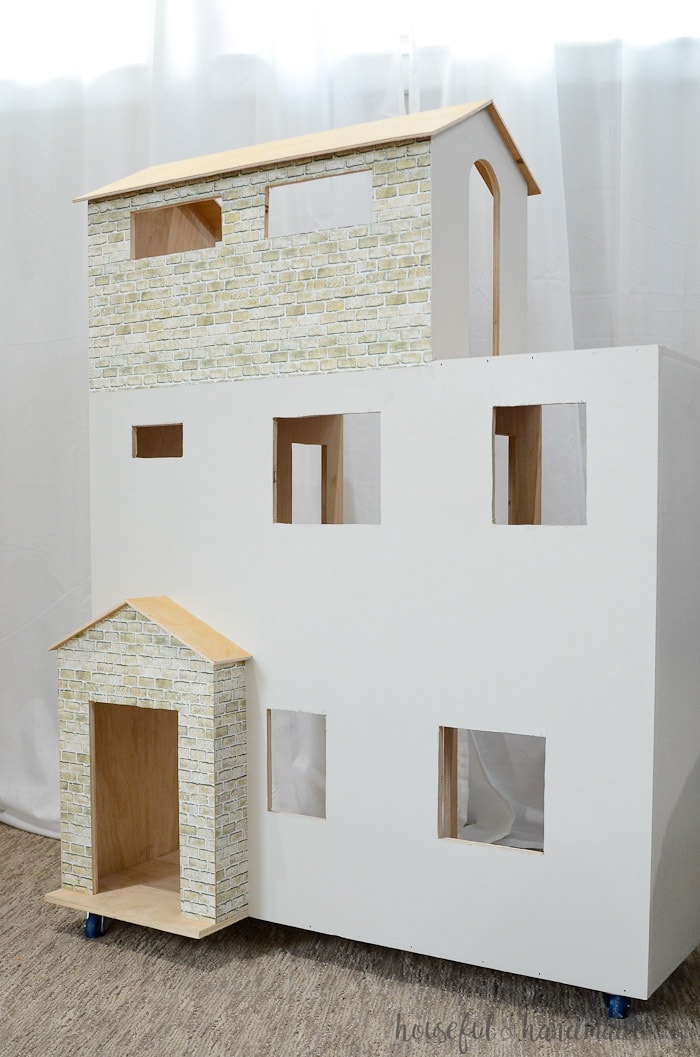

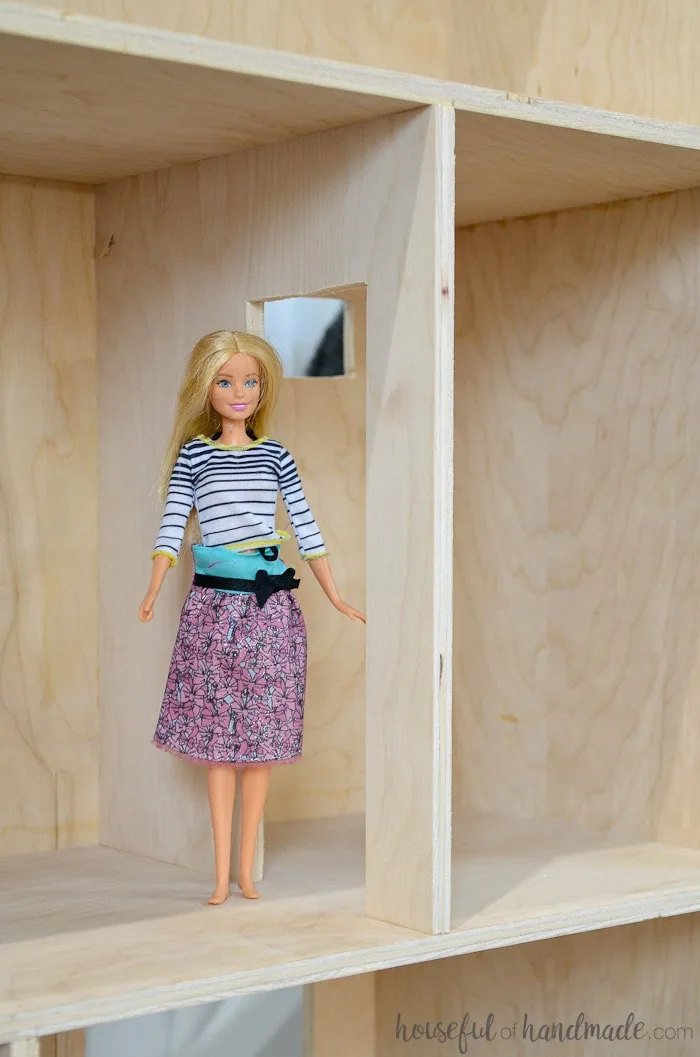
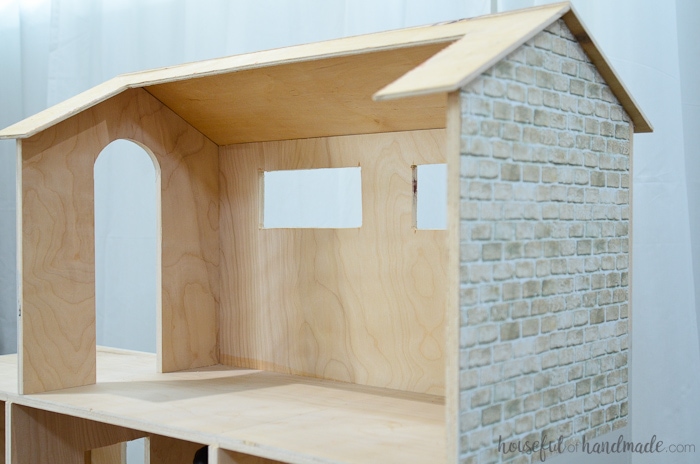
The dollhouse’s large rooms are big enough for 11″ dolls. The dolls can even to fit through the door ways standing up.
This post may contain affiliate links. As an Amazon Associate I earn from qualifying purchases. Click here to read my full disclosure policy.
A DIY dollhouse is the perfect DIY gift for Christmas morning!

I knew I wanted to get my daughter a dollhouse for Christmas. She loves playing with her dolls.
Currently she has a small house that folds up for easy storage. It gets lots and lots of play, but she keeps asking Santa for a big dollhouse. She needs something more.
We started shopping around for dollhouses and I was left unimpressed. There were a lot of expensive options and a lot of flimsy looking options.
I knew I could create something amazing for way less, so I hit the sketchpad instead.
And what was born is this beautiful rolling dollhouse that is actually large enough for her 11″ dolls to fit inside (and even through the doorways).

I am so excited to give this beautiful handmade dollhouse to my daughter this Christmas. It’s been so much fun building and decorating it.
I am only planning on finishing the dollhouse exterior and a couple of the rooms inside before Christmas. Then we can work together later to create the perfect handmade dollhouse with lots of personal touches.

DIY Dollhouse Plans
Even though I am not done with this project, I wanted to share the dollhouse plans ASAP. In case anyone else is looking to surprise someone with a beautiful DIY dollhouse this Christmas.
This dollhouse can be made from just over one sheet of plywood. I know, just over one sheet really sucks.
I thought I had it figured out how to get all the pieces on one sheet. But then after cutting it all out and assembling, realized I was missing one piece. So if you have a garage full of scraps, you can get away with just buying one sheet.
If not, you will need to buy 1 and 1/4 sheets, but then you will have plenty of left over pieces to create some fun little furnishings for the house too.


PS Please excuse Eric’s nakedness. I was lucky to find him a pair of pants for the picture, but have no clue where his shirt has disappeared too. I just wanted to show the scale.
Cutting Plywood without a Table Saw
I built this entire DIY dollhouse without using a table saw. The entire sheet of plywood was easily cut down with a circular saw with a guide track. I used the Kreg RipCut and AccuCut.
These are my two favorite new tools because they make it possible for me to rip down full sheets of plywood all by myself. And they are super easy to use and accurate.

And next week I will be sharing an update on the dollhouse with all the finishing ideas. But first, grab your saw and get to building.
Or if you need a smaller dollhouse, check out these easy MDF dollhouse plans. And the template comes with furniture too!
And don’t forget to check out the rest of my Woodworking Tutorials for more DIY gift ideas.
How to Make a Handmade Dollhouse
Tools & Materials
Tools:
- Circular saw
- Use a plywood blade for cleaner cuts
- Circular saw guides
- I like to use the Kreg RipCut & AccuCut
- Jig saw
- Drill
- 16 gauge finishing nailer
- Measuring tape
Supplies:
- 1 sheet of 1/2″ plywood + scrap piece or 1/4 sheet
- 1/4″ plywood
- 1 1/4″ finishing nails
- Wood glue
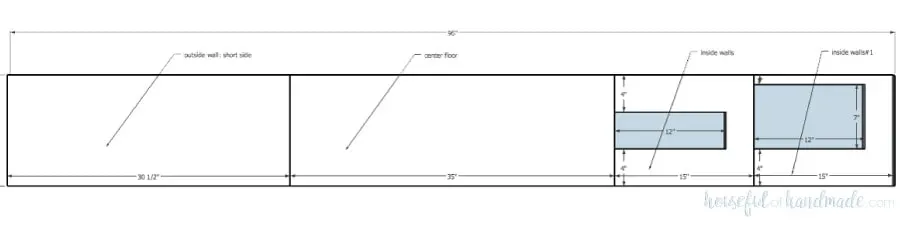
STEP 1- Cut the plywood pieces
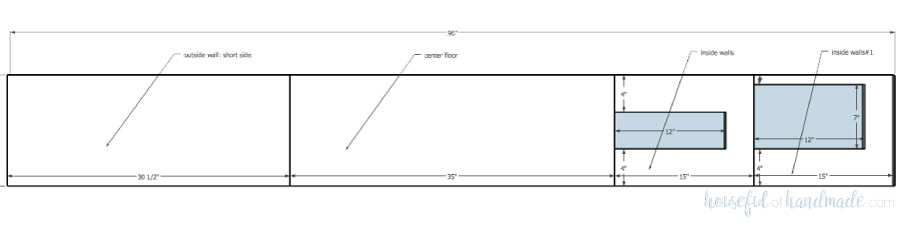
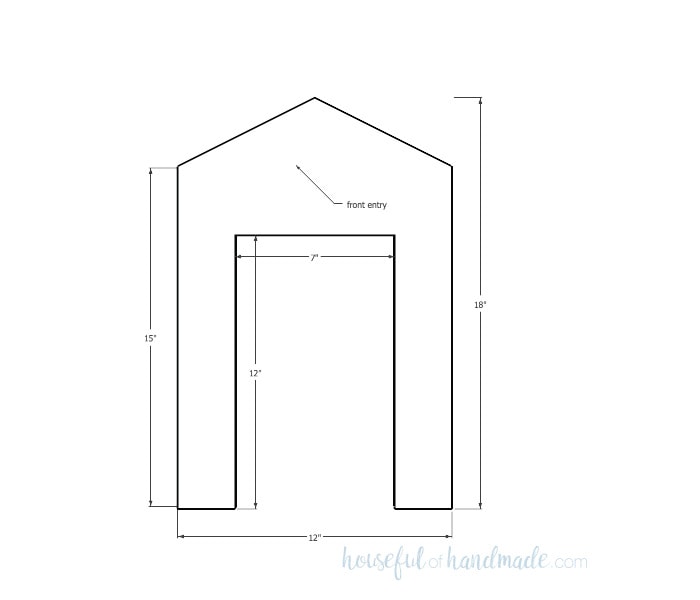
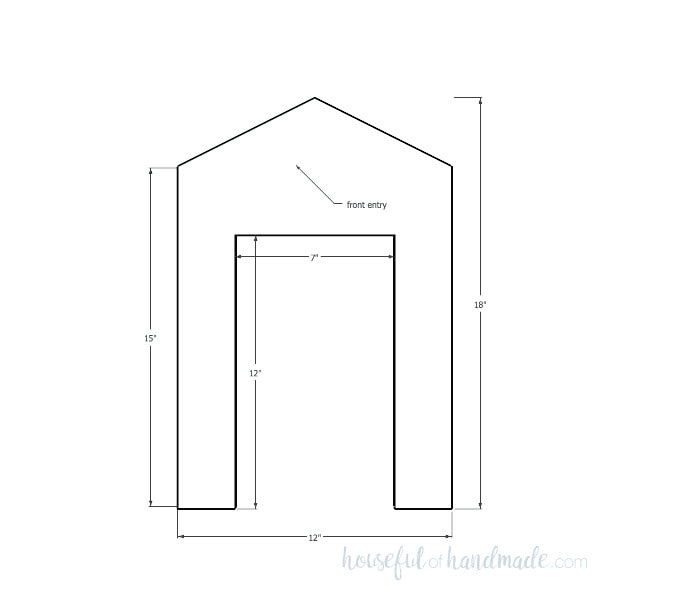
Cut all the house pieces from the 1/2″ plywood and the roof pieces from the 1/4″ plywood.

The cuts for the plywood are a little tricky. The pieces nest inside each other to get everything to fit on one sheet.
But I have it all detailed out in the printable PDF dollhouse plans with plywood cut diagrams and detailed measurements.

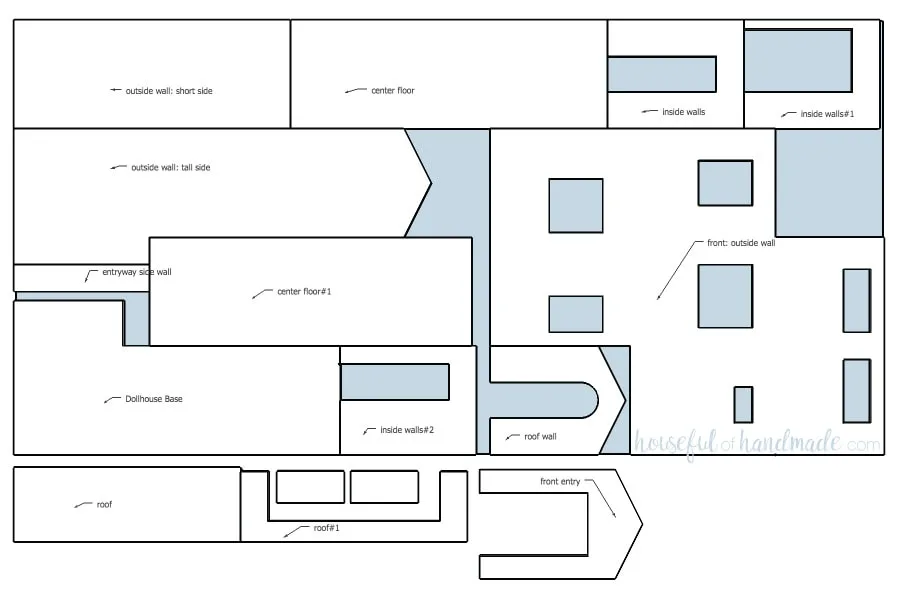
Start by ripping the first piece off the long edge of the sheet of plywood with the Kreg RipCut. Then cut the pieces out of it. I used the AccuCut to cut all the cross pieces.
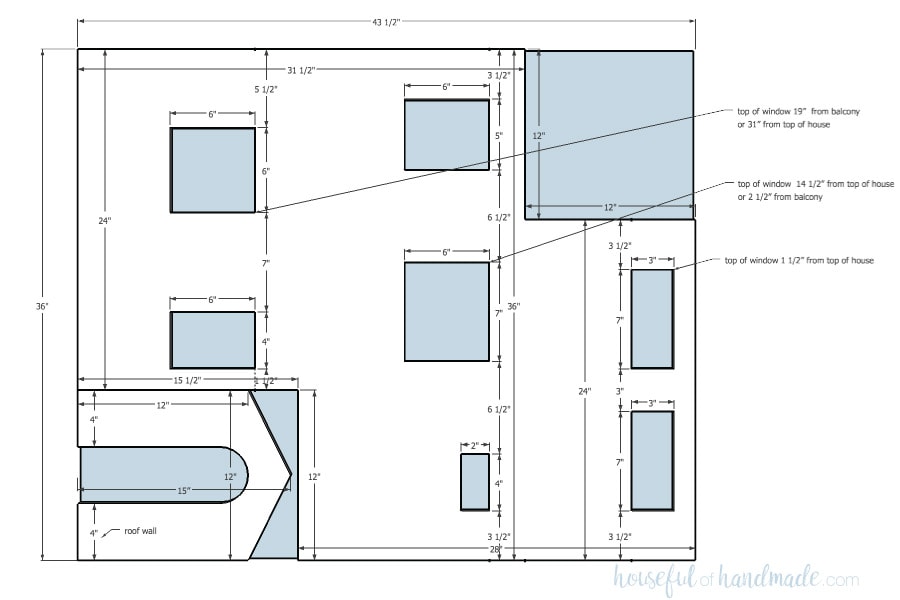
To cut out the doorways, drill a hole in the corners of the doorways and use a jigsaw to cut along the lines.
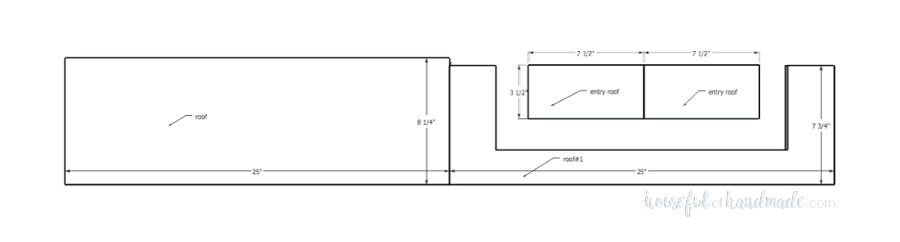
Next cut a 43 1/2″ piece off the remaining section of plywood with the AccuCut. Cut the notches out of the corners with the AccuCut. Then cut the roof wall out of the larger piece.
To keep the corners clean, cut just to the lines with the top of the circular saw (which will leave the bottom still attached because of the curved saw blade). Then use the jig saw to complete the cut.
This gives you much straighter lines than just using the jig saw.
Using the drill, drill holes in the corners of the windows and then cut them out with the jig saw.
From the remaining piece of plywood, cut the following pieces I used the RipCut to cut the 12″ sections only to the corners, then finished the notched cuts with the AccuCut and a jig saw.

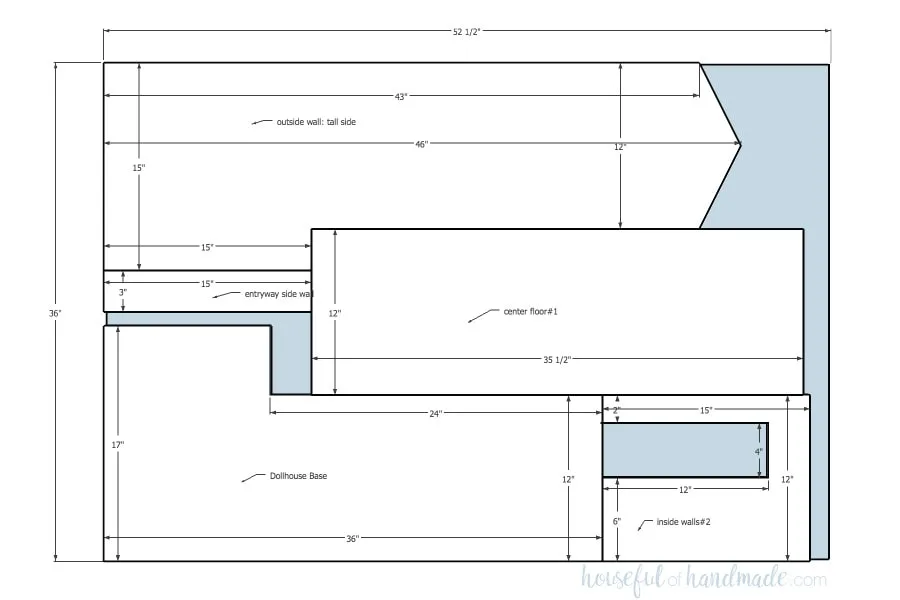
From the scrap (or second piece) of plywood, cut the last 1/2″ thick piece.
This will be the front entry of the house.
Cut the roof pieces from the 1/4″ plywood according to the diagram in the plans. Or if you have to buy a second sheet, you can always use the 1/2″ plywood as well.
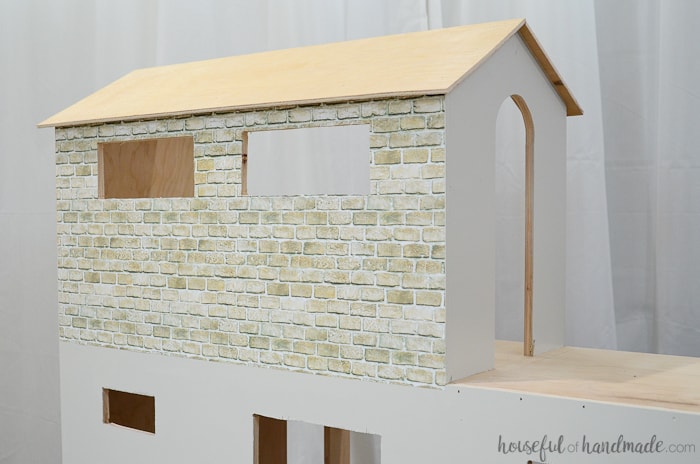
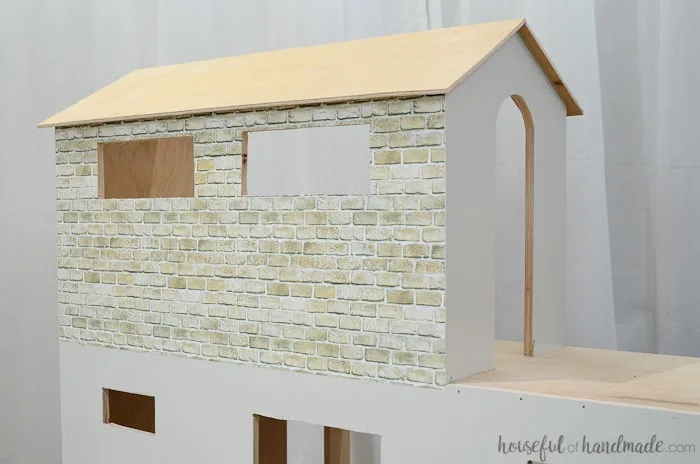
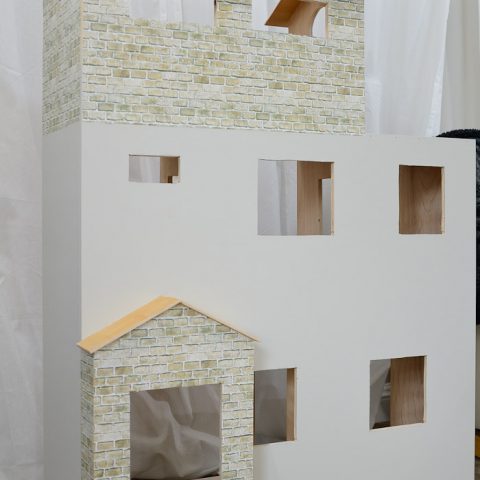
I plan on adding roof shingles to the house so I wanted to start with a thinner layer so it doesn’t add too much bulk. But you could also add texture to the thicker roof with a router or decorative paper or something else.

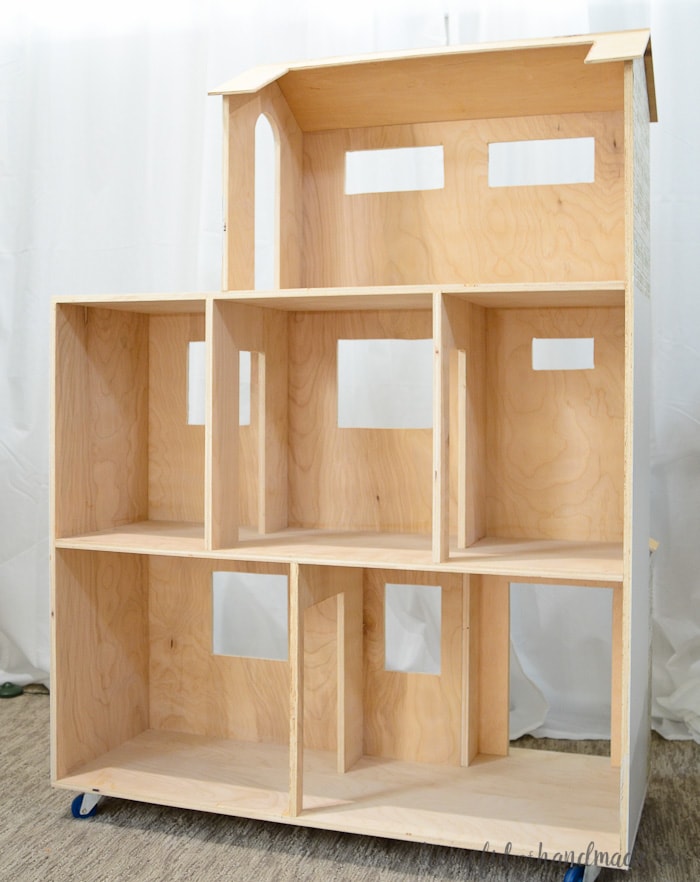
STEP 2- Assemble the dollhouse
Once all the pieces are cut, it’s time to assemble.
Starting at the bottom, attach the front of the house and then the side walls with wood glue and the 1 1/4″ nails.
Next add the bottom floor inner walls and top it off with the second floor. Continue adding the walls and floors all the way up according to the 3D renderings in the build plans.

Before adding the roof, I used my jig saw at a 22 1/2 degree angle to cut off the top of the front of the house wall so the roof would lay flat against it.
Then move onto the front entryway of the house and add the side wall and front wall. To add the roof to the top of the entryway, I cut the side of the roof boards at a 22 1/2 degree angle so they fit together nicely.
This is not totally necessary if you are planning on covering the roof up with shingles, but it was easy and looks really great.
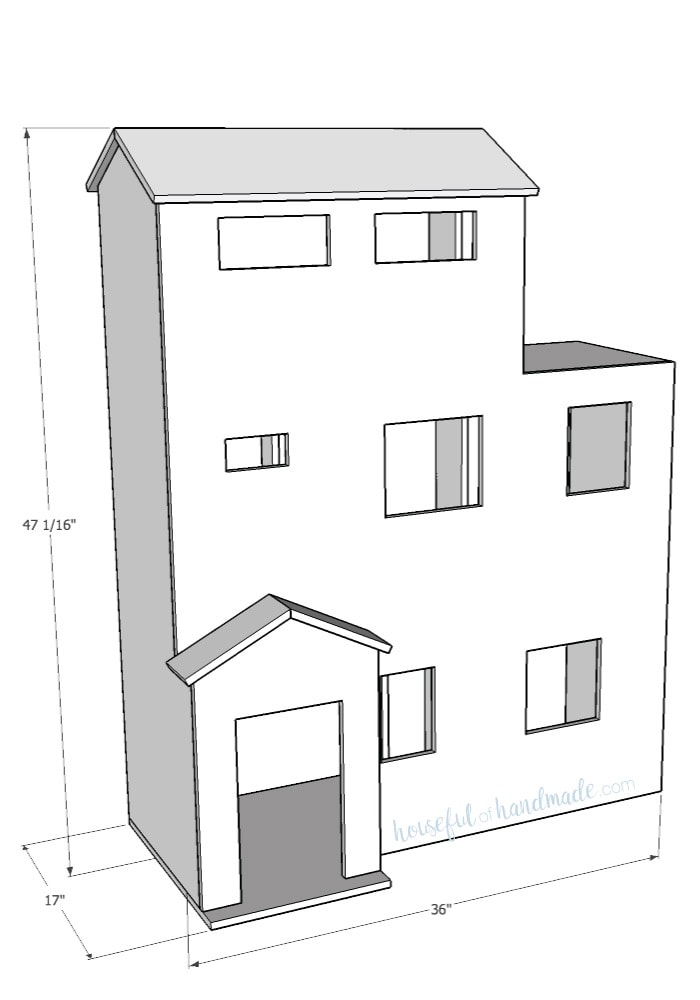
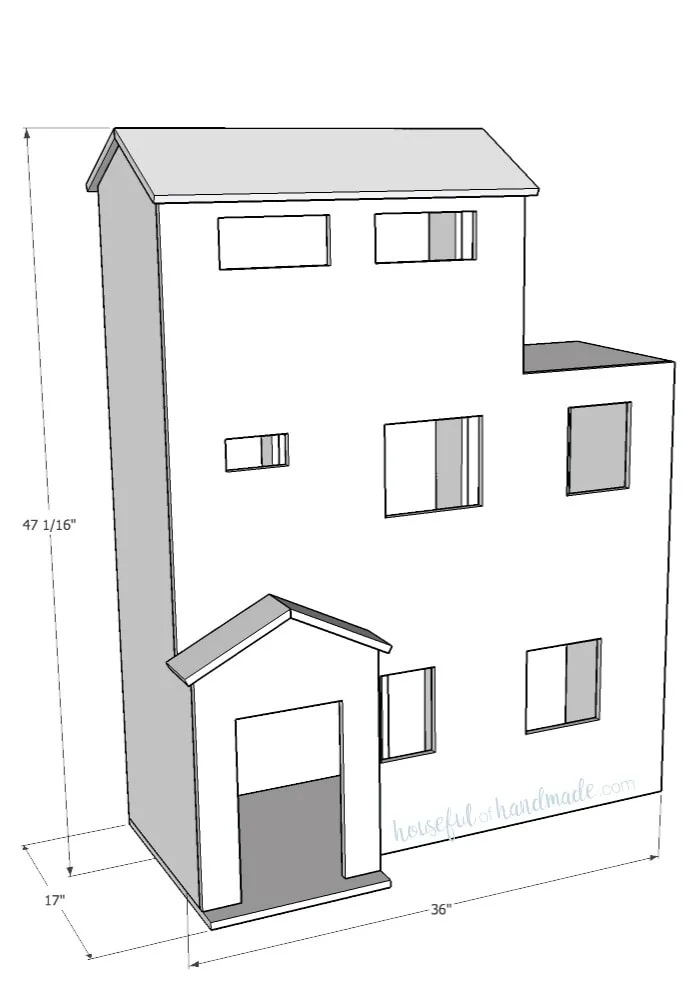
The total size of the handmade dollhouse is about the size of a small bookcase.
I added wheels to the bottom of the dollhouse so we can wheel it up against the wall like a bookcase, but then easily wheel it out for lots of play time.
STEP 3- Sand and decorate
Next I will be adding trim around the house to finish off the plywood edges and add dimension. I’ll also be adding shingles to the roof and doors.
Learn how to get a smooth paint finish on wood for a professional looking dollhouse.
You can see all the dollhouse exterior details here.


Don’t forget to grab the printable PDF plans here!
Premium PDF plans include:
- Recommended Tools
- Materials list
- Detailed plywood cut diagrams
- Step-by-step instructions with 3D renderings
- Helpful resources
- BONUS: 3D SketchUp file

Handmade Dollhouse Plans
Let me show you how to build a beautiful handmade dollhouse with these easy DIY plans.
Materials
- Printable PDF build plans
- 1 sheet of 1/2″ plywood + scrap piece
- 1/4″ plywood
- 1 1/4″ finishing nails
- Wood glue
Tools
- Circular saw with plywood blade
- Circular saw guides like the Kreg RipCut and AccuCut
- Jig saw
- Drill
- Finishing nail gun
- Measuring tape
Instructions
- Breakdown the plywood for the exterior frame, walls and floor from the 1/2" thick plywood according to the plans.
- Use the circular saw with the guide tracks to break down the plywood. Drill holes in the corners of the doors and windows and cut between them with the jig saw to create the cutouts.
- When cutting sections out of the plywood, cut just to the lines with the top of the circular saw (which will leave the bottom still attached because of the curved saw blade). Then use the jig saw to complete the cut.
- Cut the roof pieces from the 1/4″ plywood according to the plans.
- To assemble the dollhouse, start at the bottom. Attach the front of the house and then the side walls with wood glue and the 1 1/4″ nails.
- Next add the bottom floor inner walls and top it off with the second floor. Continue adding the walls and floors all the way up.
- Then move onto the front entryway of the house and add the side wall and front wall.
- To add the roof to the top of the entryway, cut the side of the roof boards at a 22 1/2 degree angle so they fit together nicely.
- Add wheels to the bottom of the dollhouse to make it easier to move around for lots of play time.
- Paint/wallpaper/stain the house however you want. Use patterned papers as wallpaper. For flooring, use scrap wood, scrap flooring or flooring samples. Add trim to the exterior to finish off the corners.
For more DIY gift ideas, check out these Homemade Gift Ideas they will Love.


Google Web Story: Handmade Dollhouse Plans
Jenny
Thursday 14th of September 2023
Do you have any pictures with Barbies laying on each level? I’m trying to get an idea for the depth before I purchase the pdf. I’d like to make sure we can put a Barbie bed on one of the upper levels. Thanks!
Kati
Tuesday 24th of October 2023
The top floor (attic) fits our barbie bed sideways. If you want it to fit beds on the other levels you will need to make it deeper.
Kelly
Saturday 20th of May 2023
Can I use foam board to make this
Kelly
Saturday 20th of May 2023
Can I use foam board instead of wood
Éva
Saturday 26th of September 2020
Hi. Truly amazing work, we will try to remake it, in a way, for our twin girlies. Can I ask you something? Ön the first pic, with proper measurements(with the center floor and the short outside wall), I cannot see the measurements, not even on my PC. Can you just Tell me the width of it? I can see that eg . There is 4-4" on both sides of the door way but then I am lost. Could you help? Thanks a lot! It means a lot to me, to us!
Kati
Friday 2nd of October 2020
The width is not on this picture, but is noted in the instructions. It is 12". Have fun building your dollhouse!
Heather
Wednesday 1st of July 2020
I can’t really see the measurements is there any way I can get these measurements from you?
Kati
Tuesday 28th of July 2020
IU will work on making a printable PDF option, but for now try looking at the measurements on a computer instead of a phone? They are easier to read on my computer.