
The master bathroom is looking so good! I find myself being drawn to it all day, just so I can look around and think about what it will look like when it’s all done. But then I snap out of it and get back to work! Honestly, in January I felt like a finished master bathroom was never going to happen for me. I vowed to get all the drywall done in January (and only missed that goal by a couple weeks). And once the walls are closed up, it all started to just come together.
This post may contain affiliate links. As an Amazon Associate I earn from qualifying purchases. Click here to read my full disclosure policy.
Redoing our master bathroom has been a lot of firsts for me. I have done drywall more than I probably ever wanted to (and I still hate it very much) but tiling and minor plumbing (we saved the big stuff for the professionals) has definitely been a learning experience. In this one little room, I feel like I have had more “learning” moments than I could have ever wanted. But alas, learning is important, and my next bathroom remodel will go much easier, right?
Today I want to share my the things I learned from my 1st and 2nd tiling projects. Luckily I feel like I learned a lot and am actually really excited to get after the fireplace surround I have been avoiding for a few years now. But I made a few mistakes, and learned a few tricks and want to share my bits of knowledge with you.
In March, my husband and I tackled the floor tiling together. We arranged the kids to spend the night at my husbands brother’s house so we could do it without distractions and that was very helpful. Once you get started, it’s really hard to stop without screwing things up.
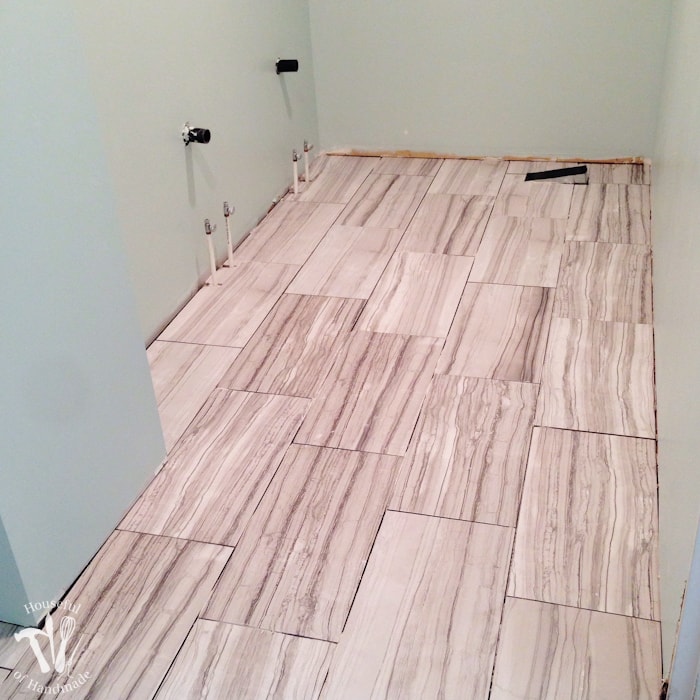
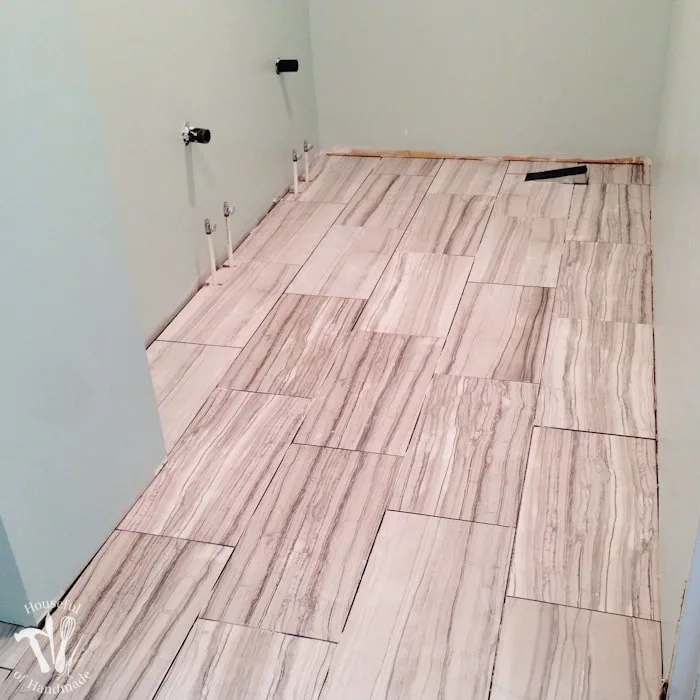
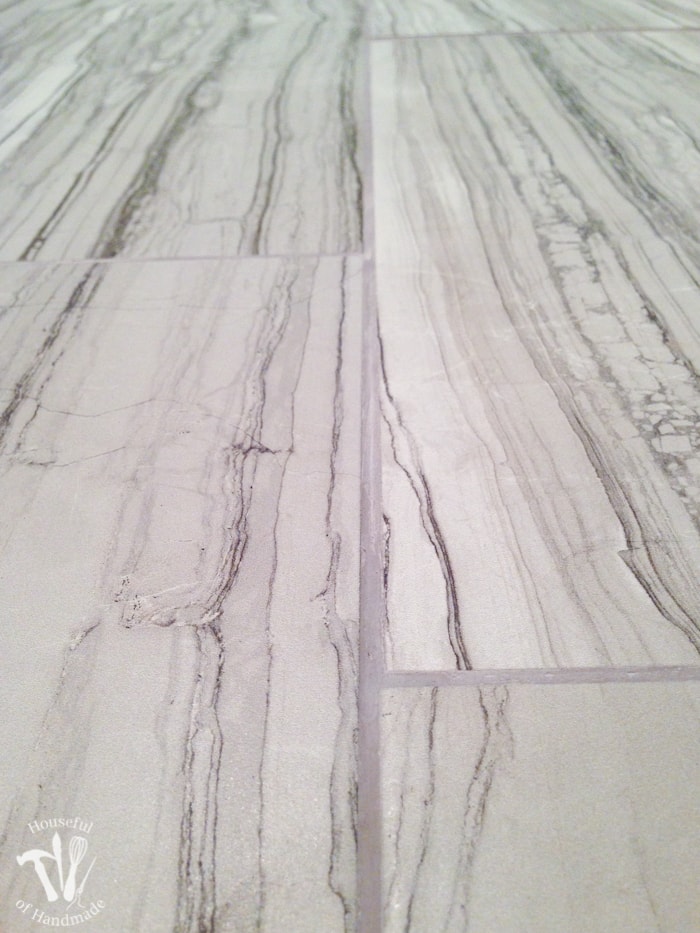
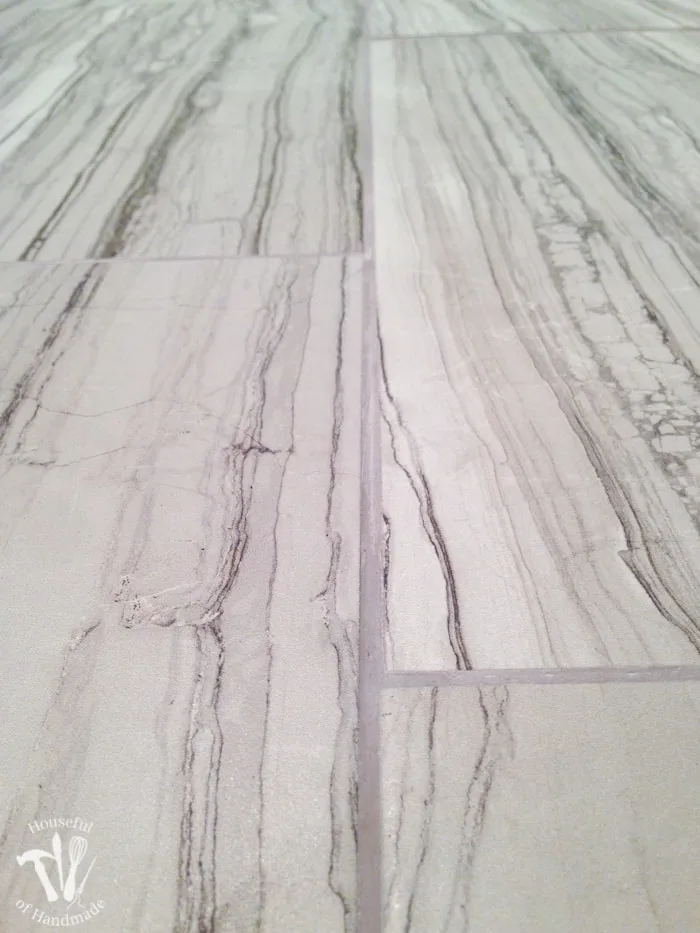
We chose a 12″ x 24″ porcelain floor tile. Nothing to fancy, looking great doesn’t mean it has to cost an arm and a leg to me. The bathroom floor is 13′ x 5′ and I wanted the tiles to run the length of the floor. But since the only opening into the bathroom was at the point that I wanted to start at, it made planning a lot harder. Thankfully I took the extra time to fully plan out the floor tiles before securing the tiles with thin set. It took a lot longer to get started but things went smoothly once we did.
We did choose to mix our own thin set. The guys at Home Depot assured us it wasn’t hard to get it right and when we saw the difference in price ($50 compared to $20) we decided to go for it. We bought a $5 paddle to go on the end of the drill. They told me to mix it to the consistency of peanut butter. My response “All natural or Jiff?” They thought I was crazy, but in the end agreed it should look like Jiff because all natural peanut butter is too watery. Start by adding the water to your bucket (we used a 5 gallon pickle bucket from the restaurant my husband use to work for) and then top it off with some thin set powder. Mix, add a bit more, mix, add a bit more, when you are worried you added to much cause it looks dry on top, just keep mixing because there will be a little extra moisture on the bottom and it will magically work into a beautiful peanut butter consistency.
The floor tiling went pretty smoothly. One problem we encountered was that because of the long skinny room, I was having to stretch and reach to place the large tiles. And they are heavy! As I was getting tired from reaching to set the long tiles in place, I was almost dropping the edge farthest from me into the thin set so it was slightly lower than the edge of the tile closer to me. Then it took a lot of pressing to get them even. And they did not end up perfect level, but I read somewhere that a great grout job can fix a less than perfect tile job (and the reverse, a horrible grout job can ruin a perfect tile job) and it was true. The grout totally hid the slightly unevenness and the floor is pretty darn awesome!
All in all (laying down cement board, prepping and tiling) it took me and my husband about 4 hours of work to get the floor done. Not too shabby I thought.
Grouting the floor was easy. The large tiles leave just a few seams in the floor. We did tile with small gaps (1/8″) and it took me about 30 minutes to get all the grout into the seams, then another 30 minutes to wipe off the excess grout. And in about an hour my floor was transformed. I thought I had this in the bag!
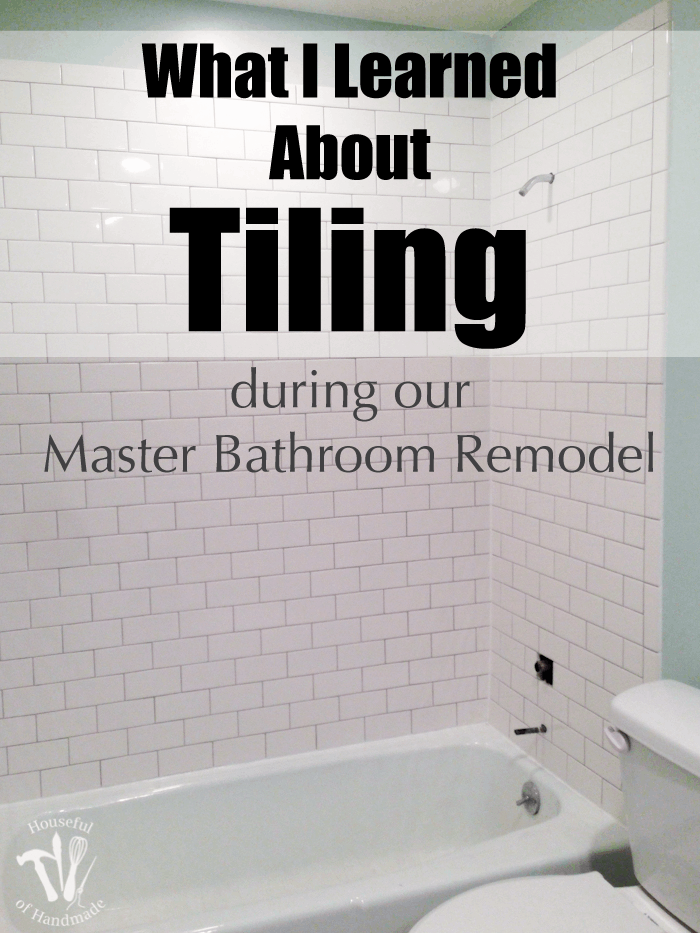
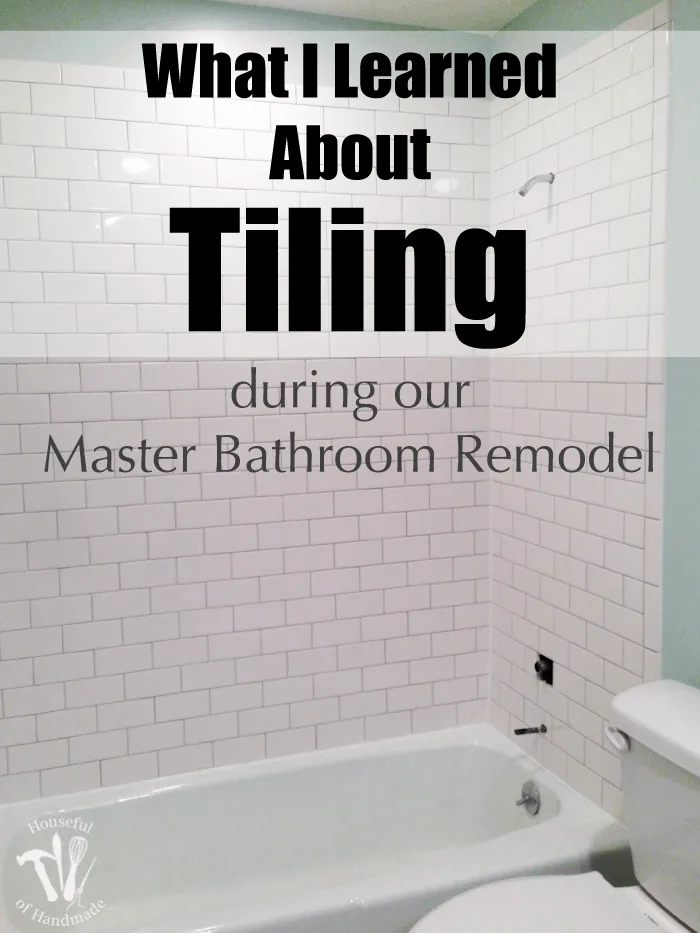
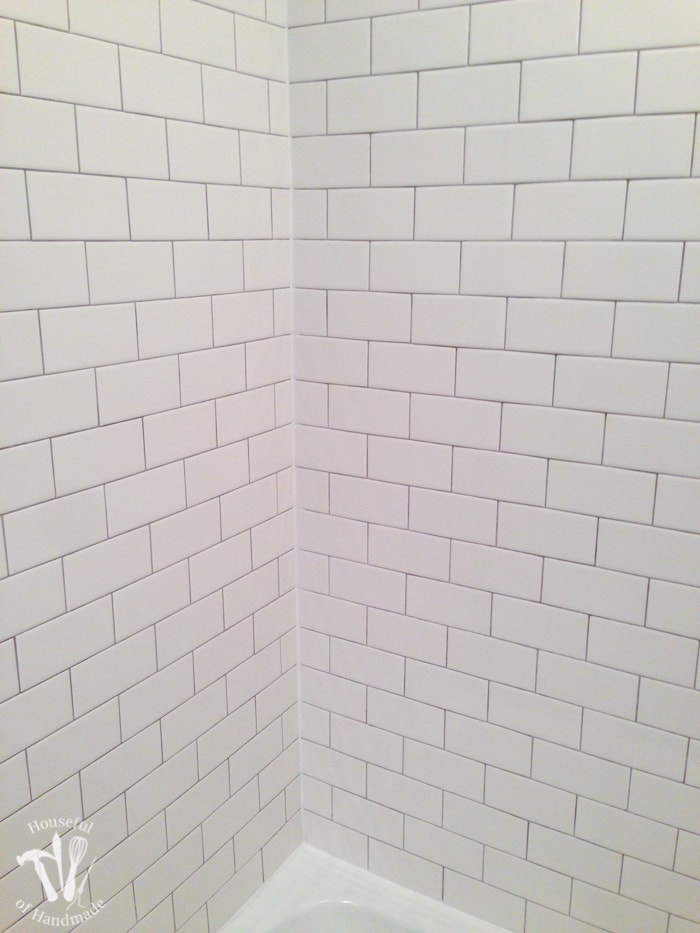
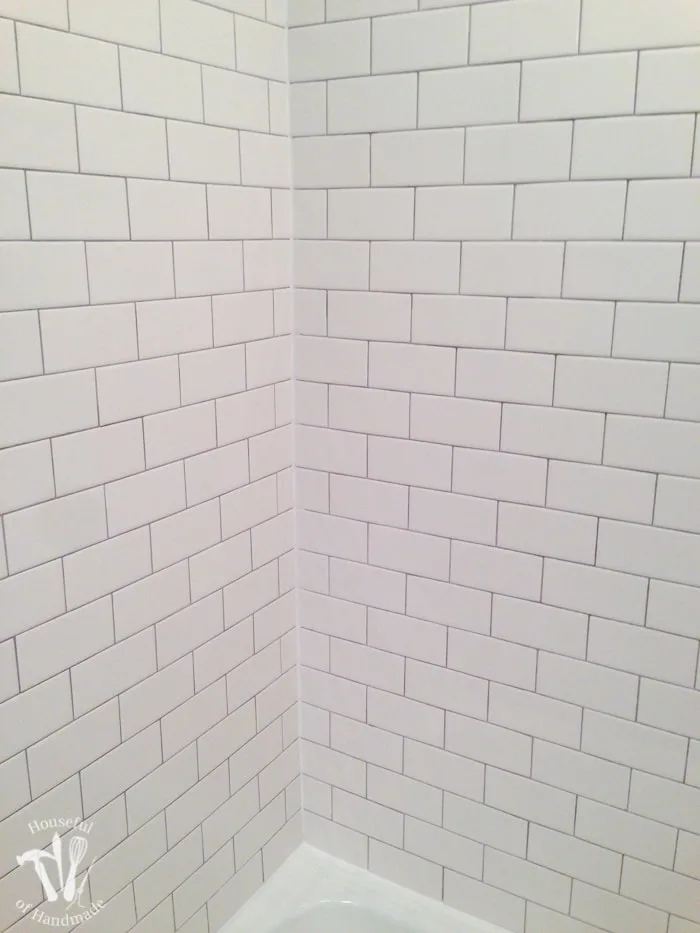
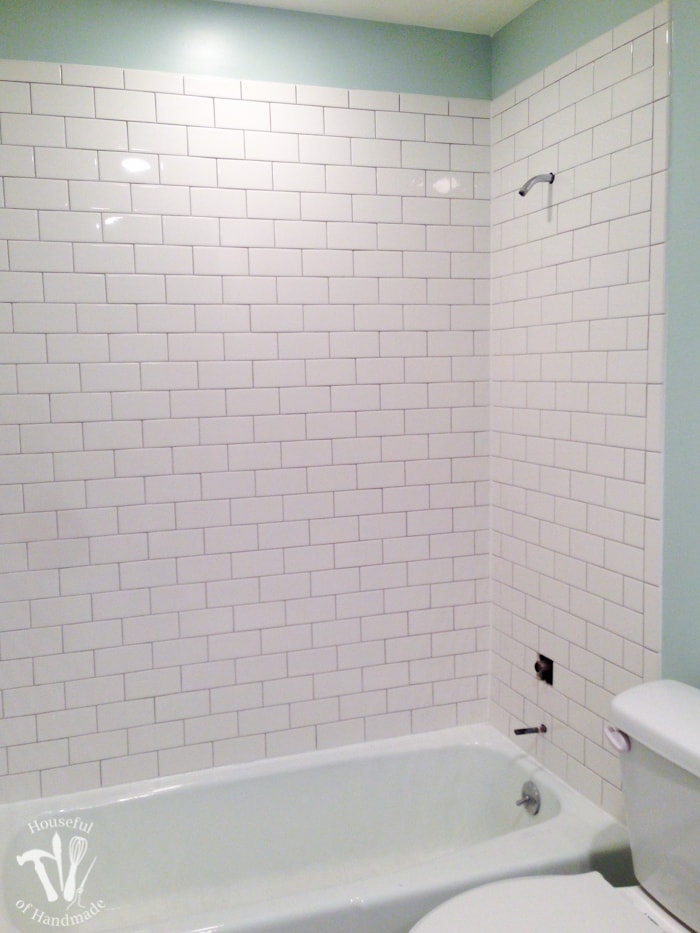
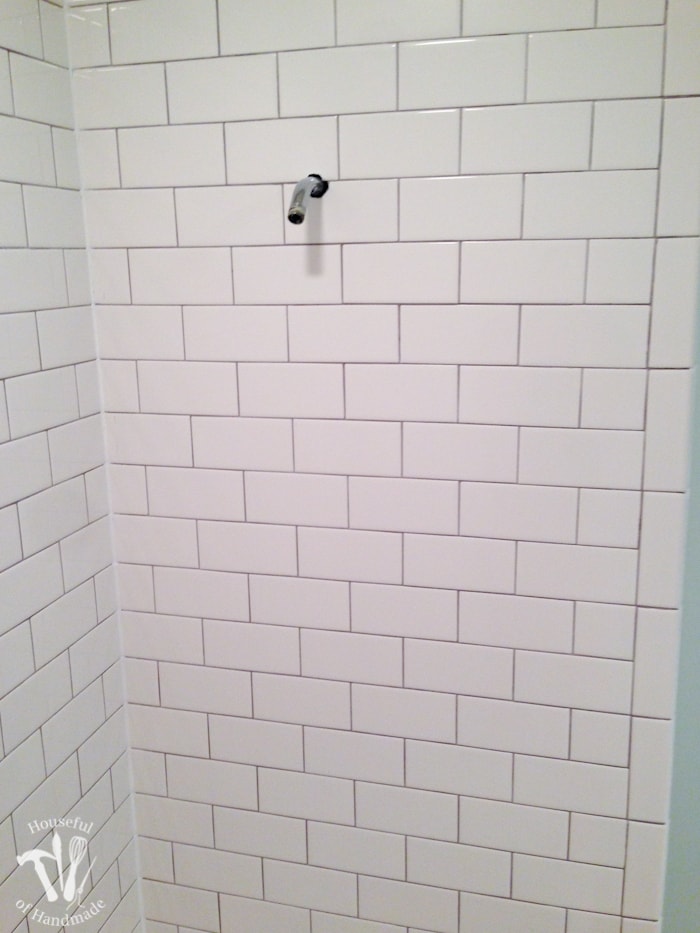
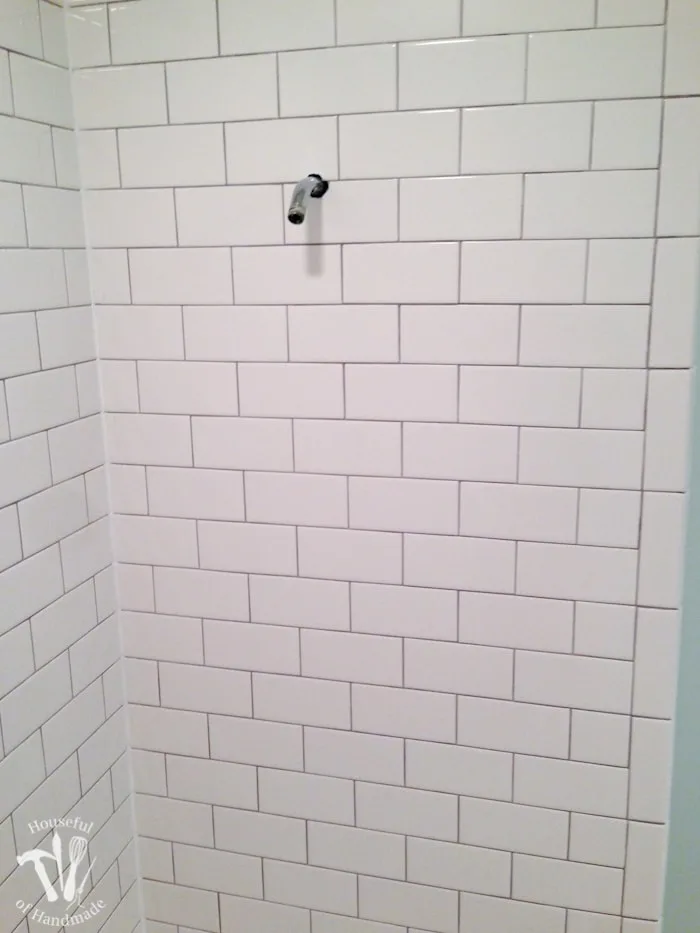
Then it was time to tile the tub surround. I had my heart set on subway tiles. I knew it would take longer because there were going to be LOTS of small tiles. But basic subway tiles are cheap and they look so good so I figured it would be worth it.
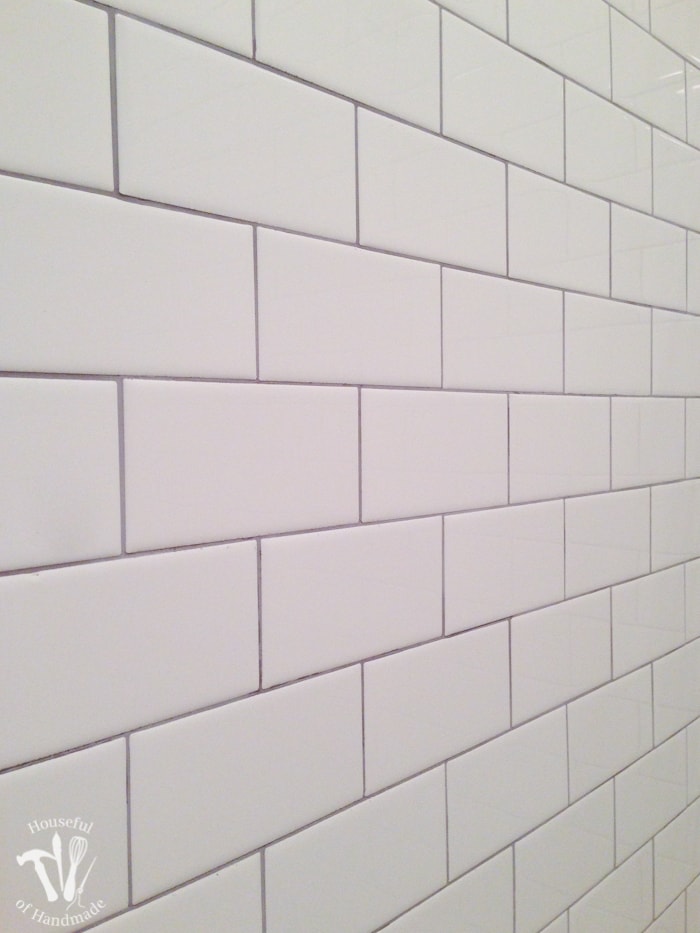
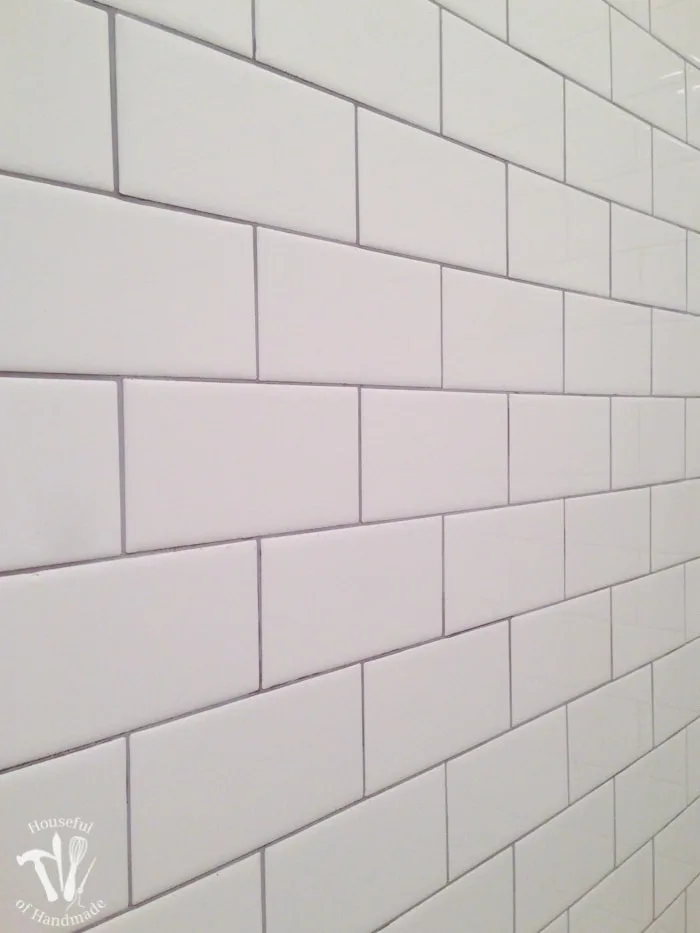
Tiling the tub was not hard, but it was time consuming. It took me about 4 hours (by myself) to do just the back wall. Then the next day I spent another 5 hours doing the two sides of the bathtub. It was easy to split the sections because there was a definitive stopping point.
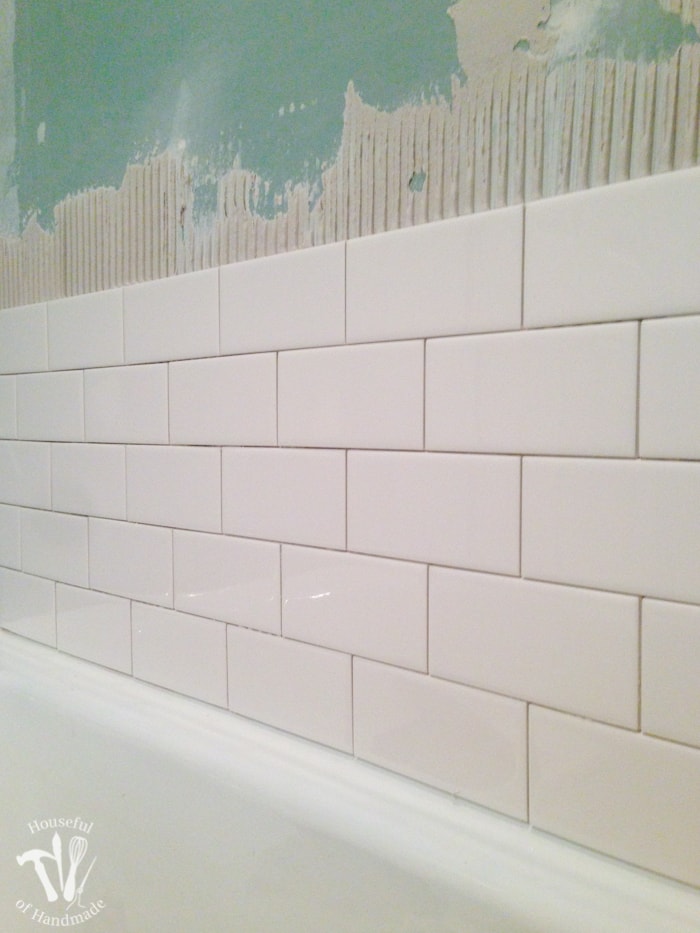
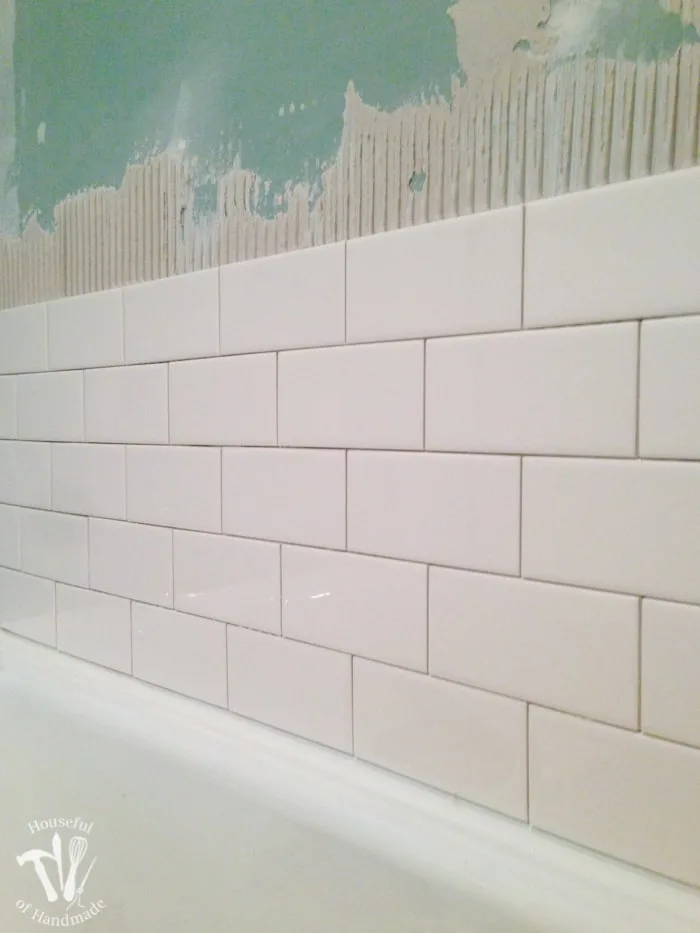
I was very happy with the way the tile ended up looking. My father-in-law was super impressed that I had the rows of tiles matching up all the way up the shower. It wasn’t hard to do once the first tile was perfectly set. To make sure the bottom row was perfectly even and lined up all around the tub I started by measuring the tile, then I added a line at that hight all around the tub with a 4′ level, making sure the line met up perfectly in the corners. Then I also drew a line level with the edge of the tub where I wanted to end my tiles (not including the trim pieces) and made a line at the top of the surround where I wanted to stop tiling all with my level.
Then when it was time to actually lay the first tiles, I measured, remeasured, cut, and over thought each tiles on that bottom row so that they lined up perfectly with the level line I drew. Then it was easy to just lay the tiles on top of that perfect line and thing just fell into place!
I added my thin set to the wall in sections big enough to lay about 10-12 tiles at a time because they laid down super fast if it wasn’t the edge because there was very little cutting involved. After I got in my groove I just puttered along laying tile after tile. Like I said, it was rather simple to do. And likely the tiles weren’t heavy at all! My back still hurt after I finished, but I am pretty sure that was from a lot of bending down to pick up more tiles.
Then came the grout nightmare! I was so confident the grout would take a couple hours (because the floor only took 1 hour) and I could whip it out in an afternoon. I got the grout mixed and started going. There were a lot more grout lines to fill so it took a bit longer to put all the grout in, it actually took me about 2 hours. Then I grabbed my bucket of water to start cleaning off the excess and that is where I discovered my error!
The grout had started to cure too much and wouldn’t clean off with water. The grout was adhering quickly to the front of my beautifully tiled subway tiles that I had just spent 2 full afternoons to put up. I was horrified. So I had to start scraping the grout off every single, tiny, little grout line in the entire bathtub surround (and let me assure you there are a TON of grout lines in between those little subway tiles).

At first I was wetting the grout and using a paint stirrer to help scrape out the not totally set grout, but it was taking forever and the grout was setting fast. I really did not was to scratch or damage the tiles, so I grabbed a plastic scraper (one that I use to apply vinyl) and it worked nicely to scrape out the grout without scraping the tiles. But it still took forever, 6 1/2 hours to be exact. And I had blisters on my hands and they were cramping up because I was gripping a tool so tightly. It was awful. Luckily my kids were totally content watching TV all day so I could get it done before it set beyond removal. Sorry I didn’t think to take any pictures of the horrible grout, I was just really focused on getting rid of it!
Once I had all the excess grout removed (and obviously a lot of the not-excess grout came with it) I had to grout again. I made sure to do the tub in sections. I did one side, then removed the excess. Then I did half the back, and removed the excess, the other half, then the other side. It took me about 2 hours total. Granted the grout was a bit easier to add the second time because the gaps were already half way filled, but I am guessing the tub would have taken me about 3 hours if I had done it right the first time (instead of 8 1/2 hours of thinking I had ruined it all).
After my long saga of tiling, you better believe I protected it with a good grout sealer. My mom said their plumber advised to not get anything less than a 20 year life to the sealer so I went for the big boys. The sealer took about 30 minutes to apply and I did 2 coats for good measure.
Whew! That was a lot of information, but I really want to spare anyone else from repeating my mistakes. I feel like a parent, I want to protect you, but if you must I guess you can go ahead and make the same mistakes I did… but hopefully not. I just keep thinking that the first shower or bath in the new tub will be so worth it! And I am hoping that I can do that this weekend. The new faucet and trim piece are getting installed and then it’s ready to go (and next week you can hear about my faucet and trim drama).
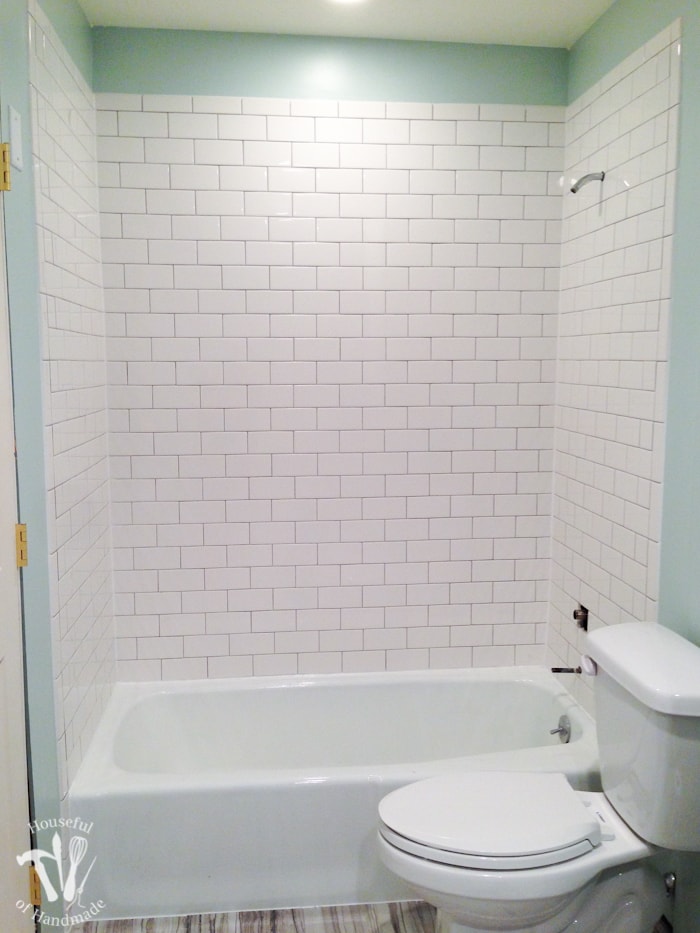

Until next week, I hope you are enjoying the pictures of the bathroom remodel so far. It really is turning out to be everything I was hoping for.


I’m linking up to some of my favorite Link Parties.
Universal Stone
Thursday 31st of March 2022
Just one word for your bathroom - Wow!! You really did a great job!!
Amber
Friday 21st of February 2020
Great job! I especially love the floor tile. What brand/store did you get it? Thanks!
Kati
Thursday 12th of March 2020
We bought it at Home Depot you can see it here: https://homedepot.sjv.io/Nqr5V (affiliate link). It was really inexpensive too!
Jenny @ Refresh Living
Monday 9th of May 2016
My mouth dropped open when I read you had to clean semi-cured grout from every tile!! I installed subway tile in our bathtub, and it was plenty of work without having that happen - I feel for you! Did you use the premixed grout or the mix it yourself? (I know you mixed the thinset yourself) Anyway, I've found that premixed grout cures even faster than the powder kind, so the first time I used it I covered an area as big as I was used to, and it was a pain to clean off because it cured so fast. I'll never buy the premixed stuff again! All of your hard work totally paid off though - it look BEAUTIFUL!
Kati Farrer
Tuesday 10th of May 2016
I was not very happy that day! I mixed my own grout, but it still dried a lot faster than I thought it would. It was a good lesson in grouting, though! One I maybe could have done without :) But I am happy with the end result, thank you!
BonBon ~ Farmhouse40
Friday 6th of May 2016
Beautiful job. Very impressive that you could do this. I got confused just reading about how you measured out the bottom roll.
Kati Farrer
Tuesday 10th of May 2016
Thank you! It definitely took a lot of time to lay things out and get going, but once I got started it was pretty easy!
Vineta @ The Handyman's Daughter
Thursday 5th of May 2016
Your tile looks amazing, especially the wall tile! I plan to retile our fireplace surround soon, and I'll be pinning this for future reference!
Kati Farrer
Friday 6th of May 2016
Thank you Vineta! I have a fireplace surround on the schedule too! I'd love to see how yours turns out.