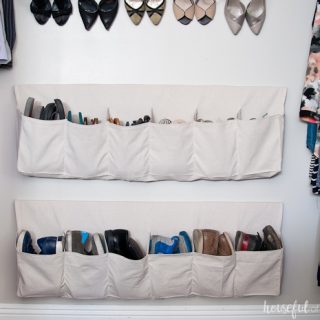
Yield: 1 Drop Cloth Shoe Holder
Drop Cloth Hanging Shoe Storage

This drop cloth hanging shoe storage will keep your shoes off the closet floor. Instead all your shoes are nice and organized. It can easily be customized to fit all your shoes and closet space.
Prep Time
30 minutes
Active Time
30 minutes
Total Time
1 hour
Difficulty
Intermediate
Estimated Cost
$10
Materials
- Drop Cloth
- Seam Gauge
- Pins
- Disappearing Fabric Marking Pens
- 1x2 Boards
Tools
- Sewing Machine
- Light Duty Staple Gun
- Serger (optional)
Instructions
- Cut 1 piece of drop cloth that is 30″ x 45″ and 7 pieces that are 9 1/2″ x 5 1/2″.
- Hem the bottom of the large piece of drop cloth using the seam gauge to iron a 1/2″ hem along the edge, then finish it with the sewing machine. Also hem the top of 2 of the smaller pieces.
- Pin the 2 smaller pieces to the bottom of the large piece so that it creates a pocket. Sew 1/4″ seam around the edge. Use the serger to help keep the edge of the drop cloth from fraying or finish off the edge with a zip-zag stitch.
- Evenly divide the new large pocket so all your small pieces can be sewn in to create smaller pockets.
- Mark where you will attach the small pieces with a disappearing fabric marking pen on the front of the pocket and the back of the hanging shoe storage.
- Draw a straight line between the two marks on the inside of the pocket. Hem and finish the sides of the rest of the small pieces.
- Line up the small pocket dividers so the edge is 1/4″ from the line on the front of the pockets. When you sew the piece on with a 1/4″ seam allowance, the seam will be right on the line.
- Make sure the top is flush with the top of the pocket. Sew the front of the pocket dividers with a 1/4″ seam allowance.
- Measure the distance from the top of the hanging shoe storage to the top of the pocket on each side. Mark this measurement on the lines you drew for the pocket dividers. Line the top of the pocket dividers up with this mark and 1/4″ over from the line. Pin well.
- Sew the back of the pocket dividers with a 1/4″ seam allowance.
- Hem the sides of the hanging shoe organizer. My drop cloth was 45″ wide so the sides were already hemmed and I just let the hem and worked with it.
- Roll the top of the hanging shoe storage over a 45″ wide piece of 1×2 board. I used furring strips because they do not need to be pretty. Attach the shoe organizer with a staple gun.
- Secure the hanging shoe organizer to the wall with 2 1/2″ wood screws through the 1×2 board. Make sure to secure it into at least 2 studs or the weight of the shoes will just pull it out of the wall.