Learn how to make a beautiful DIY Vintage Christmas Scroll using a cutting machine.
It’s time for another Silhouette Creators Challenge! Since I am in desperate need of a new wreath for our front door, I decided this would be the perfect opportunity to make one.
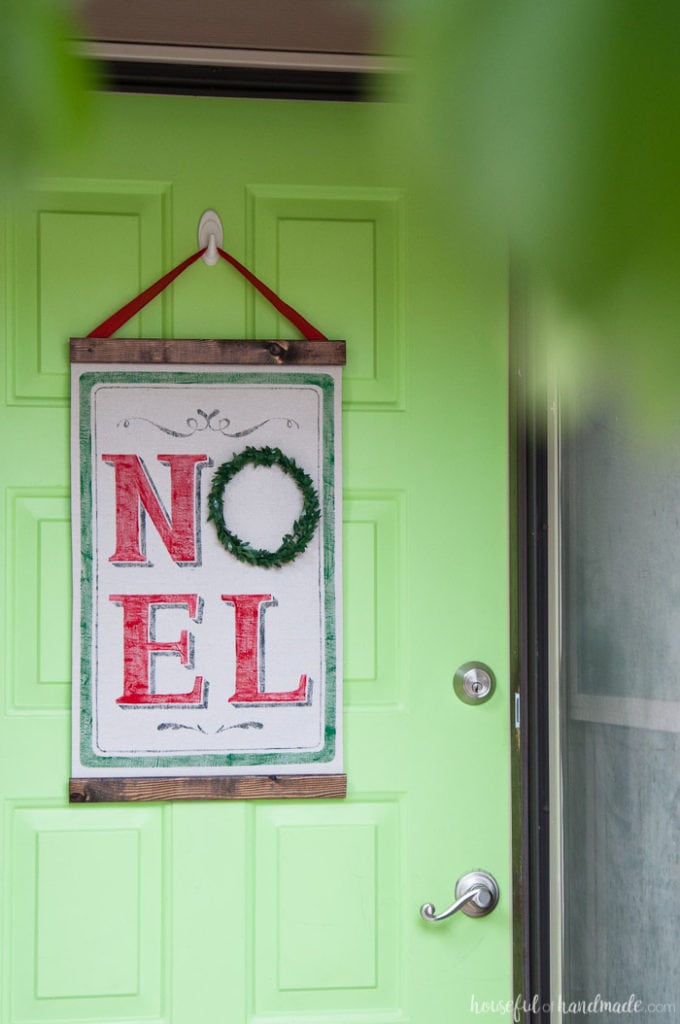
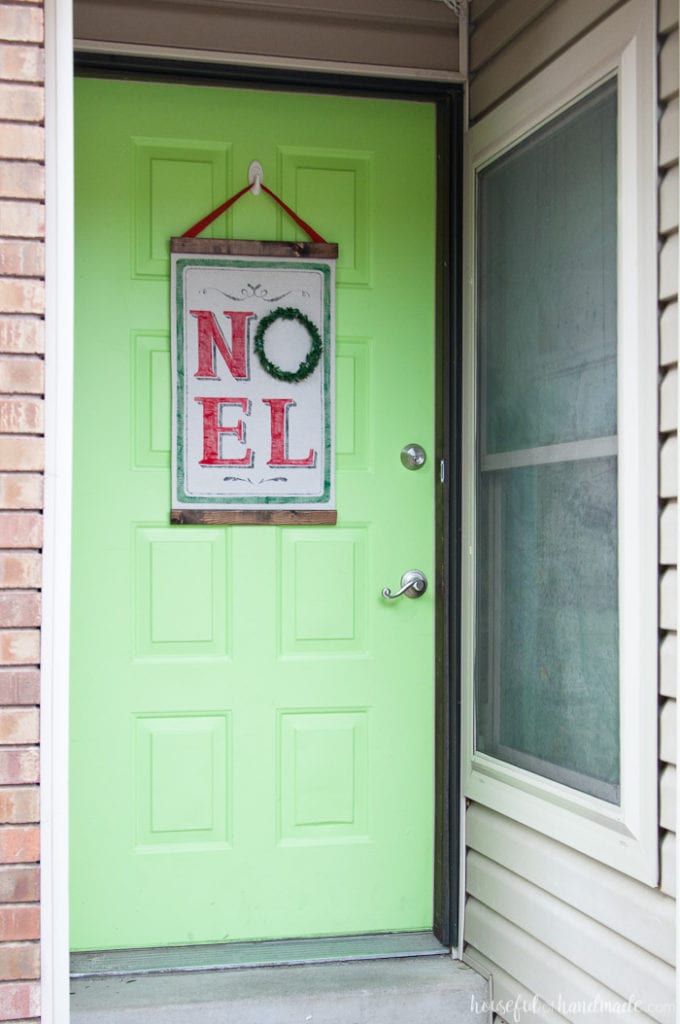
But instead of a traditional Christmas wreath, I decided to use my Silhouette to make this beautiful DIY Vintage Christmas Scroll and I’m so glad I did.
It’s the perfect Christmas decor to welcome our guests this holiday season.
This post may contain affiliate links. As an Amazon Associate I earn from qualifying purchases. Click here to read my full disclosure policy.
I absolutely love the look of vintage Christmas decor. There was just something so perfect about the bold colors and simple designs that were only made more beautiful by age.
Unfortunately, my budget doesn’t allow me to buy well preserved vintage Christmas decor, so I have to make them instead!
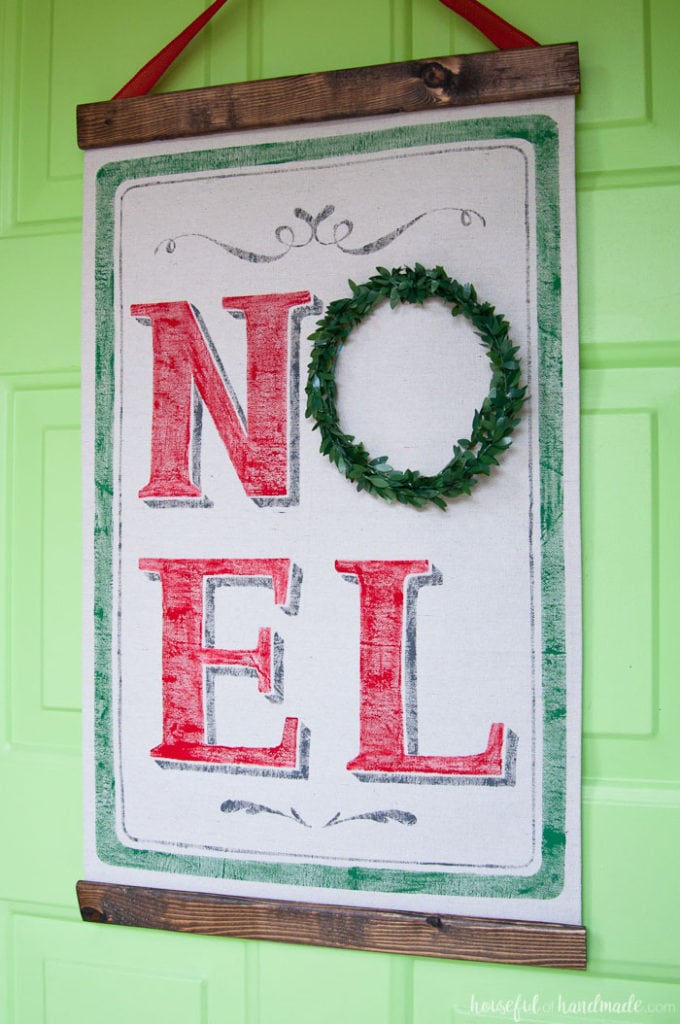
Okay, so this is not really a vintage Christmas scroll, but it is a vintage inspired DIY. It looks a little worn and loved, but with vintage design and those bold beautiful colors I love.
So if you are on a tight budget too, you can still have the vintage look in your Christmas decor with this DIY vintage Christmas scroll knock-off.
I used one of my favorite (and inexpensive) materials to make our Christmas scroll: drop cloth. Seriously, I could write a book about all the beautiful things you can make out of drop cloth.
And one $10 drop cloth can last you through many, many projects. Since we are still loving our drop cloth Christmas stockings, I figured it just made sense to add some more Christmas decor with it.
And the drop cloth helps the vintage look of the scroll.
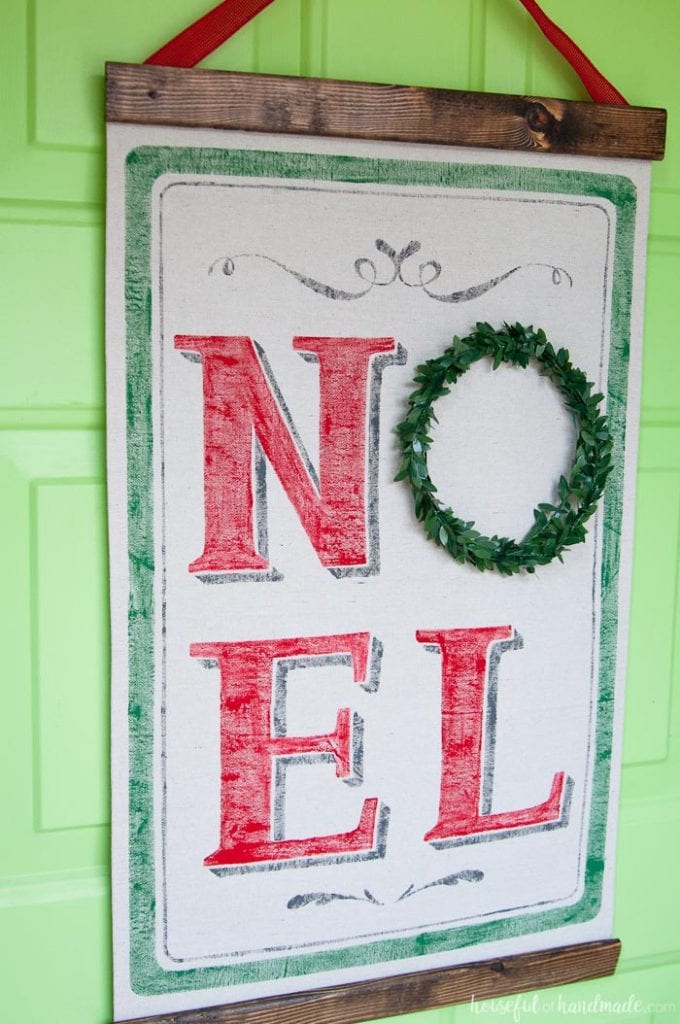
Then to really make it look vintage, I hand painted the bright colored design on the drop cloth. The texture of the drop cloth made the paint go on a little textured and worn looking.
However, since I am not so good at hand painting or lettering, I used my Silhouette Cameo to make a stencil for the letters. It looks so beautiful and vintagey!

How to Make a DIY Vintage Christmas Scroll
Supplies:
- Silhouette Cameo
- Vintage Noel cut file
- I am sharing the cut files for the Christmas scroll in my subscriber library. Click here to subscribe to my weekly newsletter and gain access to all the freebies. If you already have your password, click here to download them.
- Drop cloth (about 20″x30″)
- Vinyl
- Transfer paper
- Red, green, and gray acrylic craft paint
- Paint brush
- Disappearing fabric pen
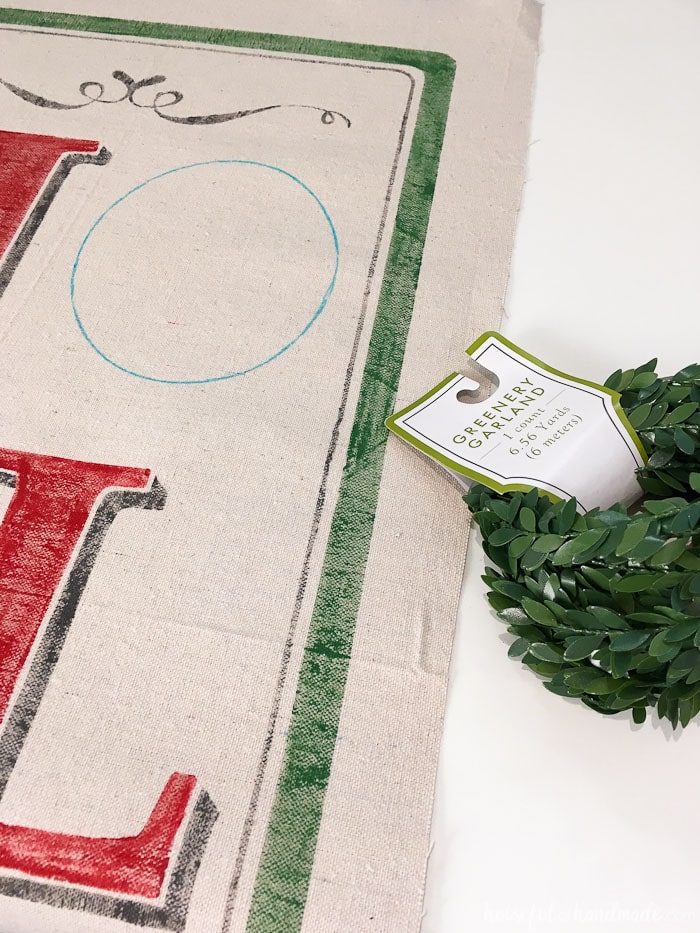
- Small greenery garland
- I used garland I found in the Target Dollar spot for $3 but there are lots of different garland options online too
- Scrap wood (2 pieces about 16″ long)
- Ribbon
- Light duty staple gun and staples
- Iron
- Optional: sewing machine with matching thread
- If you don’t have (or want to use) a sewing machine, you can iron the seam on the sides and secure with fabric glue.
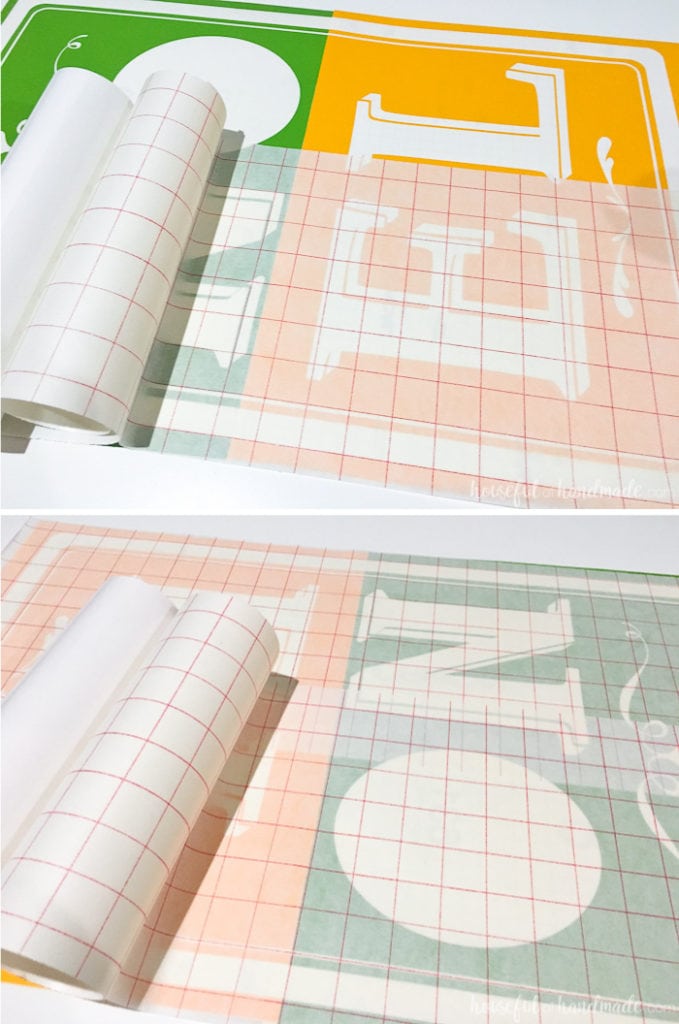
Start by cutting your stencil out. Since the design is bigger than the 12″ cut area, you have two choices: make a smaller scroll or piece together your stencil. Piecing together a stencil is not as hard as it sounds.
Before cutting the first half of the stencil, you will want to add a straight line cutting the stencil in half. It’s okay if it goes over the edges of the design a bit. Also, pick a section of the stencil that has less points to match up to make it even easier. Group the line to the design.
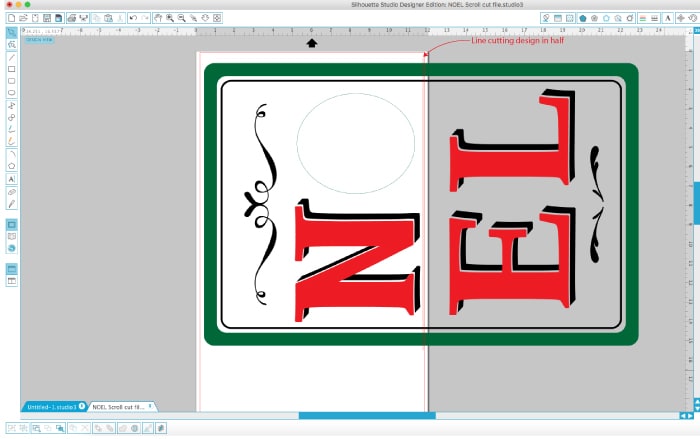
Cut the first part of the stencil out on your vinyl. Then move the design so the second half of the stencil is in the cut area (your line should be grouped to the design so it will stay in the same place).
Make sure the line is in the cut area too. Cut the second part of the stencil out on your vinyl.
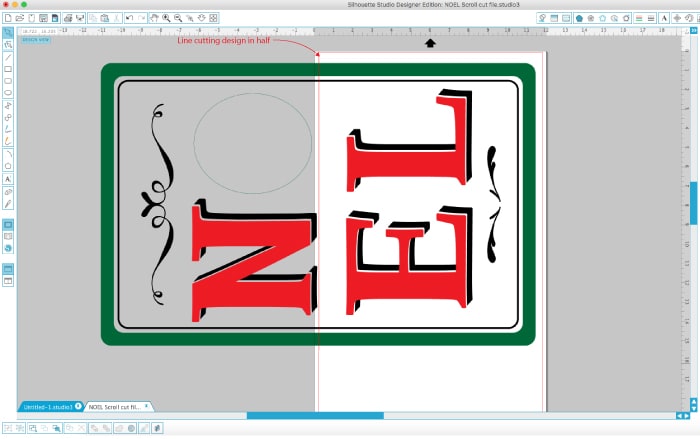
Weed out the parts of the stencil you will want to paint. Then on one of the halves, cut through the vinyl backing along the cut line you added to the stencil.
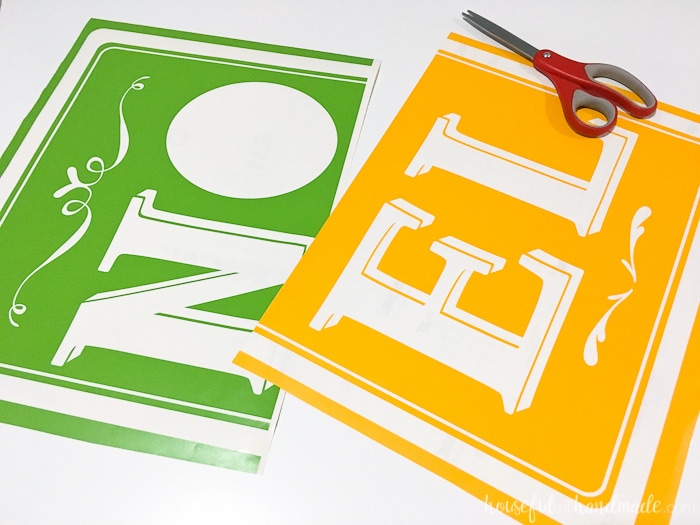
Line the two pieces up and using tape on the backing, tape the two pieces together.
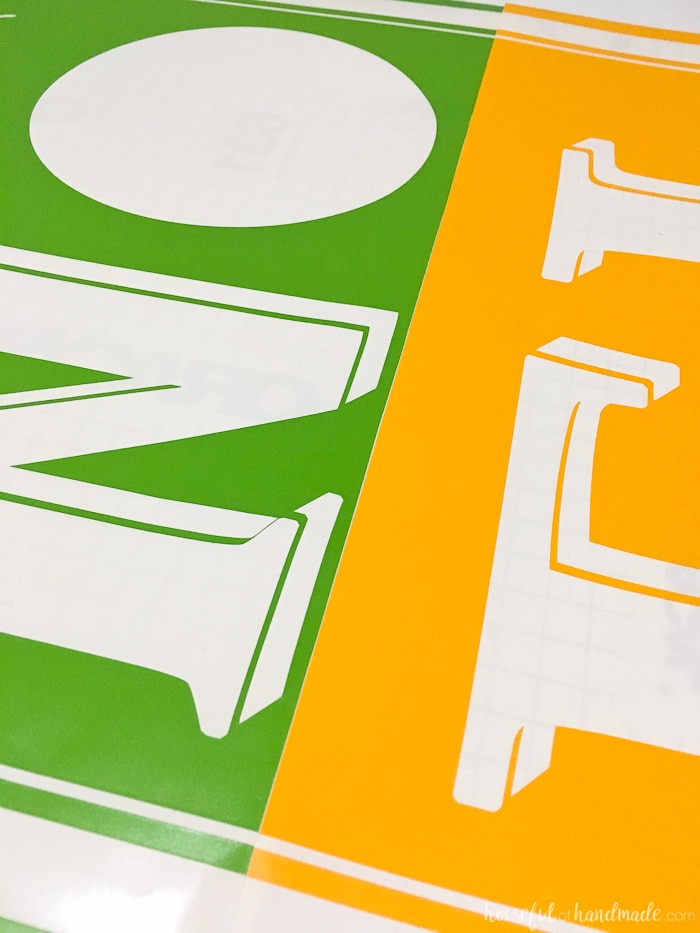
Now add your transfer tape to the front of the stencil. Unless you have very large pieces of transfer tape, you will need to use multiple sheets of transfer paper, just overlap the transfer paper so they act as one piece.
Peel the vinyl from the backing and then transfer it to your drop cloth. The drop cloth should be a little big around the outside.
You will hem the drop cloth later, but it is easier to cut the fabric after you paint the design than to perfectly line up the stencil to already hemmed fabric.
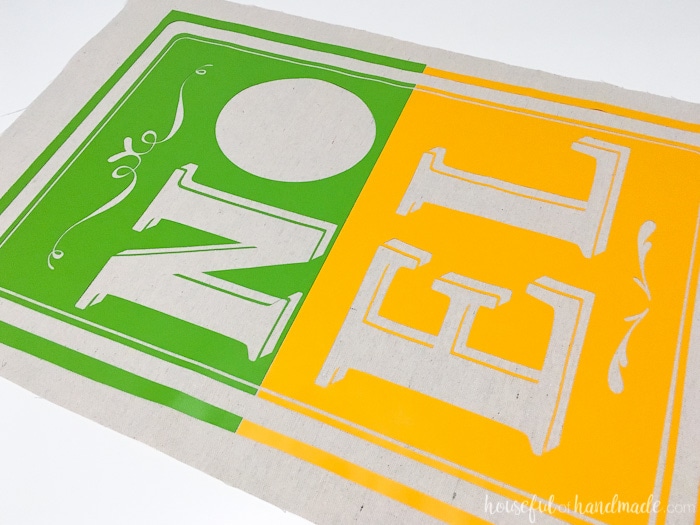
Now it’s time to paint. I used acrylic craft paint and a paint brush to add the paint to the drop cloth. There are a couple spots on the design where there is no line between the drop shadow and the letters, but these are easy enough to free hand paint.
Also, don’t be too worried about making a clean even coat of paint. The texture of the drop cloth will show through and lend itself to the vintage look.

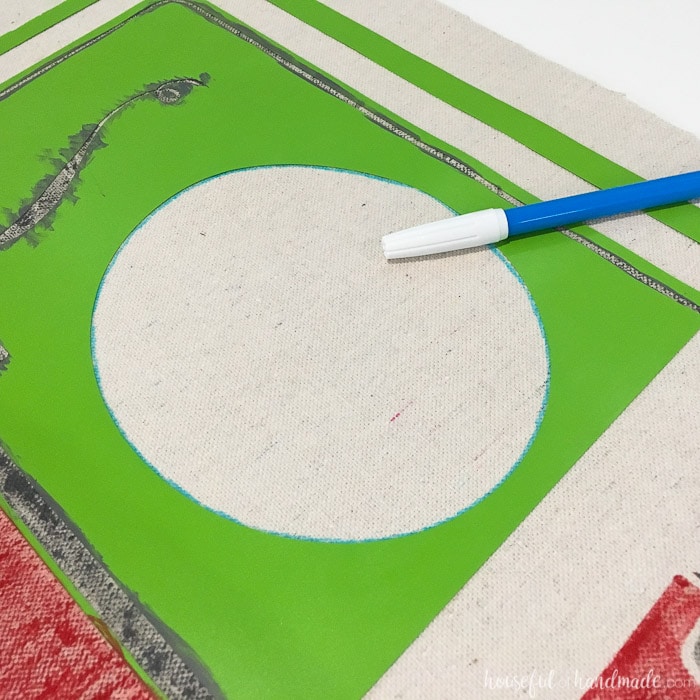
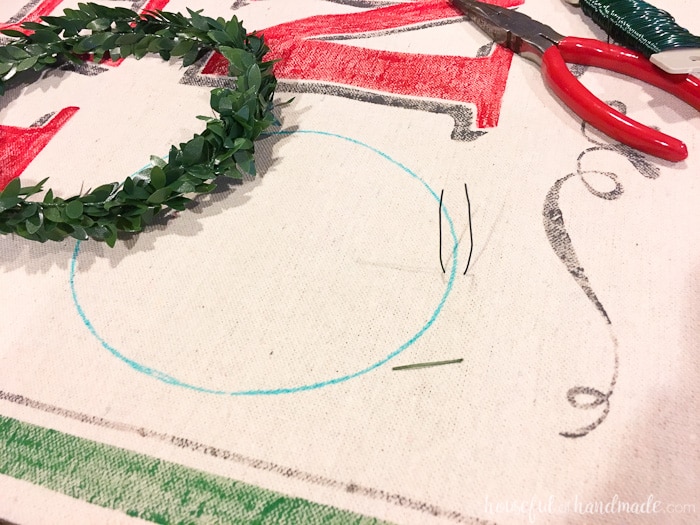
For the O, use a fabric pen to trace the circle. I used one that will disappear with water so I can easily spritz it with water when done to erase my line.
After the paint is dry, you can remove the vinyl stencil and admire your work! But don’t get too comfy, there are still a few more steps.
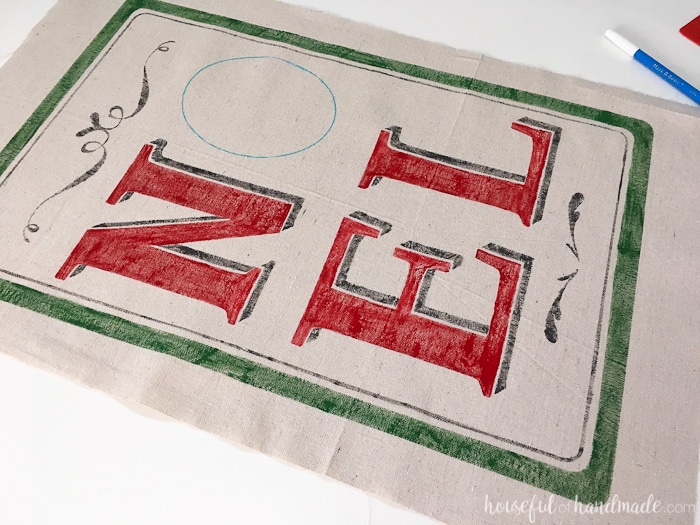
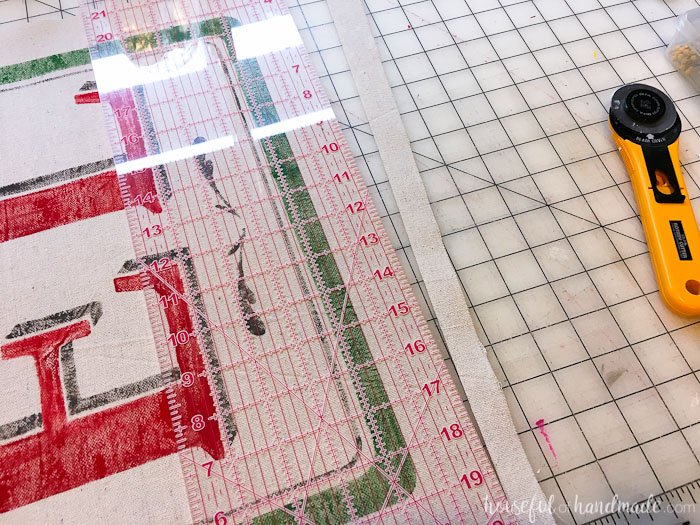
Cut the excess drop cloth from around the design. I left 1″ on either side of the border and 1 1/2″ on the top and bottom of the border.
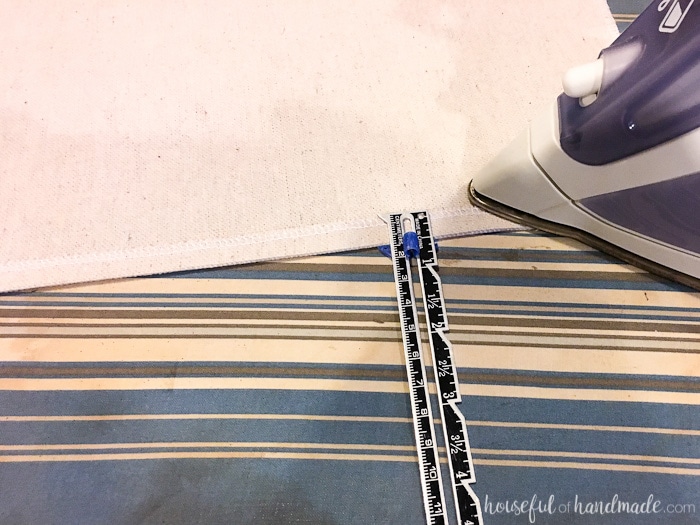
Iron a 1/2″ hem on both sides of the Christmas scroll. I used my serger to finish the edges first, but it is not necessary since you will only see the unfinished edges if you look at the back of the scroll.
Run a straight stitch along the sides of the scroll to secure the hem (or use fabric glue).
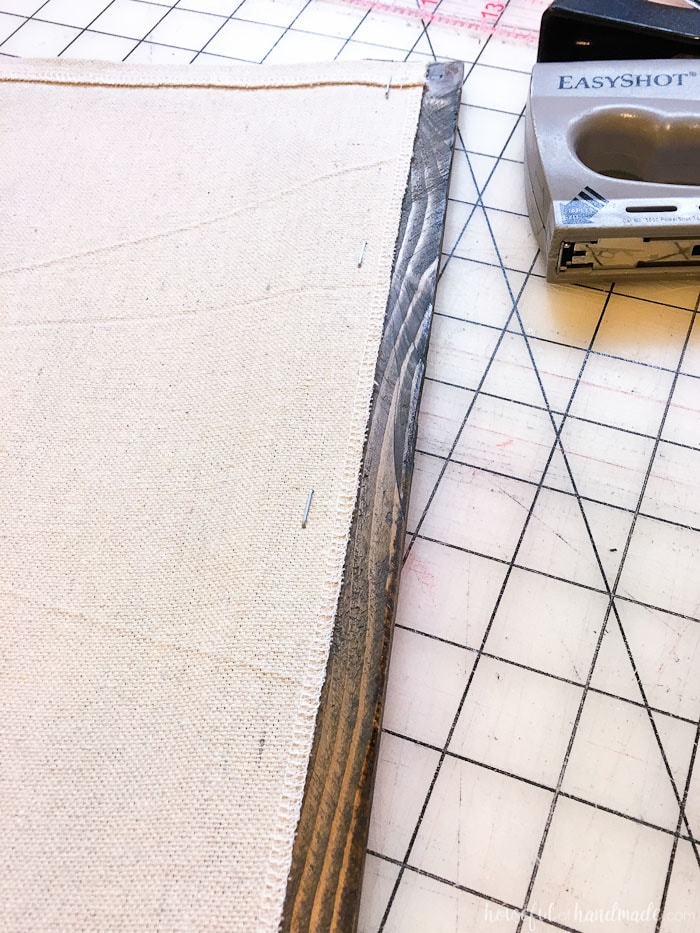
Cut your wood pieces to just slightly larger than the finished scroll. Stain or paint the scrap wood. Staple the scroll to the back of the scrap wood. Use a piece on the top and the bottom of the scroll.
To make the O wreath, use the drawn on circle as a template for the size and shape of the wreath. My garland was pretty thin so I used 3 layers to make the final wreath.
Twist the ends of the garland around each other to secure the layers together.
Use a piece of floral wire, stick it through the back of the scroll at the top of the O. Place the wreath over the circle and secure with the floral wire. Repeat on the bottom of the wreath to hold it flat agains the scroll.
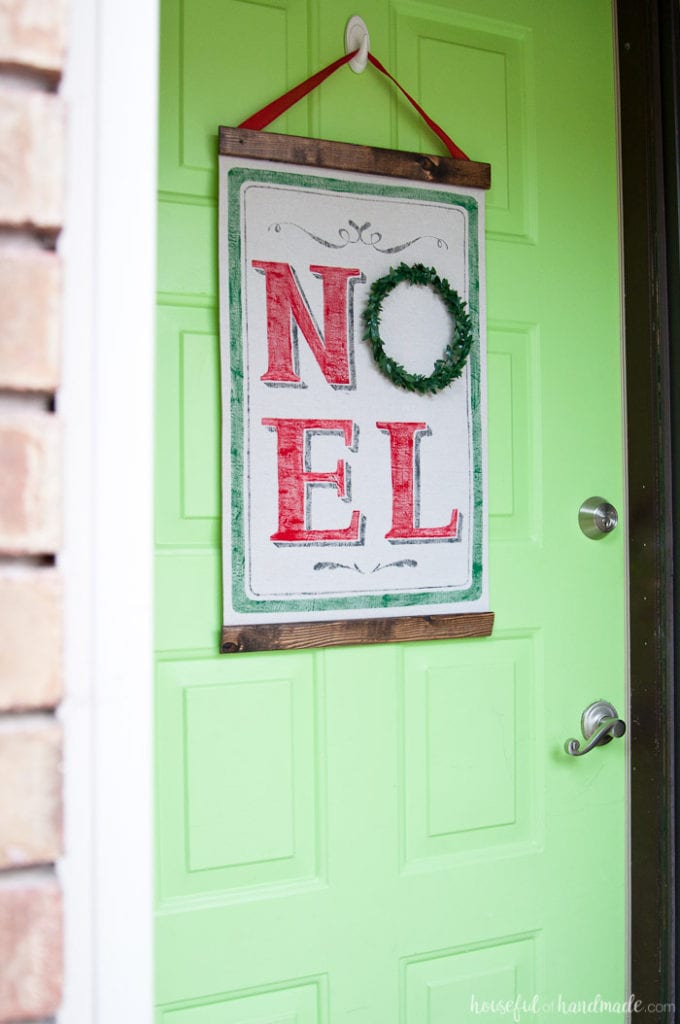
Finally, attach a piece of ribbon to the back of the top of the scroll so you can hang it up!
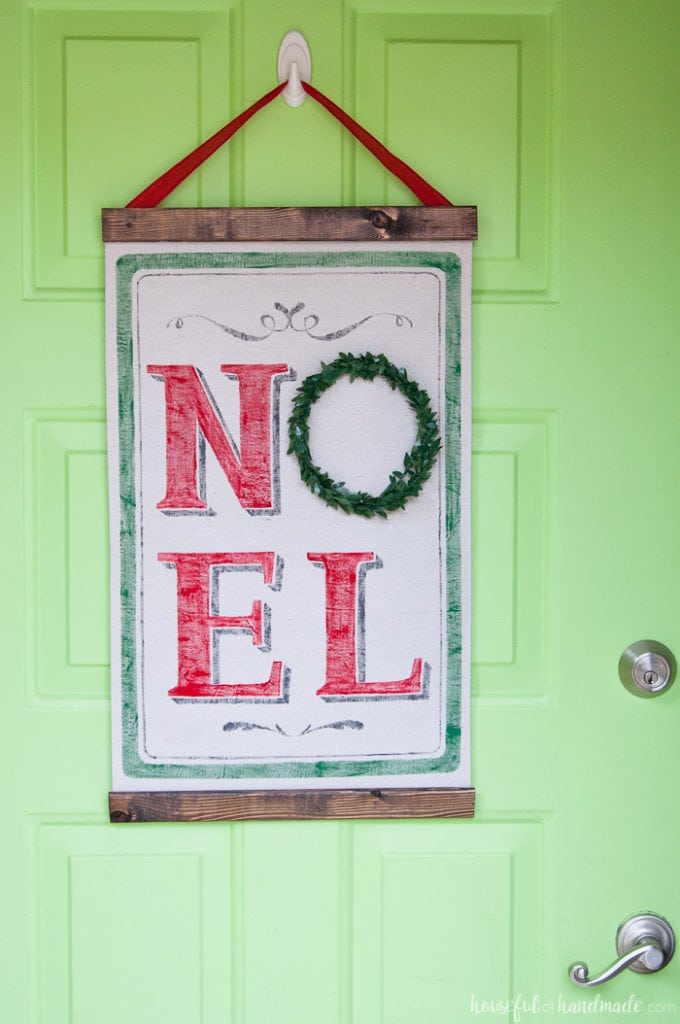
Don’t you just love how it turned out? It looks like just like a beautiful vintage Christmas scroll, only you will know that you made it this year.
Plus next year if I want a more classic Christmas wreath, I can use this beautiful vintage Christmas scroll as a wall hanging inside our home.
How to Make a Vintage Christmas Scroll
Make a beautiful DIY Vintage Christmas Scroll with this easy tutorial.
Materials
- Drop Cloth
- Transfer Paper
- Vinyl
- Vintage Noel cut file
- Red, green, and gray acrylic craft paint
- Disappearing Fabric Pen
- Small greenery garland
- Scrap wood (2 pieces about 16″ long)
- Ribbon
Tools
- Silhouette Cameo
- Paint brush
- Staple Gun
- Iron
- Optional: sewing machine with matching thread
Instructions
- Cut your stencil out. Since the design is bigger than the 12″ cut area, you will need to piece together your stencil.
- Add a straight line cutting the stencil in half.
- Cut the first part of the stencil out on your vinyl. Then move the design so the second half is in the cut area.
- Now cut the second part of your stencil on vinyl.
- Weed the stencil design.
- Line the two pieces and use backing tape.
- Add transfer tape to the front of the stencil.
- Peel the vinyl from the backing and transfer it to your drop cloth.
- Use acrylic craft paint and a paint brush to add the paint to the drop cloth.
- Use the disappearing fabric pen to trace the circle for the O.
- Allow the paint to dry and you remove the vinyl stencil.
- Cut the excess drop cloth from around the design.
- Iron a 1/2″ hem on both sides of the Christmas scroll.
- Run a straight stitch along the sides of the scroll to secure the hem (or use fabric glue).
- Cut your wood pieces slightly larger than the finished scroll.
- Stain or paint them. Once dry staple the scroll to the back of the scrap wood.
- Add the O wreath by twisting the ends of the garland around each other to secure. Attach it to the scroll with floral wire.
- Add ribbon for hanging.
Don’t forget to subscribe to my weekly newsletter so you can get access to my library of freebies where I love to share all kinds of free printables and downloads.
I hope you have a very merry Christmas!
Lindsay @ The DIY Mommy
Thursday 15th of December 2016
So cute! Love the vintage feel of it. Perfect for the holiday season. :)
Kati
Saturday 17th of December 2016
Thank you Lindsay. I love the vintage feel!
Maria Brittis
Wednesday 14th of December 2016
The noel sign looks great against the green door, its so festive. The wreath is a perfect touch..Have a Merry Chrsitmas Maria
Kati
Saturday 17th of December 2016
Thanks so much Maria! We love our green door. Have a very merry Christmas too!
Sarah
Wednesday 14th of December 2016
Ooh this is so lovely! Festive and perfect for my French-Canadian family. :-)
Kati
Saturday 17th of December 2016
Thanks so much Sarah! We are loving it :)
Michelle James
Wednesday 14th of December 2016
This is beautiful. I always use my Silhouette for making a stencil. Hand lettering is over-rated anyway. LOL! It turned out so nice and looks great on your door. Nice job.
Kati
Saturday 17th of December 2016
Ha ha! I suck at hand lettering, but you'd never know cause of my Silhouette :)
Rachel
Monday 12th of December 2016
This is so wonderful! Is there anything a silhouette isn't good for?! haha, just kidding but sometimes it does seem that way.
Kati
Saturday 17th of December 2016
I feel that way too! If I want it, I'm sure I can figure out how to make it with the Silhouette.