Make DIY Personalized Christmas Stockings that your family will enjoy for years to come.
We are still having so much fun decking our halls. I like to spread the fun of Christmas decorating out over a week or so instead of going crazy and doing the whole house in one day.
I was planning on finishing up my Christmas wreath today and was so excited to share it with you, but I didn’t find what I needed at Hobby Lobby, so after picking up the kids we drove to Michael’s and their power was out at for an unknown amount of time, so we went home and started on our Christmas mantel instead.
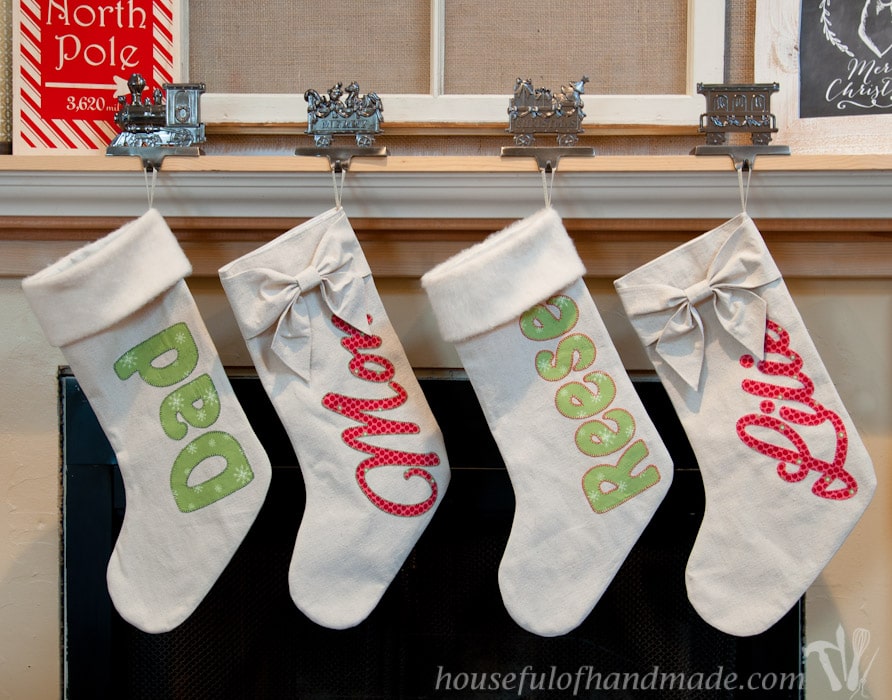
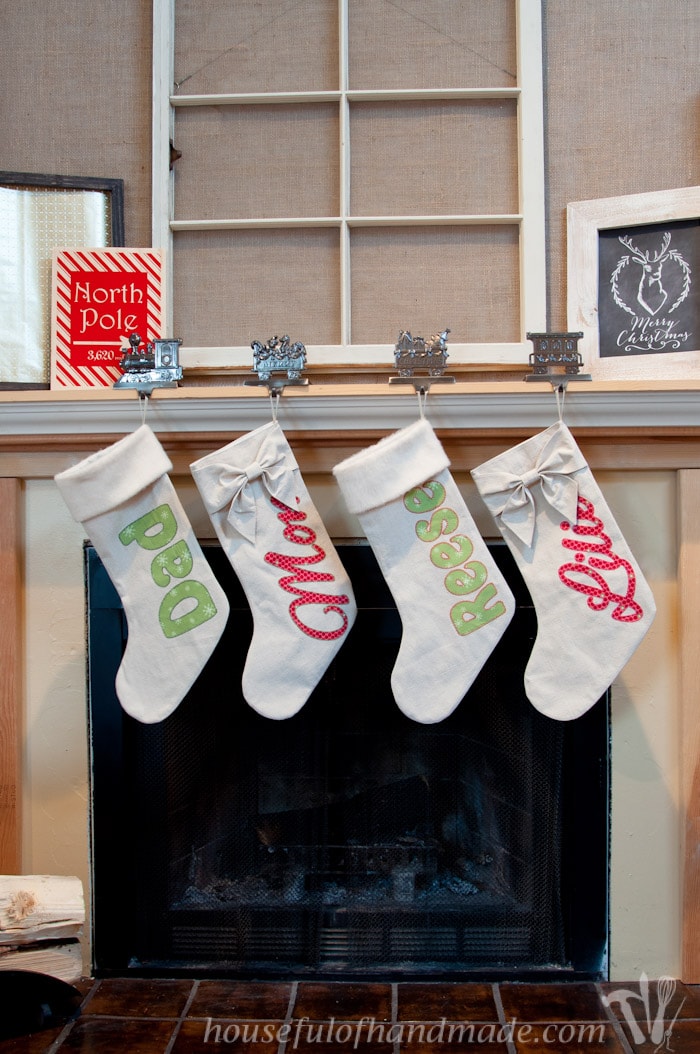
I decided I needed to share with you the DIY personalized drop cloth Christmas stockings I made last year and still L.O.V.E. so much!
This post may contain affiliate links. As an Amazon Associate I earn from qualifying purchases. Click here to read my full disclosure policy.
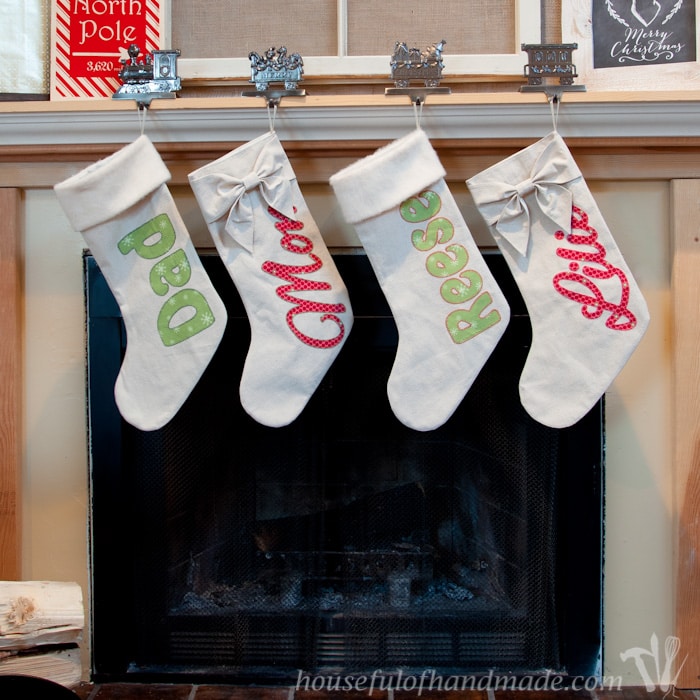
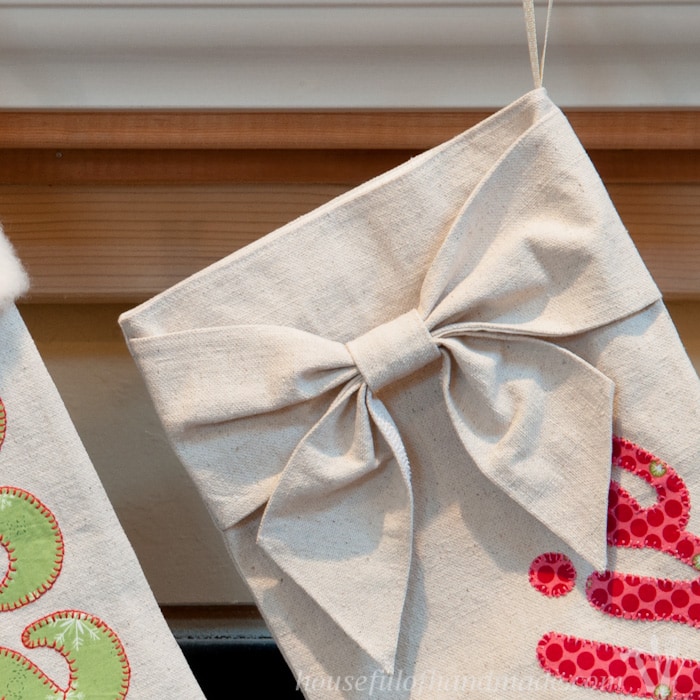
I came across this tutorial from Erin at His and Her’s Blog and knew immediately I needed to put bows on the top of the stockings for me and my daughter. I wanted a textured, natural looking fabric for the stockings, I looked at unbleached muslin but it was too flimsy.
I needed something that would hold up to years of use and my kids are hard on things. I had some left over pieces of drop cloth and really loved the way they looked and I knew they would be able to withstand the years of wear and tear I know we will put them through.
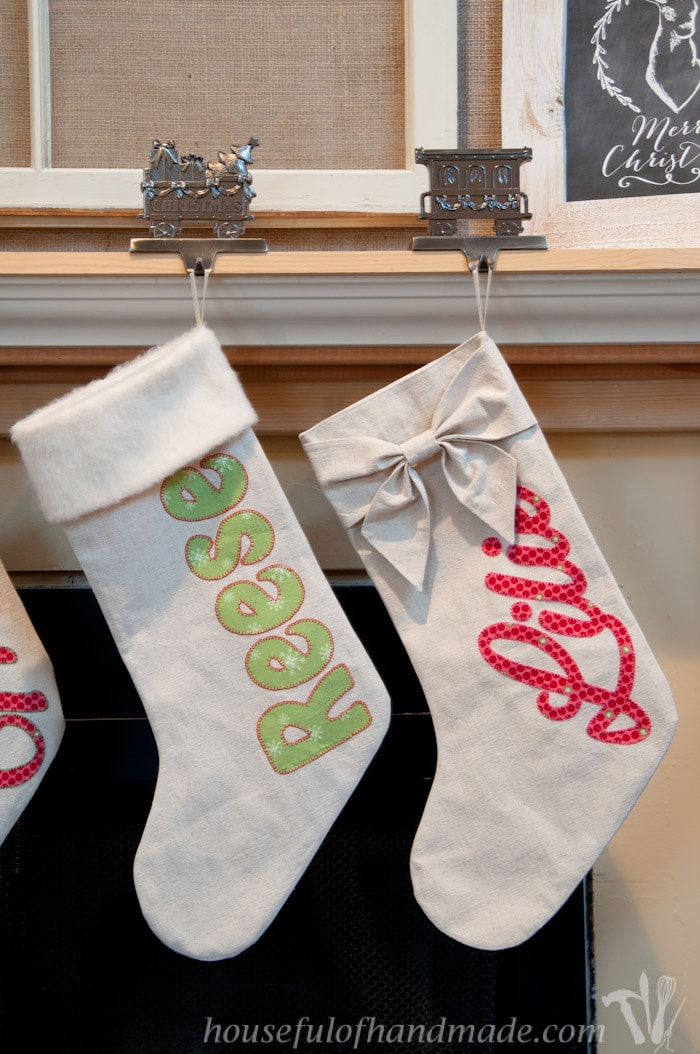
I am not going to share with you the tutorial on how I made the stockings. You can check out Erin’s tutorial for the beautiful bows. And for the boys, I just added a simple fake fur cuff. But I wanted to share with you some tricks for how I did the appliquéd names.
I love having a personalized stocking for everyone in our family and this was an easy way to add our names and lots of style as well!
I used my Silhouette to cut out our names, I have the machine (and love it) so why not use it! But if you do not have a Silhouette, don’t worry, you can still make adorable personalized stockings.

One of the things that annoys me when I want to appliqué words, I find a font that I love but it is too delicate. The appliqué has to have enough substance or you will just have a huge headache! Really thin letters do not work well, but when you find a delicate font you love I have a solution for you.
I am showing you how I did this in the Silhouette design program (which you can download for free, you can use it to see if you like it before you ever buy the Silhouette). I also use this tool a lot in Illustrator.
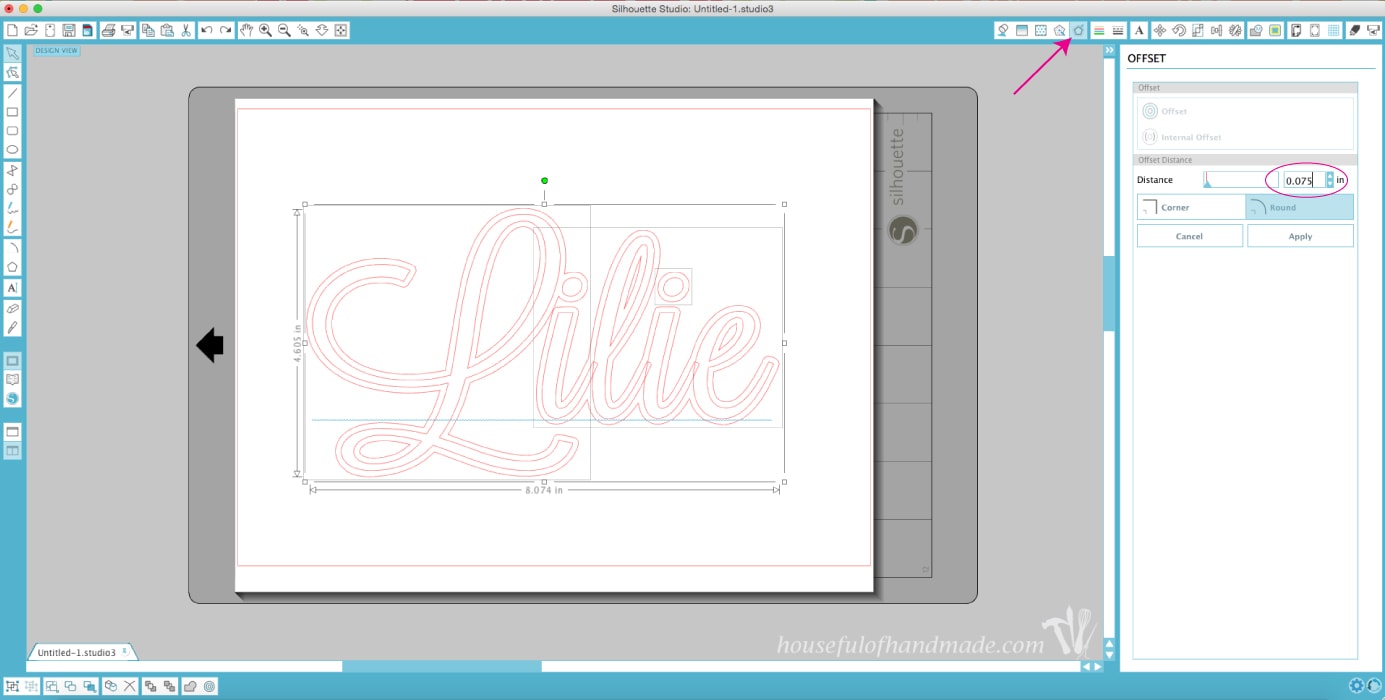
I have not used any other editing programs, but I am sure this tool is available because it is pretty basic. To start, type in the words that you want for your appliqué. I am using Lavanderia, it is one of my favorite script fonts, super girly and loopy!
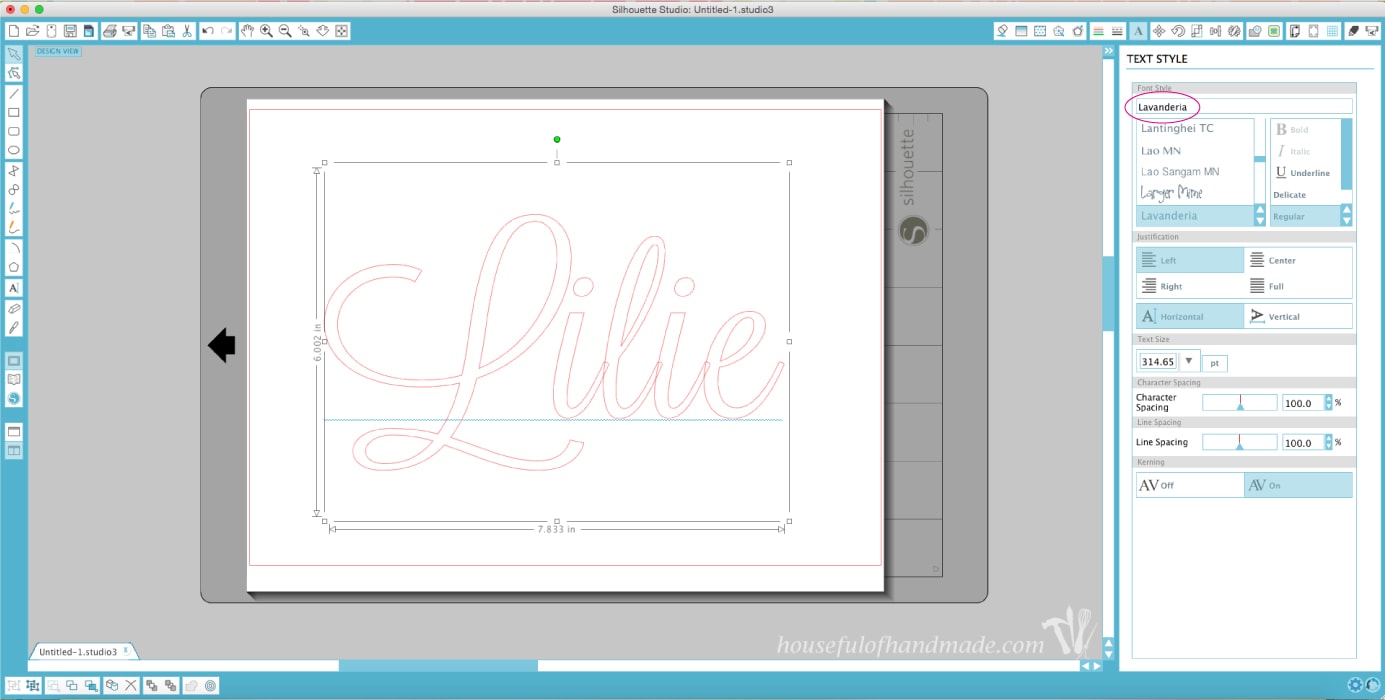
With the text selected, click on the offset path button on the top. It will automatically give the text an outline. The default is 0.125, but this was a little too thick for me, so I messed around a bit and settled on 0.075. Then hit apply.
Now you can delete the original text and be left with just the new outer path (which is the thicker version of the font you selected). But I noticed that the dot on the first i was connected to the L because it was too close together. So I decided to correct that to get the perfect appliqué.
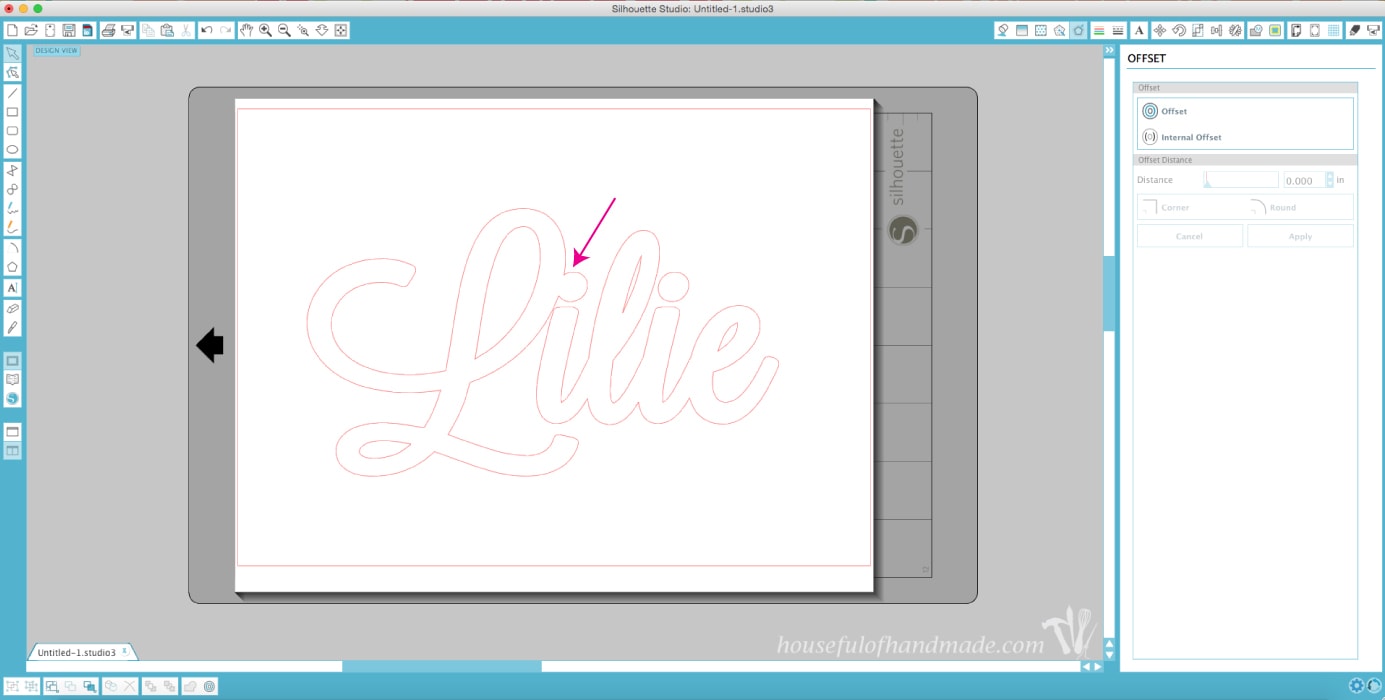
I started over with the original text, but this time, I added a space between the L and i. You can see how it is further apart (maybe a little too far but we will fix that later).

Add your offset path just like before. I stuck with 0.075. And you can see that the L is no longer attached to the i.

Delete the original text so you are just left with the offset path. Now you can grab the ilie and move it closer to the L so it looks right! Make sure to grab the dots over the i’s so they stay lined up nicely.

Now you can adjust the size if needed to make sure it fits your stocking. Then you can cut it out with your Silhouette or you can print it out and use is as a template for your appliqué.
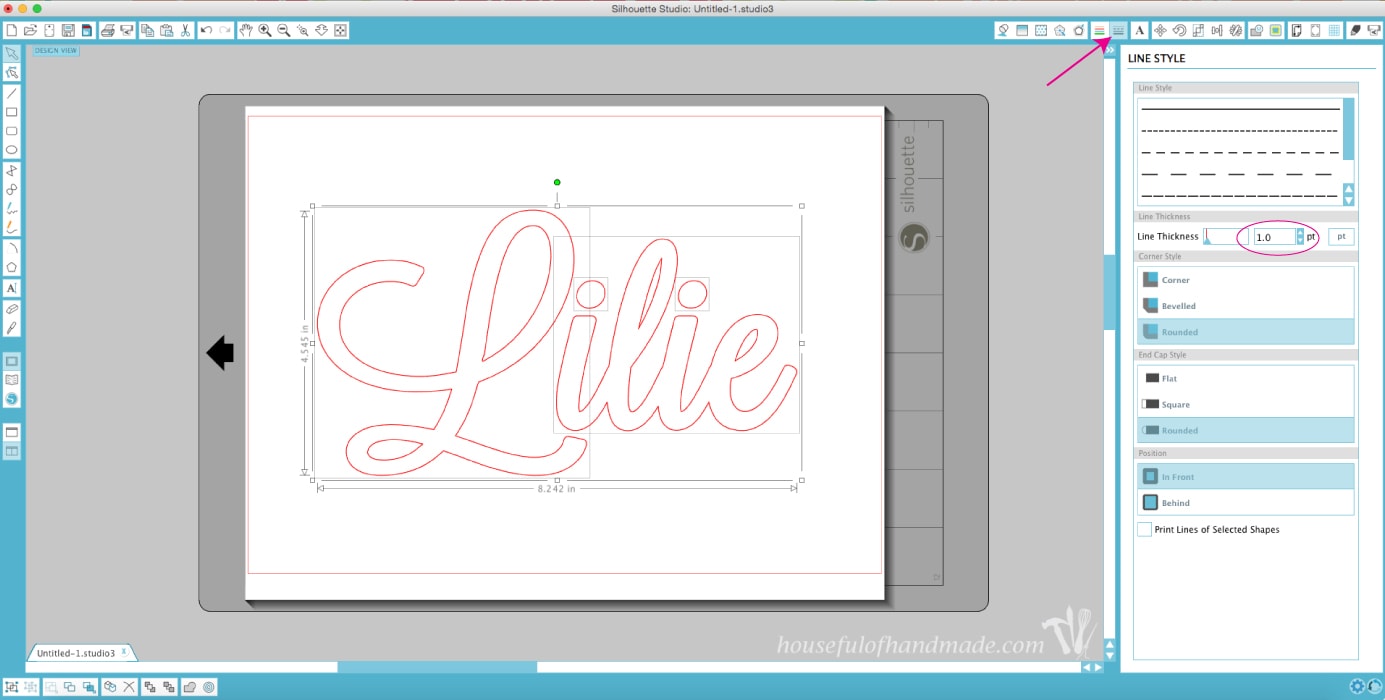
If you are printing from the Silhouette design program, one thing I learned (after lots of frustration), you need to adjust the line thickness or it will not print. Those little red lines are actually 0pt which means they only exists for cutting purposes.
I like to change the line thickness to 1pt so they print like a regular line.
I use Wonder Under Fusible Web on the back of my applique, then I cut it out with my Silhouette or use the template I just made and printed to trace it on the paper backing, cut it out with scissors, and iron it onto the Christmas stocking.
To finish off the appliqués, I used a blanket stitch and very slowly went around the whole exterior of each name. I switched it up with a few different colored threads and I am more than happy with how they turned out!
When finishing off the outside of an appliqué, just go slow and you will get an (almost) perfect stitch around it.
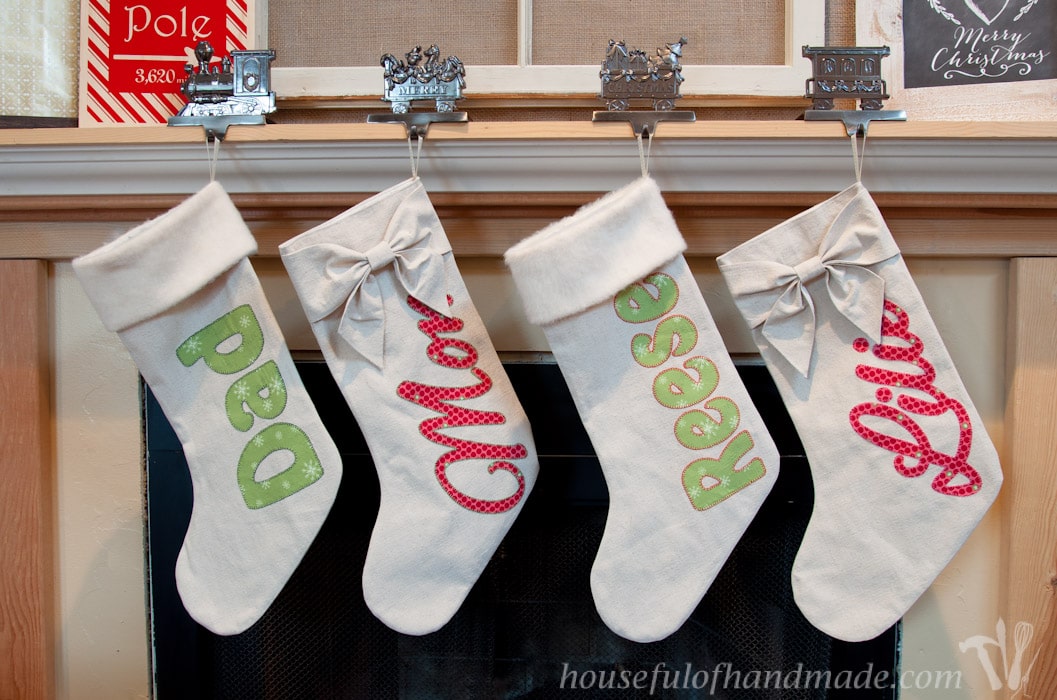
And those bows are just too fantastic! My daughter loves that we have boy and girl stockings (everything is boy vs. girls right now in her world).
I think we have a few more Christmas decorations for the mantle and then I can move on to the next part of decking the halls! And this weekend I will be sharing my super easy (easier now cause I am creating free printables for you since I couldn’t find what I wanted at the craft stores today) Holiday wreath idea.
P.S. Every time I take pictures of my mantle I vow to finally finish the it. All I need is a little paint and tile, but I keep putting it off. I guess it needs go to the top of my New Year’s Resolution list!
UPDATE: The mantle is finally done!!! You have to see how beautiful it turned out.
How to Make a personalized Drop Cloth Christmas Stockings
Learn how to personalize your own DIY Christmas stockings with your cutting machine.
Materials
- Drop Cloth Stockings
- Fabric
- Wonder Under Fusible Web
Tools
- Silhouette Machine
- Silhouette design program
- Scissors
- Iron
Instructions
- Type in the words that you want for your appliqué in the Silhouette Design Program. I am using Lavanderia.
- With the text selected, click on the offset path button on the top. It will automatically give the text an outline. The default is 0.125, but this was a little too thick for me, so I messed around a bit and settled on 0.075. Then hit apply.
- Delete the original text and be left with just the new outer path (which is the thicker version of the font you selected).
- Adjust the size if needed to make sure it fits your stocking. Then you can cut it out with your Silhouette or you can print it out and use is as a template for your appliqué.
- Use Wonder Under Fusible Web on the back of my applique, then I cut it out with my Silhouette or use the template I just made and printed to trace it on the paper backing, cut it out with scissors, and iron it onto the Christmas stocking.
Paula@SweetPea
Friday 11th of December 2015
I love your stockings! Thanks so much for sharing this project on "Best of the Weekend." I'll be featuring you this evening.
I bought a Silhouette on Thanksgiving day using a discount code but have yet to unpack it from its box. I'm really looking forward to learning how to use it. If you have any resources that I should check out to help me to learn, I'd love it if you could share them with me.
Kati Farrer
Friday 11th of December 2015
Thanks so much for the feature Paula! You gotta hurry up an get that Silhouette out of the box, you're gonna love it! I don't know where I learned wheat I did, I bought mine before Pinterest was very popular so I don't have things pinned. The biggest tip, have a separate blade for your fabric cutting because the paper and vinyl will dull the blade faster and fabric needs a super sharp blade to cut cleanly. Maybe next year I will share some of my tips for the Silhouette.
Jenna @ A Savory Feast
Wednesday 9th of December 2015
Ugh, I need a Silhouette SO BAD! I love all of your ideas. Using drop cloths to make this stockings was such a brilliant idea. I just bought some stockings and have been wanting a way to personalize them. I might be able to modify this idea to personalize my stockings.
Kati Farrer
Wednesday 9th of December 2015
You will not regret buying a Silhouette, I promise! Maybe someday Santa will get it for you :) I love the personalized stockings, it's fun that everyone has their own (and helps keep things organized on Christmas morning).
Laurie
Wednesday 9th of December 2015
I love making things with drop cloth and these are so sweet! Pinning and tweeting to share :) Have a wonderful week! ~Laurie
Kati Farrer
Wednesday 9th of December 2015
Drop cloth is pretty awesome! I have so many projects I'm using it for :)
Lindsay
Tuesday 8th of December 2015
These are great! I love that they would fit in with a rustic decor style, too!
Kati Farrer
Wednesday 9th of December 2015
Thanks Lindsay! You could make them fit in with anything, just change up the fabrics that you appliqué the names with.
Michelle James
Tuesday 8th of December 2015
I just purchased a Silhouette and can't wait til it arrives on Thursday! I made some drop cloth stockings last year and just love them. Yours turned out so amazing. I am with your daughter...I love the bows! Great job.
Kati Farrer
Tuesday 8th of December 2015
That is so exciting! I love my Silhouette, I bought mine years ago before they came out with the Curio and now I really want to upgrade. I love the drop cloth, so versatile.