Build a pergola attached to the house to extend your living space to the yard.
A DIY pergola creates a room outside for entertaining and gathering.
It is the perfect place to enjoy the outdoors. And if you add a clear roof on your pergola, you can extend your outdoor space to a 3 season space.
While this is a big DIY project, it is a great way to add space to your home without breaking the budget.
This post may contain affiliate links. As an Amazon Associate I earn from qualifying purchases. Click here to read my full disclosure policy.
Budget Outdoor Kitchen with Dining Room
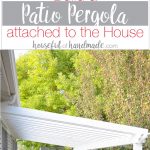
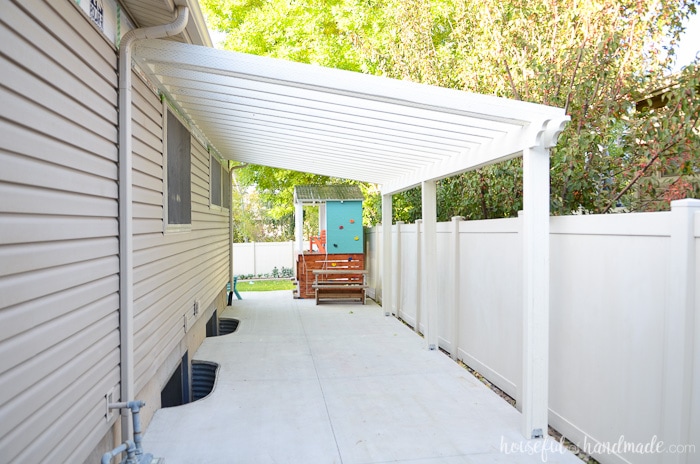
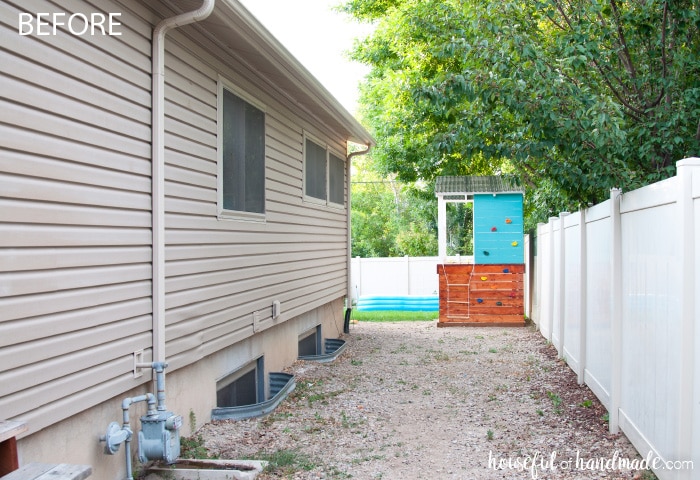
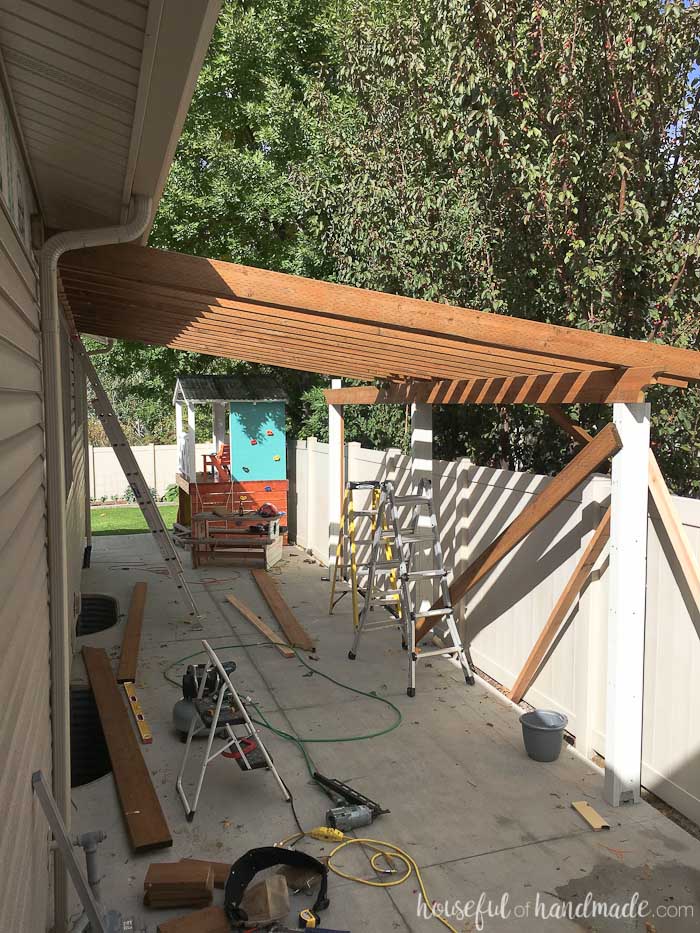
Our small side yard was wasted space. The 12′ wide strip down the side of the house was never used, except to grow weeds.
So we partnered with the Home Depot to turn our long side patio into a oasis on a budget!
All the supplies for the pergola were around $700!
We used pressure treated lumber instead of expensive redwood or cedar. It will hold up to the elements, but costs much less.
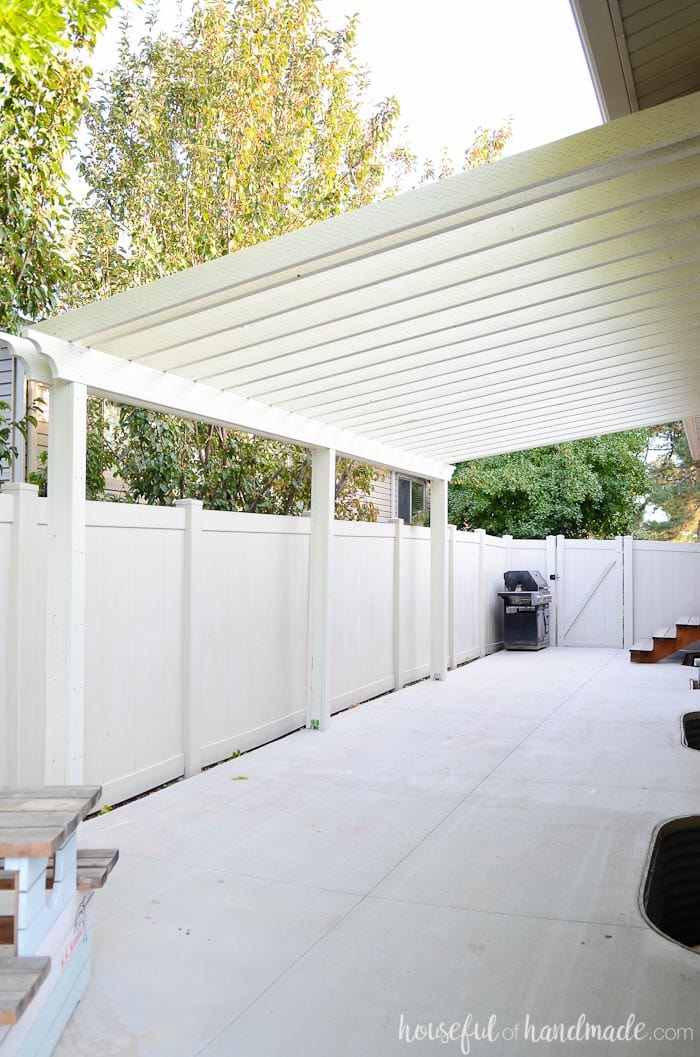
Then because I want it too look expensive (even when it is not), we painted it with a soft white paint to match the house.
I absolutely love our budget pergola!
Outdoor Gathering Space
A pergola attached to the house was the perfect solution to create a space we could use as an outdoor dining and kitchen area.
We love to bring together our friends and family around a table.
So creating an outdoor entertaining space was perfect and added useable square footage to our home.

I could have just thrown a table and chairs into the space and called it done, but I wanted to create a room.
Sometimes, large spaces can be harder to decorate so defining the space, with something like a rug or pergola, makes it easier.
A patio pergola was the perfect way to define the outdoor dining space on the long patio.
If you have ever wanted to build your own patio pergola, then this is the perfect post for you.
We encountered a few challenges and I am excited to share it all with you.
Building a pergola attached to the house is a big project, but totally worth it.
How to Build a Pergola Attached to the House
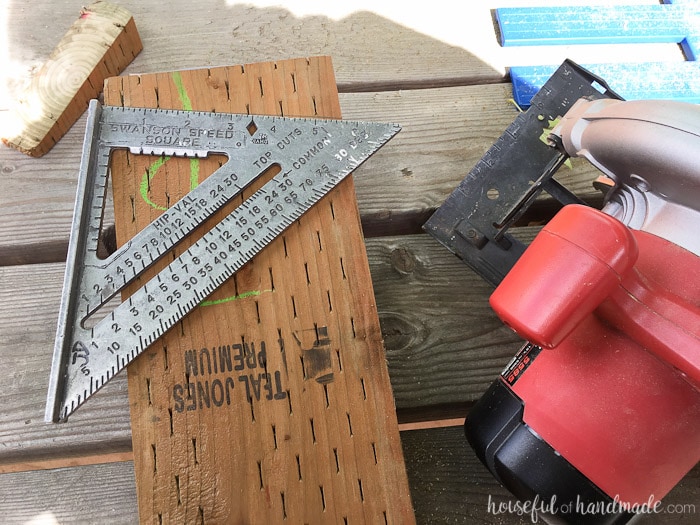
Tools & Materials
Recommended Tools:
- Circular saw
- Jig saw
- Drill
- Impact driver (optional, but I love not having to switch bits with the drill)
- Speed square
- 4′ level
- Measuring tape
- Hammer
- Optional: Framing nailer
- You can use screws and a drill instead of the framing nailer, but it was super nice to have. We borrowed one from a friend so it didn’t cost us anything either.
Supplies:
- Pressure treated lumber
- 4×4 boards for the posts (we used 3- 10′ boards)
- 2×4 boards for the posts (we used 6- 8′ boards)
- 2×8 boards for the beams (we used 4- 12′ boards)
- 2×6 boards for the header attached to the house and blocking (we used 3- 12′ boards)
- 2×6 boards for the cross beams (we used 22- 12′ boards)
- Galvanized post bases
- 4 1/4″ long 1/2″ wedge anchors (one for each post base)
- 4″ long 1/2″ lag screws (we used 36 for our 20′ header)
- 3″ construction screws
- Framing nails
- Paint
- It took us 1 1/2 gallons to paint 2 coats on the patio pergola.
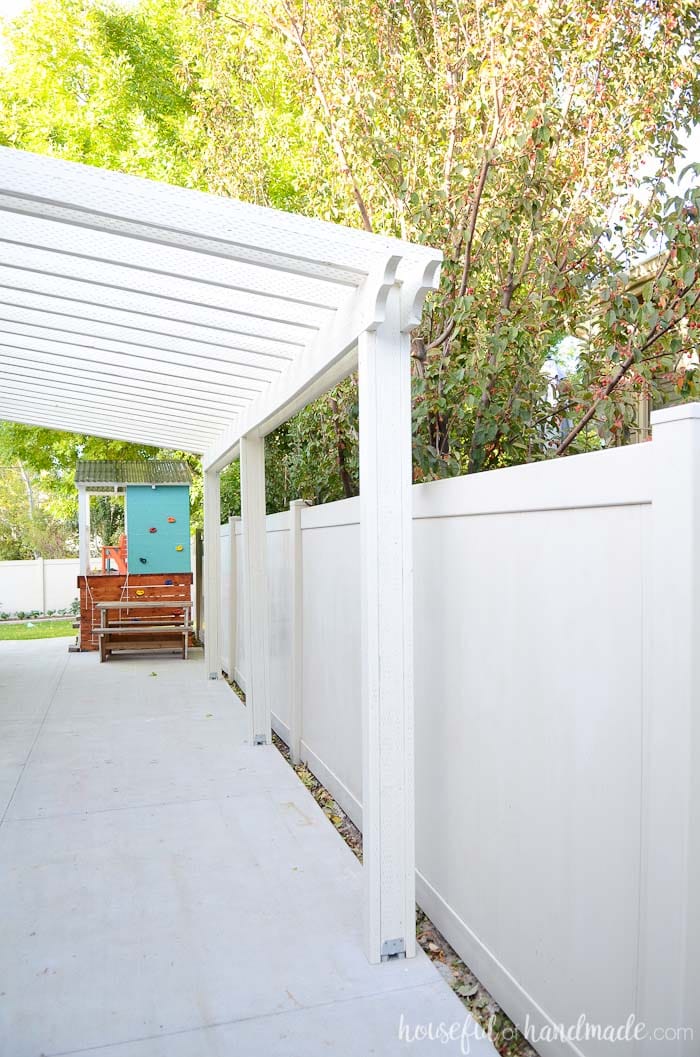
STEP 1- Install the Posts
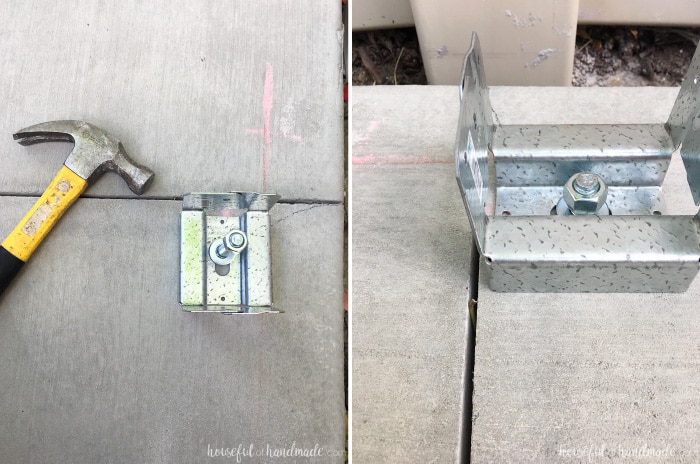
We knew we were going to add a pergola to our patio before we had the concrete poured. To give our pergola footings an extra strong grip, the concrete guys dug out where the posts were going to be so the concrete was deeper in those areas.
Then when we installed the post bases, the bolts used to hold them wouldn’t be longer than the cement was deep for a nice strong hold. This step is not necessary, but if you can, it doesn’t hurt.
To install the post bases, we drilled a 1/2″ hole in the concrete with a 6″ masonry bit. The hole was about 4 1/2″ deep.
Then we placed the base over the top and using a hammer, tapped in the wedge anchor. And we tightened it down with a wrench. Now we were ready for posts.
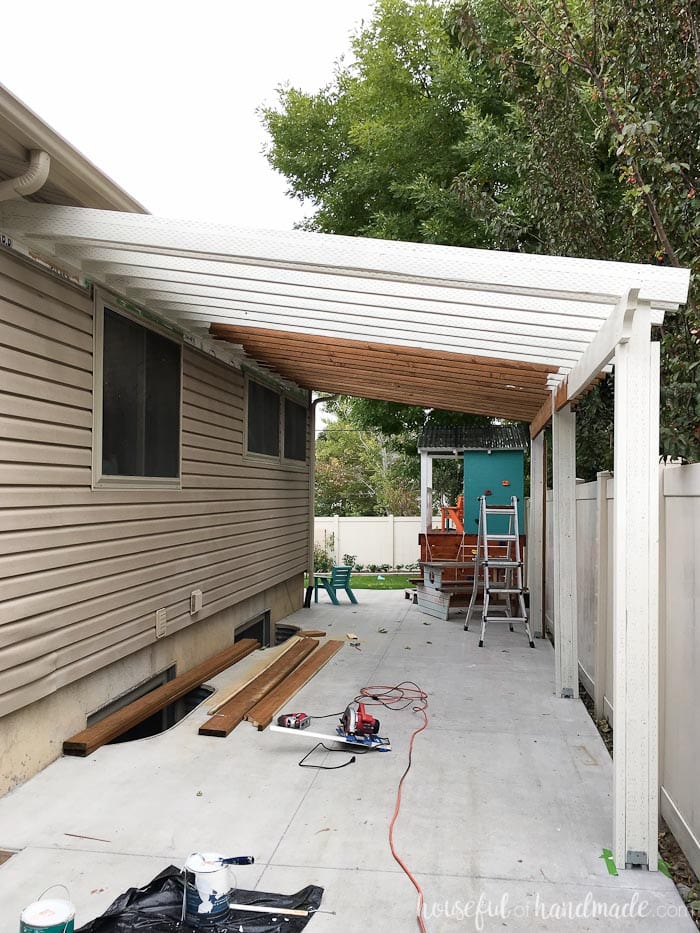
I thought it would be easier to paint all the boards for the pergola before we built it, then I could just add the final coat once it was built.
Because we had a lot of rain, I only managed to get a few boards painted. So you will notice some boards are white, but most are not.
We attached the 4×4 posts to the post base. Then cut 2×4 boards to flank either side of the posts.
These are for a bit more stabilization and to support the weight of the 2×8 beams to make installing them easier.
Before cutting the 2×4 post boards, we made sure the tops were level (most patios are not perfectly level). We used a level and a chalk line to get a level line at the top, then cut the boards to that length.
A laser level would also work, but I don’t have one of those yet.
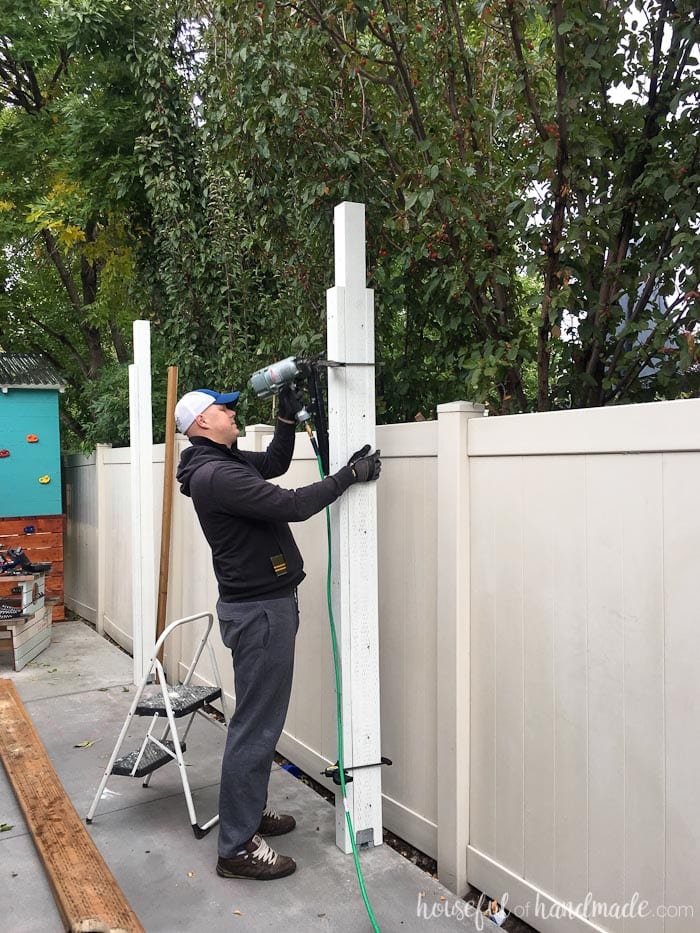
We attached the 2x4s to the 4×4 posts, while ensuring the posts were plumb with a 4′ level.
We used a couple boards to help hold the first posts plumb as we worked (once the first one was plumb and secure the rest were easy to keep in line).

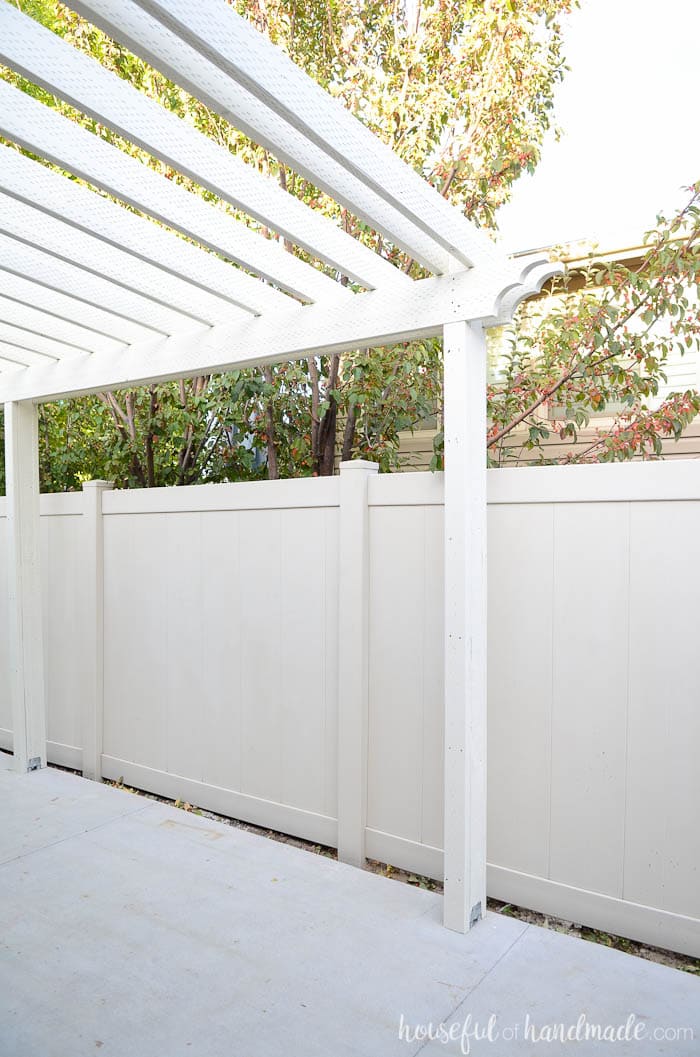
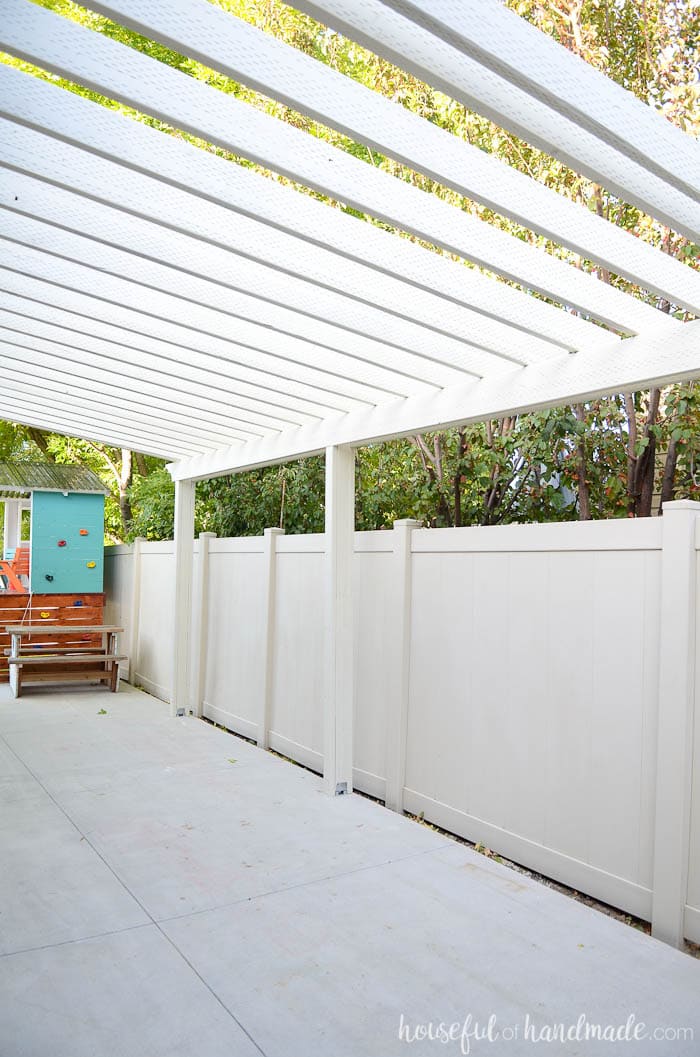
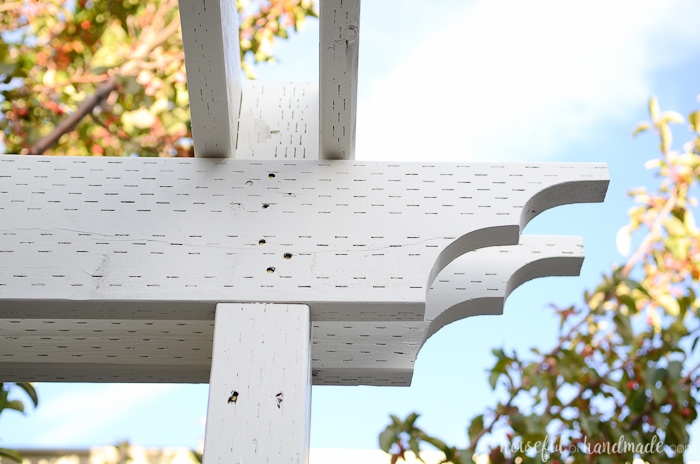
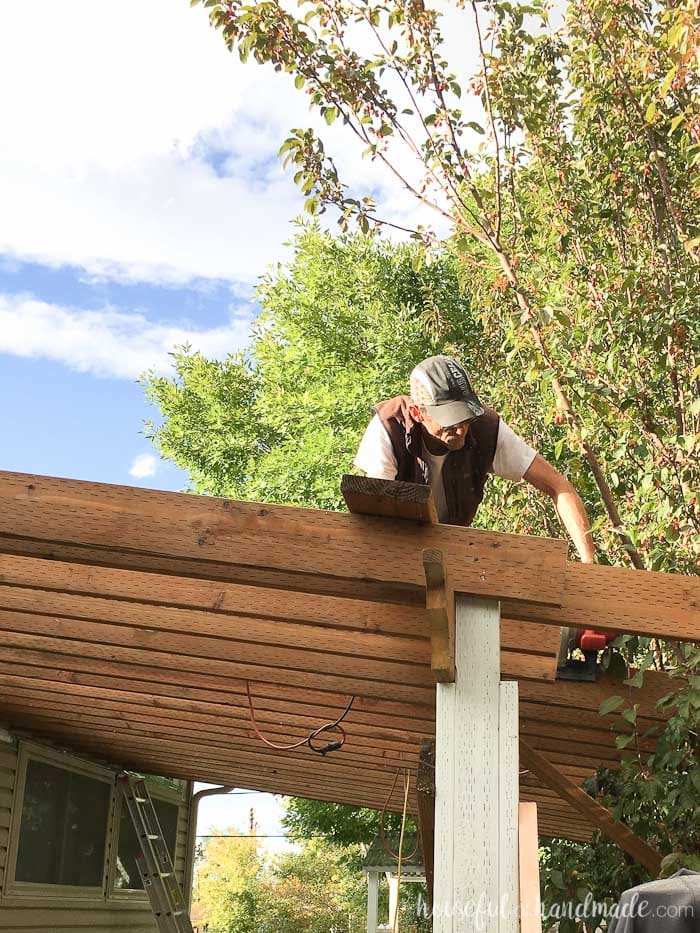
Then we installed the 2×8 beam above them.
But first, I cut a decorative edge to it with a jig saw (totally optional but makes everything so much prettier I think).
These were secured with framing nails.
We also made sure to cut the beam so it broke over the center post. Each beam sat half over the center post to support the weight.
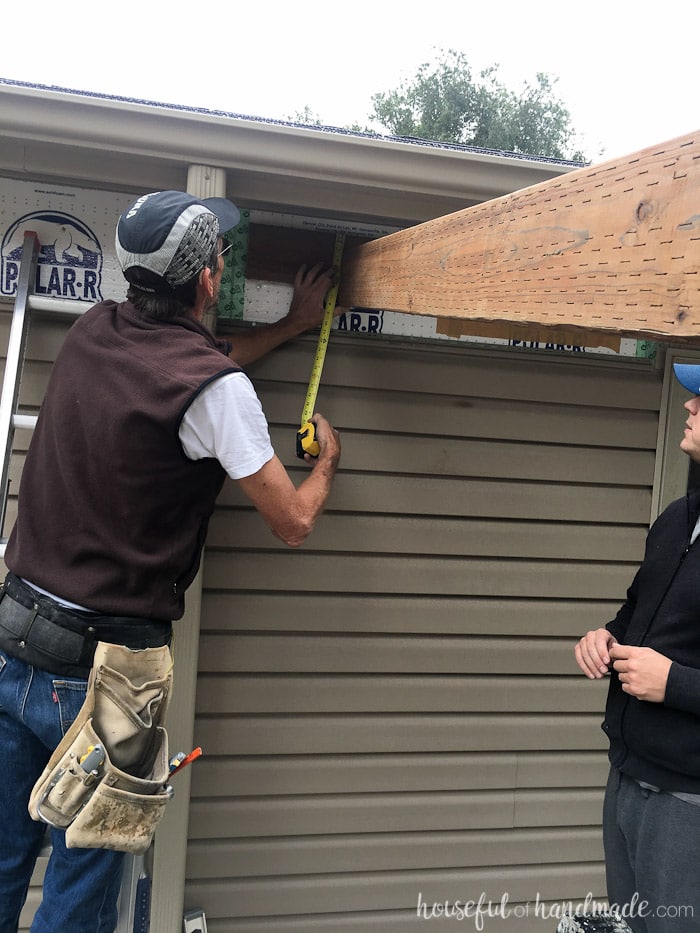
STEP 2- Attach the header to the house
We removed the vinyl siding so the pergola header can be securely fastened to the house.
I thought removing siding would be hard, I was wrong. It is created so that it just clicks into itself.
With a hammer and a flat head screwdriver for leverage, you can pop the vinyl siding off the house.
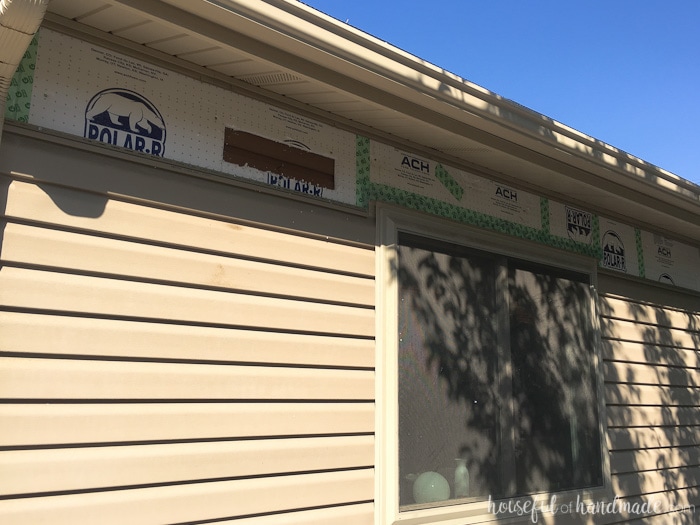
We secured the 2×6 header to the house with 1/2″ lag screws. Making sure the header was attached to the studs.
Predrill the holes for the bolts. Use (2) for each stud (typically every 16″ on center). \We built our header long so we could square up the posts and then cut off the excess.
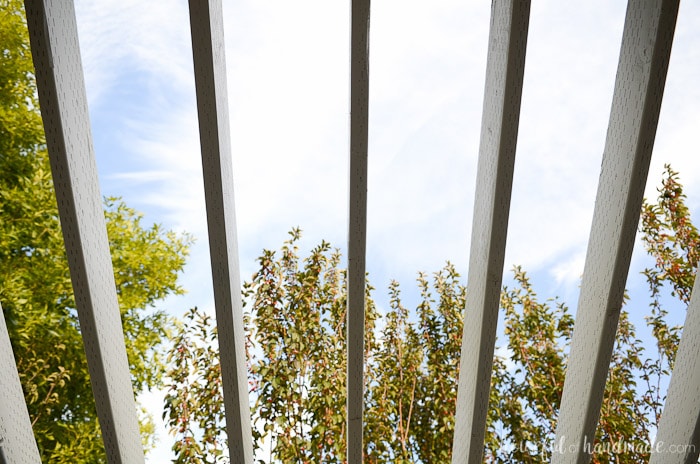
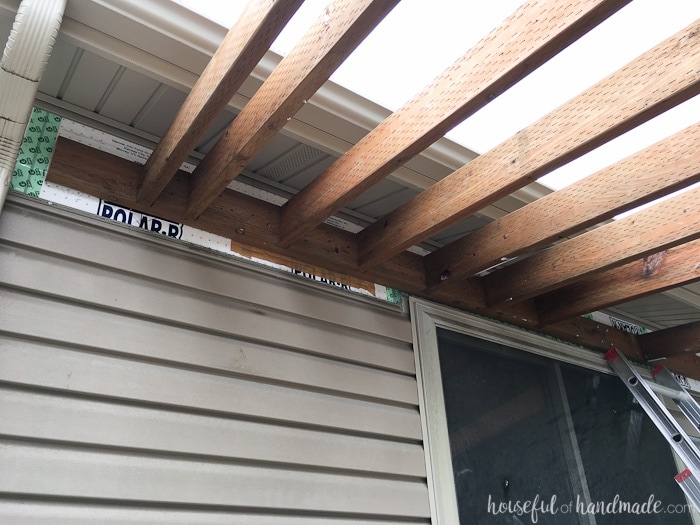
STEP 3- Install the Cross Beams
Since we are planning on covering our patio pergola so we can enjoy it more, we have to be concerned with things like snow load and roof pitch. If we were leaving the pergola open, it would not have been an issue.
So we consulted the experts and determined that we needed to make our cross beams 12″ on center instead of 16″ and we used blocking between the beams at the header.
The blocking also eliminated the need for hangers, bonus!
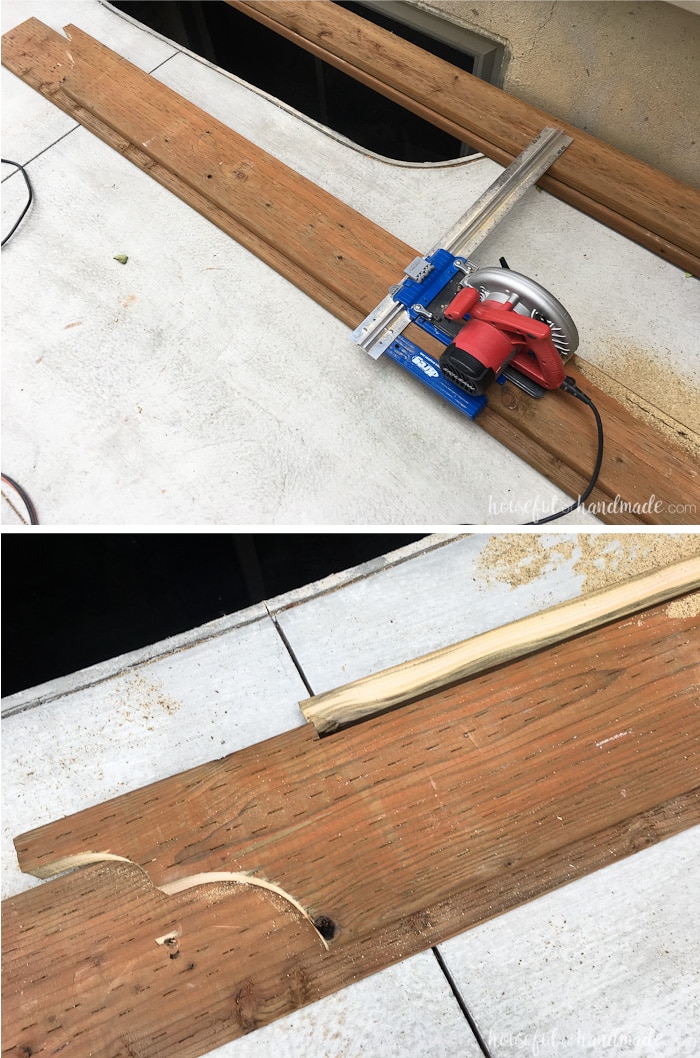
All our cross beams needed to be cut an an angle to give us the slope from the header to the outside of the patio pergola. I used a carpenter’s square and a circular saw to cut the boards.
EXPERT TIP: To draw an angled line on the boards, angle the square so the board lines up to the degree mark you need on the side. Super quick and easy!
Before attaching the first cross beam though, we needed to ensure it was square,
We used the pythagorean theorem to ensure the cross beam was square to the posts.
To ensure a 90 degree angle, measure 6′ down one side (on the header beam), then 8′ down the first cross beam, then if you measure between these two marks, they should be 10′.
We adjusted the angle of our crossbeam until it was 10′ and presto, 90 degree angle!
Now that one side was 90 degrees, we could work off that to the other side. So we secured the cross beam to the header by toe nailing nails in with a framing nailer.
Then we attached a 3 1/2″ block (the width of the 2×4 post it would be attached to on the other side of the pergola) of 2×6 to the header right next to the cross beam.
This was attached to the header and the cross beam. Then the second cross beam was attached to the side of the block and toe nailed into the header.
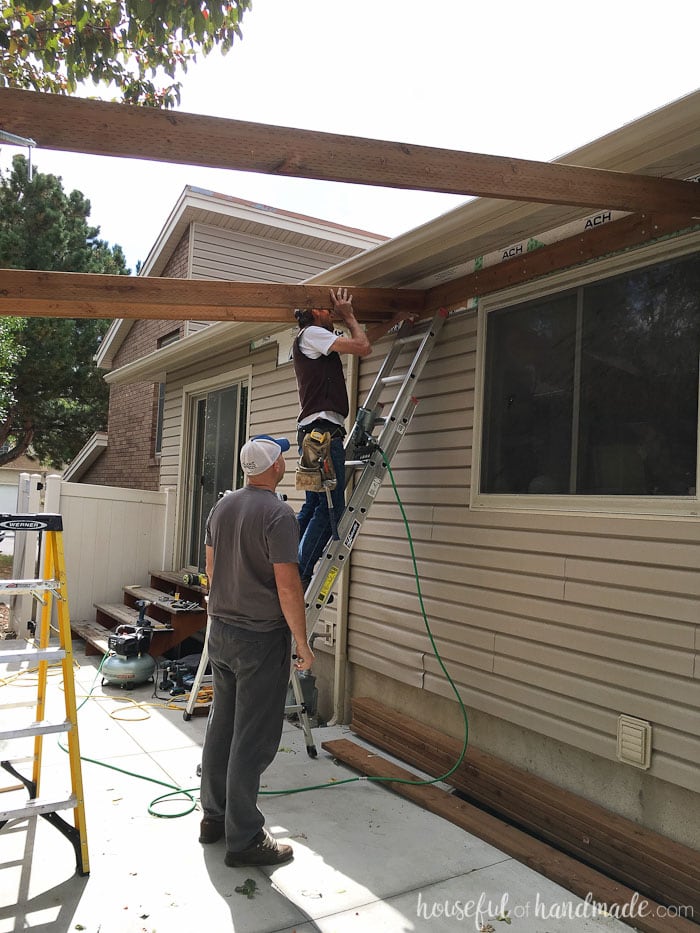
Before getting crazy attaching cross beams all the way down, we took a minute to attach these first to cross beams to the posts and beam on the other side of the pergola. We double checked that the posts were plumb both ways before attaching the boards.
Now it was a matter of attaching cross beams all the way down with 10 1/2″ blocks of 2×6 between them to keep the beams 12″ on center.
Because we had 3 hands, I was in charge of cutting the angle on the top of the cross beams and the blocking.
My husband was in charge of lifting the heavy boards up over the beams, and my father-in-law nailed them in.
It was crazy how fast this went once all the checking and double checking was done!
We did have to take a break and double check plumb again when we moved past the center post. This helped us ensure the back post was all plumb too.
Then we went to work and finished things up quickly!
Once all the cross beams were attached to the header, we attached them to the beams above the posts.
Making sure the cross beams were 12″ on center over the beam, we attached them by toe nailing with the framing nailer on either side of each beam.
STEP 4- Finish off the ends
Then we clean up the back of the cross beams so they were all straight at the end of the pergola.
We pulled a chalk line over the top of the cross beams at the length we wanted them past the posts.
I used the square to draw a line to cut. My father-in-law climbed on top of the pergola and quickly cut all the ends off the cross beams.
Lastly, we needed to add the second beam on the backside of the posts.
Because the cross beams were at an angle, we needed to cut off the top of these beams.
I didn’t want the decorated sides to be affected so I cut a notch on the top of this 2×8 beam just were the cross beams would lay but left the 12″ overhang on the edge of the beam the full height.
We had to bang these beams into place, but it gave us a nice tight fit. The cross beams are now supported over two beams between the posts.
Then we toe nailed the cross beams to the second beam too.
If I did it again, I would remember to add the second beam before adding all the cross beams.
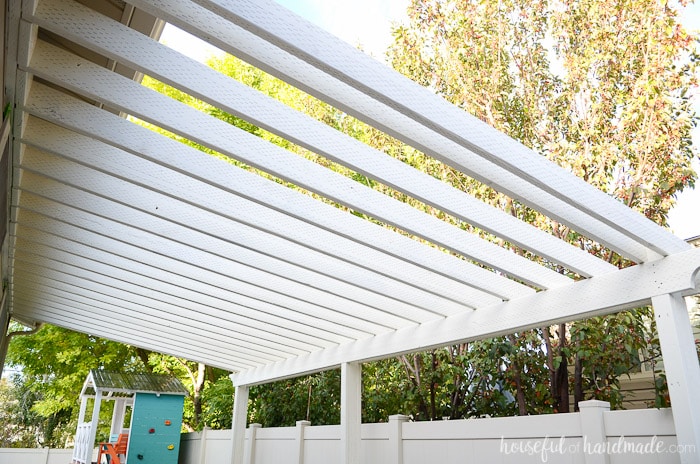
STEP 5- Paint the pergola
Finally my husband and I finished painting the patio pergola.
It took us about 6 hours to paint 2 coats of Behr Ultra Plus in Sentimental Beige over the entire thing.
But I love that the pergola now matches the house and fence. It looks like it has always been a part of it!
I still need to add a bit more blocking before adding a pergola roof. Just to give it even more stability in case of a crazy snow storm.
But for now I am ready to just enjoy our hard work.
Have you ever taken on a big project like this? It is totally worth it!
If you have good weather, this DIY pergola could be built in a long weekend.
And make sure to check out the rest of our DIY remodel projects for budget friendly remodeling ideas.
