One more week until school’s out for us! I am really excited about it. Lazy mornings, swimming lessons (which means 1/2 hour for me to sit in the sun and relax), and sunshine! We love spending time in the backyard. The kids can splash in our little pool, play tag on the grass, and the best part is having lunch or dinner outside. When we tell the kids we are eating outside they are more than excited for dinner.
This post may contain affiliate links. As an Amazon Associate I earn from qualifying purchases. Click here to read my full disclosure policy.
We don’t have an outdoor dining table, yet! I have the table top, and plan on putting legs on it this week, but for now, we sit in our outdoor chairs. The kids have a hard time balancing their food on their laps, we have tried putting them on the picnic blanket but then if they leave their food for a second, our dog swoops in and it’s gone! So it was time for a picnic table for them to enjoy their meals outside.
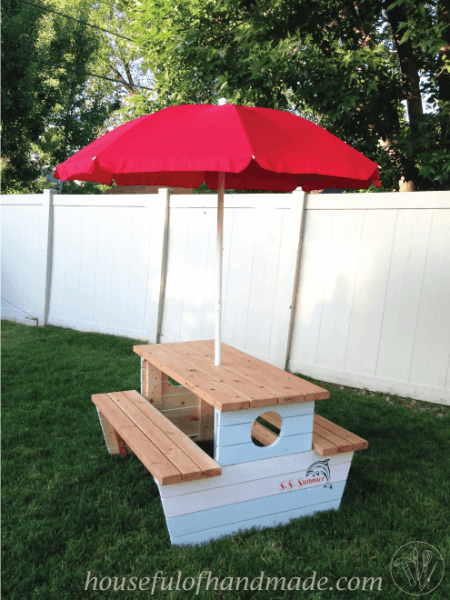
I knew I could build one pretty easy, and I found this perfect Pirate Picnic Table on Ana White’s website, but it is for little kids and since my kids are 6 and almost 4, I didn’t want them growing out of it too fast. So when I saw this plan for a basic Picnic Table for Bigger Kids, I knew I could combine the two plans and make the cute boat table BIGGER!
The best part of this build is it cost less than $50 for the table (the umbrella cost $30 additional).
Materials Needed
- 2 – 8′ long 2×6 boards
- 4 – 8′ long 2×4 boards
- 6 – 8′ long 1×4 boards
- 2 – 8′ long 2×2 boards
- 40 2 1/2″ Kreg jig screws
- 1″ wood screws
- 2″ wood screws
- 1 1/4″ finish nails
- 2″ finish nails
- Wood glue
- Sandpaper
- Stain and outdoor sealer
Tools Needed
- Measuring tape
- Miter saw
- Jig Saw
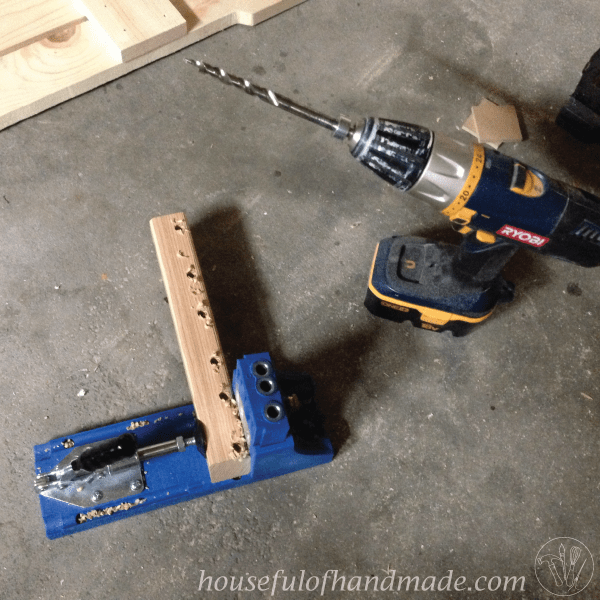
- Kreg jig
- Nail gun
- Drill
- Sander
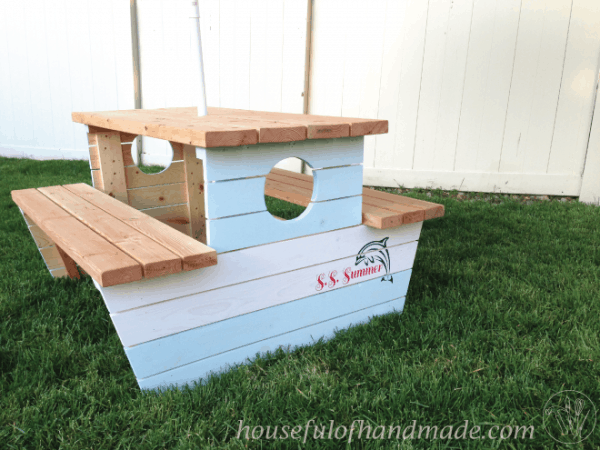
So to start, I put together this plan that combined the Pirate Picnic Table and the Picnic Table for Bigger Kids. You can see I adjusted the sides a little to eliminate buying more wood for the inside braces, and I made the top and seat out of 2x4s and 2x6s like the bigger kids table. And I love how it turned out!
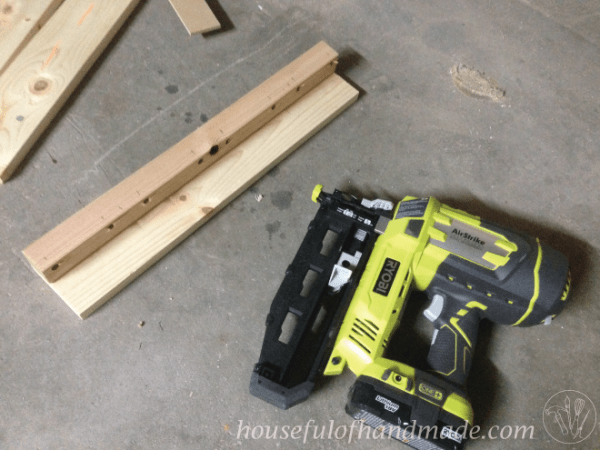
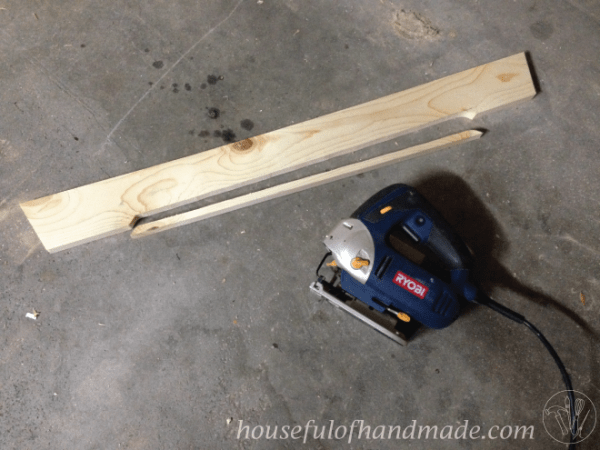
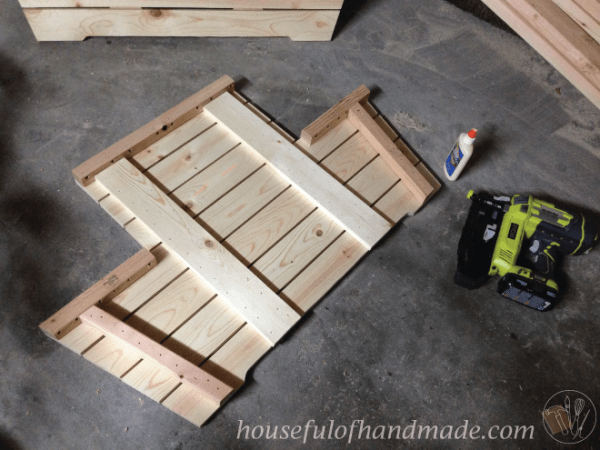
I started by building both sides, then using the jigsaw to cut out the port hole and bottom notch, then attaching the two sides together and finished with the seat and top. It went together in about 5 hours of building time by myself. I used the nail gun to hold things together while I screwed them so that I could do it without a second pair of hands. The only place I needed a second person was when I was attaching the two sides together with the brace under the seats.
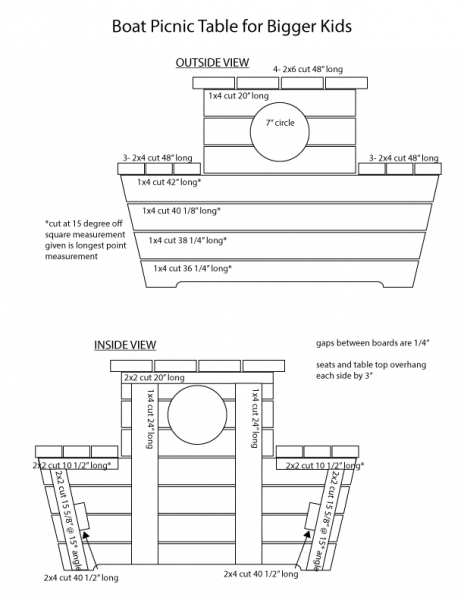
I did have to be very careful how I cut my boards so that I could ensure I got all the cuts in the least amount of wood. So to help out, I made a little cut chart. You can see what pieces were cut from each board.
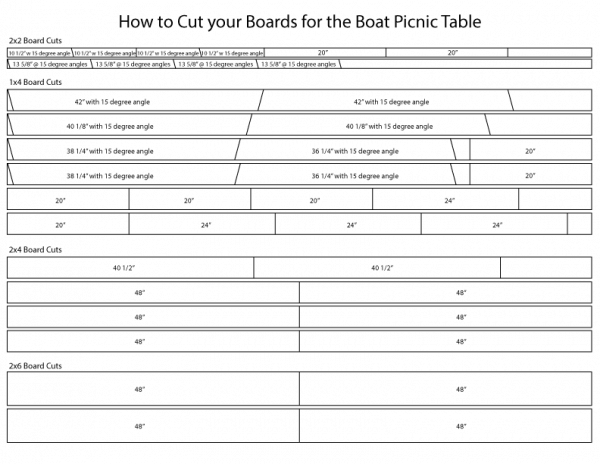
To begin, you will use the Kreg jig and put holes in the 20″ and 10 1/2″ 2×2 boards. These will be supports for the table top and seats. For the 20″ long boards, put jig holes at 1/2″, 3 1/2″, 5 1/2″, 9″, 11″, 14 1/2″, 16 1/2″ and 19 1/2″. For the 10 1/2″ boards 3/4″, 2 3/4″, 4 1/2″, 5 7/8″, 8″ and 9 3/4″ starting at the flat end of the board.
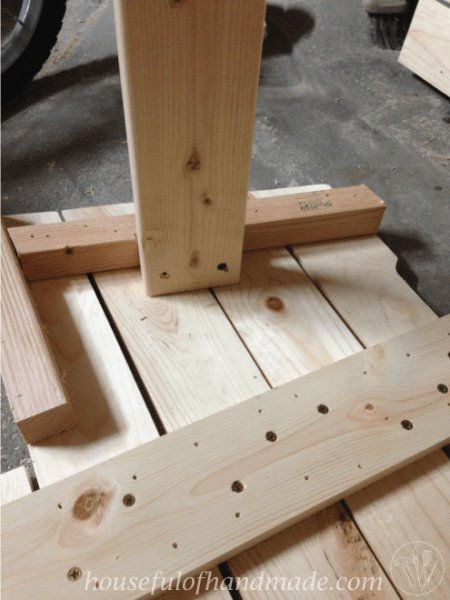
Then you can attach the table support to the top side slat (a 20″ 1×4). Add glue to the 2×2 then line it up to the top of the side slat. This is where I used 2″ nails to hold it and then 1 1/4″ wood screws from the front to secure it. I wasn’t too worried about the screws on the front showing because they are hidden under the overhang of the table top. Just make sure not to put nails or screws through one of your jig holes.
Next, you will attach the 24″ 1x4s perpendicular to the support, 1 1/2″ in from the outside. I attached it to the first board with 1 1/4″ nails and glue. Then I made a couple 1/4″ spacers with some scrap 1/4″ thick wood to help with my spacing and used them to add the rest of the boards.
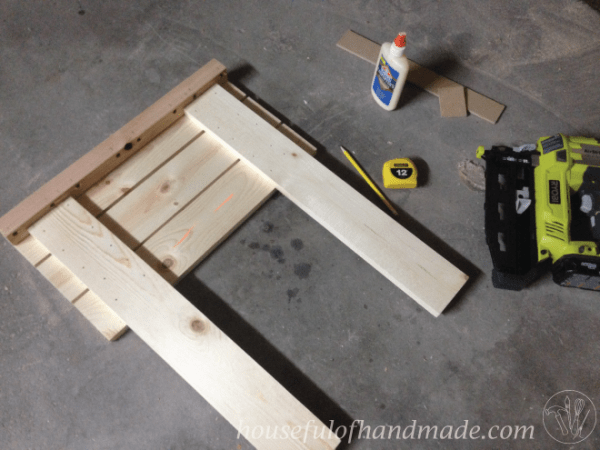
Before adding the bottom board, you will need to notch it out at the bottom so that it doesn’t rock on uneven ground. I did this using my jig saw. Notch out 1/2″ high and leave about 5 inches on each end.
Then all your side slats are attached. I decided to also secure the 24″ 1×4 boards with 1 1/4″ wood screws from the back so they wouldn’t show on the front. I forgot to take a picture of that part though.
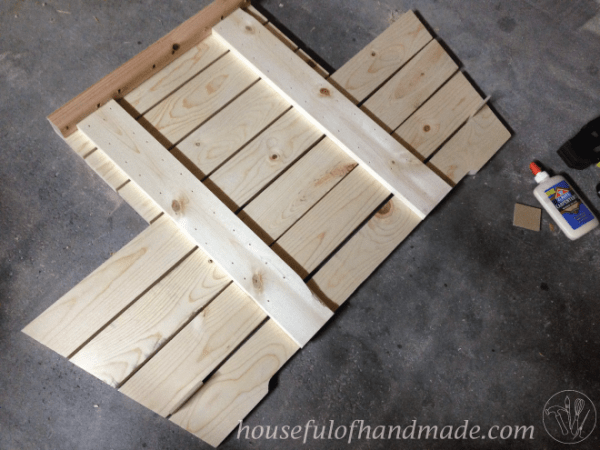
Next you will add your seat supports. Line the 10 1/2″ boards with the jig holes up on the angled edge and secure with glue and 2″ nails. Then you will line up the 13 5/8 in board that is angled on both ends so that it is 2 1/4″ away from the outer edge. Secure with glue and 2″ nails. Then flip it over and secure with 1 1/4″ wood screws.
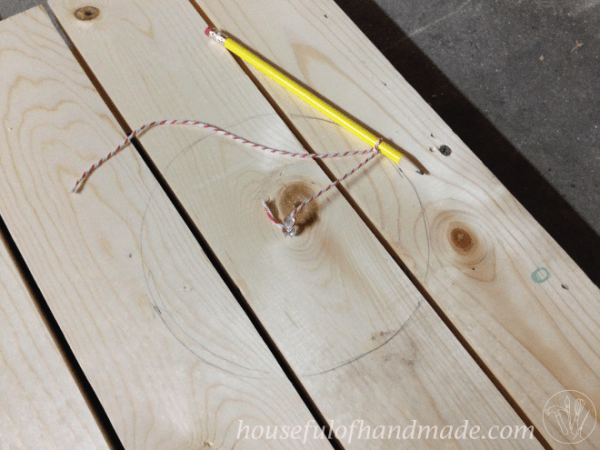
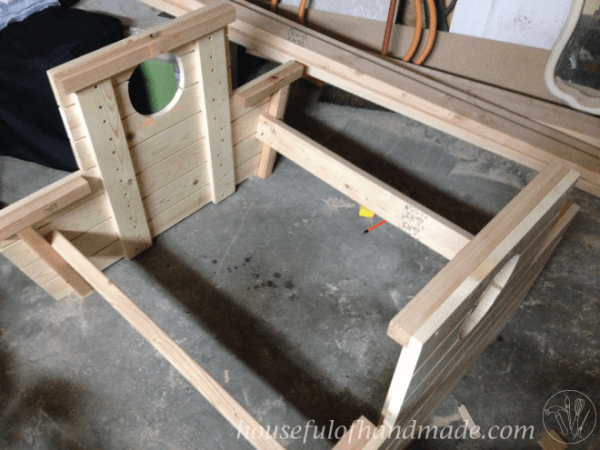
After I got both sides finished it was time to add the port holes. To make the 7 inch circle I tied a piece of string to a thumb tack and then tied it to a pencil 3 1/2″ away. I put the thumb tack in the center of the port hole and then drew my circle. Then cut it out with a jig saw.
Now was the part I needed a second set of hands. Use the 2″ wood screws to secure the 40 1/2″ 2×4 to the 2×2 support. I secured it 3 3/4″ below the seat support.
Then attach the supports to the other side.
Whoot whoot! It’s looking like a table now 🙂
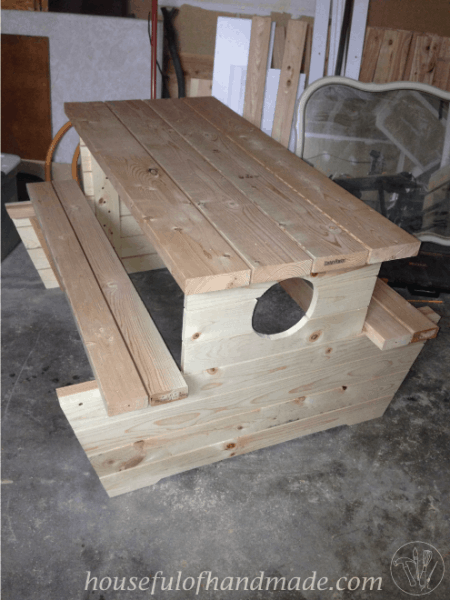
Now it’s time to add the seats and table top. I used my 1/4 inch spacers and secured the boards with 2″ nails. Then climb under the table and use the jig holes you drilled to attach the top with 2 1/2″ jig screws. And you’re all done (except I miscalculated one board so I am one 2×4 short so I had to make another trip to the store to get mine finished!).
Sand it down really well and then you can paint. I thinned my paint a little bit with some water so that it would be more like a white wash look. I painted the top 3 boards and the bottom 3 boards with a pale blue paint and the middle boards with white.
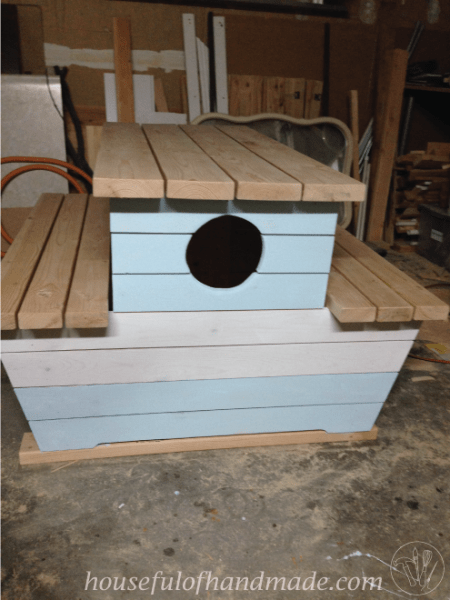
I left the seats and table top natural wood and opted to not paint the insides because they aren’t super visible and it’s a pain to get in there.
Then I wanted to add a boat name to our boat, so I used my Silhouette to design a name with a dolphin and cut it with vinyl to make a stencil.
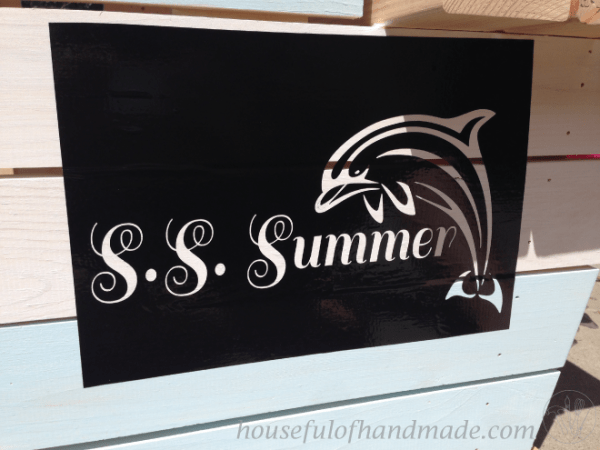
Attach the stencil to the boat and then use a foam brush to carefully paint it.
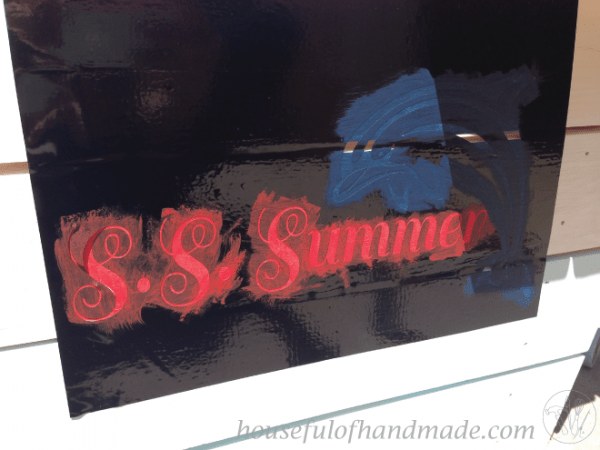
I like to remove the stencil before it’s completely dry so that it doesn’t pull the paint off with it. I find removing stencils just a few minutes after you finish painting is so much easier. And you can see your handy work immediately and I don’t like to wait 😉
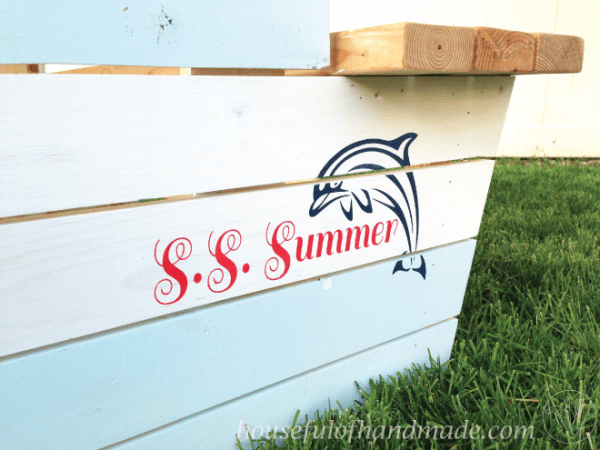
Isn’t it so cute. I love dolphins and now my boat is cute and nautical!
If you want to use an umbrella with yours, I bought a 5 1/2′ umbrella and cut a hole in the middle of the top slightly larger than the pole. I used some boards clamped to either side of the drill bit to keep it from slipping around while I tried to get the hole started. It worked perfectly!
Then all I needed to do to finish was seal it up to withstand the elements. I used a clear deck sealer and painted it on with a foam brush then wiped the excess off just like you do with a stain. Let it dry for 24 hours and you are good to go!
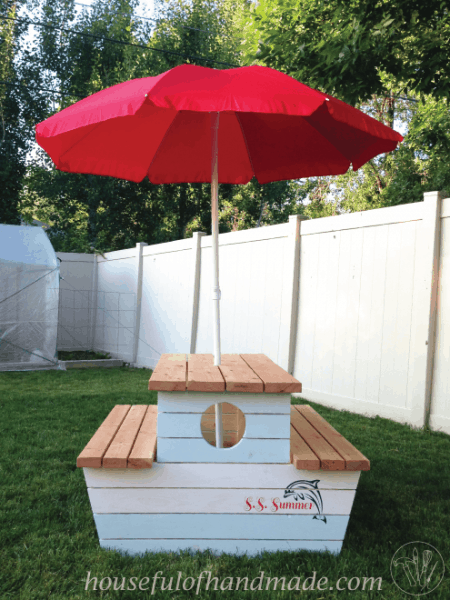
Time to enjoy some picnics outside.
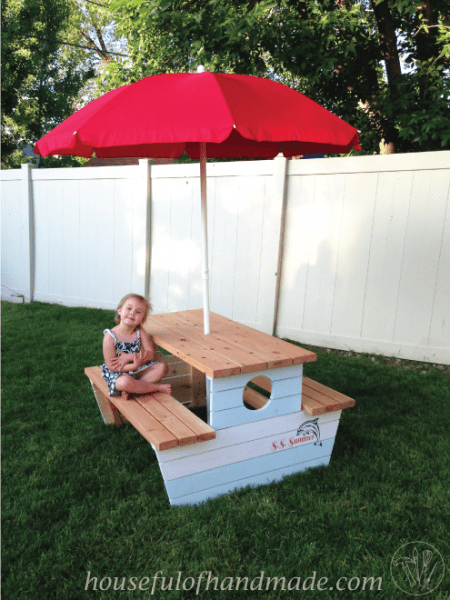
The kids love the new picnic table and it is also big enough for me to comfortably sit with them.

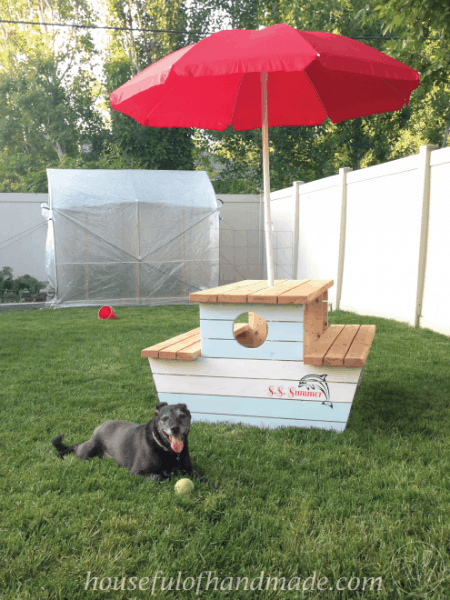
My doggie might not be loving the table so much, she’s just hoping I’ll put down the camera and play with her.
Now when I finish our outdoor dining table, we can all sit comfortably outside to eat! What are you doing to enjoy these early days of summer?
Love this project? Sign up for my weekly newsletter so you never miss a tutorial. You will also get access to my library of free printables & downloads (lots of printable decor and fun!
