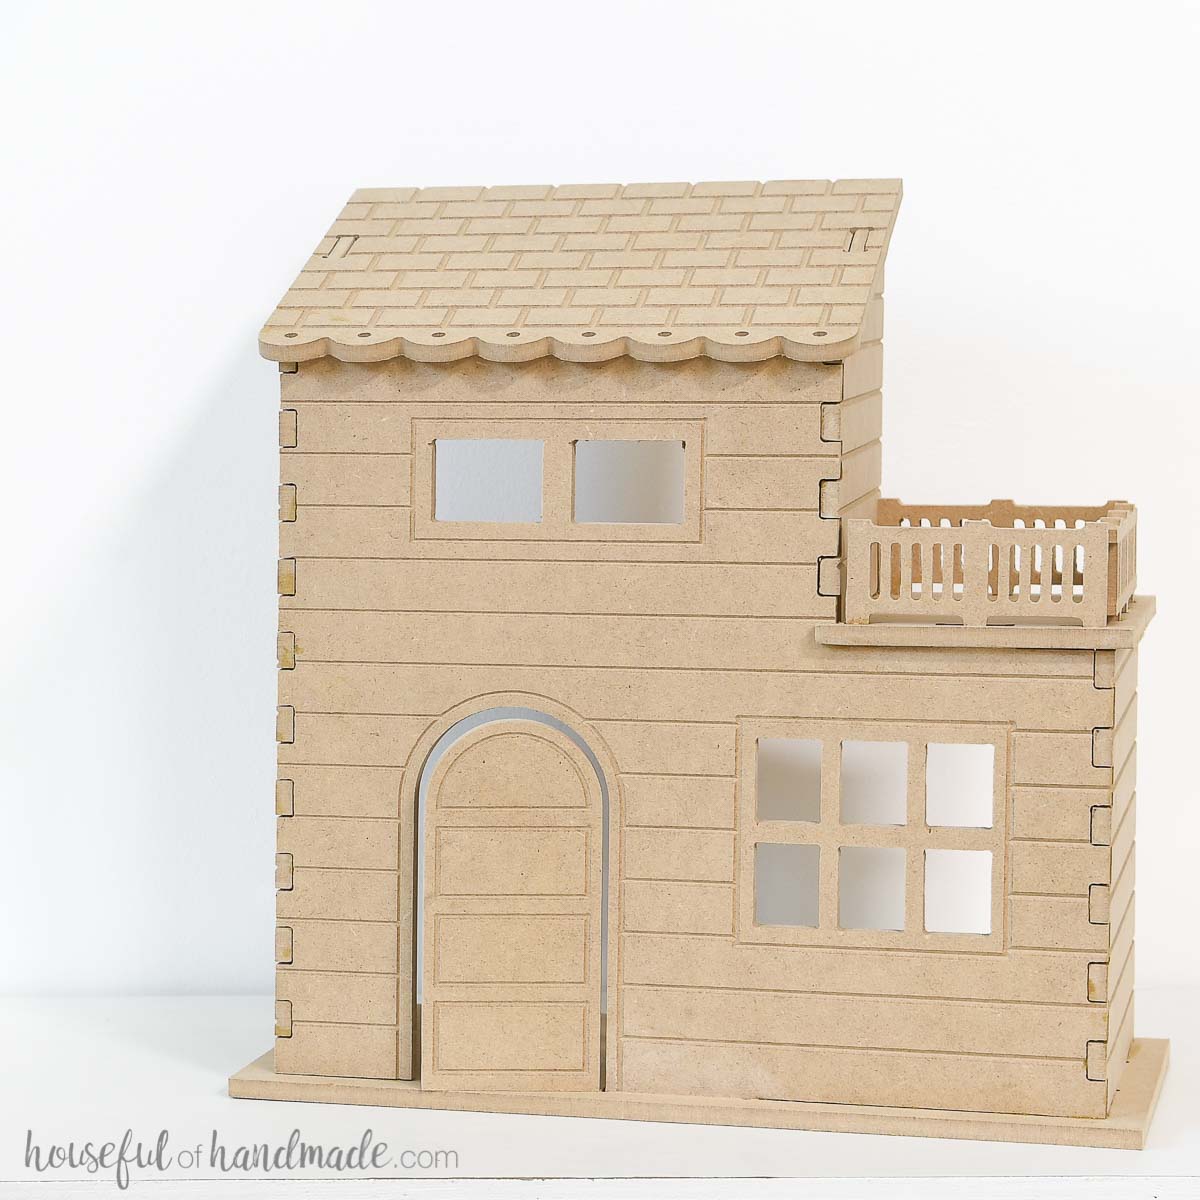
This tabletop dollhouse is the perfect gift and is made from inexpensive MDF.
Making a dollhouse for a gift is a big project. Or is it?
What if you could gift a dollhouse that you could make in an afternoon, with loads of details, and for less than $10 in materials?
You can with this easy MDF dollhouse. I partnered with Inventables to create a small dollhouse that is made from a small piece of 1/4″ MDF. All the pieces are carved out with the X-carve CNC machine and then they fit together with tabs and slots.
This post may contain affiliate links. As an Amazon Associate I earn from qualifying purchases. Click here to read my full disclosure policy.
There are so many things I love about this dollhouse:
- It can be cut out and shipped flat in case you want to gift it to someone far away.
- It is inexpensive to make.
- You can just as easily make 1 as you can 7.
- It is a blank canvas for you, or the person you make it for, to decorate.
- It fosters hours of creative play.
The list could go on, but let’s get right to the DIY! Or if you need a bigger dollhouse, check out these dollhouse build plans for 11″ dolls.
MDF Dollhouse Design
The idea for a small MDF dollhouse came when my daughter wanted to have a doll-themed birthday party. I thought, wouldn’t it be fun if I could make a dollhouse for each of the little girls to decorate themselves and take home as a party favor?
So I started designing. I created a dollhouse that could be carved out of 1/4″ MDF. Why MDF? Because it is cheap!

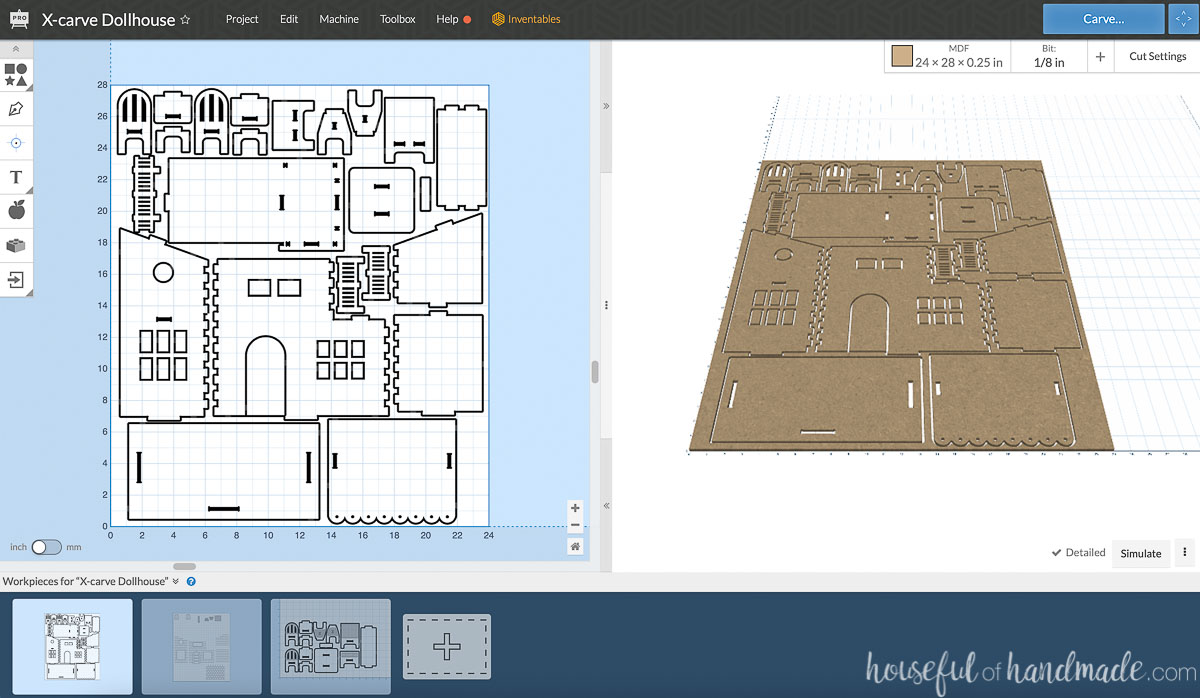
I bought a 4×8 sheet of MDF at my local lumber yard for $15. Each dollhouse only needed a 24″ x 28″ piece of MDF to cut out a 12″ tall dollhouse with a 12″ x 6″ base
I could get 7 dollhouses out of 1 sheet of MDF. That is the cheapest party favors I have ever purchased for a birthday! I also grabbed a small doll for each girl. This dollhouse is perfect for 4″-5″ dolls.
Adding Details to the MDF
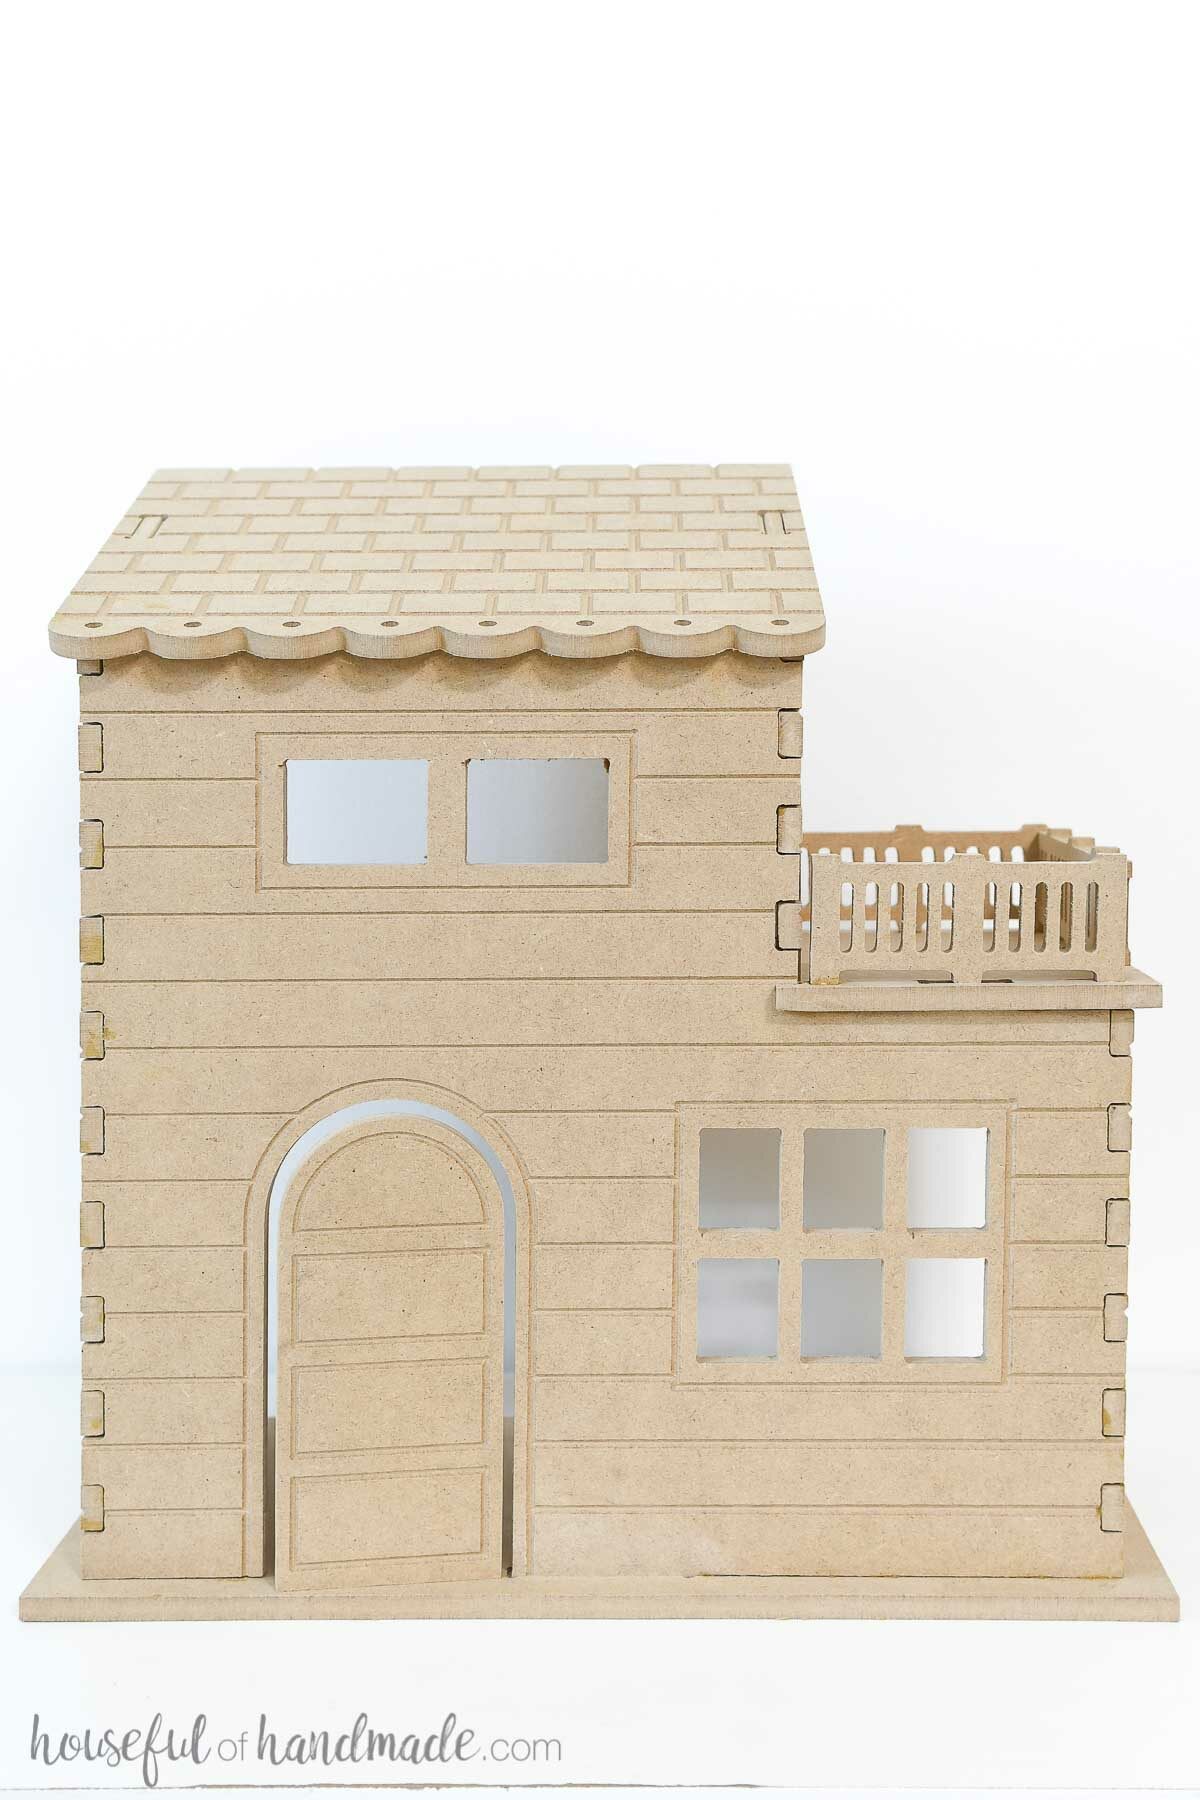
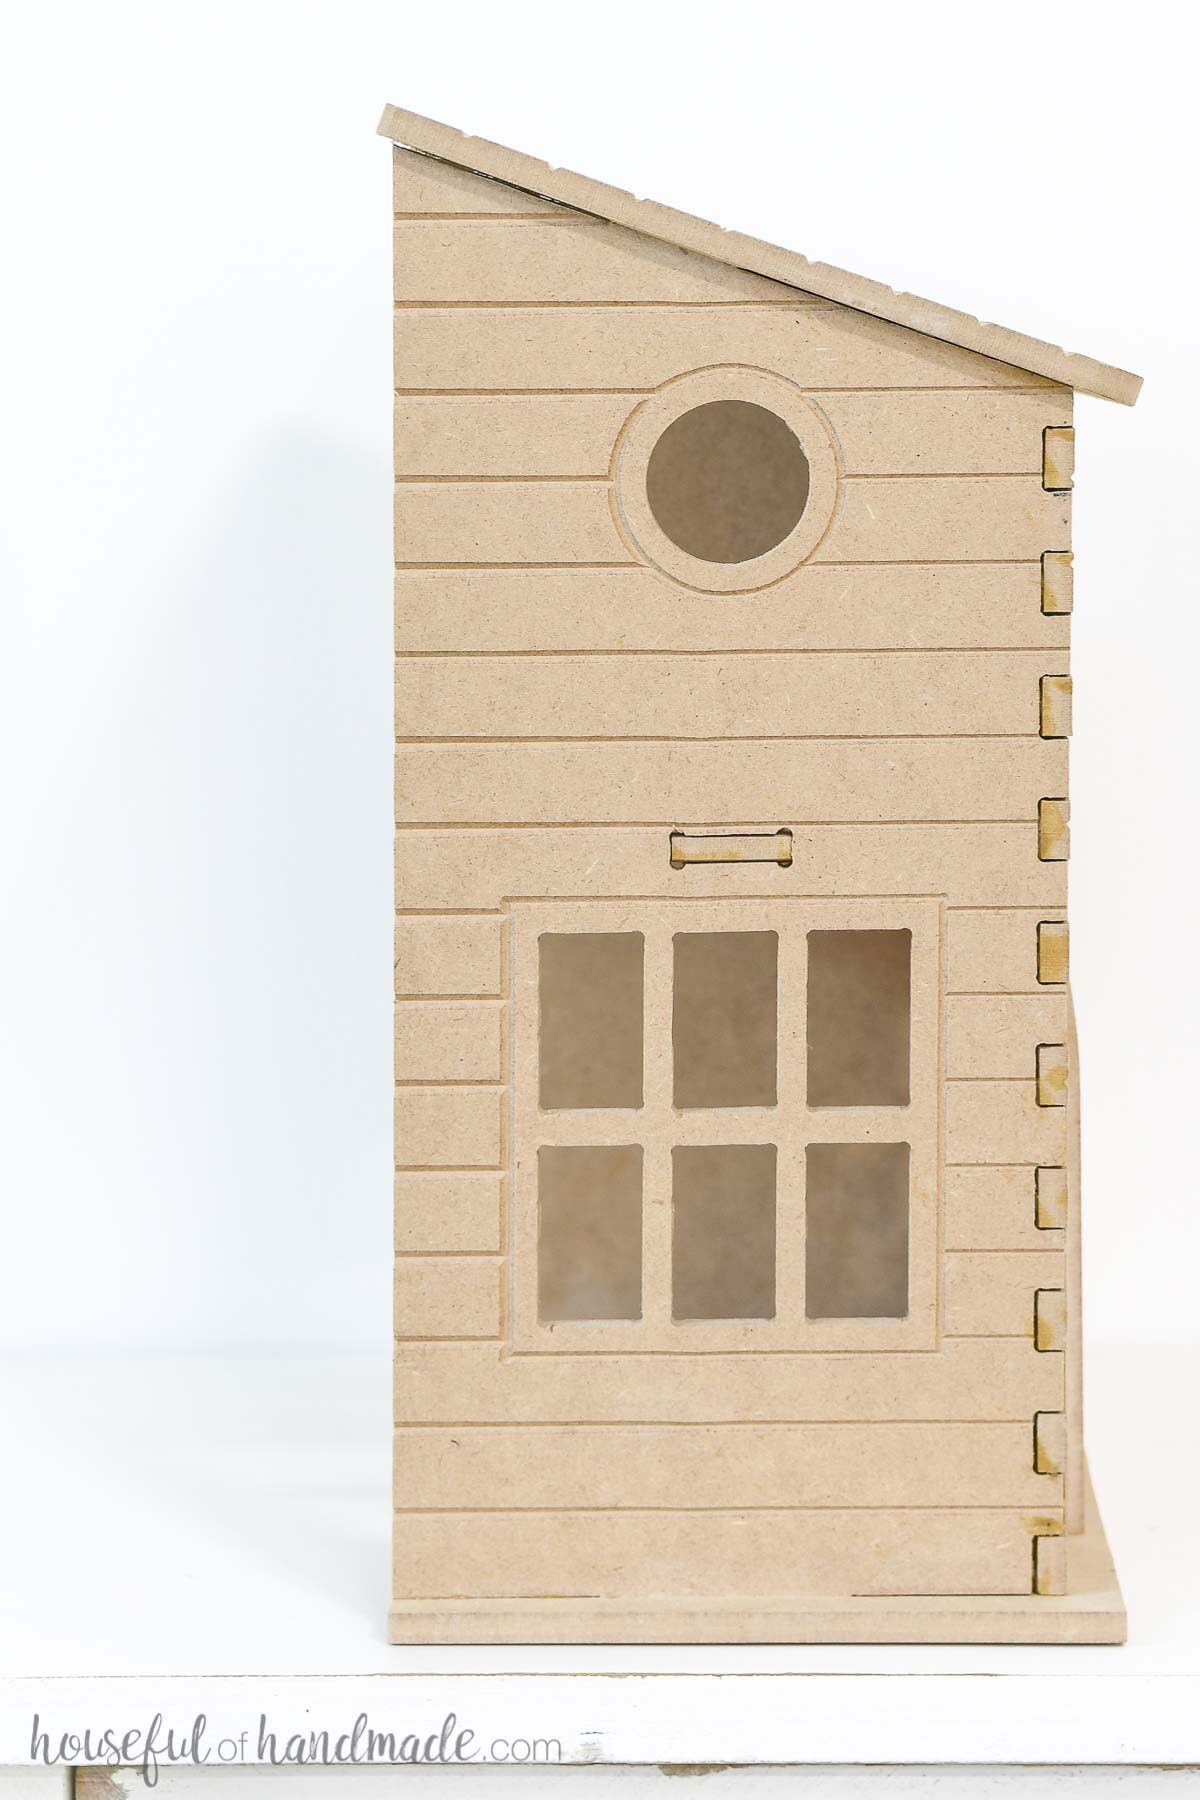
MDF is a great material for carving out the dollhouse. It cuts cleanly and takes paint beautifully. But it is boring!
So to add style to the dollhouse I used a v-carve bit to carve lines into the MDF. The v-carve creates perfect grooves in the MDF that add details to the house.
The door got panels, the windows got trim, the house received horizontal stripes. But my favorite is the roof!
The roof of the house got shingles carved with the 90 degree v-bit and they look amazing. The texture adds so much to the boring MDF that the cheap DIY dollhouse now looks fancy and expensive.
Dollhouse with Furniture
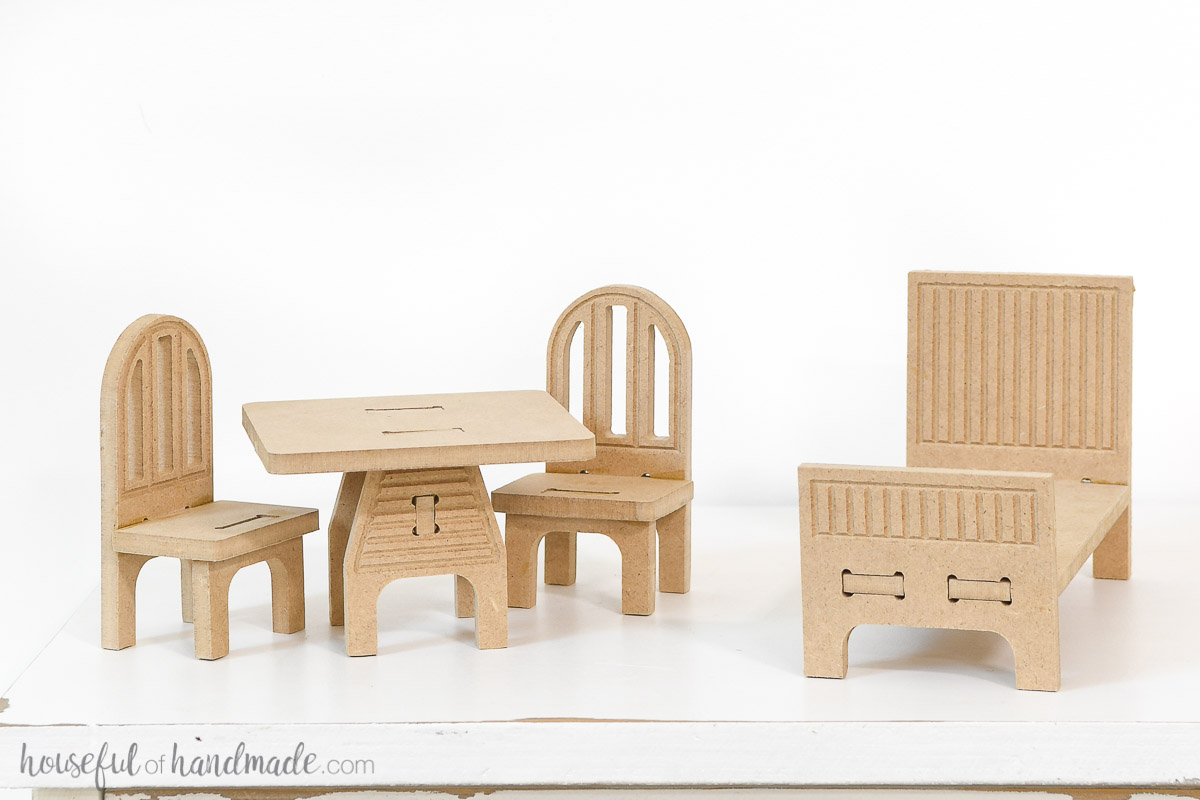
Of course I couldn’t just cut out just a dollhouse. Every dollhouse needs furniture too!
So I used some of the space around the dollhouse pieces on my 24″ x 28″ piece of MDF for a few pieces of furniture. The furniture also has some of that great v-carve detail on it to really make it special.
The wooden dollhouse furniture is assembled the same way as the dollhouse. There are tabs that fit into slots. So easy!
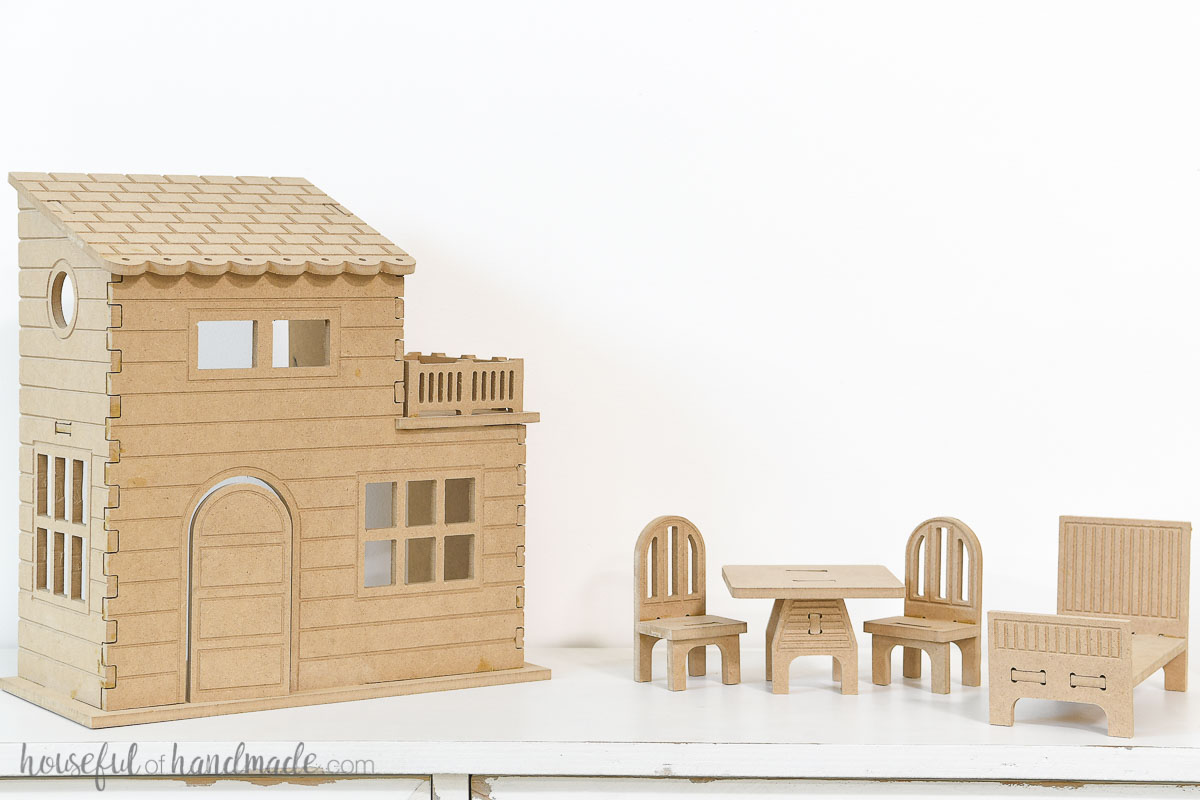
The furniture is a little big for the size of the dollhouse. It works perfectly for little hands to decorate and play with. But in case you want furniture more to scale with the dollhouse, I included designs for that too.
WHAT IF I DON’T HAVE AN X-CARVE?
There are so many amazing things you can make with an X-carve. It would be a great investment if you want to start your own business or Etsy shop selling wood decor items.
But if you do not have an X-Carve, you still have options.
- Some high schools, libraries, and maker spaces have X-Carves you can use. Use this link to find a location near you.
- You could cut out the wood pieces with a scroll saw and router the details or paint them on.
- Save up and buy an X-carve! There are so many amazing things you can make with it. And you can always use it to make items to sell.
Either way, start by signing up for a free Easel account to start designing your own DIY light. You can play around with the detailed preview to show you how it looks carved out of your wood with different bits.
How to Make the DIY Dollhouse
Tools needed:
- X-Carve with Easel Pro account
- If you do not have an x-carve, find a location near you where you can use one.
- 1/8″ straight bit
- 90 degree v-carve bit
- Digital Calipers
- Utility knife or chisel
- Clamps
Supplies:
- 24″ x 28″ piece of 1/4″ thick MDF
- Wood glue
- Sandpaper
Carve the dollhouse pieces
You can use the designs I created for the MDF dollhouse by first, signing up for a free Easel account, then clicking on the link below to open the file. You will need an Easel Pro account to use the V-carving feature.
When you open the link, it will not be editable unless you make a copy.
In the file, there are 3 different workpieces on the bottom: one for the carved pieces, one for the v-carve details, and the third I added with smaller sized furniture.
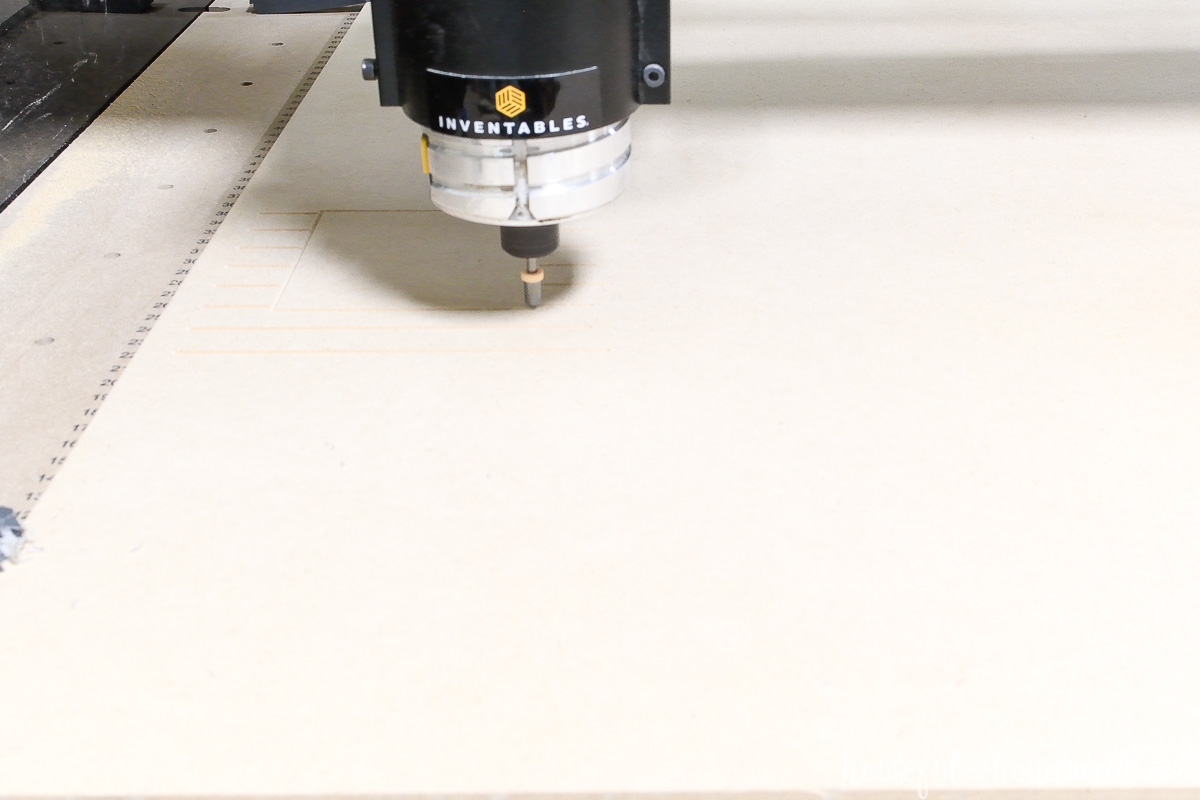
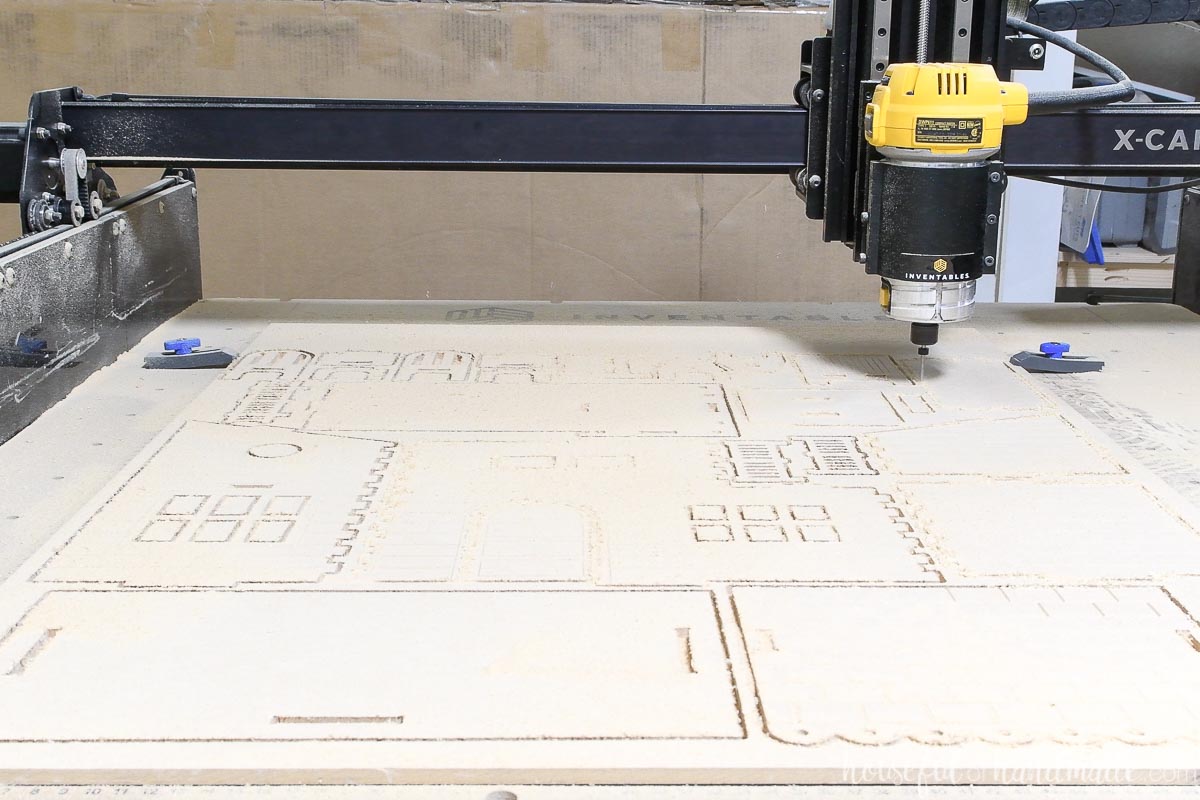
Secure the piece of MDF to the wasteboard of your X-carve. Add the v-carve bit into the router and walk through the carve set-up in the Easel software.
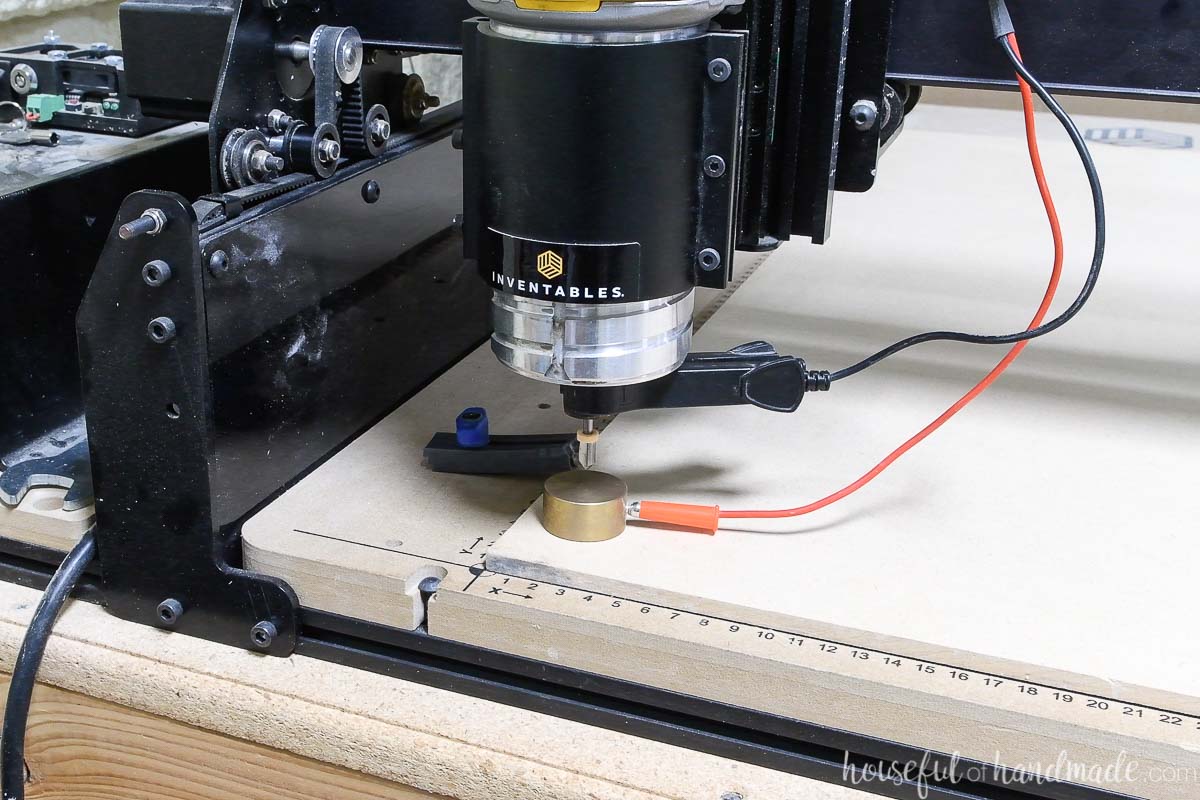
Then watch the v-bit carve all the beautiful details on the MDF dollhouse.
Next you will need to swap out the bit for the 1/8″ straight cut bit.
Run through the carve set-up again. You will need to re-zero the Z axis but make sure to use the same XY zero.
EXPERT TIP:
If you have troubles with your machine jogging when switching bits out mid-carve, set you X Y zero position to the homed position on your machine. That way if you do jog it, you can re-home the machine and be back at the correct X Y zero.

Watch as the X-carve does all the work cutting all the pieces out for your DIY dollhouse!
Remove the pieces from the board
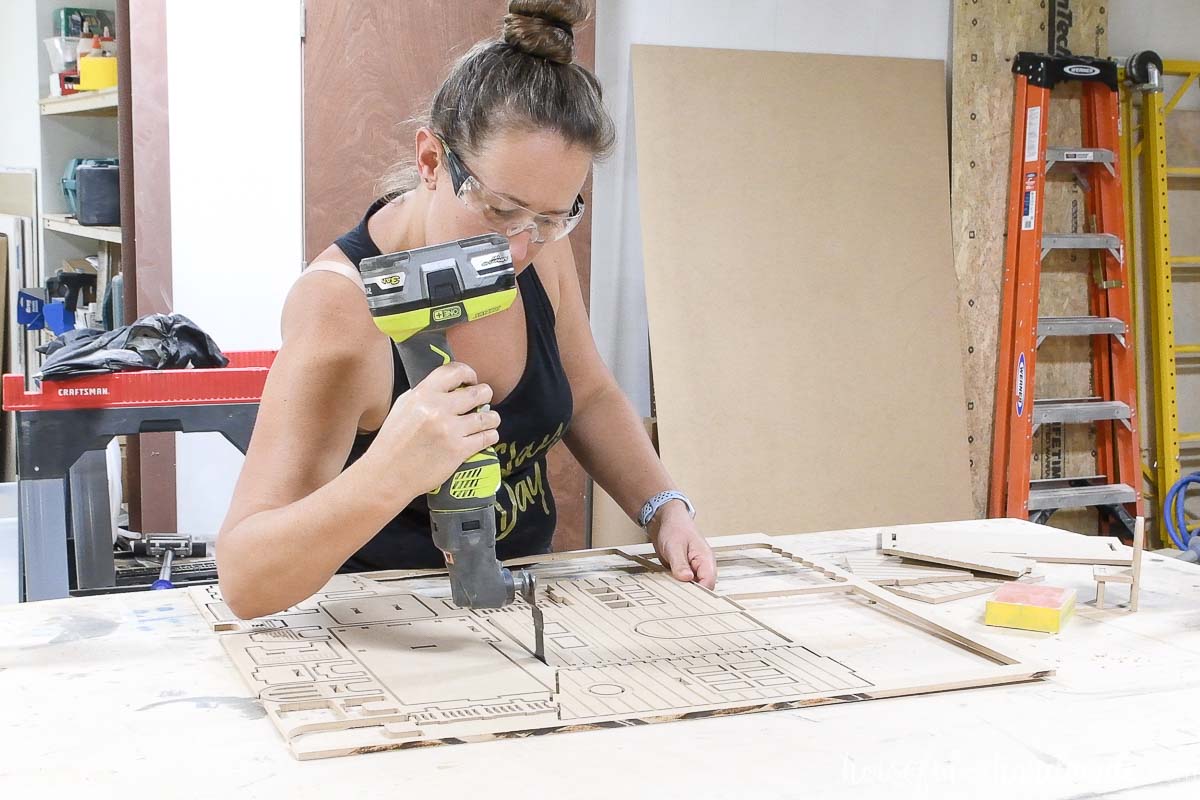
When the cut is complete, remove the MDF sheet from the wasteboard. Cut through the tabs holding the pieces in.
EXPERT TIP:
Use an inexpensive multi-tool with a straight cutting blade to make quick work of cutting through the tabs.
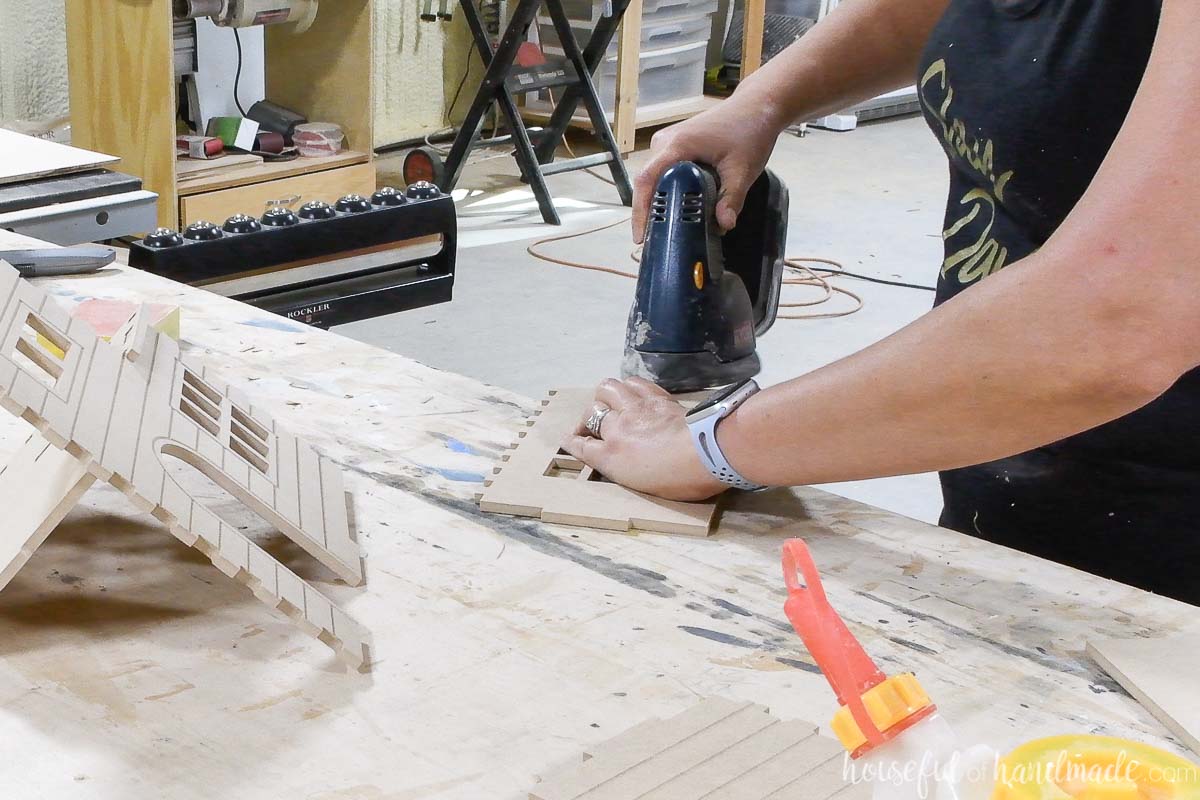
Give the pieces a light sanding where needed.
For my dollhouse, the bottoms of some of the pieces had a slight bit of MDF still attached that was easily sanded off with a fine grit sanding block.
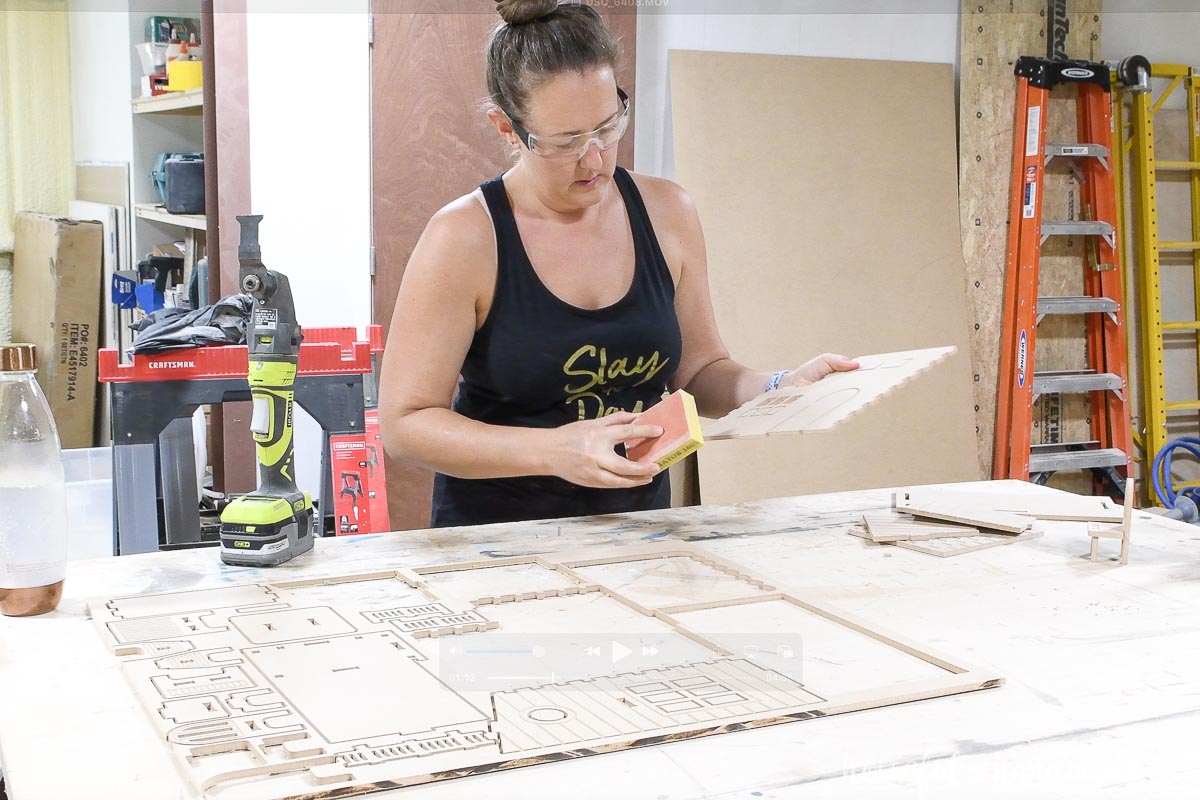
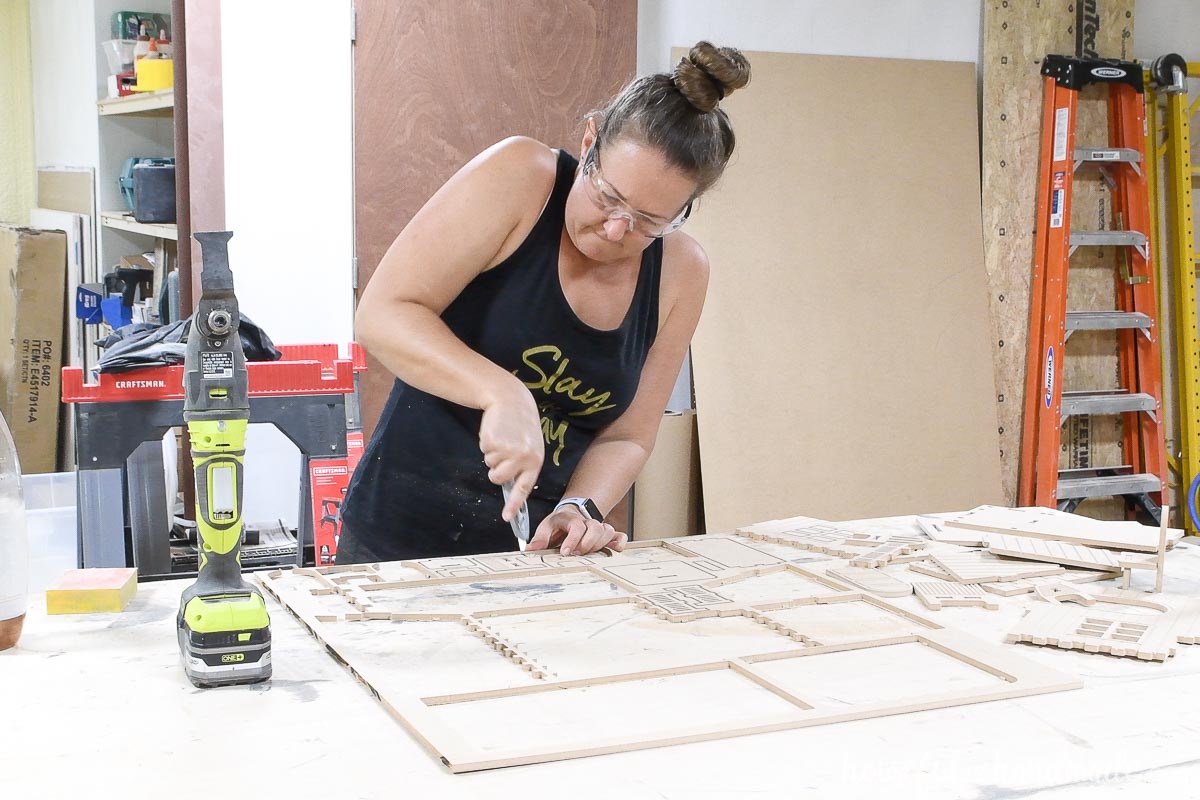
Also, some of the pieces did not carve completely through the MDF because there were a few thicker spots. The thin bits of MDF were easy to cut through with a utility knife.
Use the side of the piece as a guide and carefully slice the MDF through.
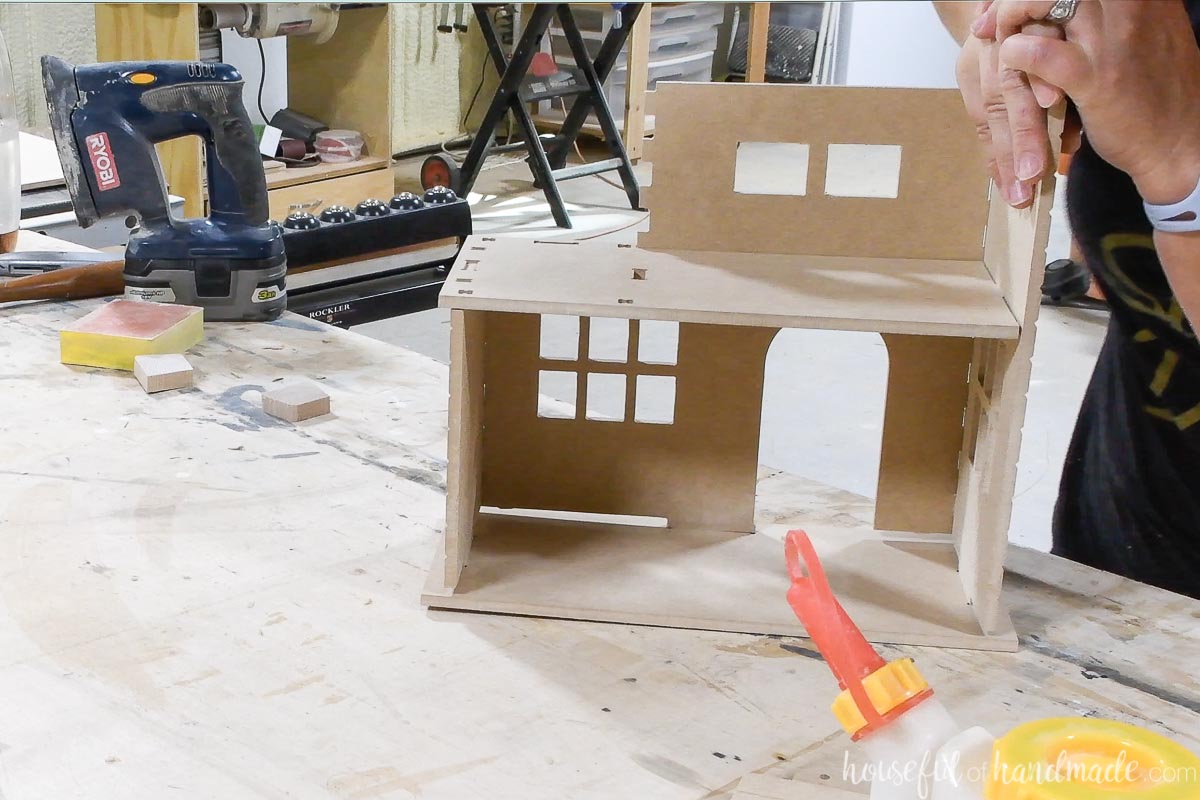
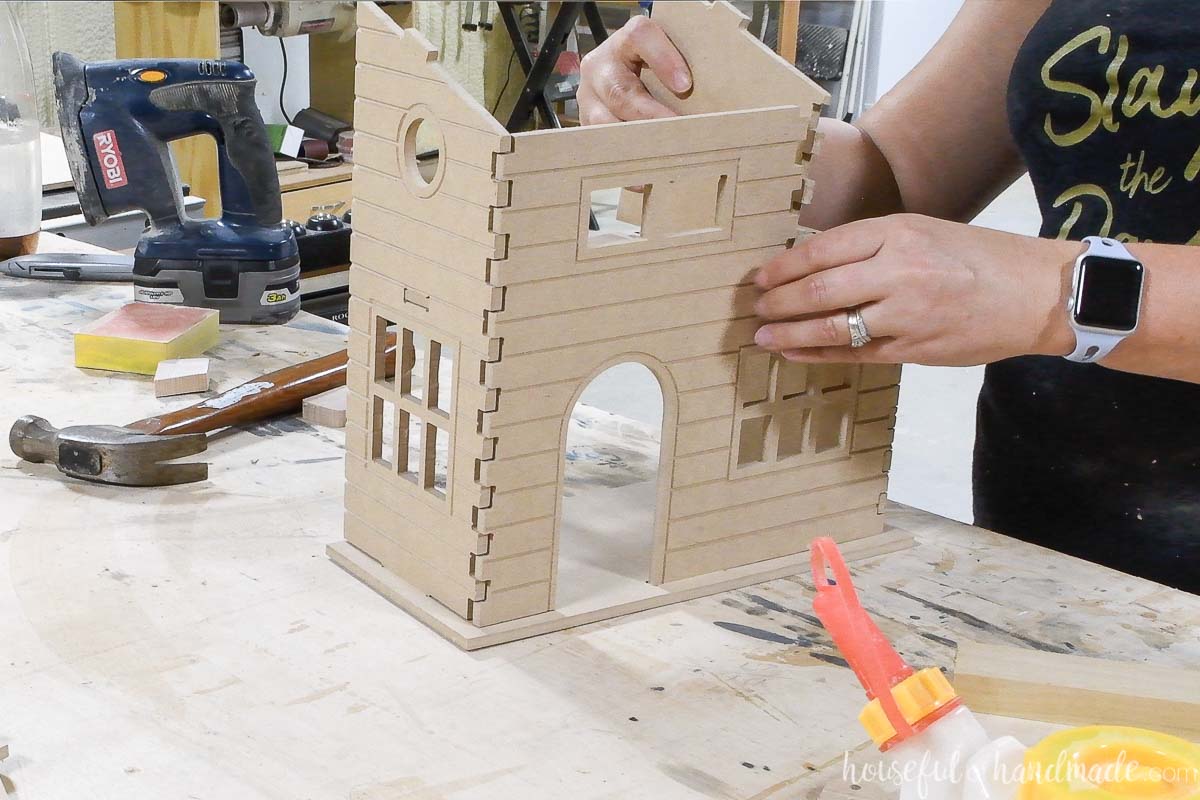
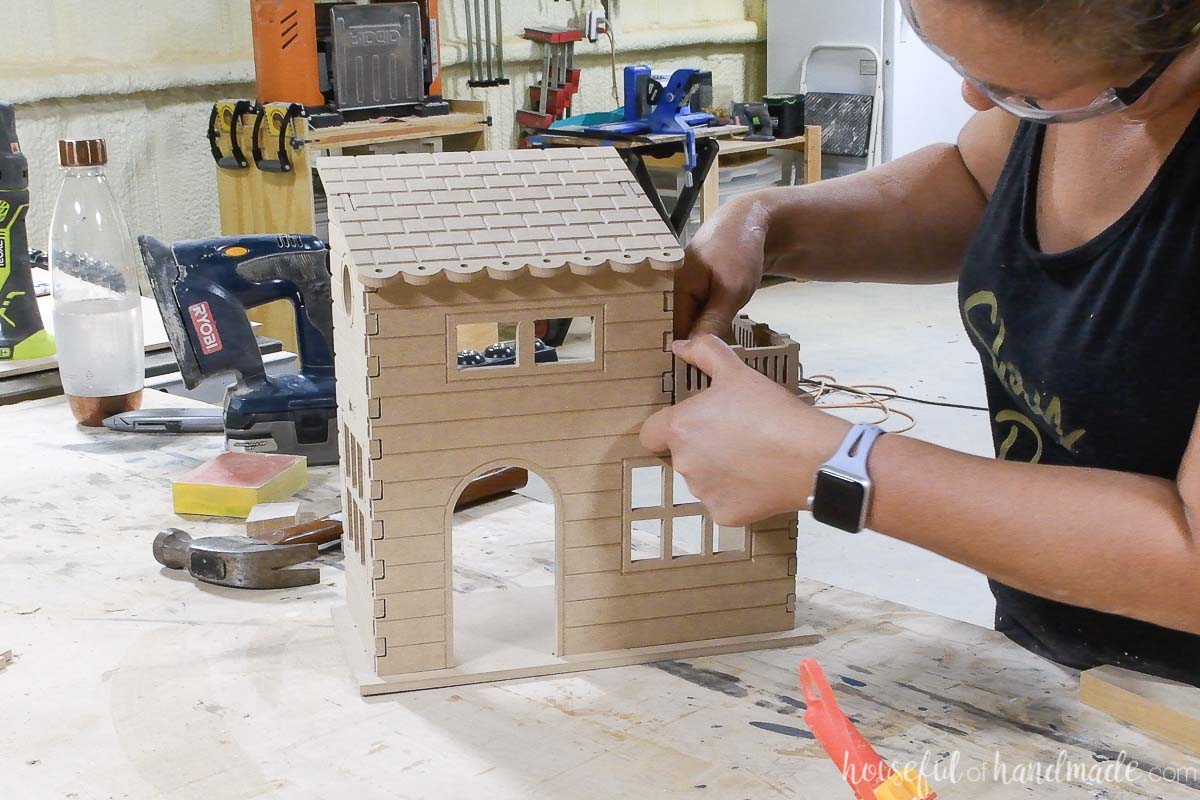
Dry fit the dollhouse pieces
You’ll want to dry fit the MDF dollhouse pieces together before glueing.
Here is the way I designed the pieces to fit together with the least bit of struggle.
1- Attach the second floor to the top of the dollhouse front.
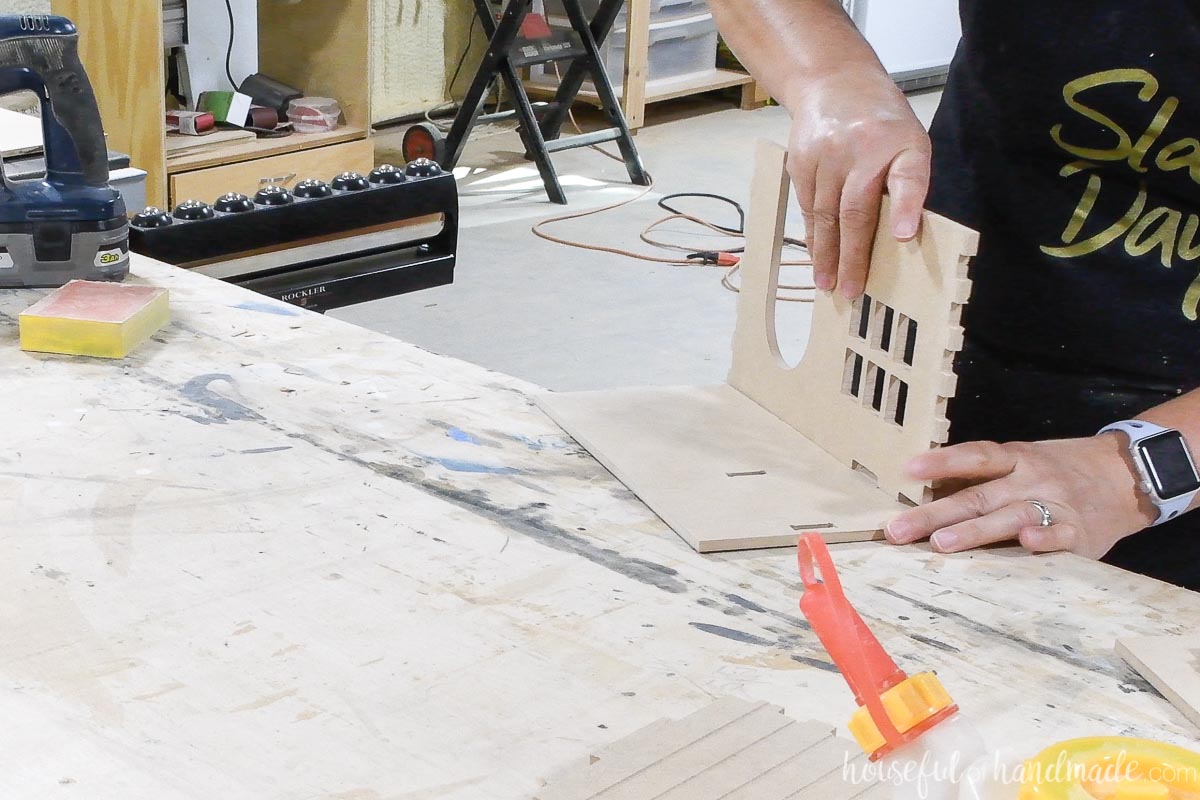
My MDF was slightly thicker than 0.25 inches. When I check the thickness with my calipers, it was anywhere from 0.255 to 0.268 inches thick.
Since the slots for the tabs are made to work with 0.25 thickness they did not slide in at first. I used a corner sander to slightly sand down the tabs on each piece before assembly and it worked perfectly!
2- Attach the tall side to the house front and second floor.
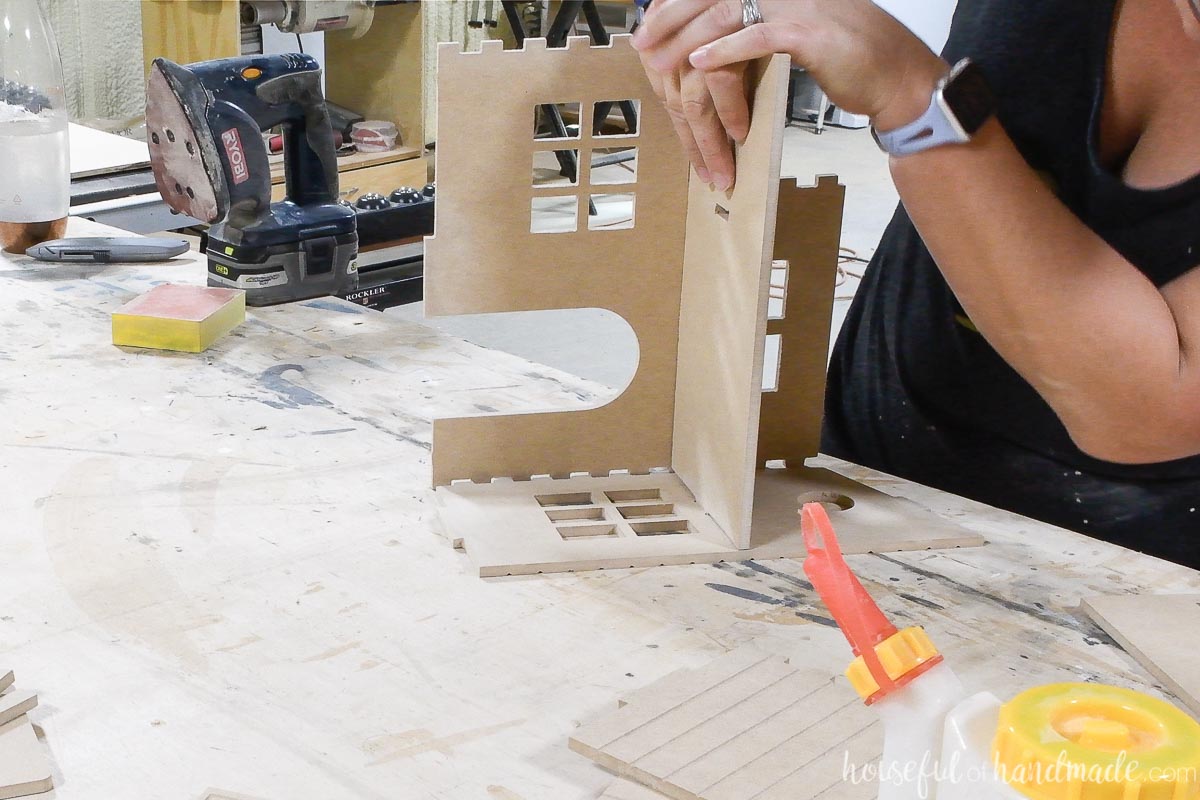
3- Attach the short side piece into the house front and under the second floor.
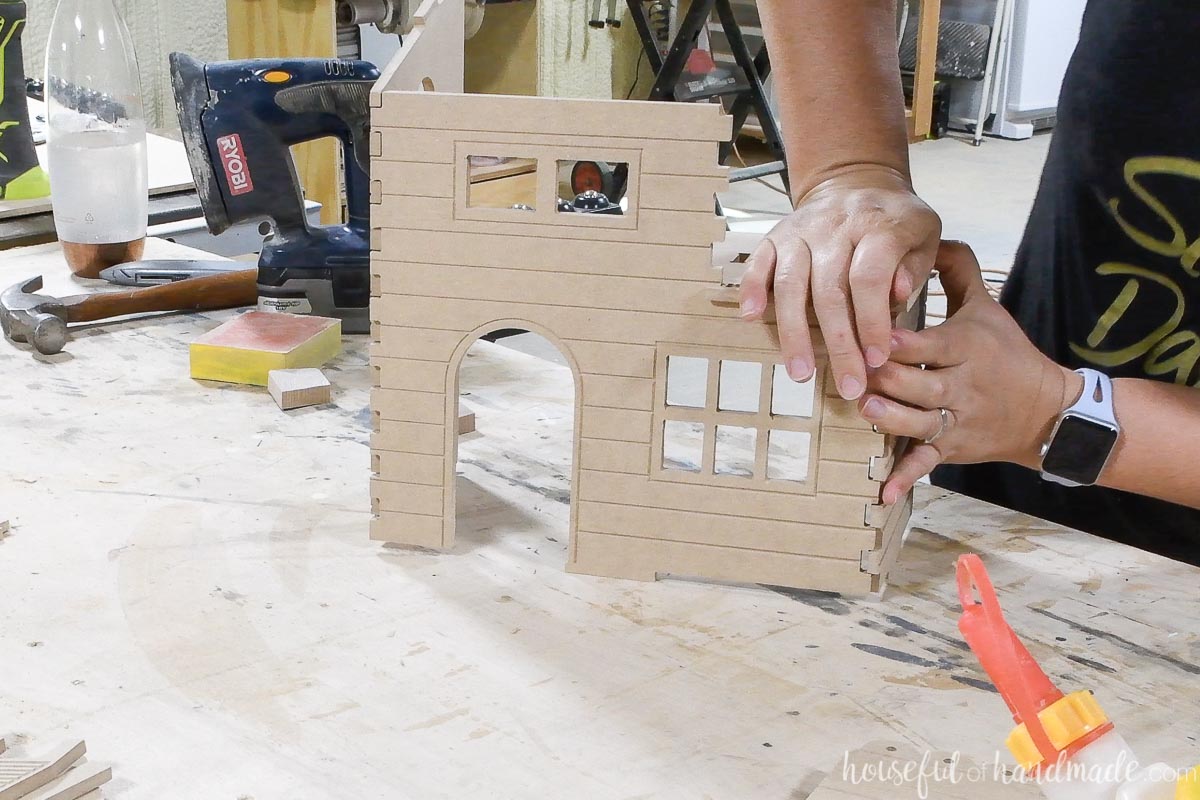
4- Press the house front and sides into the base.
5- Attach the second floor side piece.
6- Attach the roof.
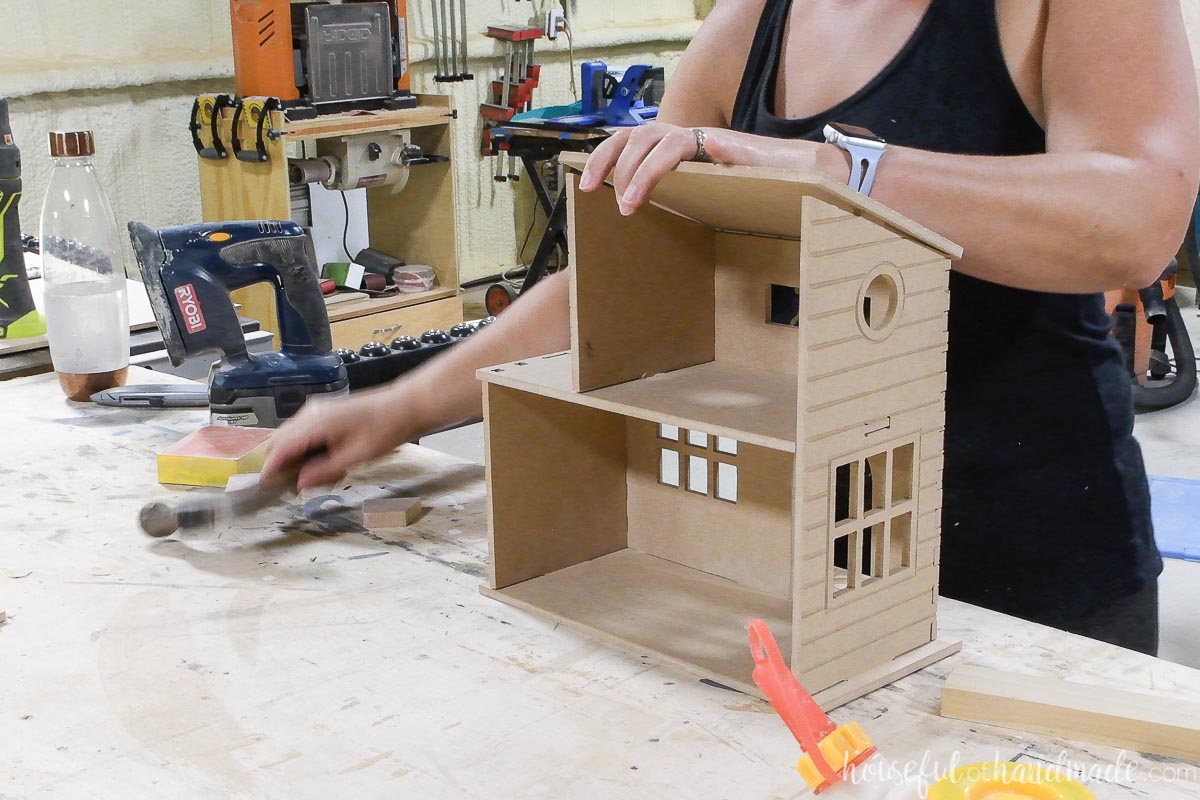
You can use a scrap of wood and a hammer to tap in any tabs that are sticky. Also, sand back more if needed so the tabs are seated fully in the slots.
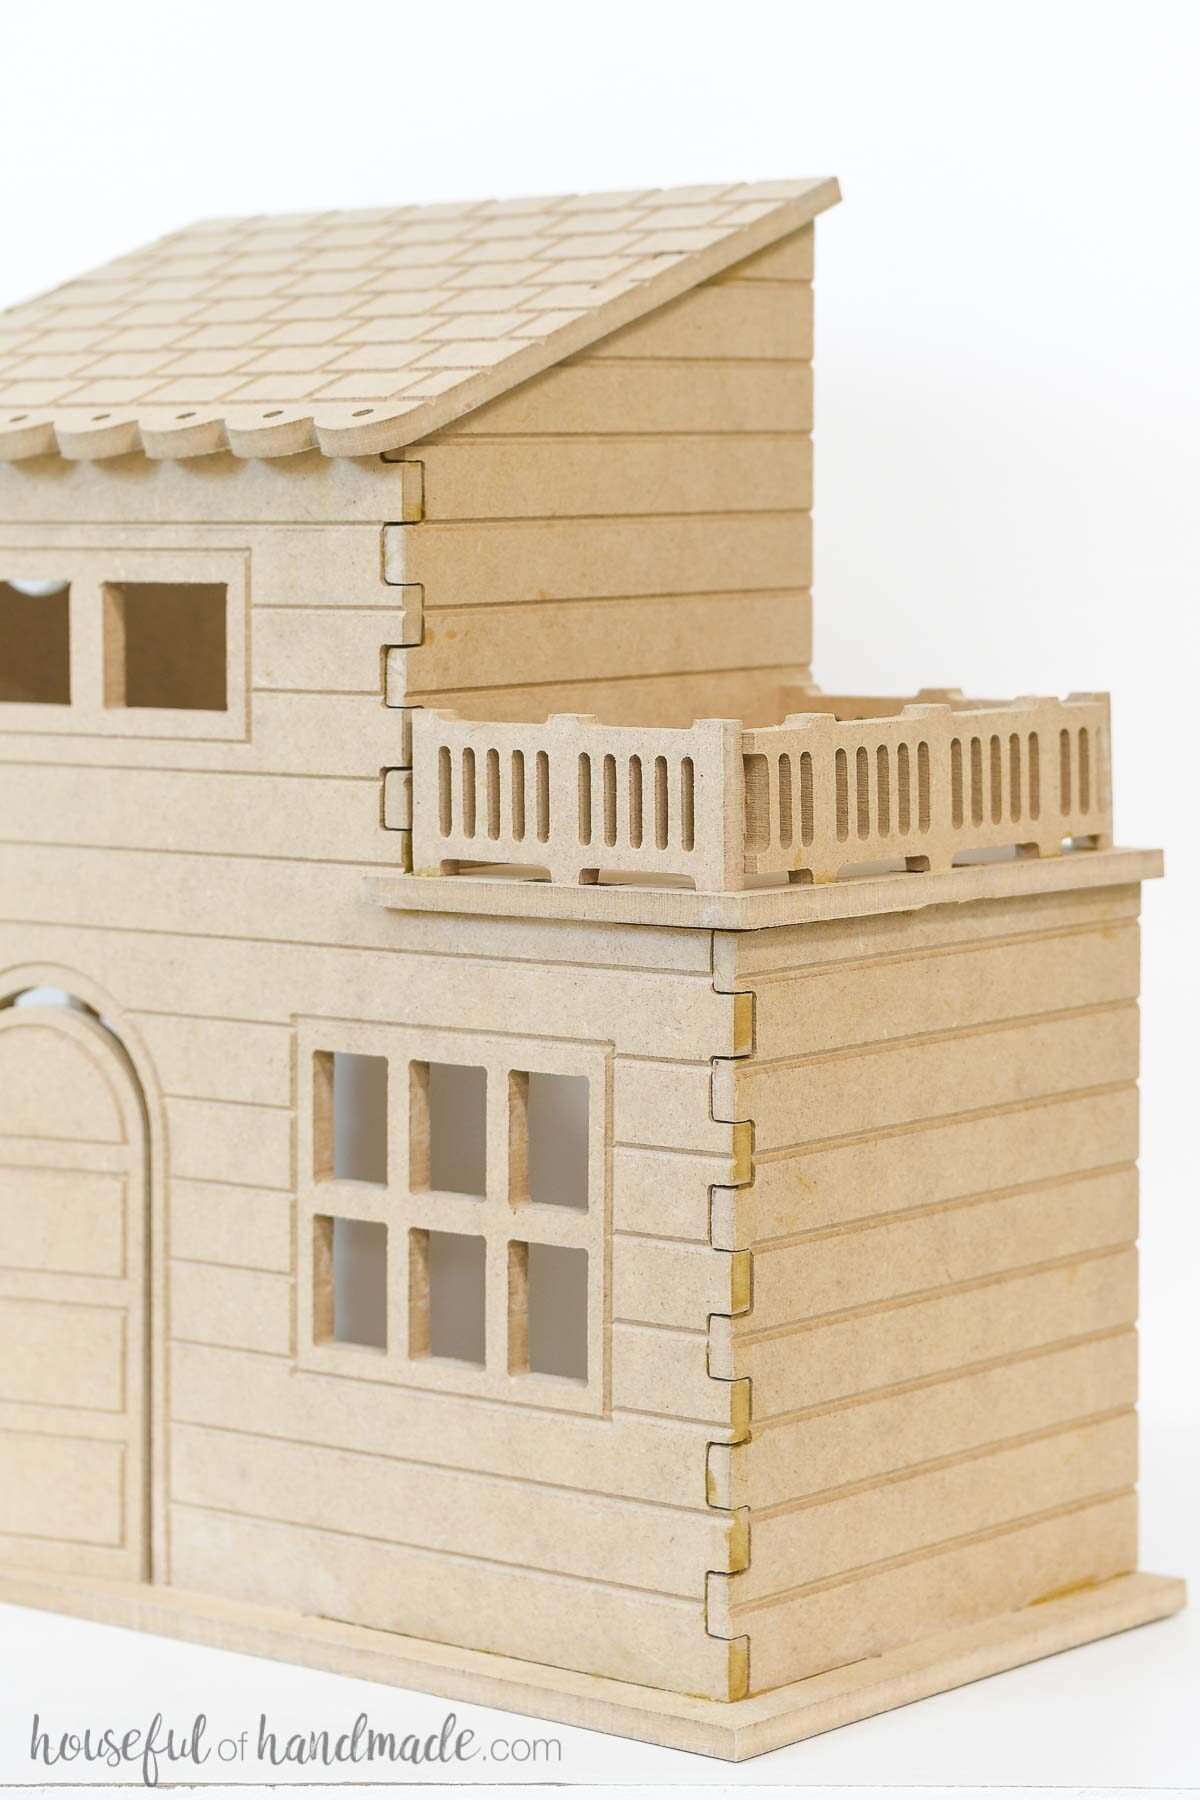
7- Press the railing into the slots on the balcony.
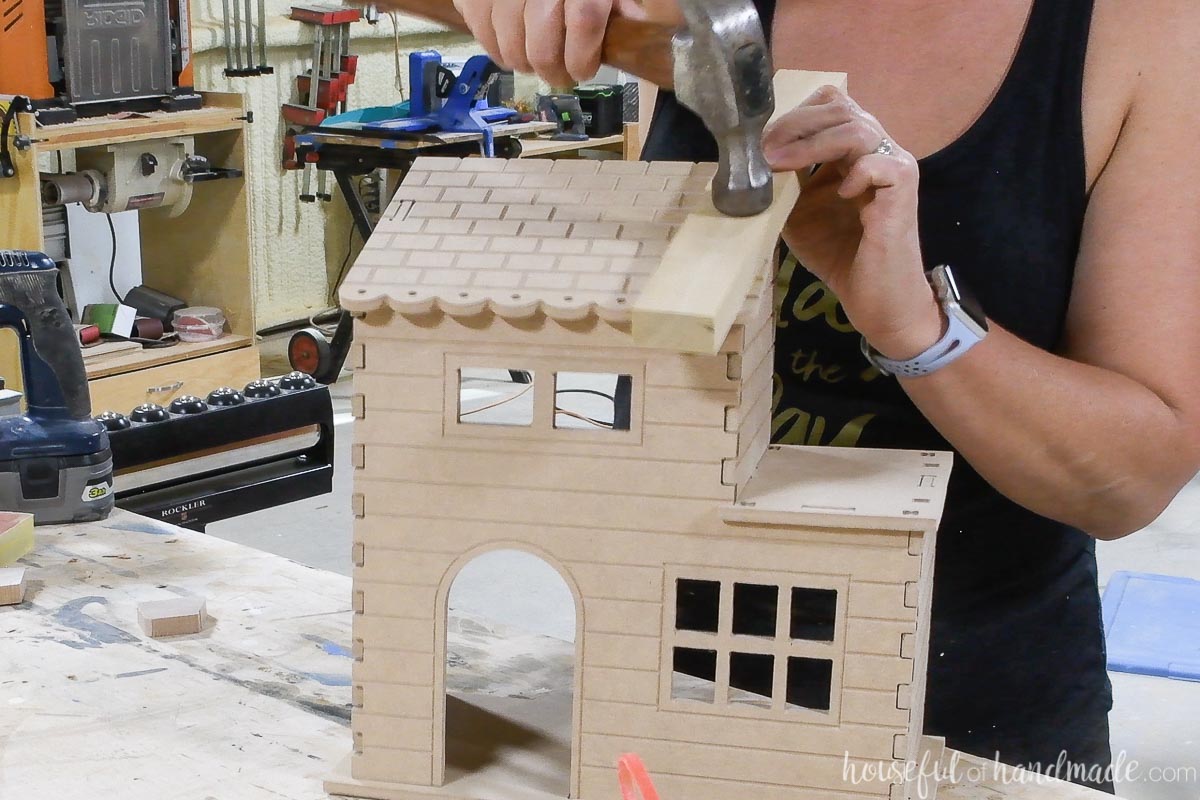
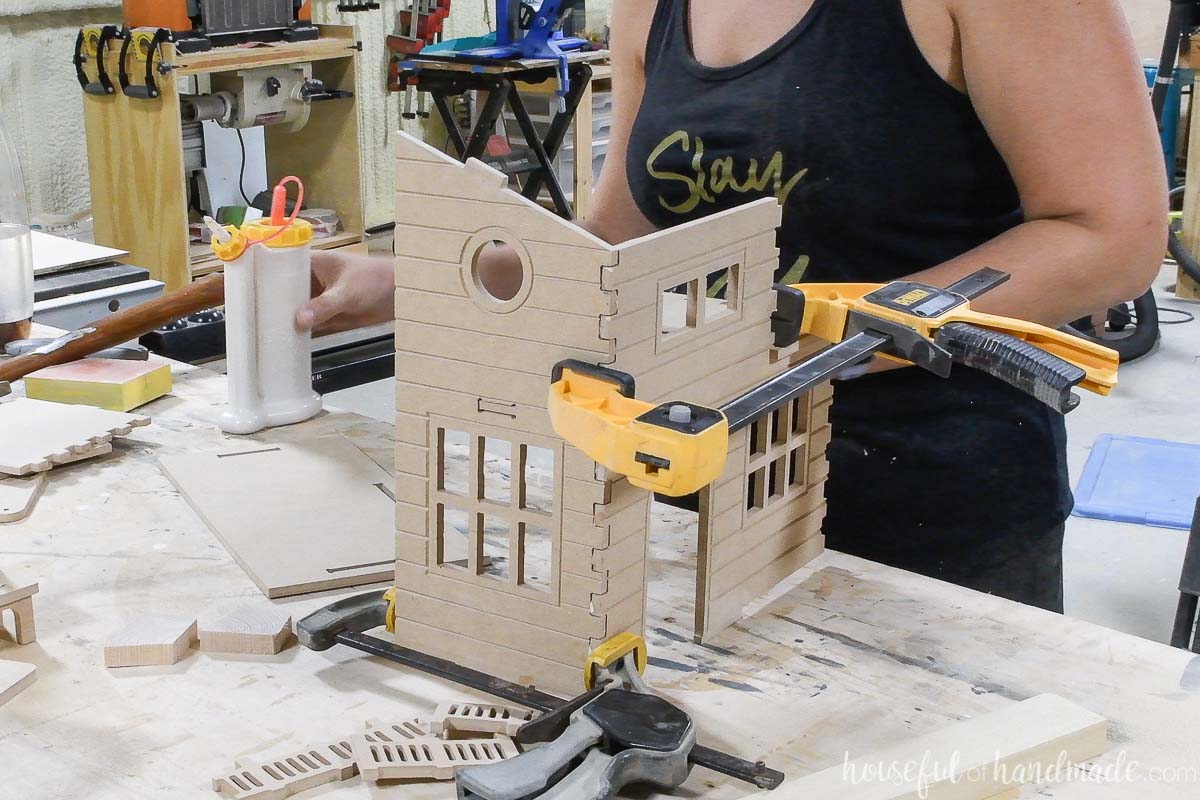
Glue together the MDF pieces
Once you are happy with the dry fit, it is time to take it all apart and glue it together.
Make sure to add glue to all the notches on the corners of the front and side pieces as well as the edges of the boards that come together around the slots.
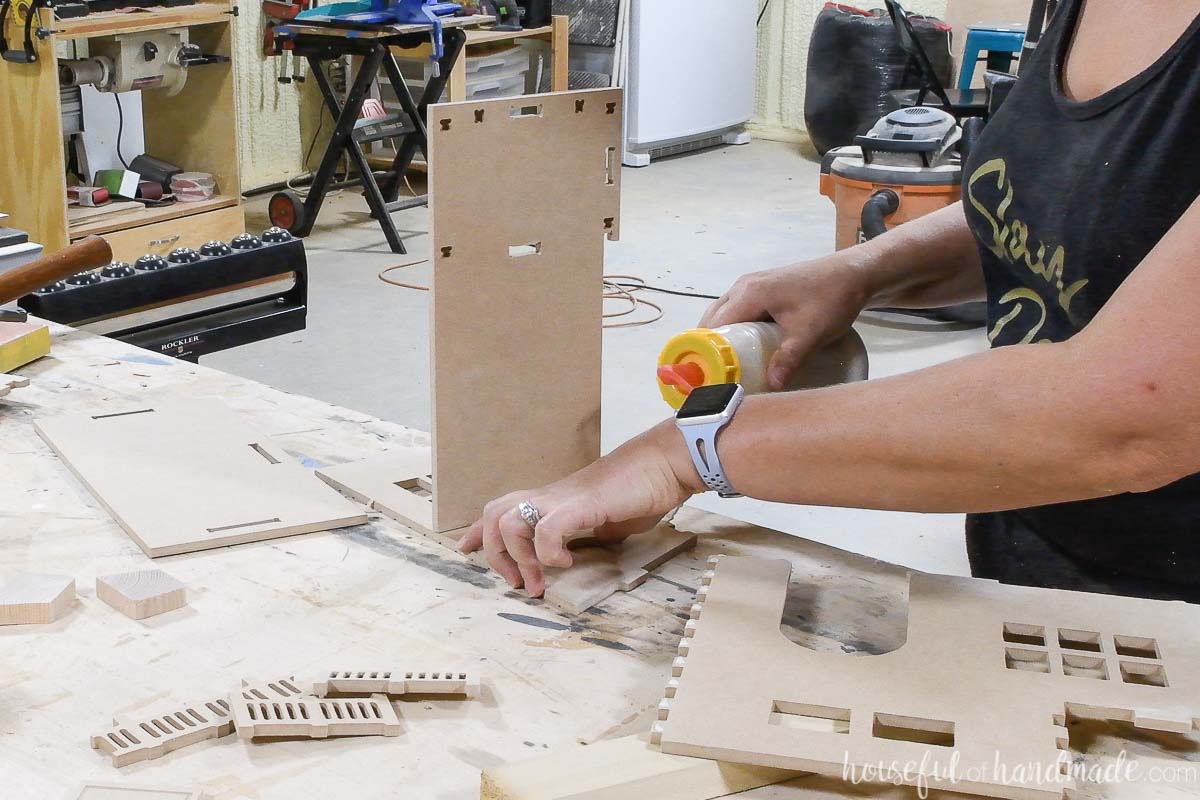
Carefully put the pieces together with wood glue.
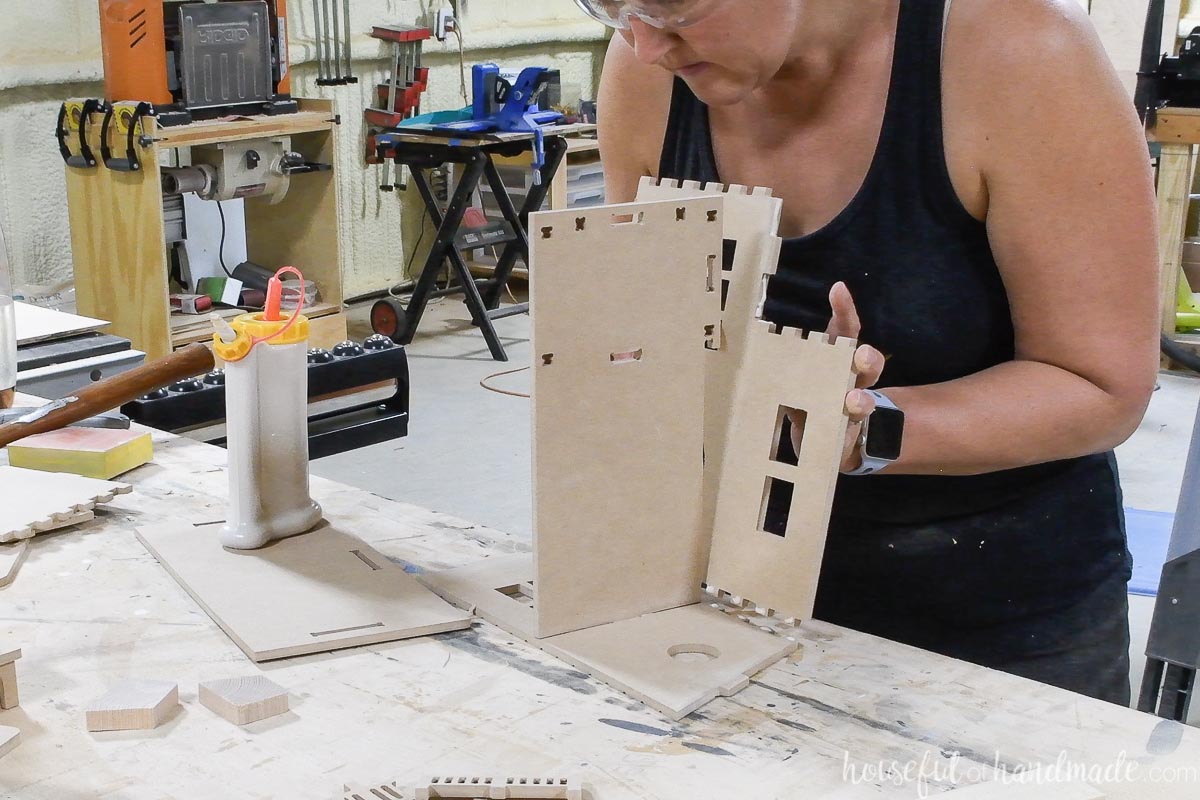
Use clamps to hold them together tightly while the glue dries.
Use your hammer to tap the pieces together the same as you did in the dry-fit.
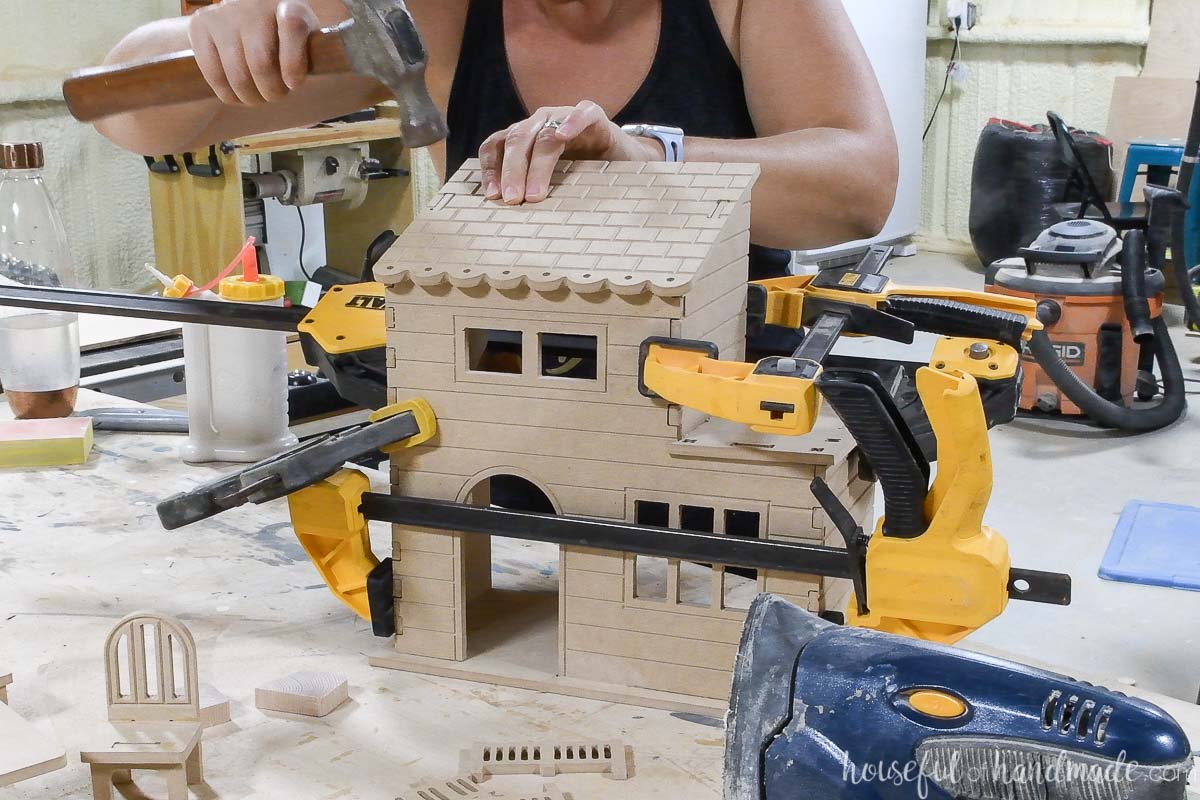
Let the glue dry overnight and then remove your clamps.
Assemble the dollhouse furniture
The file also comes with a bed, a table and 2 chairs for your dollhouse.
To assemble the furniture, insert the tabs into the slots. Secure with wood glue the same as you did with the house.
Make sure the tabs are fully seated in the slots to keep the legs from being uneven.
Make sure the carved details in the furniture are on the correct side when you glue them together.
Now your dollhouse is all done! It is ready for paint and decor.
Have fun being creative and decorating your new dollhouse. I think I am going to keep this one for myself and enjoy decorating it for me!
Happy building!
