
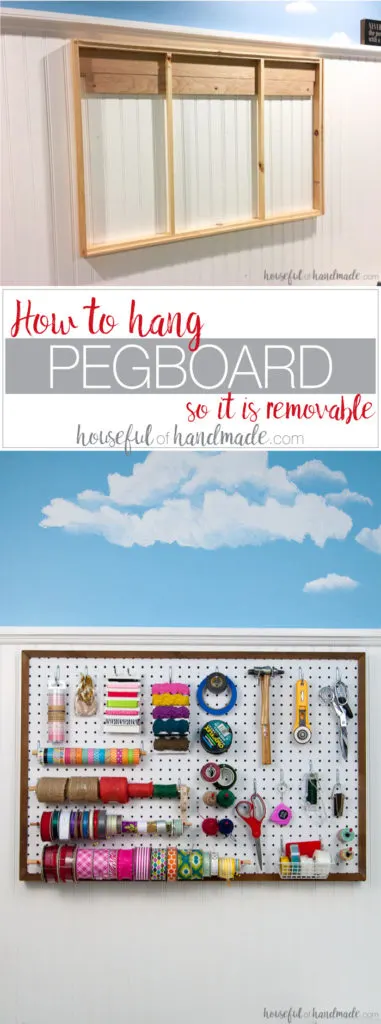
If you haven’t use pegboard to organize your sewing or crafting supplies, you should! Seriously, it was a huge game changer for me when I created my pegboard in my old craft corner.
Having my scissors, washi tape, ribbons and other frequently used crafting supplies within arms reach, always ready to go, makes crafting so easy.
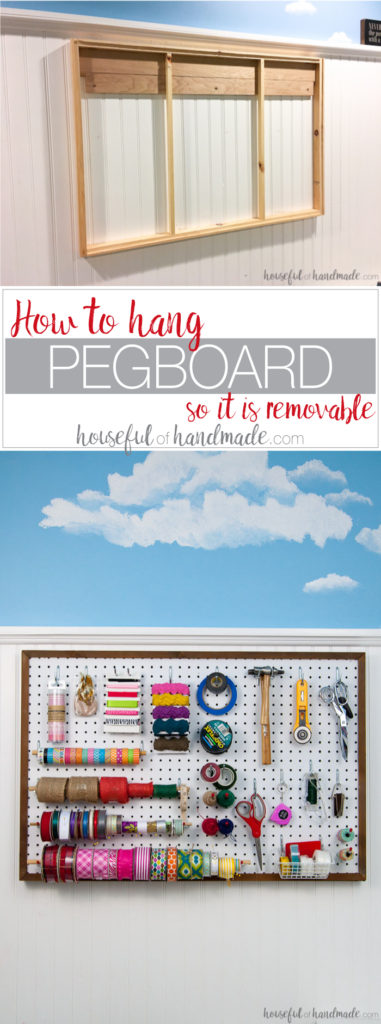
But when I moved from my craft corner and desk in the living room to my new office & craft room, I knew I wanted my pegboard hung so it wasn’t permanently attached to the wall. With a few extra steps, I figured out how to hang pegboard so it is removable (or easily moveable).
This post may contain affiliate links. As an Amazon Associate I earn from qualifying purchases. Click here to read my full disclosure policy.

If you missed yesterday’s post, I am working on redoing my new office & craft room this month by only spending $100. Yikes! That is a very small budget for everything I have planned.
Luckily, I already had this pegboard hanging up in my old craft corner. I just needed a way to bring it into my new space and pretty it up. I am happy to report, I managed to figure out how to hang pegboard so it is removable and only spent $0!

If you do not have an old piece of pegboard and a pile of scrap wood lying around, it may cost you a little bit to make this awesome craft room storage solution. But it is still very cost effective.
You can find pegboard hooks in packs for a great price. Also, I built the frame for this pegboard to hang on out of 1x2s and 1x1s which are less than $2 for an 8′ board. To build my 3 foot by 2 foot pegboard, I would have needed to buy 1 1×1 and 2 1x2s (and I would have lots leftover for another project).

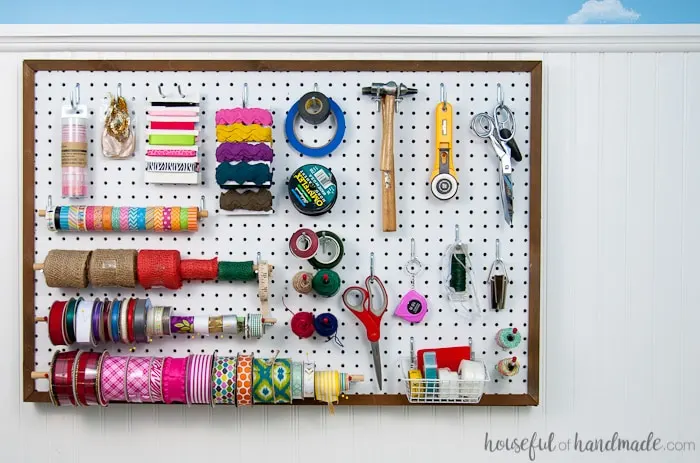
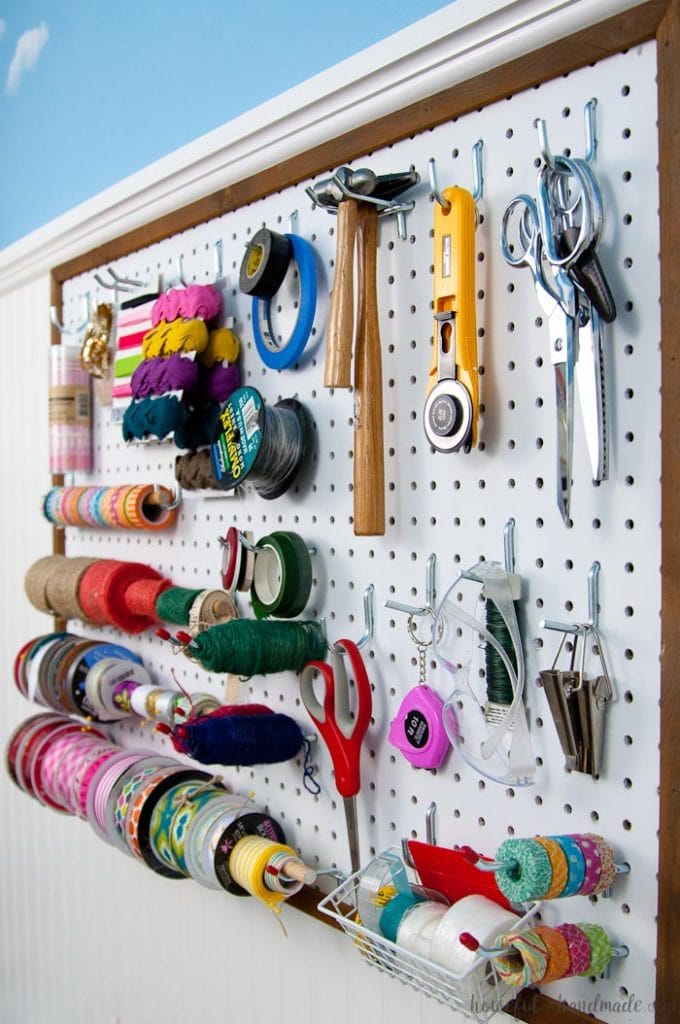
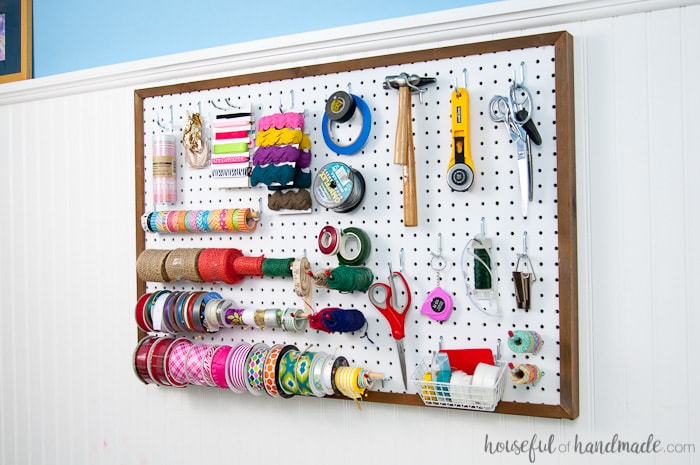
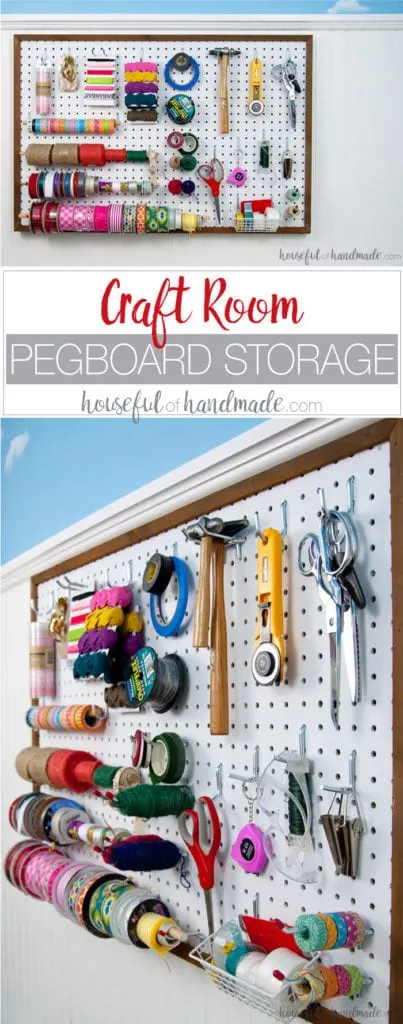
And can we just talk about how pretty the pegboard looks loaded with craft supplies and tools? This roll of brightly colored washi tape really makes me happy.

Having my special sewing scissors (that NO ONE is allowed to touch but me) always ready to go really makes crafting easier. I also hang up my rotary cutter that I use for everything.
Seriously, this is one of my favorite tools for cutting. You can use a ruler and quickly cut clean lines on paper, cut out patterns in way less time than using conventional scissors, and more. And those blades are so sharp so they cut easily (and replace easily after lots of use).

Now that my pegboard is back in business, I’ve got a few more work spaces to build so that I can be super productive in my new office & craft room. Make sure to stop by next week when I share how I’ve turned a couple cheap white bookcases into the perfect mobile work table!
There are going to be so many budget friendly ideas for this space, sign up for my newsletter so you don’t miss out on anything!
How to Hang Pegboard that is Removable
Supplies:
- Pegboard
- Wood: the amount of wood will depend on the size of your pegboard. Measure your pegboard and see how to much wood you will need in the tutorial.
- 1×2 boards
- 1×1 boards
- 1/2″ plywood
- Wood glue
- Finishing nail gun and nails
- Table saw
- Miter saw
- Clamps
- Stain or paint
- Spray paint is best for covering your pegboard so that it doesn’t fill up the holes you need for your pegs.
- Pegboard hooks
- Optional: lots and lots of craft supplies
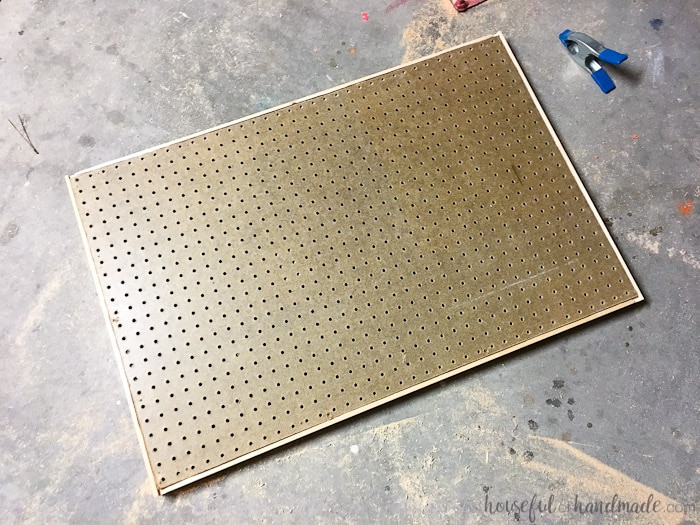
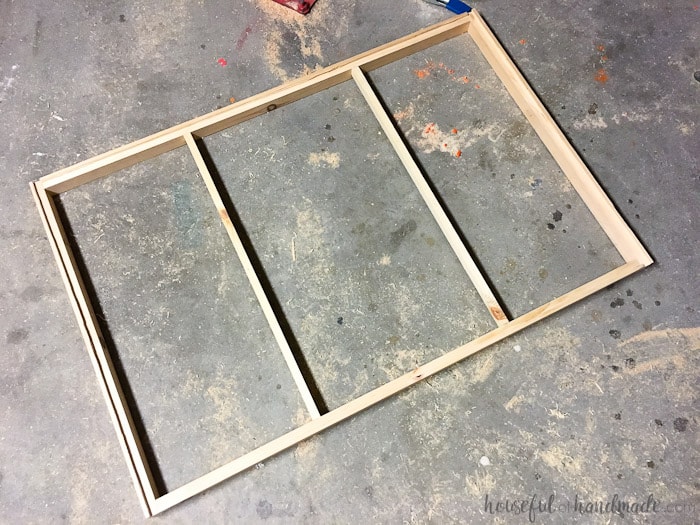
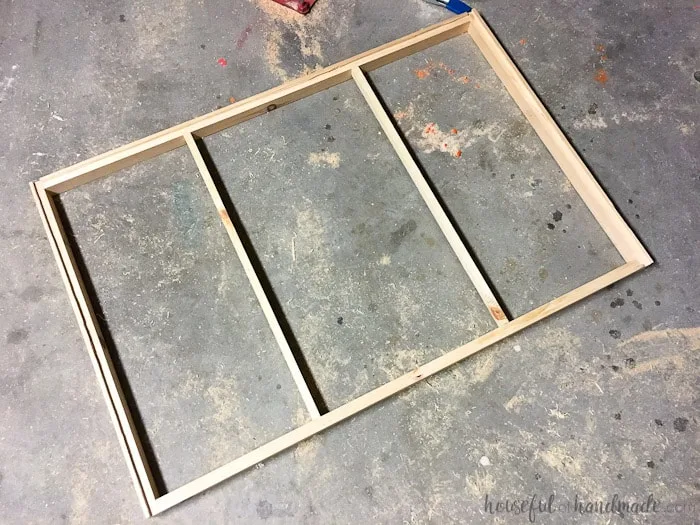
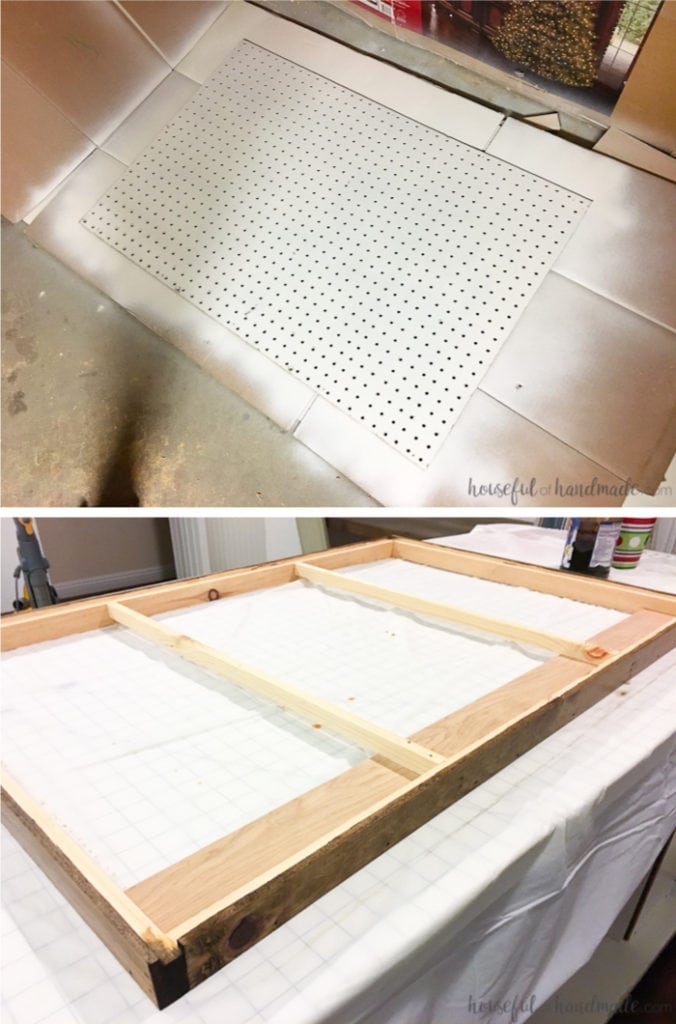
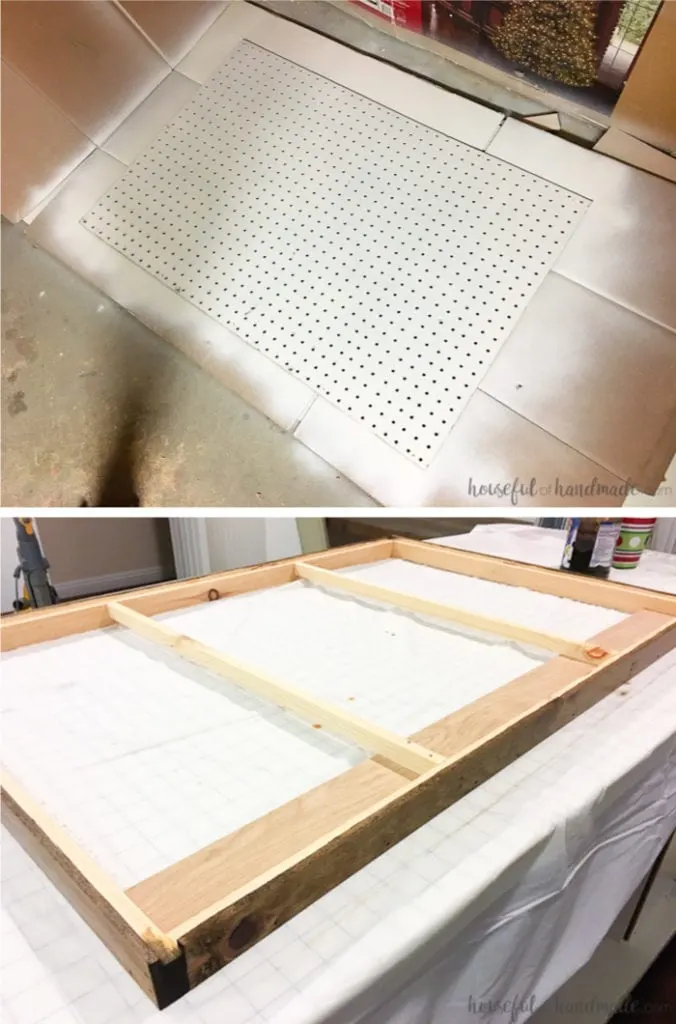
Start by measuring your piece of pegboard. I had a scrap piece that my mom gave me so I needed to make my pegboard that size.
You will need to create a frame for your pegboard to sit into. Since the outside of the pegboard is not pretty, we will notch out the frame so it sits inside the frame, then cover up the ugly edge with a second, thin frame.
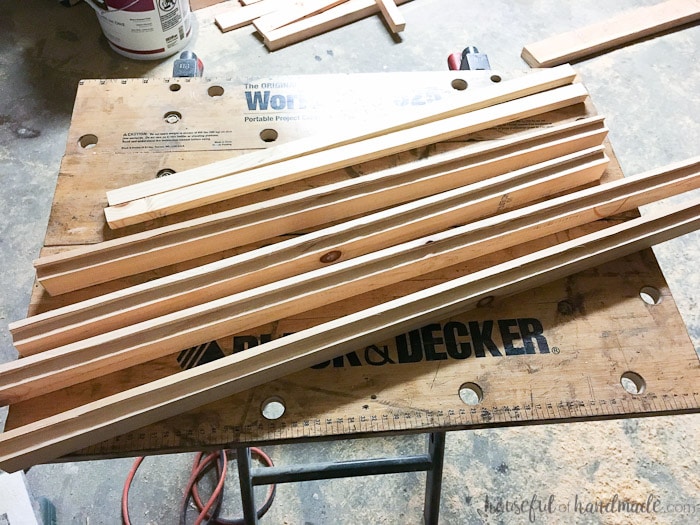

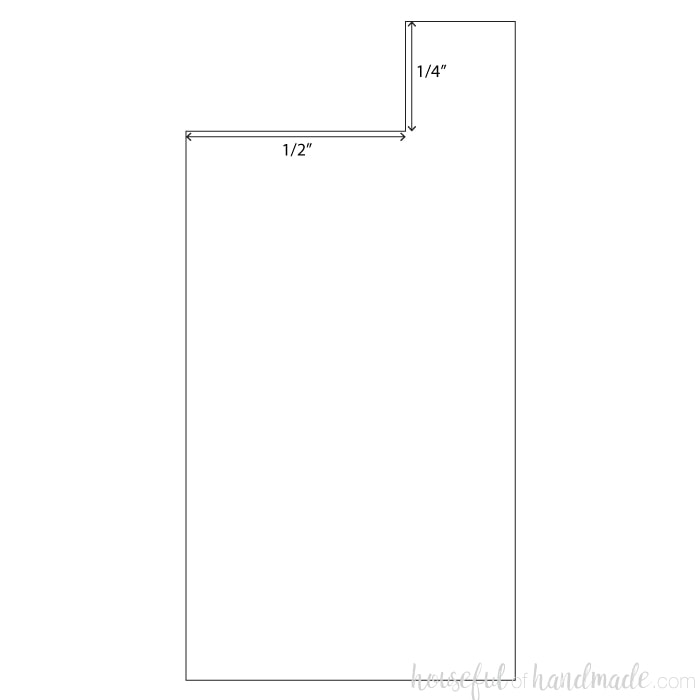
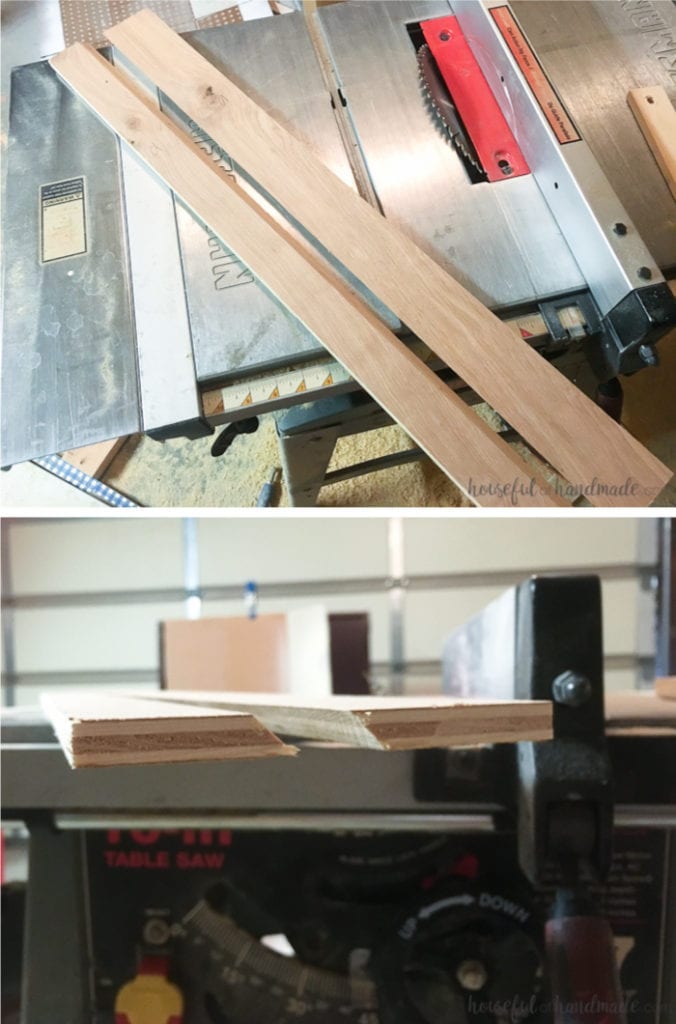
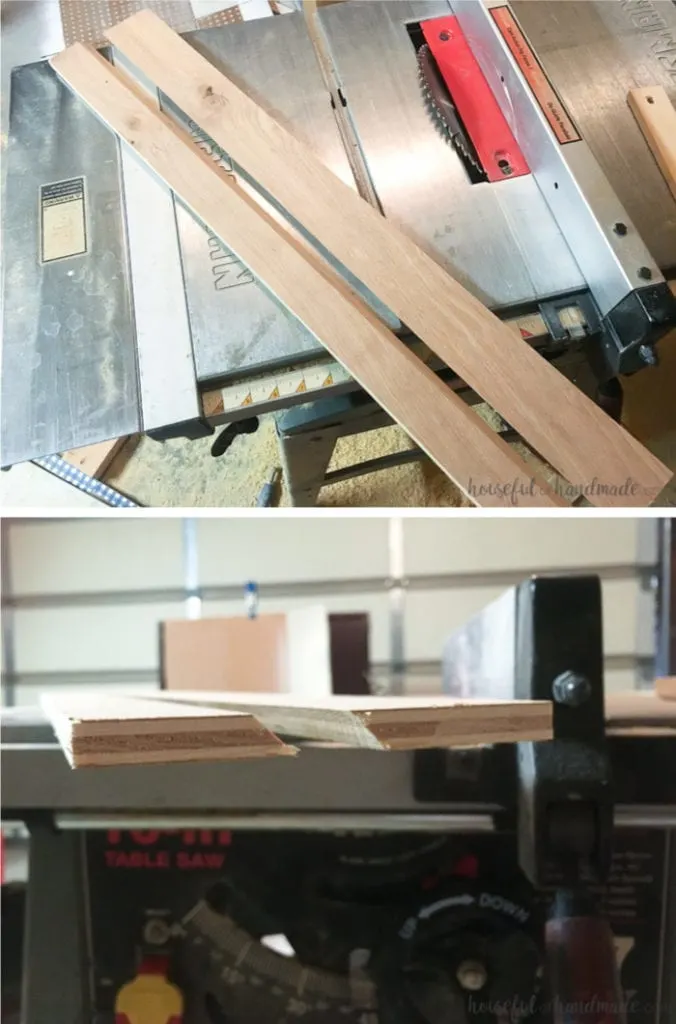
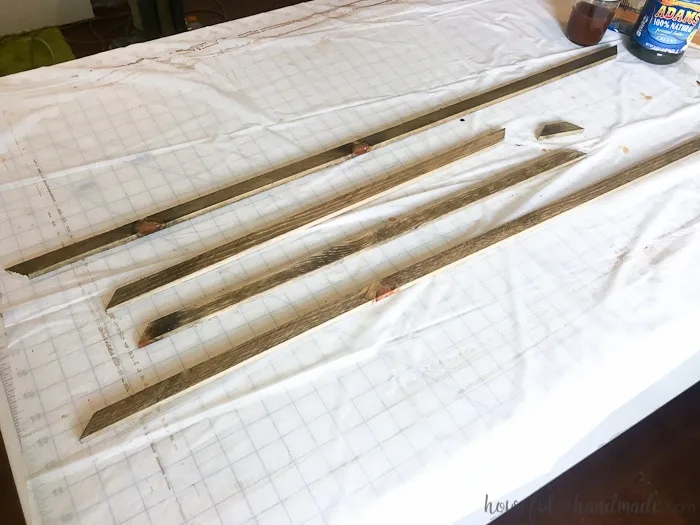
Cut 2 1×2 boards the width of your pegboard minus 1″ and cut 2 1×2 boards the height of your pegboard plus 1/2″. Now create a notch on one of the short sides of each of the 1×2 boards that is 1/4″ deep and 1/2″ wide (see picture below).
This will create the notch for your pegboard to sit into so we can later cover up the ugly edges. I made my notches on my table saw. Set the blade height to 1/4″ and place your fence at 1/4″. Run the boards through.
Then move your fence a blade widths further away from the blade and run your boards through again. Repeat until you have completely notched out the boards.

Now assemble your frame. Add wood glue to the edges of the top board. Attach it to the side board so it is flush at the top. Clamp and secure with finishing nails or a screw (I prefer my battery powered nail gun for this because it leaves just little holes and is so quick and easy to use).
Repeat on the other side.


Then repeat for the bottom board (on both sides) so you have a completed frame.


Double check that your piece of pegboard fits inside the notched frame. Trim your pegboard if necessary.

Now add some supports to the frame. You want the frame to hold up to some weight and some use. Cut 2 1×1 boards to the height of the opening in your frame. Using wood glue and your nail gun, attach them to the top and bottom of the frame.
Make sure they are flush with the bottom of the notched frame so the pegboard sits on top of them when you put it in the frame. Finish your frame as desired.
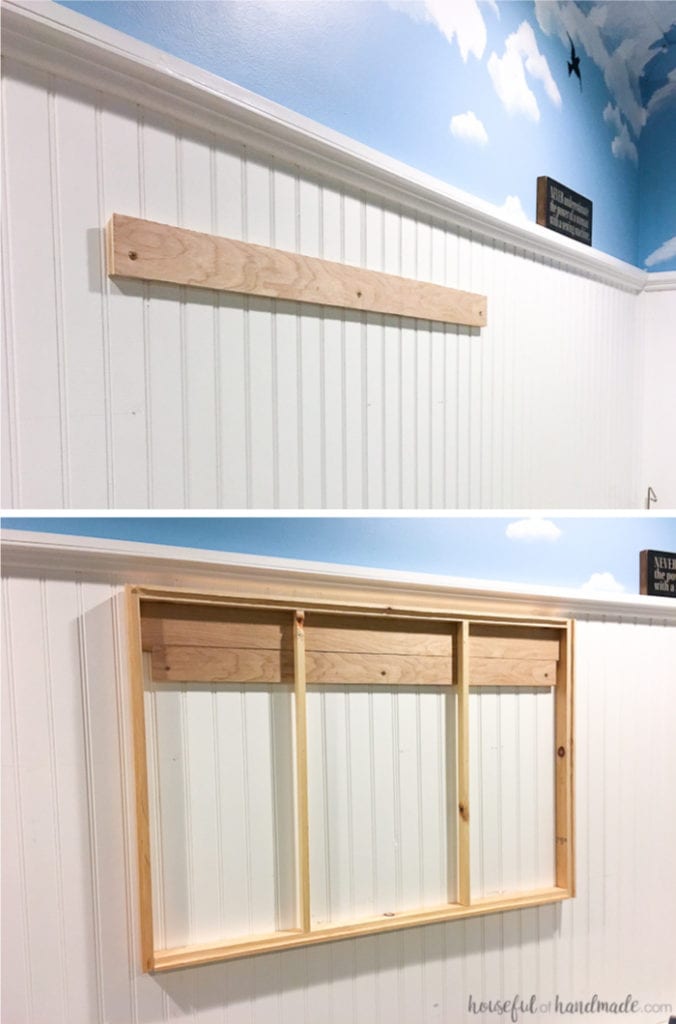
Now it’s time to create the perfect way to hang your pegboard so it is not permanent on your wall. I have a new found love for french cleats and it is the perfect solution for the pegboard.
You may notice that your support boards are about 1/2″ in from the back of the frame, this will allow you to put a 1/2″ french cleat on the back and then it will be completely hidden by the frame of the pegboard. But you can easily lift if off the wall and move the piece of the cleat that is attached to the wall in just minutes.
To make a french cleat, rip a piece of 1/2″ plywood to around 4-5 inches wide and the length of the opening width of your frame. Then rip the piece of plywood in half at a 45 degree angle down the length of the board. Now you have two pieces that interlock.
Attach one of the pieces of your french cleat to the back top of your frame so it sits inside the frame.
The french cleat needs to be attached so the angled part of the cleat is facing down and the longer part of the cleat is on the back of the frame (so you create a tooth that can grab onto the other cleat later). Use wood glue and your nail gun to secure it.
Trim the other french cleat so it is about 1-2″ shorter than the one that is attached to the frame. This will make it easier to slide them together.
Attach this cleat to the wall using a level. The angled part of this cleat needs to be facing upwards and the longer part of the angle needs to be away from the wall to create a tooth for the other cleat to fit into.

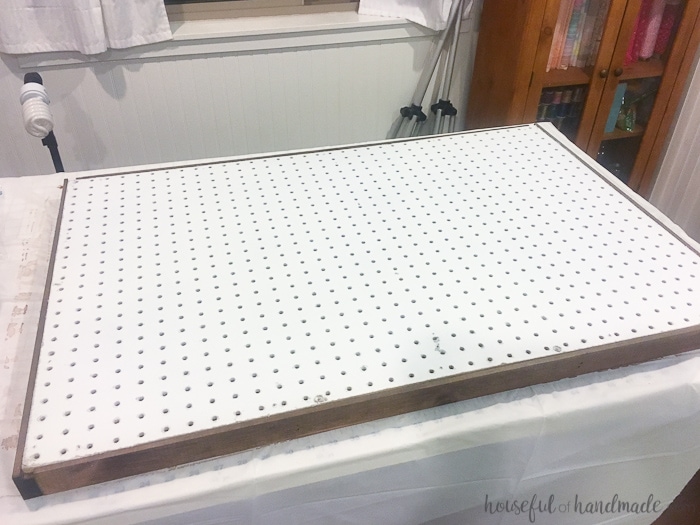
Now it’s time to finish your pegboard and frame. I wanted the frame stained. I used a natural stain that included black tea and steel wool soaked in vinegar.
Then to finish the pegboard, I recommend spray paint instead of rolled or brushed on paint. The spray paint is less likely to gum up your pegboard holes so you will be able to use them easier.
Once your paint is all dry, set your pegboard into the notched frame. Secure with nails around the entire edge and down the center supports.

Now you can hang your pegboard and start using it, but remember I said we were going to cover up the less than pretty edges of the pegboard?
To do that you will want to cut pieces of 3/4″ wide stock, mitered at the corners, to fit around the edge of your frame. I wanted my frame to be super thin so that it didn’t interfere with adding the pegs to the board or using the entire area.
To do this I ripped down 1×2 boards so I had 1/4″ x 3/4″ pieces of wood for my frame. Paint or stain the trim to match the frame.

Once it is dry, you just need to attach it to the perimeter of your pegboard with finishing nails. Normally you would wait to load up your pegboard with all your supplies until after you trim it out, but I am very impatient and wanted to get organized 🙂

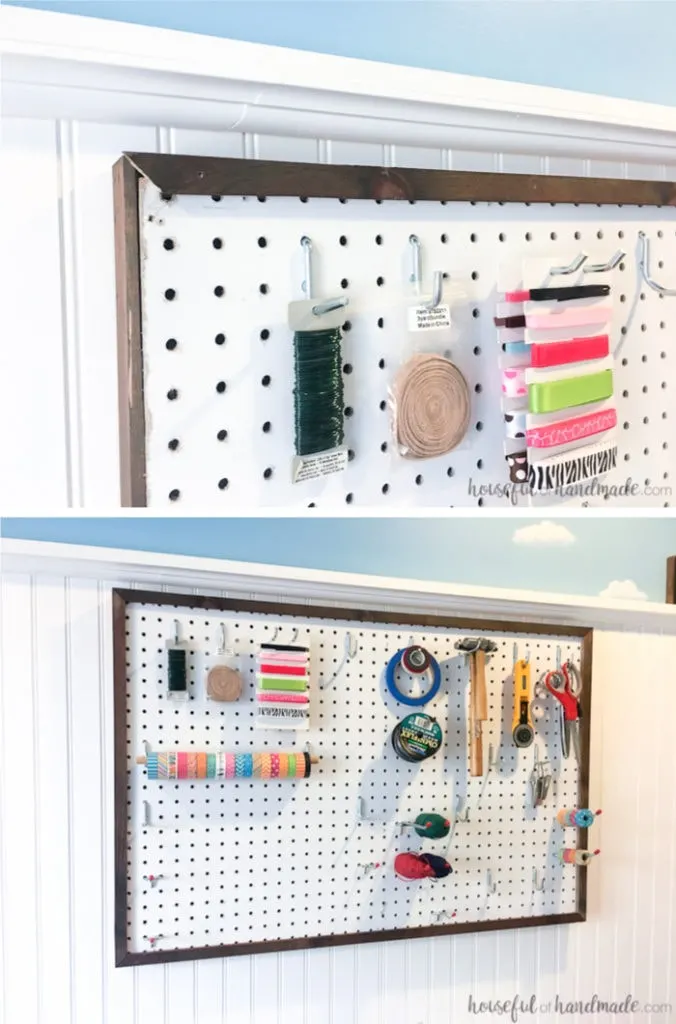
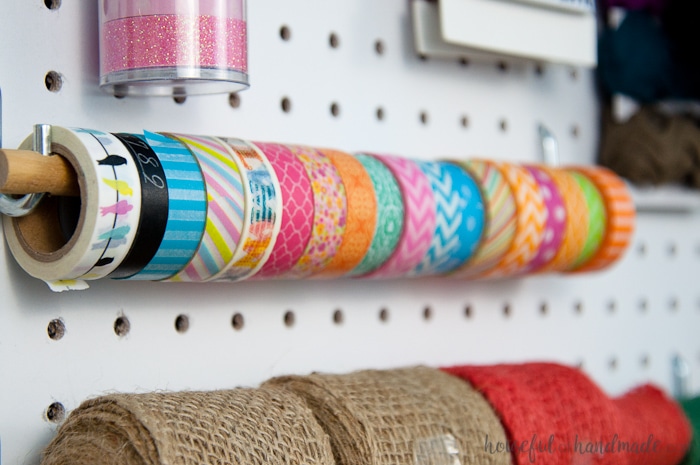
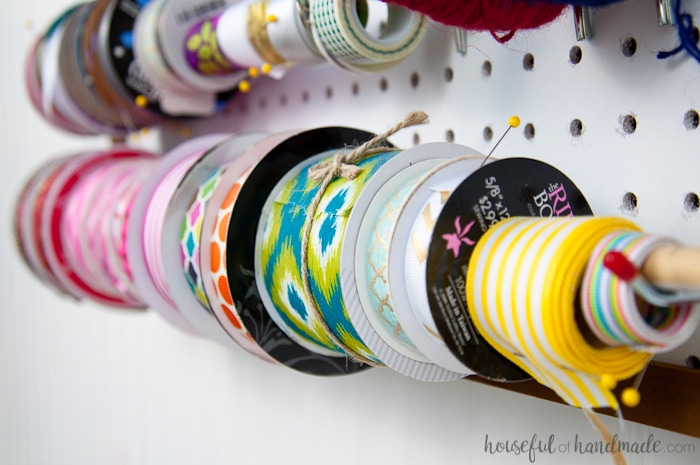
Use the pegboard hooks to organize everything. I love using dowels on the hooks to organize things like ribbons and tape. You will be able to easily see all your supplies so you can get to crafting!

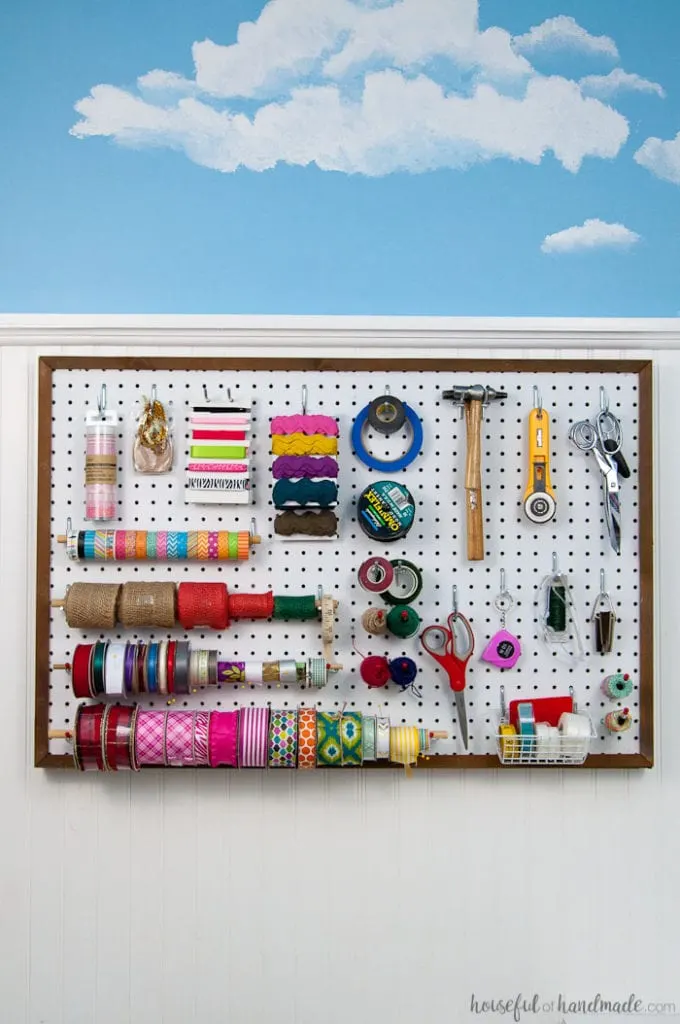
Now you have a beautiful pegboard that you can use to organize your whole life! Okay, maybe not your whole life but I feel so much more together by having my craft supplies organized and accessible. It’s the little things that make me really happy.


And don’t forget to follow along as I finish this room for only $100!


Faith
Tuesday 30th of January 2024
Where were you 40 years ago? LOL Were you even born then? Alas, I'm unable to do as much now as I did back then. But I still want to!! Reading this has given me ideas. I have a bulletin board in my sewing room, but it's pretty limited. I like the idea of a peg board. I'm thinking of a 6 foot 2x4 frame on wheels or gliders (because there's very limited wall space), with the pegboard on one side and the bulletin board on the other. Maybe (not sure yet--I only just started thinking) some kind of narrow (like 1 foot deep) storage on the bottom half. That wouldn't need a French cleat, but . . . I've been wanting to have a pegboard to hang my cast iron pans in the kitchen. It's not fun, or easy at my age, to get the pan from the bottom of a pile, but I love cooking with them. The only place I have is the side of my pantry cabinet, but Husband doesn't want to see them and since it's two steps in from the front door, I'd rather have some kind of door or something over them. I need to think more on that one. But a French clear at the top of the cabinet, would be just the thing to hold it. I no longer have all the tools I had (and I never did have a table saw), but I have basic tools and I think I might still have my router, so I could make the notched edges. If not, my brother has everything. I can borrow them or conscript him.
jill
Monday 17th of August 2020
I love your use of the French Cleat. I thought I knew alot about woodworking, but you taught me something new. Very creative!
Kati
Tuesday 1st of September 2020
Thanks Jill! The French cleat is my new favorite way to hand large pieces. It's so easy but so strong (and I usually have scraps of wood I can make it from).