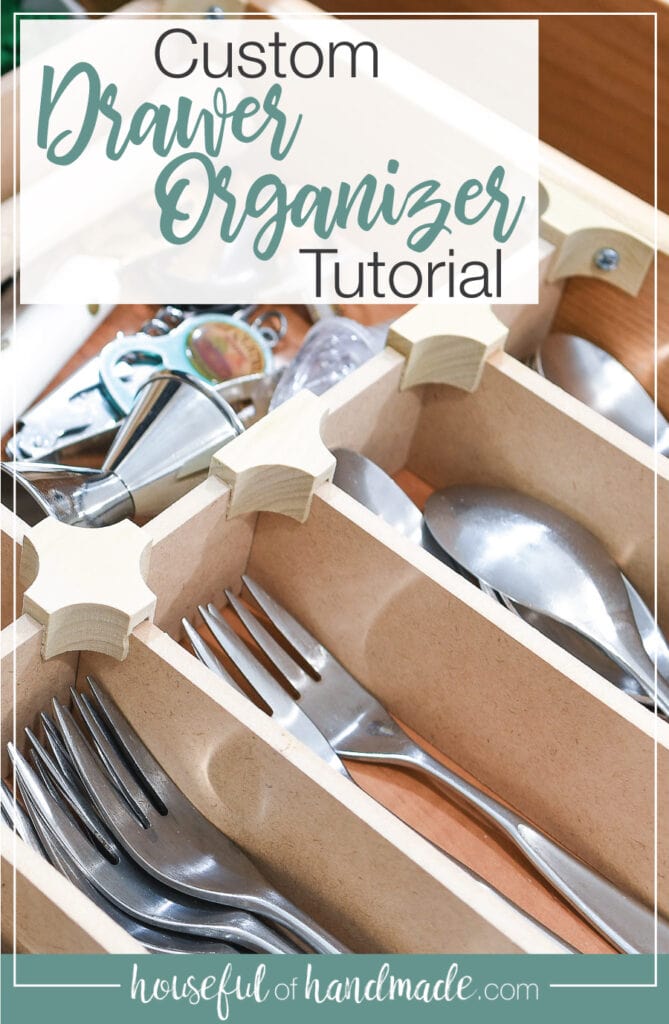
Get organized with these custom drawer organizers. You’ll want them in every drawer!
Organizing makes me happy! Maybe that is why I love spring so much. I’ve been spring cleaning and organizing everything.
And I am sad to admit that it’s been almost 2 years since our kitchen remodel and my drawers have remained un-organized. So I partnered with Inventables to make the ultimate DIY drawer dividers.
Kitchen Drawer Organizers
Before our kitchen remodel, I made these plywood kitchen drawer organizers. They worked okay, but after a couple years, I realized I could make much better drawer dividers for my kitchen.
This post may contain affiliate links. As an Amazon Associate I earn from qualifying purchases. Click here to read my full disclosure policy.
One of the things I hated about my previous drawer organizers was that they were not secured into the drawer. My kids open drawers like they are pulling the cord to start a lawnmower.
When they opened the drawers, the heavy flatware in the drawer would jerk and push itself under the dividers. To fix this, I had to remove everything from the drawer and nestle the divider back down.
It made me a little crazy!
To make the 2.0 ultimate version of my kitchen drawer dividers, I knew I wanted them secured into the drawer so they would not move.
The design started from there. And what it ended up with was the simplest little carved wood clips.
Drawer Organizing Clips
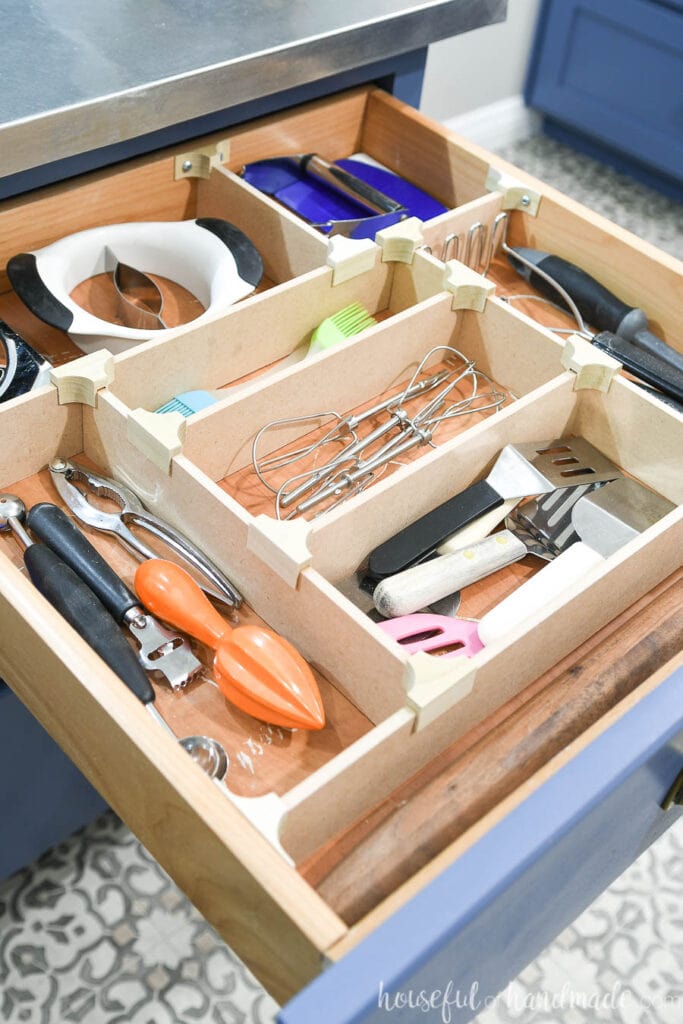
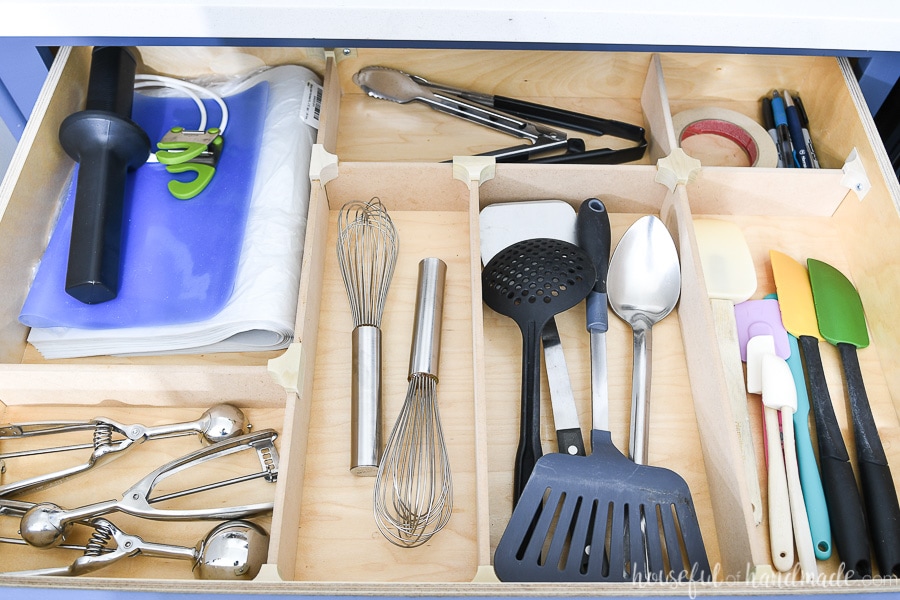
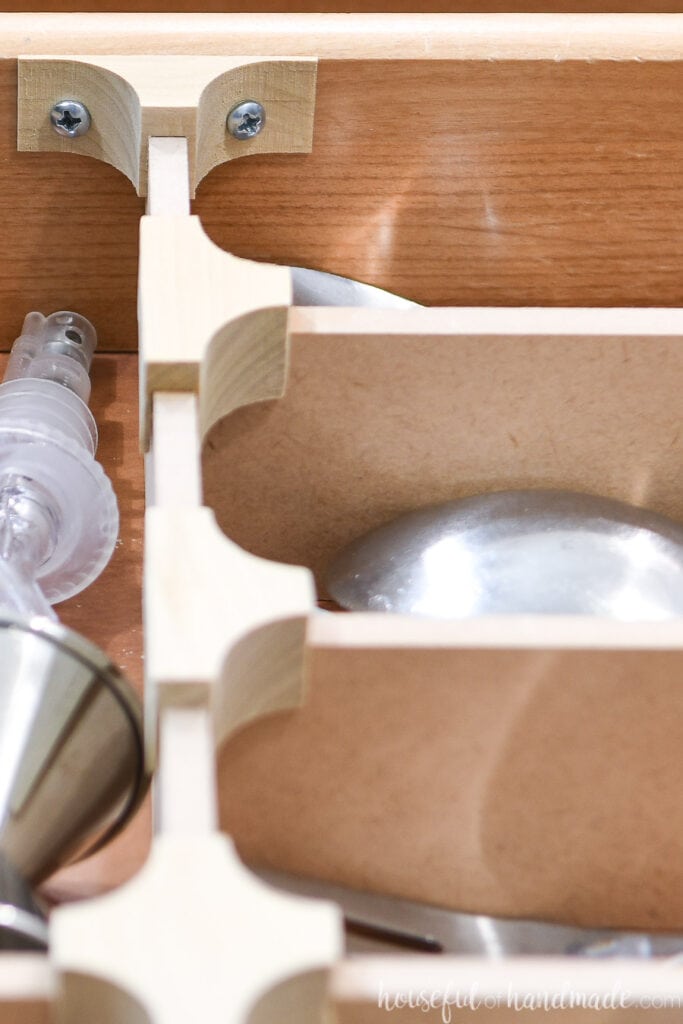
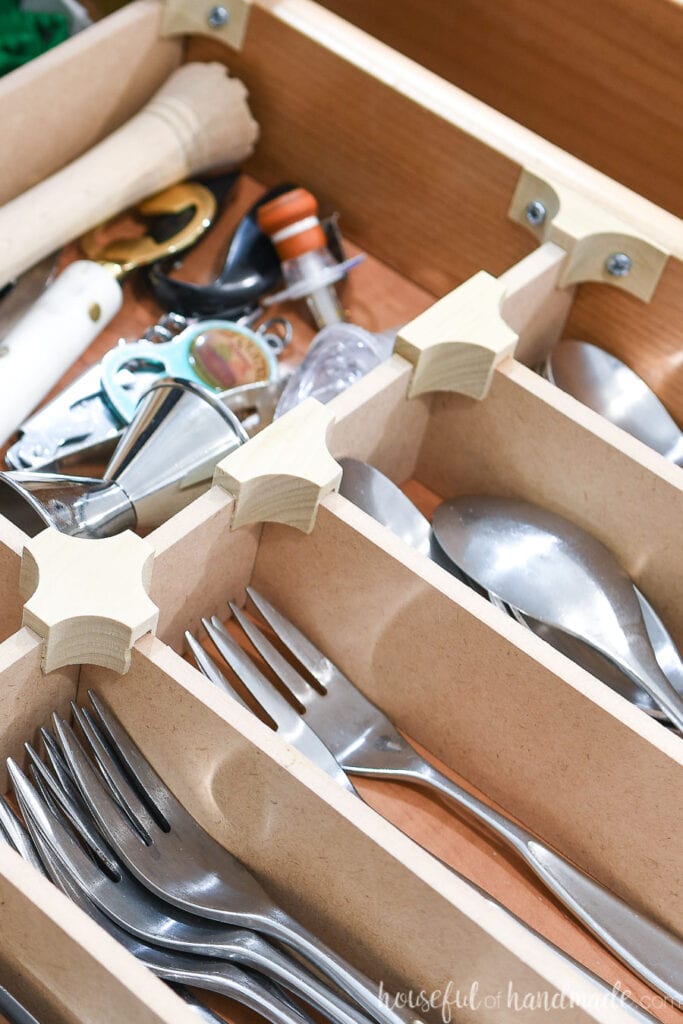
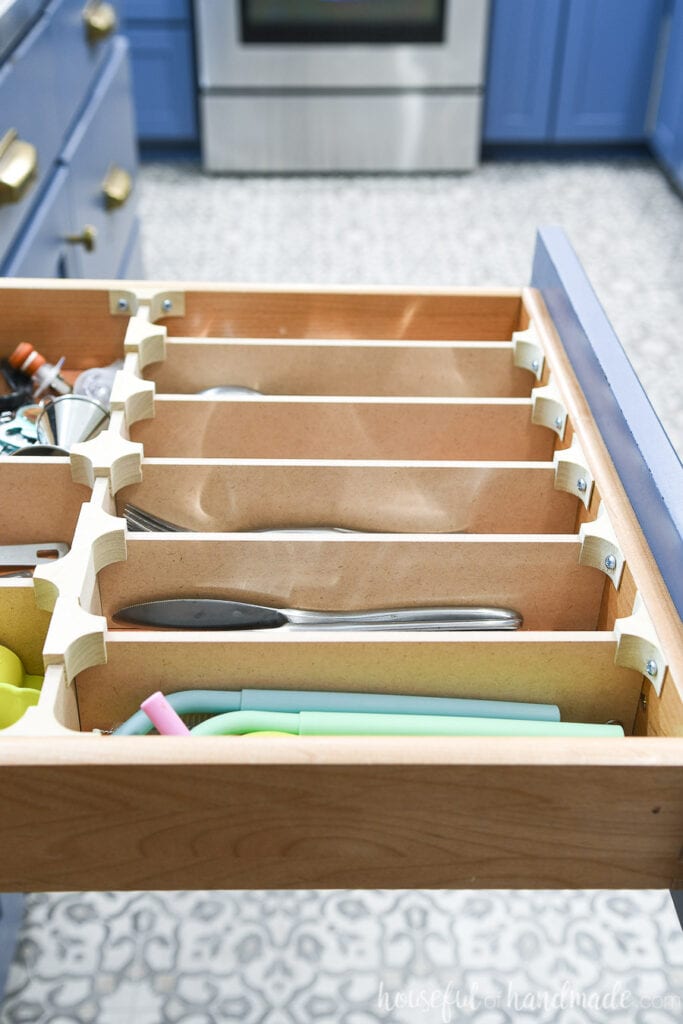
The heart of my new drawer dividers are the wood clips that hold everything together. They make it easy to set up any configuration of dividers in any drawer.
There are 3 different styles of clips, a T, and X and an end cap. The T and X are for combining the 1/4″ MDF strips into your perfect drawer system. And the end caps are used to secure it to the walls of the drawer so it doesn’t go anywhere!
These wood clips are easily cut out with the X-Carve CNC machine. Each little clips takes about 3 minutes to carve.
So while I was cutting strips of MDF and laying out all my kitchen utensils, the X-Carve was cutting all the little clips I would need to get organized.
The design is created to make the clips snug on a piece of 1/4″ MDF. You can use the clips with or without glue. I chose to glue mine so my kids couldn’t bump them and ruin all my hard work.
But if you don’t live with heathens, you probably can do without it. And then they can be adjustable in case your need to change around your drawer dividers.
What If I Don’t Have an X-Carve?
I understand that an X-Carve is a specialty tool. But there are so many awesome things you can make with it, including making items to sell!
But if you do not have an X-Carve, you still have options. Some high schools, libraries, and maker spaces have X-Carves you can use. Use this link to find a location near you.
Also, you can always start by signing up for a free Easel account to test out designing in their software. I love the simulate option to see how long it will take to carve out my design,
And make sure to look out for fun contest from Inventables. Maybe you can use your design to win an X-Carve or supplies!
Easy to Build Drawer Knife Holder
During our kitchen remodel, the magnetic knife holder did not make it back into the kitchen. The backsplash was too pretty to cover up. Instead, the knives were all moved to a drawer.
So during my epic kitchen drawer organizing spree, I knew I needed to address knife storage.
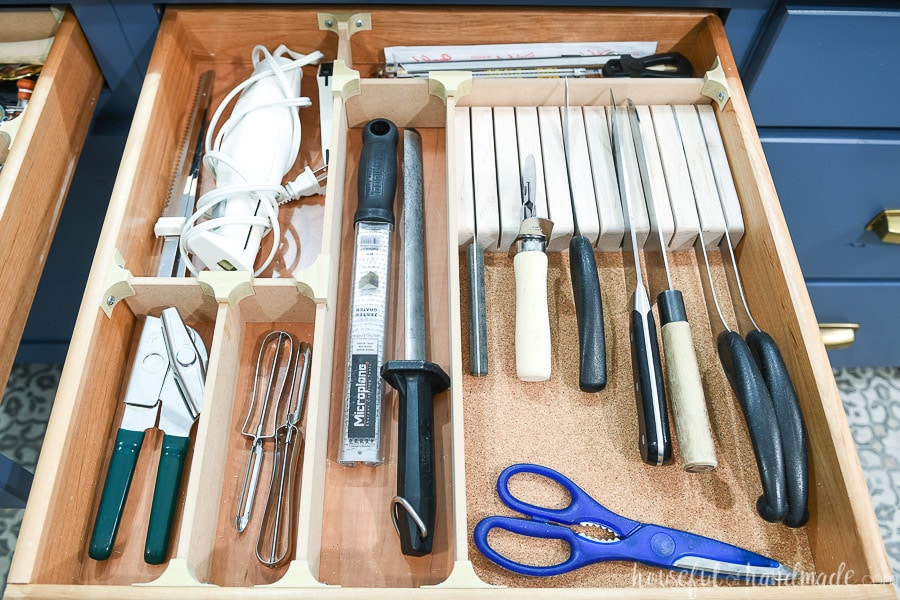
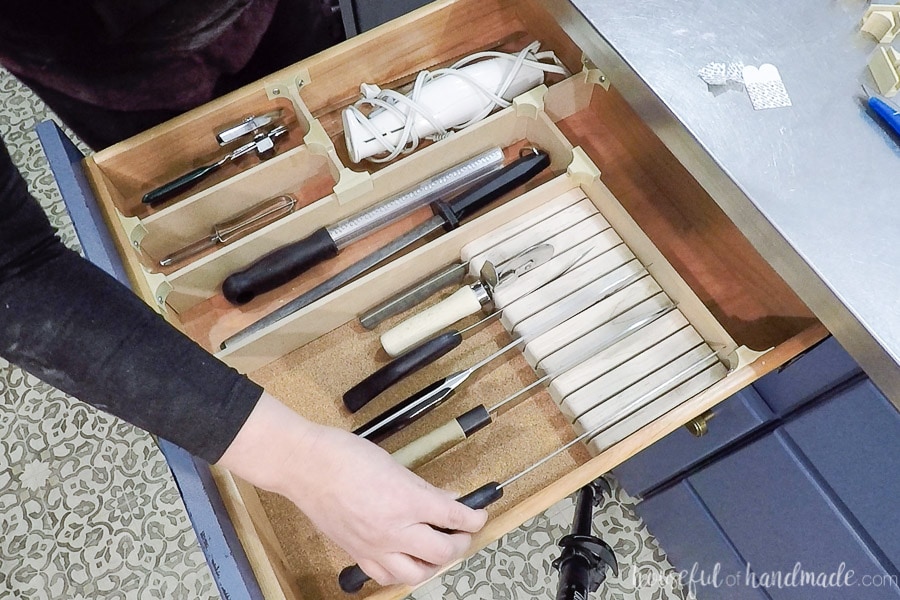
I made the easiest knife block that fits right into the drawer. And it integrates perfectly with the wood clip drawer organizer system.
But my favorite part, it was made from just a scrap of maple left over from another project, while the wood clips were carving out on the X-Carve!
How to Make a Custom Drawer Divider
Tools Needed:
- X-Carve
- If you do not have an x-carve, find a location near you where you can use one.
- 1/8″ two flute straight end mill bit
- Digital Calipers
- Saw to cut MDF
- I used a table saw to rip the MDF into strips and a miter saw to cut them to length.
- Drill
Supplies:
- 1/4″ blue painters tape
- Drawer Organizing Clips Easel file
- You will need a free Easel account to use this file, sign up for one here.
- Scraps of wood to cut clips
- I used a couple 10″ long 1×6 pieces of poplar
- 1/4″ MDF
- Sand paper
- 3/8″ long #6 screws
- Wood glue
- Chisel
PLAN YOUR DRAWER DIVIDER
Pull everything out of the drawer. I did this one drawer at a time. Take a minute to clean out the drawer (it’s smart since it’s empty).
Then carefully lay everything back in the drawer (you can see my knife block is part of this, and I will share how to make it below). Clump like items together and figure out the layout in the drawer.
Use 1/4″ painters tape to help you figure out where the dividers will go.
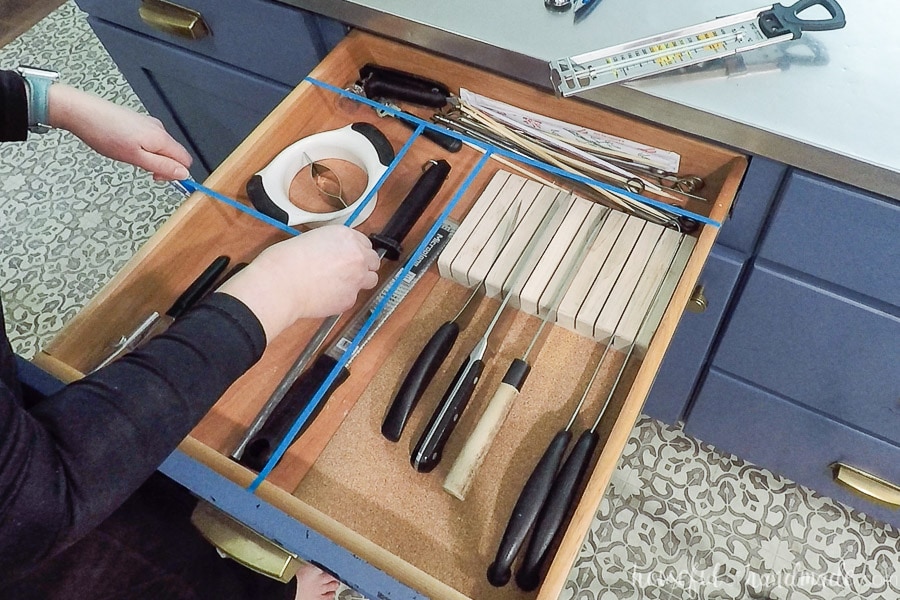
Count the number of Ts, Xs, and end caps you will need to carve for your drawer.
Repeat for all drawers.
CARVE THE WOOD CLIPS
You can use the design I created for wood clips by first, signing up for a free Easel account, then clicking on the link below to open the file.
When you open the link, it will not be editable unless you make a copy. Then you will need to duplicate the clips until you have the number you need for your drawers.
Secure your wood to the waste board with clamps and go through the steps in the Easel program to carve your clips out.
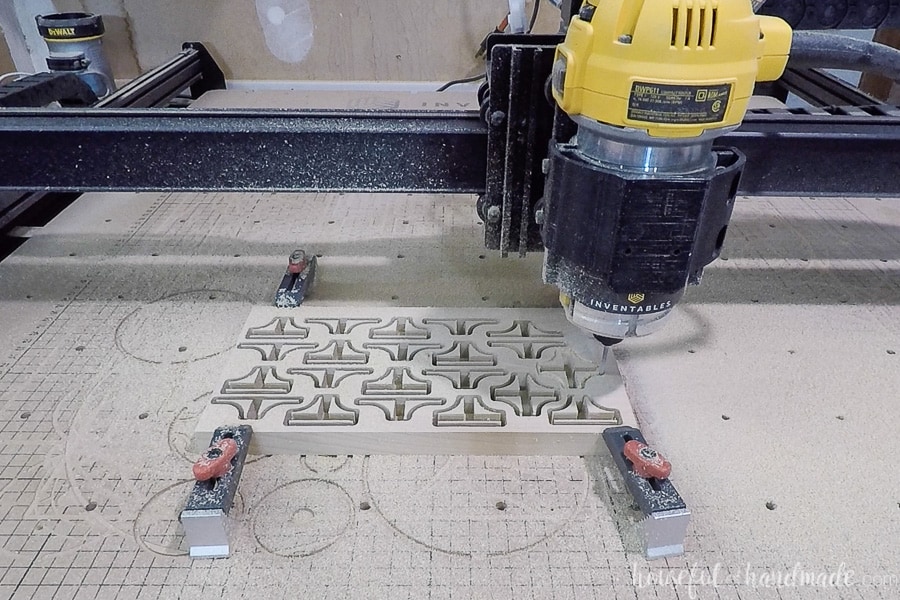
When the X-Carve is done carving, remove the wood and break the tabs with the chisel to free the clips. Give the edges a quick sand to smooth as needed.
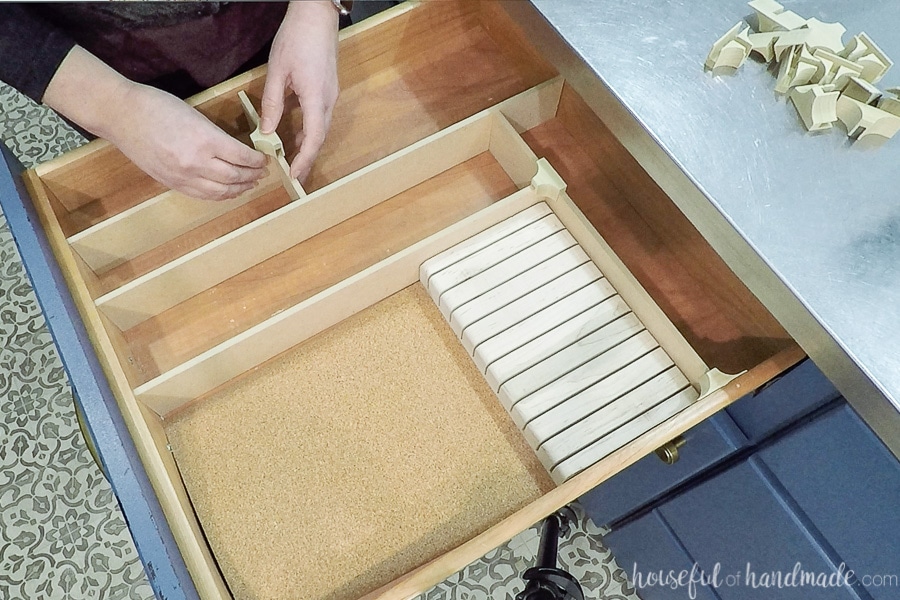
ASSEMBLE THE DIVIDERS
Rip down the MDF to the height you want. I cut mine the same height as the sides of my drawers, minus 1/4″. The wood clips will stick up from the MDF by 1/4″ so that made the top of the clips flush with the top of my drawers.
Cut the MDF to the appropriate width for your custom drawer divider layout.

Then assemble the MDF pieces inside the drawer. Use the wood clips on the corners and ends to create your desired configuration.
To attach the end caps to the inside of the drawer, use a drill to make a hole each the side of the end cap. Secure it to the drawer with a 3/8″ long screw.
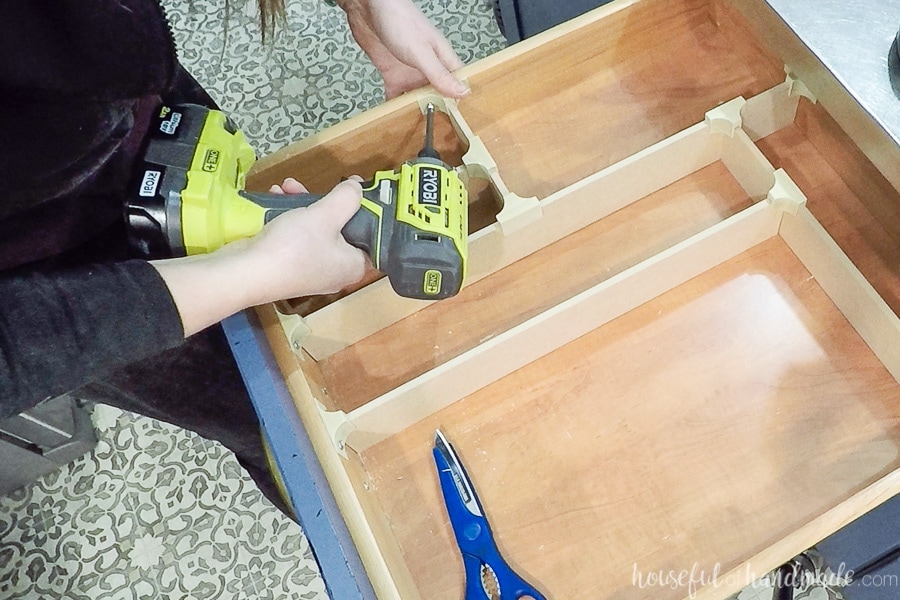
You can choose to glue your wood clips to the MDF for a stronger hold, or leave them so you can rearrange as needed.
I glued mine by adding a bit of wood glue into each clip and pressing it back on the MDF. Wipe off any squeeze out immediately. Once dry, these custom drawer dividers will hold up to even my crazy children!

HOW TO BUILD THE KNIFE HOLDER
Tools Needed:
- Table saw
- Router with round-over bit
- Sander
Supplies:
- Block of 1 1/2″ thick hardwood
- Sandpaper
- Food safe sealer
- Cork roll
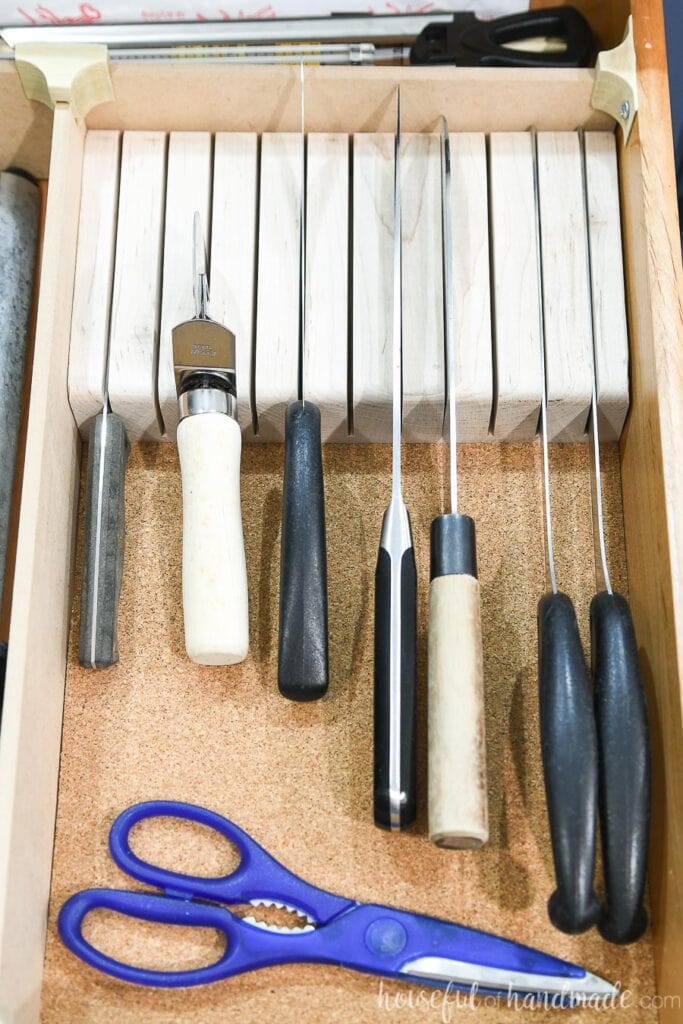
For my knife holder, I used a 9 1/2″ long x 6″ wide x 1 1/2″ thick piece of maple. This gave me 11 knife slots 3/4″ apart.
Using a router with a rounder bit, I rounded the top two edges. Then I gave it a good sanding.
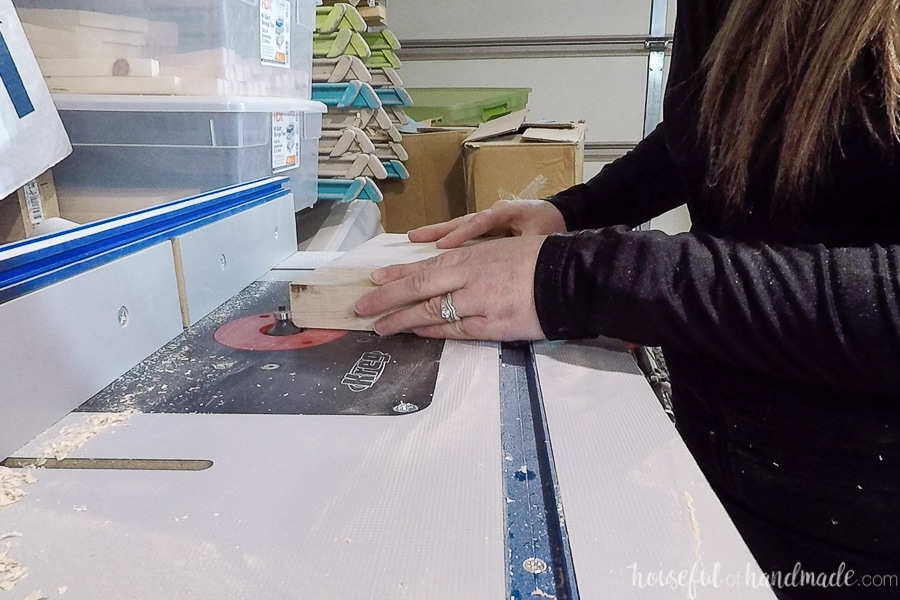
Measure and mark out where the knife slots will be cut. To get 3/4″ spacing between the knives, the marks actually need to be 13/16″ (the 1/16″ mark just above 3/4″). This allows for the kerf of your blade leaving the slots with enough room for a standard knife.
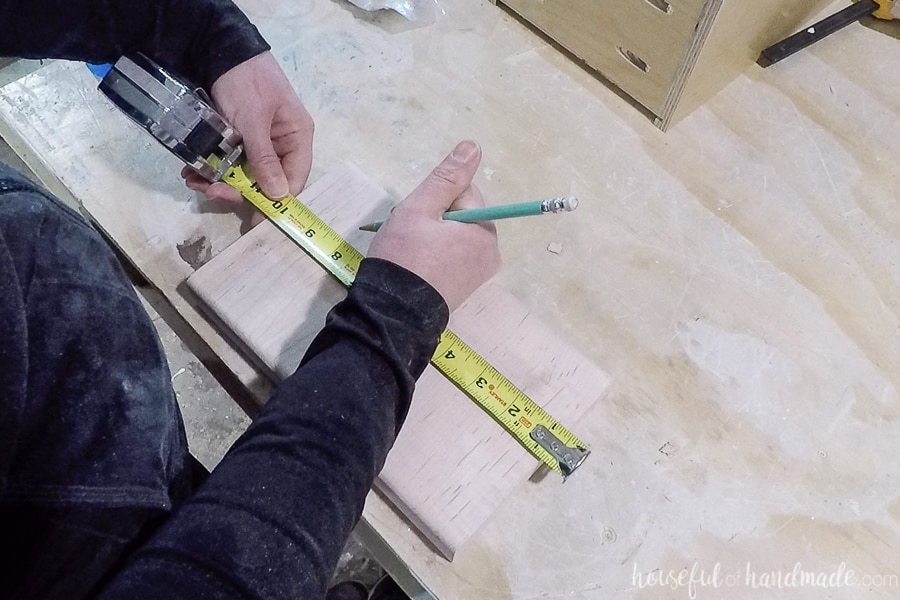
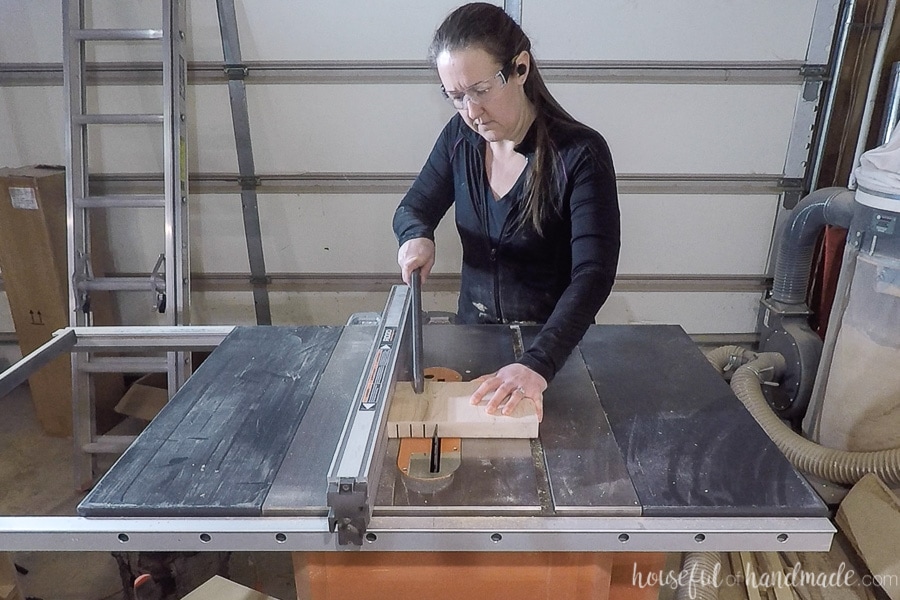
Transfer the marks to the edge of the board. Set up your table saw so the blade is 1/8″ shorter than the height of your wood. Cut the groove in the board at each mark.
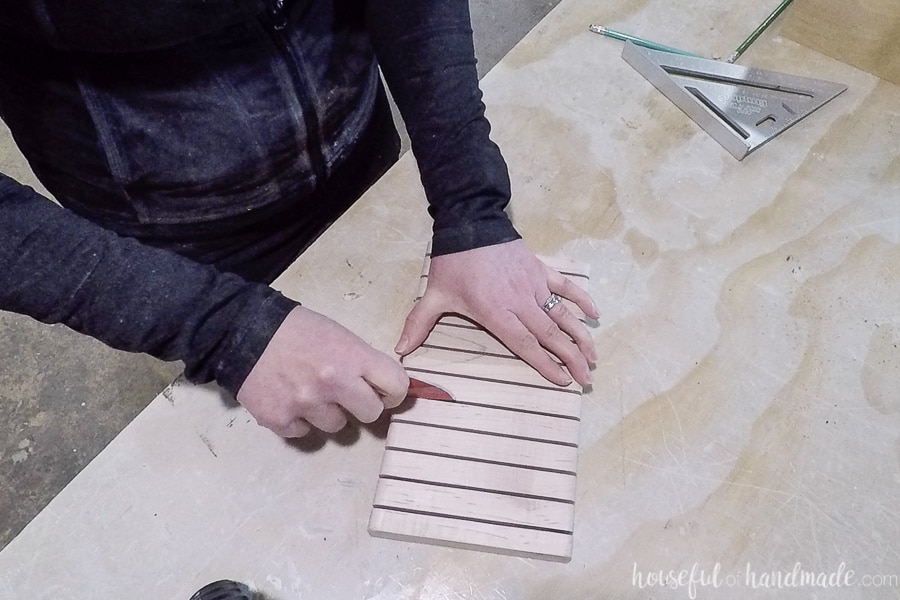
Sand the grooves with a piece of sandpaper folded in half. Seal with a food safe sealer.
I also cut a piece of cork (the kind on a roll) to lay under my knife block. This keeps the block from moving around on the smooth drawer bottom and gives a bit of cushion for the knives sitting in the block.
LOAD UP THE DRAWERS
Now all that is left is to load up those organized drawers! My Type A personality is in heaven seeing even utensil with it’s own home.
But I think I should add back in the kitchen utensil drawings like I did in the earlier version of the drawer organizer. Those really made my heart sing!
Thank you to Inventables for sponsoring this post. I only recommend products that I use and love and all opinions are 100% my own. Click here to read my full disclosure policy.