One of the reasons we moved to Texas a few years ago was to have more land so we could have a small homestead.
We haven’t ventured into large animals yet, but we have been raising chickens for meat for the last couple years and love it.
To start our chicken ventures, I transformed a small trailer into chicken tractor. But it was so heavy to move no one but my husband could do it.
This post may contain affiliate links. As an Amazon Associate I earn from qualifying purchases. Click here to read my full disclosure policy.
So this year I decided to upgrade our chicken tractor to make it easy for anyone in the family to move it! We just finished raising turkeys in the new mobile coop and it was a dream.
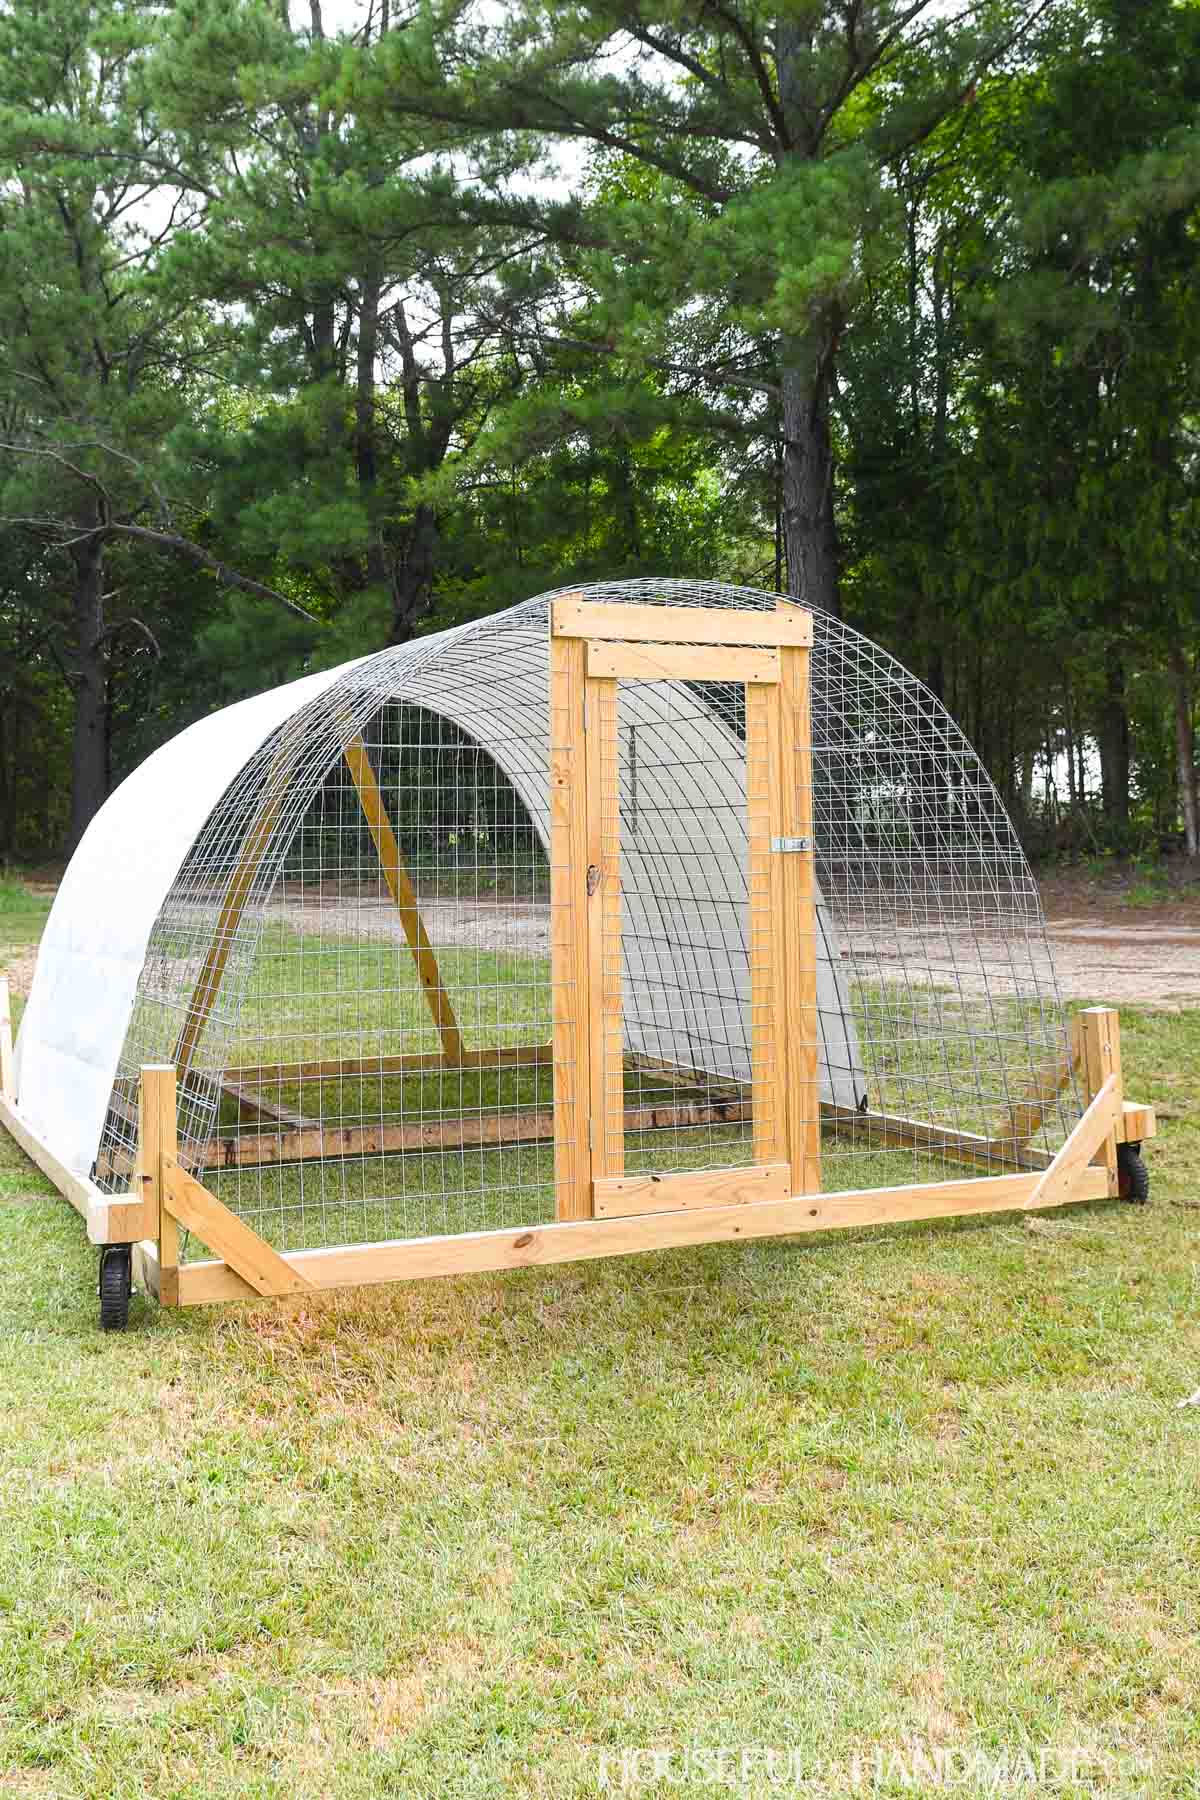
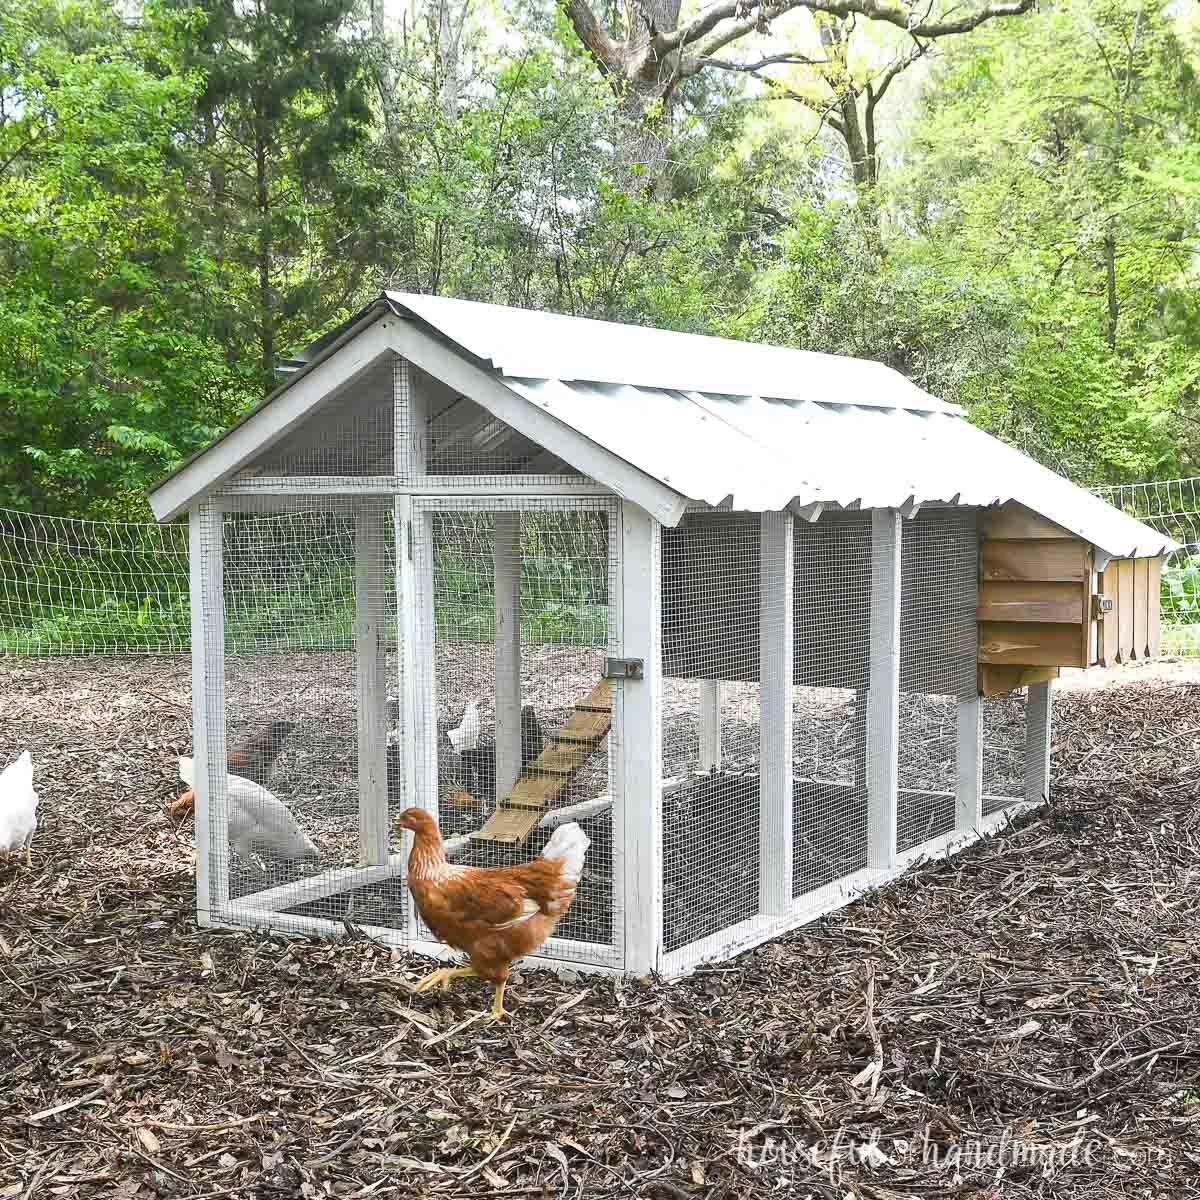
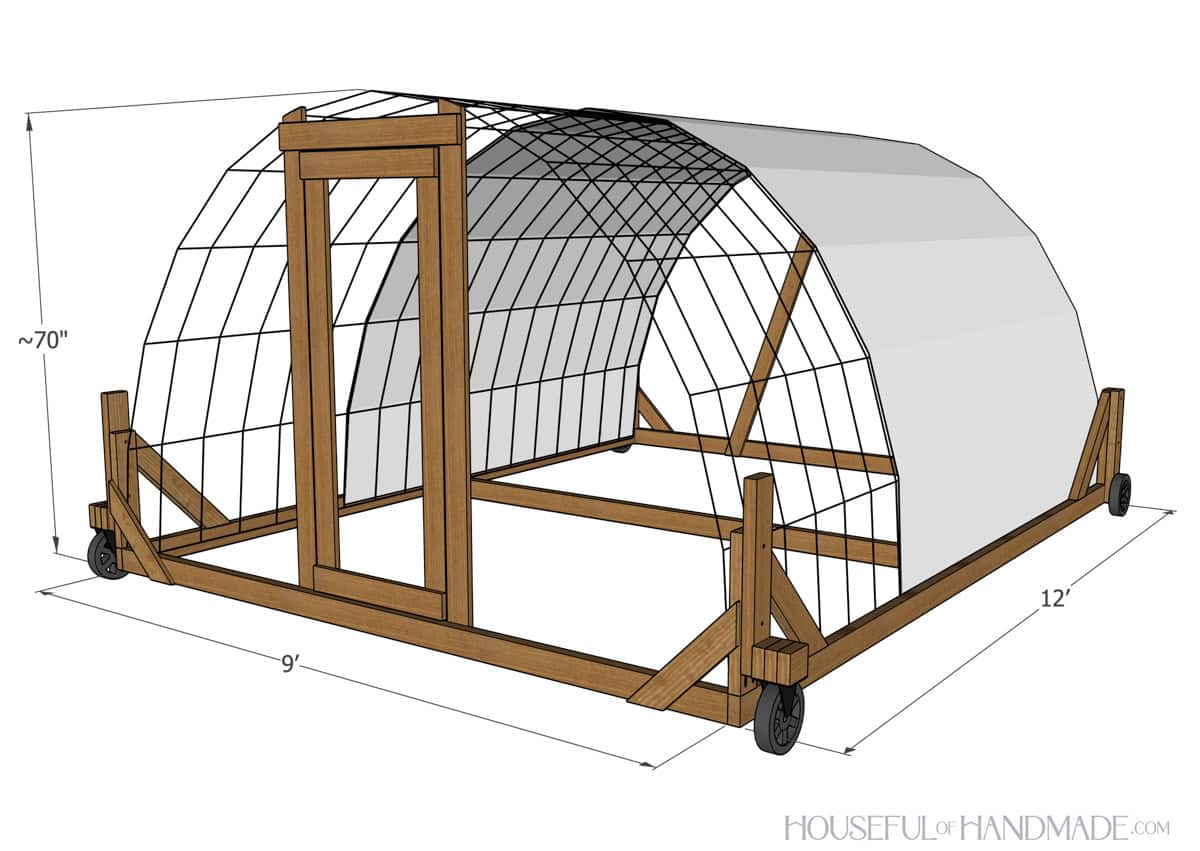
Cattle Panel Poultry Coop
To build a strong frame without adding a lot of weight, I used cattle panel fencing to create a hoop.
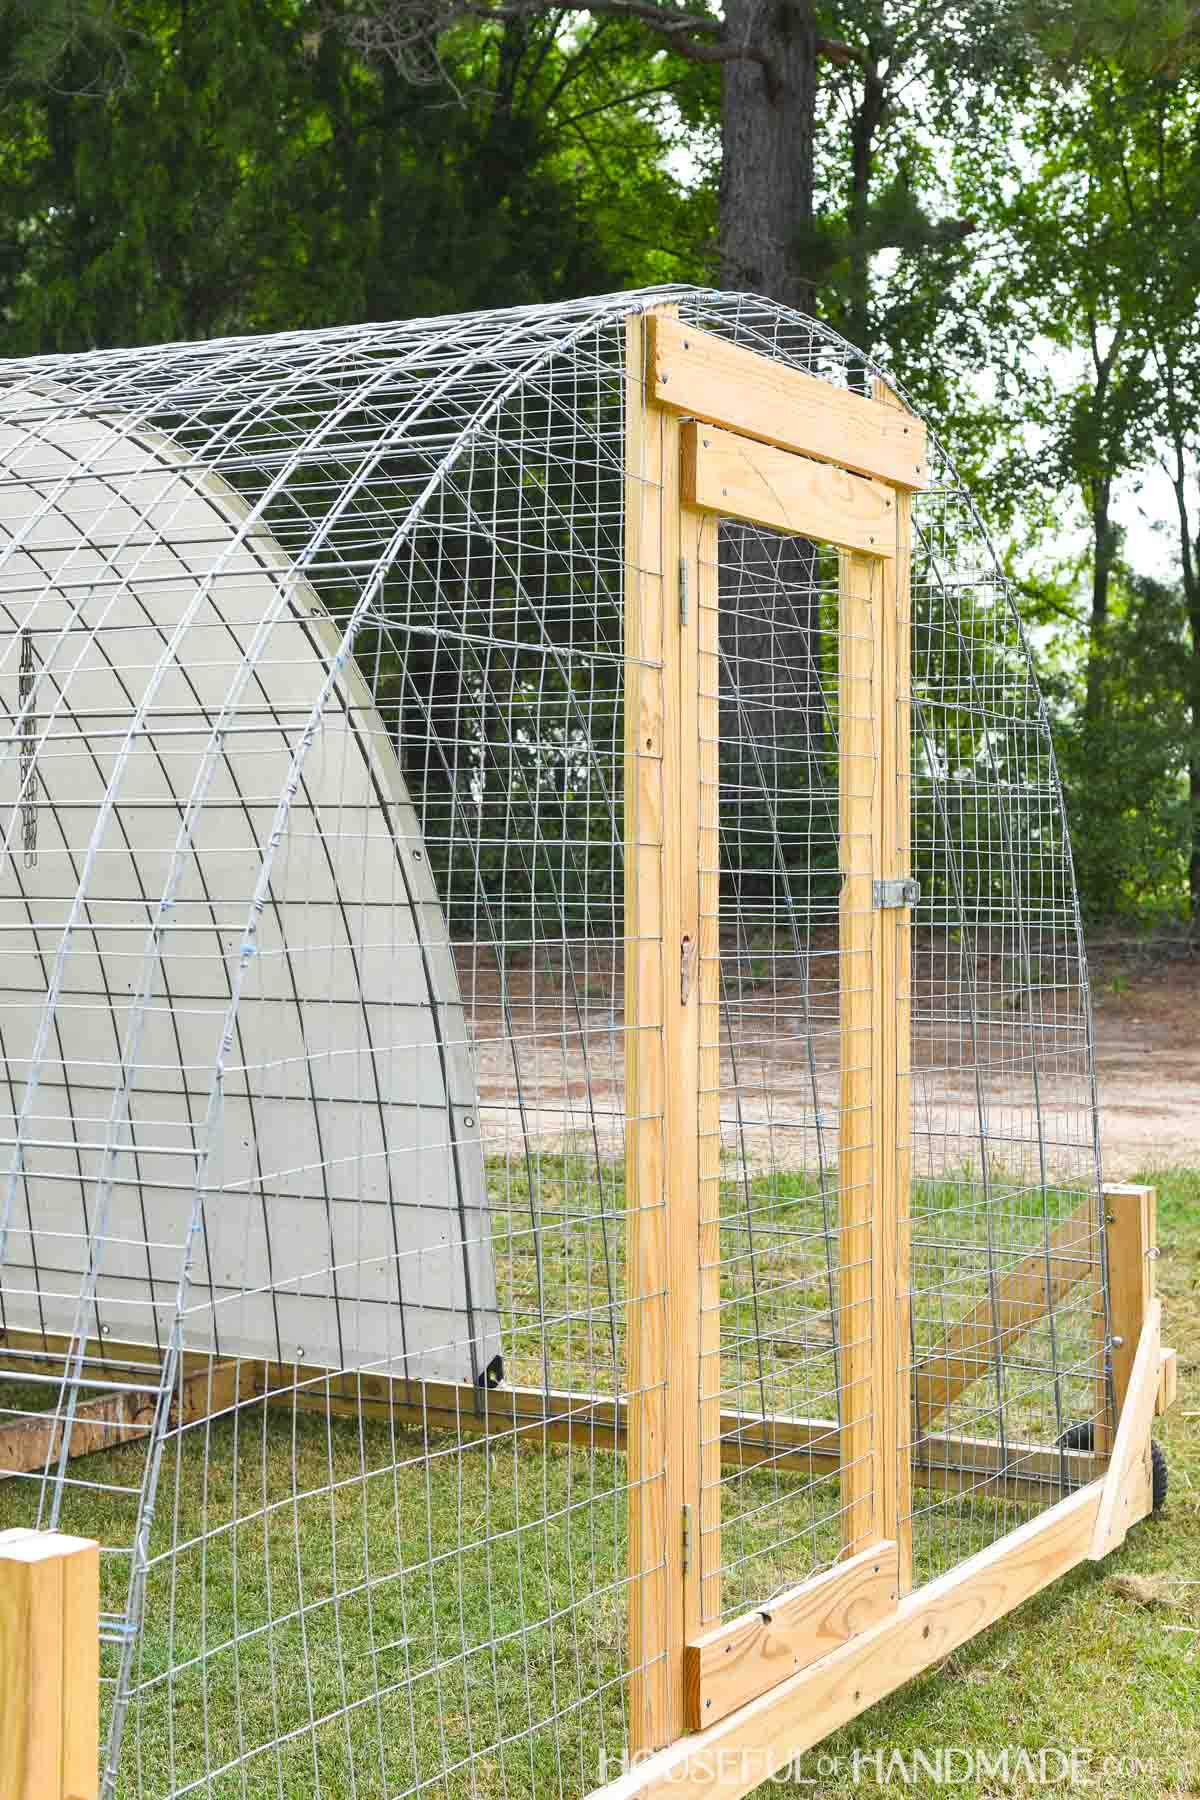
The hoop makes the inside of the mobile house nice and tall so feeding is easier. With a 59″ door, we barely have to duck to enter it.
And the inside is nice and big! There is plenty of room to grow out a bunch of birds for our family.
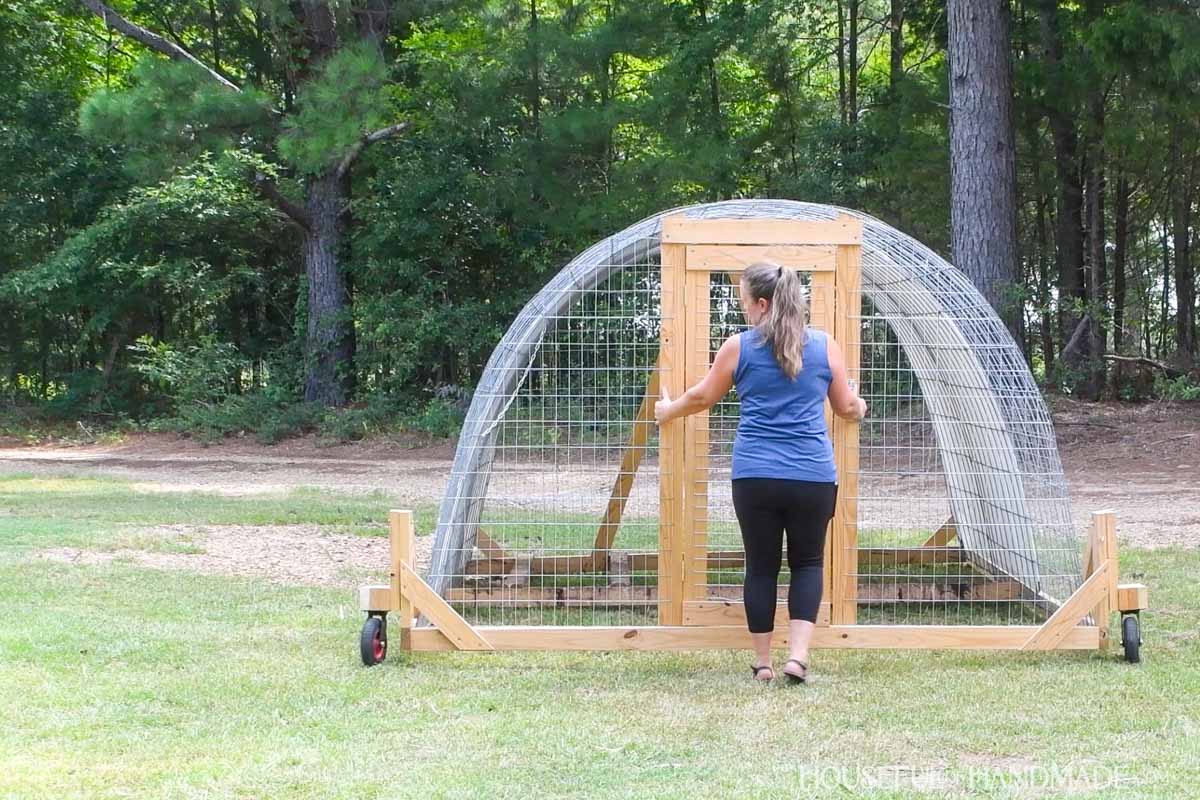
But most importantly, it is fast and easy to move to new grass every single morning. The kids or I can do it all by ourselves.
We have a lot of predators in our area, so we place the chicken tractor inside an electric fence.
Keeping the chickens in a chicken tractor inside the fence gives us extra peace of mind and protects them from arial predators while giving them shade.
Plus it makes it easier to move them forward to new pasture. Before it was almost comical when a handful of birds would run in the wrong direction while we tried to move the fencing.
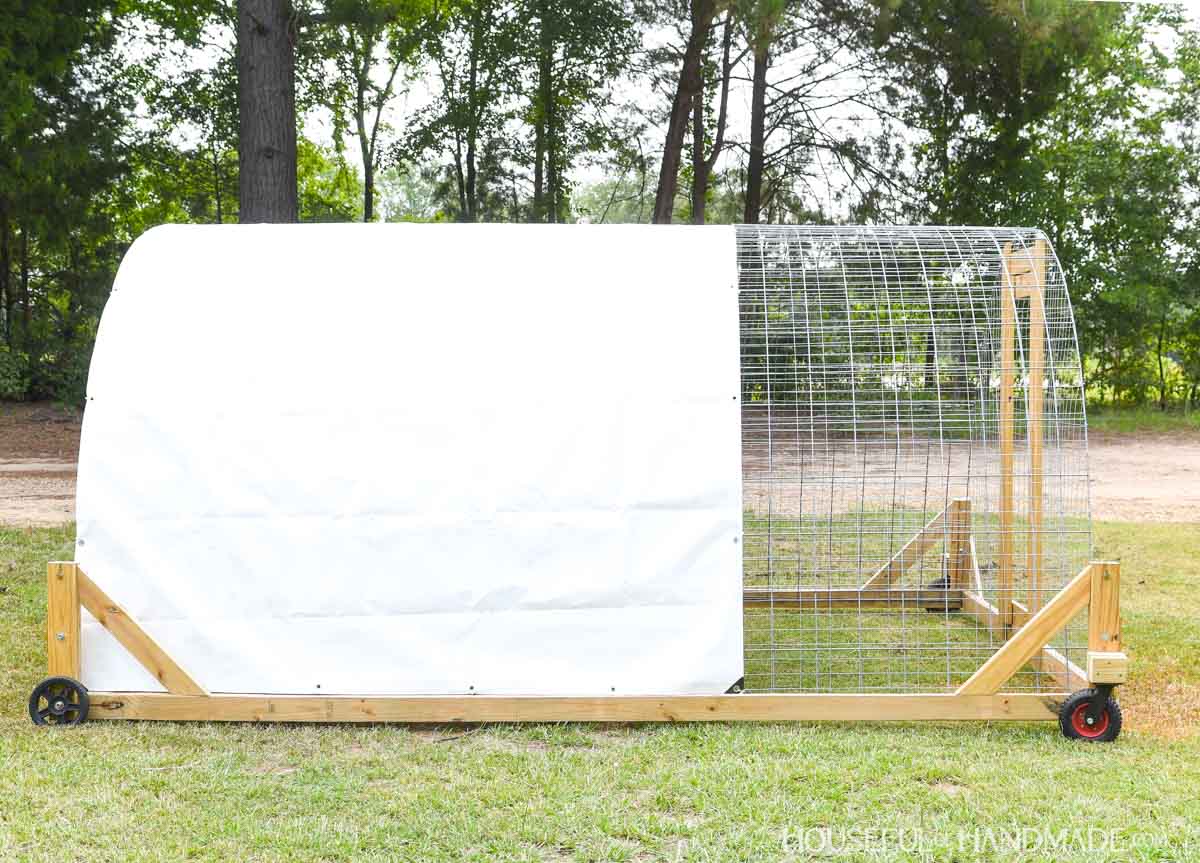
I chose to keep 1/3 of the chicken tractor open to the sun. With our previous batches of meat birds, they loved lounging in the sun.
I was happy to let them have room to do so because the extra vitamin D they made from sun exposure makes the fat extra healthy.
And having access to both sun and shade makes this chicken tractor usable all year round for us since we do not have extreme winters.
More Homestead Builds
If being more self sufficient is part of you plan. Check out these builds to help you homestead easily.
How to Build a 9′ x 12′ Chicken Tractor
Tools & Materials
Recommended Tools:
- Circular saw or Miter saw
- Jig saw
- Pocket hole jig
- Drill
- Impact driver (optional, but I love not having to switch bits with the drill)
- Pneumatic stapler
- Angle grinder
- Speed square
- Multi-mark measuring tool
- 90 degree drill adapter
- Hammer
- Pliers
Supplies:
- Wood products
- (5) 2×4 boards, 12′ long
- (3) 2×4 boards, 8′ long
- (7) 1×4 boards, 8′ long
- (3) 16′ x 50″ cattle fence panel
- Welded wire mesh or hardware cloth
- (1) 8’x16′ ultra thick tarp
- 2 1/2″ exterior pocket hole screws
- 2 1/2” exterior wood screws
- 1 1/4” exterior wood screws
- 1 1/4″ fence samples
- 3/4″ pneumatic staples
- Zip ties
- (2) 3″ narrow hinges
- (1) 3 1/2″ swivel hasp
- (4) Bolts with nuts
- (8) Washers
- (4) 3/8″ x 3 1/2″ long square double wire lock pins
- (2-4) 8″ Lawn mower wheels
- Optional: (2) 8″ swivel caster wheels
Overall Dimensions
The finished chicken tractor base is 9′ x 12′. It is approximately 70″ tall in the center of the hoop with a 59″ tall door opening.
Cut List
Cut out the pieces according to the easy-to-read table in the PDF plans.
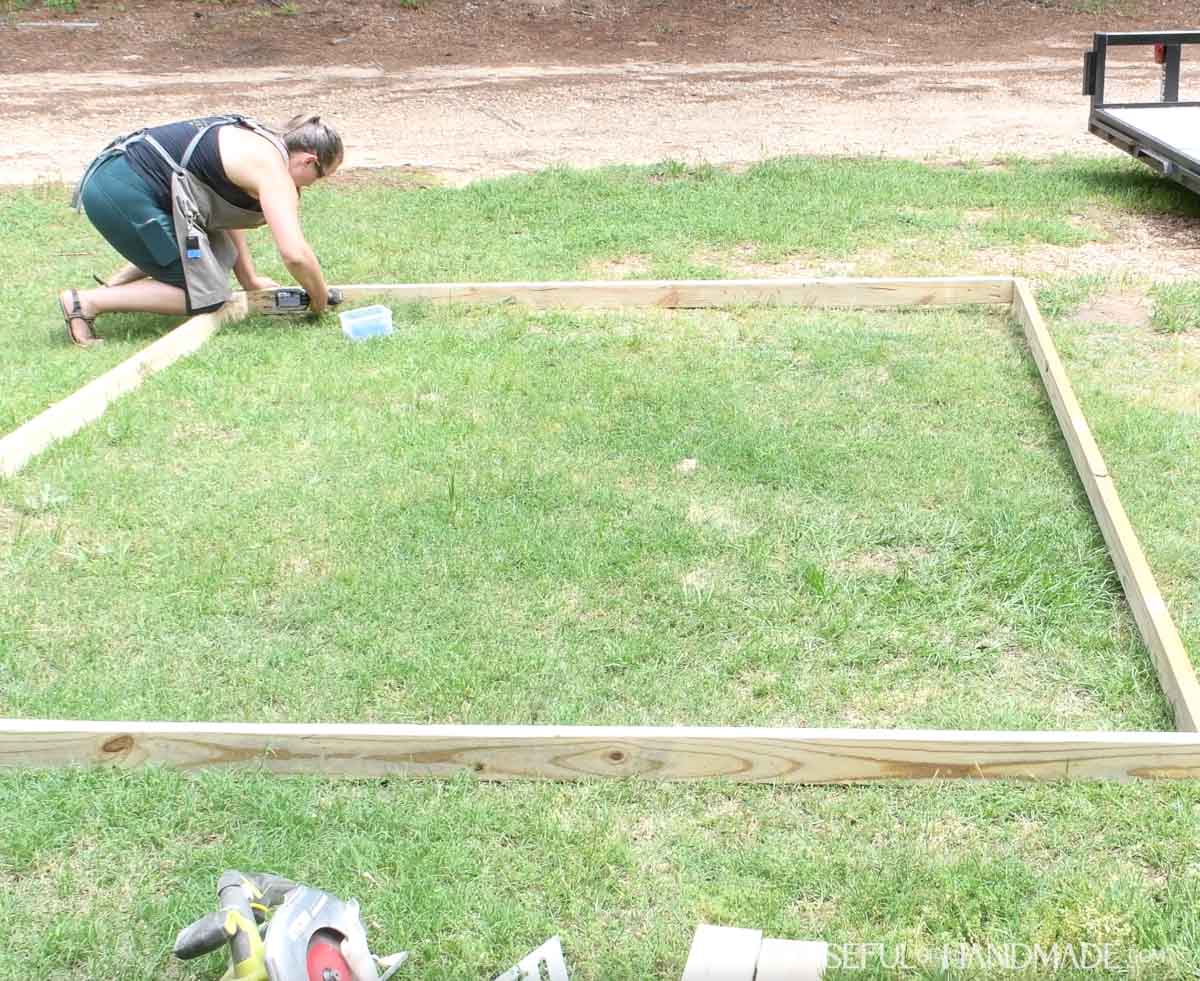
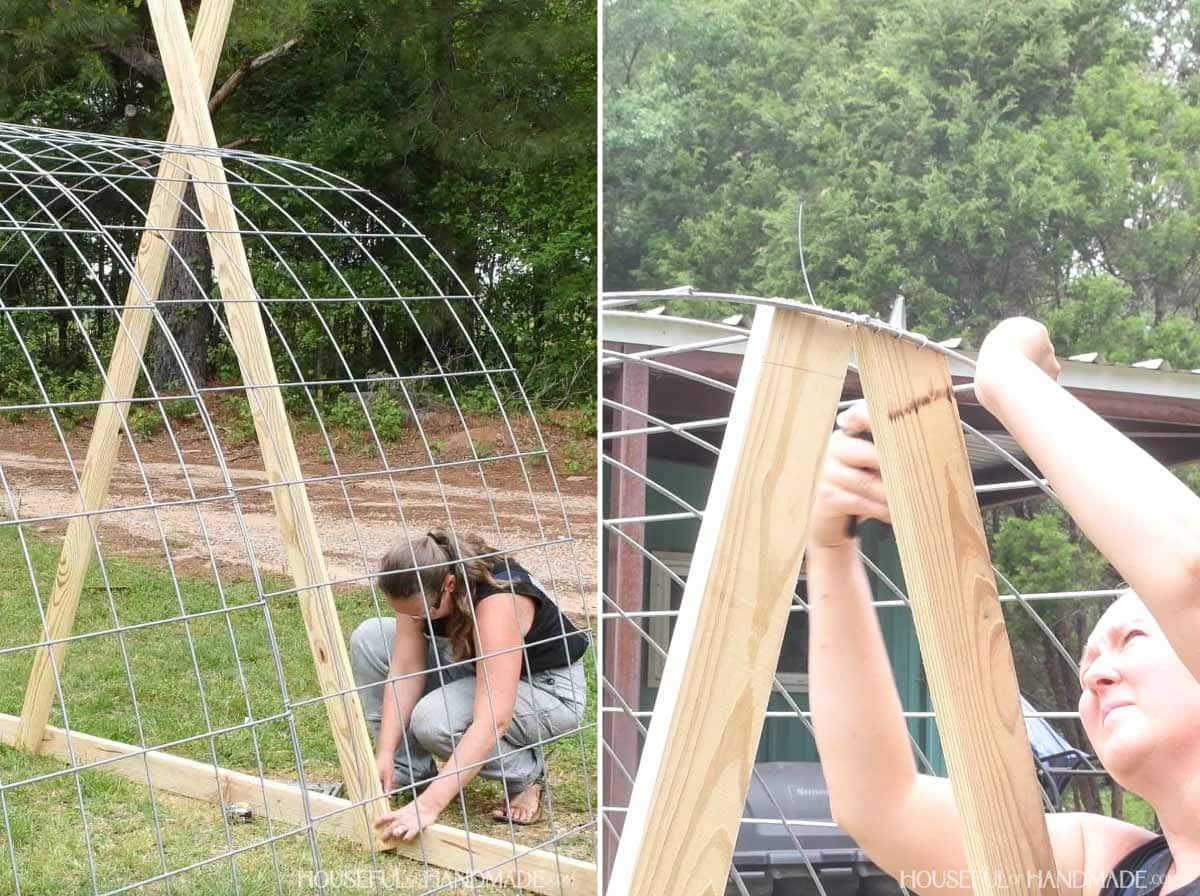
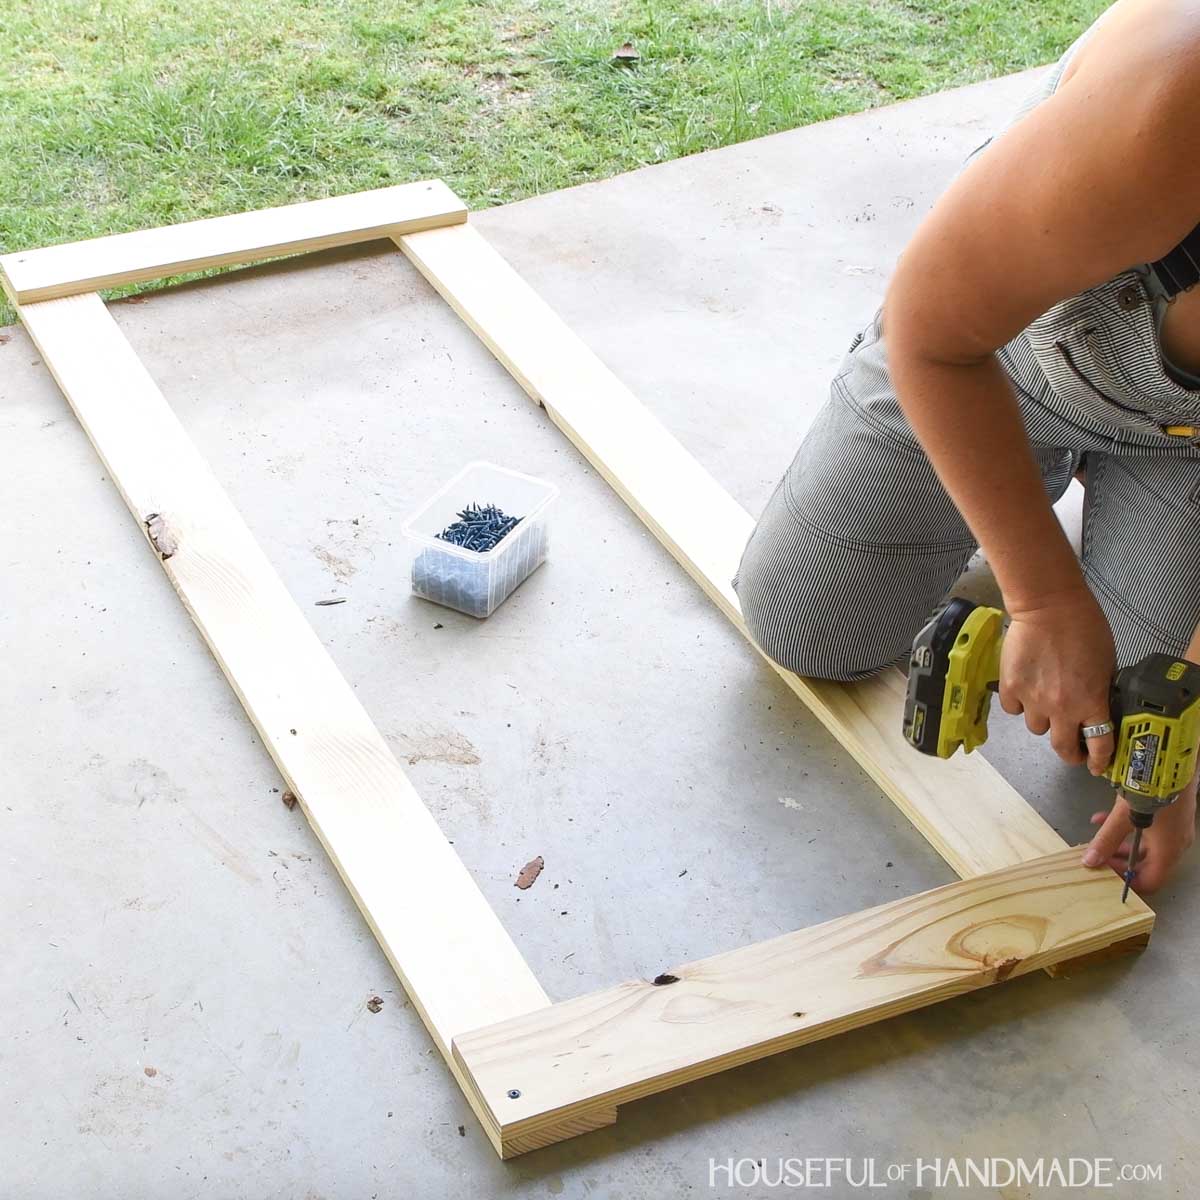
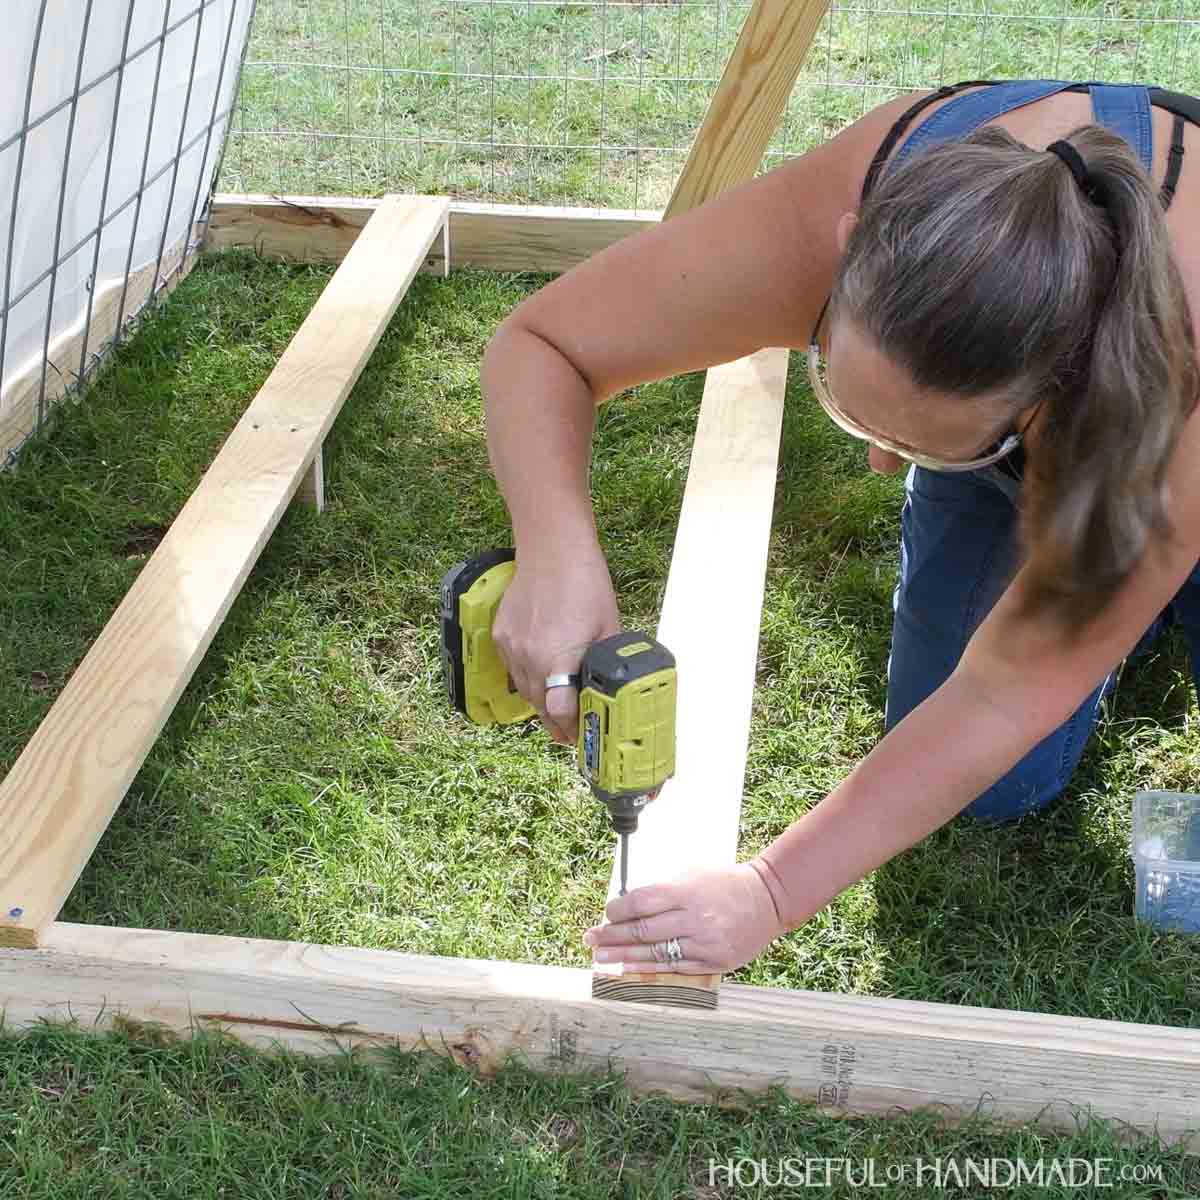
STEP 1- Build frame
Cut the frame pieces to length. With these large boards, I prefer to cut them on site using a circular saw.
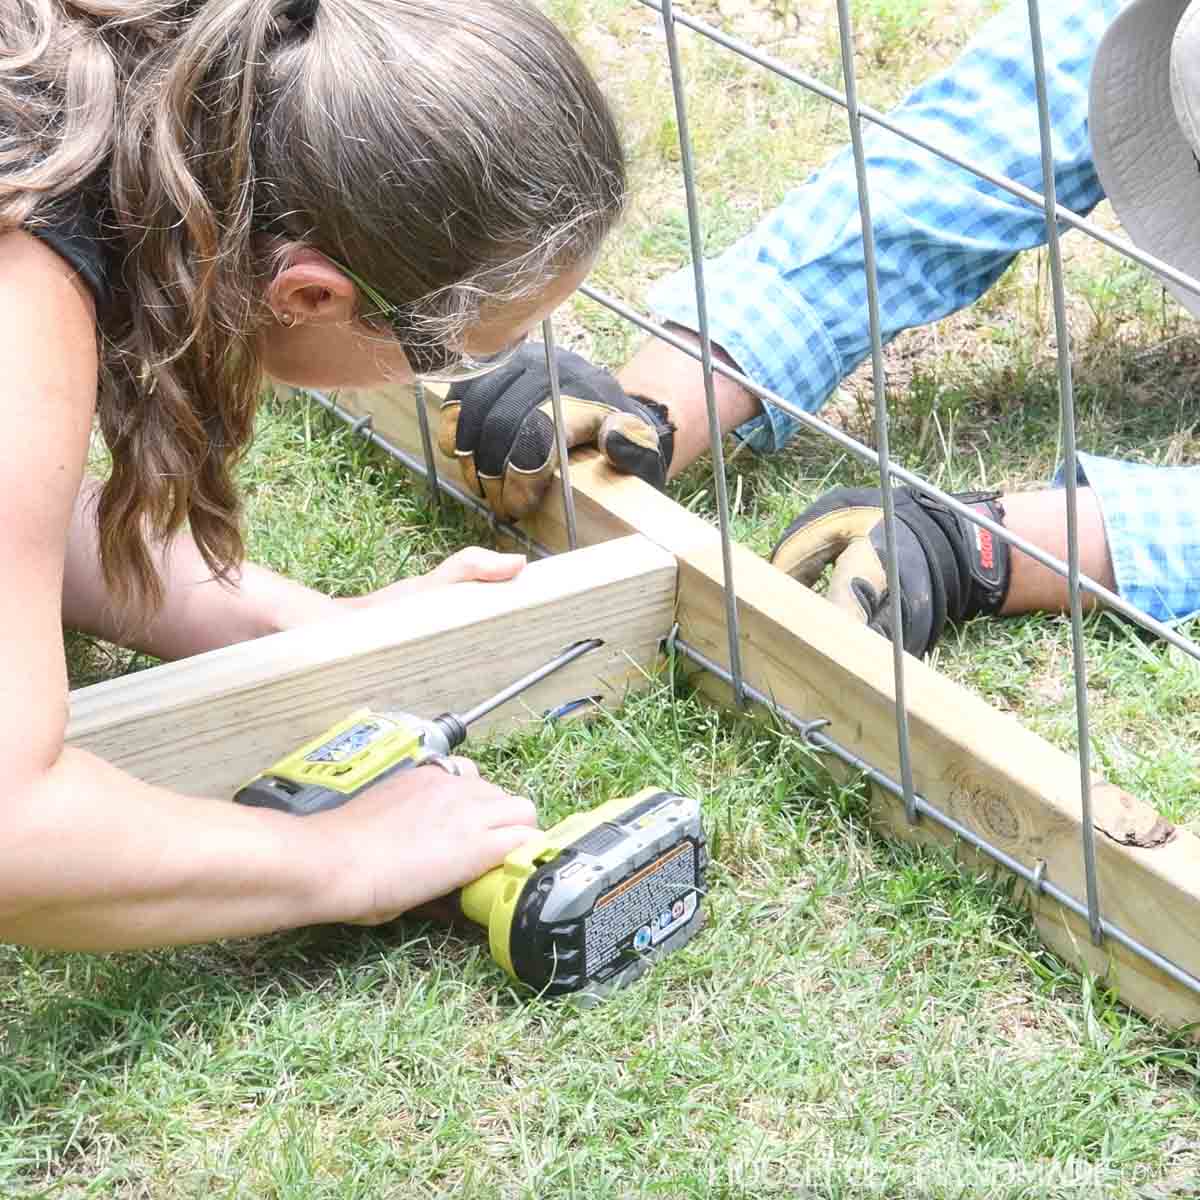
Drill pockets holes set for 1 1/2” thick material in both ends of the bottom front/back pieces.
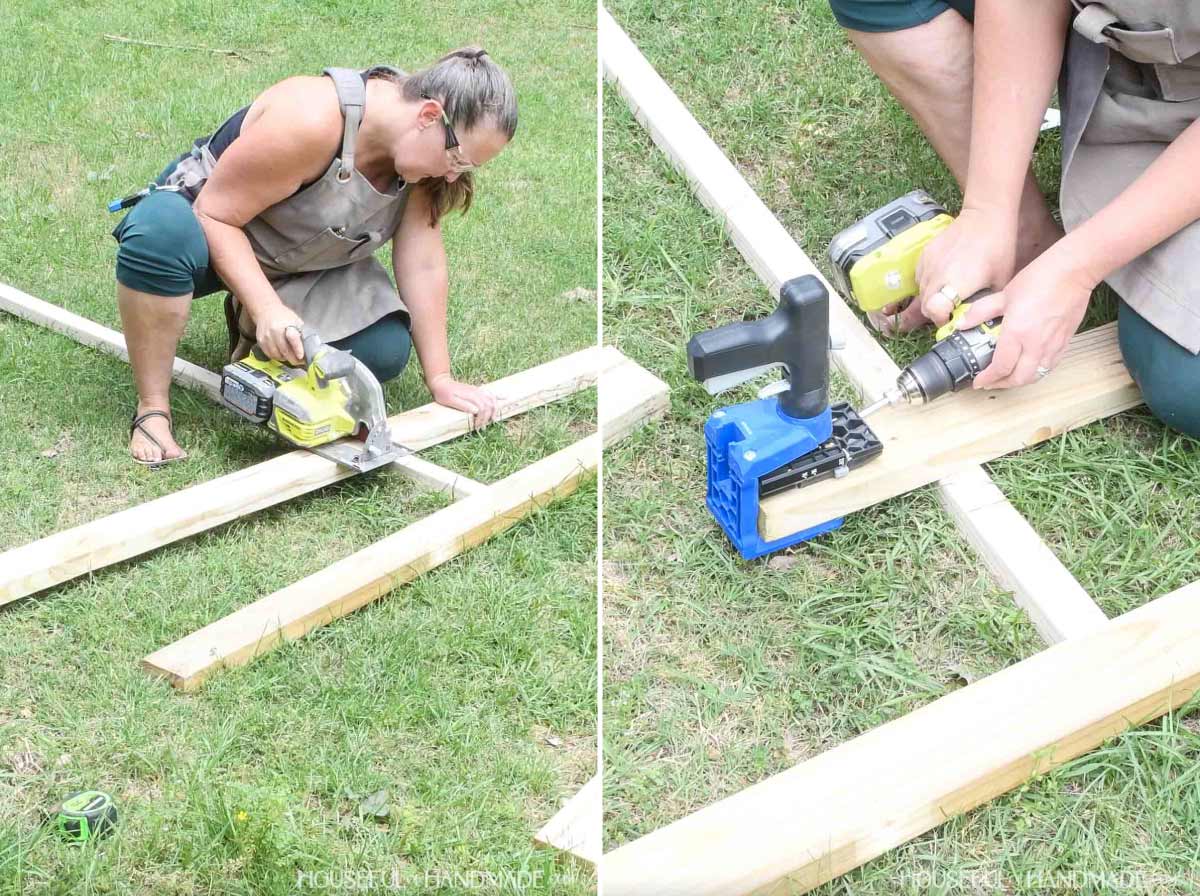
Attach the front/back pieces between the bottom sides so they are flush at the corners.
Secure with 2 1/2” pocket hole screws.
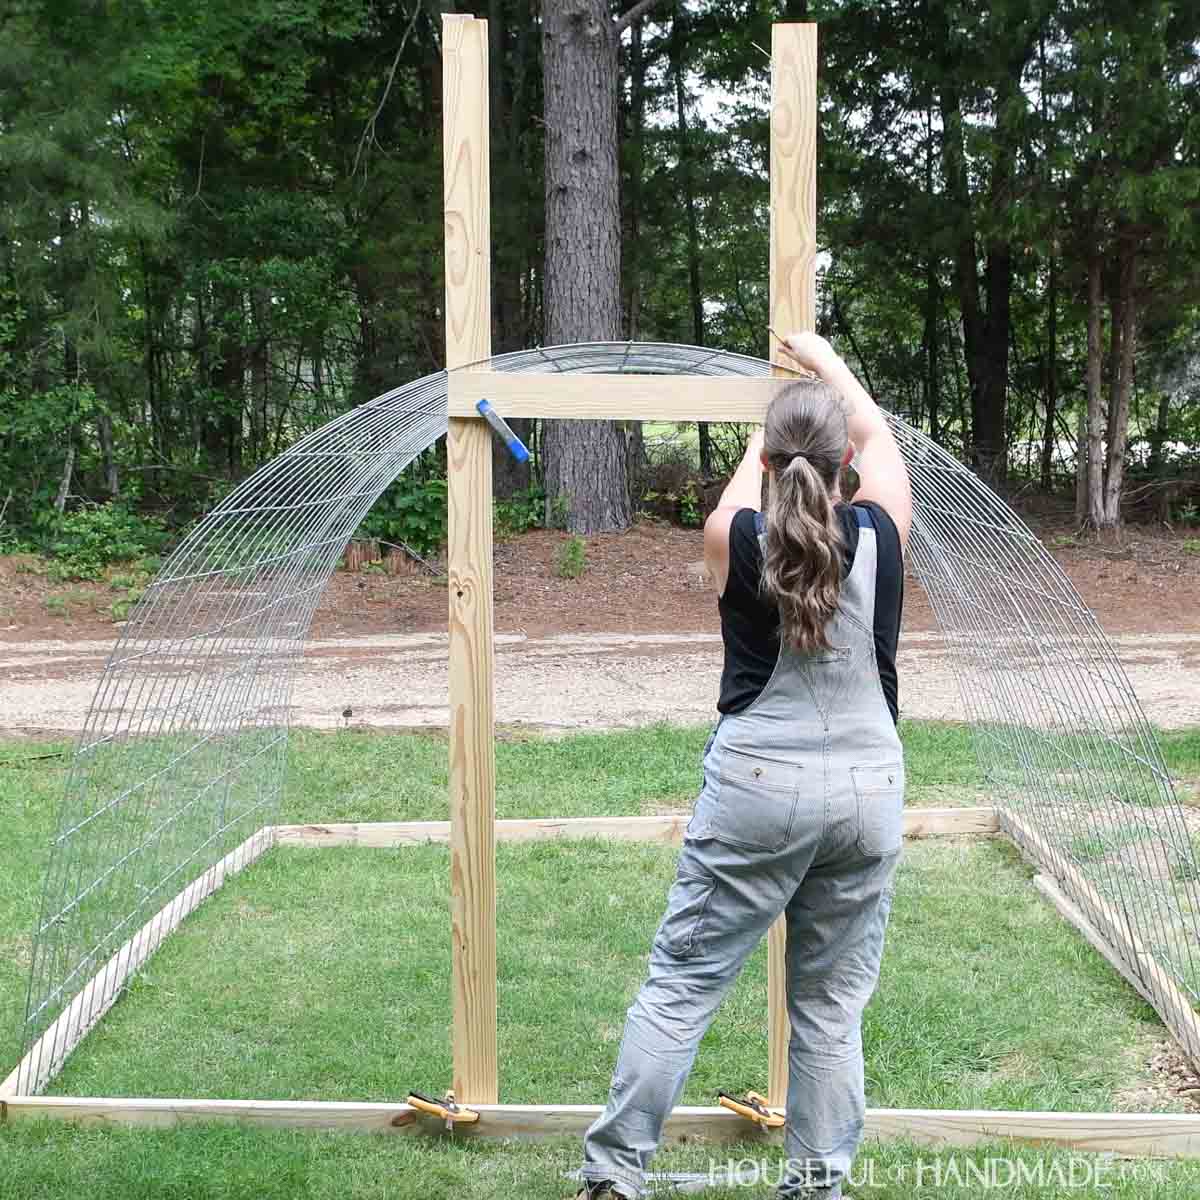
Place the cattle panels inside the frame so they create an arch.
It can be a bit tricky to get them in place with only one person (ask me how I know). But if you can get one side braced against the inside of the frame, then pull the second side down to create an arch it is easiest.
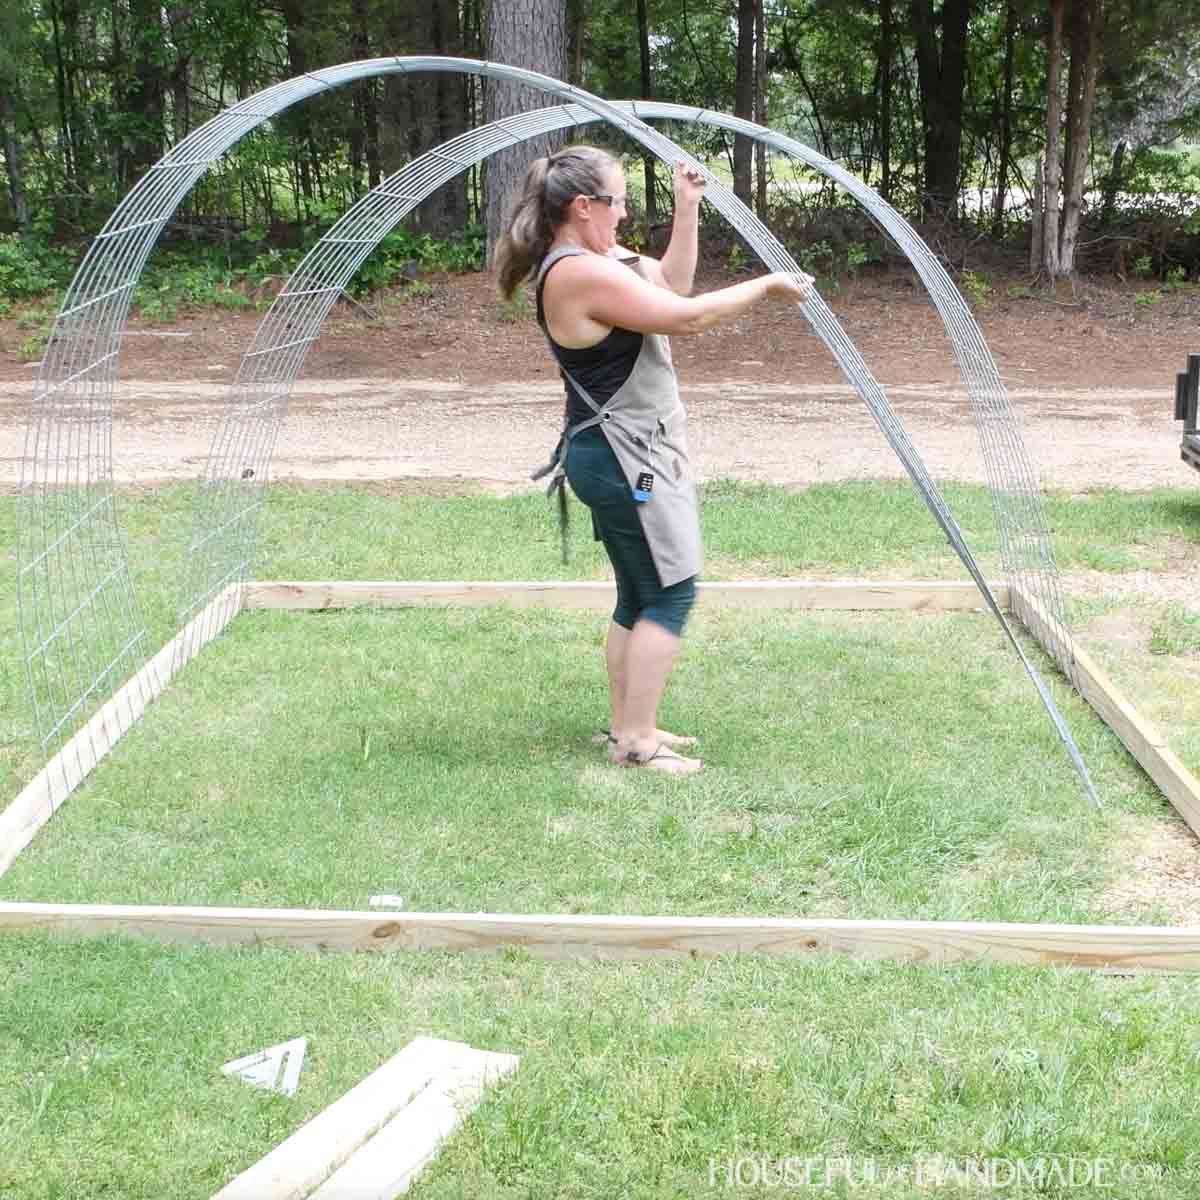
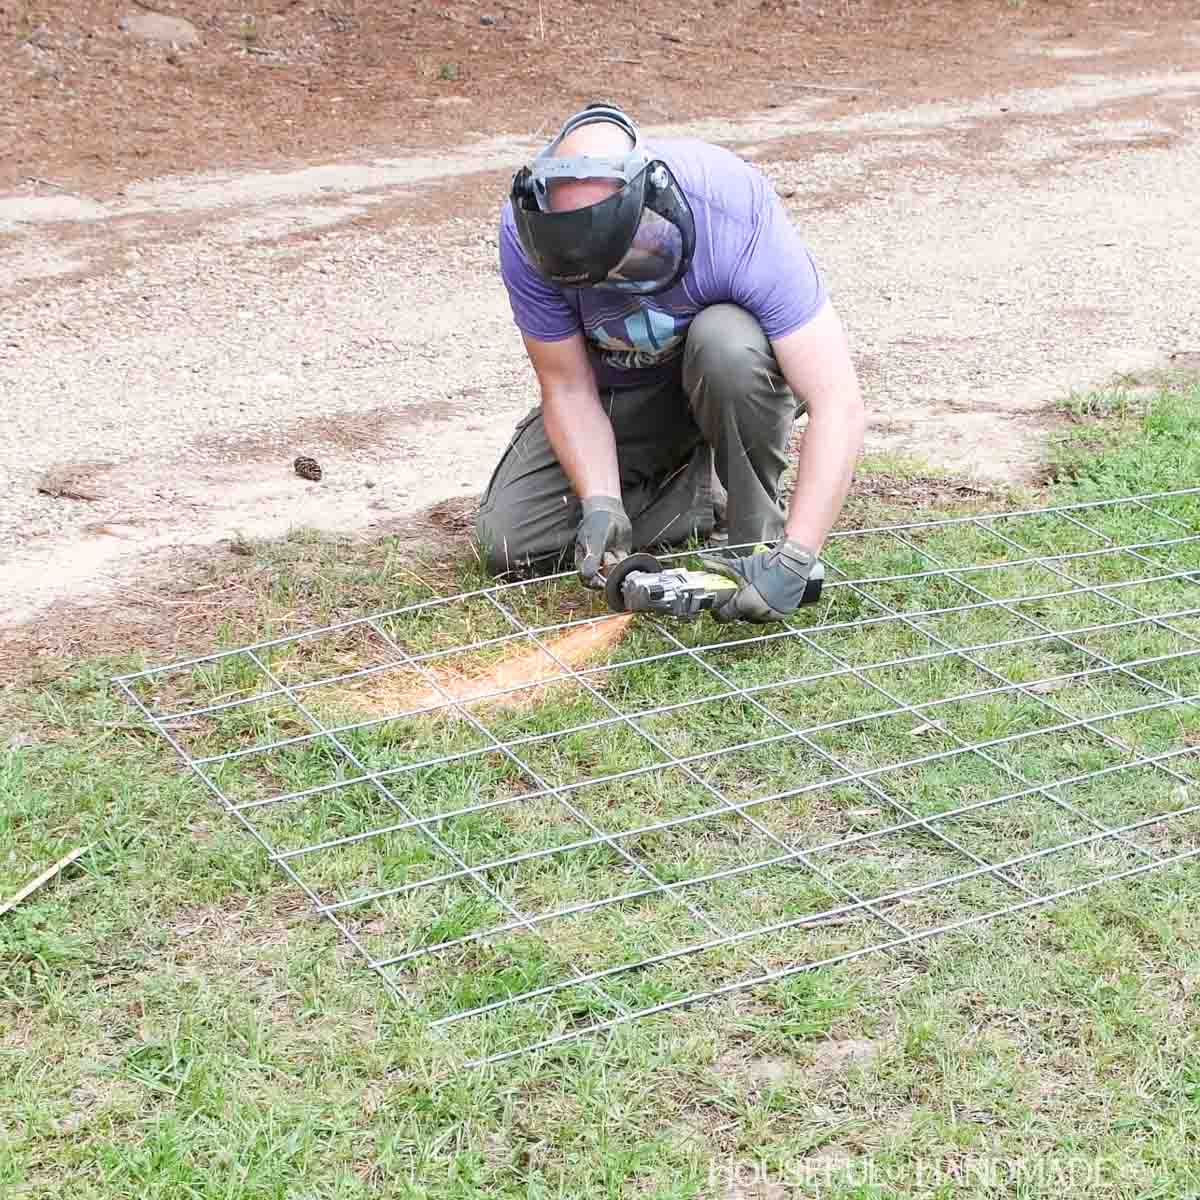
The 3 cattle panels are about 9” too big for the frame. You can overlap them slightly on the seams or use an angle grinder to cut one section off each edge of one of the panels.
You have to cut one off each edge to get the proper fit because on one edge there are two smaller sections.
You need to remove one smaller and one larger section for the perfect fit.
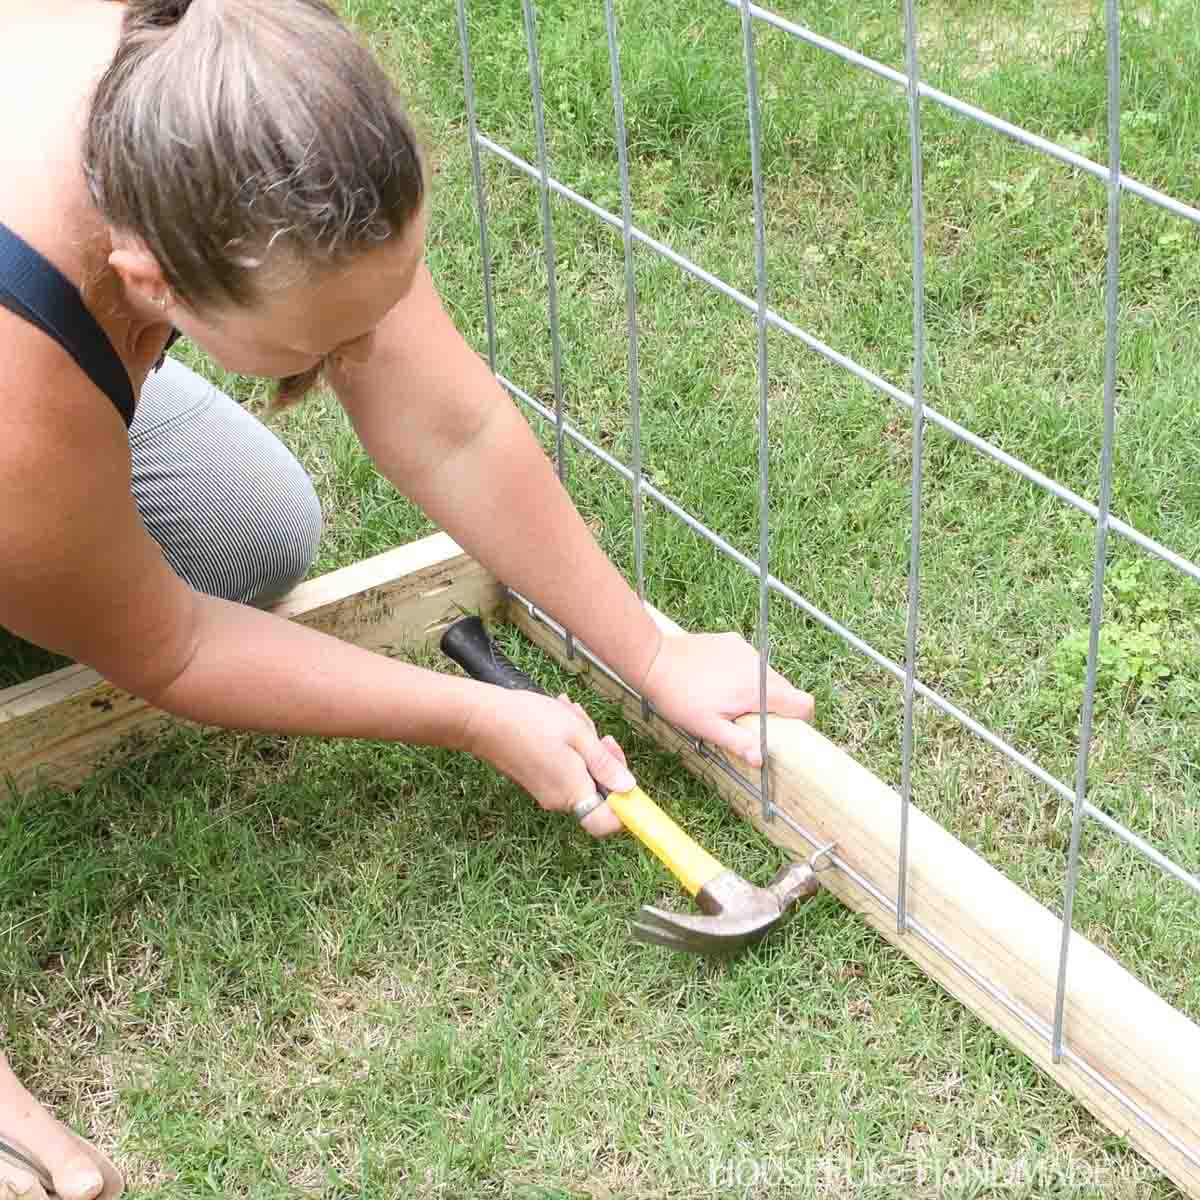
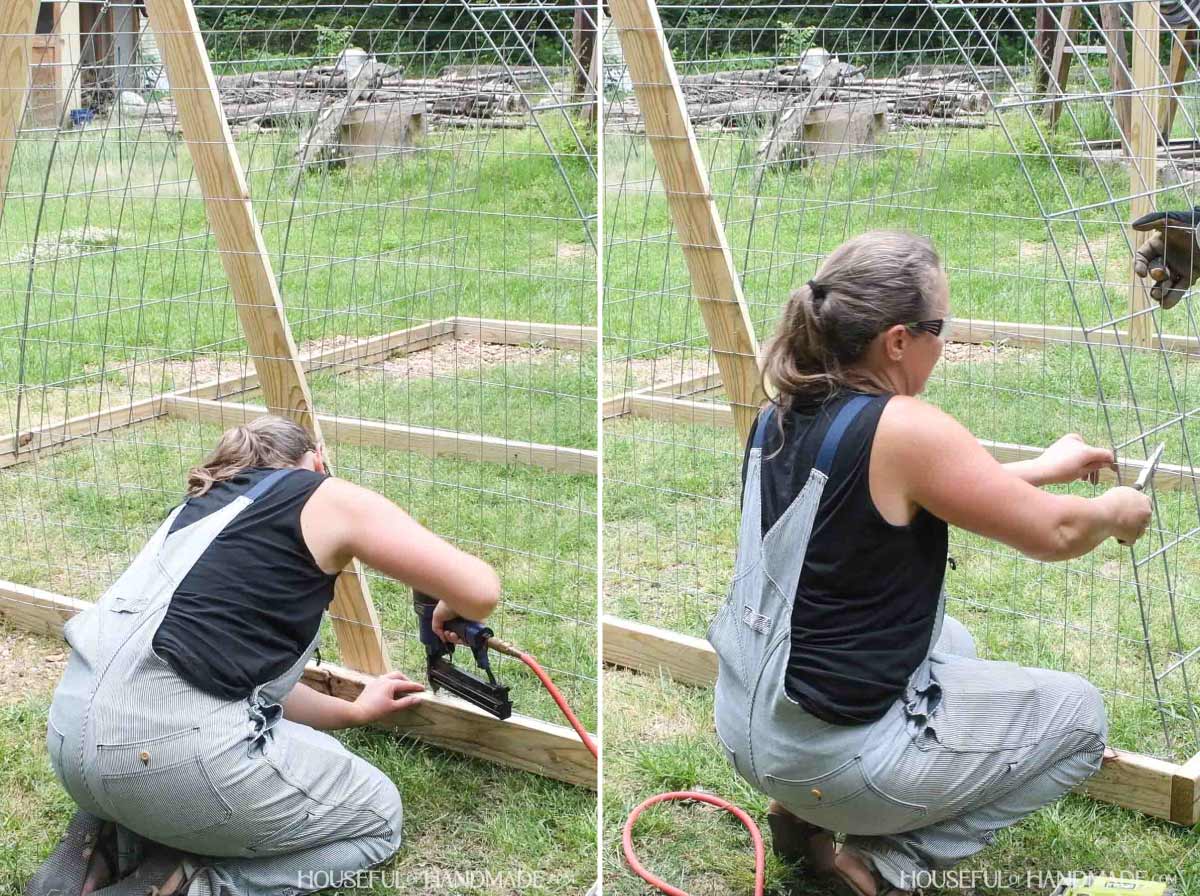
Once all the cattle panels are inside the frame. Attach them to the side of the 2×4 base with fence staples.
I pulled the cattle panel 1 1/2” up from the bottom of the side. Then hammered a staple into each section of the fence panel.
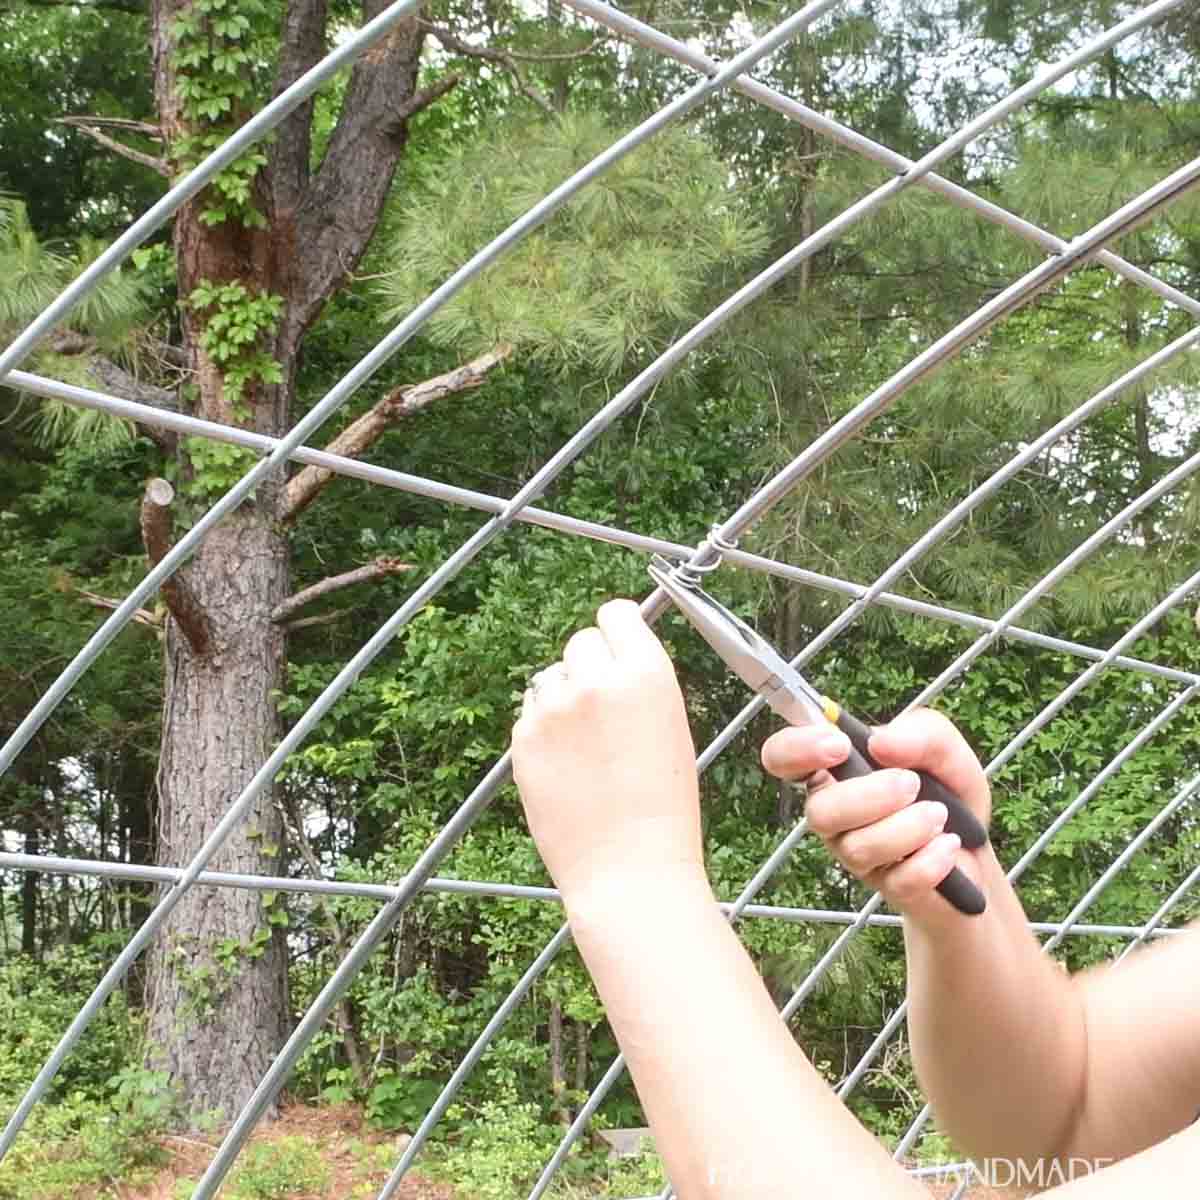
To attach the panels together, I cut an ~6-8” piece of fence wire and twisted it tightly around the two panels to hold them together.
I added twisted wire about every 2’ along the entire cattle panel arch.
The cattle panels pushing against the frame caused it to bow out in the center so I added a center support to keep it square.
Cut a notch in the middle ends of the center support piece where the cattle panel bottom piece they will lay flat against the frame sides.
Then drill pockets holes set for 1 1/2” thick material in both ends and attach it to the center of the frame. Secure with 2 1/2” pocket hole screws.
You may need a second set of hands to push the edge of the frame in while you attach it.
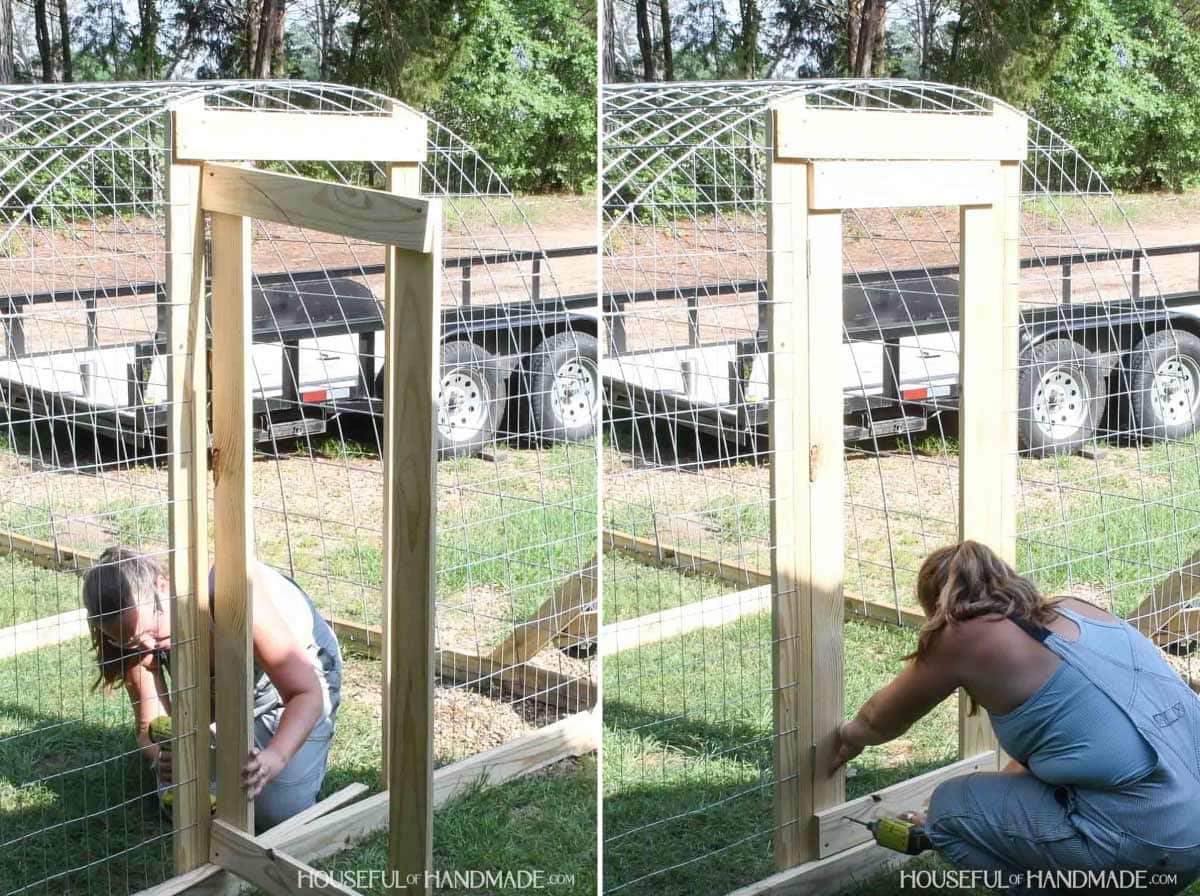
STEP 2- Add front and back
Place 1×4 boards inside the front of the frame. Clamp them in place on the bottom. Then clamp the top board in place to hold them straight.
Draw a line along the top of the boards where the top curve of the hoop is.
Then remove the boards and cut along the curve with a jig saw just above the line.
Drill 4 holes evenly spaced along the curved cut just big enough to thread your fence wire into them.

Then attach the frame boards together according to the digram below. Secure with 1 1/4” wood screws.
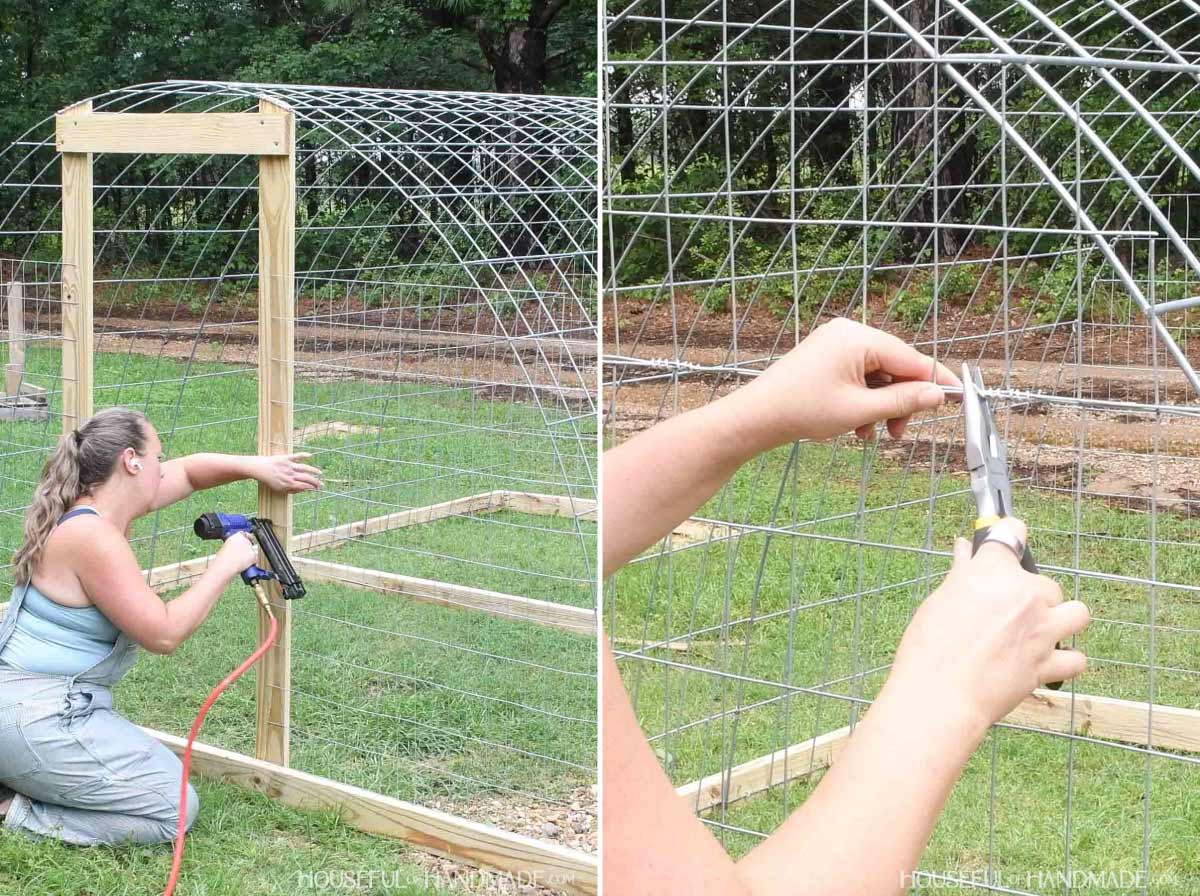
Place the door frame inside the 2×4 base so the top of the 1x4s sit behind the front wire of the cattle panel.
Secure to the 2×4 base with 2 1/2” screws.
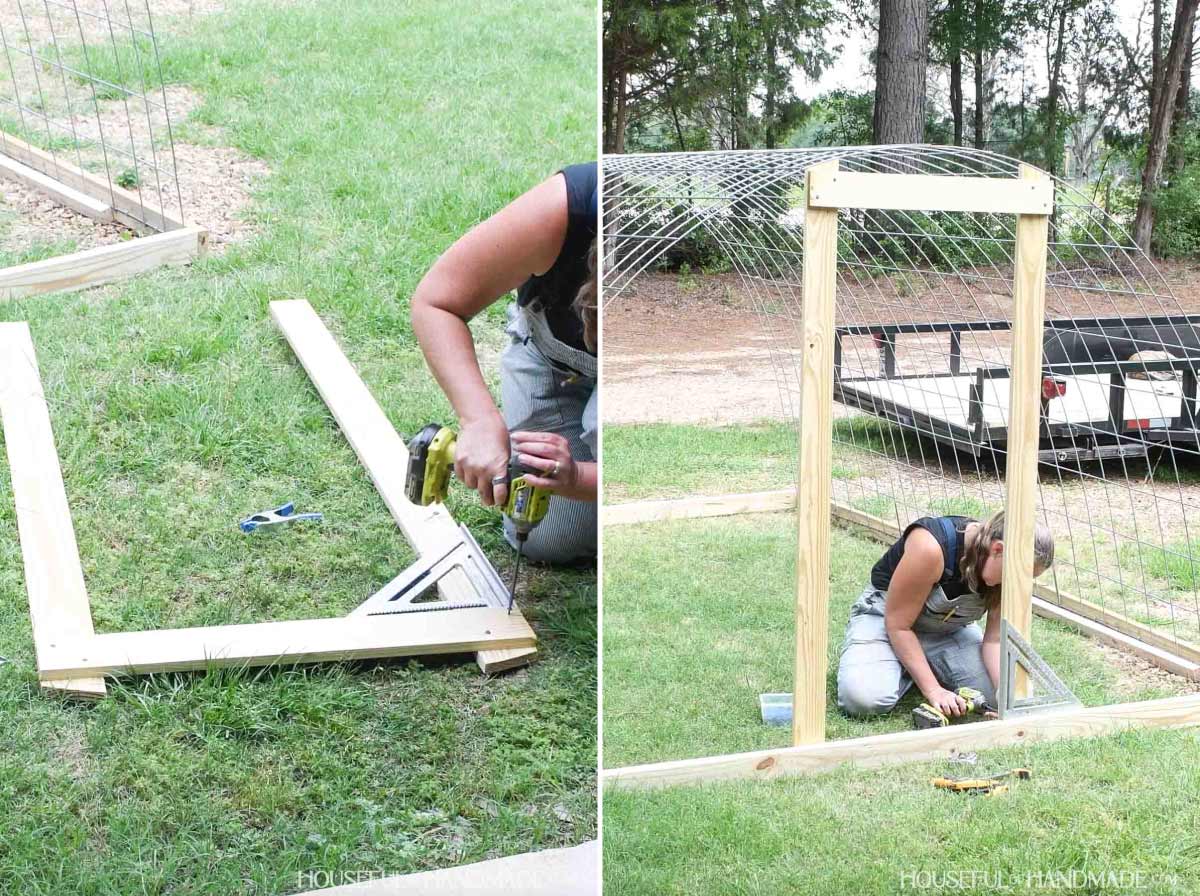
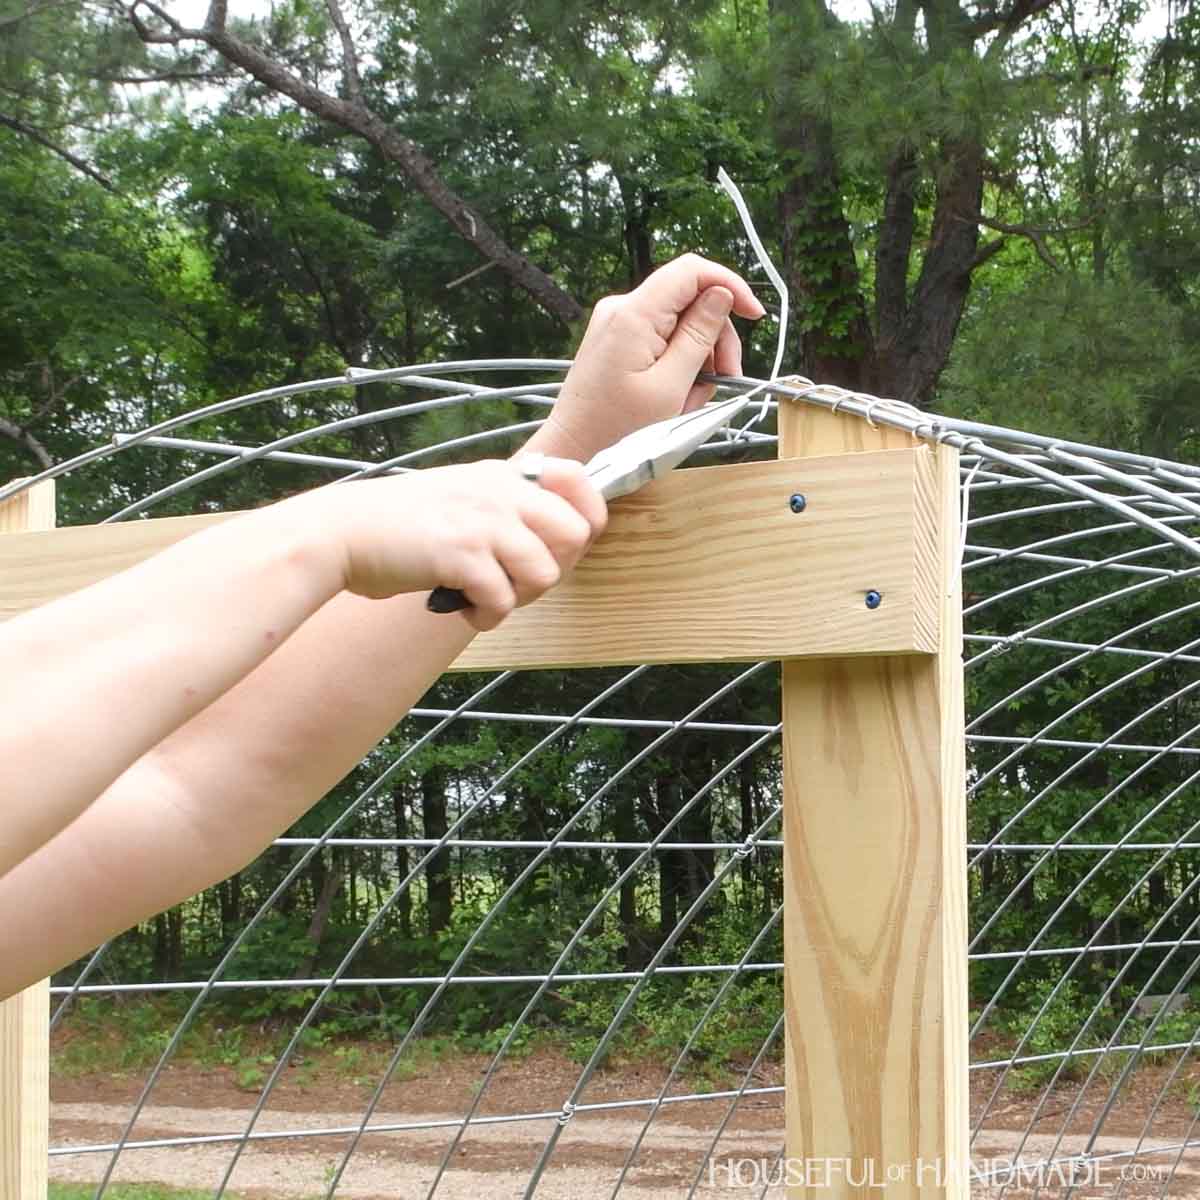
Attach the top of the door frame to the cattle panel hoop by twisting the fence wire around the cattle panel and then through the holes drilled in the top of the board.
Continue threading (or sewing) the wire around the hoop until you go through all the holes on the board.
Then twist the ends a couple times around the wire of the hoop very tight before cutting off the extra.
For the back support boards, place the 1×4 inside the frame and clamp them so they are spaced appropriately on the bottom. Then lean them toward the center of the hoop so they touch in the the middle.
Draw a line to transfer the angle to cut the bottom and the curve on the top. I recommend cutting the bottom angle first, then bring the boards back and draw the curve of the hoop.
Drill 4 holes in the top of the boards big enough for the fence wire. Then attach the boards to the bottom frame with 2 1/2” wood screws.
Sew the top of the boards to the hoop the same as the door frame to secure it.
STEP 3- Enclose tractor
Cut a piece of the utility mesh or hardware cloth the to fit across the back.
Attach it to the base and back supports with pneumatic staples.
Trim the excess along the curve of the hoop with wire cutters on the pliers, but make sure to leave 2-3” lengths.
Twist the 2-3” ends around the cattle panel hoop to secure them.
Make sure they are twisted tightly and have 2-3 full twists before cutting off the excess.

Then cut a second piece to go above the first and repeat. Use fence wire to twist the two sections together as needed.
Next repeat for the front on either side of the door frame. I also added a small cutoff above the door frame to cover the slight gap.
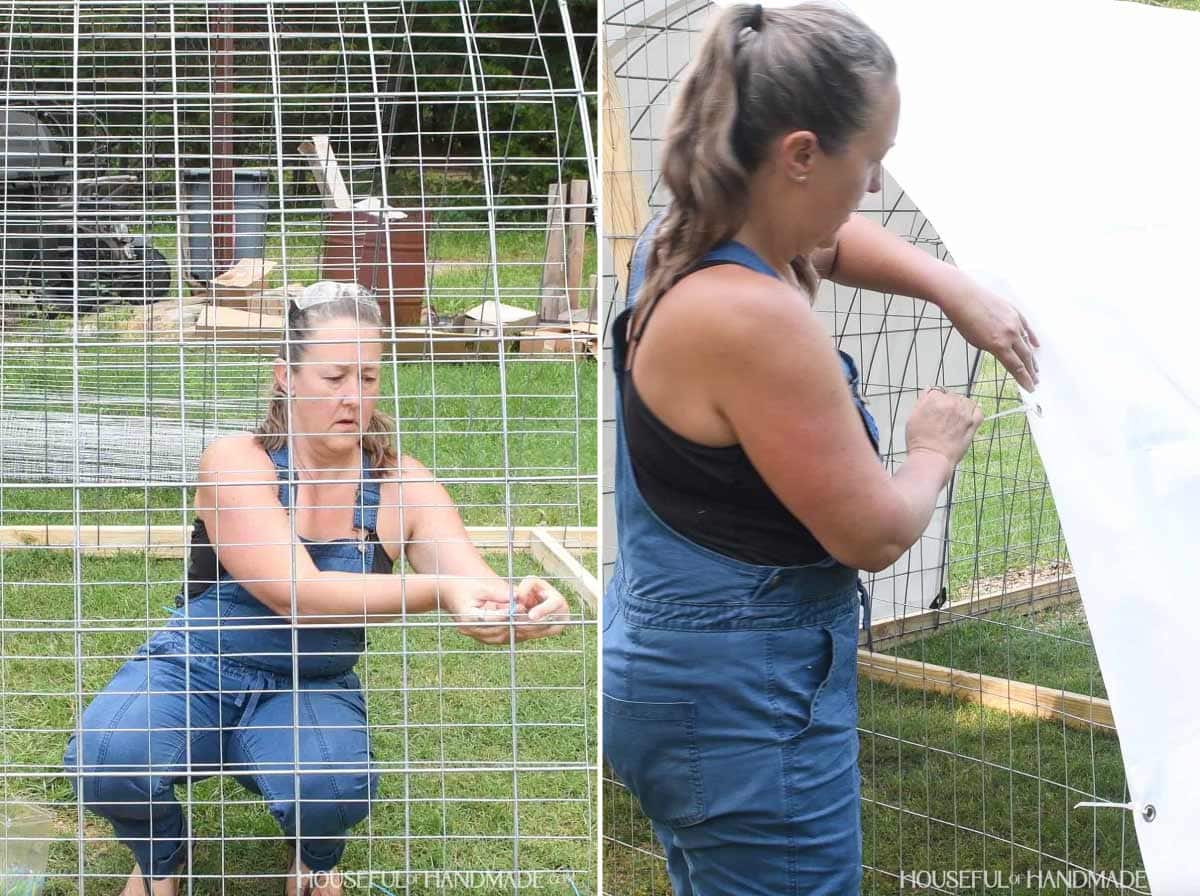
We added the smaller utility mesh over the cattle panel where it would not be covered by the tarp. This is necessary to prevent small birds from being able to get out the larger cattle panel openings.
Cut a piece to fit along the entire arch. Then secure it to the cattle panels with zip ties.
Next, pull the tarp over the remaining section of the hoop. Secure the tarp to the panels with zip ties.
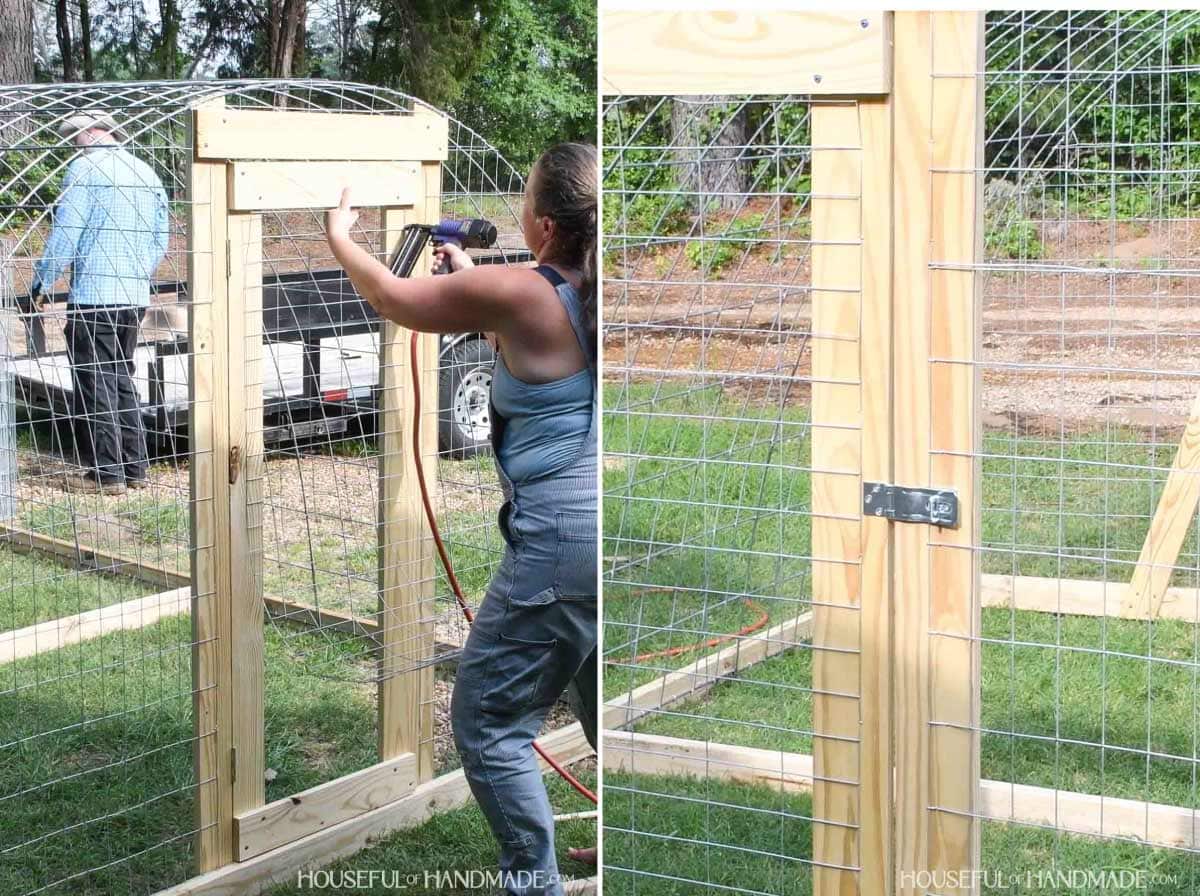
STEP 4- Build and hang door
To build the door, place the door top and bottom pieces on top of the sides so they are flush in the corners.
Secure with just 1 screw in the corner for now, you will add a second one later.
Hang the door inside the frame using the 2 narrow hinges.
Since the door is only attached with one screw in each corner, the boards should be able to shift. This is great if your door frame is not perfectly square.
Adjust the door inside the frame so you have an equal gap all around. Then add a second screw to each corner to stop it from shifting.
Add a piece of mesh to the door and secure with 3/4” pneumatic staples.
Then add a hasp latch to the door hold it closed.
STEP 5- Add wheels to corners
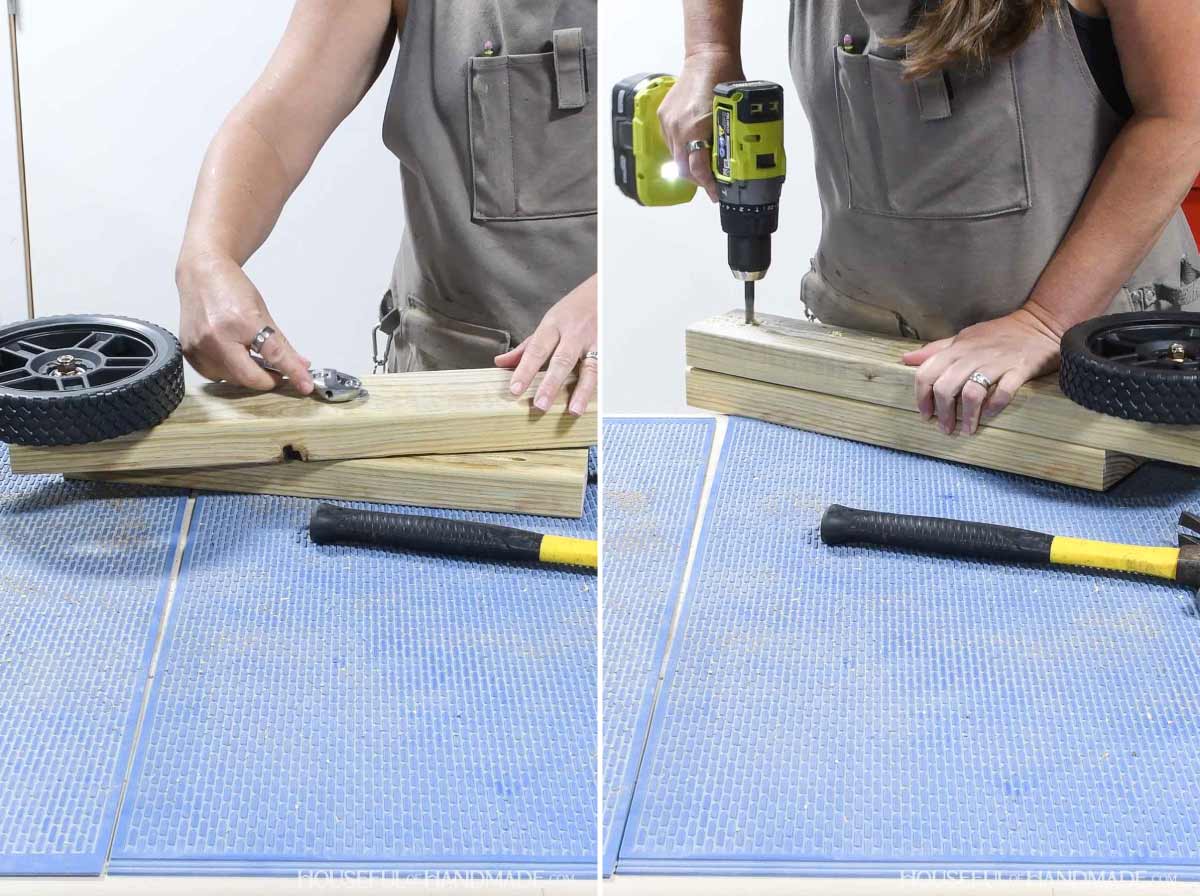
Drill pocket holes set for 1 1/2” material in one end of the wheel upright pieces.
Each wheel assemble will need an upright board and pivoting board. Drill the holes in these boards according to the diagrams in the plans.
For all the lawn mower wheels, drill a hole large enough to fit the bolt that came with the wheel in it. I also had to drill a hole in the back to recess the head of the bolt since it wasn’t long enough to go through the 2×4 board and the wheel.
The remaining holes are drilled to fit a 3/8” bolt or locking pin.
I drilled the hole 13/32” so it was slightly bigger, but later made the locking pin holes even bigger.
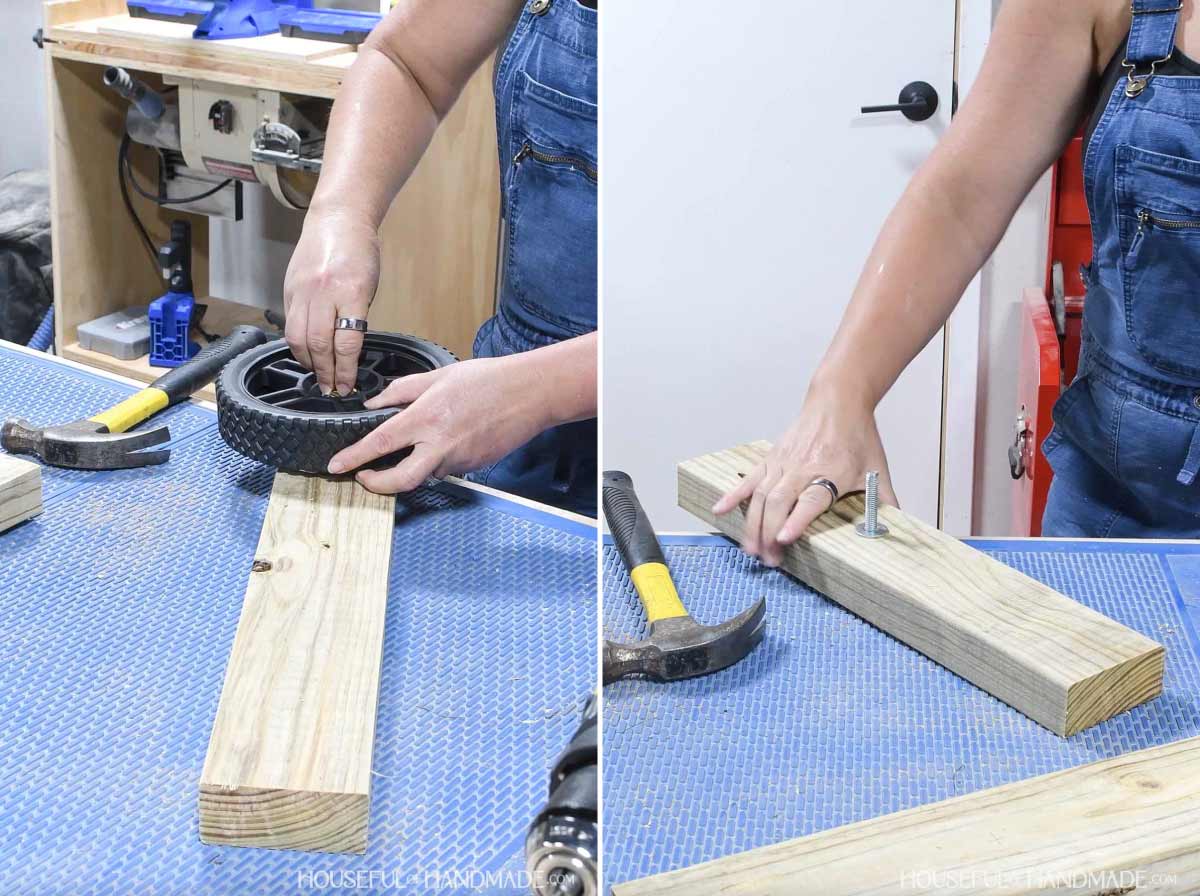
Attach the wheel to the upright boards. Then add a bolt to the center hole and place a washer on it.
Then place the pivoting board on the bolt and secure with a nut.
Attach the upright board to the corner of the tractor frame with 2 1/2” pocket hole screws. I had to remove the pivoting board first.
Then attach the wheel side support and secure it to the upright and frame with 2 1/2” wood screws through the diagonal.
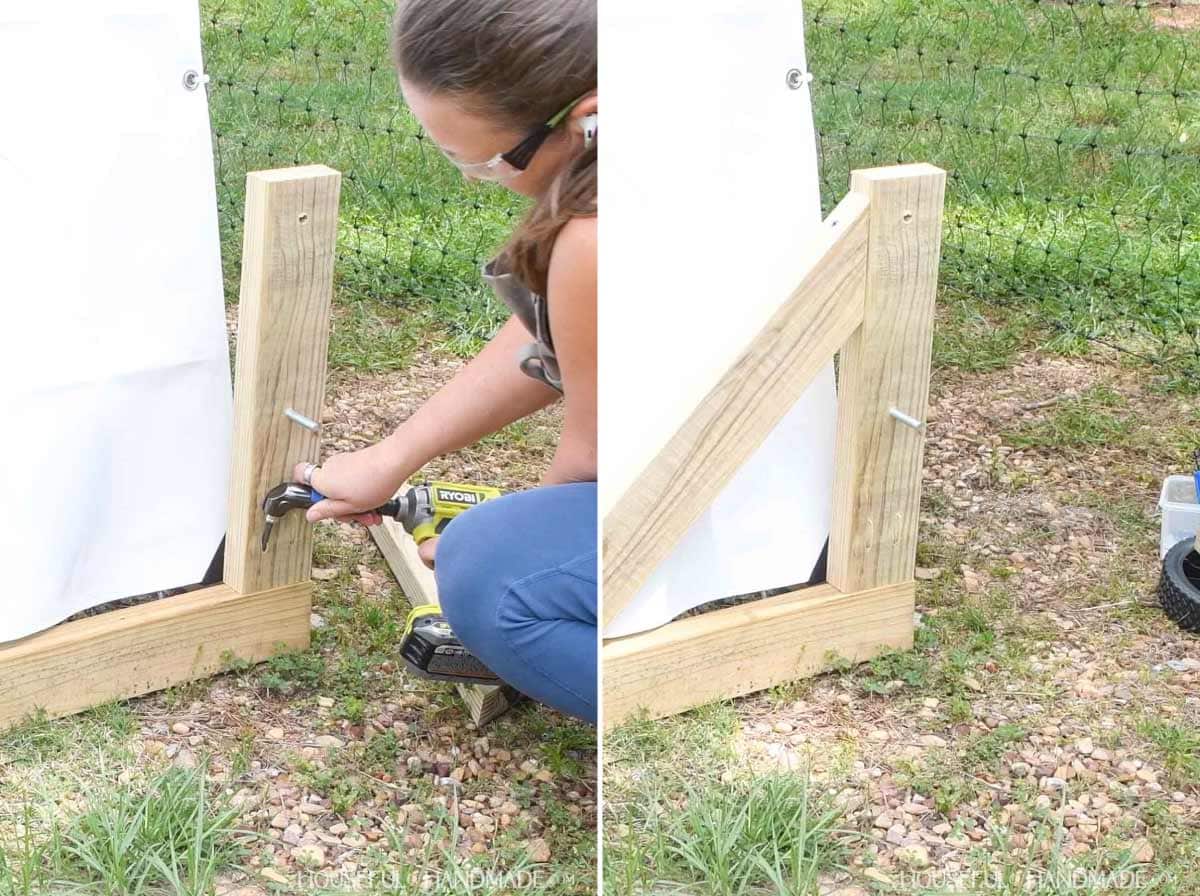
Place the bolt through the center hole in the upright board.
Add a washer on the bolt in then, thread the pivoting board onto it and secure with a nut.
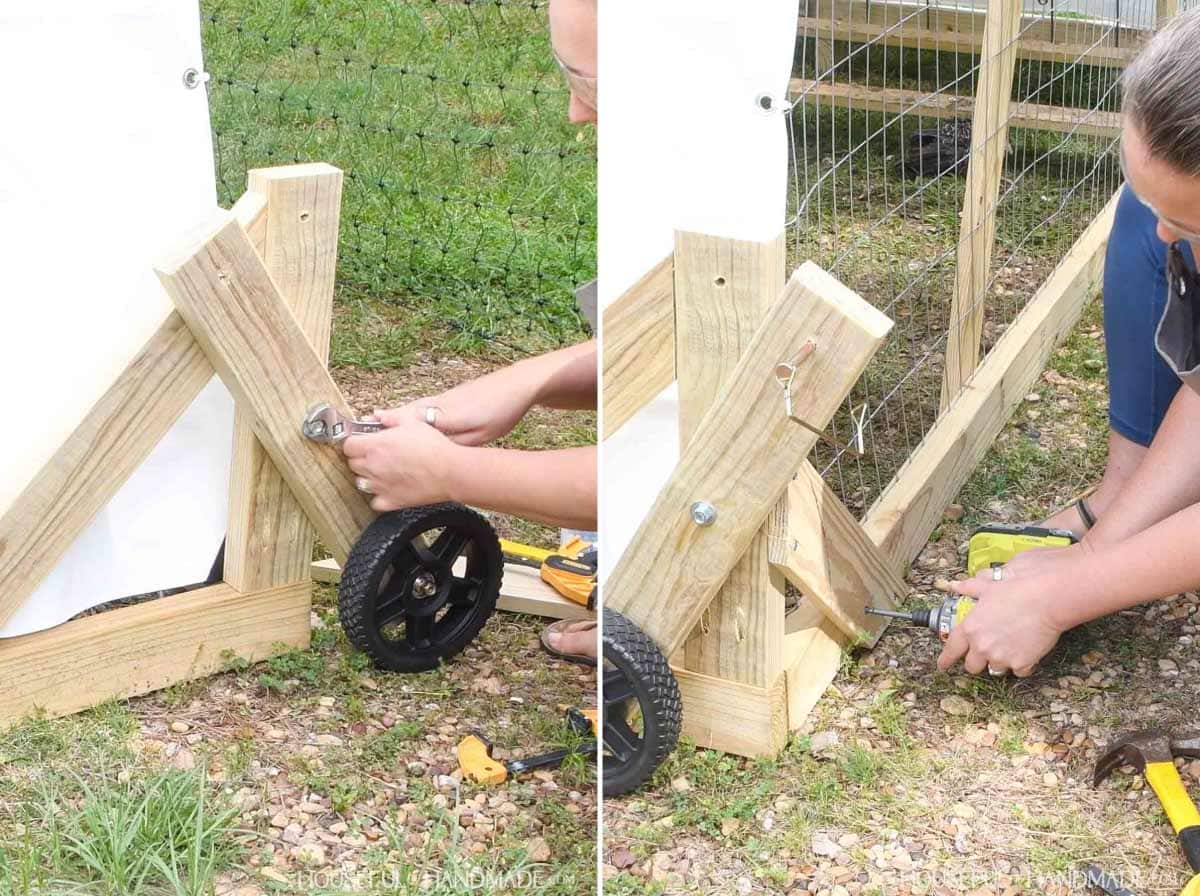
Finally, attach the wheel front support on the front of the frame and edge of the upright board. Secure with 1 1/4” wood screws.
To raise the chicken tractor for moving, press the pivoting board so it is inline with the upright board and secure with a lock pin through the top holes.
Now you can roll the chicken tractor onto its new pasture. Then remove the locking pin and lower the tractor to the ground.
The lawn mower wheels only allow the tractor to move forward and backward easily. If you need to pivot it side to side, I recommend adding swivel casters to the front wheels.
Attach 3 blocks to the outside bottom of the pivoting board with holes drilled according to the swivel wheel diagram. I secured these with waterproof wood glue and 2 1/2” wood screws into each layer.
Then attach the caster to the bottom of the blocks. The wheels raise and lower the same as the other wheels, but require a little more force since they move around.

Because we get a lot of rain in east Texas, I added a simple roost bar to the back corner under the tarp.
This was mostly to give them a place to get their feet out of the water when we have crazy rain storms. But I found our meat turkeys roosting on it every morning.
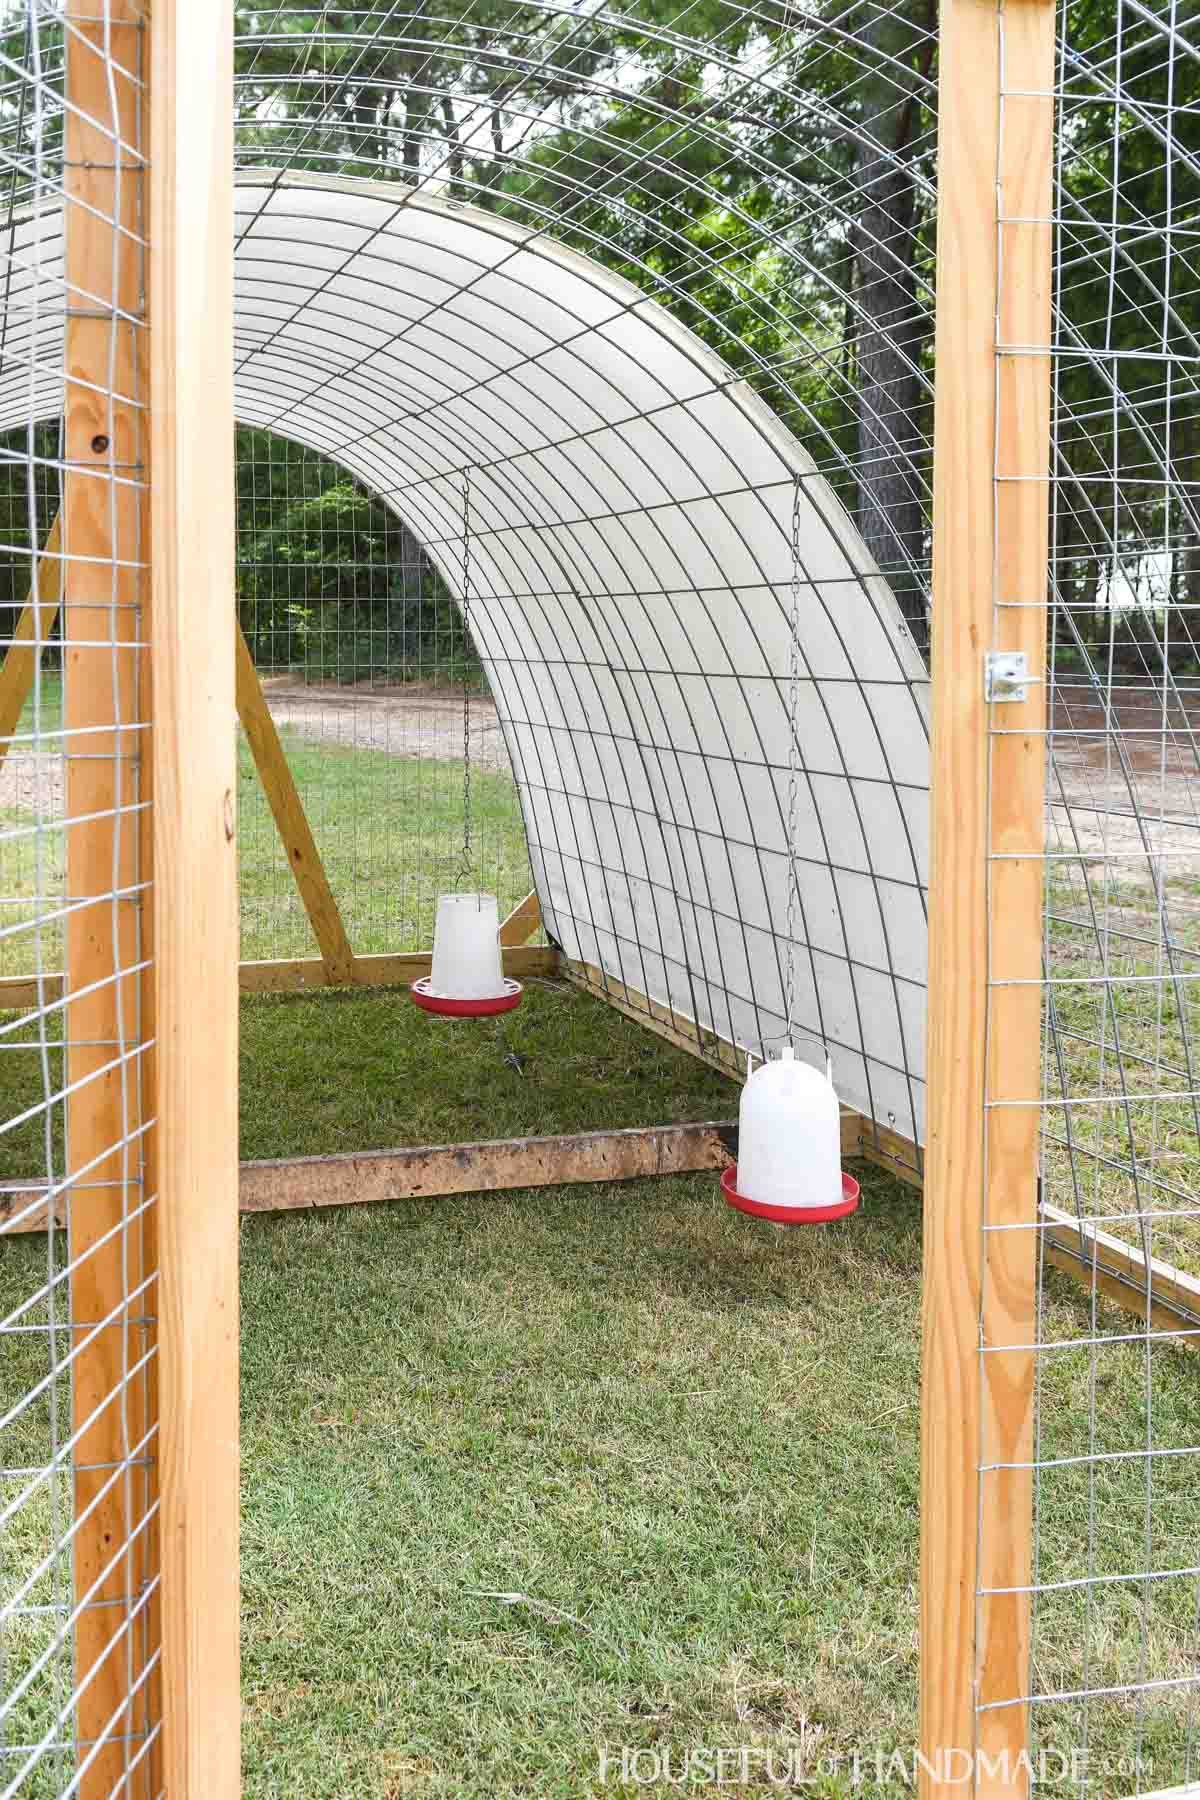
To feed the birds, we hung feeders from the cattle panel hoop using chain and s-hooks.
The chain is great for being able to quickly adjust the height of the food and water as the chickens and turkeys grow.
Premium plans include:
- Recommended Tools
- Shopping list
- Easy to read cut list table
- Cut diagrams
- Step-by-step instructions with 3D renderings
- Helpful resources
- BONUS: 3D SketchUp file
You did it!
Now once your birds are big enough to leave their brooder, you can place them in the chicken tractor and easily move them to new grass or pasture every morning.
Nothing beats happy poultry!

Happy building!
