Skip to Content

How to Easily Remove Linoleum

Removing linoleum flooring doesn’t have to be a pain. Learn the easy way to remove your old flooring!

If you are remodeling an old house, you know the headache of old linoleum flooring. It is glued down to the subfloor and can be such a pain to remove.

They say you can just put your new floor on top of linoleum, but my experience is it’s always better to start with a clean slate. If you are going to take the time to do it, you might as well do it right!

Learn how to easily remove linoleum for your next remodel with a heat gun.

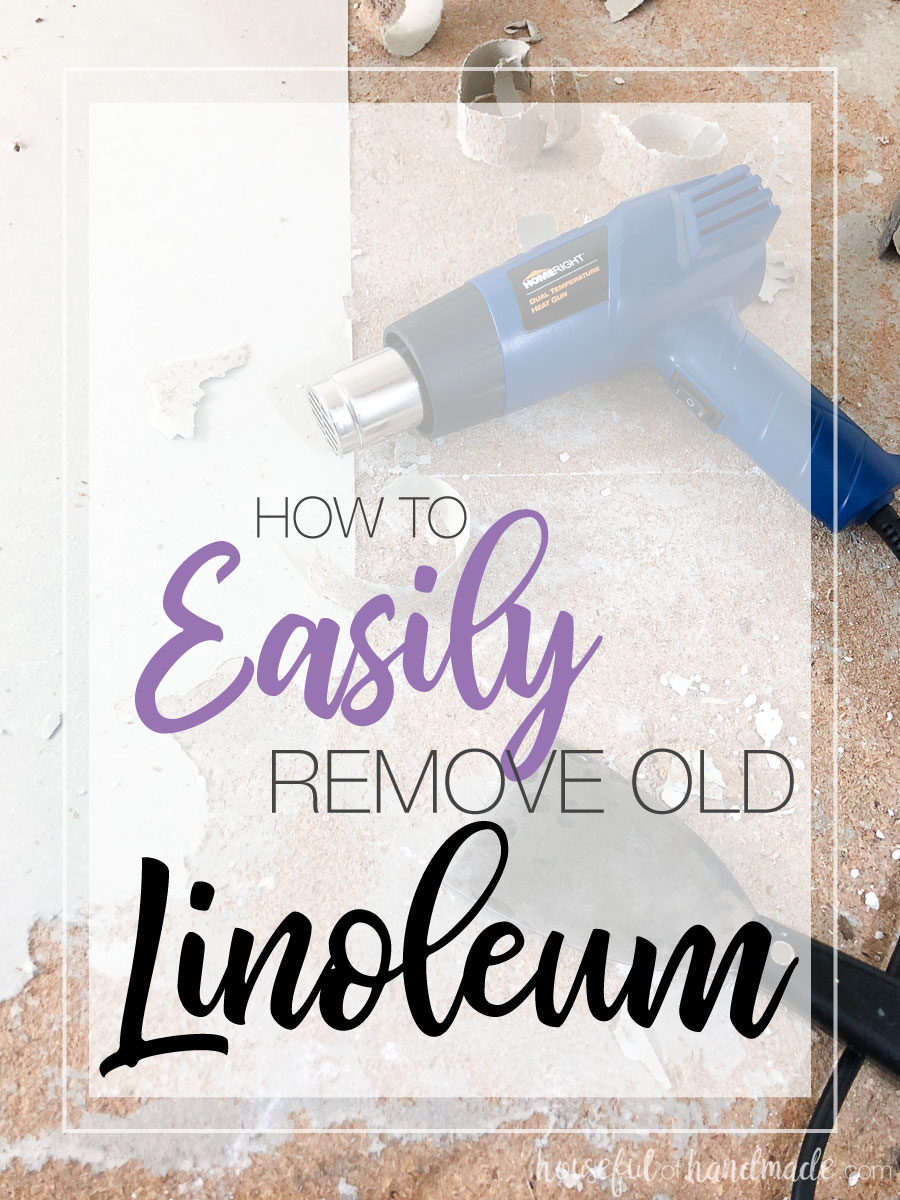
The trick to removing old linoleum is a heat gun! So simple right? And I partnered with HomeRight to share how to easily remove linoleum with the HomeRight Dual Temperature Heat Gun. This little gun is inexpensive but has so many uses, especially when you are remodeling your home.

This post may contain affiliate links. As an Amazon Associate I earn from qualifying purchases. Click here to read my full disclosure policy.

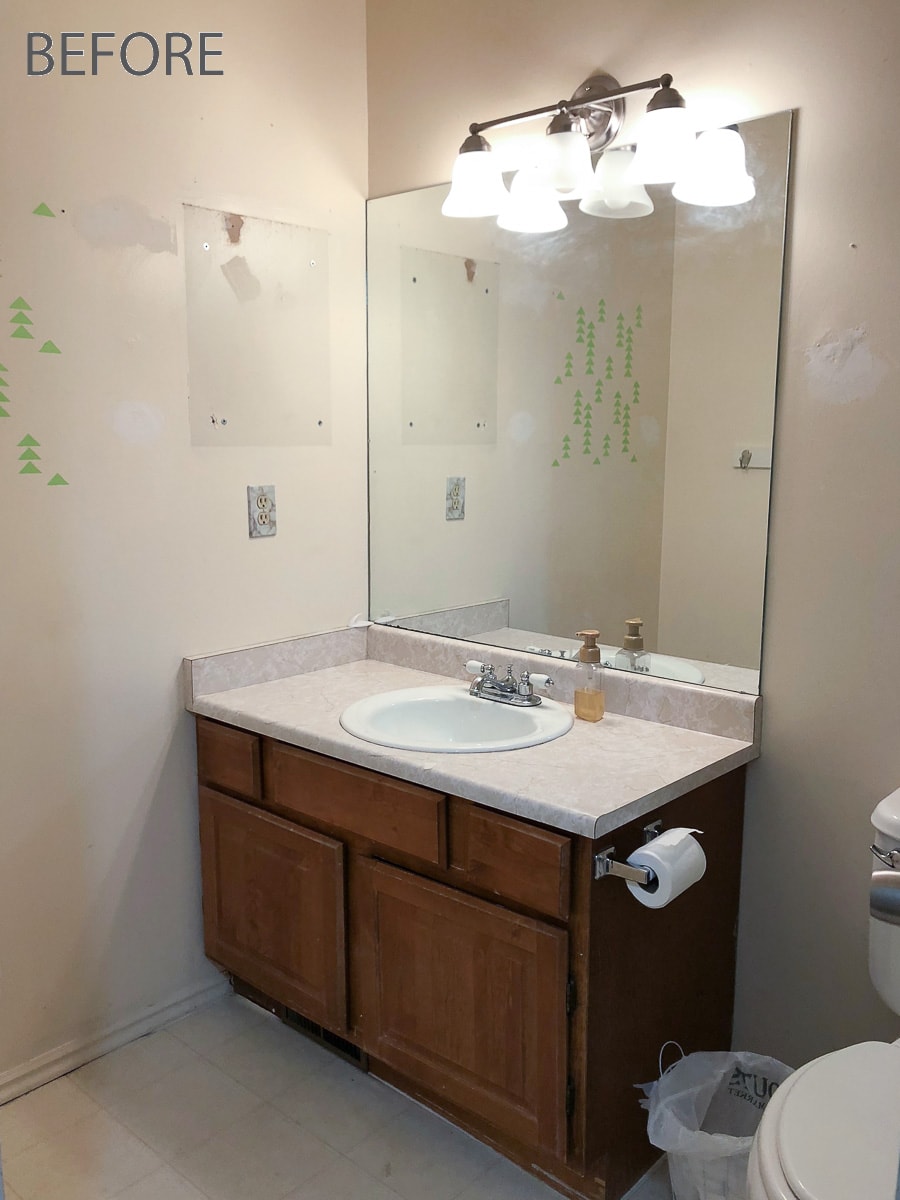
I must be crazy because the paint is barely dry on the blue & white two tone Kitchen Remodel and I am already ripping out another room. Our hallway bathroom on our main floor is the guest bath and the only room in the house that has not been touched.

After surviving the crazy 6 week kitchen remodel, we figured we can survive this tiny room too. So last week I grabbed a hammer and started the demo!

Old guest bathroom with oak builders grade vanity, large wall mirror and ugly off-white walls.

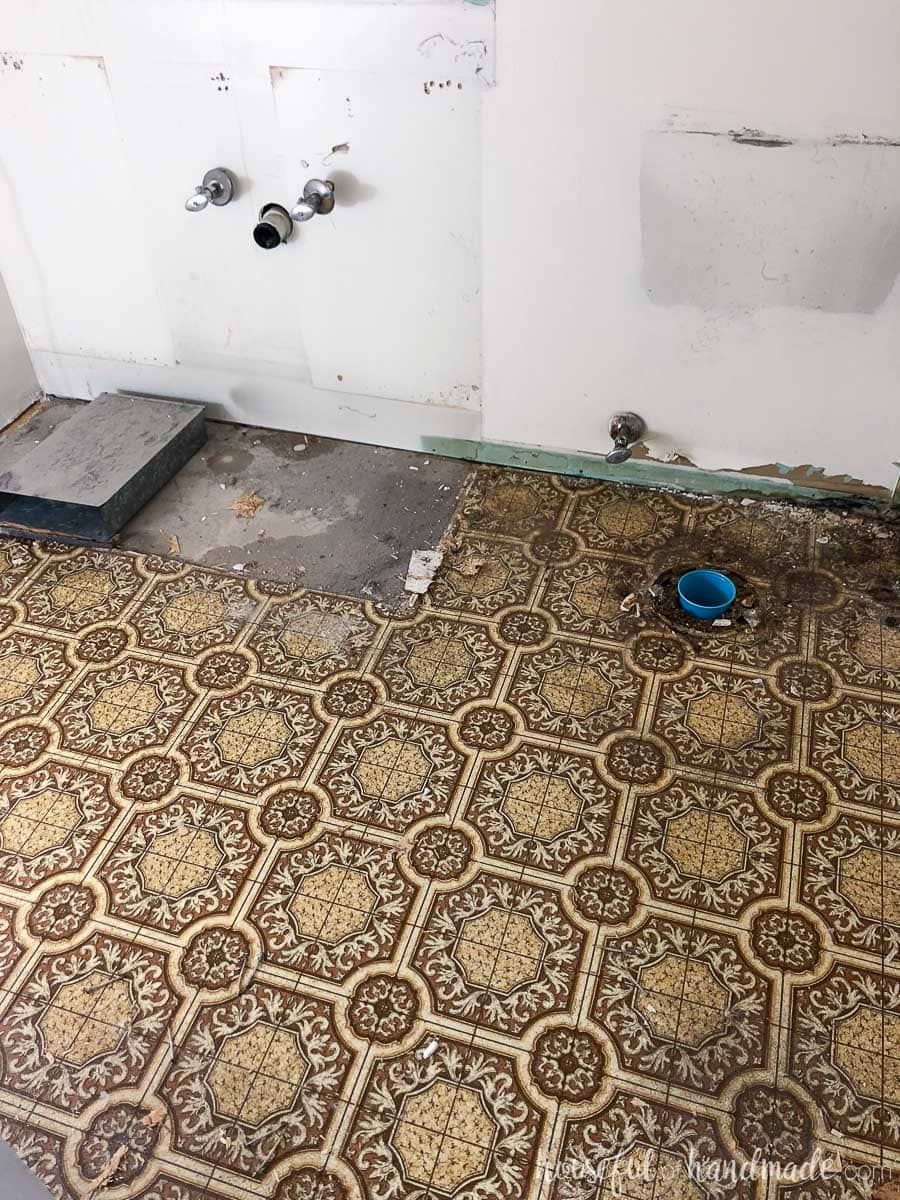
When we pulled up the vanity, we realized there was a second layer of subfloor on top of the original flooring. But since the new floor was only where the vanity was not, it meant that layer had to go.

And guess what we found below it…

Removing second layer of subfloor to reveal old 70s linoleum underneath. Good thing I know how to remove linoleum the easy way.

Isn’t it so vintage?

I am sure you have seen the same (or very similar) old linoleum in your parents or grandparents house. As much as I love old stuff, this too needed to go.

Because the old linoleum was only laid on the floor where the vanity was not, we needed to remove the linoleum to make a nice smooth surface for our new flooring. Which can be a pain.

But after learning a lot while removing the linoleum from our kitchen, I knew there was an easy way to remodel linoleum and I am so excited to share it with you!

Old linoleum flooring. Vintage cream and brown flooring ready to be removed.

How to Easily Remove Linoleum

Supplies:

  • HomeRight Dual Temperature Heat Gun
  • Utility knife
  • Heavy putty knife
    • I specified heavy because there are cheap ones that are really flimsy and those will not make this easy. You need something with some weight to it, but don’t worry they are not really expensive.
  • Entertainment
    • I said this was easy, but it does take time. I love to listen to audiobooks while I do simple tasks like this to keep me going.

Pick a spot to start the linoleum removal from. There is no right or wrong place. I like to start in a corner so that I can work in strips across the room.

Using the utility knife, cut the linoleum into strips of about 12″-15″. These will make the next steps more manageable.

Cut the old linoleum with a utility knife into strips to make it easier to remove.

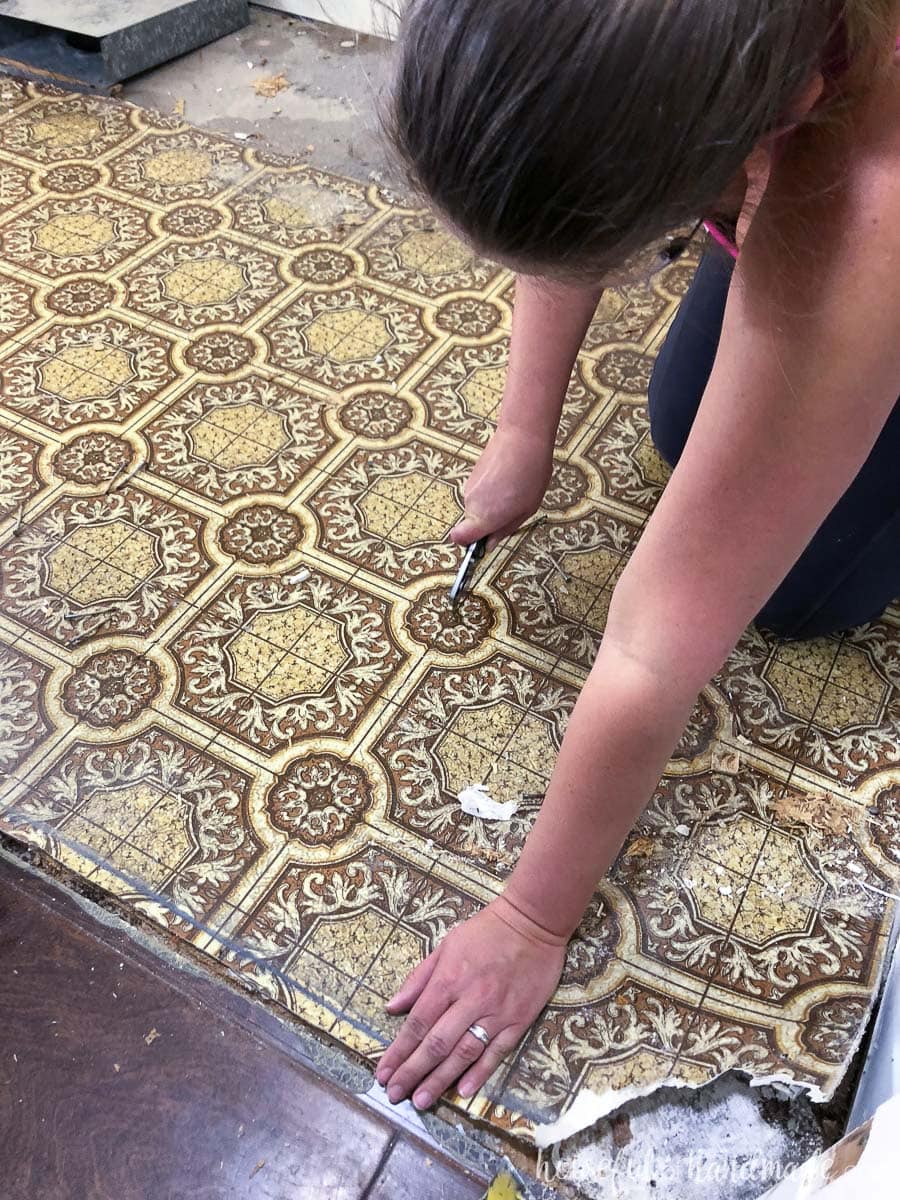
I do not like to cut strips on the entire floor all at once. Just cut one strip and work on it, then cut and repeat.

It gives your back a break from bending over and cutting and it gives your knees or bottom a break from sitting and scraping if you do it that way.

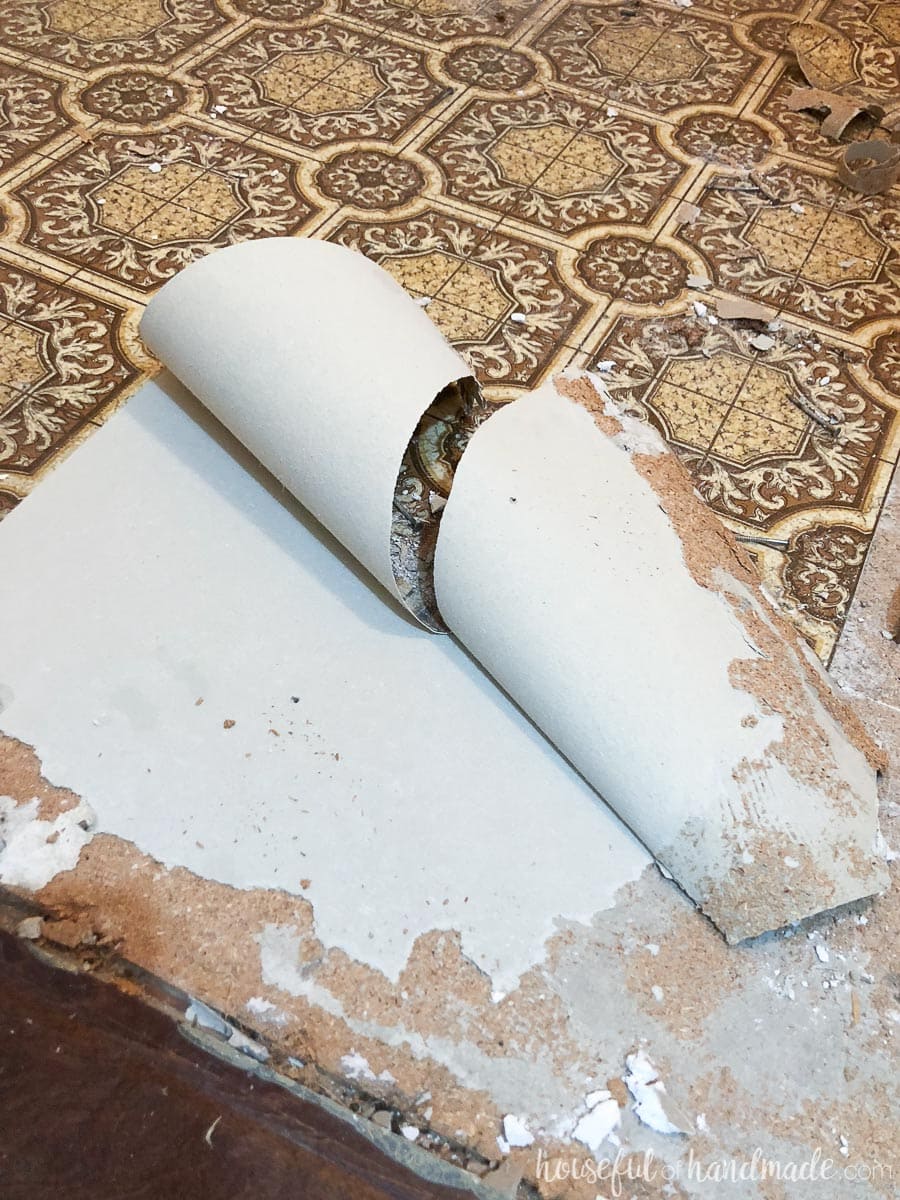
After you have cut the flooring in a section, you will want to remove the top layer of linoleum. Just grab the corner and pull.

Mostly the top layer only will come up, but there might be places where the glue is worn that also come up with just a little tug. Yay!

Pull the top layer of linoleum off to reveal the glued down part below.

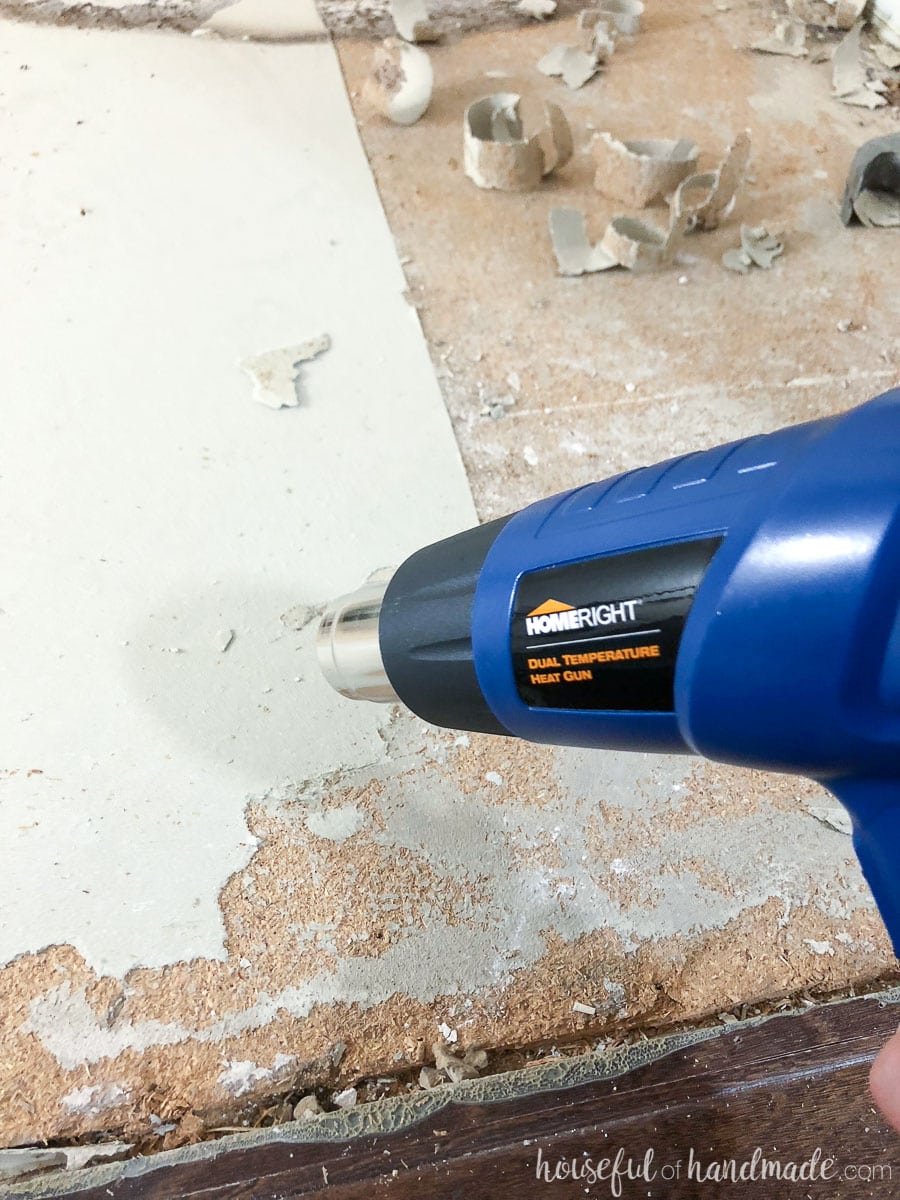
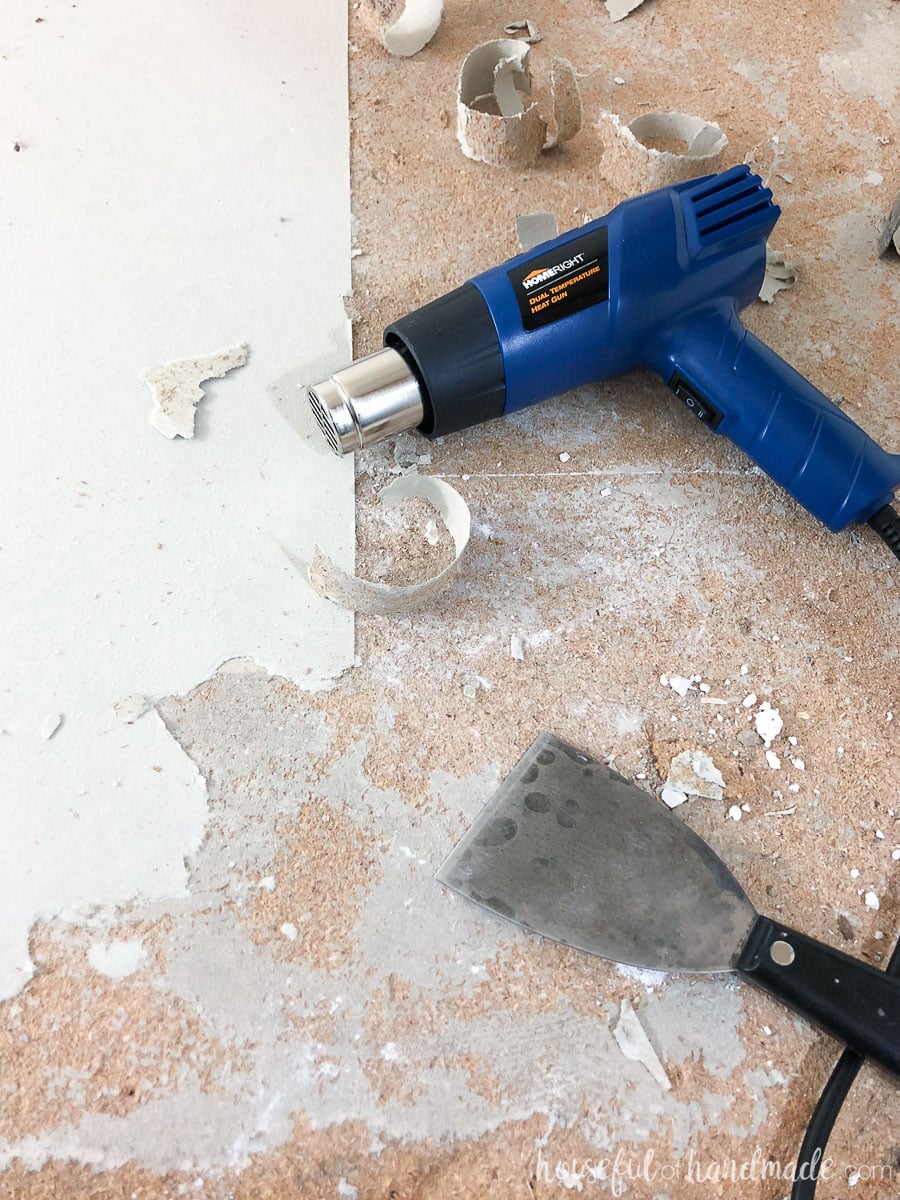
Now it is time to pull out that heat gun. The HomeRight Dual Temperature Heat Gun has 2 settings. Nice and simple! For the flooring, I used the high setting.

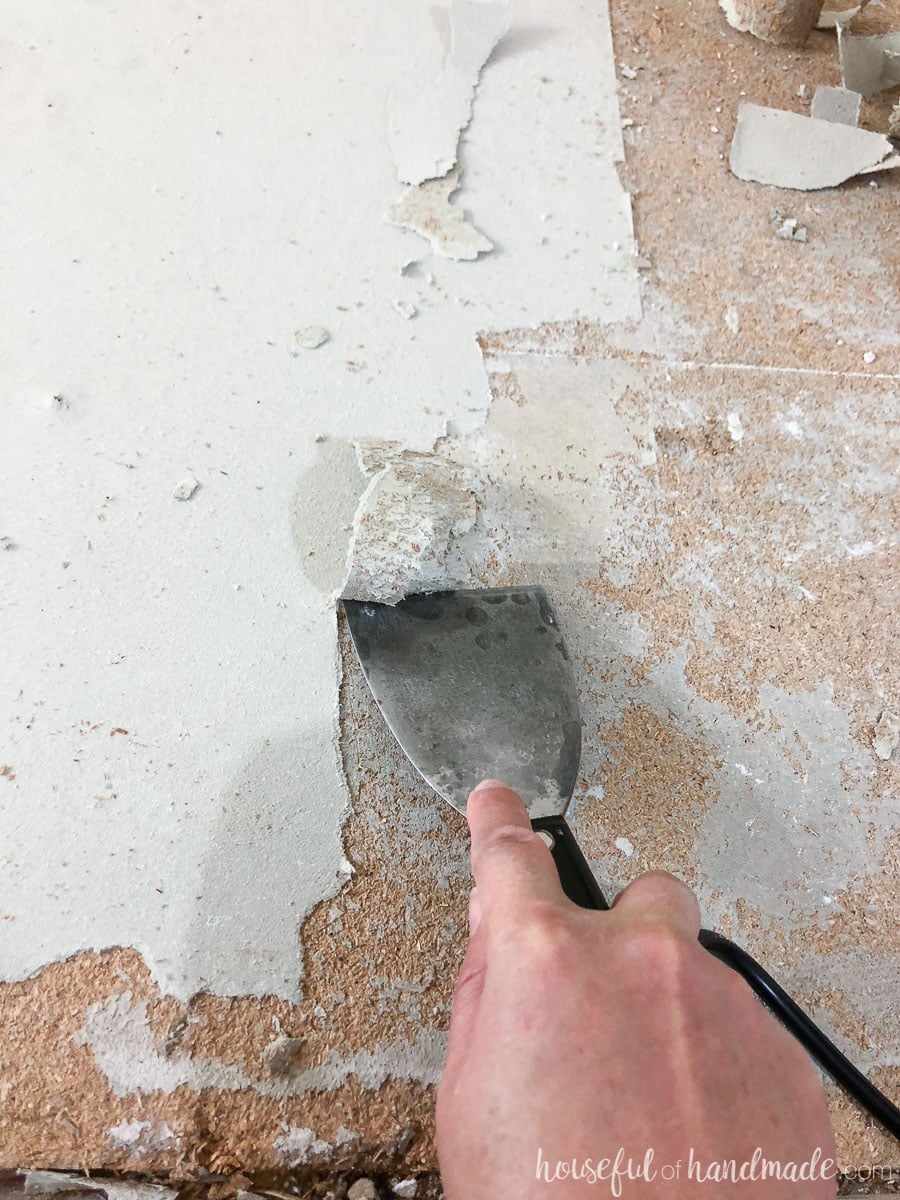
Turn the heat gun on and aim it at the old linoleum that is left behind when pulling off the top. You will want to work in small sections, about 3″ x 6″ at a time. Slowly move the heat gun back-and-forth over the small section to heat it.

Use the HomeRight heat gun to soften the old linoleum glue to remove it easily.

Then turn the gun off and scrape the warmed linoleum off the floor with your putty knife. It will just curl right off the floor in very satisfying little strips.

Scrape the warmed linoleum off the floor to remove the linoleum the easy way.

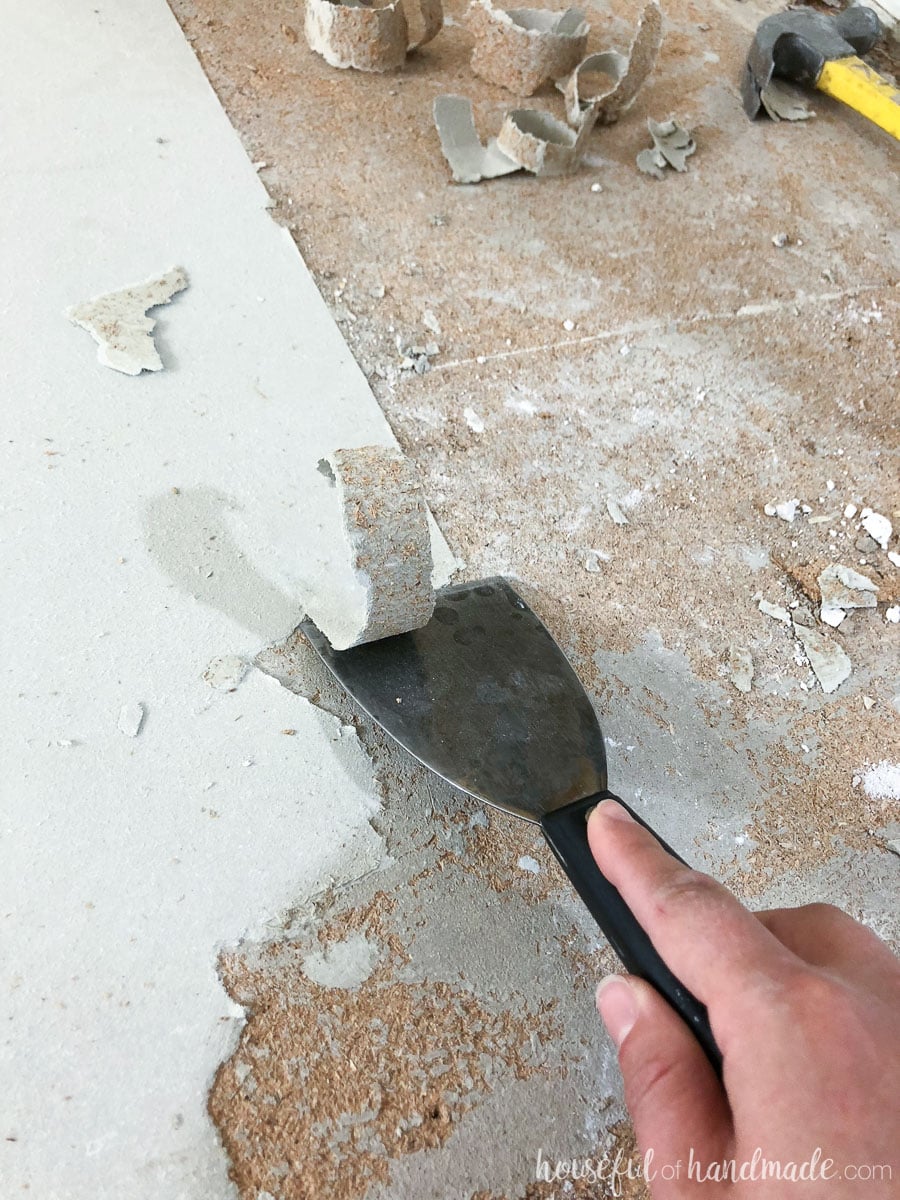
After that piece is gone, heat a new small section and repeat. Easy as that. But remember I didn’t say it was quick, however, it is worth it to have a nice smooth floor to lay your new beautiful flooring on.

To keep things moving along, I held the Dual Temperature Heat gun in my left hand and putty scraper in my right hand. It kept me from putting the hot gun down on the floor and made it easy to heat and scrape and heat and scrape.

Scrape the layers of old linoleum off the floor with a heat gun and putty knife.

You will want to note that the heat gun does have a safety feature to keep it from over-heating.

When I started removing the linoleum, I didn’t turn it off while scraping. Instead I let it run continuously for about 15 minutes.

Then it wouldn’t turn back on because it was too hot. After it cooled (about 60 minutes) it turned back on and worked great.

So make sure to switch it off while you are scraping to prevent overheating!

Learn how to easily remove old linoleum with a heat gun. Get ready for your next remodel.

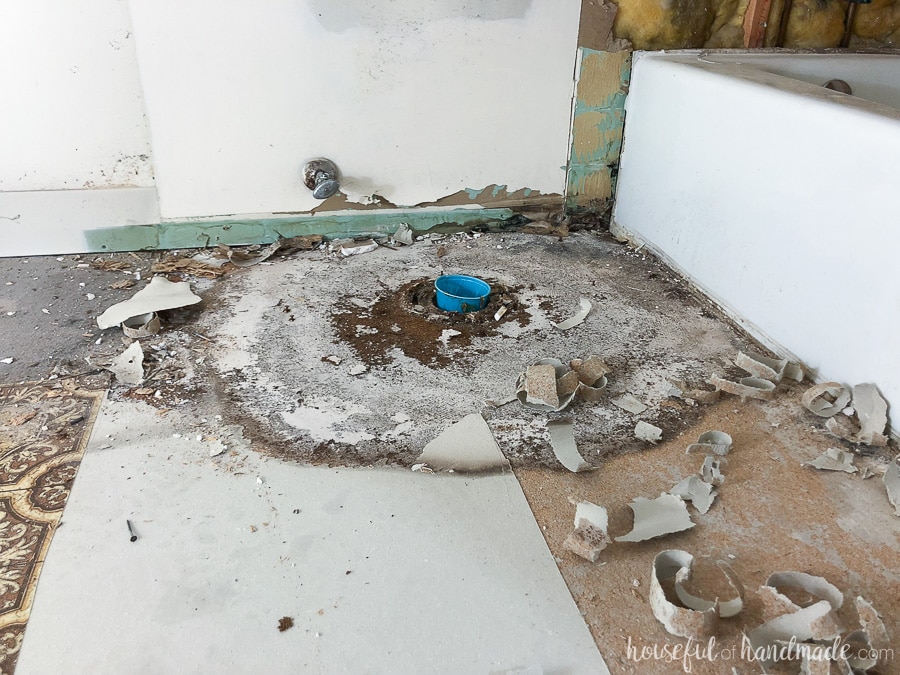
Unfortunately our vintage linoleum was hiding a dark secret…

The subfloor under the toilet and next to the tub had suffered from water damage and was destroyed. I didn’t find it until we pulled up the linoleum.

So after scraping the first half of the room, we realized we needed to completely remove the subfloor and replace it to give our bathroom floor a strong, solid surface for the new flooring.

Under the linoleum we found water damage on the subfloor. Yikes!

After using the HomeRight Dual Temperature Heat Gun to easily remove linoleum, you are going to love all the other things you can do with it. The two heat settings makes is super useful around the house.

  • Use the low setting is great for removing old stickers, paint, soften caulk and more.
  • The high setting is super helpful for striping varnish, removing vinyl, softening plastics to bend and more.

And now it’s time to go install our new subfloor so we can make some progress on this bathroom remodel!

-Kati with picture of blog author Kati

Gar

Sunday 24th of July 2022

since you're big on the heat gun.. another use (which I bought mine) is to remove dents from plastic fenders on cars .. y'all can google. thanks.

Jason

Thursday 24th of March 2022

It’s not that it may contain asbestos. It does contain it. In the photo, she’s pulling up and scraping old Armstrong flooring and it most definitely had an asbestos backing. I had an entire house with that lovely stuff.

Karen

Tuesday 10th of November 2020

We had the square floor tiles like those you see in older elementary classrooms. Almost all of the tiles lifted easily with the exception of a small section and all were handled with correct protocol and disposal. underneath was still a black glue residue on the floor. We were pretty sure the adhesive had asbestos and were following those guidelines. I tried removal with water and a scraper and it was so difficult and laborious that we looked at other solutions and came up with WD-40 which kept the asbestos from becoming airborne, softened the glue - actually made it a black oil to tar like substance. If done in sections it can be left overnight so the WD-40 does all the work, otherwise you will need to use a scraper and wire brush to lift the tar from the subfloor. Follow that with Prep sol to remove the oil from WD-40 application. I would not recommend this on any floor that has sheetrock butted against the floor as the oil will seep into the sheetrock.

I'm going to try heating up the remaining tile to see if I can soften it up enough to remove it.

Kati

Wednesday 16th of December 2020

Thanks for the tips!

Brian Grier

Thursday 23rd of July 2020

This is not a project for the faint of heart. I just finished removing three layers of vinyl from the 200 sq ft of floor in the kitchen of my '82 house, tested and there was no asbestos. The top layer was fairly easy as they had stapled a wood underlayment on top of the two existing glued down layers. I used a circluar saw to cut through the underlayment, but not the linoleum under it. I was able to clear that flooring in about 6 hours. Removing the staples left behind was a multi-day endeavor that resulted in the extraction of 1lb 6oz of staples and the lose of use of my right hand for 3 days. There is a trick to getting the staples out, which is to use a pair of lineman pliers and grab only half of the staple and push the pliers to the side. If I learned that earlier it would have taken less time, and probably not have hurt my hand as mush as it did.

The top glued down layer came off fairly easily by cutting it into 3 foot strips and pulling. The bottom glued down layer was the tough part. To get the bottom layer off I found scoring 3-4 inch wide strips about 3 foot long, and prying the end with a chisel and pulling worked well and left me with a backing layer glued to the subfloor. In most areas a white fluffy layer was left on top of the glued down layer. You need to get that off because if smokes really easily when using the heat gun. Using various methods I found a 1 inch chisel was the easiest way to do get rid of this. Next was the really tedious part. After a lot of trial and error what worked best was scoring the backing layer into 1x2-3 inch rectangles allowed the heat gun to work better.

From start to finish I spent 20 days working on the floor. Weeknights I could only get in 2-3 hours and on weekends I would be able to put in 7-8 hours over a 12 hour period.

Why would I do this? The estimate from various contractors was over $2300

Kati

Tuesday 28th of July 2020

Thanks for your tips Brian! Removing linoleum is my least favorite job, also did it in our kitchen and had the biggest blister ever. But to save the money, I guess that is what we have to do. Hope the new floor is amazing and worth it ;)

Kimberly

Saturday 27th of June 2020

Thank you for the ideas and heads up call on the subflooring. I literally just started to rip up the obnoxious vinyl fake wood the previous owners atempted to put in. It would just come right up with no umph! needed. Then I remembered my home has hardwood floors throughout, which was already a downstairs and stairway project. So to shorten this long story, I had fakewood, 2 linoleum floors, and the cutest little tile floor. I'm stopping at the tile. Light pink and Robin egg blue! Super Cute!

Kati

Tuesday 28th of July 2020

Awesome find with the cute tile underneath. I am picturing a beautiful vintage tile and so jealous ;)

Comments are closed.

This site uses Akismet to reduce spam. Learn how your comment data is processed.