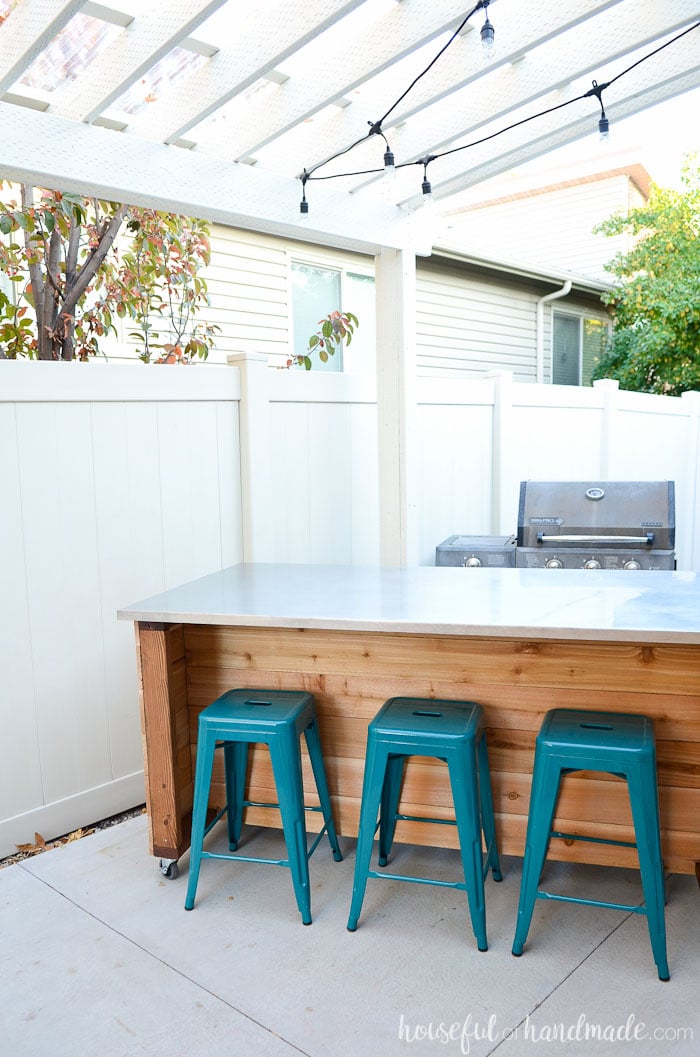
If you’ve always wanted a beautiful outdoor kitchen, but never had it in your budget, this outdoor kitchen island is the answer. The large rolling kitchen island can store all your barbecue and entertaining gear.
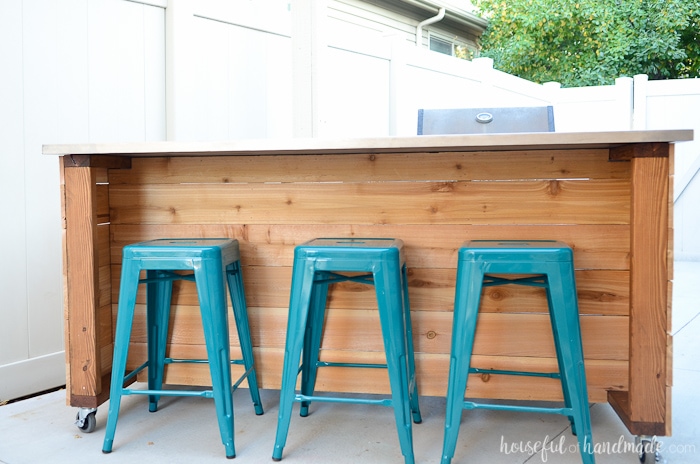
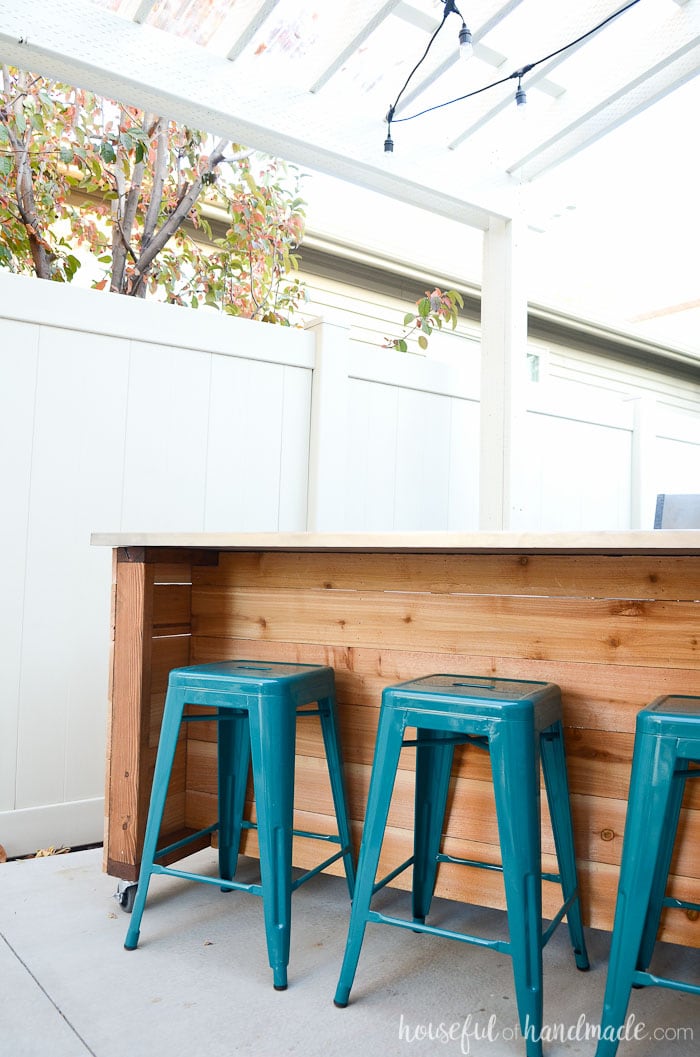
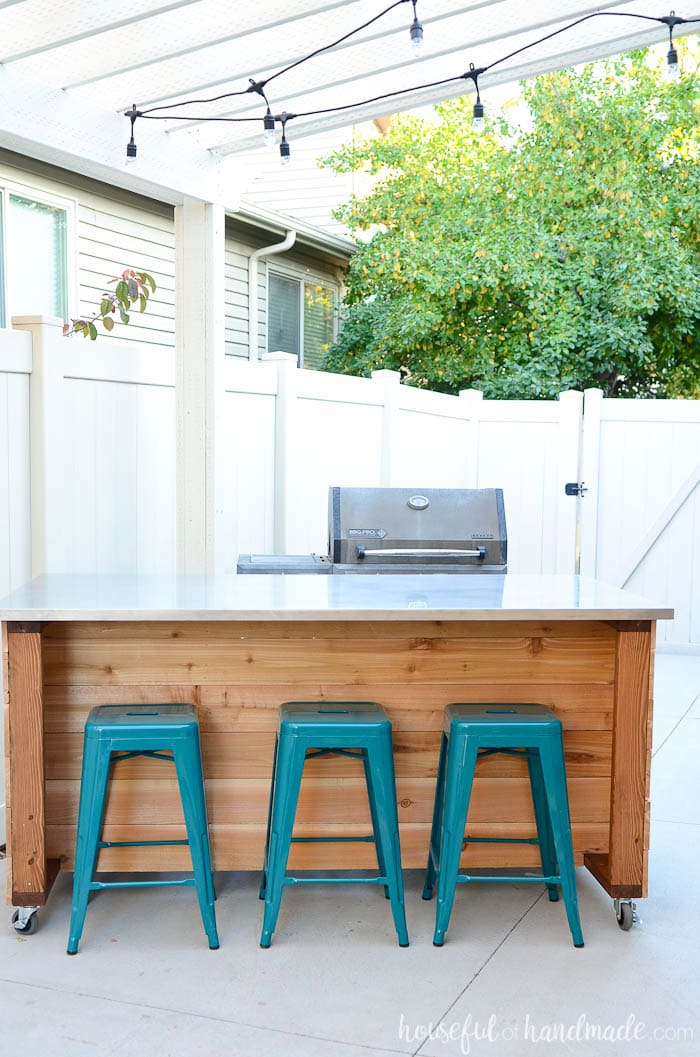
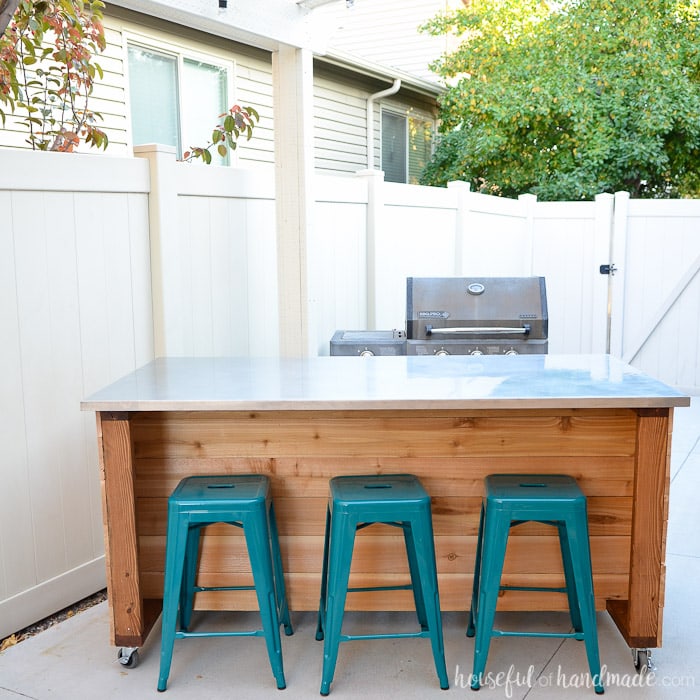
The large table top gives you a big area for food prep and serving. Plus there is an overhang for bar stools to allow for additional outdoor seating to transform your patio into the perfect gathering space.
This portable kitchen island will turn your lonely barbecue into a functional outdoor kitchen. And you can do it all on a budget!
This post may contain affiliate links. As an Amazon Associate I earn from qualifying purchases. Click here to read my full disclosure policy.
Creating an Outdoor Kitchen Area
It is easy to transform a patio area into an outdoor kitchen. All it takes is a place to prep and cook your food with some weathertight storage.
To cook food outside, a BBQ or grill is the easiest option. And to transform your lone BBQ grill into a kitchen, all you need is the perfect DIY kitchen island!
Then to really make the ultimate backyard kitchen area, add a DIY pergola with a DIY pergola roof. Now you can enjoy your outdoor space year round.
Functional Kitchen Island Design
This kitchen island is portable so it can be moved around depending on your needs.
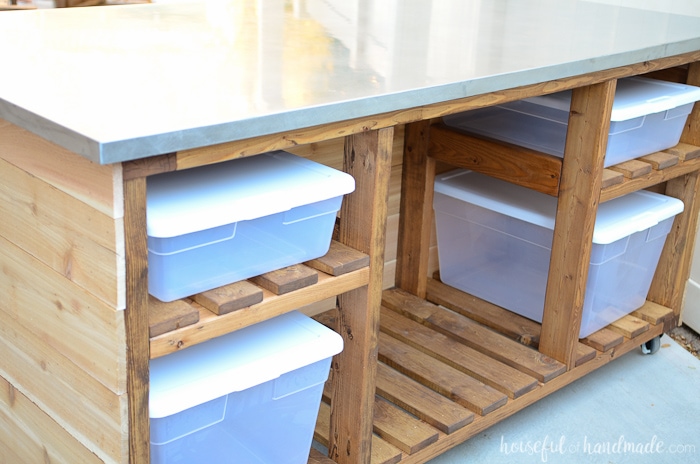
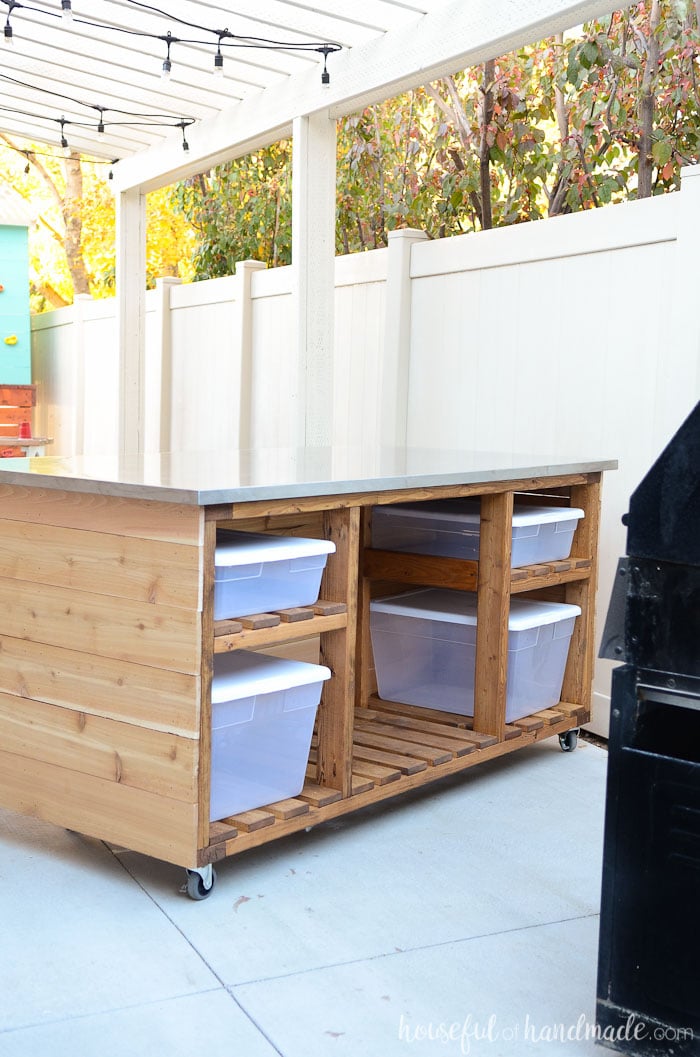
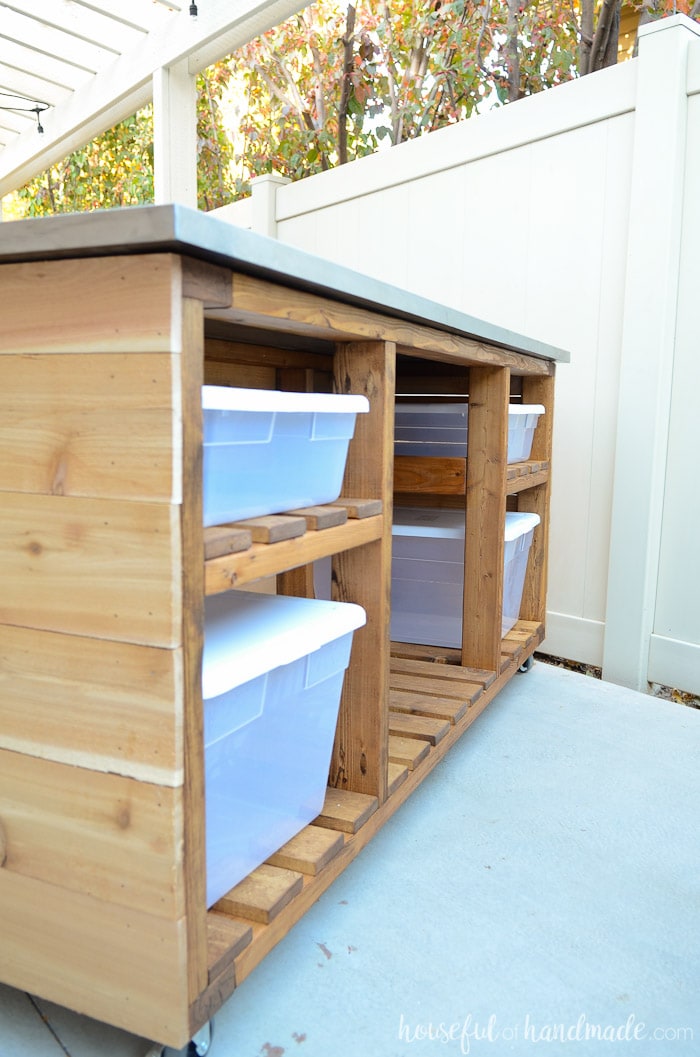
On the front of the island are shelves to hold water-tight plastic bins and lids. This will keep things clean and dry when not in use.
Between the shelves is an open area to hold a cooler. Now any food needed can stay cool while you are cooking (or better yet, a perfect place for drinks on ice).
The large (38″ x 72″) countertop is the perfect place for both prepping and serving food.
And there is an overhang on the back for counter height seating. It is great for added seating or a perfect place for the kids to help with the cooking.
Budget Countertops for Outdoor Kitchens
Outdoor kitchens do require a more sturdy countertop than indoor kitchens. Excess water from the weather can wear away low cost kitchen countertops.
But you can still have an amazing outdoor kitchen island without the high price tag. While granite and quartz are great outdoor countertops, they are expensive.
Instead use one of these budget friendly outdoor countertop ideas:
- DIY concrete countertop
- Sealed DIY wood countertop
- Tile countertop
- Scratch & dent or clearance countertop
I purchased a large stainless steel table top from a scratch and dent furniture store. It did not have legs, just the table top. The stainless steel is bent around a piece of wood which protects it from the weather.
It has held up well to the outdoors, but the shiny surface reflects the sun back at you while cooking and can get hot in the summer months.
I would not recommend it for an outdoor kitchen that is not covered from the sun.
Next up, build an outdoor dining table and benches or kid’s picnic table to add seating in your new outdoor kitchen area!
How to Build a Portable Outdoor Kitchen Island
Tools & Materials
Recommended Tools:
- Miter saw
- I recently upgraded to this sliding miter saw (watch for it to go on sale), but previously used this inexpensive miter saw that I love.
- Pocket hole jig
- Jig saw
- Drill
- Impact driver (optional, but I love not having to switch bits with the drill)
- Speed square
- Finish nailer
- Sander
- Tape measure
Supplies:
- Printable PDF Woodworking Plans
- Lumber
- (9) 2×4, 8′ long boards
- (6) 1×4, 8′ long boards
- (10) 5 1/2″ wide cedar fence pickets, 6′ long
- (2) 3 1/2″ wide cedar fence pickets, 6′ long
- 2 1/2″ outdoor pocket hole screws
- 1 1/4″ finishing nails
- Wood glue
- Outdoor stain
- Outdoor wood sealer
- 3″ swivel castors with locks
- 38″ x 72″ counter top
- You can purchase a countertop or build one. Learn how to build a wood countertop here and how to make a fast concrete countertop here.
Overall Dimensions
The final kitchen island is 34″ tall x 69 1/2″ wide and 35″ deep without the countertop. I recommend using a 1″ thick x 38″ x 72″ countertop.
Cut List
Cut out the pieces according to the detailed cut list in the PDF woodworking plans.

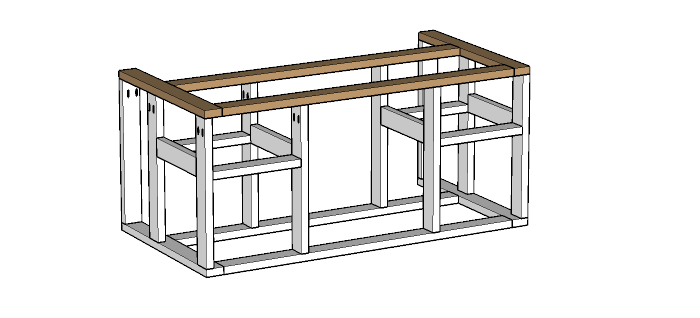
STEP 1- Build the Base
Drill pocket holes set for 1 1/2″ thick material according the 3D renderings in the printable plans.
Build the base of the island by attaching two of the island frame boards between the island frame sides. Secure with 2 1/2″ screws and wood glue.
The back island frame board should be 12″ from the back of the island frame sides. Repeat for the top of the island.
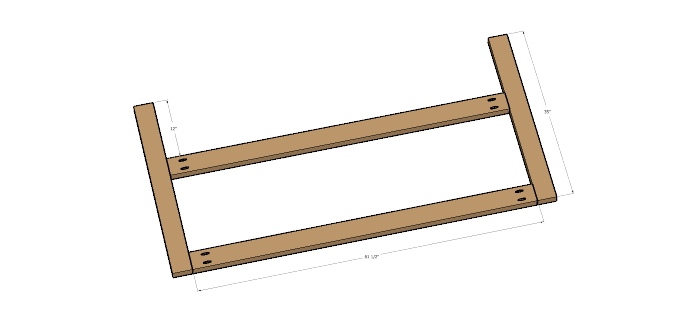
Repeat for the top
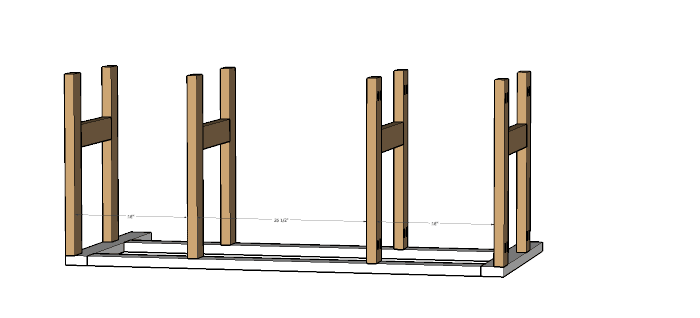
STEP 2- Build the sides & center posts
Drill pocket holes set for 1 1/2″ thick material in the shelf side boards.
Build the sides and center posts of the outdoor kitchen island by securing the smaller pieces between the bigger pieces with 2 1/2″ pocket hole screws so they are 16 1/2″ up from the bottom.
Build a total of 4.

STEP 3- Attach sides & center posts
Attach the sides and center posts to the base of the island.
Attach two to the outside of the base and two 18″ in from that with 2 1/2″ screws and glue.
Make sure the pocket holes for the outside of the portable kitchen island are facing out so they will be hidden by the cedar pickets.
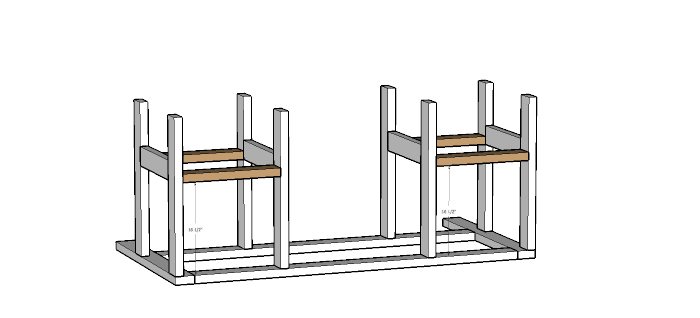
STEP 4- Attach shelf supports
Drill pocket holes set for 1 1/2″ thick material in both ends of the shelf support pieces.
Attach the shelf supports between the vertical frames. Secure with 2 1/2″ pocket hole screws and wood glue.
The bottom should be 16 1/2″ up from the base of the outdoor kitchen island.
STEP 5- Finish building the frame
Attach two vertical frame boards to the end of each of the island frame sides according to the diagram in the plans.
These boards support the overhang of the kitchen island and create the seating area.
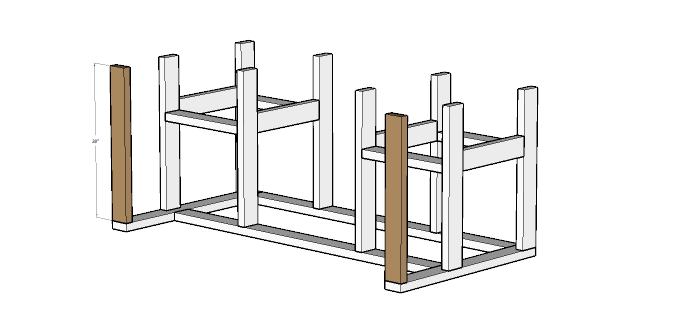
Secure the island top to the outdoor kitchen island with pocket holes previously drilled and 2 1/2″ pocket hole screws.
Make sure to line up all the boards the same as you did when attaching them to the base to keep the island frame square.
STEP 6- Add slats and finish
Add slats to the bottom and the shelves. Secure with wood glue and 1 1/4″ finishing nails.
Space them evenly along the area.
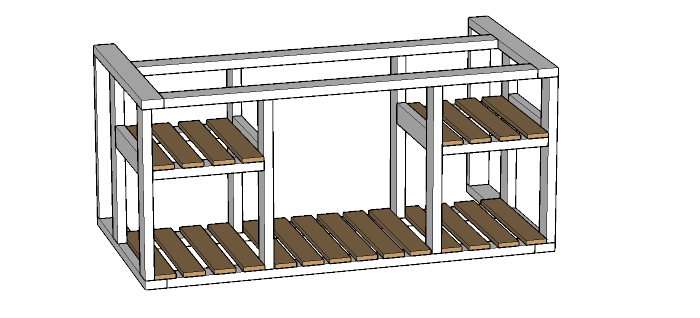
Sand, stain and seal the finished frame before attaching the cedar.
Attach the cedar panels first to the back of the kitchen island. Notch out the bottom panel so it fits over the 2x4s on the sides. Secure the cedar with finishing nails on each vertical post.
Continue up the back until the top panel. This one will need to be notched out like the bottom panel.
Last, attach the cedar to the sides of the outdoor kitchen island starting at the bottom in the same manner.
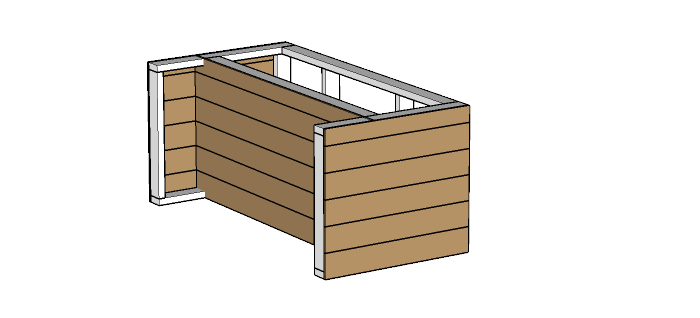
Attach the castors to the bottom of the island. If you have a heavy countertop, it might be a good idea to add an additional caster in the middle.
Then attach the counter top.
My counter top was wood surrounded by stainless steel so I was able to attach it with wood screws through the top of the island frame.
You did it!
Premium plans include:
- Recommended Tools
- Shopping list
- Easy to read cut list table
- Cut diagrams
- Step-by-step instructions with 3D renderings
- Helpful resources
- BONUS: 3D SketchUp file
Now all that is left is to add some bins to hold all your outdoor kitchen gear.
The larger bins will be perfect for storing paper plates, cups, napkins, outdoor table cloths and placemats in the lower bins.
Utensils and barbecue tools will be perfect in the top bins.
Happy Building!