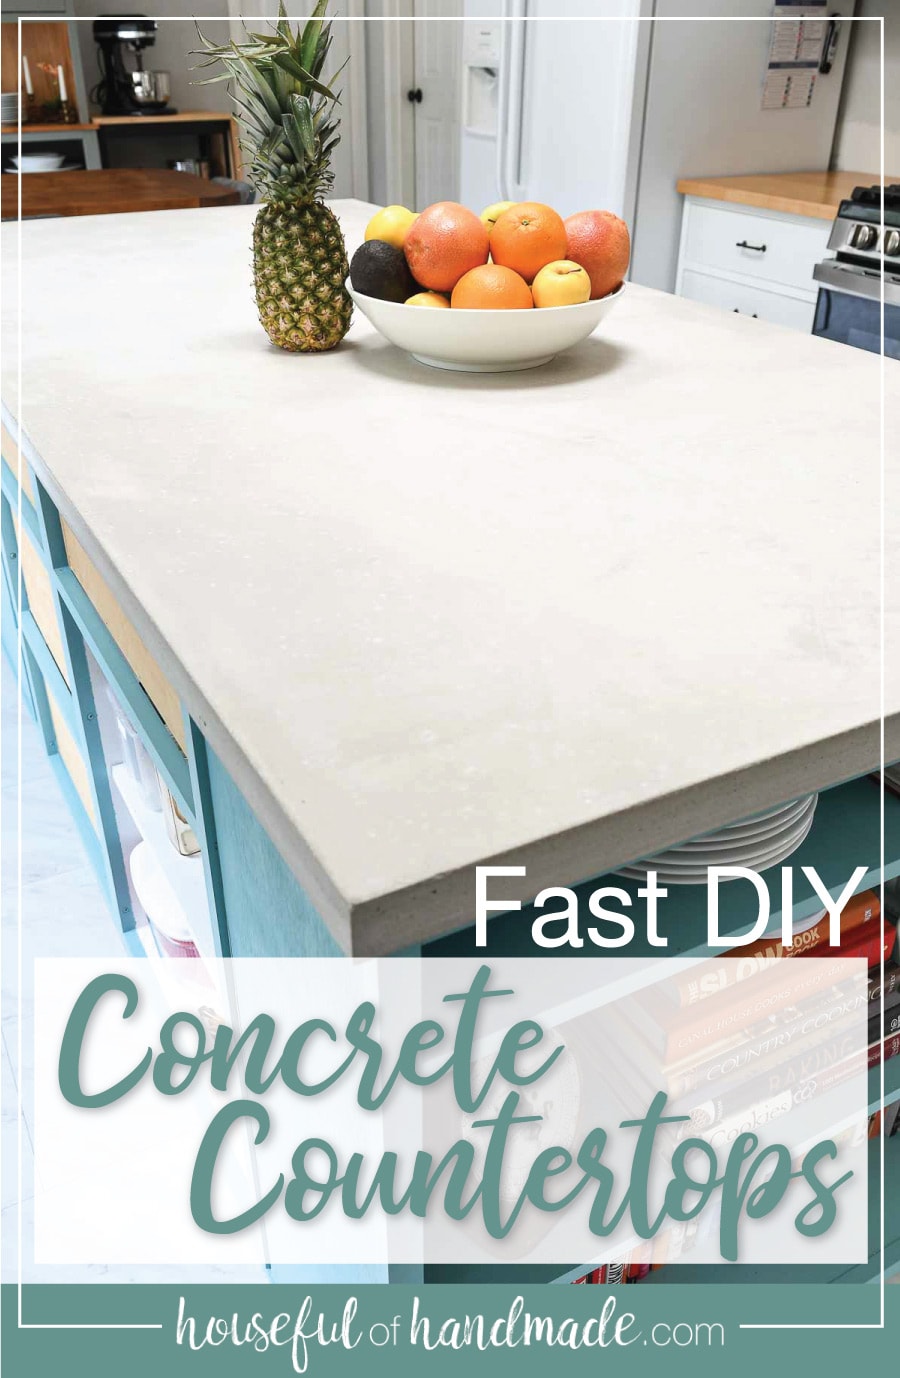
You will love how fast you can make DIY concrete countertops and how amazing they look.
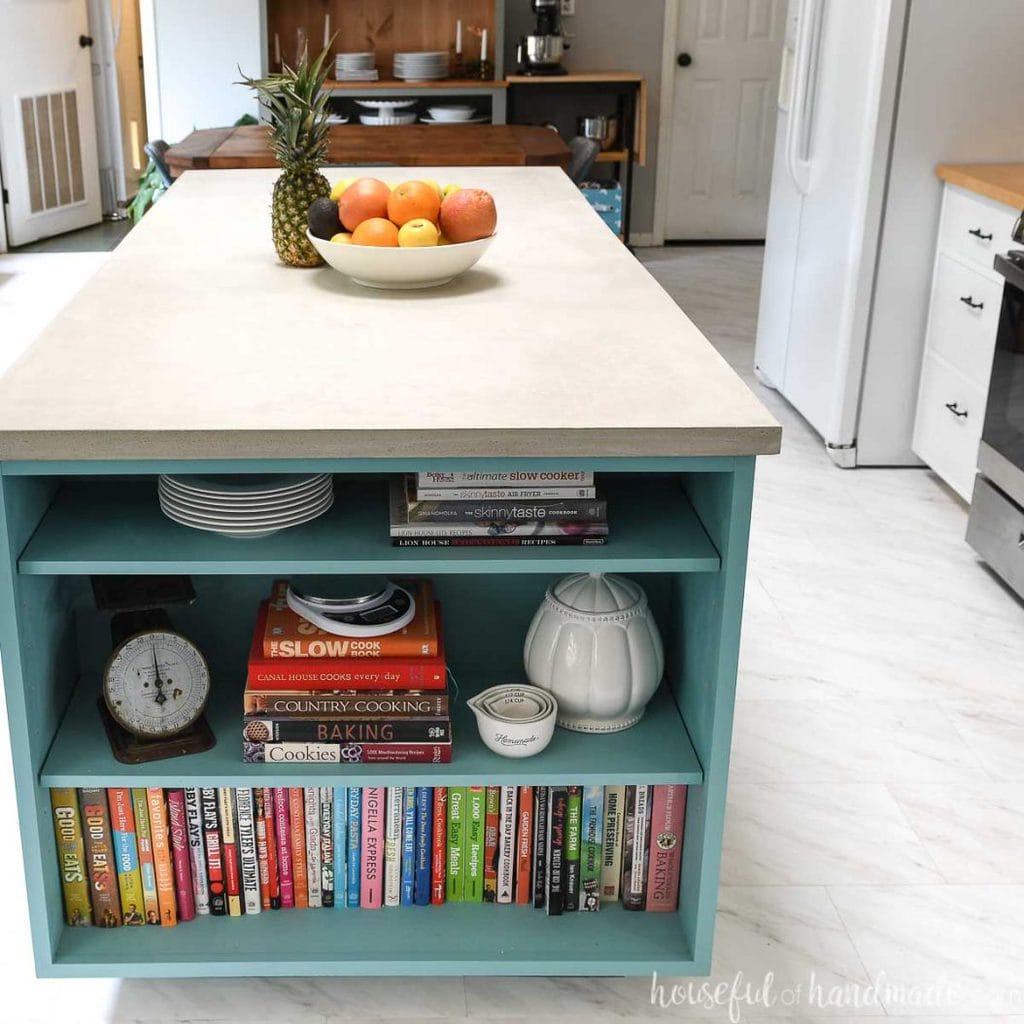
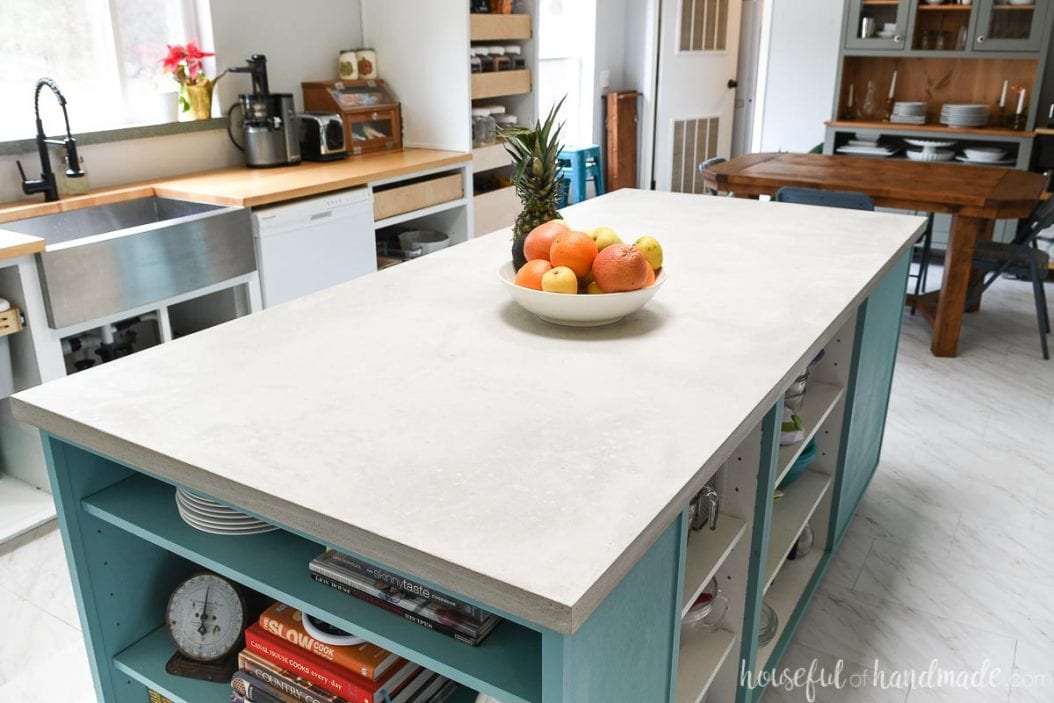
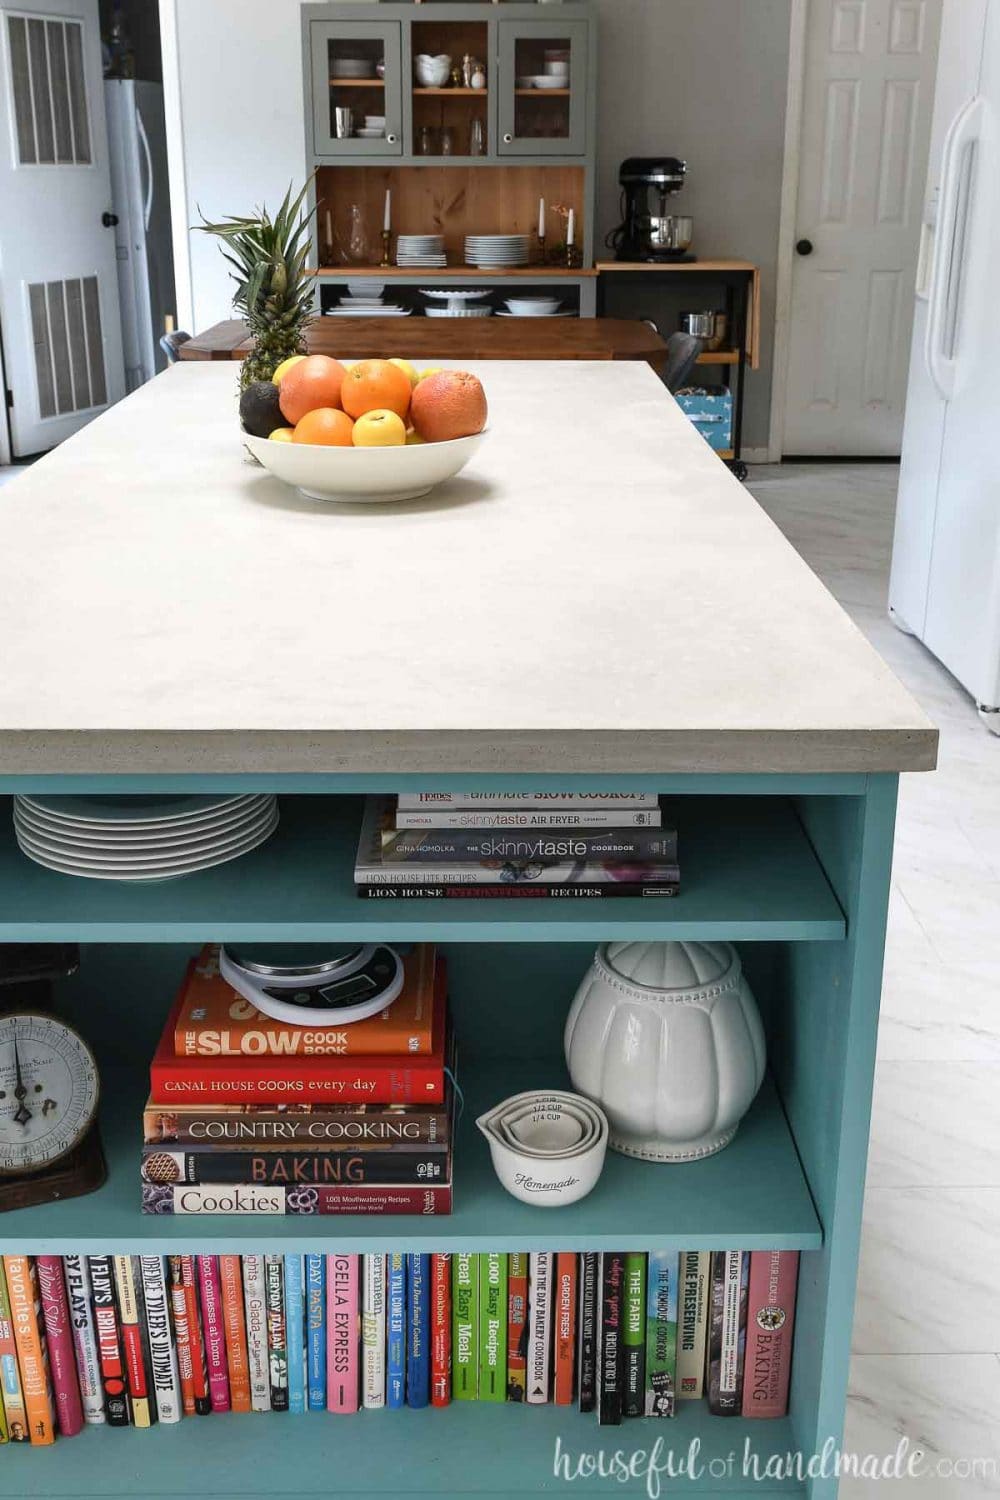
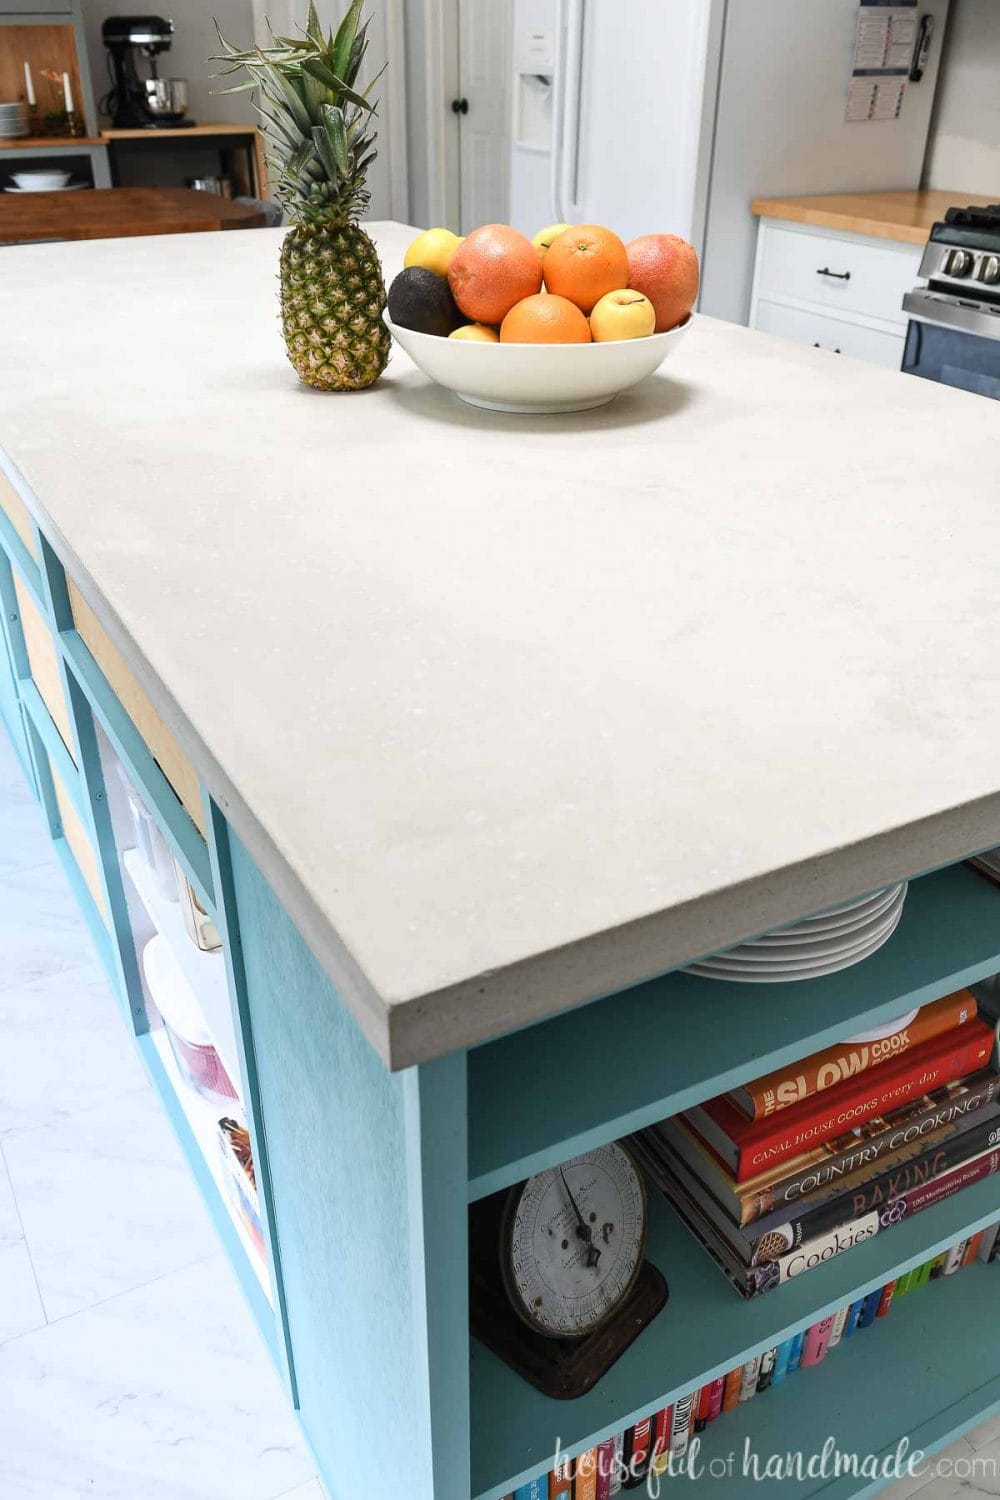
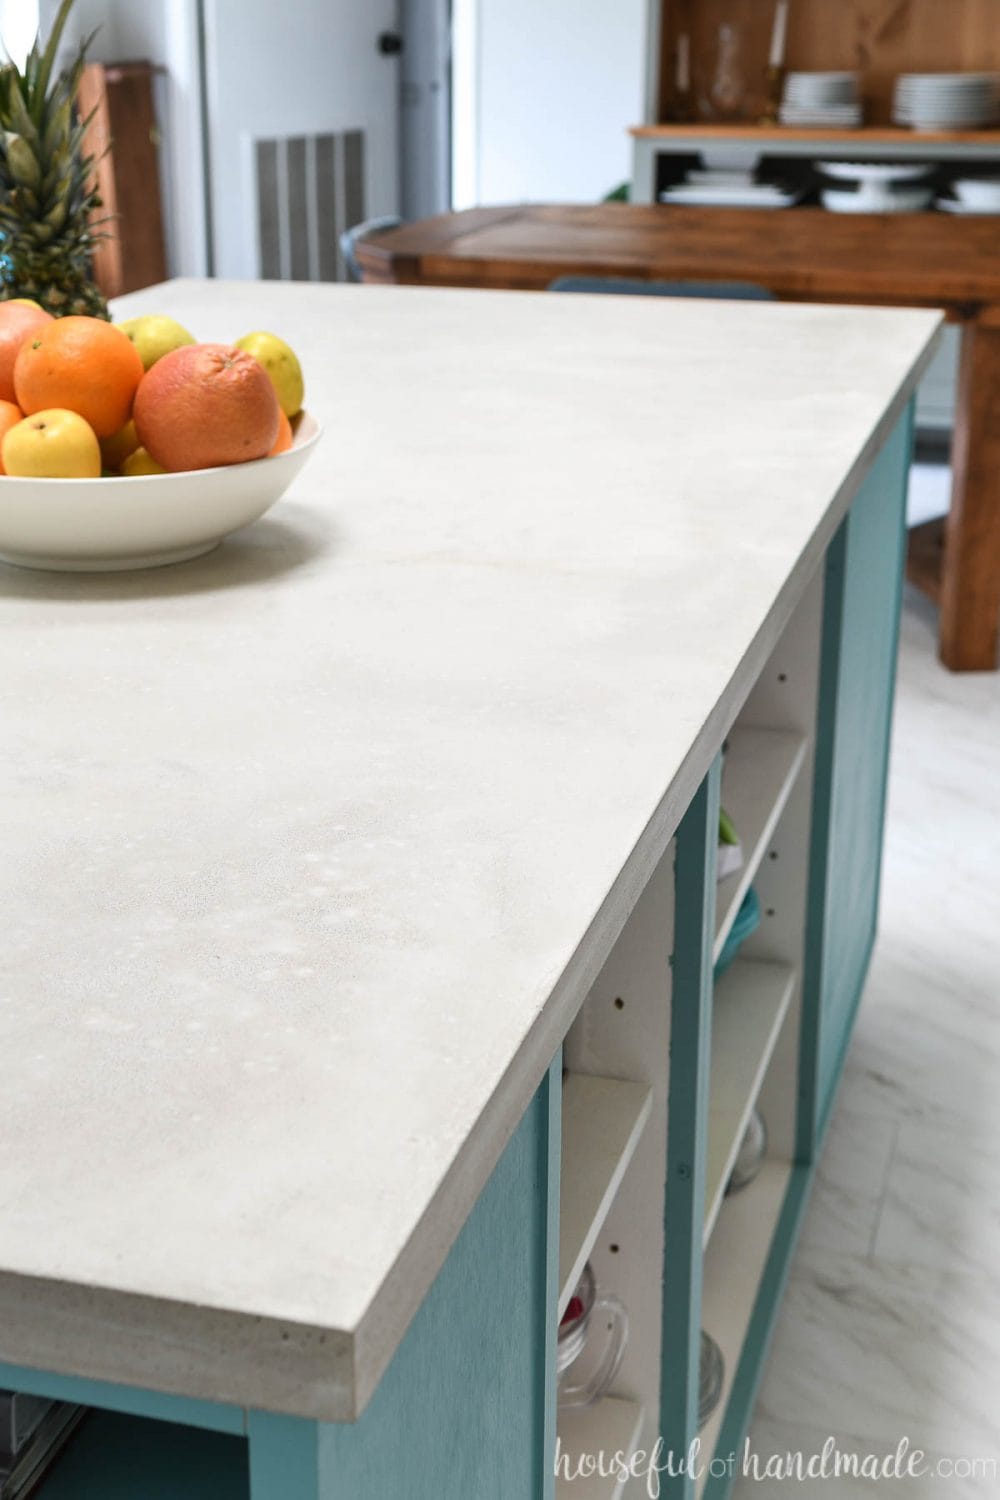
I am so excited to finally have our last kitchen countertop installed in our DIY kitchen remodel. We almost have a fully working kitchen again.
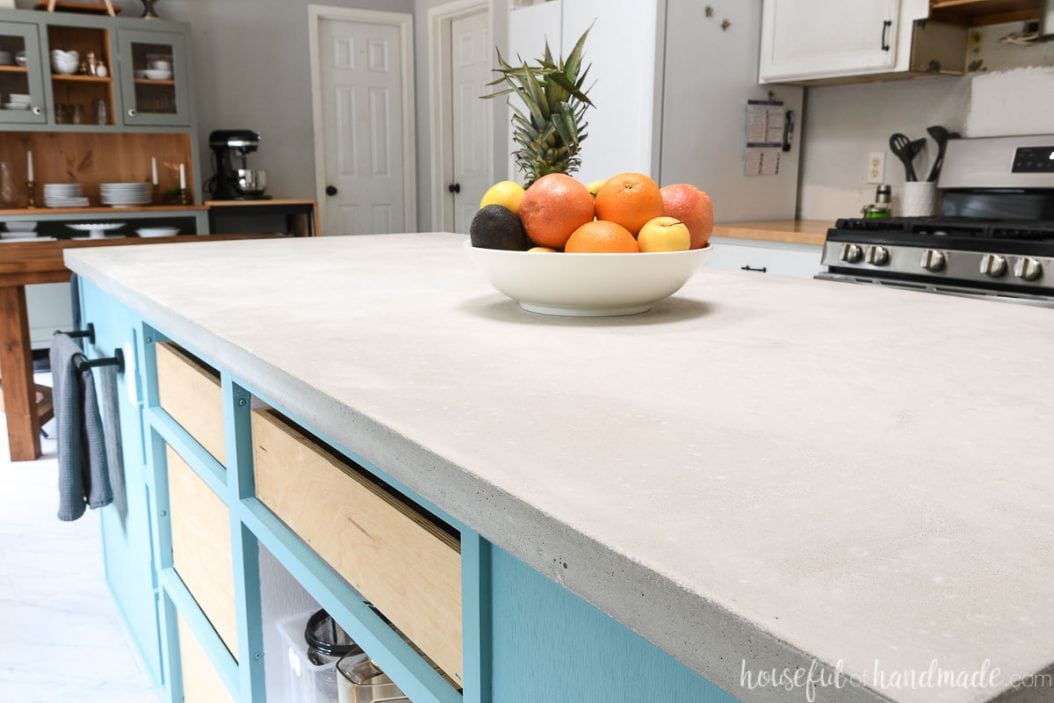
For our kitchen island, I wanted a beautiful solid surface countertop, but on a budget! So we partnered with CTS Rapid Set to try our hand at DIY concrete countertops. And I am so happy we did because our new countertops are AMAZING!
Using the Rapid Set Cement All for our countertop meant we could DIY our countertops in a fraction of the time it takes compared to using traditional concrete.
This post may contain affiliate links. As an Amazon Associate I earn from qualifying purchases. Click here to read my full disclosure policy.
Instead of waiting 2 days for the concrete to cure, we were removing our countertops from the forms just 1 hour after completing the pour. We started mixing our concrete at 10:30 AM and had the project finished and everything cleaned up by 2:30 PM!
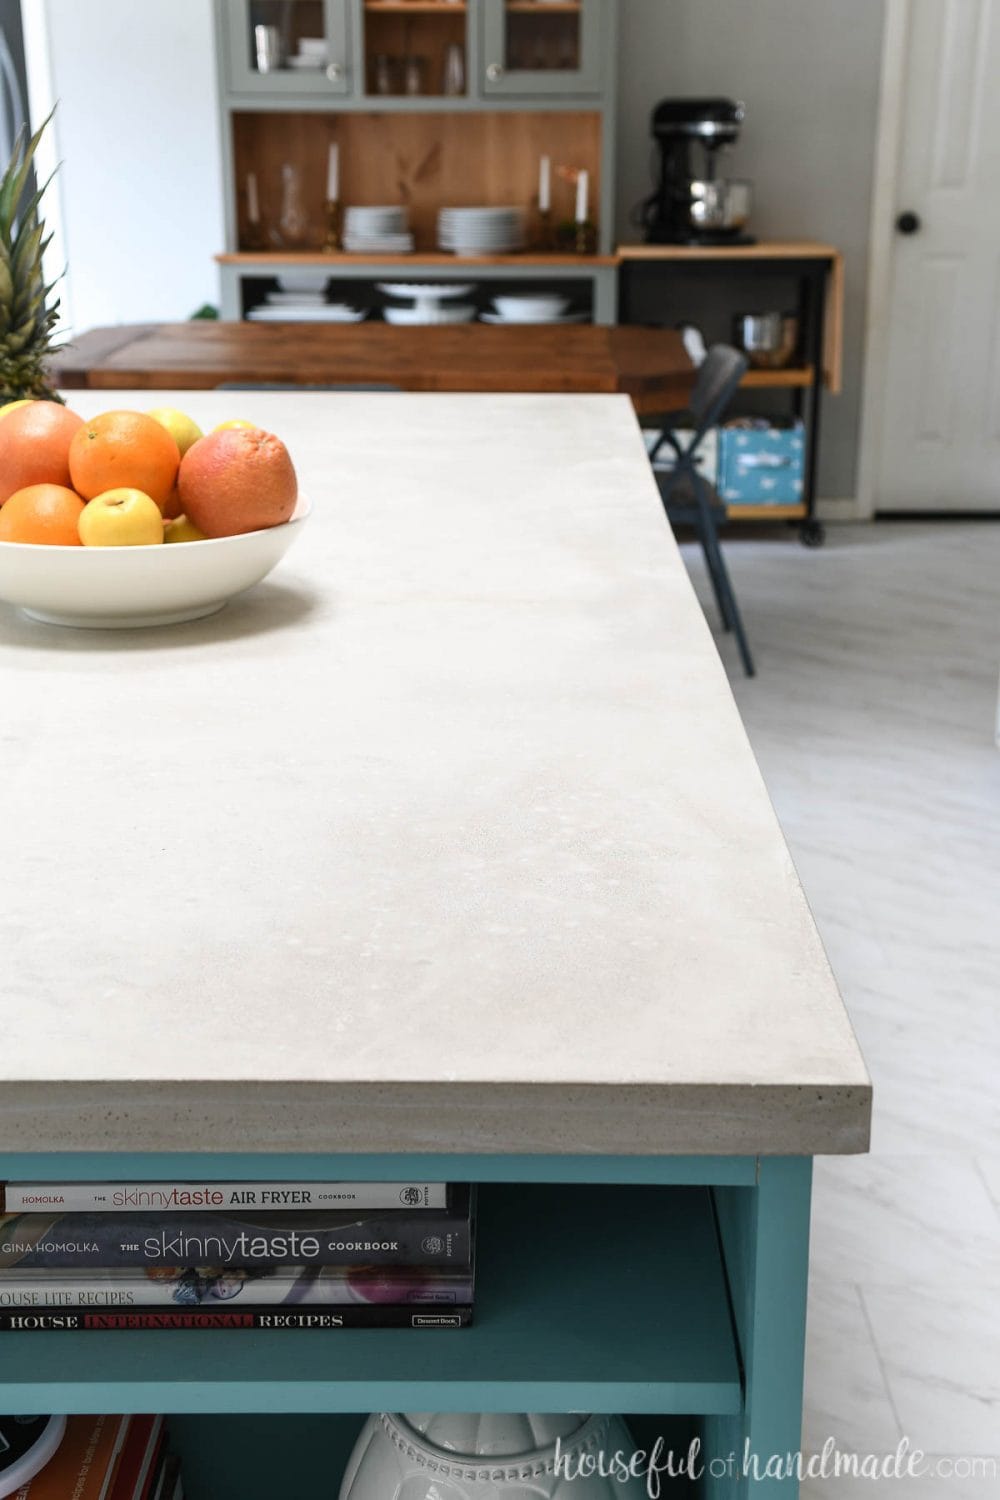
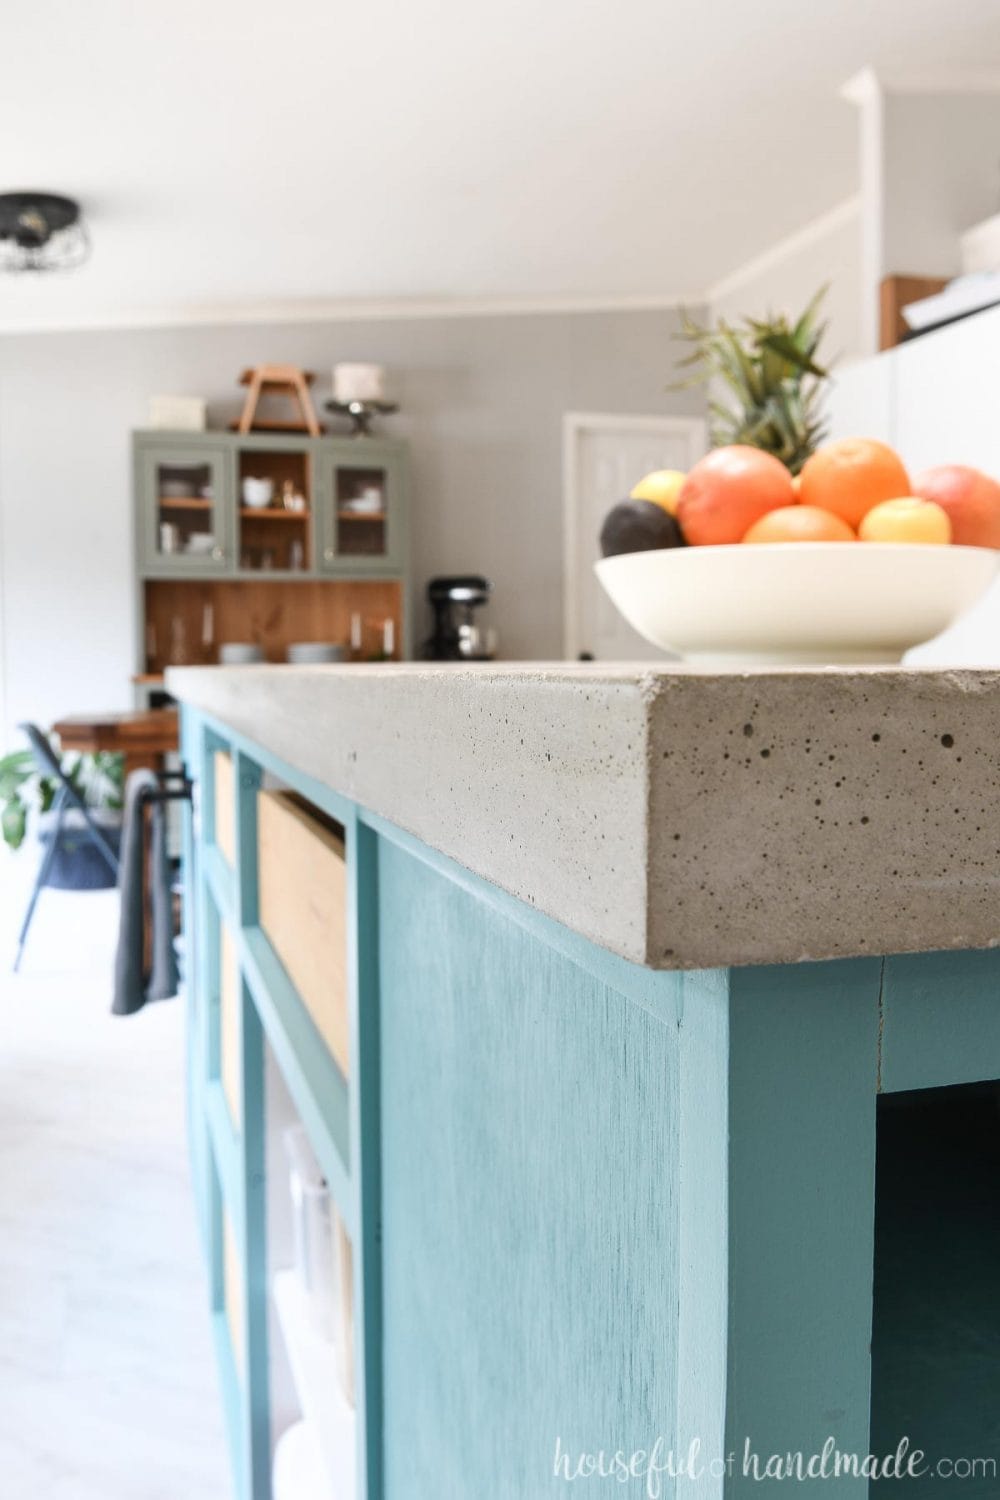
And now we have the most beautiful solid surface countertop that adds so much character to our kitchen. But more importantly, we have a fully functional kitchen again! This was the last big step after installing the cabinet drawers.
The last projects to finish up the kitchen are to build cabinet doors, tile the backsplash, and install the open shelving. I am eager to cross this room off the to-do list!
Making concrete countertops is a big project, but you can always start with a DIY concrete vanity top to learn how to work with the concrete before you tackle your kitchen countertops.
Table of contents
Pros and Cons of Concrete Countertops
There are many reasons to choose concrete countertops in your kitchen. Concrete is a beautiful solid surface that gives a kitchen a modern feel.
Pros of Concrete
Cost:
Concrete is very budget friendly if you DIY it. Be prepared for some imperfections in your DIY countertop, especially if this is your first time working with concrete.
But if you are willing to accept some imperfections character in your countertops, you will love the savings it will give you.
Here is a breakdown of the material cost for our 40″ x 84″ kitchen island countertop:
- (5) 55 lb bags Rapid Set Cement All – $115
- (8) 2.12 oz packets Flow Control – $24
- (3) .88 oz packets Set Control – $9
- (3) 3′ x 5′ sheets HardieBacker cement board – $36
- (1) 15 3/4″ x 8′ melamine covered board – $20
- Clear silicone caulk – $4
- Screws – $8
- Sandpaper (220, 400, and 600 grit) – $5
- Food grade sealer – $20
Total cost for our countertop was less than $250 for a large solid surface kitchen island! That is a huge savings over other solid surface countertops that would cost $1000+.
Durability:
You cannot beat the strength of concrete! It is the stuff you build your entire house on. And the Rapid Set Cement All is an even more high-strength at over 9000 PSI.
And concrete countertops hold up to high heat. Feel free to set your hot pots and pans directly on it. That’s a huge bonus for busy kitchens!
Cons of Concrete
Porous:
Concrete is a porous surface so it does require proper sealing. You will need to seal your countertops thoroughly after they fully cure. Then periodically as you use them.
I plan on sealing my countertops more frequently at the beginning, about once a month for a few months. Then I will switch to maintenance sealing every 3- 6 months after that.
Cracks and Imperfections:
Concrete can get hairline cracks in it as houses settle and temperatures change. The Rapid Set Cement All that we used is more crack and shrink resistant than standard concrete.
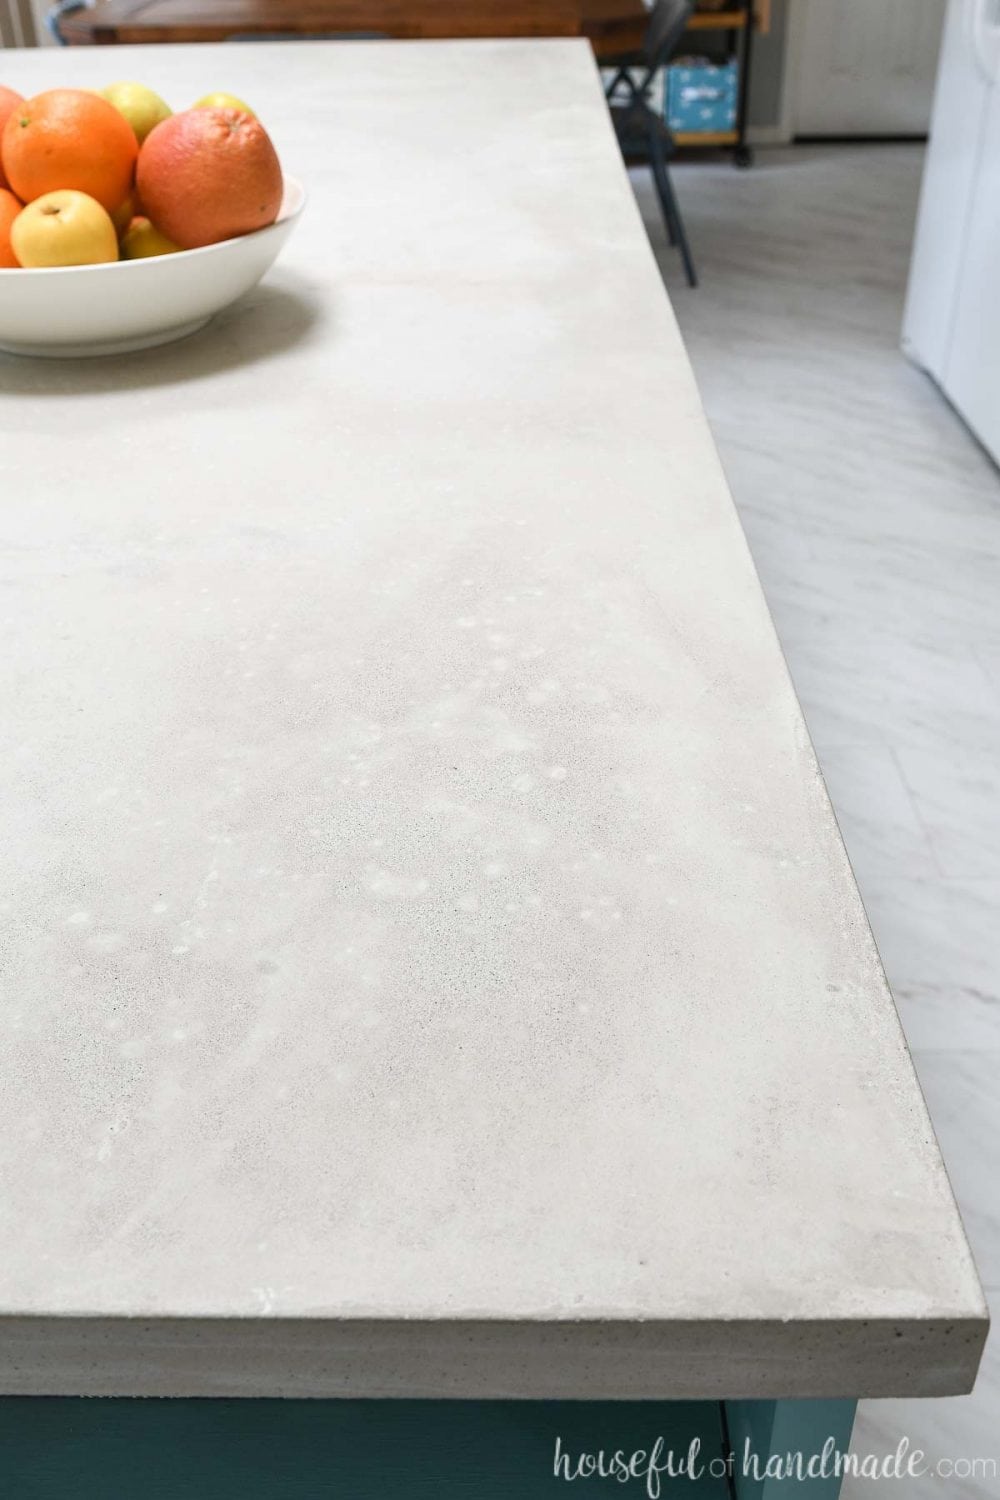
Also, concrete is not a perfect surface. There might be air holes, divots, color variations, etc. It is just part of the charm of concrete.
If you want a perfect solid surface, you will want to spend the money for something like quartz. If you like the character the imperfections add, you will love concrete!
But if you end up with cracks (we had a very small one as the countertop settled) or air holes that you want to fix, the Cement All is also made to bond to itself with no additional primers or fillers.
So we just mixed a small portion of Cement All with some water and pressed it into the crack with a gloved finger. Then cleaned the excess away and it was gone!
So now that I have convinced you to go with concrete countertops, let’s talk about everything you need to know to DIY them!
Working with Fast Set Concrete
One of the reasons traditional concrete countertops did not appeal to me was the time. You would pour your concrete, then have to wait 48 hours before removing the forms.
But once the forms were removed, you still had to wait 5 days for the concrete to fully cure before sealing it. I am not that patient!
But you can reduce the time to create DIY concrete countertops by using Rapid Set concrete mixes. The entire pour for our large kitchen island took about an hour. Then we smoothed it out, kept it wet for an hour, removed the forms, sanded the surface and had the mess cleaned up for a late lunch!
You just cannot beat the time savings of getting your kitchen back in a day versus a week!
But working with a fast set concrete has some drawbacks- you have to be prepared with all your tools ready at hand and you have to work fast. A couple extra sets of hands is also very useful!
Because of this, there are a couple additives we used to make our DIY concrete countertop go smoothly:
- Flow Control
- Set Control
What is Flow Control?
The Flow Control is used to increase fluidity of the mixed concrete. Normally concrete is similar to a peanut butter consistency when mixed. With the addition of Flow Control, we got it to a thinner, pancake batter consistency.
The thinner consistency was much easier to work with for our concrete countertops. It made the concrete flow into all the nooks and crannies. It also makes it easier to vibrate the bubbles out resulting in a smooth surface.
Why not just add more water to get a thinner concrete?
If you add more water to your concrete mix, it actually decreases the strength of your concrete. The Flow Control allows you the benefits of the thinner concrete but with all the strength you want for perfect countertops!
What is Set Control?
The Set Control is used to add more working time to your fast set concrete. Each packet of Set Control extends the working time by 15-20 minutes.
Other factors also change the amount of working time you will get. Higher air temps will lower your working time. Also, colder water will give you more working time.
Set control is added to the water before you add your concrete mix. We used 1/2 a packet of Set Control in each of the 55 lb bags of concrete for our project since it was cooler (in the 60s) and we were using cold water.
It was enough time for our simple project, you may need more working time for a project with more corners, area, etc.
Do you need rebar?
You will notice in the tutorial below that we didn’t use any reinforcement or rebar in our countertops. The Rapid Set Cement All is a high strength concrete so it was not needed for our project.
But that does not mean you don’t need it for any countertop. If you have a large overhang (for a sit at bar) or small sections (like around a sink), you will need to add rebar for extra reinforcement in those areas.
Pour in Place or Pour in Mold
There are two ways you can make your concrete countertops:
- Pour in Place
- Pour in Mold
For pour in place countertops, you create a form on your existing cabinets. Then you fill the form with concrete and smooth the top.
Once the concrete is cured, you remove the molds and your countertop is already installed.
For pour in mold countertops, you create a mold of the entire countertop with melamine covered boards. The bottom of the mold ends up being the top of the countertop.
Once the concrete is cured, you remove the mold around it and then transfer the countertop to the cabinets to install.
And in case you are not aware… concrete is HEAVY! The larger the countertop area you have, the heavier it is. That is why we opted for the pour in place method for our large kitchen island.
The benefits of the pour in place are that you do not have to move them. But you make a big mess in the area you are pouring (but with some drop cloths, it wasn’t hard to clean up).
The benefits of the pour in mold are it is easier to get a smooth top to the countertops since it is up against the melamine boards. But you risk breaking them as you move them into place.
Whichever method you choose, both ways can be made fast with the use of the Rapid Set Cement All or Mortar Mix!
How to Make Concrete Countertops
Tools Needed:
- Saw for cutting forms
- You can use either a table saw or circular saw to cut melamine boards for concrete forms.
- Drill
- Impact Drive
- Measuring tape
- 4′ level
- Utility knife
- Caulk gun
- Water sprayer
- Steel mixing bit
- Concrete trowels
- 5 gallon buckets
Supplies:
- Rapid Set Cement All
- Use the concrete calculator on the CTS website to help figure out how much you will need.
- Rapid Set Flow Control
- Rapid Set Set Control
- Cement board
- 100% silicone caulk
- Cold water
- WD40
- Wet sand sandpaper in 220 grit, 400 grit and 600 grit
- Food safe sealer
CTS Rapid Set sent out 2 of their local reps to help us with our DIY concrete countertop pour! They were able to answer all our questions so we could pass that knowledge onto you.
A huge thanks to Tyler and Manny for answering my millions of questions and making concrete so much fun!
Prefer to Watch? Check out the Video Below
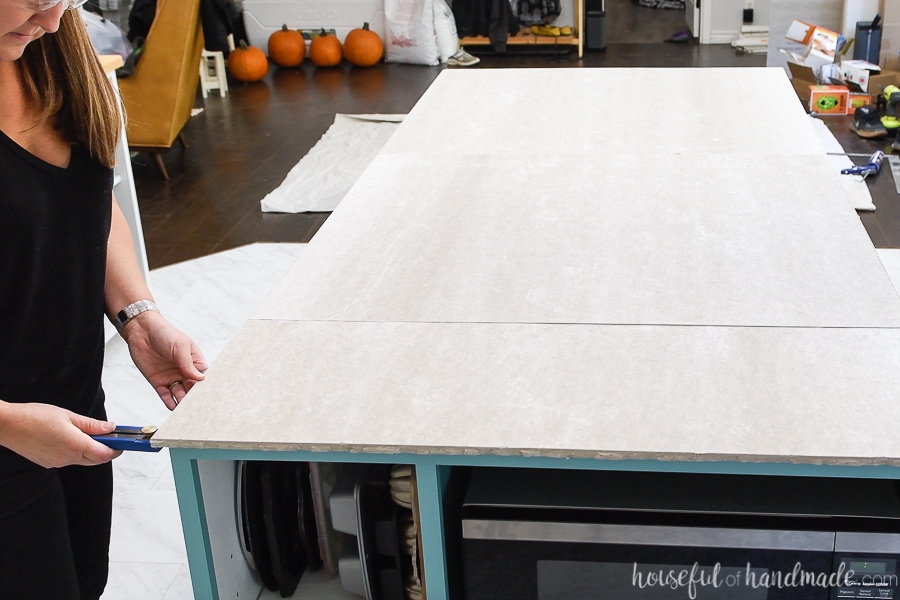
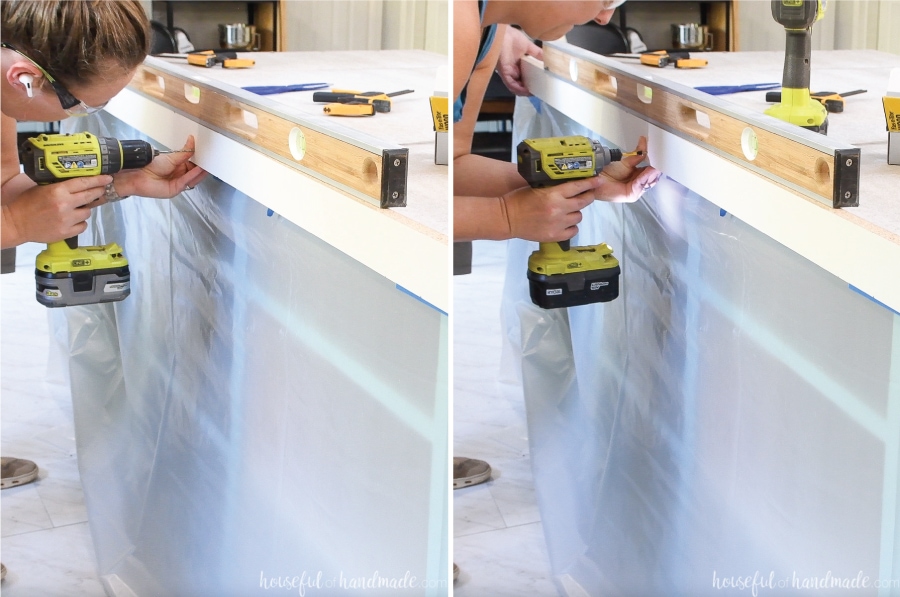
Build the Forms
For the pour in place countertops, you build a form directly on top of the countertops. The base of the form is made up of 1/2″ thick cement board.
Since the cement board comes in 3′ x 5′ sheets, we needed 3 sheets for our form.
Plan your desired overhang. Since our cabinet doors will be inset I am only doing a 3/4″ overhang on our countertop. So the cement board was cut to make up 1/2″ of that overhang.
Then the remaining 1/4″ of the overhang was created with the cement. This also covers the ends of the cement board, but still gives you enough room on the cement board to attach the rest of the forms.
To cut the cement board, use a straight edge and score the edge multiple times with a utility knife along the straight edge. Once you have a nice groove, put some force on the edge and pull up the other side to break it along the score.
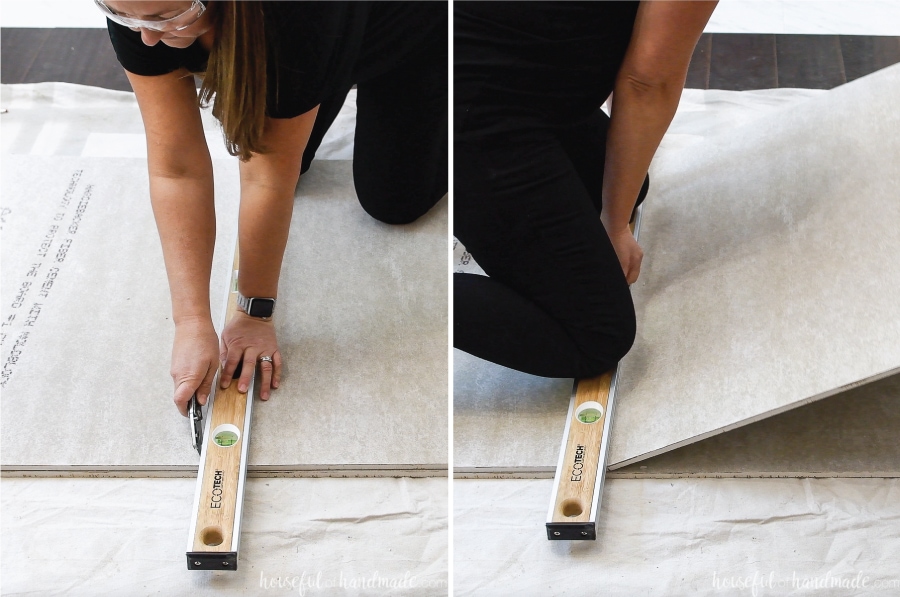
Repeat as needed to cut the cement board to fit a single layer, with your desired overhang, on your entire countertop.
To secure the cement board, add some silicone caulk to the top of the kitchen cabinets and press the cement board back on top of it. Once the caulk is dry it will hold the cement board in place, but still make it possible to remove the cement countertop someday in the future without having to break it into pieces.
Also, caulk any seams of the cement board so that the mixed concrete does not drip through. This can cause holes and low spots in the countertop, as well as make a big mess!
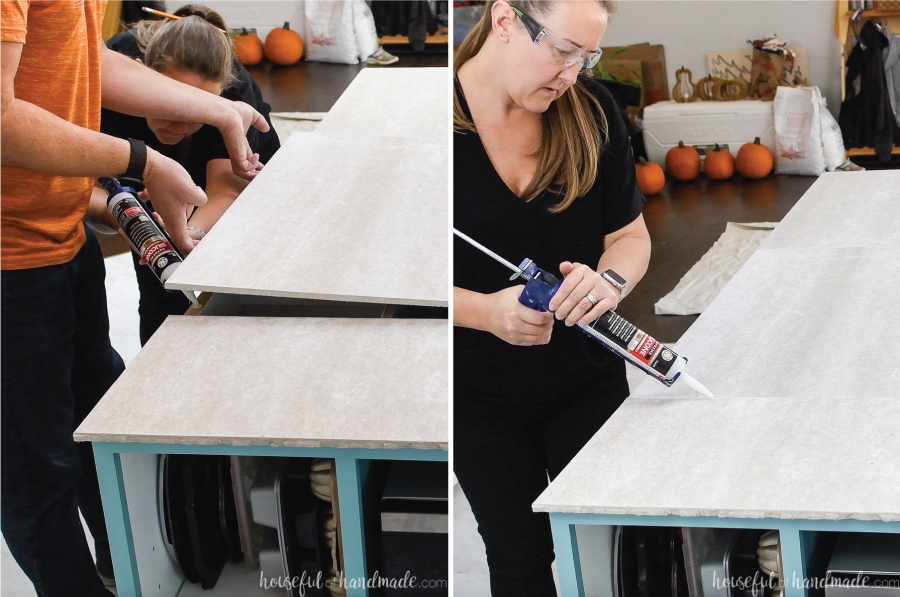
Rip strips of the melamine covered board the exact width of the overhang you want. Mine were 3/4″ thick. You need enough of these strips to secure to the bottom of the cement board all around the countertop.
Make sure to predrill for your screws when attaching the thin strips of melamine board to the underside of the cement board. Otherwise you will split the thin board (ask me how I know this).
Then secure the board with 1 1/4″ wood screws. I added screws about every 6-8 inches. No need to measure and be precise, just make sure the board is well attached.
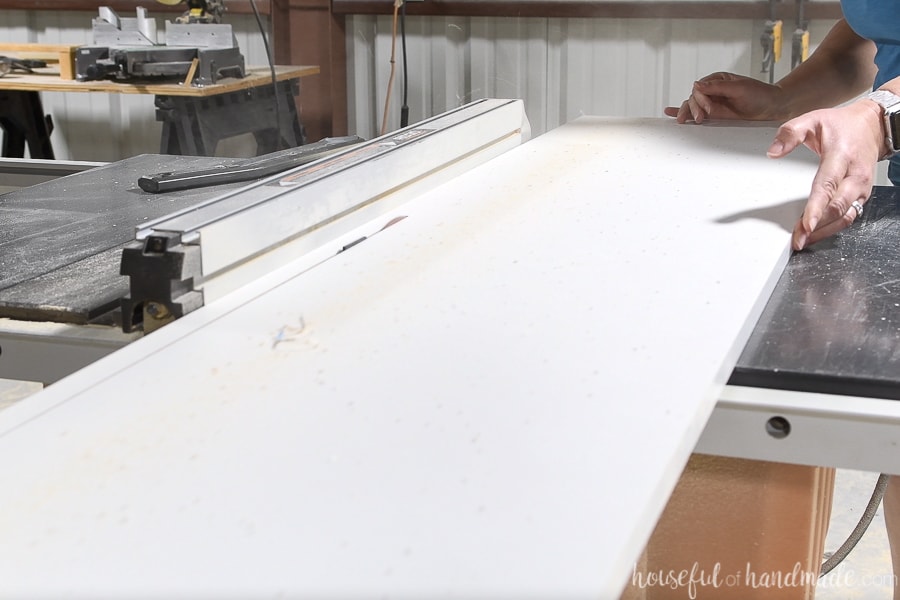
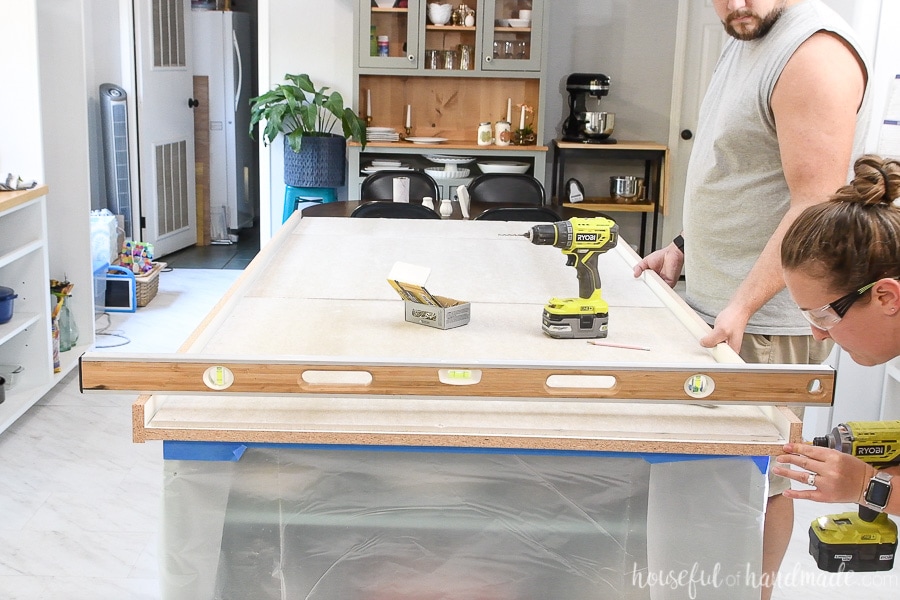
Next rip more melamine covered boards the thickness you want your countertops (standard countertops are 1 1/2″ thick and that is what I did mine) plus the thickness of the melamine board (3/4″). I also added an extra 1/4″ so I had room to level the boards as needed.
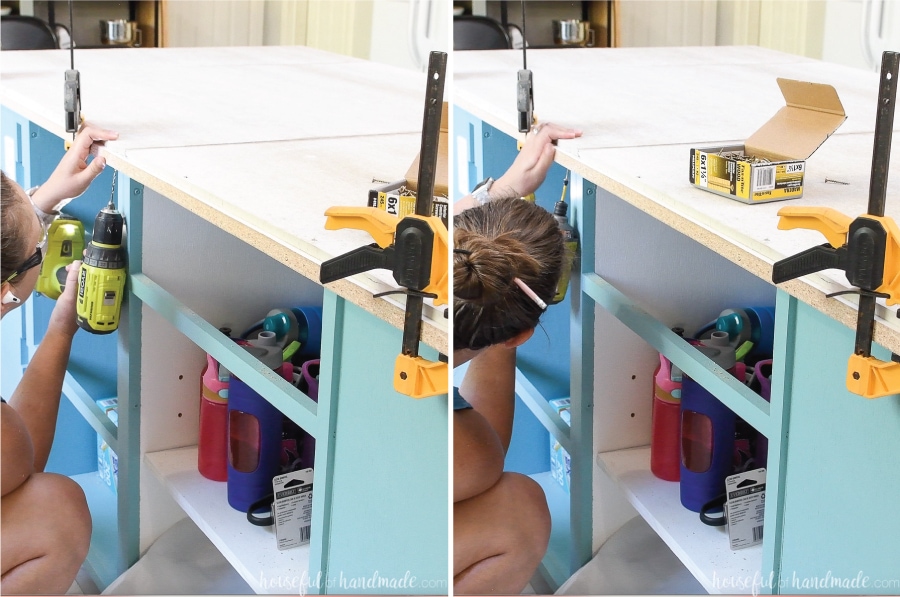
Attach the boards to the side of the other boards that are already installed. Again, predrill your screw holes and attach with 1 1/4″ screws.
Use a level to make sure the side of the form is level. Typically your cabinets are leveled when installed, but it’s always good to double-check.
Repeat for the second side of the countertop making sure to keep the side level to the first as well.
If adding a countertop up against a wall, you will need to attach a thin board (around 1/2″) that is not melamine covered to the wall. This board should be the exact thickness of your countertop and will sit on top of the cement board. It will give you an edge to the countertop so you can level the concrete to it, then it will be hidden when you add a backsplash to your countertop.
Finish by adding the ends to the form in the same manner.
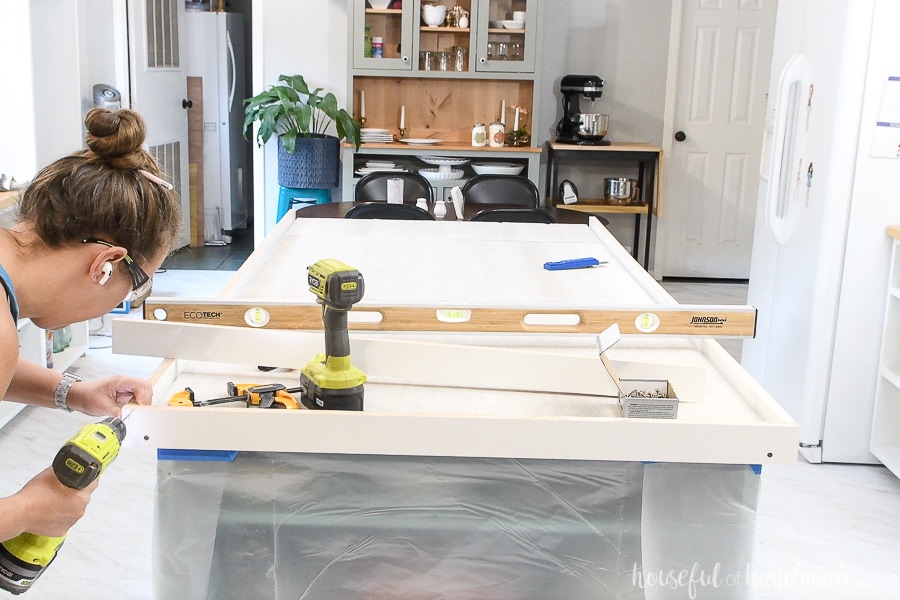
Use duct tape on the outside of the form to cover any areas where there are gaps in the form. This will prevent the concrete from leaking through and causing holes/bubbles in your countertop.
Prep for the Pour
The most important thing we learned from the CTS reps when pouring concrete countertops with Rapid Set is to have everything prepped and ready before you start mixing any concrete!
That means you have all your tools laid out and ready, open your concrete bags and additives, and make a plan. Once you start mixing, your working time starts and you don’t want to waste time looking for something you thought you had.
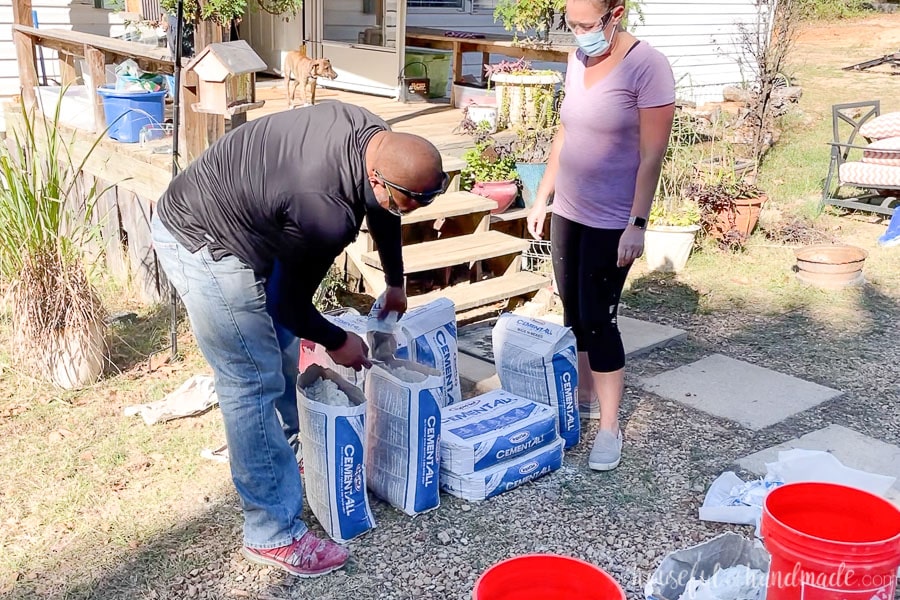
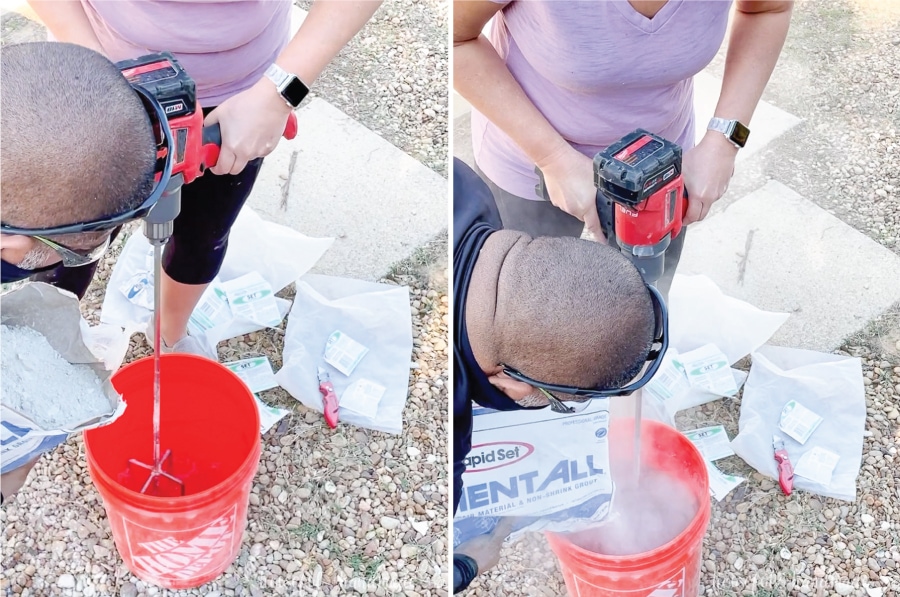
Set up the concrete mixing area:
Wherever you plan to mix your concrete, set it up for quick mixing success.
- Stand them upright and cut open your Cement All concrete bags
- Cut open the Flow Control & Set Control packets
- Have 1 bucket set up for water
- Measure out your water and draw a line on the bucket so you can refill quickly
- Have 1 bucket ready for mixing
- Set up a hose to clean the mixing bit and bucket between concrete mixes
Set up the pour area:
Make sure you have all your tools at the ready in the area you are pouring your countertops.
- Cover the floor/cabinets/etc. with tarps and drop cloths
- Set your clean concrete trowels nearby
- Use a rounded corner one for finishing work to prevent scratches from the corners
- Have a straight 1x or 2x board longer than the width of your countertop for a concrete screed
- Bring in your vibrating devices (we used sanders) and make sure you have power/extra batteries
- Fill your water sprayer with water
- Move anything out of the walkway between the mixing area and pour area
Final Form Preparations
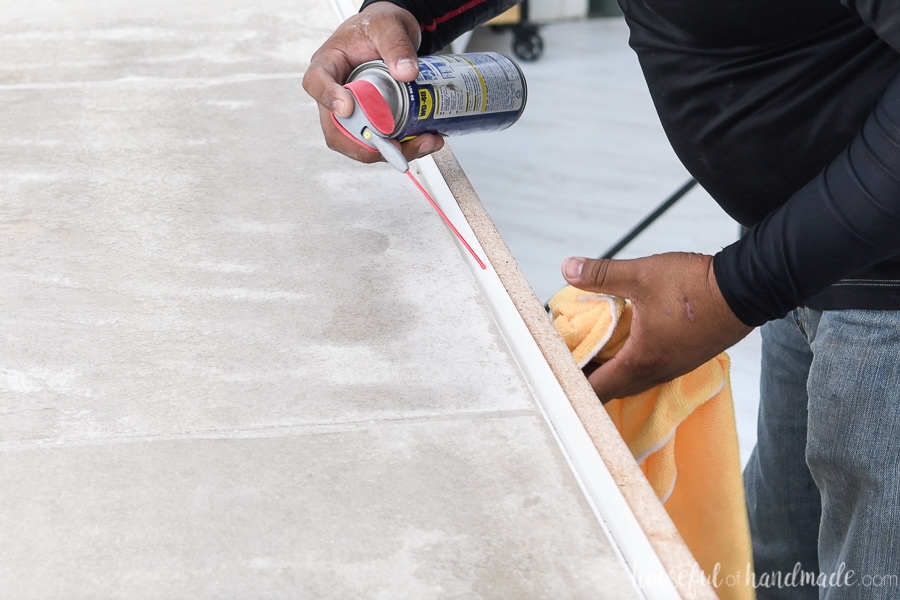
The last thing to do before pouring is the final prep on the form. Add some WD40 to the melamine on the inside of the form. Then rub away any excess with a clean cloth.
This will make it easier to remove the form from the finished concrete countertop later.
Also, dampen the cement board with water. You want the water to soak into the cement board and not have puddles. But you do not want to have dry cement board since it will pull the water out of your cement causing it to set up too fast.
Now you are all prepped and ready to make a countertop!
Mix the Concrete
A lot of factors will change how much water and additives you will use for your concrete. Warmer air and water temperatures, humidity, etc can all affect it. I am sharing what we used for our project to give you a jumping off point.
Measure out the water for your first pour and place it in a bucket. We started with 4 quarts, but ended up using 5 quarts for each 55 lb bag of Cement All.
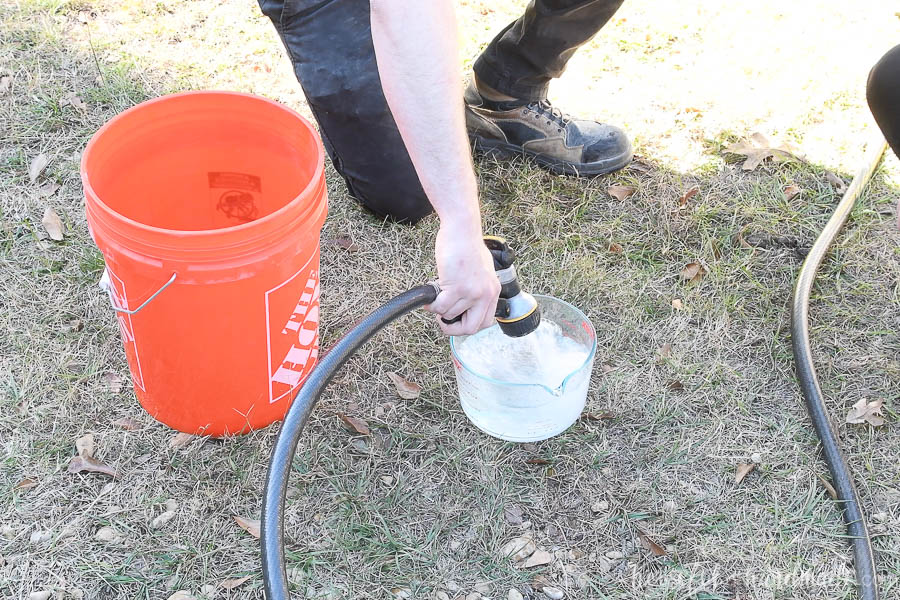
Once the water is in the bucket, use a sharpie to mark the line. This way you can just refill the bucket to the line for each subsequent mix.
Pour your water into your mixing bucket. Then add the Set Control. We used 1/2 a packet of Set Control for each 55 lb bag of Cement All. Each bag will give you 15-20 minutes more time.
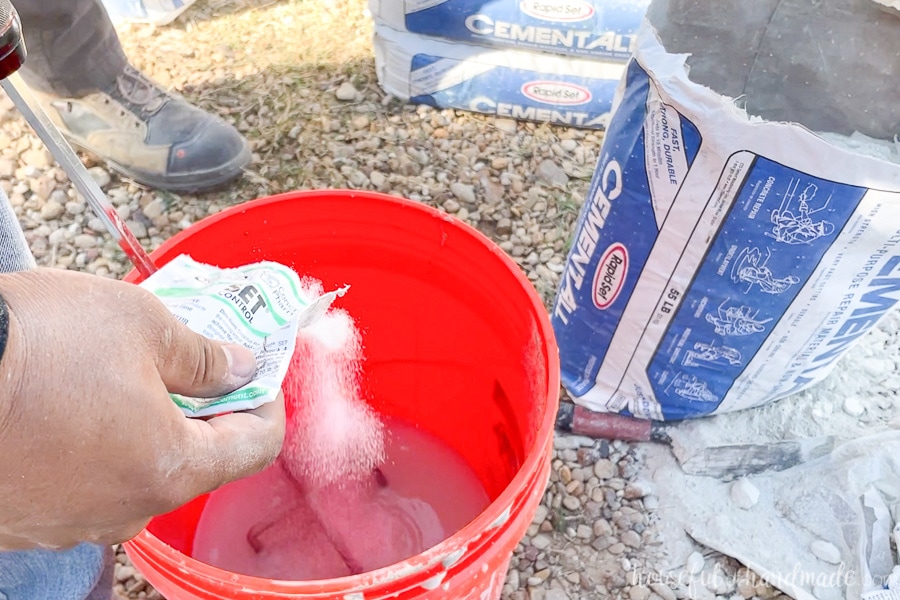
Since our pour is just a rectangle and the temperatures were cooler, we only needed the few extra minutes of working time. If you are working on a larger countertop area or in the summer, you may need more.
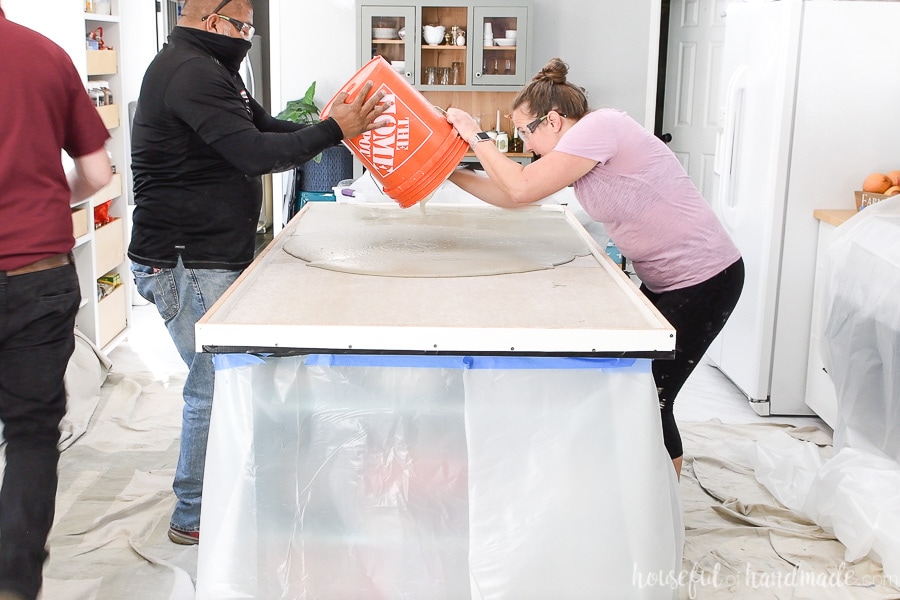
With the mixing bit in the drill, start mixing the water while someone else pours the bag into it. Always pour the concrete into the water so you don’t have dry spots in the bottom.
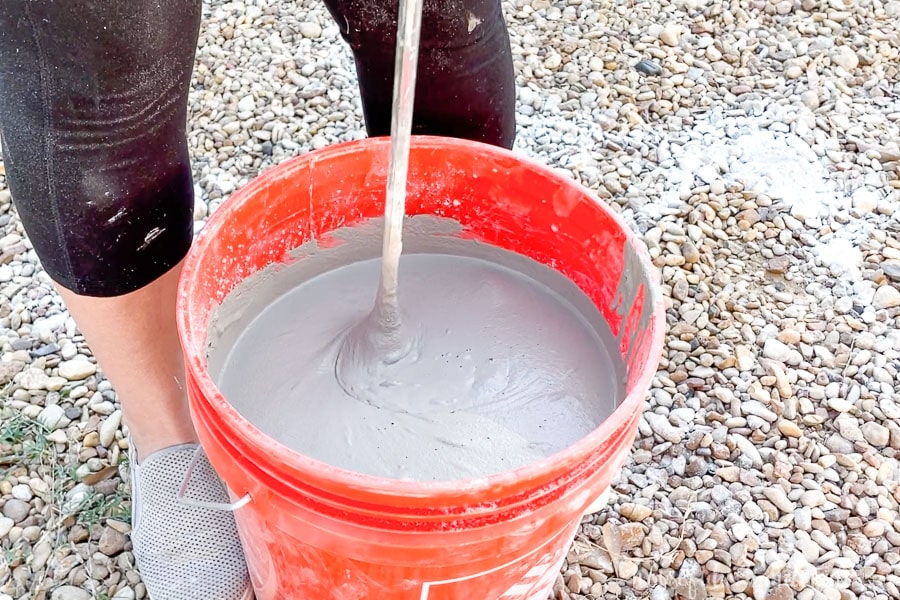
Continue mixing until you don’t have dry spots, adjust your water if needed but do not exceed the recommended amount. Then add in your Flow Control.
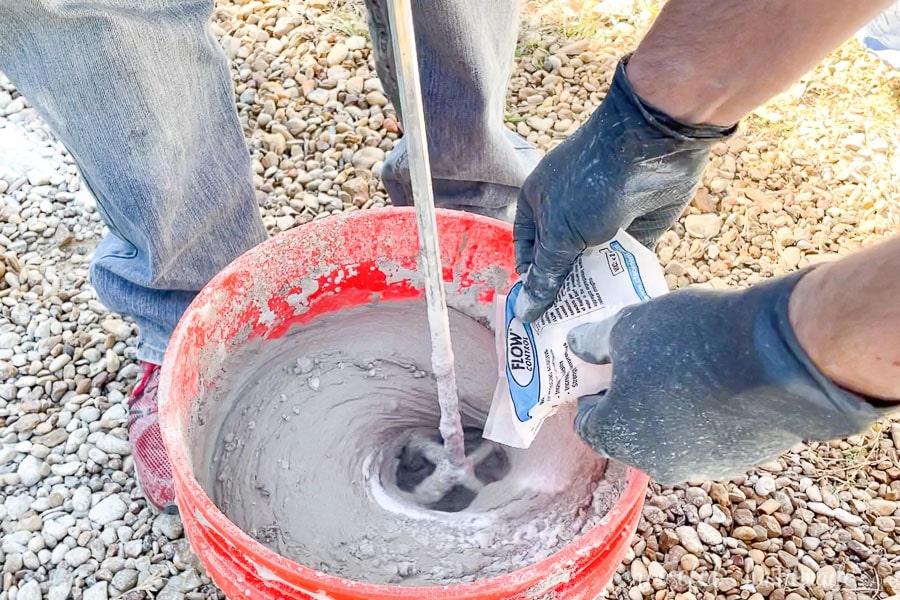
You will immediately see the concrete start to get thinner and soupy. For our countertops we ended up using 1 1/2 packets of the Flow Control for each 55 lb bag.
Once you see no more lumps and have a smooth concrete, it’s time to add it to your forms. Have someone take the concrete into the pour area while someone else immediately sprays off the mixing bit to clean it off.
Pour into Forms
Pour the mixed concrete into the countertop forms. Use a scoop to scrape out as much as you can from the bucket.
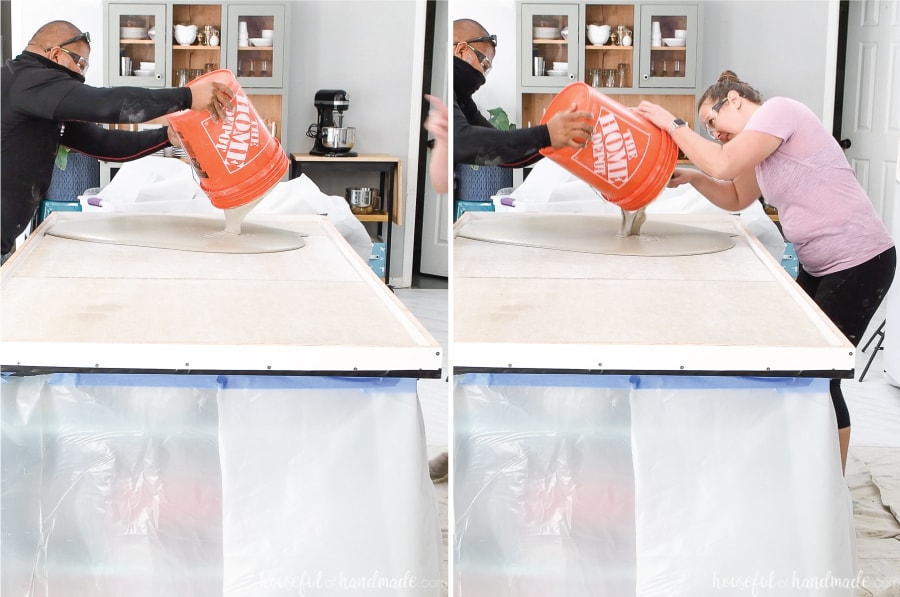
Then let someone take the bucket back outside, rinse the bucket immediately and start mixing the next bag.
While inside someone else can start moving the concrete into the corners and edges of the forms with the trowel.
Add a second bucket of mixed concrete and repeat.
Also, this is the time to start vibrating all around the outside of your countertops. I used a battery powered sander to vibrate the edges. Vibrating is necessary to release the air bubbles.
Continue to add mixed concrete to your forms until the forms are full. Use the trowels to move the concrete to the different areas of the form and vibrate out the bubbles (you cannot vibrate enough, I promise).
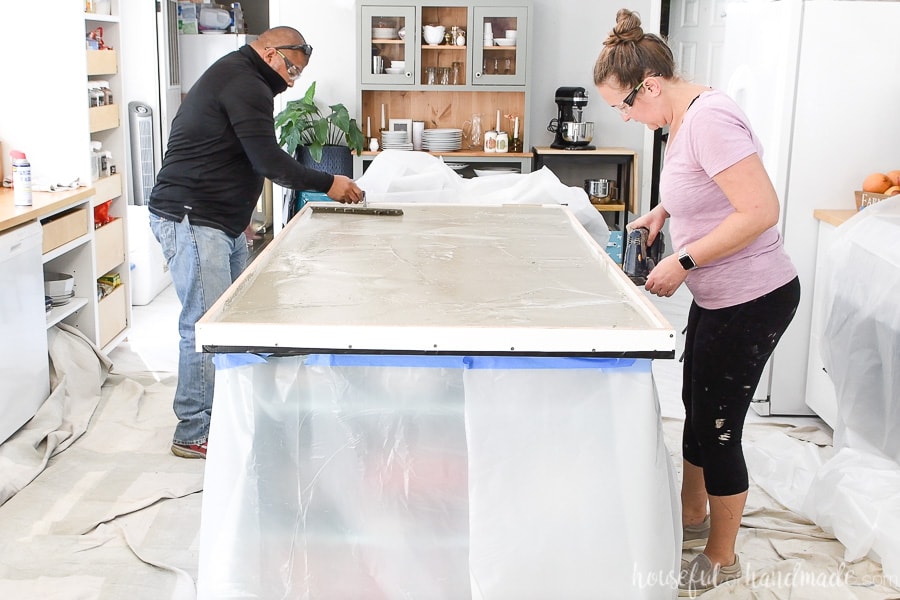
Once all the concrete is in, use your screed to level off the top of the countertop. This will also show you where you have low spots that may need to be filled in.
When you screed the top, move the board back and forth at an angle across the top of the countertop forms. This will move the excess concrete off the sides and into low spots.
Only screed in one direction, we always started at the back and moved to the front. Once the countertops were level, you are done with the screed.
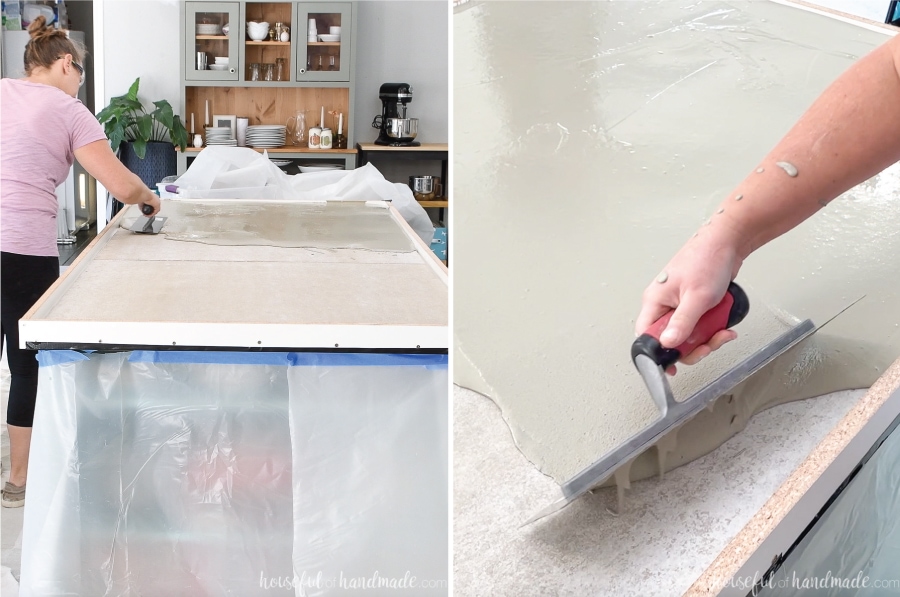
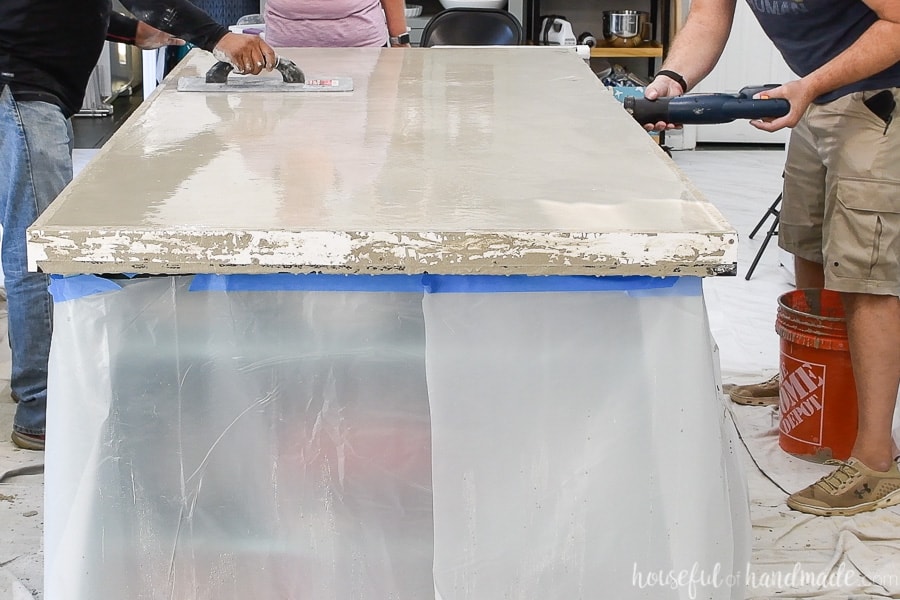
Now you can use the rounded end trowel to smooth the surface. Using large arched strokes, smooth the top of the concrete with a light hand, pulling the back of the trowel across the surface.
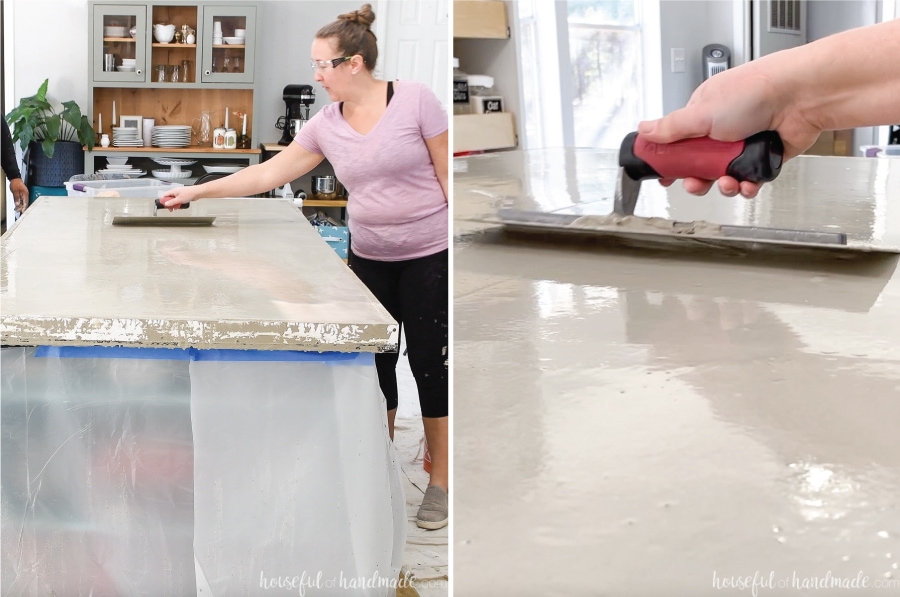
It is similar to frosting a cake, and it may take you a few tries to get it down. Continue to smooth out all over the entire surface of your countertop, all while someone is still vibrating away at the sides!
You do not have a ton of working time since this is fast setting concrete, so get the surface smooth and then step back. As the concrete starts to set you will do more harm by continuing to work the surface.
Finishing and Sanding
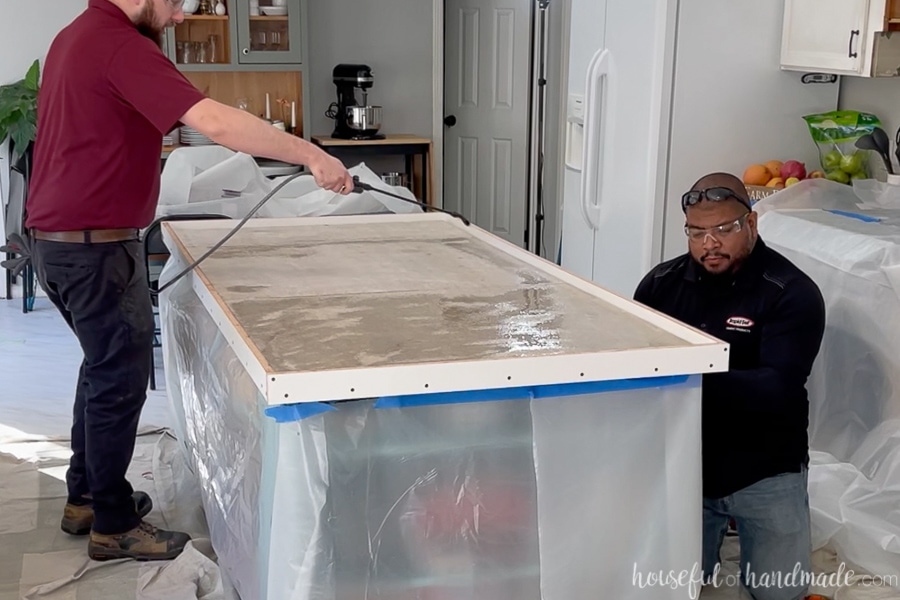
Once the surface is smoothed and the concrete starts to set, it’s time to wait. But don’t leave because you still have work to do.
For the next hour, while the concrete sets up, you need to keep it wet. Using the water sprayer, continue to keep the surface of the concrete damp as it cures.
So grab an ice cold drink (you deserve it) and stand around watching your concrete dry! But make sure to spray it with water as it starts to dry, always keeping the surface wet.
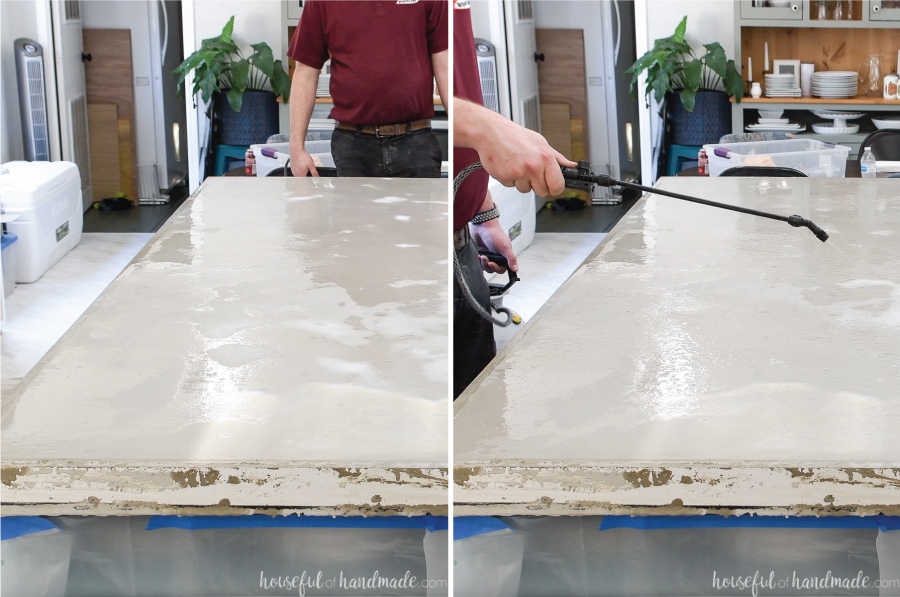
Around an hour you will notice a slight change in the color and sheen of the concrete. This means you can stop wetting it. It is a very faint difference and I probably wouldn’t be able to point it out again, so just use the clock as your stopping point.
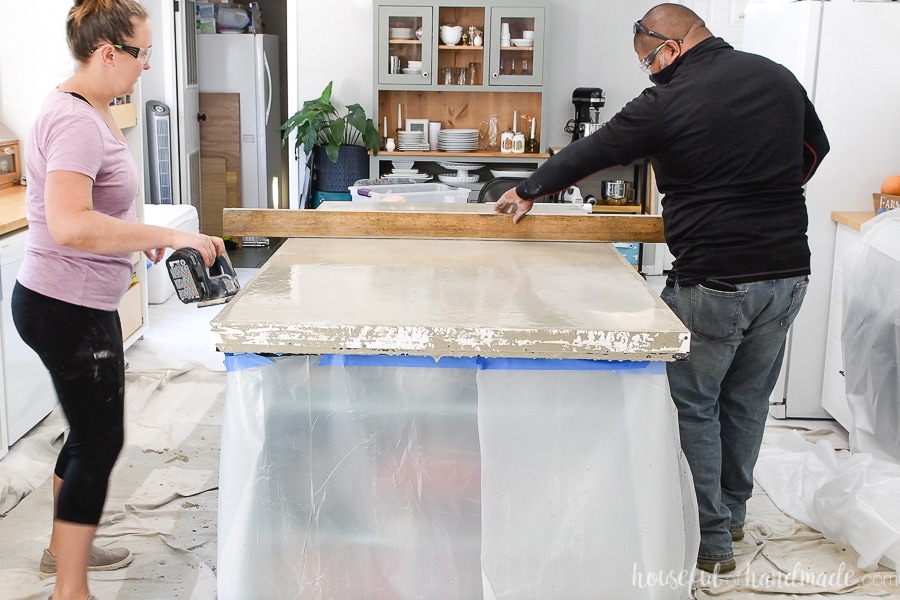
When the hour is up, you can remove the forms from the side of your countertop! This is super exciting. Unscrew the screws in the bottom of the form (the ones into the cement board). Then unscrew the corners of the forms.
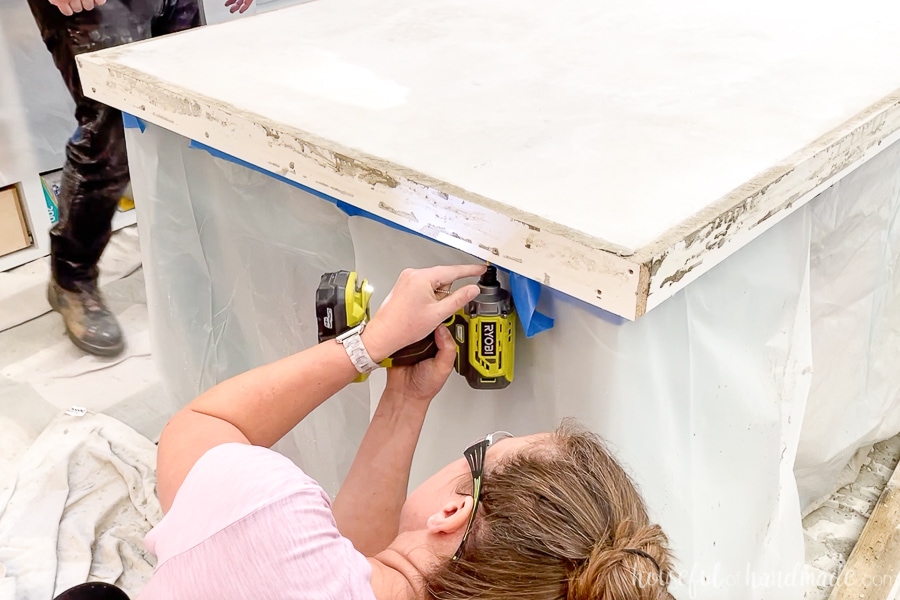
With constant firm pressure, pull the forms off the side of the countertops. Don’t jerk at them, just give them a consistent tug and the forms should release pretty easily.
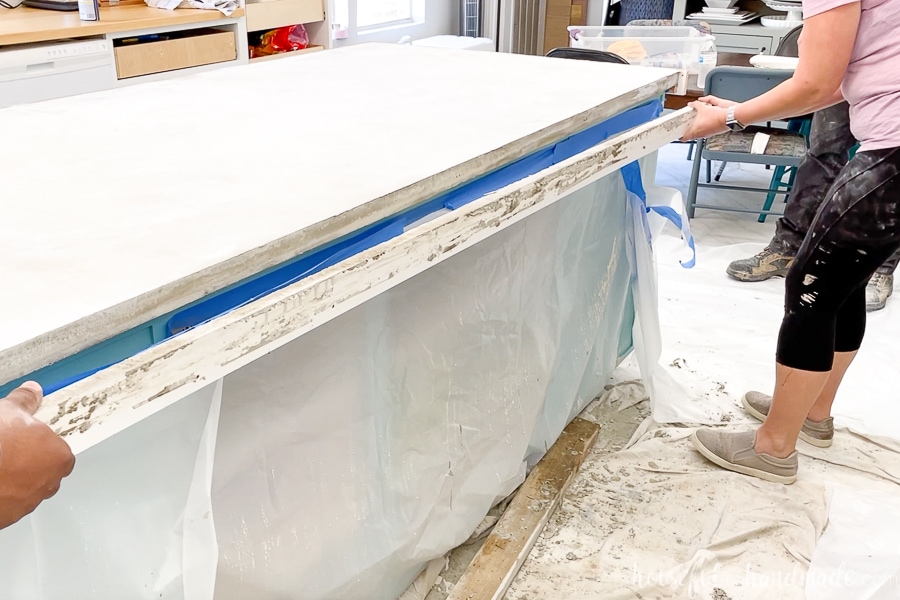
Repeat for all the edges of your countertop!
And now you have a few minutes to sit back and admire your work before it’s time to sand. But really just a couple minutes cause you’ve gotta get this sanded before it sets up too much.
Sanding the Countertops
We hand sanded our concrete to keep the mess to a minimum. Also, we wanted a matte finish, not a super shiny polished one.
The sanding needs to happen right after you remove the forms before the countertops cure too much as they will continue to harden.
Spray the surface of the countertop so it is wet (again) and using the 220 grit wet sandpaper first, sand all over the surface in a circular motion. Don’t forget to also sand the sides. You can use a rub brick to slightly round over the corners.
For the first sanding, I attached the sandpaper to a scrap 2×4 block to make it easier. It was easy to hold while sanding, but required that the sandpaper be swapped very quickly which was annoying.
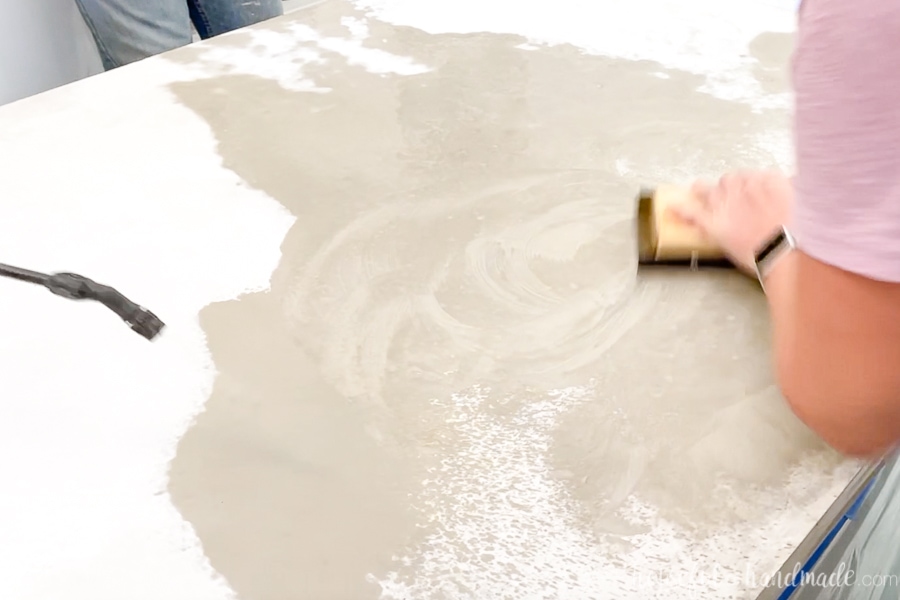
As you are sanding at first, you will notice what is called the “cream”. It is a creamy film in the water as you sand. This is the top layer of the concrete that needs to be fully sanded off since it is easier to scratch.
After sanding a bit, clean off the surface and then repeat the sanding with the 220 grit. Continue over and over until there is no more “cream” when you sand.
Next switch to the 400 grit and give it a good sanding, again with water, using a circular motion. Sand as much (or as little) as you like.
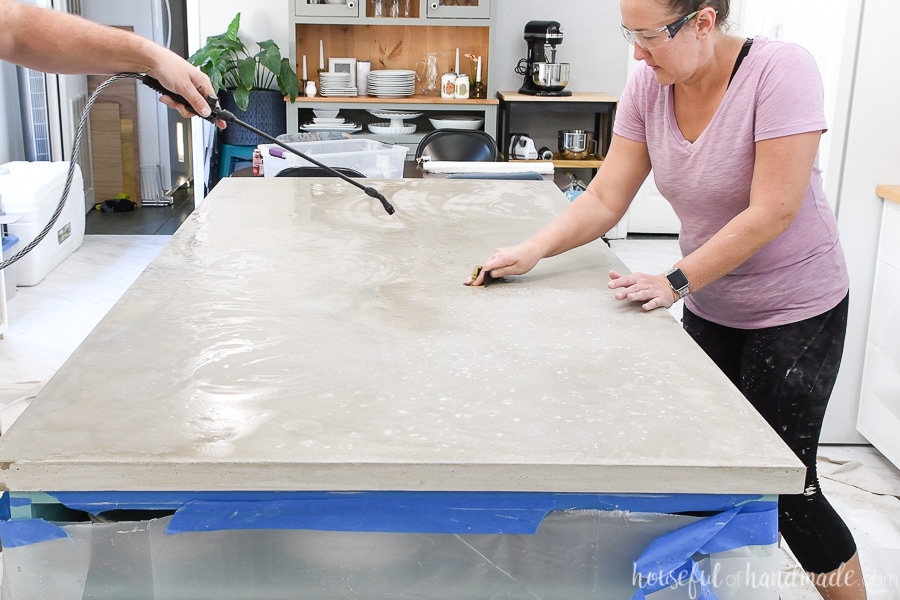
Repeat with the 600 grit sandpaper. You can even go higher grit for more polishing effect. But we were happy with the smooth texture of the countertop with the 600 grit. And we wanted a matte finish instead of a shiny one.
Once you are happy with your sanding, clean the countertops off with clean water again. And now you are officially done!
Seal the Concrete
Concrete countertops have to be sealed. They are very porous and will absorb all the kitchen stuff if not.
You only have to wait 16-24 hours after pouring your countertops with the Rapid Set Cement All before sealing (as apposed to 5-7 days with traditional concrete). So try to not use them for a day so you don’t end up with stains.
There are many, many options for sealing your concrete countertops. Some are super shiny, some leave the concrete looking wet, some are a matte finish (like the one we chose). I found this YouTube video by Michael Builds very helpful when choosing a sealer.
We used this Stone Care Granite & Stone sealer for our countertops. And it was super easy to apply!
Just spray a nice layer over the concrete. I smoothed it over the surface with a lint free cloth since my spraying wasn’t the most even, but made sure it was still wet everywhere. Let it soak in for 5 minutes then rub off any excess.
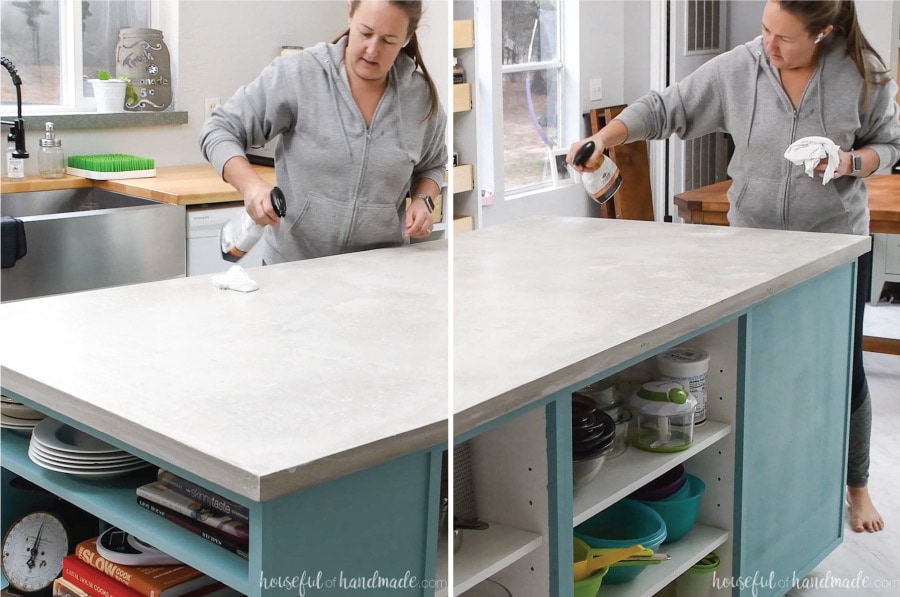
I didn’t have any excess so I figured I needed more. So I repeated the entire thing a second time. And then a third for good measure!
And once that was all dry, I threw some water on the countertop to check and it puddled up nicely on the surface. Success!
So now I know my countertops will be protected from normal kitchen spills and messes. I plan to reseal the countertop once a month for a couple months, then I can move to every 3-6 months for maintenance sealing.
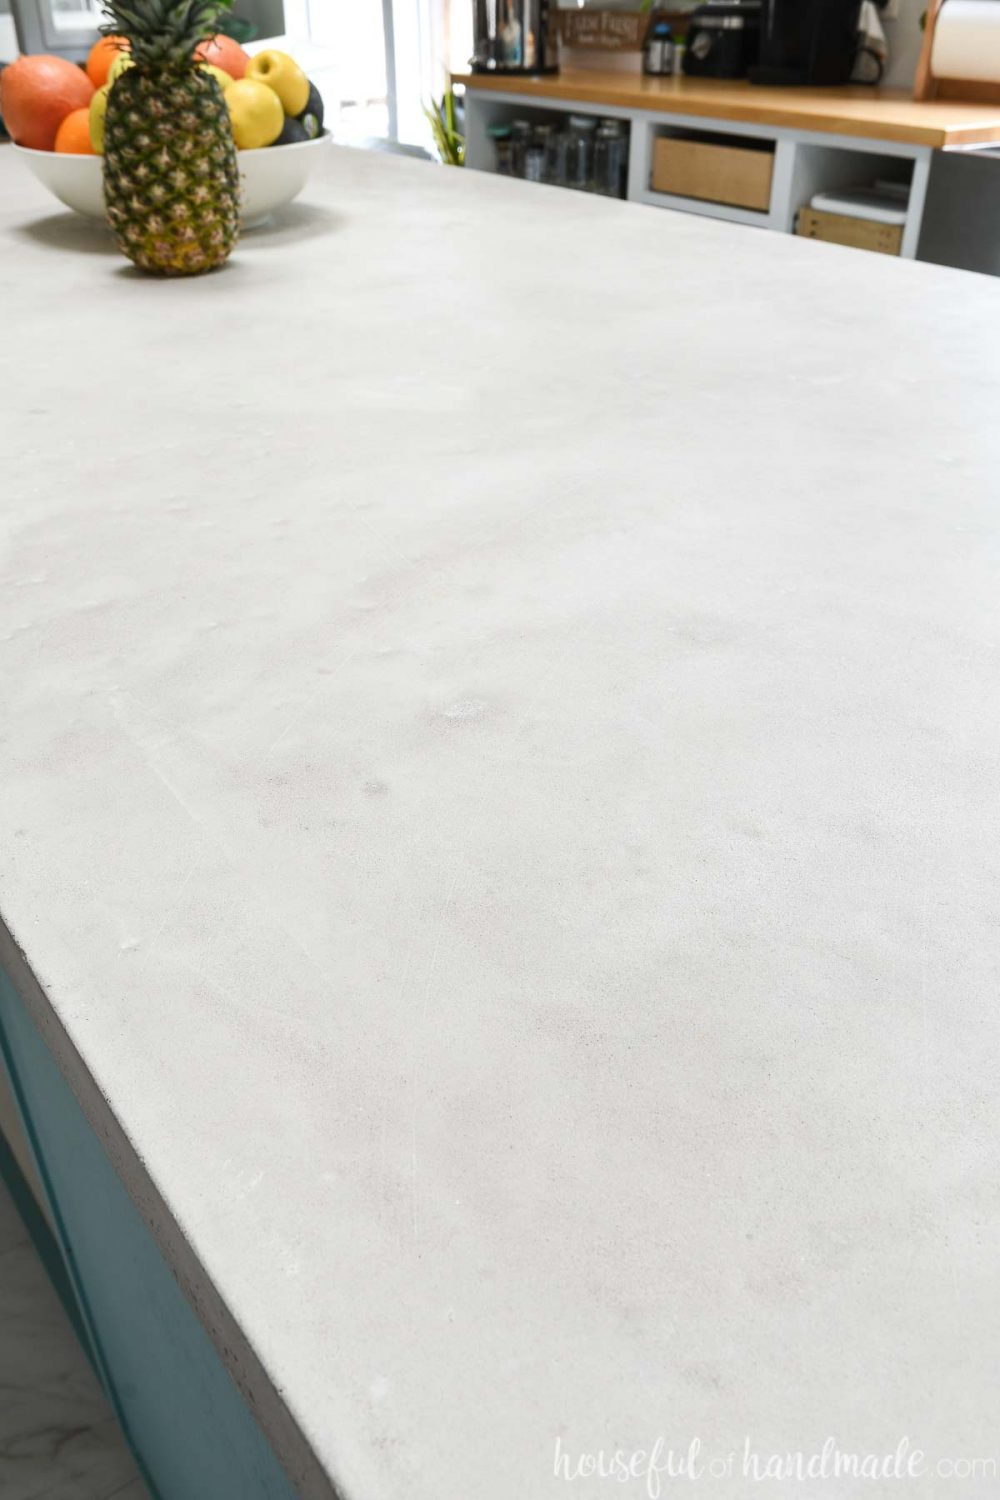
And I truly do love the character and imperfections on the countertop. The color and texture is so cool and unique. I love running my hand over the surface of it.
But my favorite is how durable this countertop is. Not needing a trivet under my hot pans is something I am sure to get used to!

Thank you to CTS Cement for sponsoring this post. I only recommend products that I use and love and all opinions are 100% my own. Click here to read my full disclosure policy.