
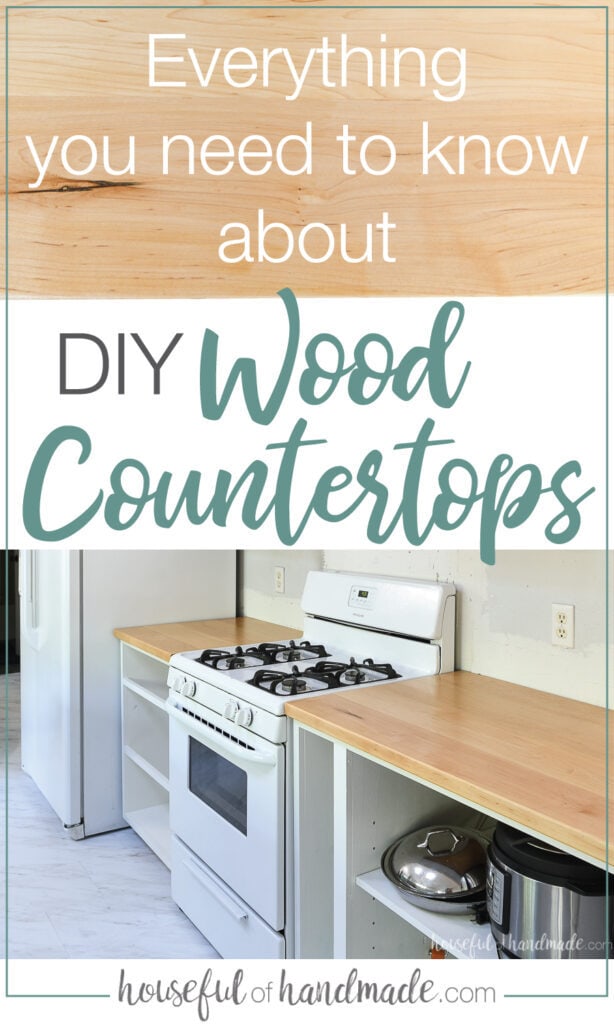
Add warmth and beauty to your kitchen with DIY wood countertops.
Countertops are one of the most expensive things you can put in your kitchen. They can even be more expensive than the cabinets. Popular hard surface countertop options like quarts and granite can easily cost $5000+ for a kitchen with lots of counter space (everyone’s dream).
Since I love saving money, I knew I could save so much money by making my own wood countertops. And after living with this beautiful wood vanity top in our master bathroom for many years, I knew I could seal them to last forever.
So I partnered with Waterlox to use their new water based, low-VOC sealer, H2OLOX, to make the most amazing wood kitchen countertops. And I am sharing all the knowledge so that you can build and seal your very own countertops too!
This post may contain affiliate links. As an Amazon Associate I earn from qualifying purchases. Click here to read my full disclosure policy.
Below I am sharing all the information you need to build your own wood countertops and seal them to last. But if you do not want to build your own, but still save so much money, you can purchase unfinished hardwood butcher block countertops like these and learn to install butcher block countertops in this post.
These unfinished countertops would just require you to template and cut them to fit your cabinets. Then seal them as noted below to last forever!
How Much do Wood Countertops Cost?
Wood countertops can be a cheaper option than the popular quartz or granite. Quartz and granite typically cost between $75-$150 a square foot, while wood is typically $50-$100.
But you can save even more money when you DIY your own wood countertops like we did! I love to see how much money we saved, so I am laying it all out here for you.
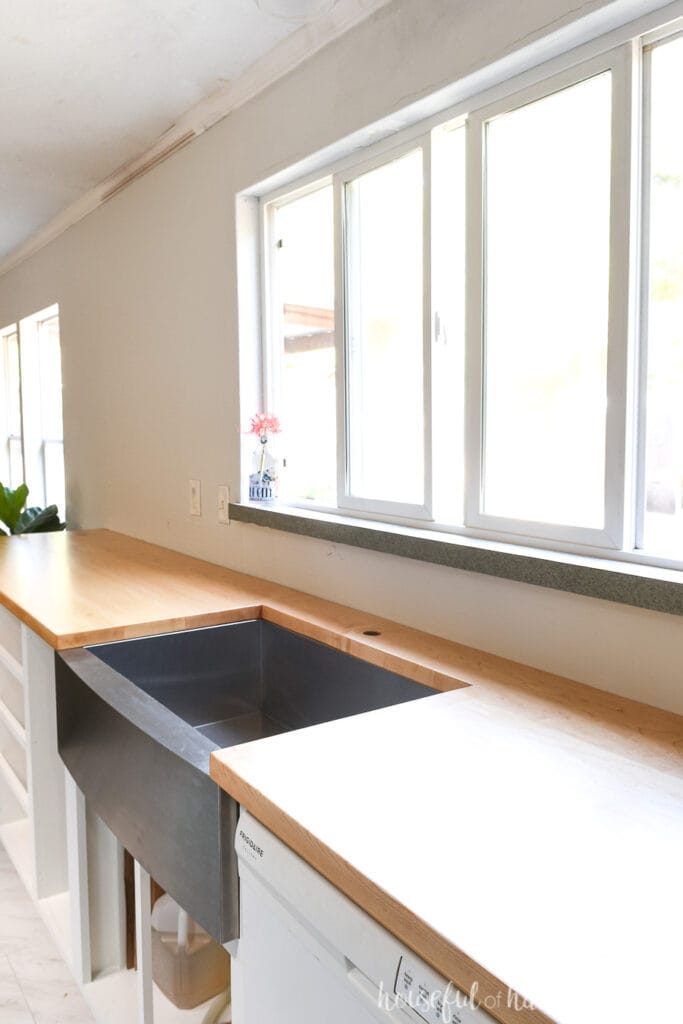
Our kitchen countertops (minus the island since we are doing that in a coordinating countertop… stay tuned) are 41 square feet. This does not include a backsplash since I prefer a tiled backsplash instead of one that matches the countertops.

Here is the breakdown of what it would cost for each type of countertop:
- Quarts or granite: $3,075-$6,150
- Wood (not DIYed): $2,050-$4,100
- DIY Wood: $410
Wow! That is a pretty amazing saving. Here is a complete breakdown of the costs for our DIY countertops:
- Hard maple boards: $350
- Waterlox sealer (UTOS and H2OLOX): $32
- Hardwood biscuits: $12
- Wood glue, sandpaper, sealing rags, paint brushes: had on hand but guessing it would cost around $16 for those items
So our countertops cost a total of $10 a square foot! That is even cheaper than laminate countertops which you can plan on spending about $25 a square foot for. Plus I have enough leftover maple to make 3-4 cutting boards to use in my new kitchen!
Even if you had to purchase a couple tools to be able to make your own countertops, you could still come in with huge savings versus other countertop options.
Would I DIY my own wood countertops again??? Absolutely yes! They look amazing and I am ecstatic about how inexpensive they were.
What Wood to Use for Countertops?
You really can build your countertops out of any wood you want, but different types of wood will have different benefits or drawbacks.
Softer woods like pine and poplar are less expensive. They are also easier to cut and work with. But the downside to softer woods is that they will easily dent. So if someone drops something on your countertop, you will have a permanent reminder of it.
Also, softer woods have a looser grain than hardwoods. This means they will require more coats of sealer to penetrate their grain to protect them. And if you do not use enough sealer, the looser grain will allow for things to seep into your countertops.
Hardwoods like maple, walnut or oak are going to be more expensive. They can also be more challenging for a beginner woodworker to work with (which is why I am a huge fan of starting to learn on cheaper soft woods).
My table saw had some challenges sawing through the 1 3/8″ thick hard maple boards so I had to cut them in passes. Not knowing how to problem solve a challenge like this could cause you to abandon your countertop project.
But the biggest benefit of hardwoods is that they are hard. They can take lots of abuse and still look amazing. So for a project like countertops they are such a great choice.
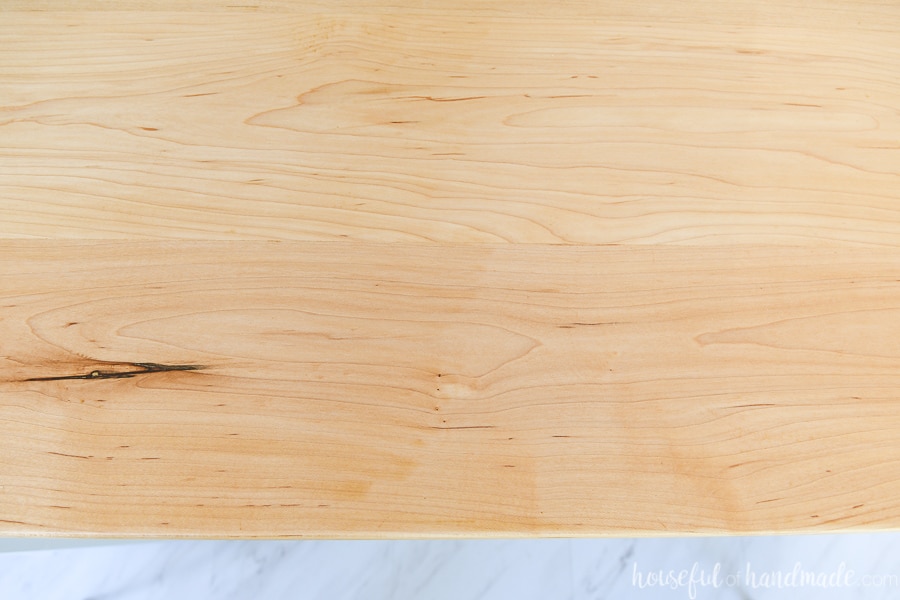
One other thing to note, not all hardwoods are the same. Some hardwoods have an open grain pattern (like oak and ash). You can see the openness of the grain when you look at these boards.
Those open grains can act like a softwood requiring more sealer or allowing seeping. This is why hardwoods with open grains are not recommended for making cutting boards.
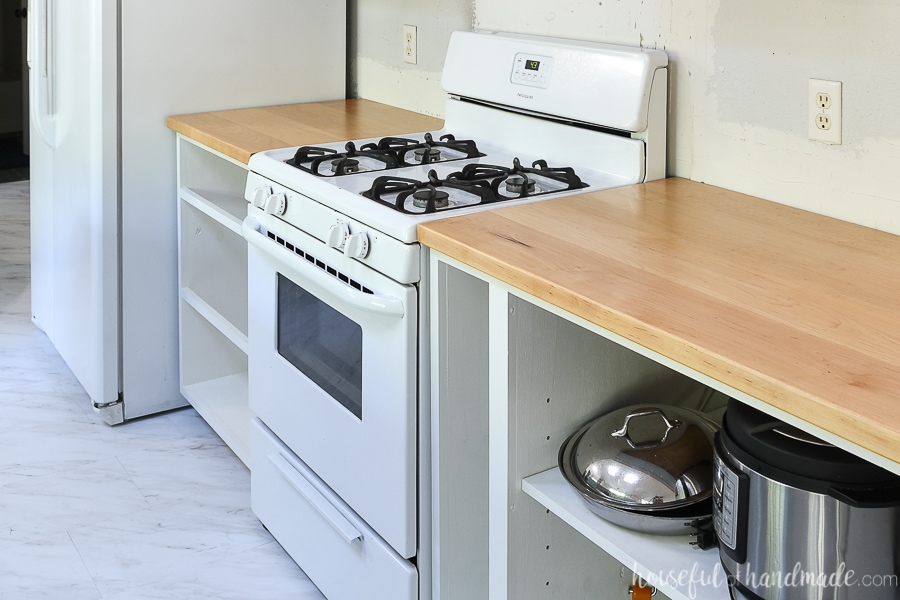
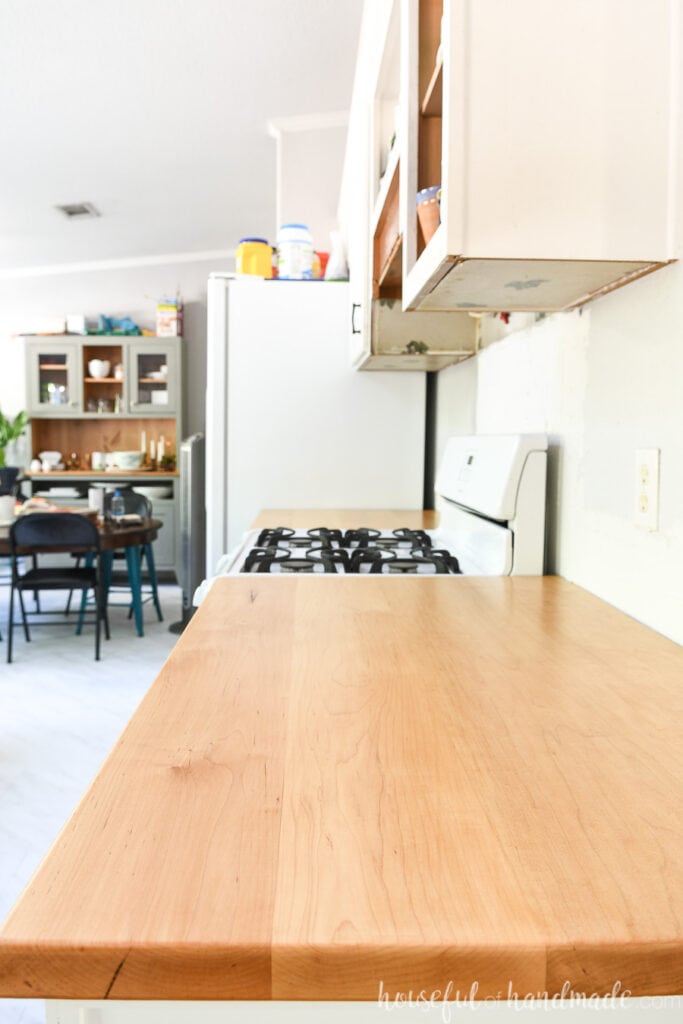
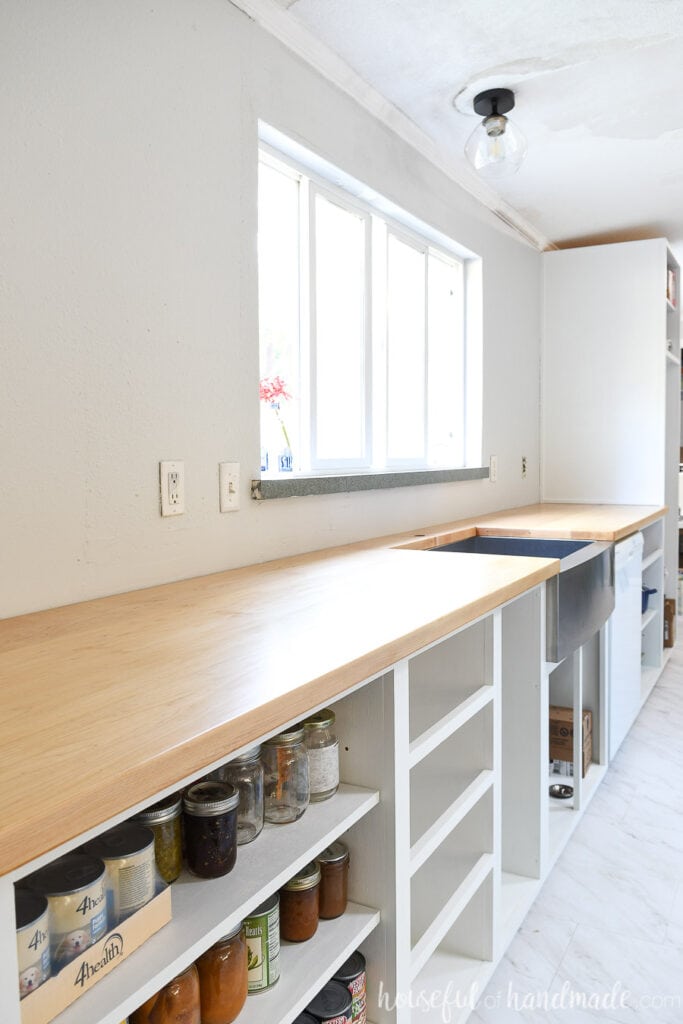
So for our countertops I chose a hardwood that is commonly used to make cutting boards: hard maple. I love the light tone of the wood. It will coordinate perfectly with the white cabinets and give my kitchen the airy, beachy look I am going for.
Buying Wood for Countertops
A typical countertop is 1 1/2″ thick. Because you are making your own wood countertops you can choose to make them thicker or thinner. It is totally up to you!
But if you want to go with countertops thicker than a typical 1x board, which is actually only 3/4″ thick, you cannot buy that wood at your standard big box home improvement store.
Instead you will need to go to a lumber yard. And that means new lingo you might not be familiar with. Don’t worry, I am here to help with that too!
Rough sawn lumber
Most of the wood you will be buying at a lumber yard is rough sawn lumber. This means it is the original cut without any smoothing or sanding. The boards can be a variety of thicknesses, widths, and lengths.
The standard 1x and 2x boards you see at the big box stores are dimensional lumber that have been planed, cut, and sanded to a standard size.
Buying rough sawn lumber will require you to have a way to mill it. This usually means you need a planer, jointer and table saw. All three are large (and expensive) woodworking tools.
- Planer: a planer is a machine that will cut the top surface off a board creating a smooth surface. You can use a planer to cut down a board to a specified thickness.
- Jointer: a jointer is a machine that flattens out one long edge of your board. Without a flat side to start from, your board will not be straight. Boards need to be flat on one side before even using a table saw to cut them to the final width.
But do not fear, a lot of lumber yards will actually plane and edge joint your boards for you for an additional fee. It is so worth it for taking large rough saw boards to beautiful boards ready for your countertops.
For my countertops I had the lumber yard do an initial planing (I do have this planer that is great for expanding my woodworking skills). I also had them edge joint one side since I do not have a jointer.
I have used a table saw jig to create a straight side in leu of a jointer on other projects, but that is much harder to do on these long, heavy boards.
Wood Thickness
When buying rough sawn lumber, the thicknesses are noted in 1/4″ increments. You will hear them referred to as 4/4, 6/4 and 8/4 to name a few. This can be confusing at first, especially if you hated fractions in grade school.
To figure out what lumber you need, divide the thickness you want by 1/4 (or 0.25) to give you the top number. So if you want to buy a piece of lumber that is 1 1/2″ thick, you will be looking for 6/4 lumber.
1.5 ÷ 0.25 = 6 or 6/4 lumber
But remember, this wood is not planed or sanded. So once you get that 6/4 lumber ready to use with a flat surface on both sides, it might only be 1 3/8″ to 1 1/4″ thick.
If you want countertops that are the true 1 1/2″ thick standard countertops, you will need to buy 8/4 lumber. This lumber is actually 2″ thick in its rough state. This allows plenty of room to plane it smooth to 1 1/2″.
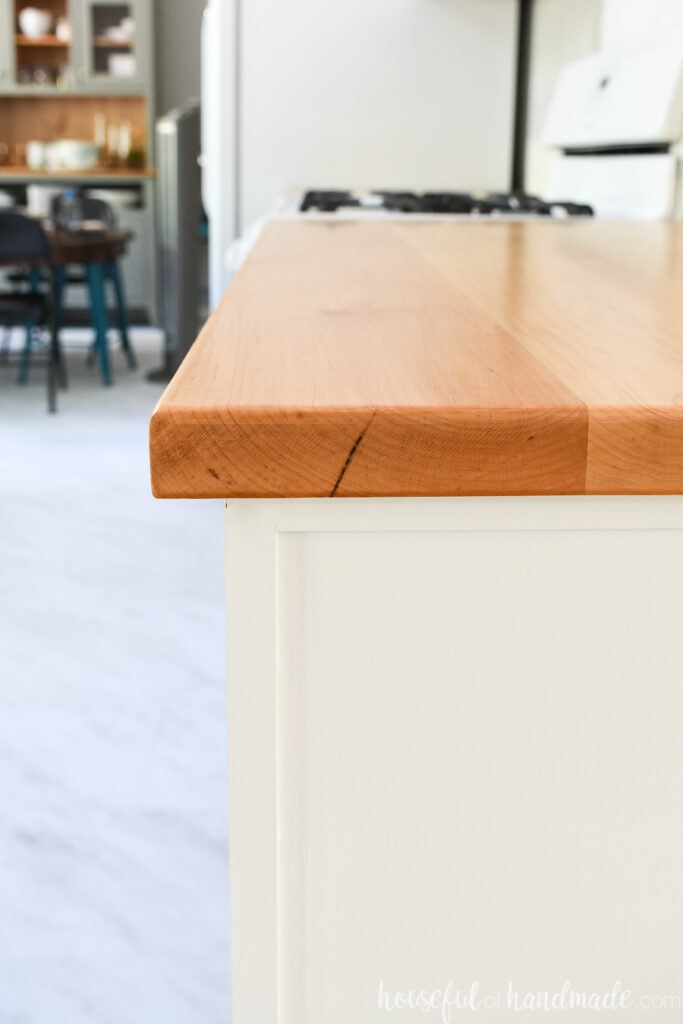
For our countertops I chose to use 6/4 lumber and planed it down to give us countertops with a final thickness of just under 1 3/8″. They still look very thick and substantial and starting with the thinner wood definitely saved us some money.
Board Feet
Another new term you will hear at a lumber yard is board feet. The wood is all sold by the cost per board feet. And it can be very confusing to figure out how many board feet each board is.
To determine your board feet, you need to know the length, width and thickness of your board. I always like to take a measuring tape with me to the lumber yard.
Then you can determine your board feet with the following formula:
thickness (in inches) x width (in inches) ÷ 12 x length (in feet)
So if you have a 6/4 board that is 6 1/4″ wide and 9 feet long, this is how you would figure out board feet:
1.5 x 6.25 ÷ 12 x 9 = 7.03 board feet
Then you can determine your total cost for the board by multiplying your total board feet by the cost. My maple was $4.62 per board feet so this board would cost $32.48.
And don’t worry if you get confused trying to figure out board feet. Just let the lumber yard workers know you are new to the whole thing. All the lumber yards I have visited have been so nice in helping me understand and figure out my costs.
What Tools do you need to Build Countertops?
Obviously you will need some woodworking tools to build your own wood countertops. But you could actually get away with building your own countertops with just a few tools if you do it right!
Planer & Jointer
To take rough saw lumber to beautiful hardwood countertops, you will need a planer to smooth the boards and jointer to flatten and square up the edges.
If you have the lumber yard joint and plane your boards, you will not need to have a planer or jointer.
Since I have a planer, I had my lumber yard do one pass in the planer. And since I do not have a jointer, I had them run one edge through the jointer for a clean flat edge. Then I used my table saw to cut a flat edge on the other side.
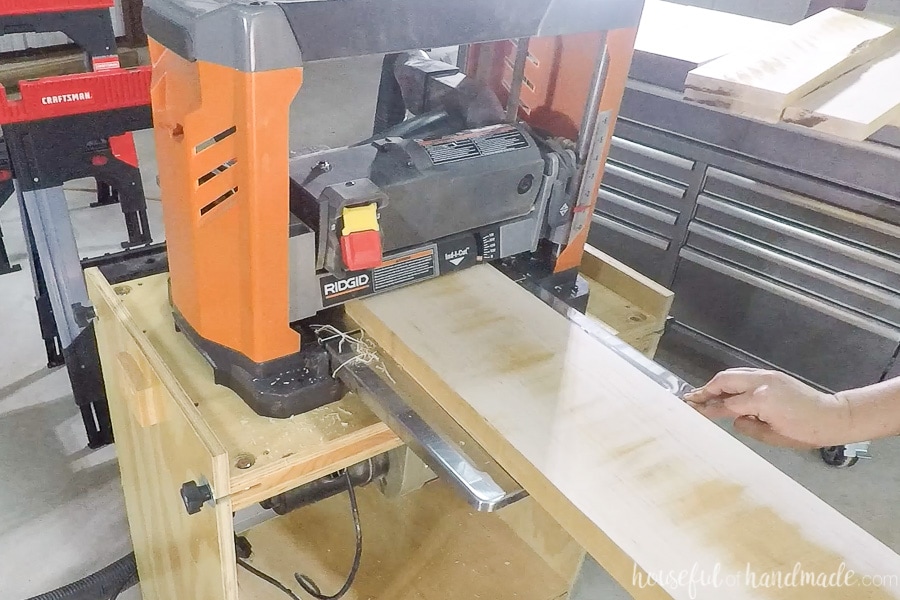
Plate Joiner
To glue up the boards, you may want extra assistance in making sure thing line up easily and don’t pull apart. A plate joiner (aka, biscuit joiner) is the perfect tool for this.
A biscuit joiner not necessary, but a handy tool to have when glueing together lots of boards along the edge. It is also useful for mitered corners on things like picture frames.
Circular Saw
A circular saw is all you need to cut your boards to length. It is also used to cut the final countertops to their template.
A guide track is very useful when using a circular saw. It helps you get straight lines every time. I used mine to cut the ends off the glued-up countertops as well as cut around the farmhouse sink opening.
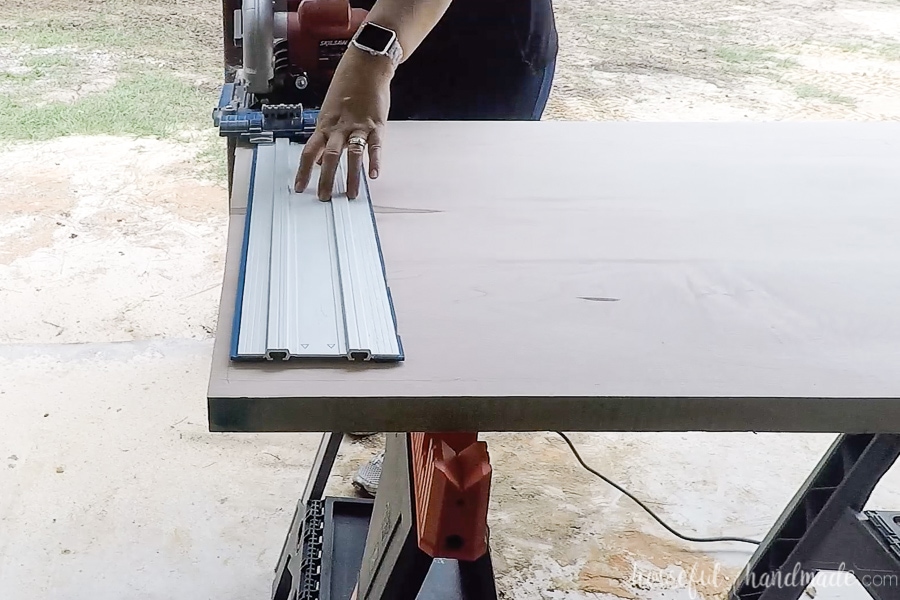
Table Saw
The table saw is used to rip the boards to the final width. If you have the lumber yard edge joint both edges of your board, you can probably build your countertops without one.
But you will need to take the extra time to figure out the widths of your boards at the lumber yard to make sure you have enough total width once edge jointed.
Clamps
You will need lots and lots of clamps when building wood countertops. Multiple boards will need to be glued together to get the necessary width for a countertop.
When glueing two (or more) boards together, edge-to-edge, you need to clamp them all along the length of the board while the glue dries to get a good joint. I only have 5 clamps that are large enough to clamp the 26″ total width and so I had to glue up my countertops one section at a time.
What Finish will Seal Wood Countertops?
You will want to seal your wood countertops to protect them from all the water, spills, and grease that come with a kitchen.
You can seal your countertops with a butcher block oil like you do for cutting boards. But that requires frequent re-application to maintain the water-resistant seal.
For our bathroom vanity, we used the Waterlox Original formula and it still looked amazing when we sold it after 3 years of constant use. But the original formula only comes in High Gloss, Semi Gloss and Stain finishes.
For our kitchen countertops, I wanted a matte finish. That way the countertops would look just like giant cutting boards. So I was super excited to learn about Waterlox’s new H2OLOX formula that comes in a Matte finish!
This new formula also creates a waterproof seal over all your wood. The biggest differences are:
- it is a water-based finish (yay for easier clean-up!)
- it is a low odor, VOC compliant, eco-friendly sealer
- it comes in a matte finish (as well as the other finishes)
- it requires an initial coat of the Universal Tung Oil Sealer (which brings out the beautiful grain and color of your wood).
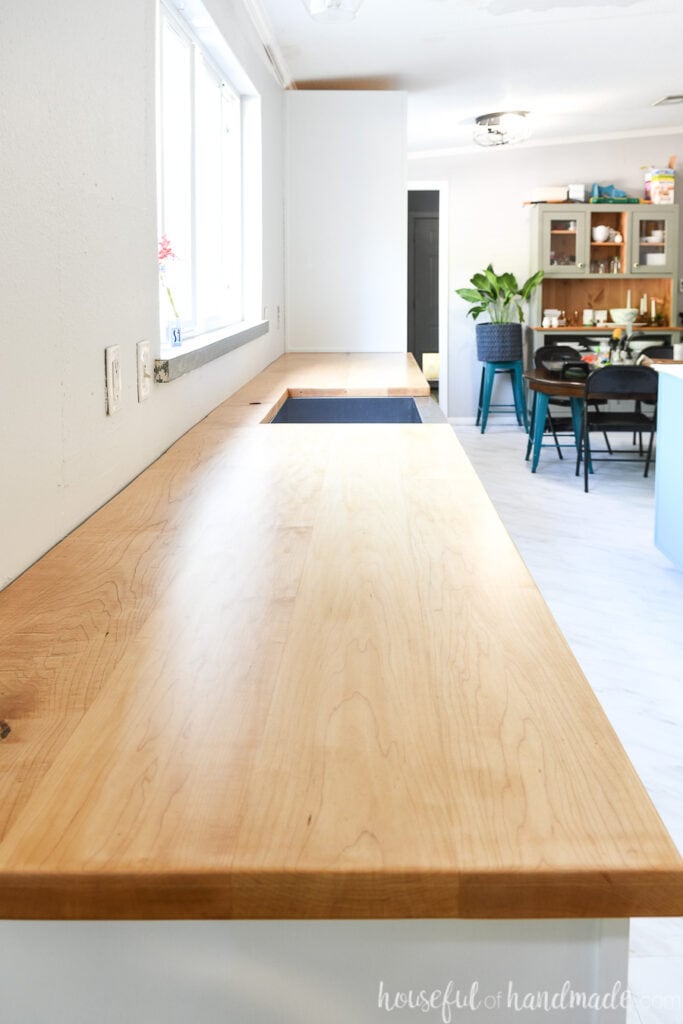
When sealing countertops, I would recommend that you seal all sides of the countertops. This will make sure that any wood expansion and contraction is more uniform.
I made sure to apply all coats of sealer to the underside of my countertops first. Then after the last coat dried for 24 hours, flipped them over and applied the finish to the top and sides.
This way any scratches or marks in the finish were on the bottom (but I did not have any that I noticed). Also, only applying the finish to the sides with the top kept any drips from forming on the top of the countertops.
How to Build Solid Wood Countertops
Tools Required:
- Circular saw with guide track
- Table saw
- Sander
- Optional: planer & jointer
- You do not need these if you have the lumber yard plane and edge joint your boards
- Optional: plate joiner
- Optional: jig saw
- Will be necessary to cut around any curves in your countertop template, not all countertops will have curves
- Optional: palm router
- In case you want to add a roundover or other decorative edge to your countertops
Supplies:
- Cardboard or 1/8″ plywood
- Lumber
- The amount you need is dependent on the size of your countertops. For the type of wood needed, refer to sections above.
- Wood glue
- Sandpaper
- Optional: #20 hardwood biscuits
If you want beautiful DIY wood countertops with less work, you can always purchase unfinished hardwood butcher block countertops like these, then template and seal them like we did below.
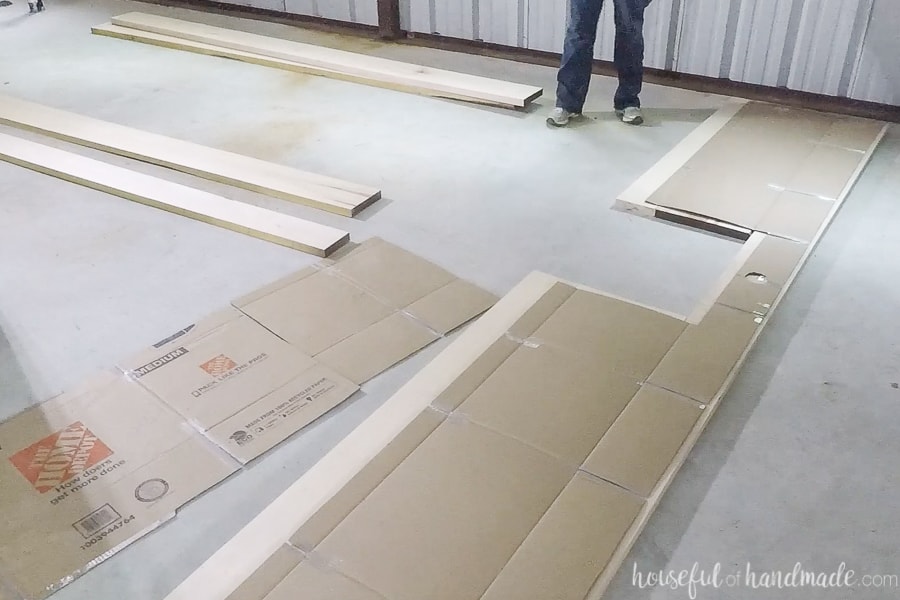
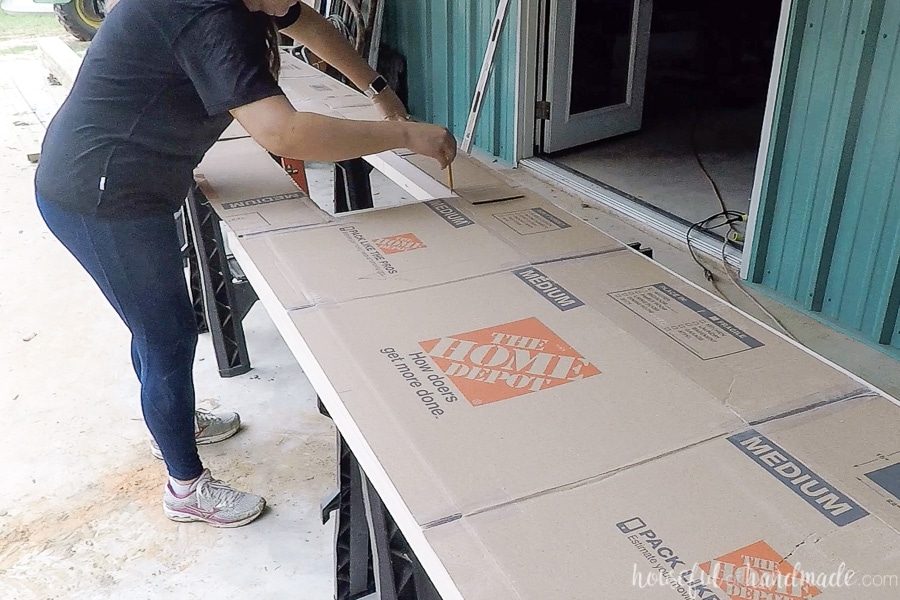
Create your countertop template
Before cutting your wood, you will want to create a template of your countertops. You can do this with cardboard or inexpensive 1/8″ plywood.
I used the cardboard from empty moving boxes which worked okay, but I wish I would have used pieces of cardboard to stiffen up the space between the top and bottom flaps.
When working between two walls, you will need to create your template in 2 pieces that overlap and then secure together in the middle. This will allow you to scribe both sides for a better fit.
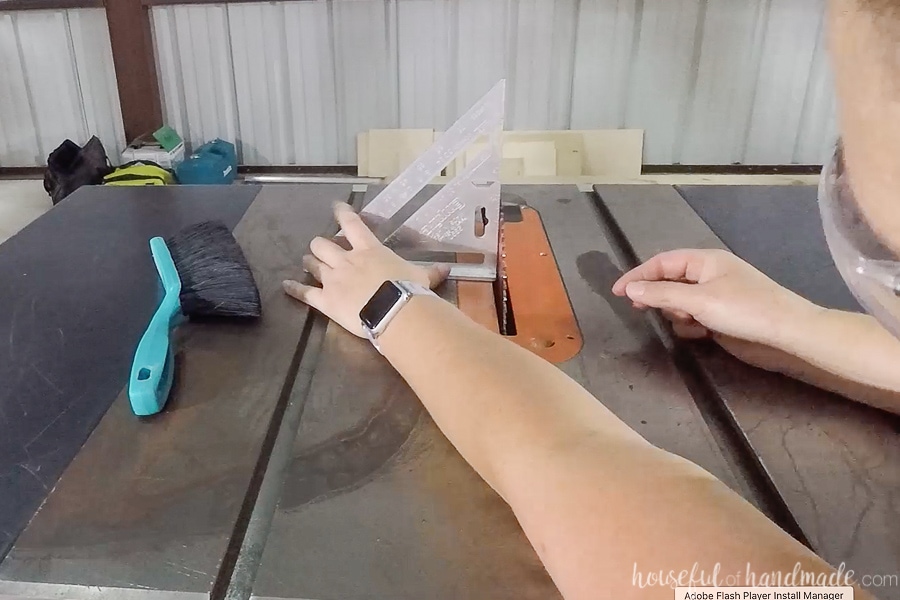
Lay your template material on the cabinets and use a pencil in a compass to draw the line of the wall along the top of your template. Cut it out and test fit. Adjust if needed.
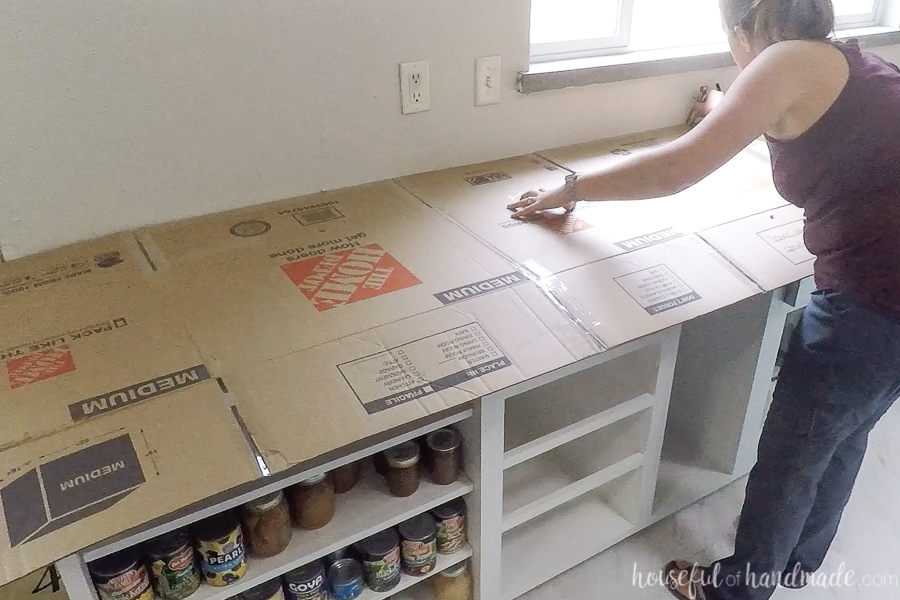
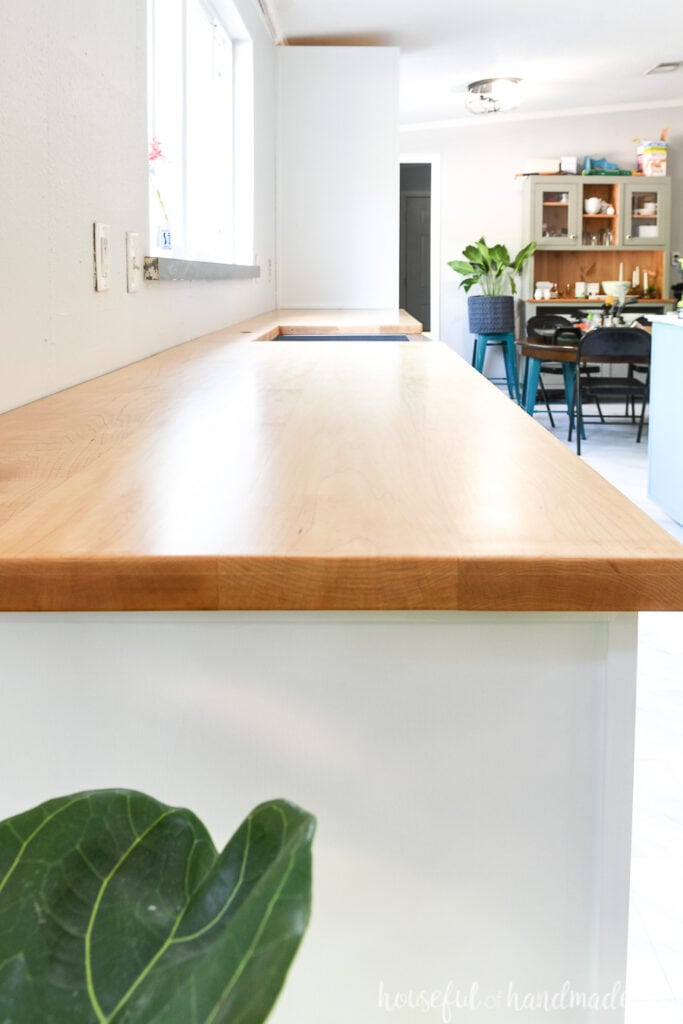
For the overhang, you will want a to have 1/2″-3/4″ overhang to protect your cabinets and doors. I am making inset cabinet doors so the total overhang from the edge of the cabinet was 3/4. If you have overlay cabinet doors, you will want to start the overhang from the front of your door.
Draw the overhang on the template. I used the compass to scribe from underneath to mark this. Cut and adjust as needed.
Repeat for all countertop pieces.
Make sure to mark your countertop templates with the top and front so they do not get flipped around once you remove them from the kitchen.
Cutting the Countertop Boards
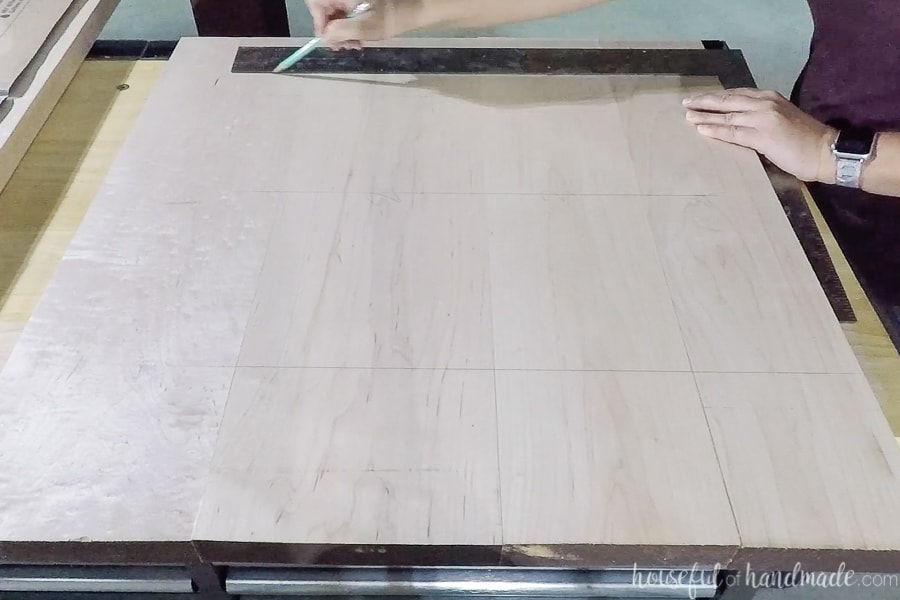
Lay out your boards to create the look you want. Pay attention to the grain patterns in your board to try to line them up. This will make them look more seamless after glueing them together.
Cut the boards to length with the circular saw. Make sure to give yourself 1-2″ excess on either side so you can square up and cut the boards to the template after glue-up.
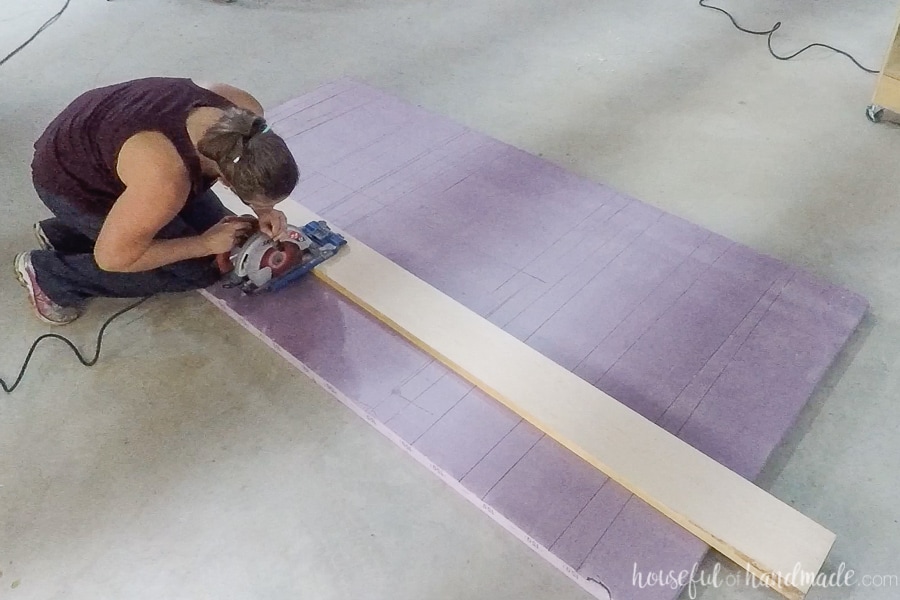
Lay the boards out under your template.
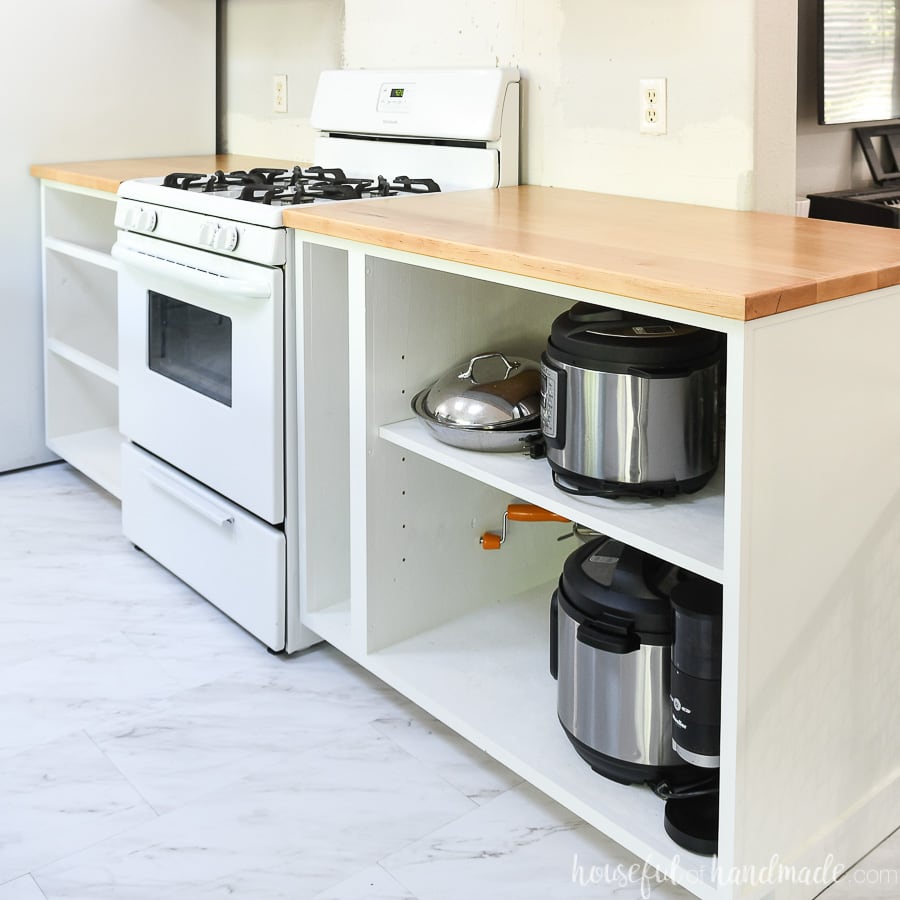
All the lumber you need for your countertops needs to be planed to the final thickness. Standard countertop thickness is 1 1/2″. But you can make them any thickness you want. Mine are just under 1 3/8″ thick.
Then edge joint one or both edges to create a straight, square board. I had my lumber yard edge joint one side of the boards for me since I do not have a jointer.
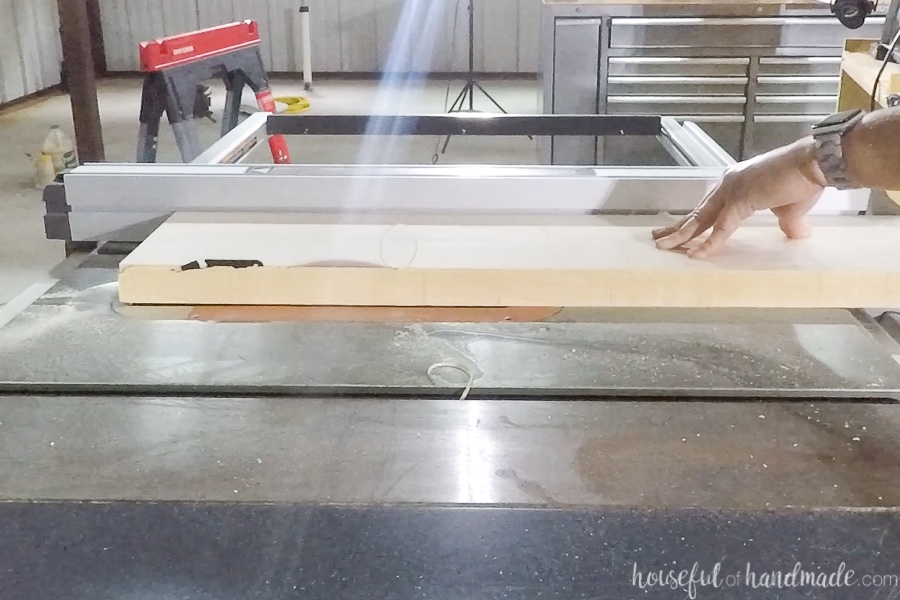
Cut the boards to width so that you will have at least 1″ extra width from your template once glued-up. I wanted the boards to be close to similar size, but not exact. Just make sure that you do not have one board that ends up being only 1-2″ thick, cut them all an inch or two smaller instead.
When cutting the boards to width, take extra time to make sure your saw blade is a perfect 90 degrees to the table of the saw. This will ensure your countertops lay flat when glued-up instead of having a bow to them.
Once the boards are all cut to width and planed, lay them out under the template to double check everything before glueing them together.
Countertop Glue-Up
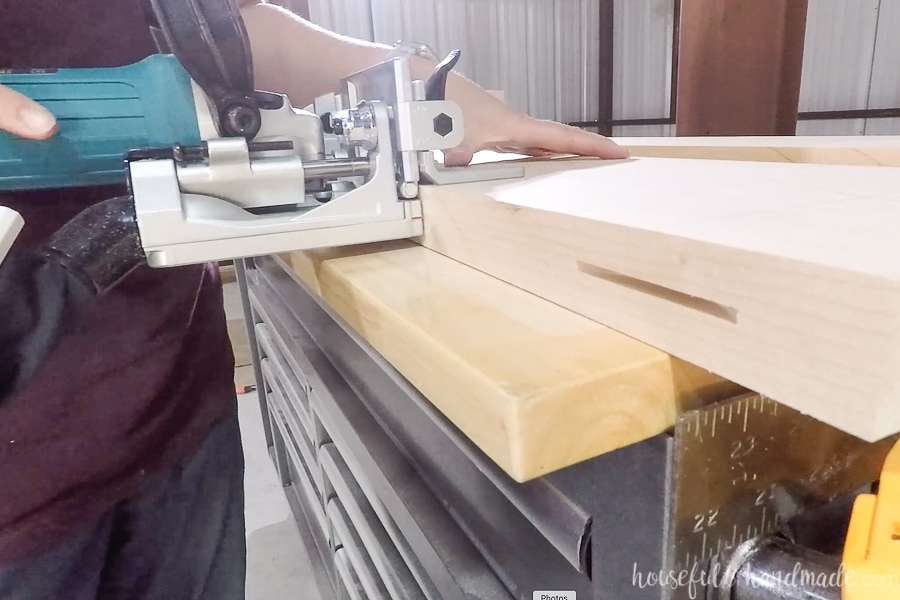
Once all the boards are cut, it’s time to glue them together. I used hardwood biscuits to help with the alignment and add a little insurance against the boards pulling apart. This is not necessary.
If using biscuits, set the plate joiner to cut #20 biscuit slots. And adjust the plate so that the slot is in the center of the edge of the board.
Lay out the boards and draw a straight line through all the boards every 6-8″ apart.
Make sure the biscuits on the edges and around the sink are far enough in from the edge that they will not be exposed when you cut the countertop to final size.
Cut your biscuit slots in the edges of the boards at these marks. You will only need to cut slots in one side of the back and front boards, but both sides of the center boards.
Test fit everything together without glue to make sure it all goes together properly. Then pull it all apart and get ready to glue!
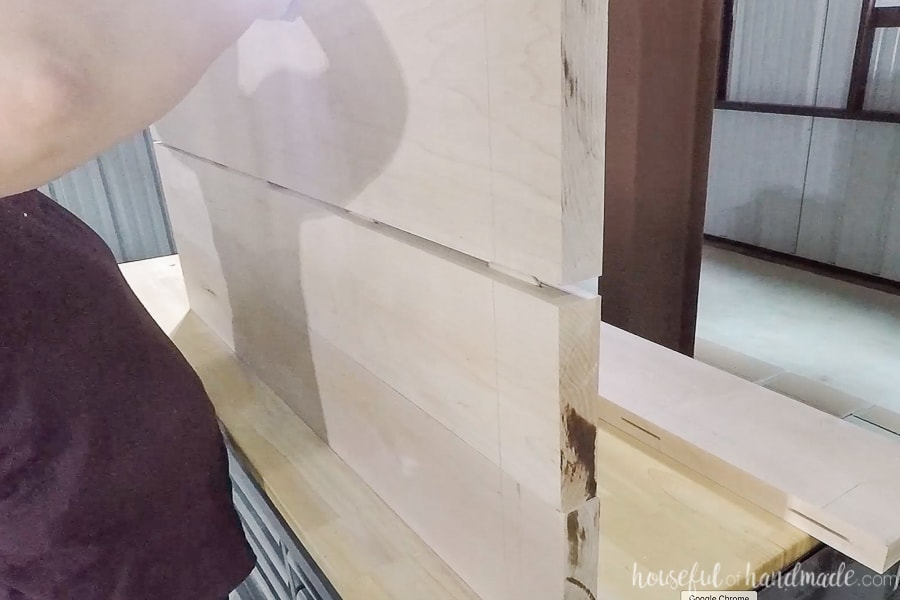
Add glue in the biscuit slots and insert the biscuit into one side of the board. Add a good layer of glue to the entire edge of the board. Then press the two boards together lining them up so the biscuits go into their coordinating slot.
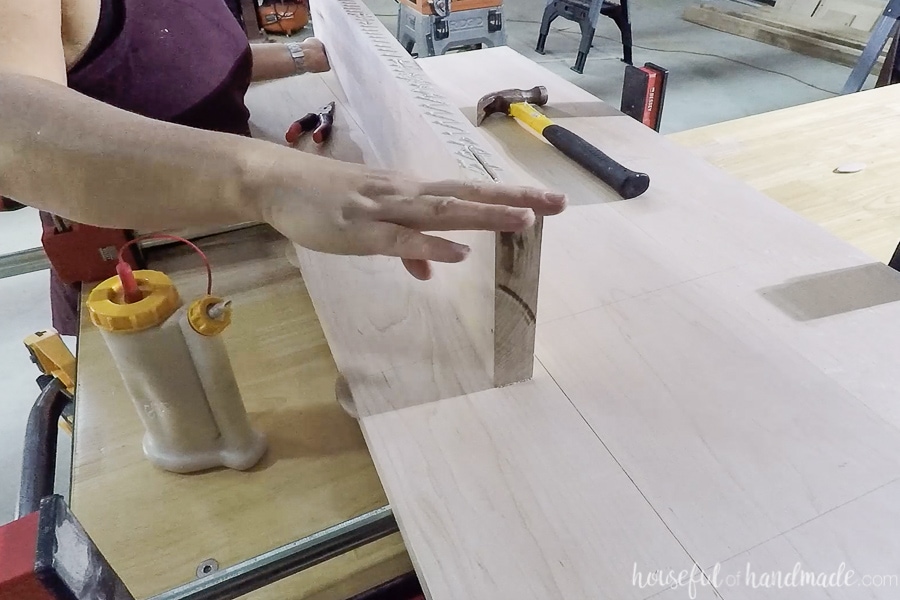
Repeat for the rest of the boards for that section of countertop. Then clamp them tight together. Use alternating clamps (one on top, one underneath, etc.) to prevent bowing.
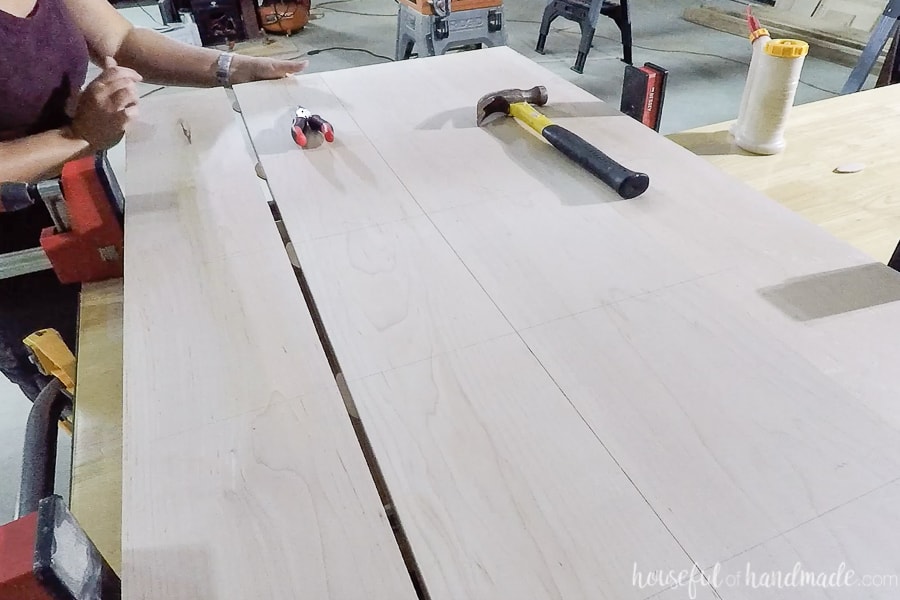
Let the glue dry according to the glue directions before releasing the clamps. Then use a chisel or knife to scrape off the glue squeeze out.
Sand the top & bottom surface of countertops with 100-150 grit sandpaper. Take the time to make them perfectly smooth.
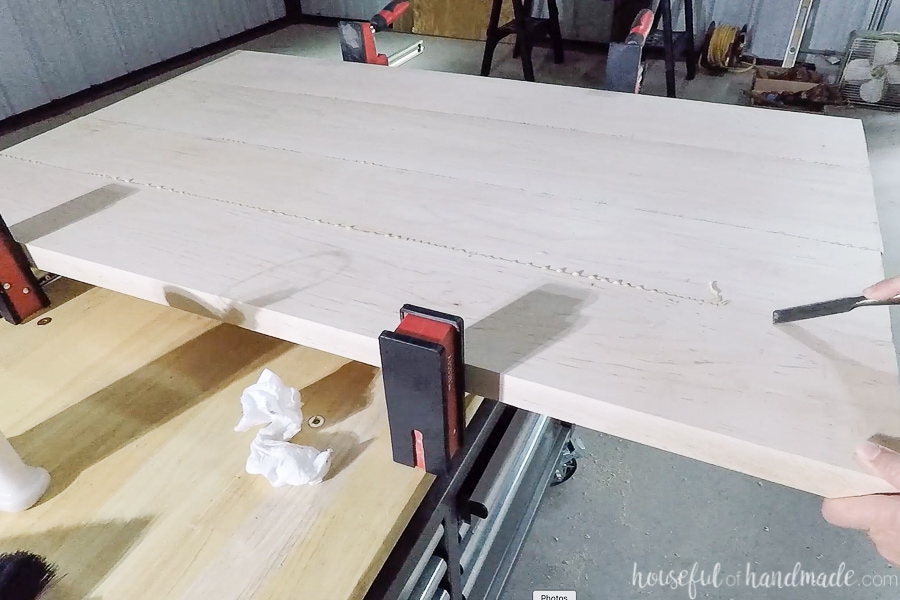
Cut to Final Size
Lay the template on the top of your countertop. Make sure it is placed so the countertop is right side up and the front is on the front that you want the countertop.
Trace around your template with a sharp pencil. Make sure to get close to the edge of the template.
For the front of the countertops, I lined up the template with the straight front of the glued together boards so there would be no trimming on this most visible edge.
Use the circular saw to cut the countertop to the template. If you have curves or small corners, you a jig saw to cut these sections. If the back edge of the countertop is less beautiful, don’t stress. This can be easily covered up with a backsplash.
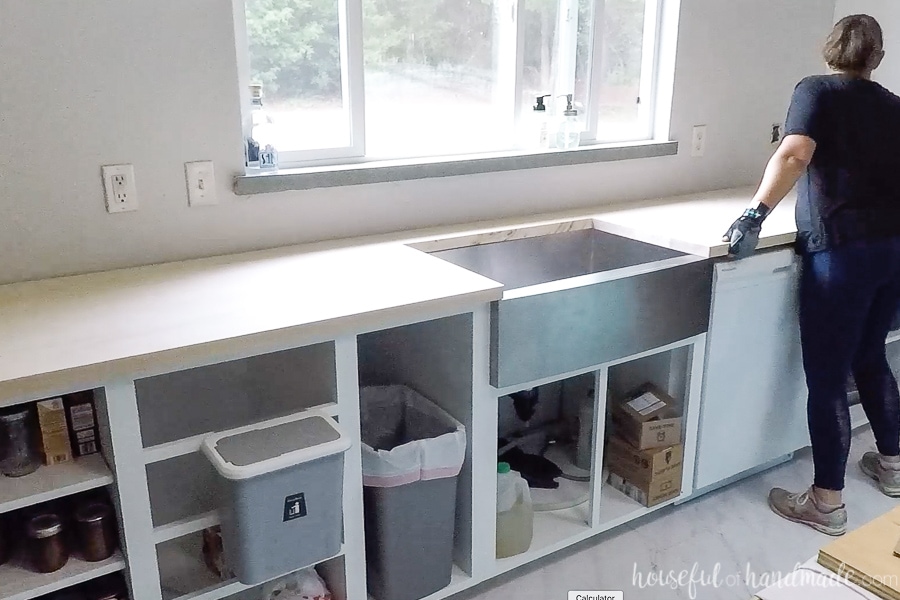
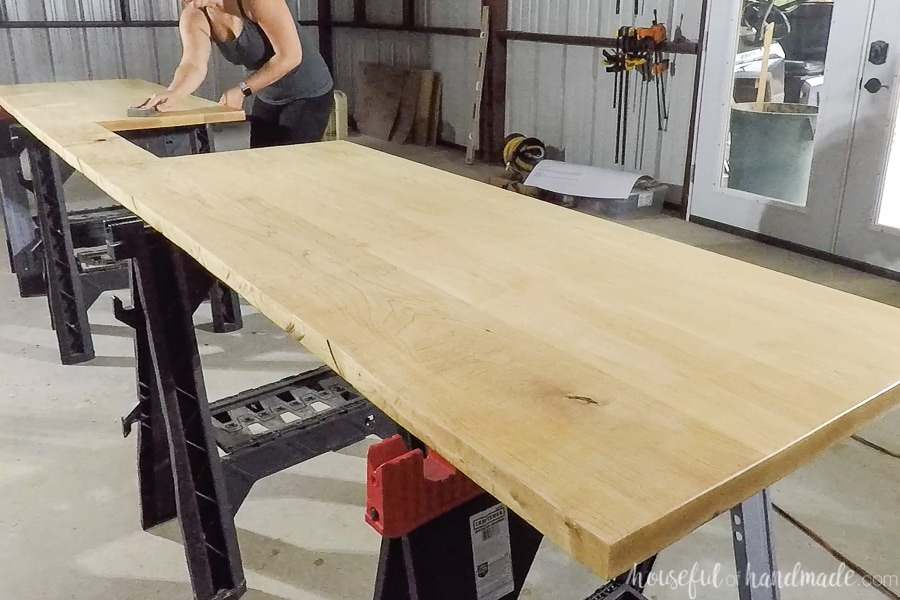
Test your countertop by placing it on the cabinets and adjust as needed till you have the perfect fit! Then sand the countertops again, paying extra attention to the newly cut edges.
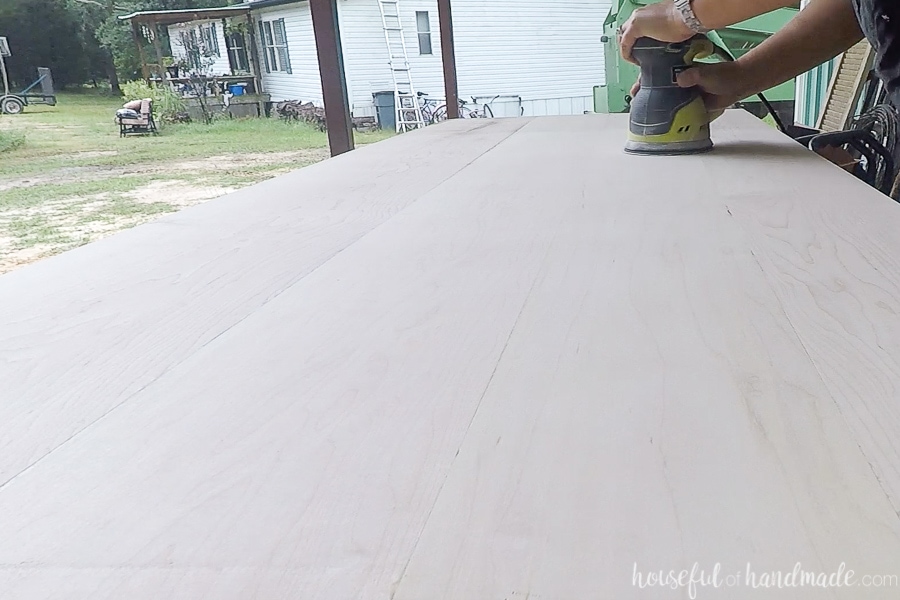
I decided to do a small roundover on the top edges of my countertops to take off the shard corners. This was quick and easy to do with a palm router.
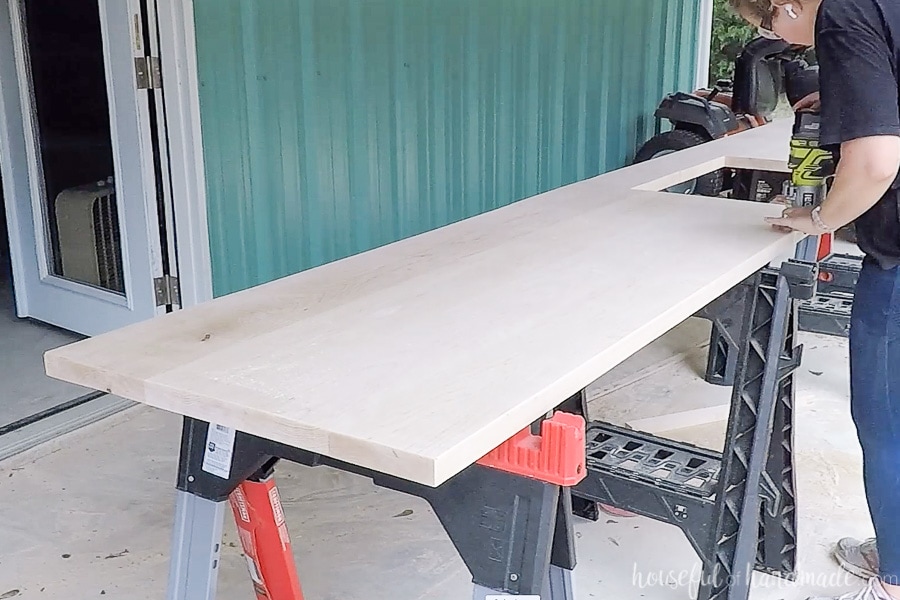
Do a final sanding with 220 grit sandpaper over the entire countertops.
How to Finish Wood Countertops
Supplies:
- Tack cloth
- Waterlox Universal Tung Oil Sealer (UTOS)
- Waterlox H2OLOX Finish
- Gloves
- Clean, lint-free rags
- Foam brush or paint brush
- Fine grit sanding block
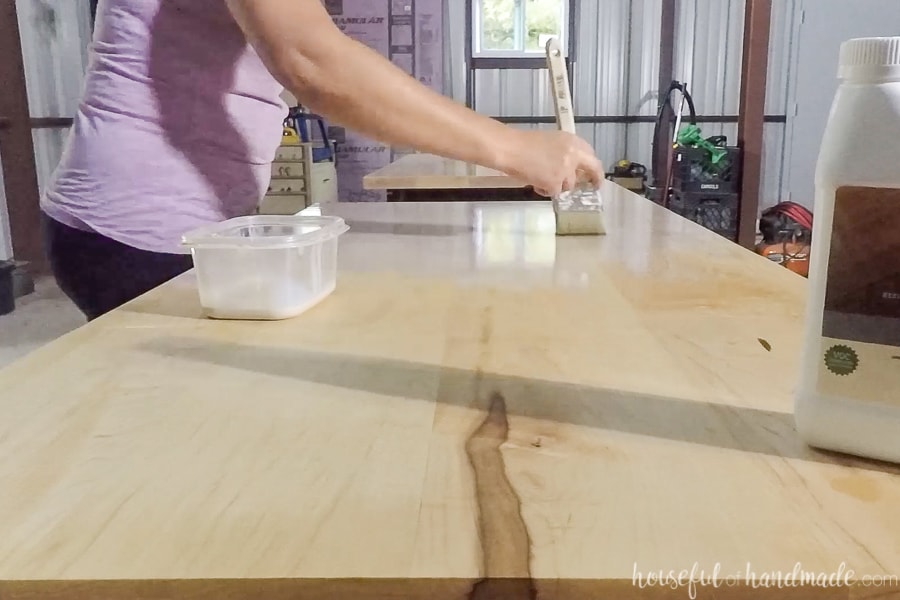
Apply the Sealer
After sanding, vacuum or brush off the dust. Then use a tack cloth to remove any remaining dust.
To apply the UTOS, pour a small puddle of the sealer on the surface of your countertop.
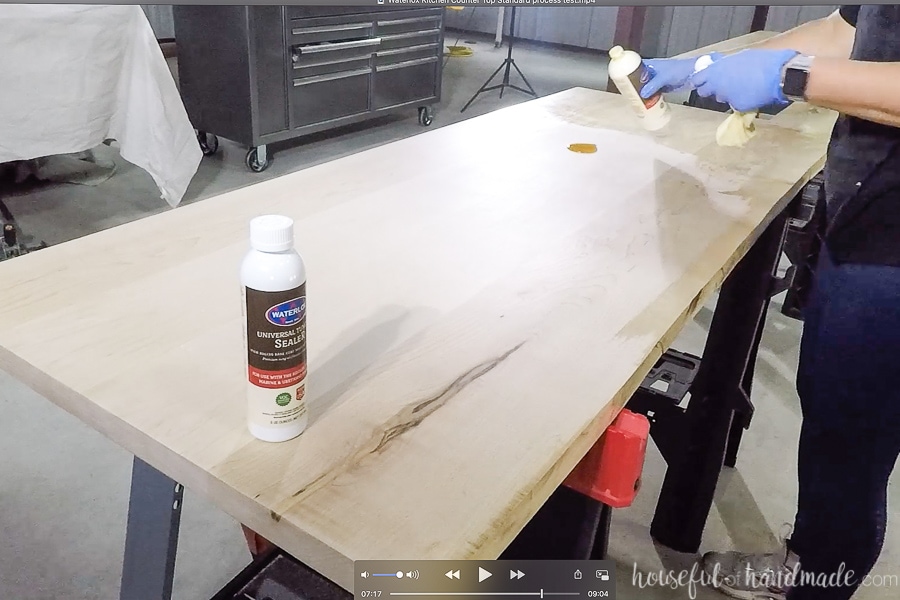
Use the rag to rub it into the surface. Then pour another small puddle and repeat.
Move along the entire surface of your countertops. You want to give the wood enough sealer to soak it in, but not have any excess on the surface.
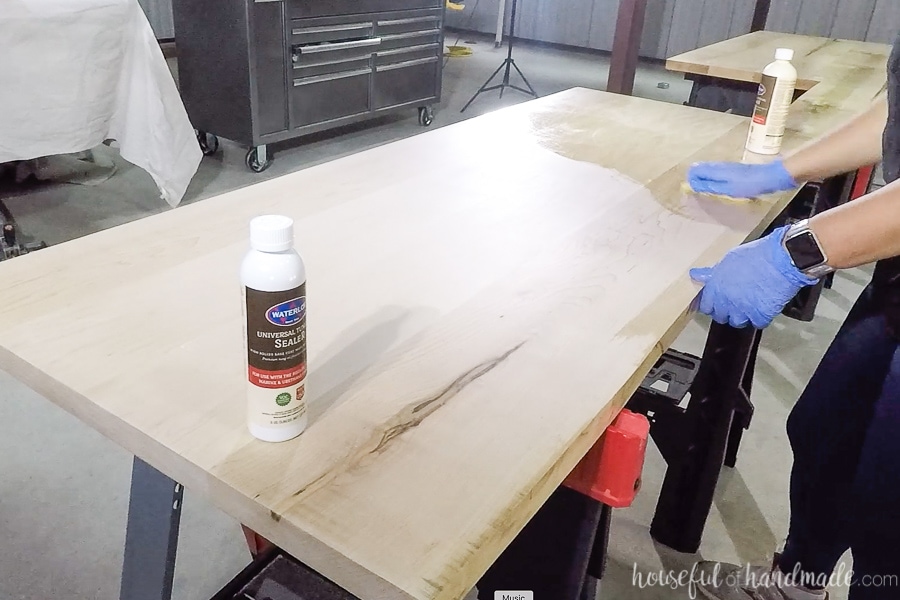
After you have applied UTOS to the entire countertop, let it sit about 20 minutes. Then go back to the beginning and using a new clean rag, buff off any excess sealer.
Let the UTOS dry for 24 hours before applying the finish.
Apply the Finish
After the UTOS has dried for 24 hours, it’s time to apply the first coat of H2OLOX finish. The finish is cured with oxygen so you want to make sure you have lots of airflow. Open up all the windows when applying it.
Since we are sealing the top/bottom/sides of the countertop, start by applying the 2 coats of finish to the bottom of the countertops. Use a tack cloth to remove any dust from the surface.
Pour out the amount of sealer you need in a separate container then put the lid back on the original container. The sealer starts to dry when it is exposed to air so you want to limit its exposure.
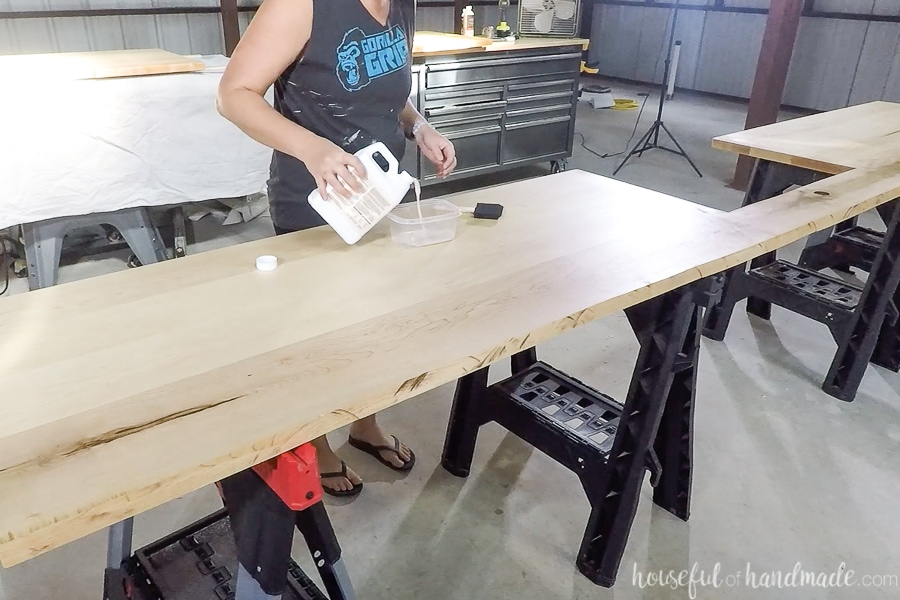
Using a foam pad/brush or brush, apply a nice coat of the H2OLOX finish to the bottom of the countertops. You want enough sealer to allow it to level itself, but not enough that there will be any pooling.
Do not overwork the finish as you apply it or you will have visible brush strokes. The H2OLOX starts to dry/cure as it touches the air.
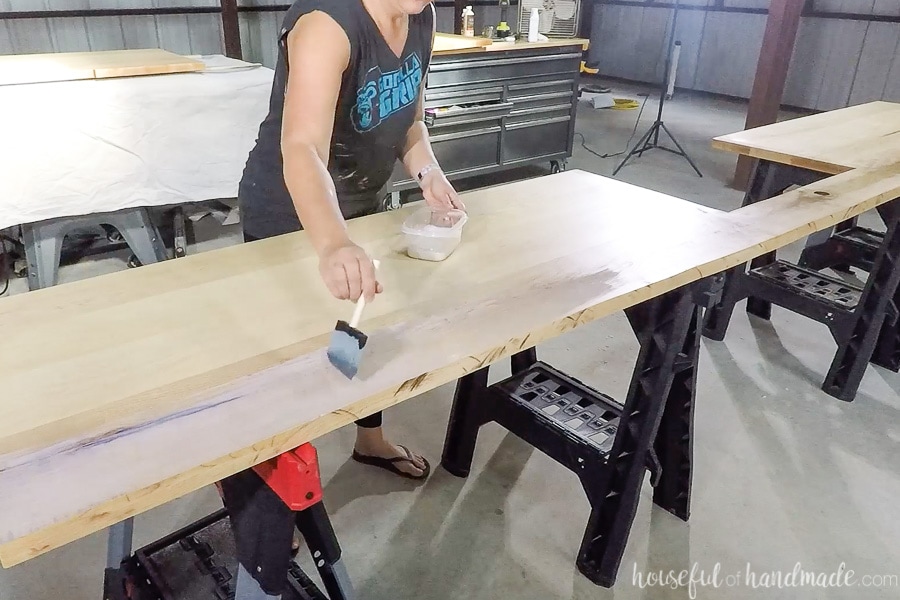
Let the first coat dry for 2-4 hours. At this point it will not be tacky to the touch. Then you can turn on some fans to increase the airflow over the surface of your countertops. This will make sure your finish has enough oxygen for it to cure properly.
Wait 24 hours before applying the 2nd coat.
Make sure to turn off the fans. Lightly sand the surface with a fine grit sanding block, and then clean the surface with a tack cloth.
Apply the 2nd coat in the same manner as the first. Let it dry till not tacky and then turn the fans back on.
After 24 hours, you can flip the countertops over and repeat the process on the top and edges of your countertops.
When applying finish to the edges, pay extra attention to the drips and pooling at the bottom edge of the sides. After I applied the finish to the entire countertop, I went back one last time before leaving it and checked for drips and pooling.
For hardwoods, you will need 2 coats of H2OLOX finish on your countertops. For softer woods, you will need a 3rd coat to get a perfect layer of waterproof protection.
Installing Wood Countertops
You will need to have some way to secure your wood countertops to the top of your cabinets, while still allowing for natural wood movement.
They make clips that can be inserted into biscuit slots and are used to attach table tops. These would work great, but I did not have any so I came up with a different solution.
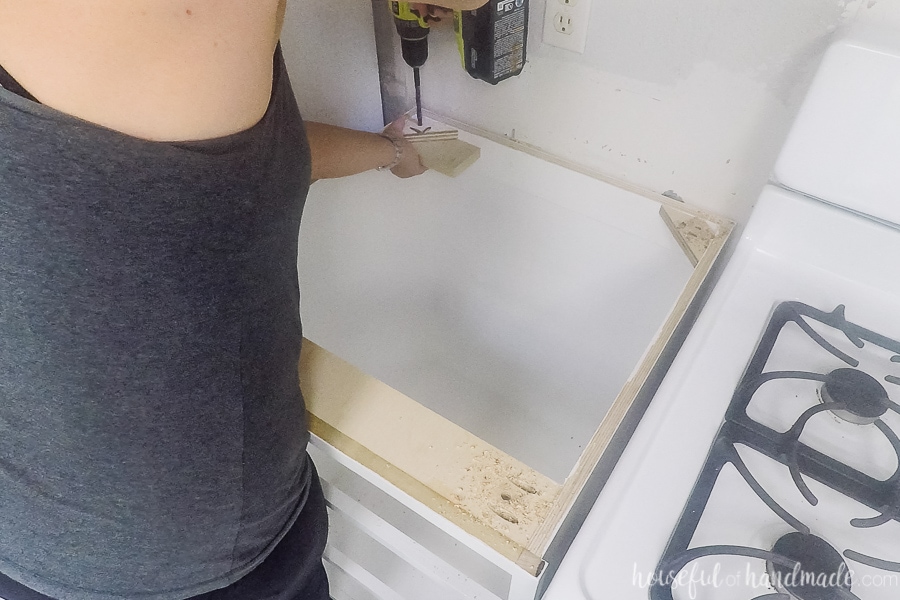
For the back of my countertops, I cut scraps of plywood at 45 degree angles to create a triangle. I attached these in the corners where I wanted to attach the countertop with some pocket holes.
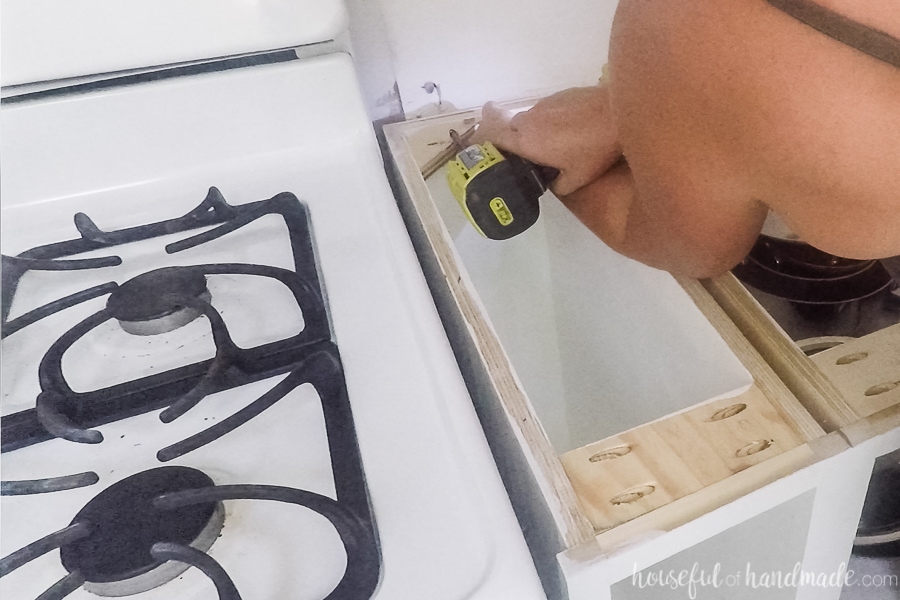
The front of my countertops already have a support board across the top so I didn’t need to add anything.
Then I drilled a 3/8″ hole in the supports/triangles.
Wait at least 24 hours after the final of coat of finish has been applied, but longer if you can stand it (I cannot… ever!).
Lay the countertops on top of your cabinets and slide into place. Use a self-tapping, pan head wood screw (I used some Kreg pocket hole screws) with a washer larger than 3/8″ on them. Drive the screw into the countertop through the 3/8″ hole.
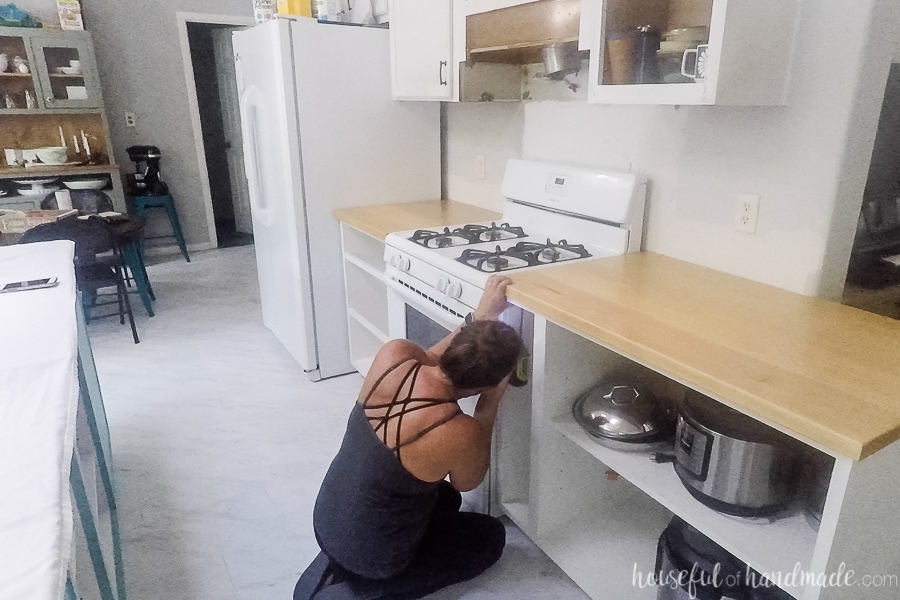
Now all that is left is to caulk around the edges and sink as needed.
The countertops are ready for light use after 48 hours. And should be good for normal use after 7 days. But they will not fully cure for around 30 days.
Make sure you have lots of airflow during this time to give the finish the oxygen it needs. Open your windows and use fans to move the air over the surface.
And make sure to take the time to admire you hardwood. The beauty of solid wood countertops is just amazing!
Frequently Asked Questions
Yes, you can add color to your countertop before sealing. The Waterlox TrueTone color infused Tung Oil stains are made to work with the H2OLOX sealer. And you can see how each colors looks on different species of wood here.
Wood will expand and contract with temperature and humidity changes. Sealing the top and bottom of your countertops will help keep the expanding and contracting uniform which will prevent the countertop from splitting or warping.

Thank you to Waterlox for sponsoring this post. I only recommend products that I use and love and all opinions are 100% my own. Click here to read my full disclosure policy.