Organize your home printer with a beautiful and functional printer stand.
My old printer stand was too embarrassing to even show you… it was a 20-year-old, too-tiny, inexpensive side table. To think I waited his long to build a proper printer stand. One with lots of storage to keep everything organized, is well… embarrassing.
But better late than never right? Because this new printer table is amazing! I partnered with Kreg Tools, and their new project plan site BuildSomething.com, to make this dreamy printer stand that is full of features for style and storage.
Features of the Small Printer Table
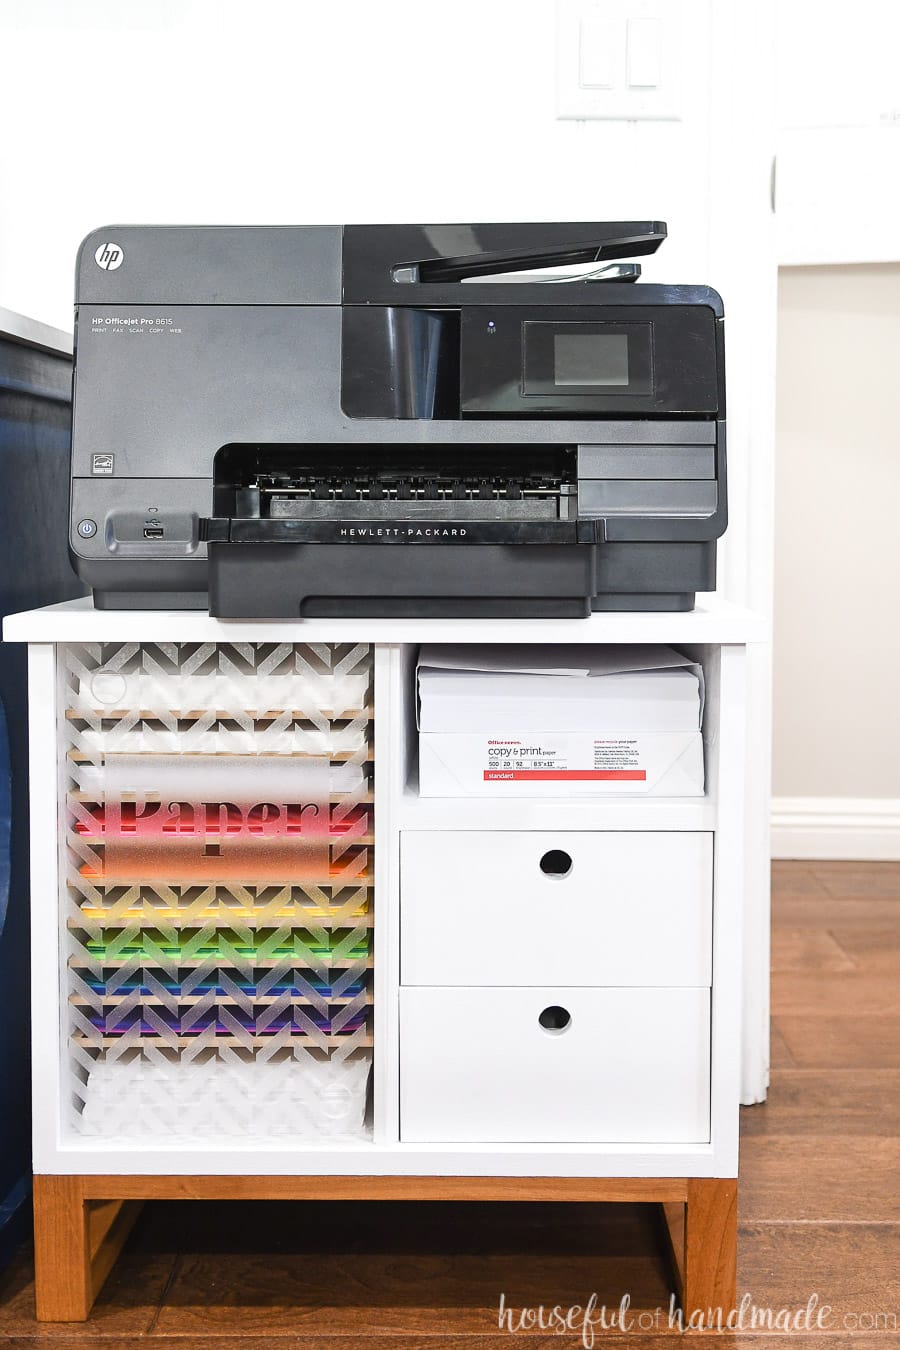
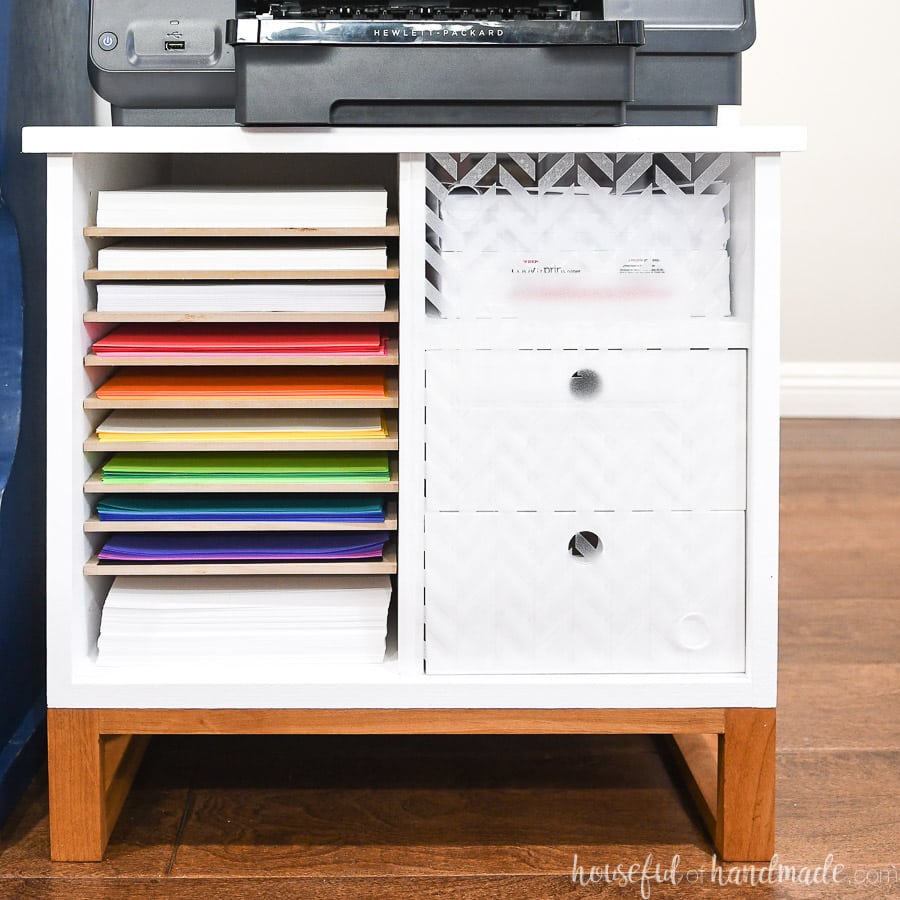
When designing the printer table, I knew that it had to be small. I have packed a LOT of stuff in my office & craft room. There was just enough space on one wall to fit the printer. So the new table needed to stay compact.
This post may contain affiliate links. As an Amazon Associate I earn from qualifying purchases. Click here to read my full disclosure policy.
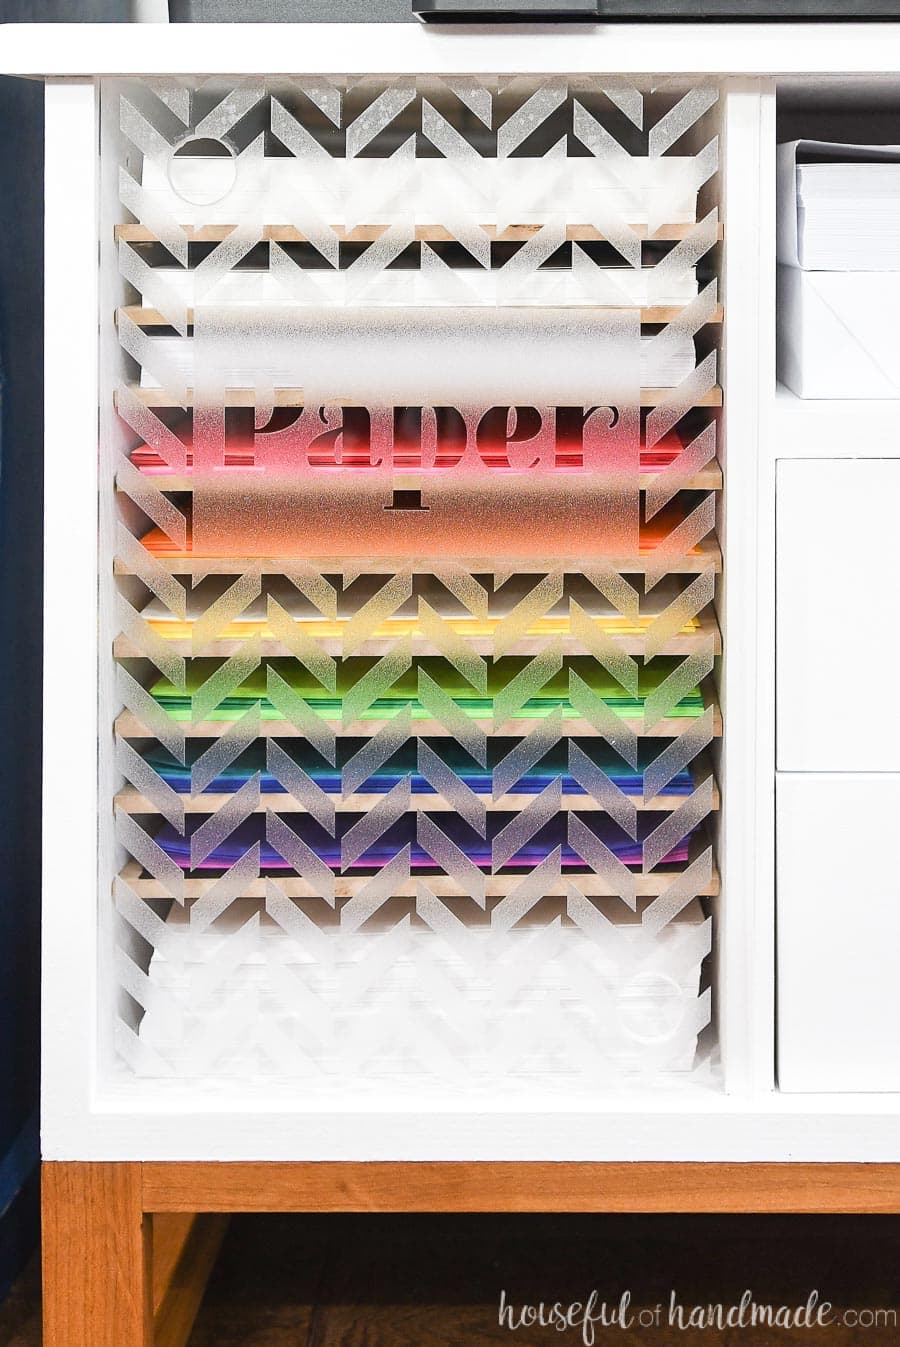
However, I also knew I needed to address the storage problem my original “printer stand” was lacking. I use a lot of different types of paper with all my paper decor projects. So my top storage priority in the new printer table was lots of paper storage.
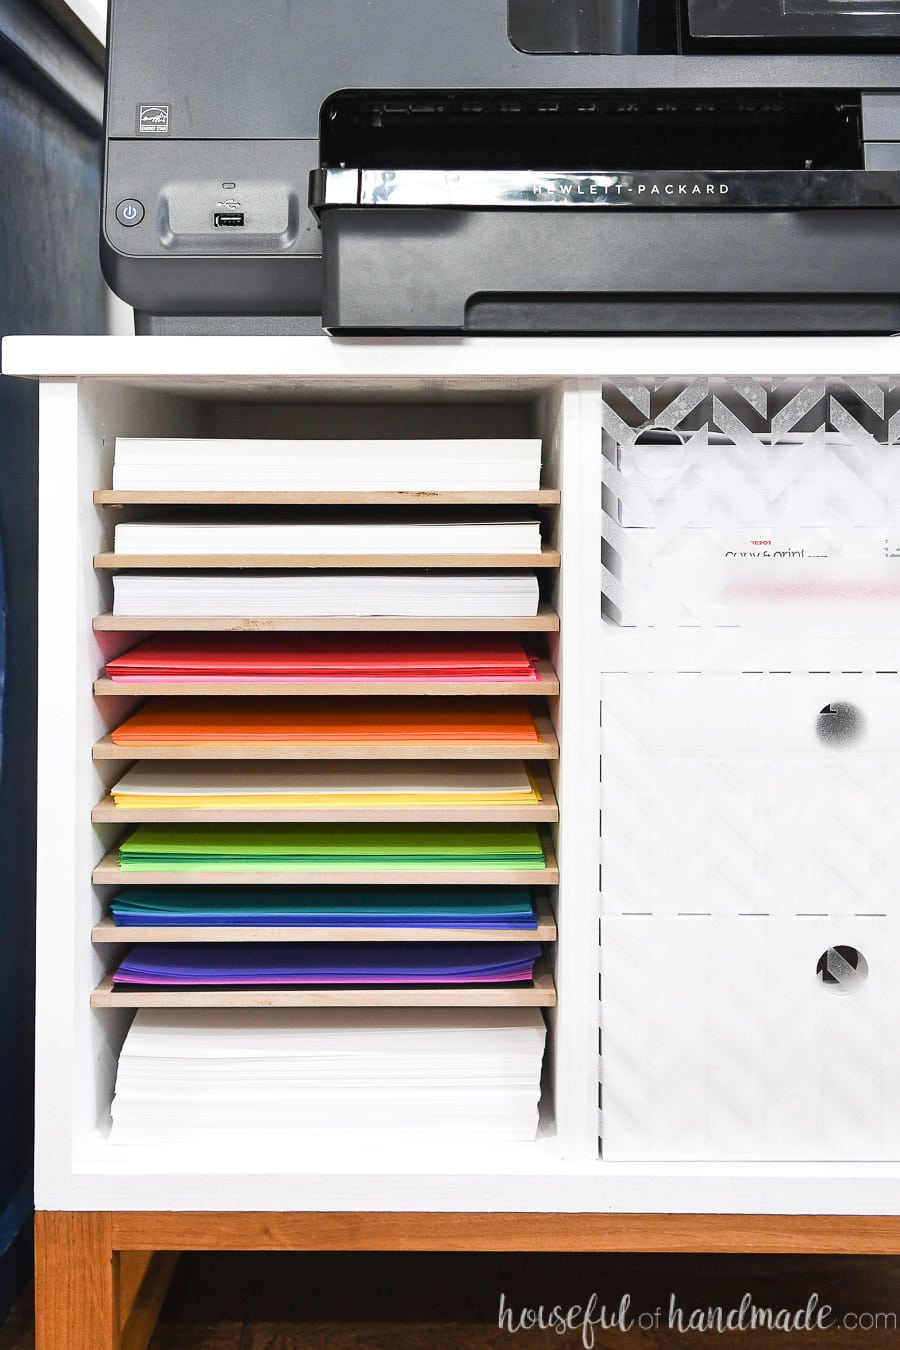
And I could have left the paper storage open, but instead I used this as an opportunity to give the printer stand some extra style. So a sliding plexiglass door covers the paper storage. Which will also help protect it from dust.
But when I need to access all the papers, just slide the door over in front of the drawers and it’s easy to see all the colorful options.
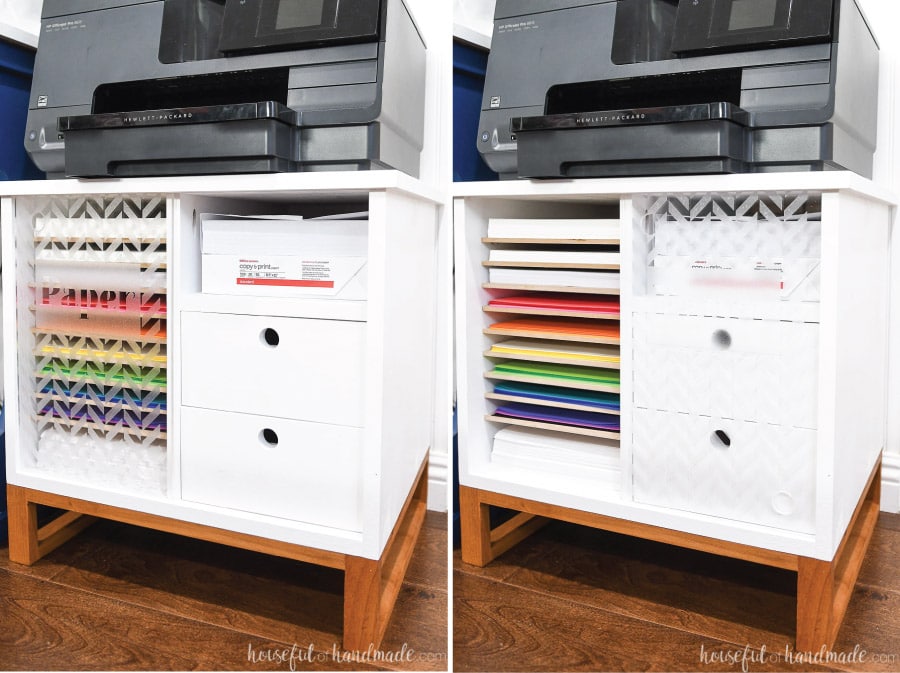
Also, I could have just let the plexiglass door clear. It would make the paper storage on the printer stand more visible. But no, I decorated it with some frosted vinyl to really make this new piece stand out in the room.
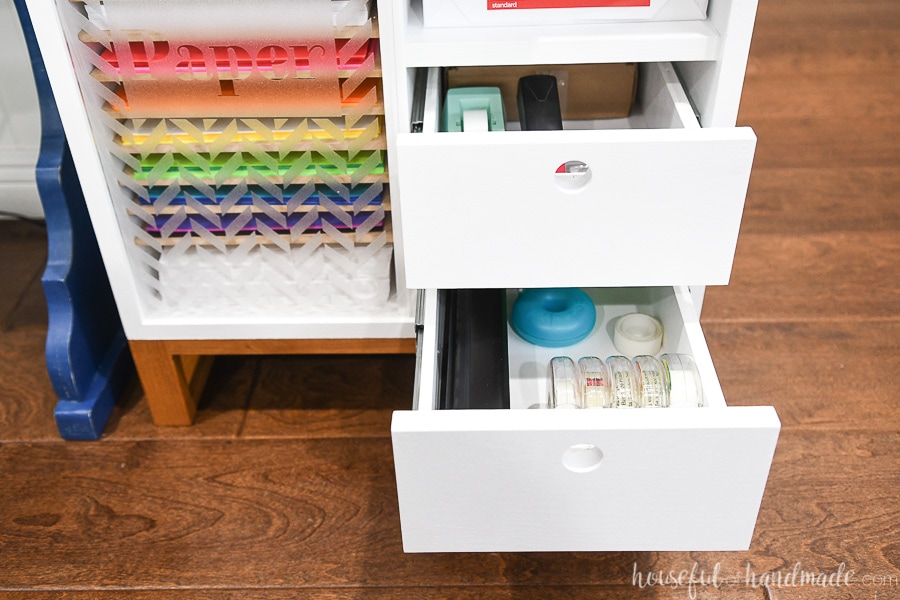
And for more storage there are 2 drawers. These drawers are small, but the perfect size for holding extra ink cartridges and other office supplies. As you can see, we use a lot of tape at our house.
The final compartment is perfect for holding a couple reams of paper at the ready. This is where I am storing plain copy paper. Making it more accessible will hopefully keep my kids from taking the nicer paper accidentally.
Building the Printer Stand
The entire printer cart was built from 3/4″ plywood with the base made from 1×2 boards. If you need your printer table more mobile you could put it on casters instead of the modern wood base. But I love the style the simple 1x2s give it.
For the body of the printer table, I used baltic birch plywood because it has less voids in the layers, which meant I didn’t have to use edge banding. However, even with the baltic birch, the edge grain of the plywood can be hard to paint.
Tips for Painting Plywood Edges
- Sand down the edges to 220 grit sandpaper.
- Using your finger, rub a thin coat of wood glue into the exposed end grain.
- Let the glue dry and then sand smooth to at least 220 grit (a higher grit will give you an even smoother edge).
- Paint as desired. Use this process for a super smooth and professional finish.
Tips for Cutting Plexiglass
After using plexiglass on this gorgeous 2 tiered breadbox, I got a lot of questions about how to easily and cleanly cut it.
For this project I used 1/4″ thick (technically 0.22″ but close enough) plexiglass. I have never had good luck with the score and break method on the thick panels. Instead I used my woodworking saws.
Keep the protective coating on the plexiglass while cutting and sanding. Use a circular saw or table saw fitted with a fine tooth carbide tipped saw blade (I have this one in my circular saw and this one in my table saw). These would be the same blades you need to get clean crosscuts on the plywood while building the printer stand.
I did notice I got less melting on the plexiglass when using the circular saw with the Kreg AccuCut. I placed the plexiglass on a piece of 2″ rigid foam and was able to cut quickly but accurately with the guide track.
My table saw also worked great, but I tend to move the material slower on the table saw so there was some melting. The melted plexiglass was easy to remove with a knife or chisel. Remove it immediately before it cools and hardens too much.
Sand the edges of the plexiglass to remove any sharp spots. I love these ultra-fine grit sanding sponges for this.
This printer stand also had holes drilled in the plexiglass to act as handles. I found the easiest way to drill was to use a forstner bit and drill 1/2 way through the plexiglass. Then quickly remove the melted material around the hole with a chisel or knife. Finish by drilling the remaining way through and removing the last of the melted material.

Free Build Plans for the Printer Stand
If you are ready to build your own printer stand with lots of storage, I am sharing the free plans over at BuildSomething.com. Click here for the complete printer table build plans.
Happy building!

Thank you to Kreg Tools and BuildSomething.com for sponsoring this post. I only recommend products that I use and love and all opinions are 100% my own. Click here to read my full disclosure policy.