
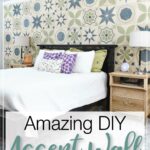
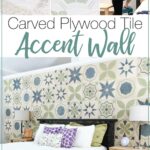
Create a stunning accent wall in your home with these carved wood tiles.
Lately I have been obsessed with patterned tiles. Any chance to use them in a remodel I take (like on our bathroom floor or this kitchen remodel). But in our new house, there is no place to use patterned tiles… or is there?
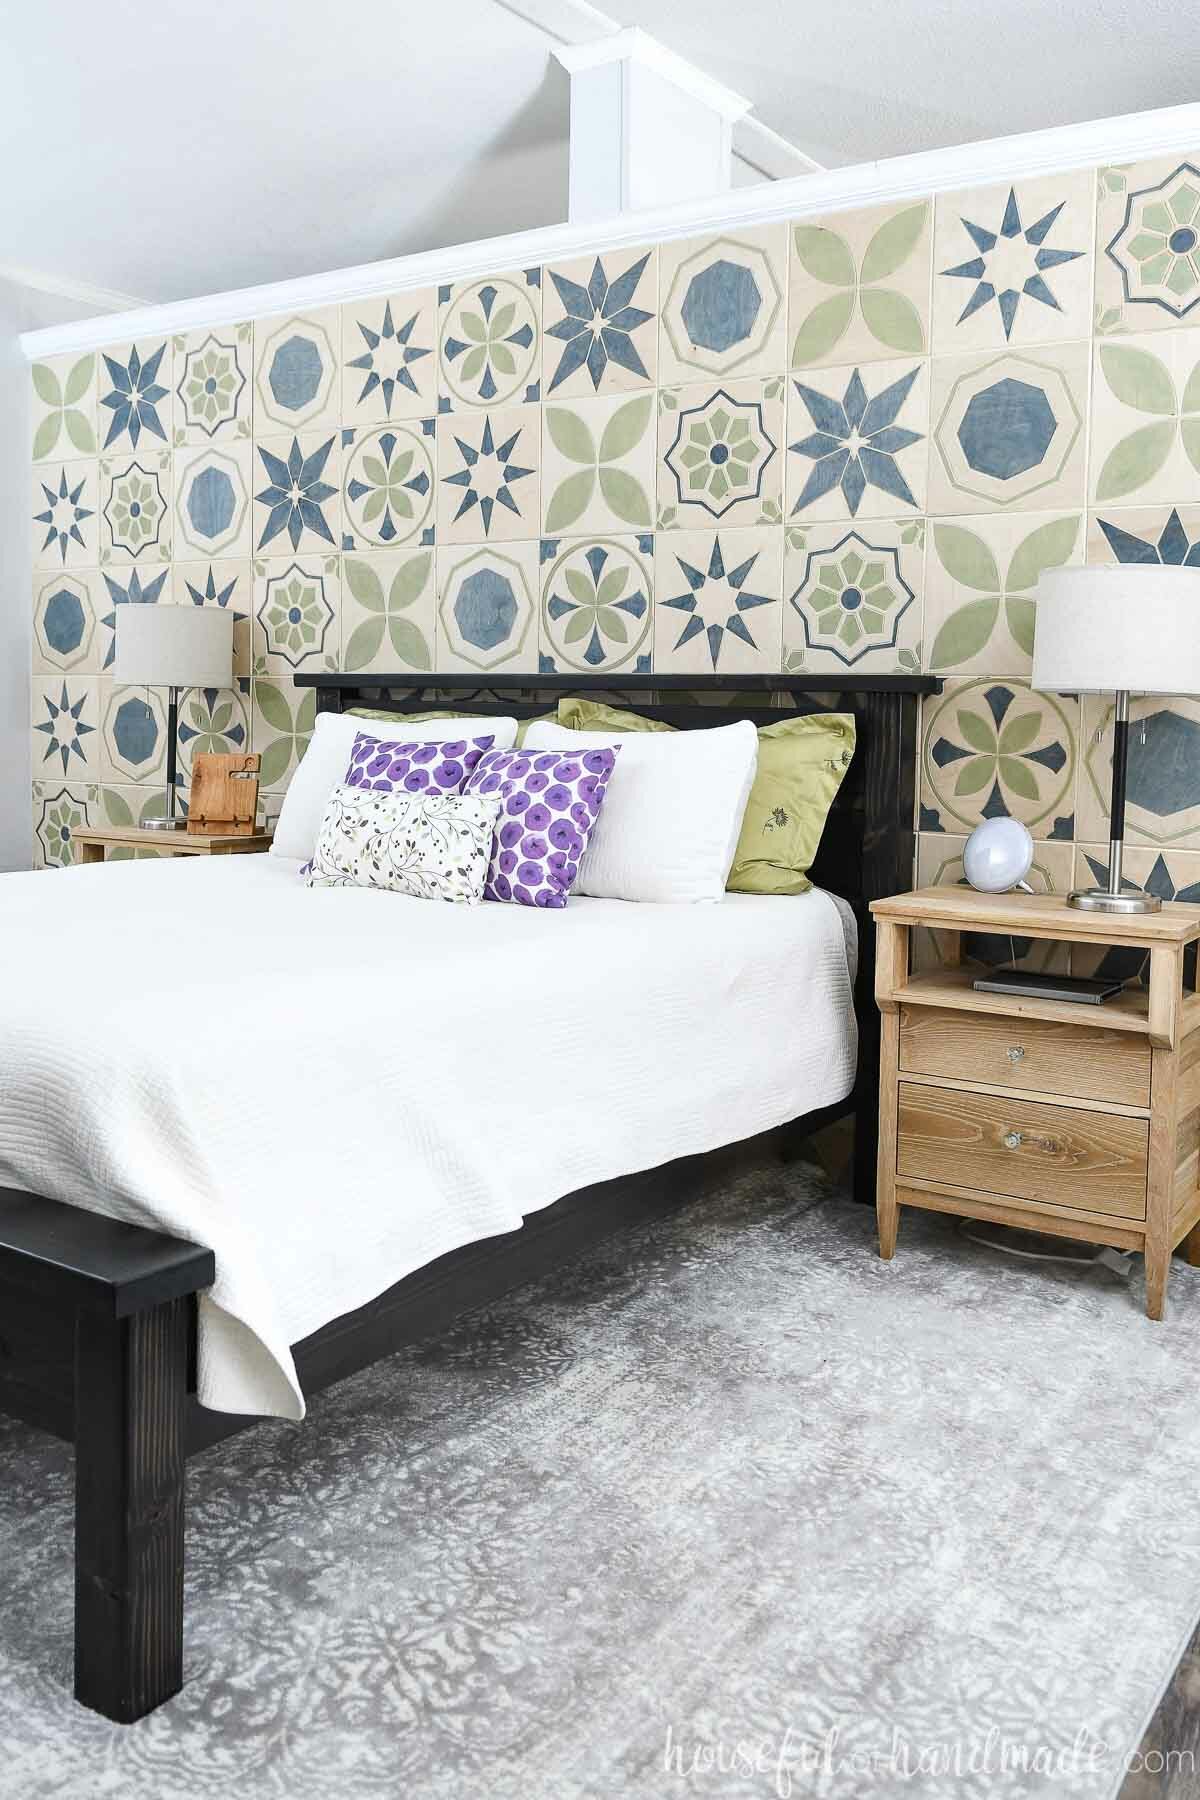
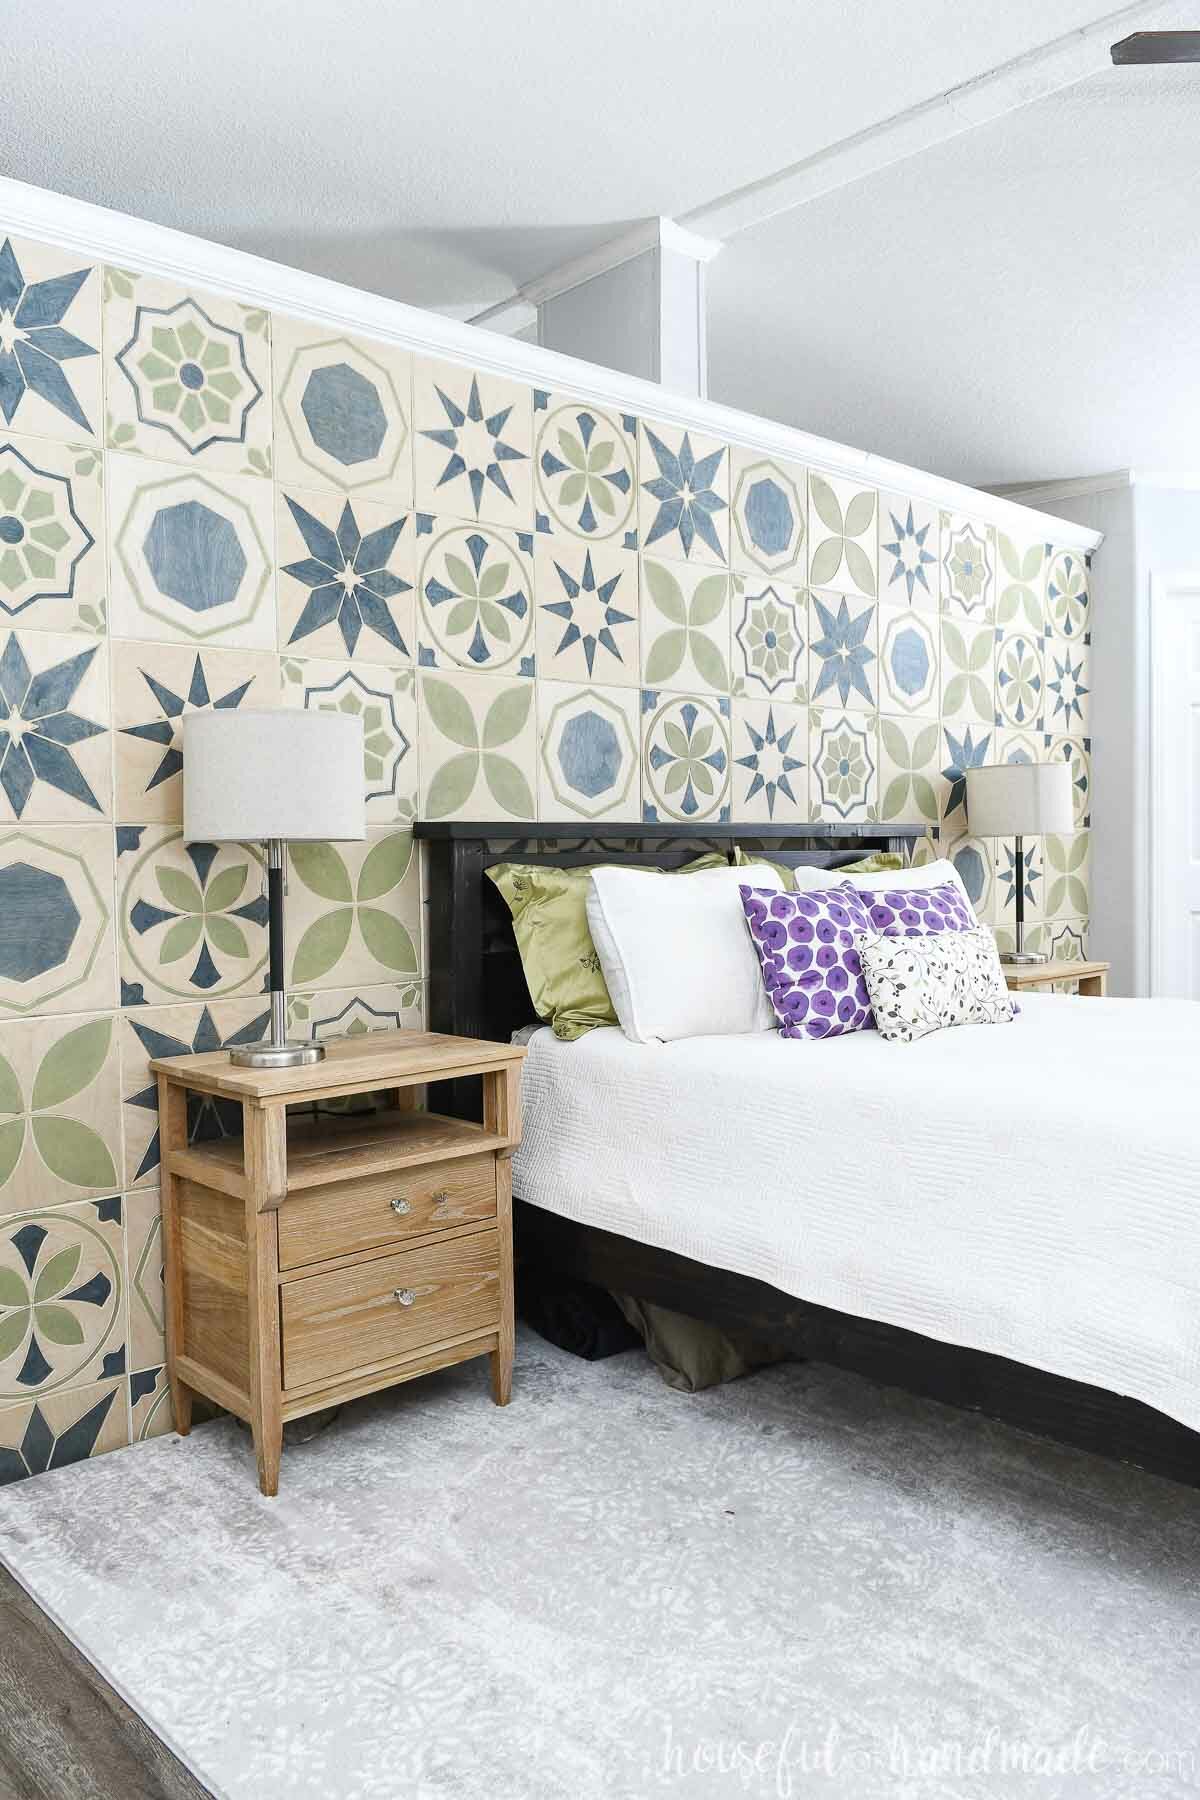
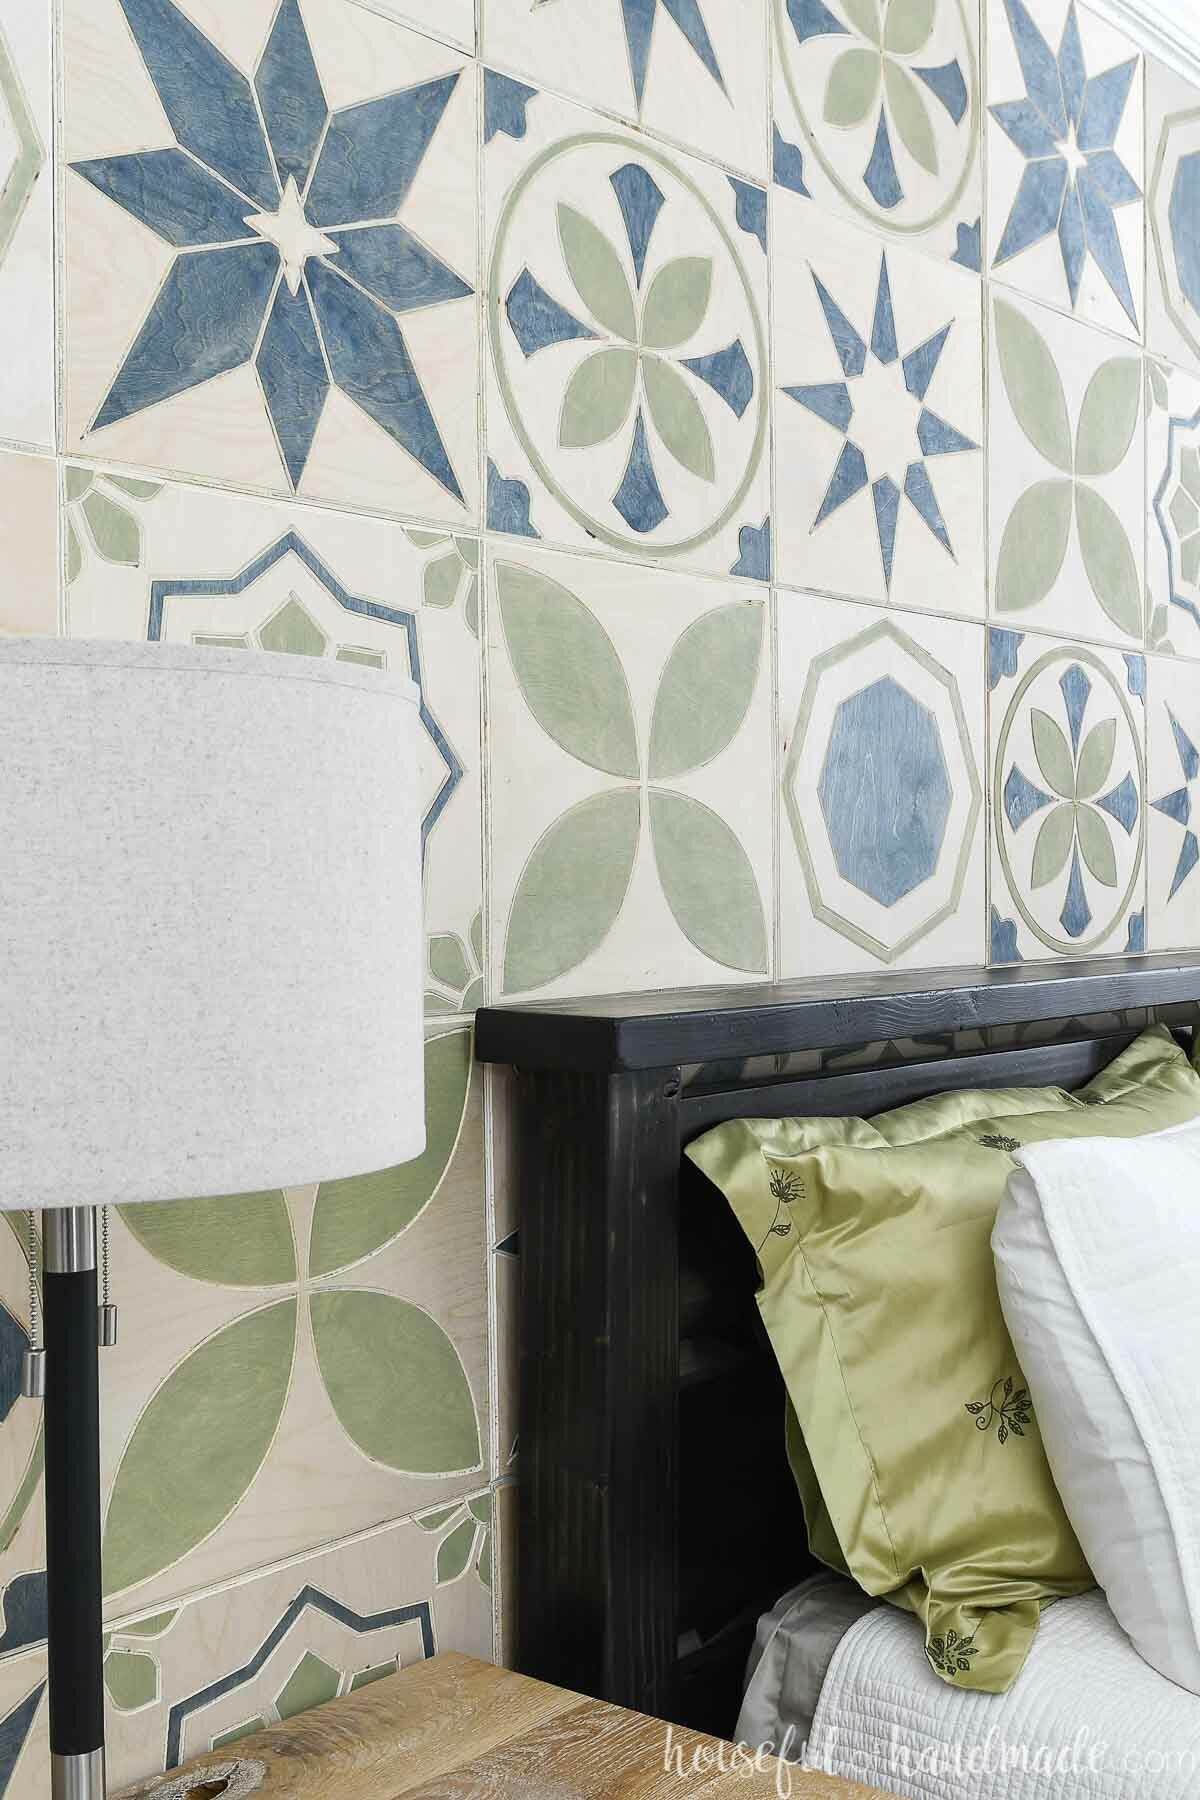
Instead of putting tiles on the floor, why not put them on the wall? Of course, you could use normal patterned tiles to create a DIY accent wall, but I wanted to do something unique and made my own carved wood tiles for our accent wall.
I partnered with Inventables to use the X-Carve CNC machine to create my own patterned wall tiles. I created 6 different patterns that mimic the designs I have been obsessing over on cement tiles. And the result is the most stunning DIY accent wall I have ever seen!
This post may contain affiliate links. As an Amazon Associate I earn from qualifying purchases. Click here to read my full disclosure policy.
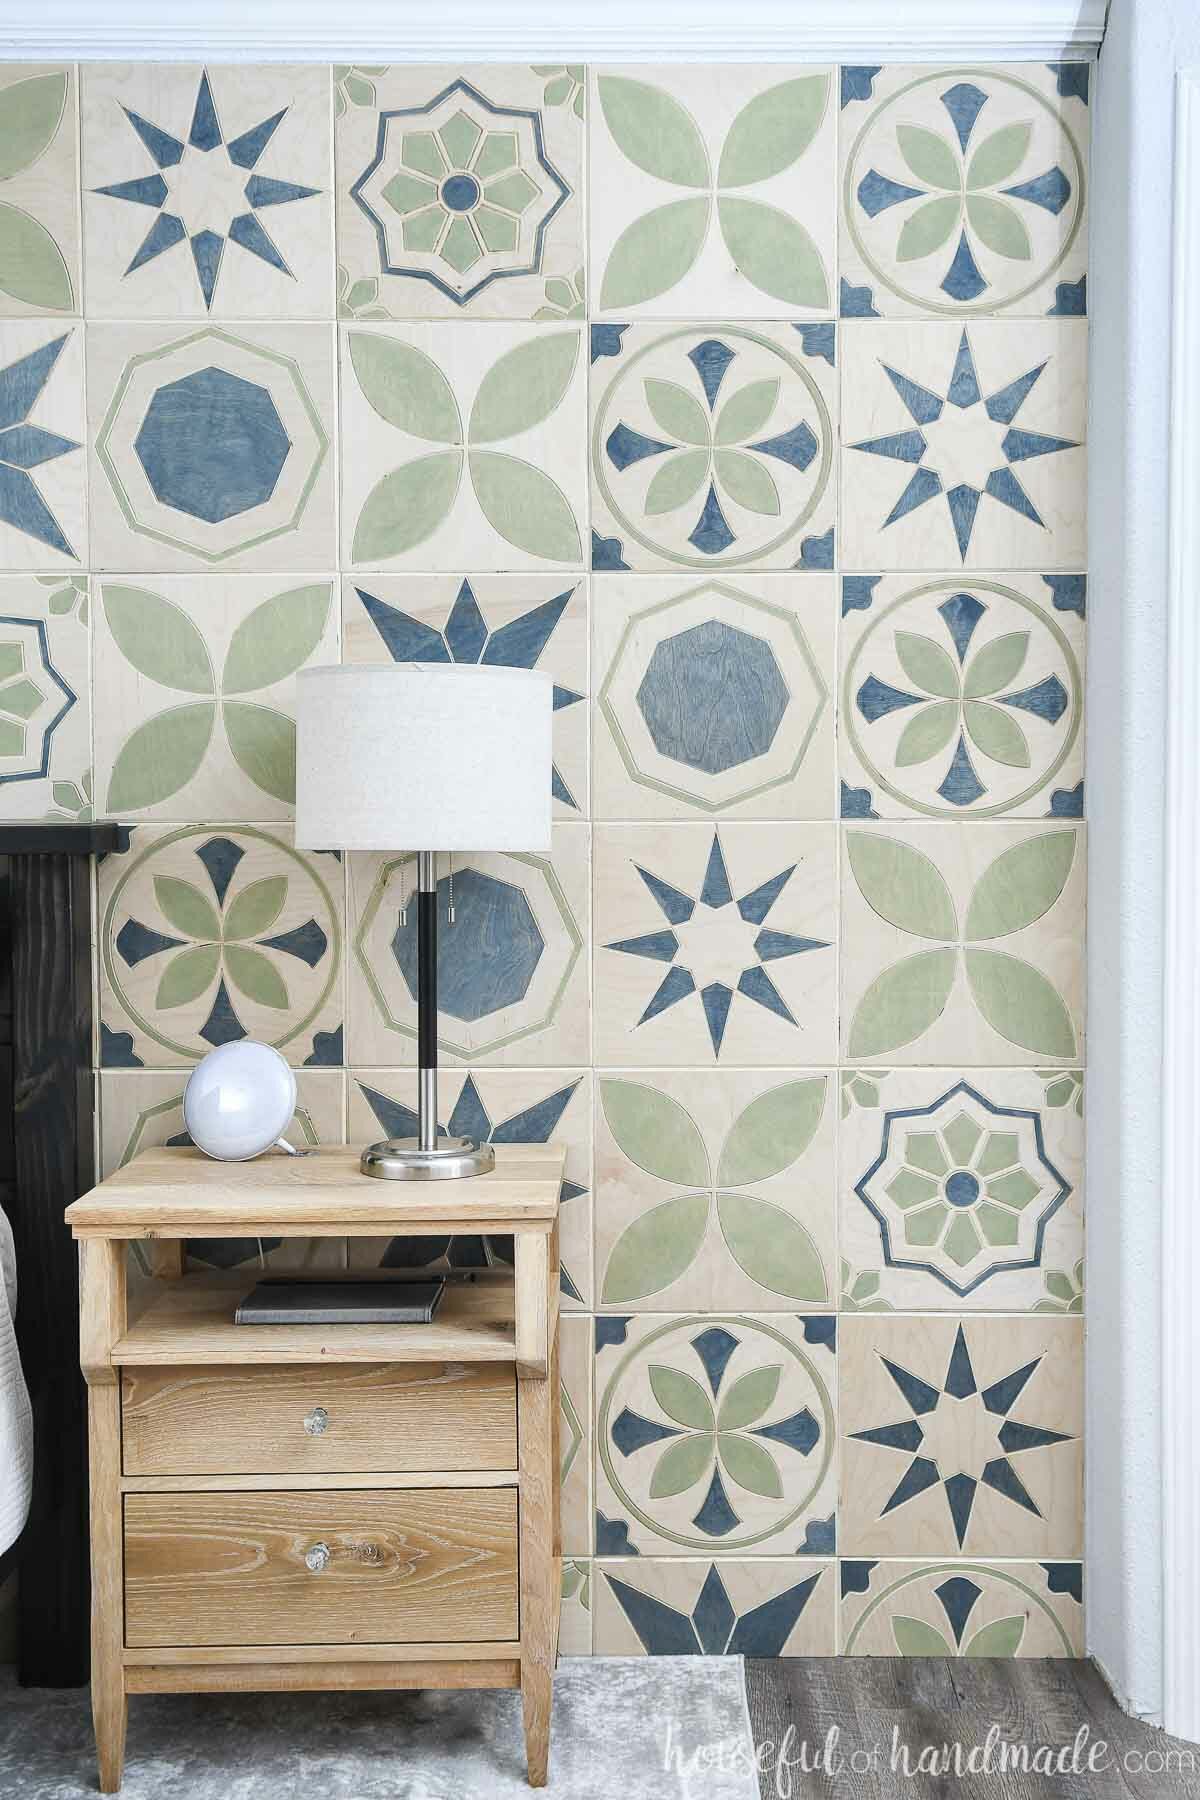
Table of contents
Carved Wood Tiles
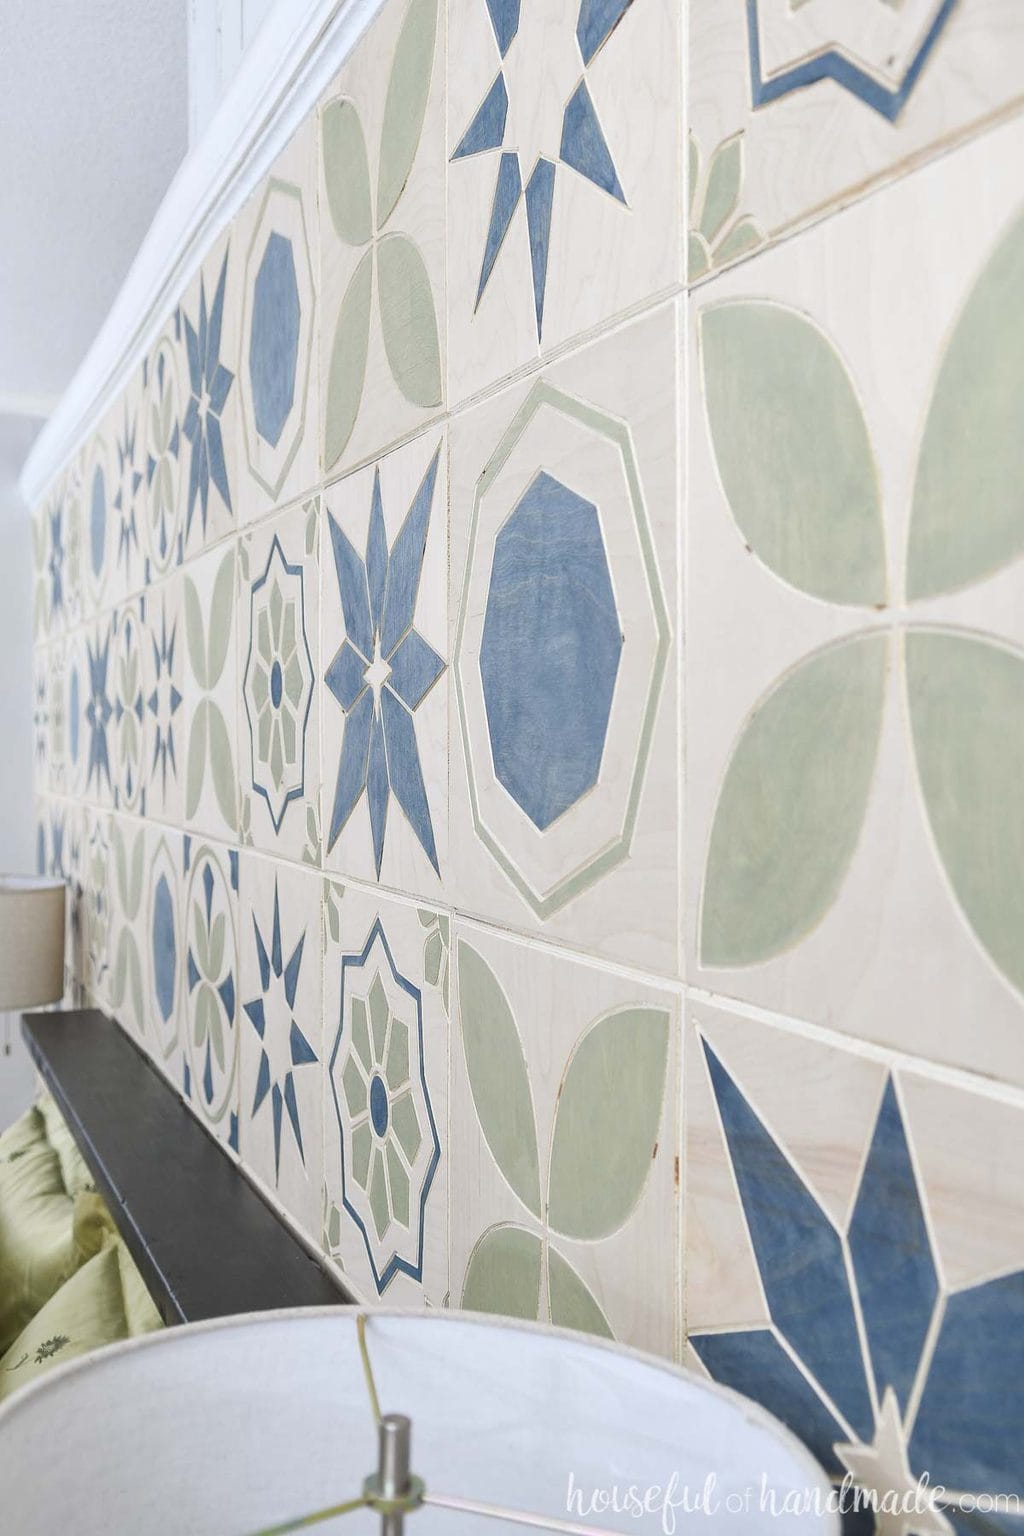
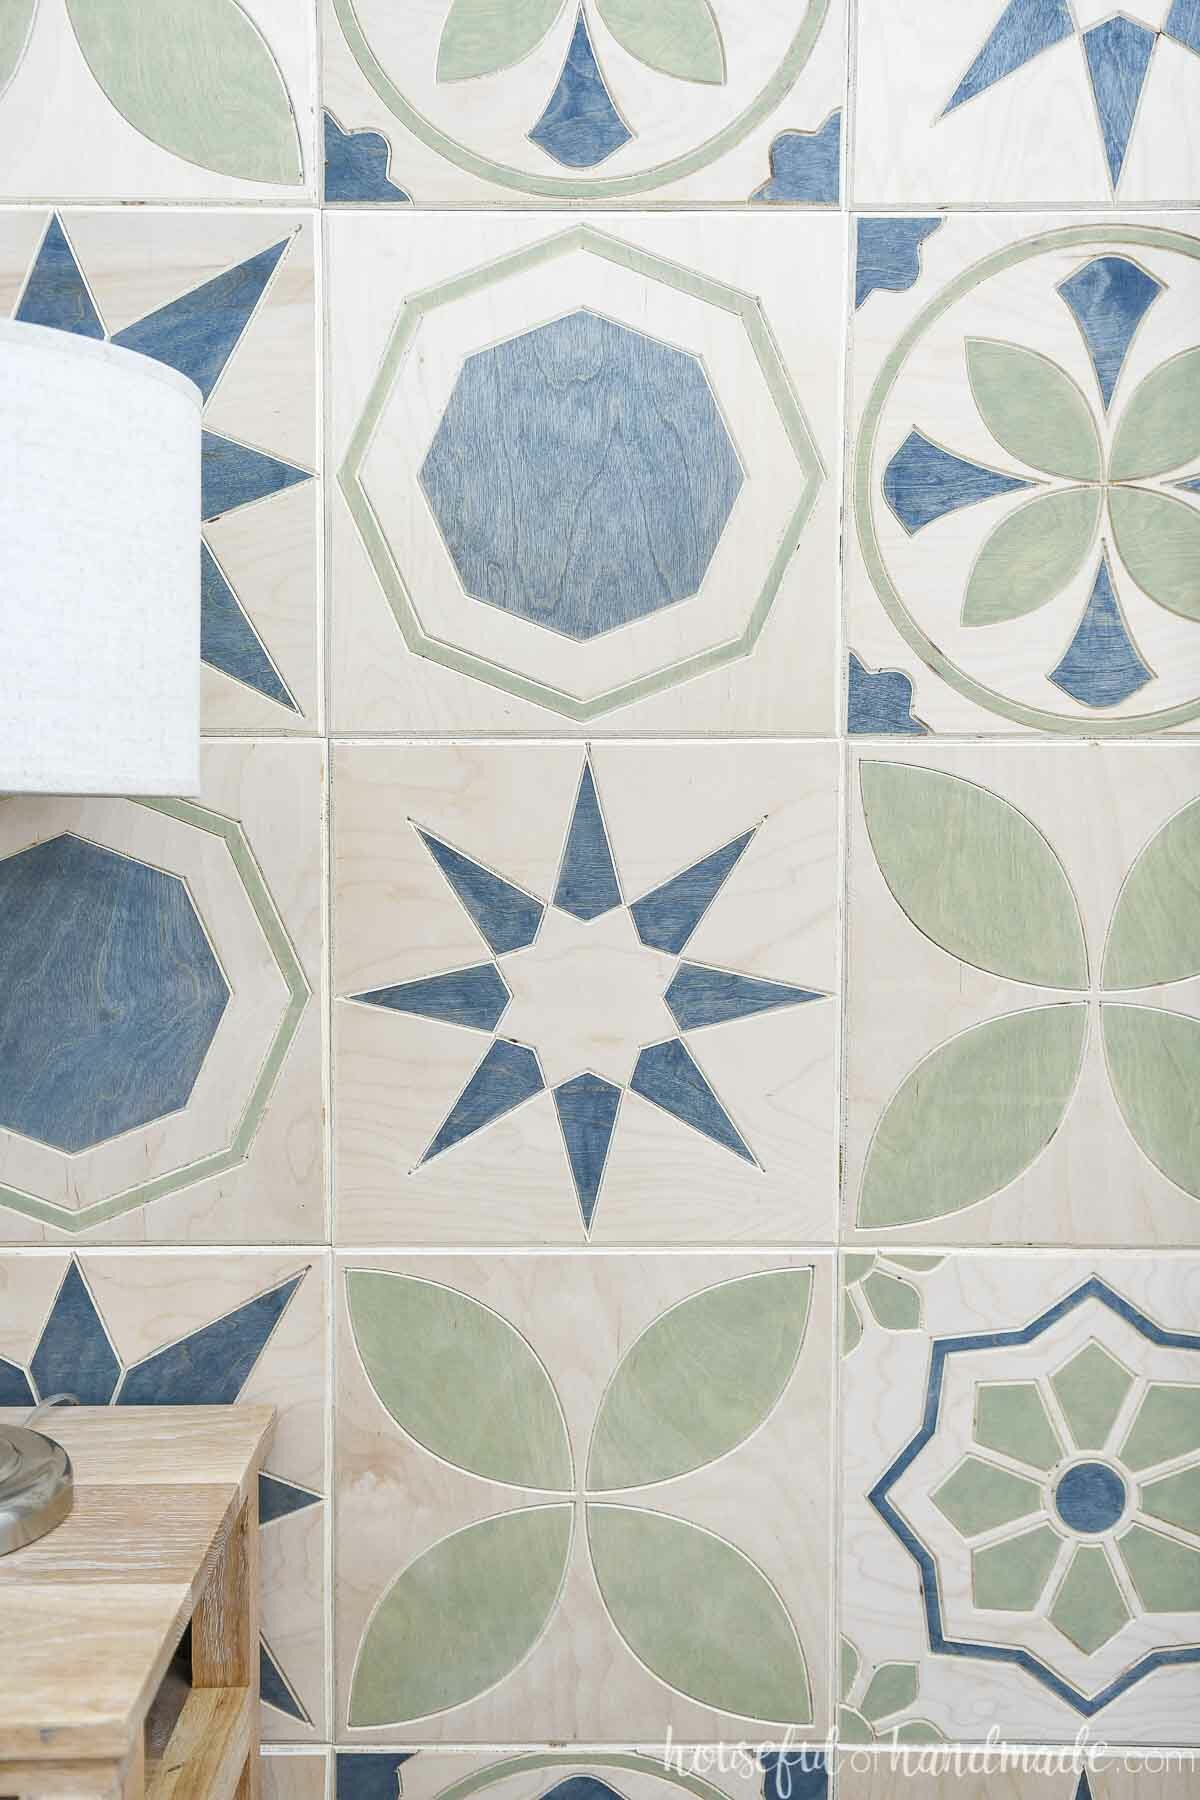
Carving the design in the tiles does two things. It adds texture to the wall and made it easy to stain the different parts of the design.
I used the v-carve features included in the Easel Pro software. The v-carve uses a V shaped bit to create a nice channel in the carve.
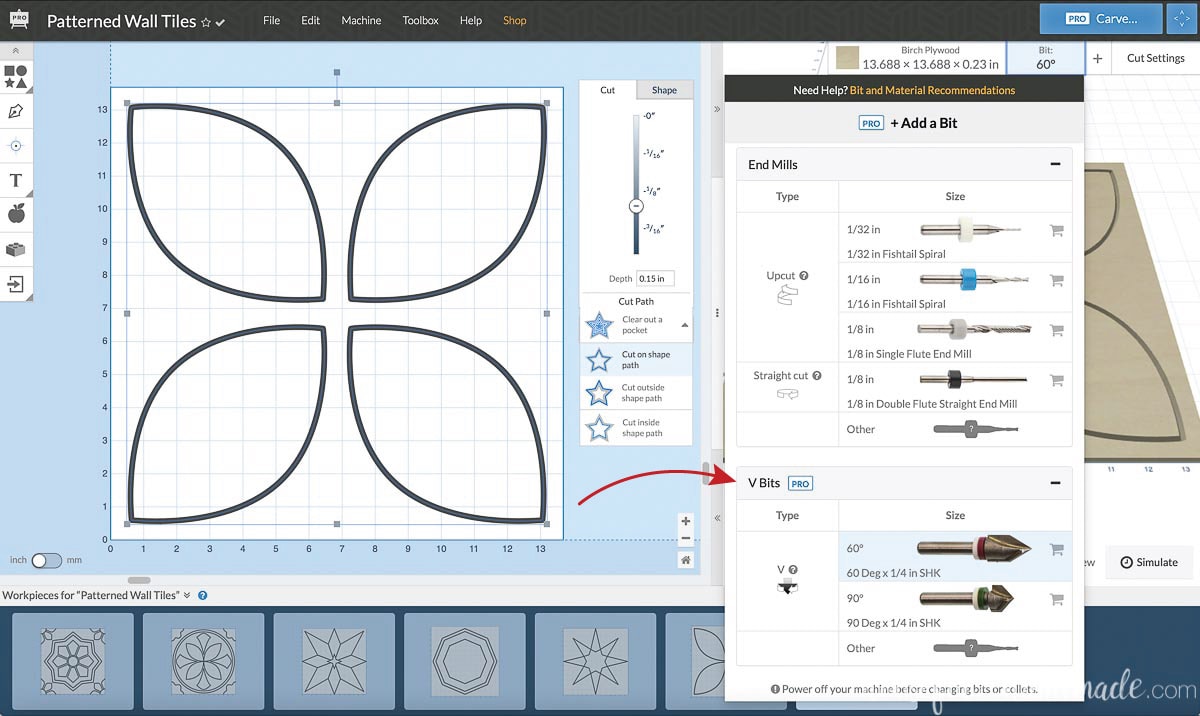
You can use a V bit with different degrees. I used a 60 degree V bit for a wider channel in the carve.
The v-carve is one of my favorite Easel Pro features. It makes absolutely beautiful carved text. You can see how it carved the Team 1 & 2 on my outdoor games score board I made last summer.
Designing a Balanced Patterned Wall
There are two ways you can create a patterned tile accent wall:
- Use a variety of different patterned tiles to create an eclectic focal wall.
- Use 1 patterned tile to create a repetitive design on your wall.
I chose to use a variety of patterns to create an eclectic cement tile inspired wall. But I didn’t want it too busy. This required a balance of colors and patterns.
Balancing the Different Patterns
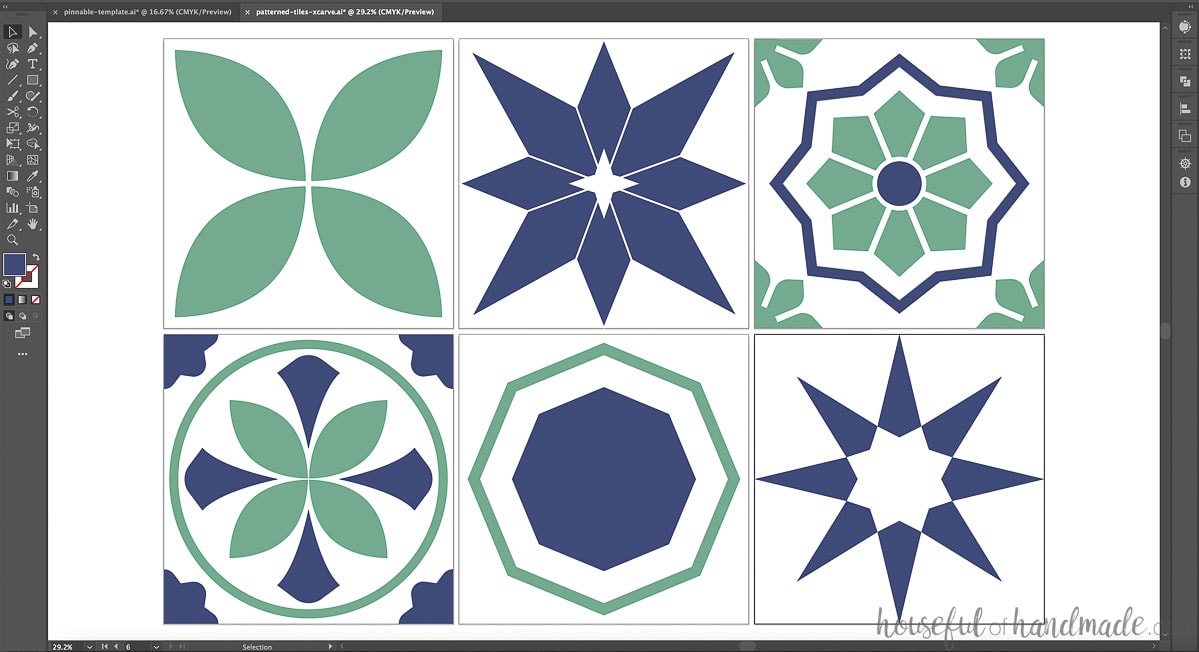
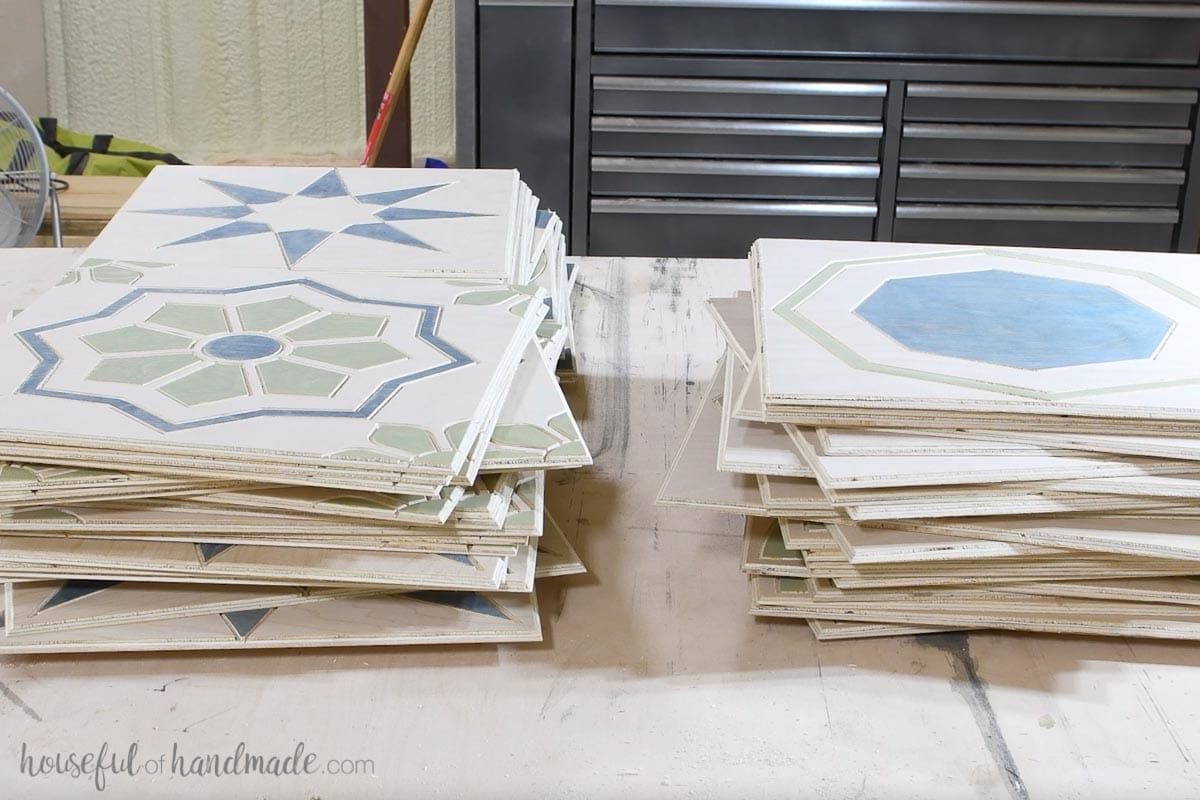
Creating the different patterns for my wall was so much fun. I originally was planning on only using 5 designs, but couldn’t decide which one to eliminate so I ended up using 6. But I happily could have kept designing more tiles!
To balance out all the patterns, I made sure that I included a similar amount of each of the elements that I used. Similar to balancing a room where I try to have colors in at least 3 places, I tried to have 3s in the different elements.
For example, the all green “leaf” design is used once as it’s own tile. Then a second time as the center of another time. And finally as the corner of a third design.
These are the different design elements I balanced in my designs:
- Single color tiles
- Tiles with a ring or border around a design
- Curved lines
- Sharp points
Not all elements did make it in 3s, instead the design felt balanced using them on 2 tiles.
- Tiles with corner elements
- Simple, medium, or complex designs (I used 2 of each)
Really, balancing the design is all a matter of what looks right to you. Just have fun adding in different designs that you are inspired by and playing with it till it all looks right.
Balancing the Colors
Creating a balance of colors on the tile wall was important to keep it from being too busy. To do that, I decided to limit my color palette to 2 colors plus the color of the wood.
After designing the different tiles, I played around with how I wanted the colors on each tile. I did this electronically in Adobe Illustrator, but you could use any drawing program you have or even do it on paper.
With all 6 tile designs on visible on the screen, I changed around the colors of each design until I had an equal balance of the different colors.
Some tiles are all one color, other all the other color, and others have a mix of both colors. This makes it easy to balance out the colors as you add them to the wall.
I chose to put my wood tiles on the wall in a random order, not a pattern. So I focused on having a good balance of colors overall. If you want to put your tiles on the wall in a pattern, make sure the tiles are in that pattern when you start looking at the color options so you pattern is balanced.
What if I Don’t Have an X-Carve
I have had so much fun creating all kinds of amazing projects with the X-carve. It would be a great investment if you want to start your own business or Etsy shop selling wood decor items.
But if you do not have an X-Carve, you still have options.
- Some high schools, libraries, and maker spaces have X-Carves you can use. Use this link to find a location near you.
- You could skip the carving on the tiles and just paint the patterns on your wood tiles. This will not give you as much texture, but could still be amazing.
- Save up and buy an X-carve! There are so many amazing things you can make with it. And you can always use it to make items to sell.
Either way, start by signing up for a free Easel account to start designing your own tiles in their software. You can play around with the detailed preview to show you how it looks carved out of your wood with different bits.
Prefer to Watch? Check out the Video Below
How to Make Carved Wood Tiles
Tools Needed:
- X-Carve with Easel Pro account
- If you do not have an x-carve, find a location near you where you can use one.
- 60 degree v-carving bit
- Digital Calipers
- Table saw or circular saw
- Router
- Utility knife
Supplies:
- 1/4″ thick Baltic birch plywood
- Sand paper
- Wood Stain
- I used Varthane wood stain in Rustic Sage and Worn Navy.
Figure out your Tile Size
To ensure your tiles fill the entire wall without having to be cut, take a measurement of the entire wall you want for you accent wall. Measure both horizontal and vertical. My wall was 178″ x 87 1/2″.
Then divide the total width by the size you want your tiles to be close to. I wanted my tiles to be around 12″ squares, so I divided 178″ by 12″ to get 14.8333. This let me know I needed to either go with 14 or 15 tiles across to be around 12″ tiles.
I wanted an odd number of tiles on my wall to prevent a line right up the center. So I decided to go a little larger with my tiles since under 12″ seemed to small. So I settled on 13 tiles across. To figure out the final size I divided 178″ by 13 to get 13.69″ which I rounded to 13 11/16″ (or 13.6875″).
To figure out how many rows I would need, I divided the total height of my wall by 13.6875 and came up with 6.39. This means the bottom row will have to be cut to fill the wall with square tiles.
You can play around with different sizes until you get a configuration you want.
Figuring out how many Tiles
Once you decide on a final tile size, you can quickly figure out how many tiles you will need to cut to fill your accent wall.
Multiple the number of tiles across by the total number of rows to get the total number of tiles needed.
For my wall it was 13 across by 6.39 down. Since my bottom row is under .5 I knew I could cut a full tile to be two smaller pieces for the bottom row. I would need a total of 78 full tiles (13 x 6), and then 13 half tiles (or 7 more full tiles).
If your bottom row is above .5, you will need to count that as a full row.
Designing the Tiles
I designed my tiles in Adobe Illustrator since I use it already for my craft projects, but you can easily design the tiles right in your Easel software.
Also, if you want to use the tiles I designed, I am sharing the Easel file below. First, sign up for a free Easel account, then clicking on the link below to open the file.
Designing in the Easel Software
To design in Easel, you can create shapes with the Shapes panel on the left hand size. Resize them to fit your design by pulling at the boxes in the corners.
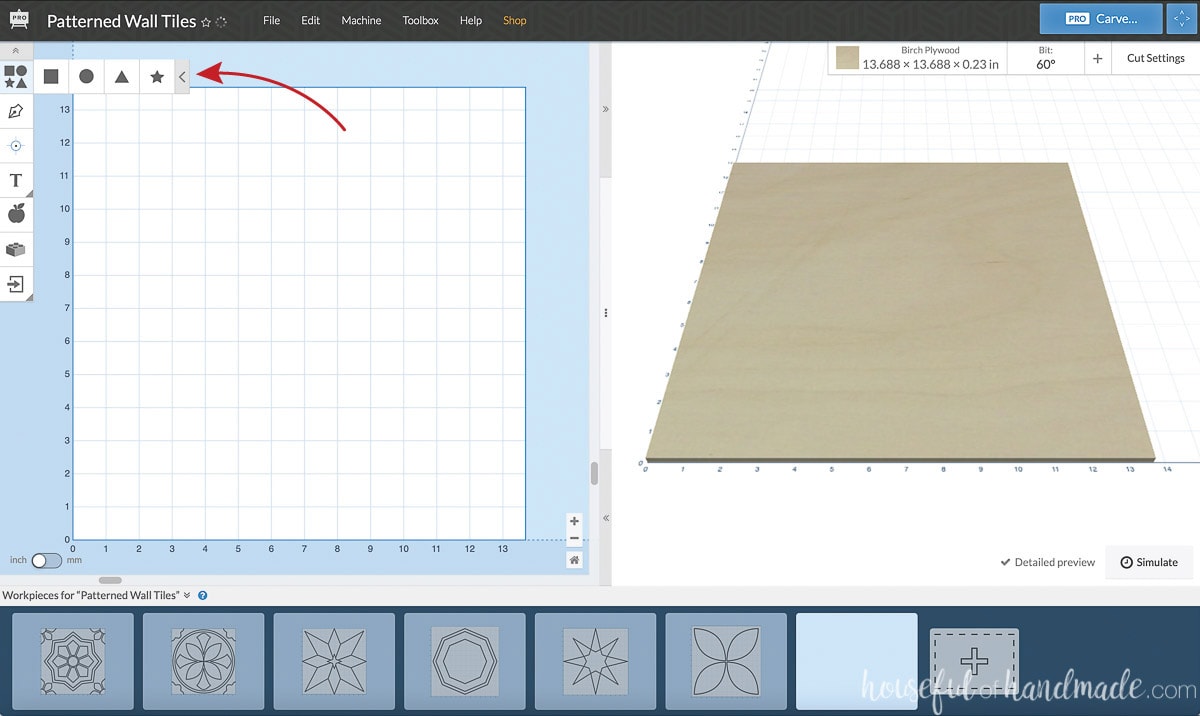
When the shape is selected, use the Shape tab on the object design panel to the left of the design area. Rotate the design 45 degrees to make it fit into the corner of your tile.
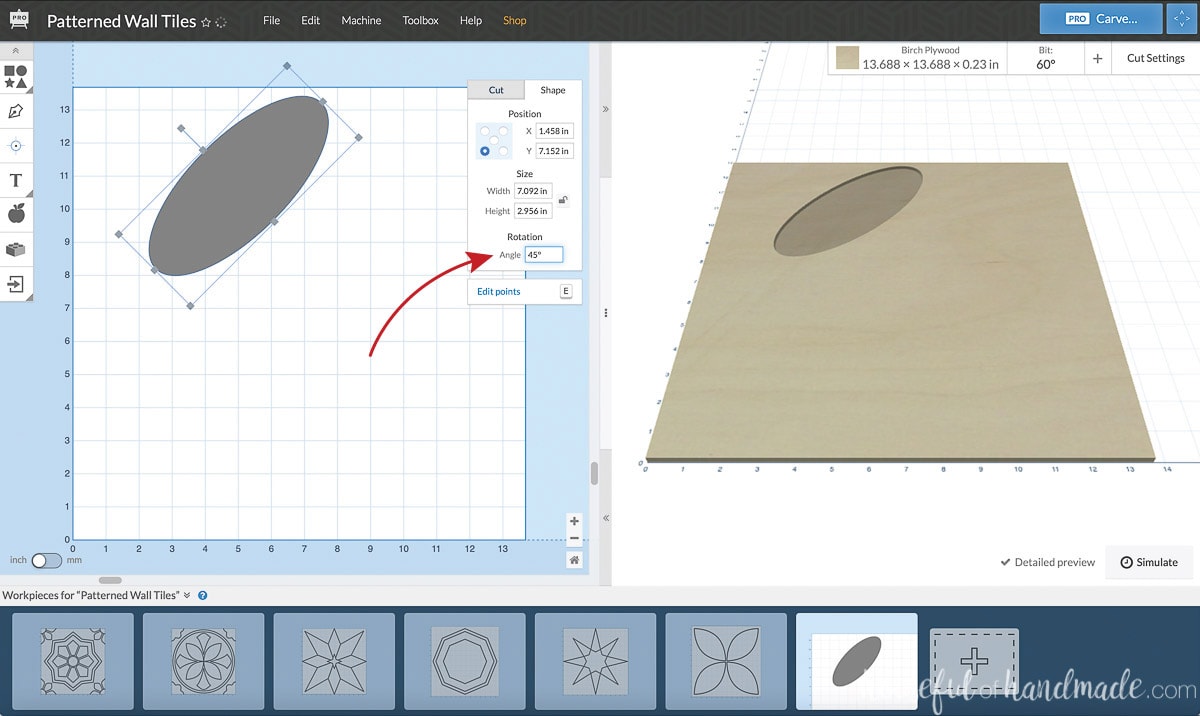
If you double click on a design, you will have access to the points to further manipulate the design.
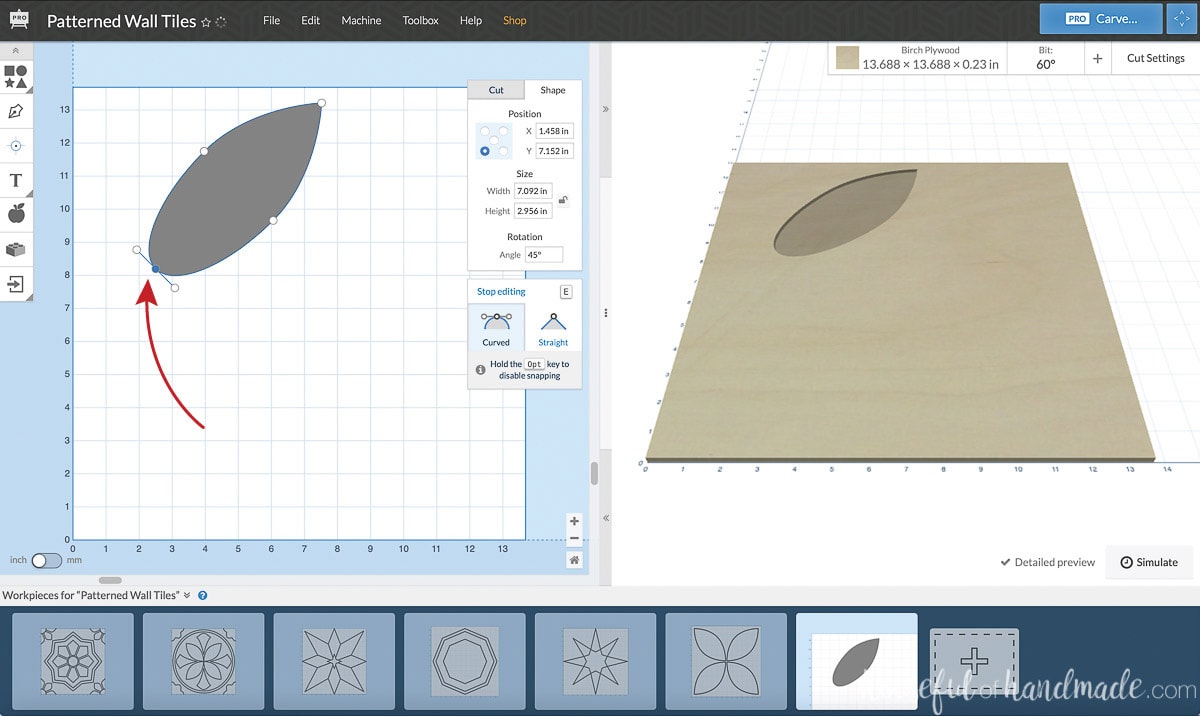
Design just 1/4 of the design first. Once you are happy with it, you can copy and paste it to make a second identical section. Rotate it to fit into another corner. Repeat for all corners.
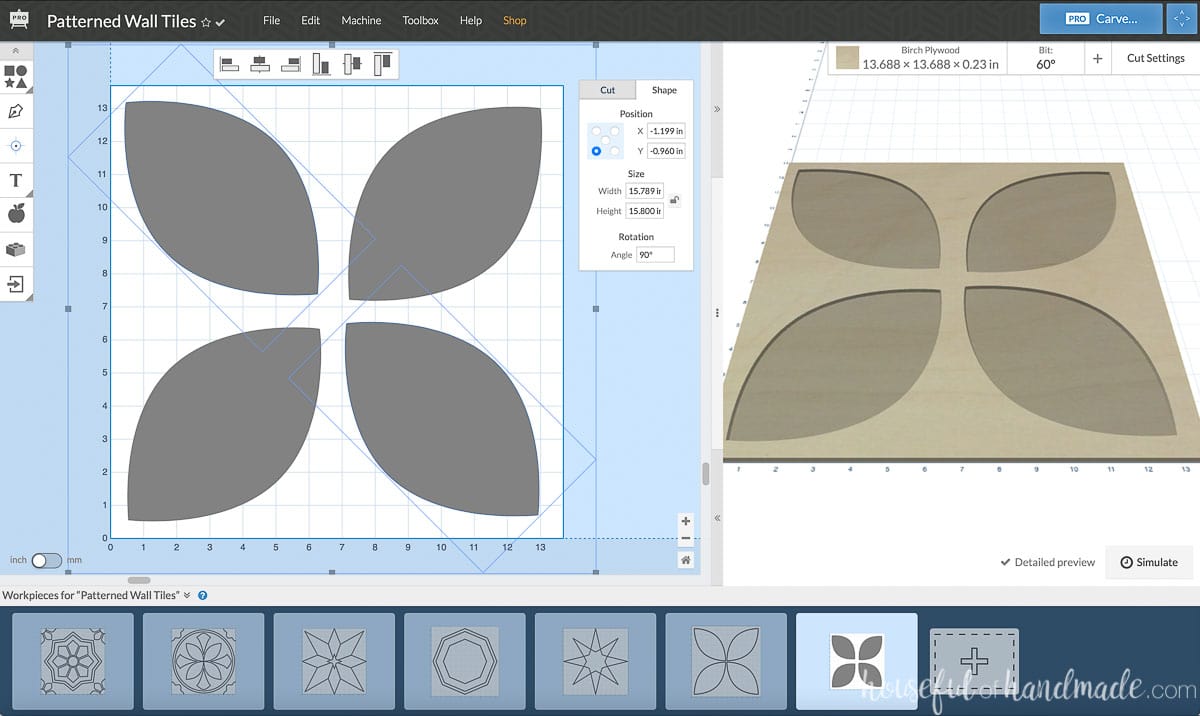
With multiple objects selected, line them up easily with the Alignment icons that appear above the design area.
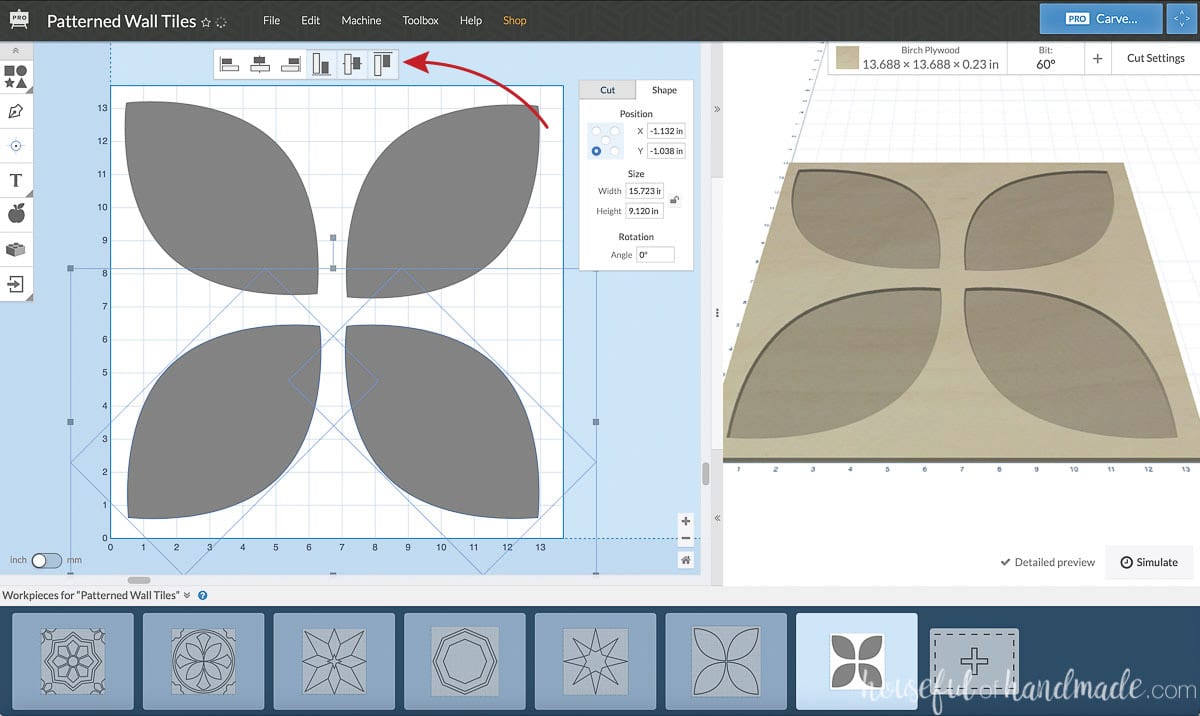
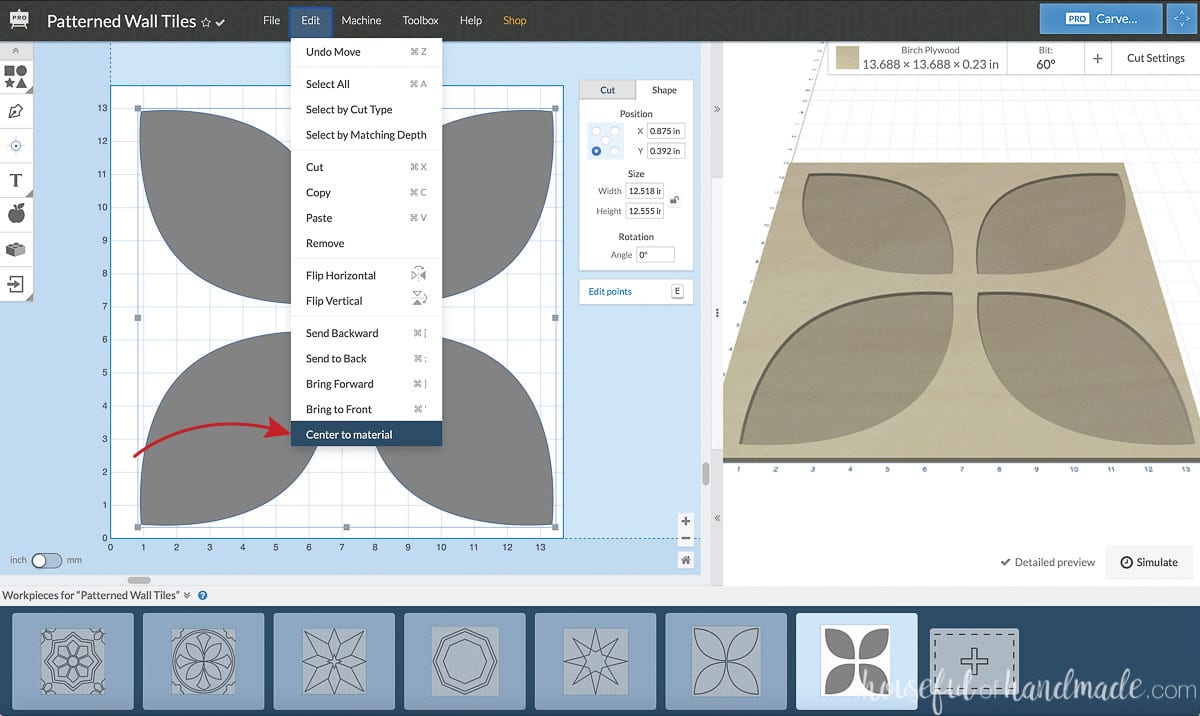
Once you have all the different sections aligned. You can select them all and right click to reveal the menu. Choose Combine to make them into one design.
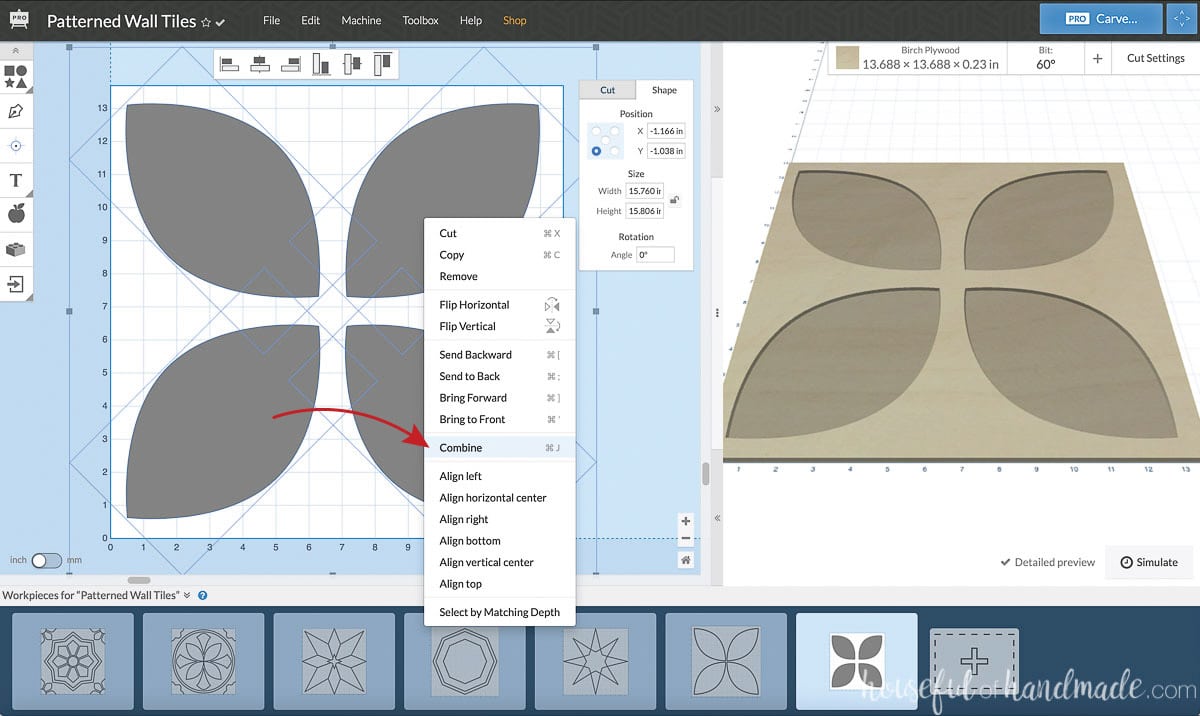
Once combined you can click Edit, then Center on Material to center your entire design on the tile.
Cut Settings
Once your tile is designed, select it and then select the Cut tab in the object design panel to the left of the design area. You will need to change the Cut Path to Cut on Shape Path.
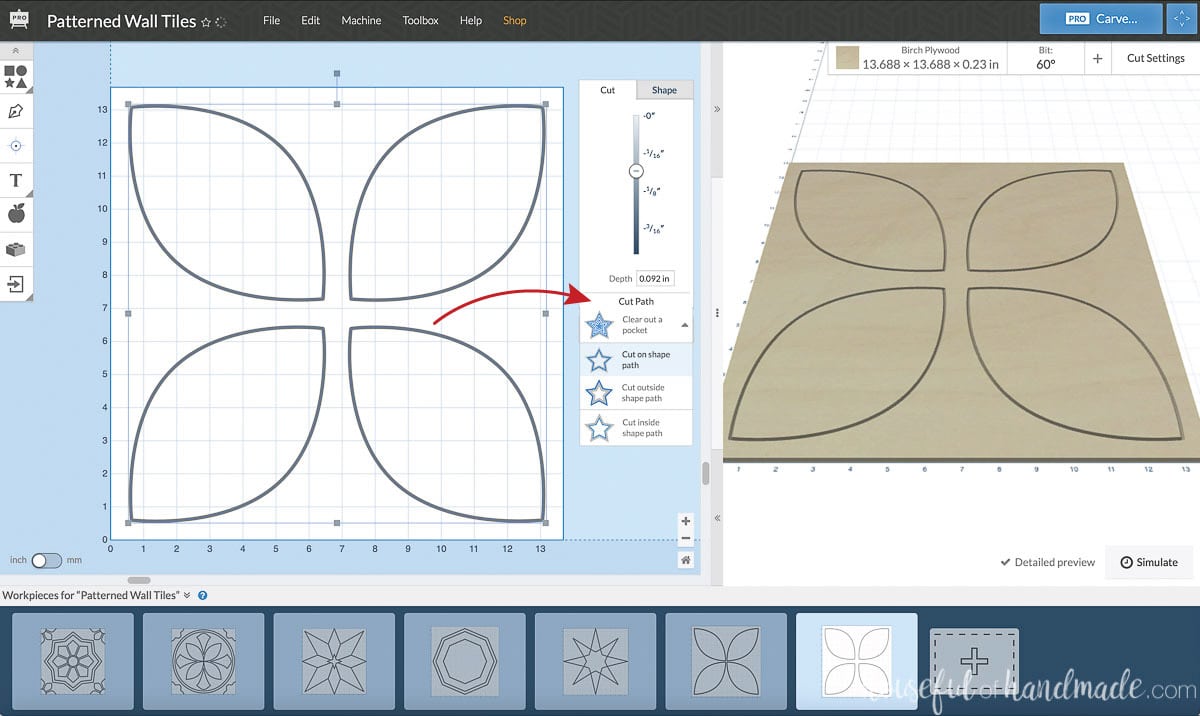
Next change your cut depth. The deeper the depth, the wider the V channel around the design will be. You can get a preview of the carve on the far left of the screen. I cut all my tiles out at 0.15 inches depth.
Also, make sure the bit is changed to the 60 degree V-bit to get an accurate preview of the final carve.
Now you are ready to cut out some tiles!!!
Carve the Tiles
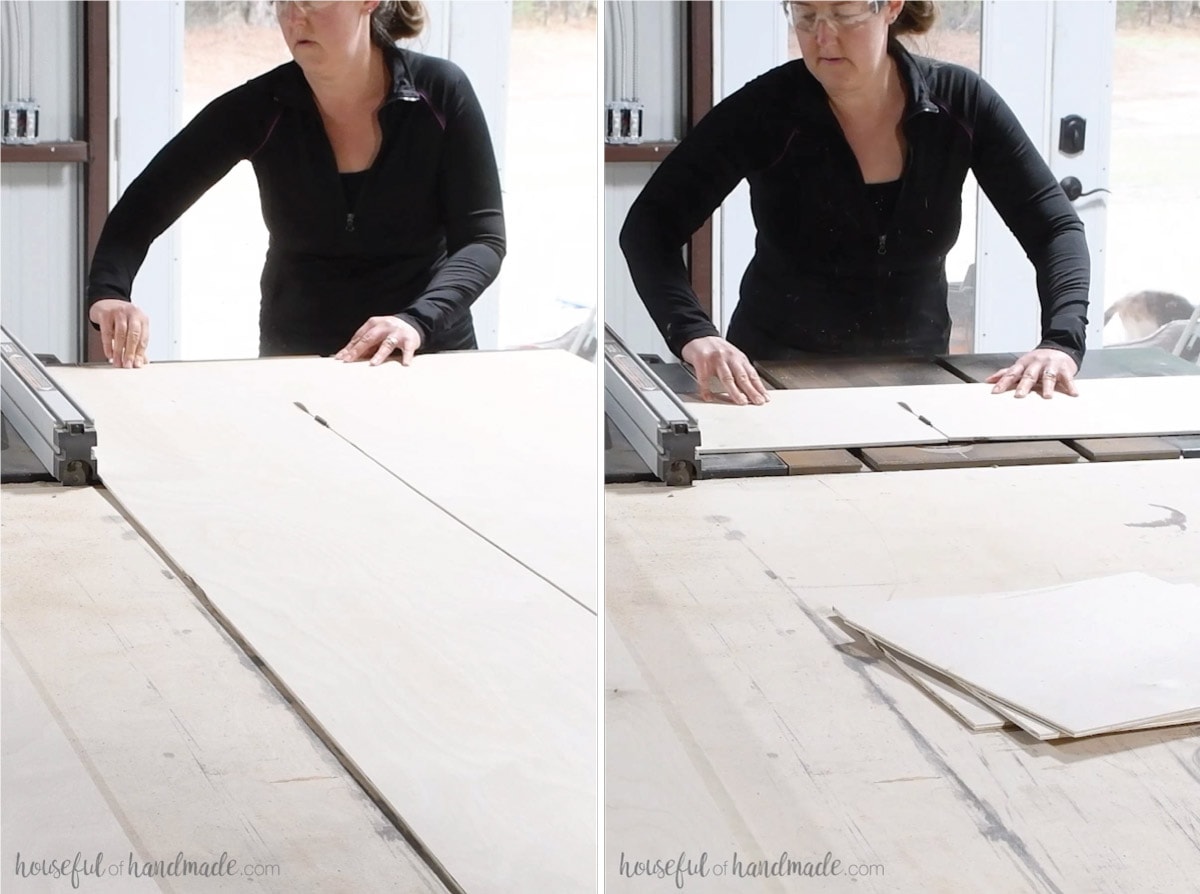
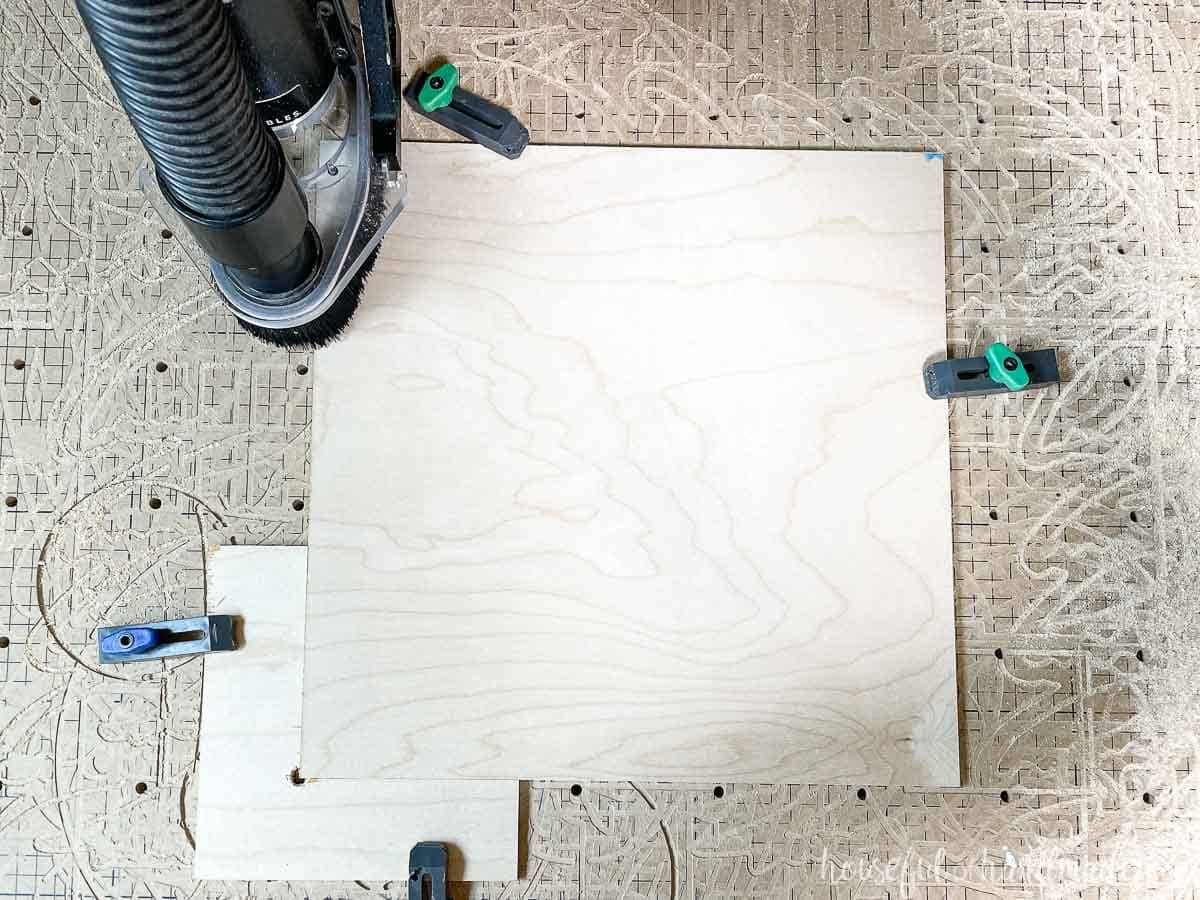
Using the table saw, cut the plywood into the total number of tiles you need. I prefer using a table saw for this since you set the fence once and then can make lots of repeating cuts to ensure your tiles are uniform in size.
Also, since plywood is not always perfectly square, alway make sure to square up the edge before cutting out the tiles.
Set up the X-Carve for Repetitive Cuts
Since we will be making a lot of the same cut, in the same material, you can set up the X-carve to quickly restart cuts instead of completing the Z-probe set-up each time. This will save you tons of time carving your wood tiles.
You will need to create a corner block. I did this with an approximately 5″ x 5″ scrap of the 1/4″ plywood. In one corner, make a mark 2″ in from each edge. Drill a 1/4″ hole on that mark.
Then using the table saw, set your fence to 2″ and cut the long side of the scrap up to the drilled hole. Repeat on the other side so you have a 2″ thick L with a drilled hole in the corner.
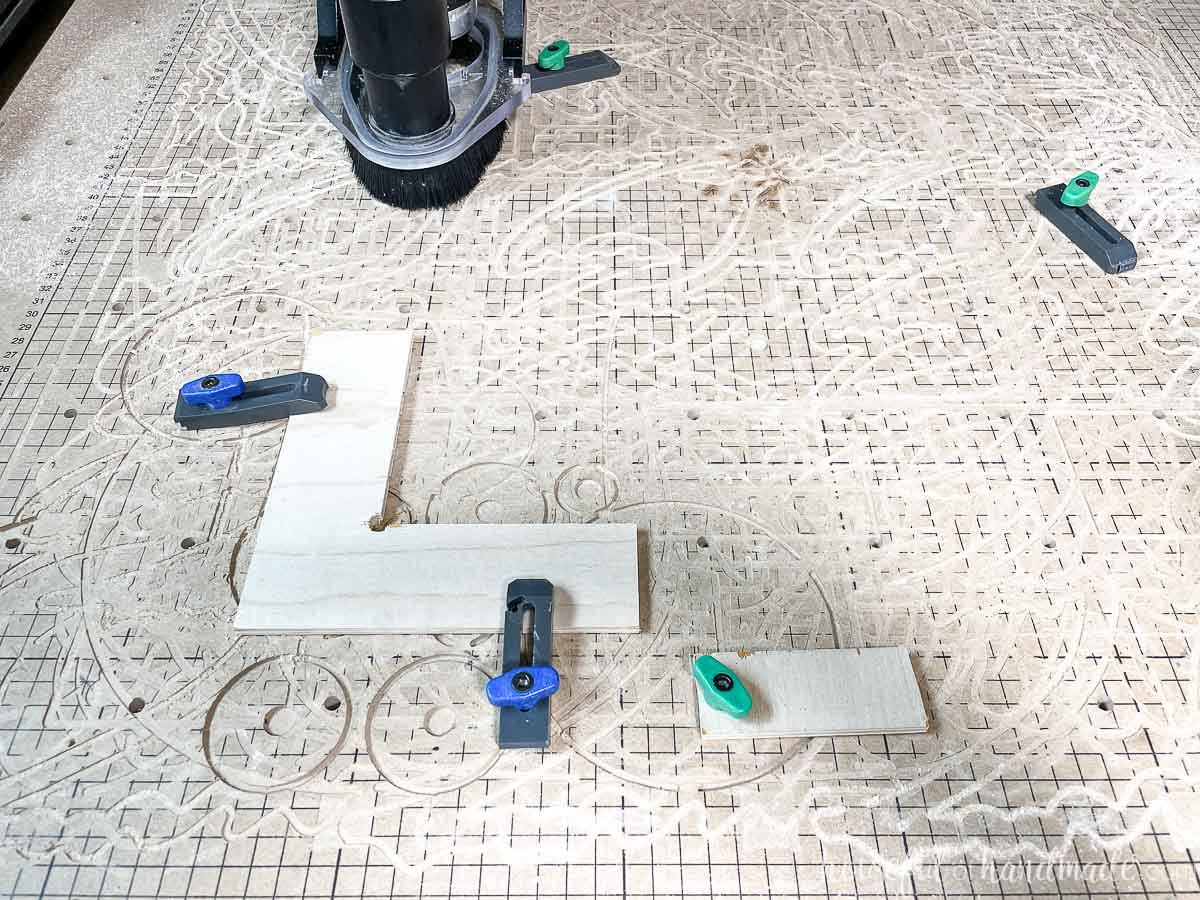
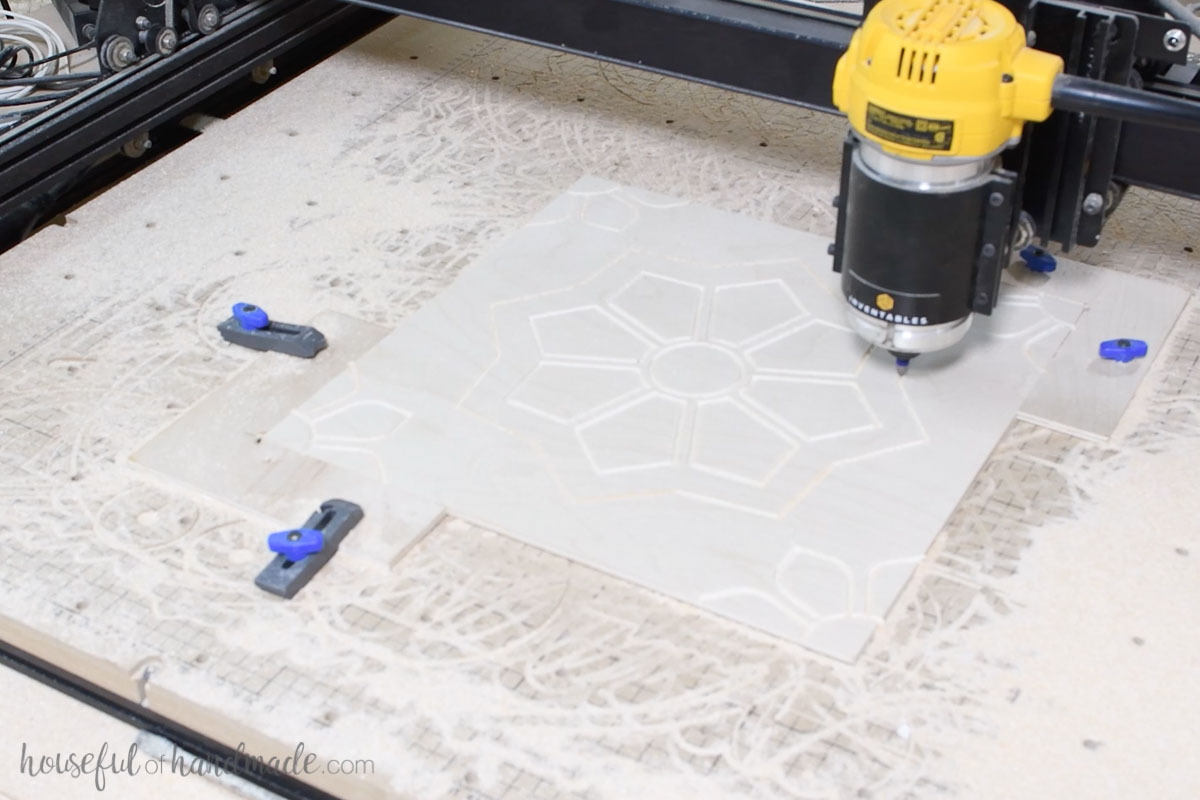
Clamp the corner block to your X-Carve waste board. Place the first wood tile on the waste board so it is tight into the corner block. Then clamp it down. Be aware of where the design will cut and do not clamp it in those areas.
Hit Carve on the top of the right hand corner of the Easel software. For this first cut, follow all the prompts, including setting the Z position either manually or with the Z-probe.
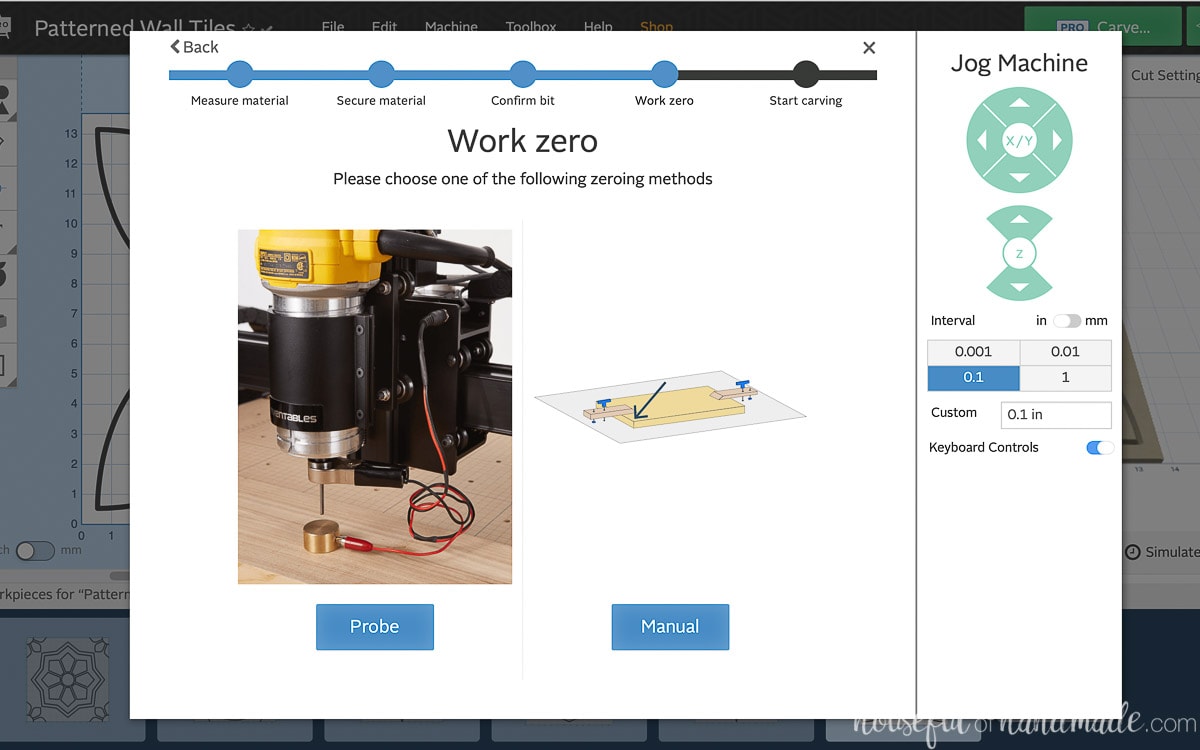
For the XY zero, set the tip of the V bit to the very corner of the tile in the corner block. Then carve your first tile!
Once the first tile is done, without moving the machine (be careful not to accidentally bump it), remove the tile. If you cannot easily remove the tile, you can use the Easel controls to Jog the machine out of the way.
Then clamp the second tile into place, so it is tight into the corner block.
Hit the Carve button again and proceed through all the setup steps until you get to the Z position. On the Z position screen choose Manual. On the bottom of the manual screen is the option to Use the Last Position. Select that and the machine will automatically use the previously set Z, X & Y positions.

As long as you do not turn off your machine or computer, or accidentally bump the router, you can continue to use the previous position. This will save a lot of time when carving your tiles.
Finishing the Tiles
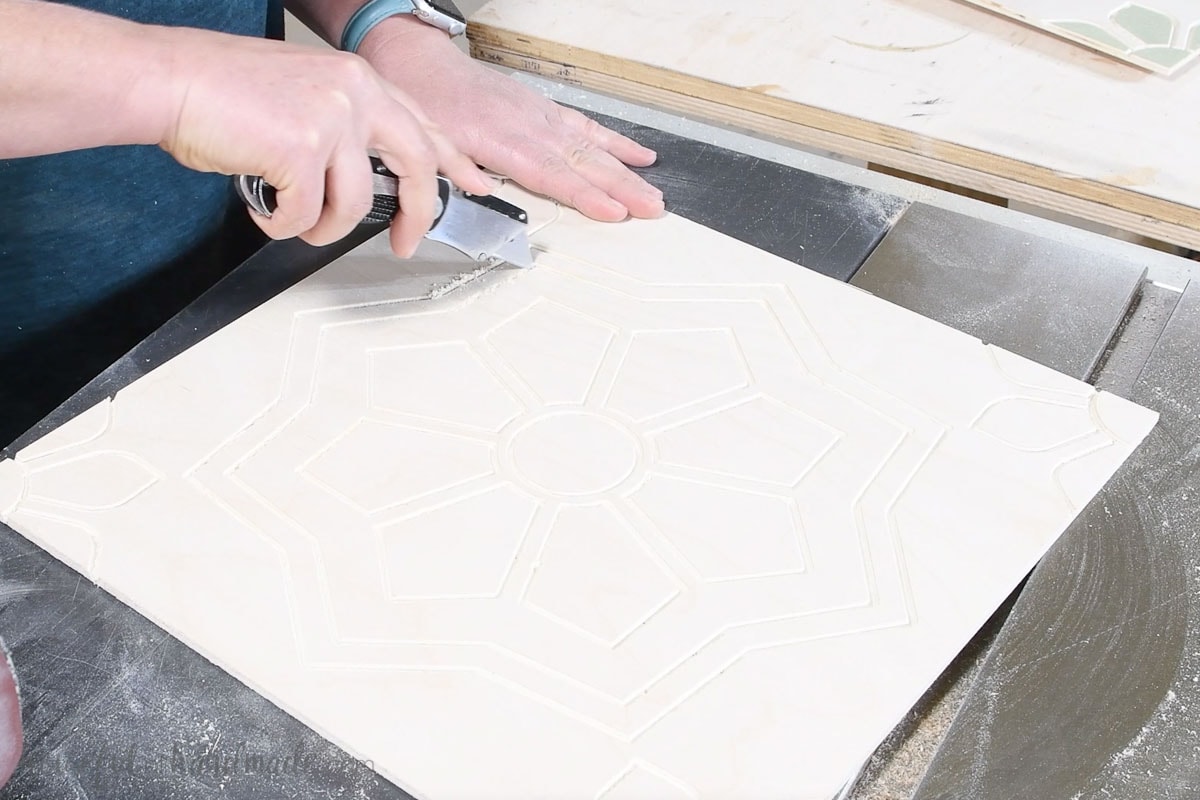
Once your tile is carved with the design, remove it from the X-Carve and give it a quick sanding with 220 grit sandpaper.
Along certain directions, the plywood did not cut as cleanly as others. I used a utility knife to quickly clean out these lines.
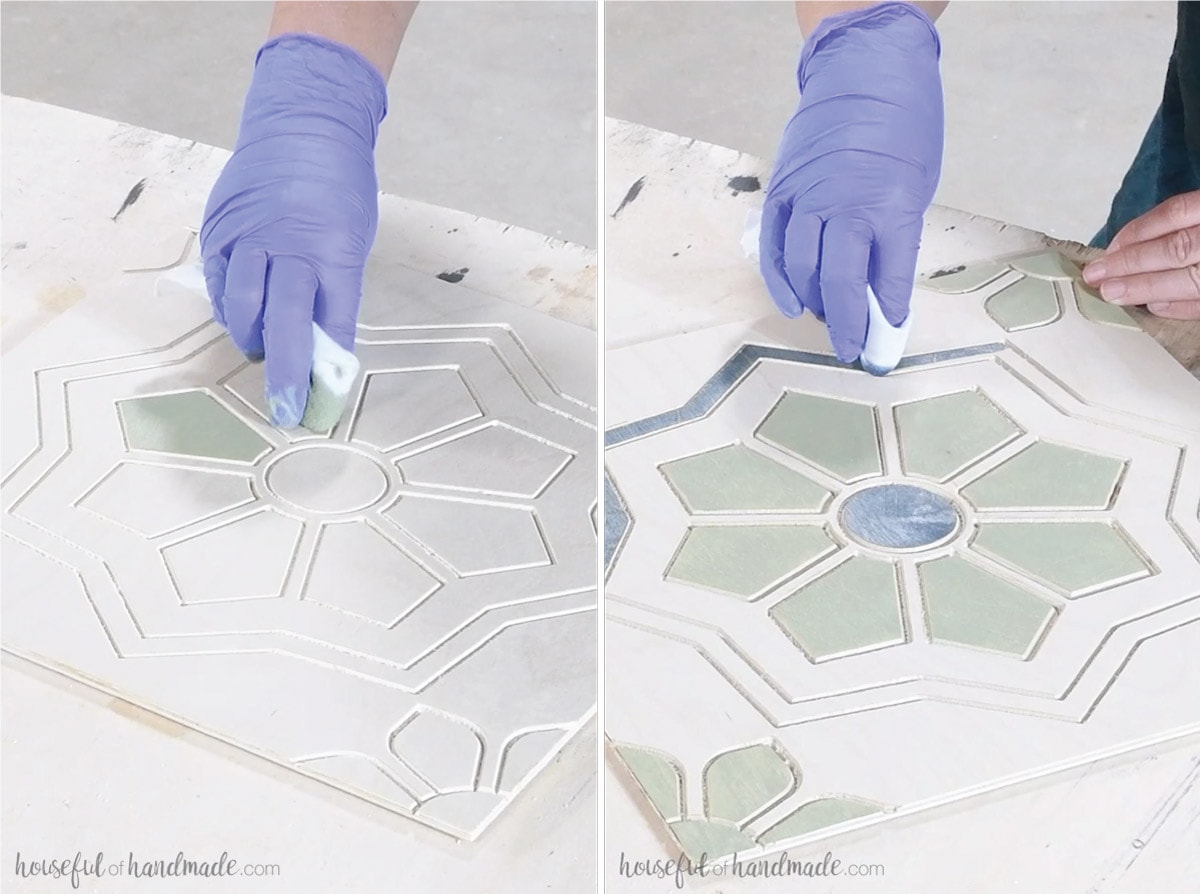
Then it was time for stain. At first I tried only carving a shallow line in the tiles, then stained them, then returned them to the X-Carve for the final carve. I was hoping this would make it easier to get clean stain lines.
However, if the machine got reset or bumped, the lines did not line up perfectly. And the tiles required a tiny bit of sanding again which caused a lighter stain.
So on the next design I did the full carve and then I stained it. The deep V channel was easy for me to stain around and I rarely had stain outside of the area I was staining. If I did, I could easily sand it off. And this required less carving time since the tiles were only carved once.
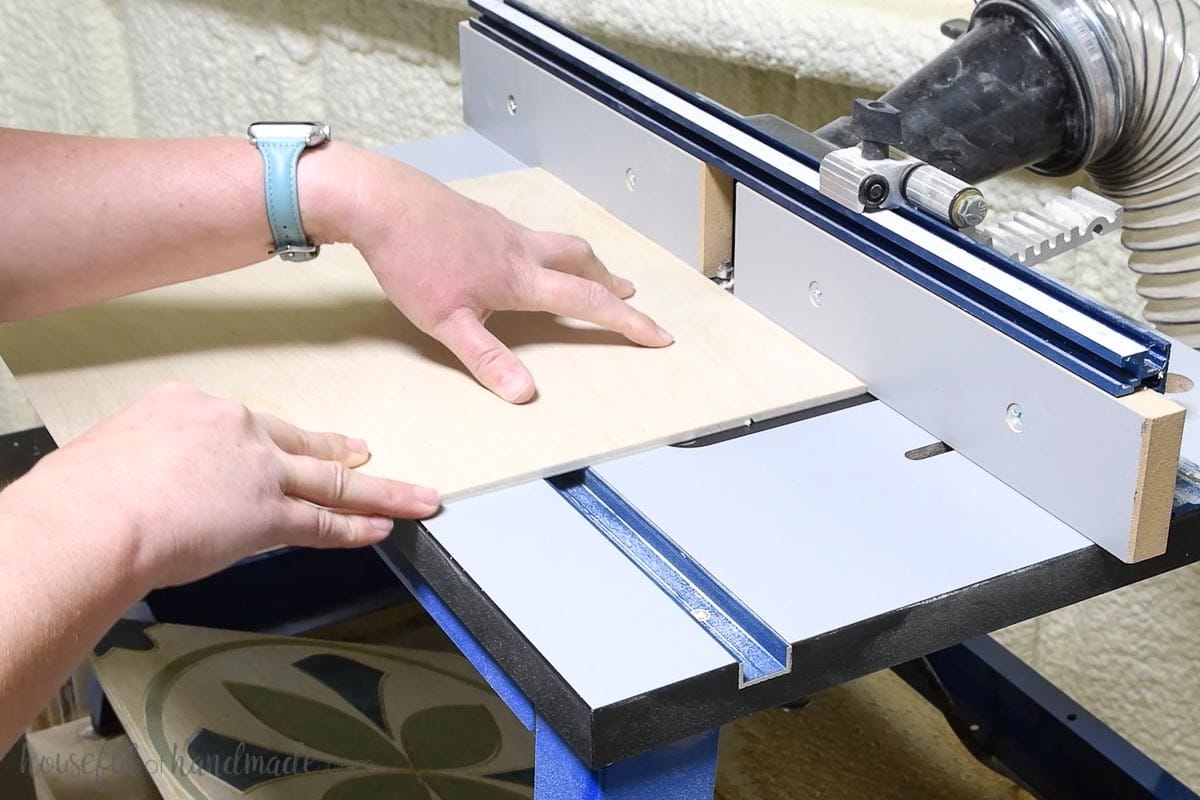
After the tiles were stained, I used a router to add a chamfer along all the edges. This chamfer was about 2/3 of the way through the 1/4″ plywood. It makes it easier to install the tiles since you cannot tell if the thin edges of the tiles do not line up perfectly.
How to Install the Accent Wall
Tools Needed:
- Brad nail gun
- Level
- Caulk gun
- Table saw
- Jig saw
- Drill
Supplies:
- Carved Wood Tiles (see above for how to make them)
- Liquid nails
- 1″ brad nails
Lay out the first row
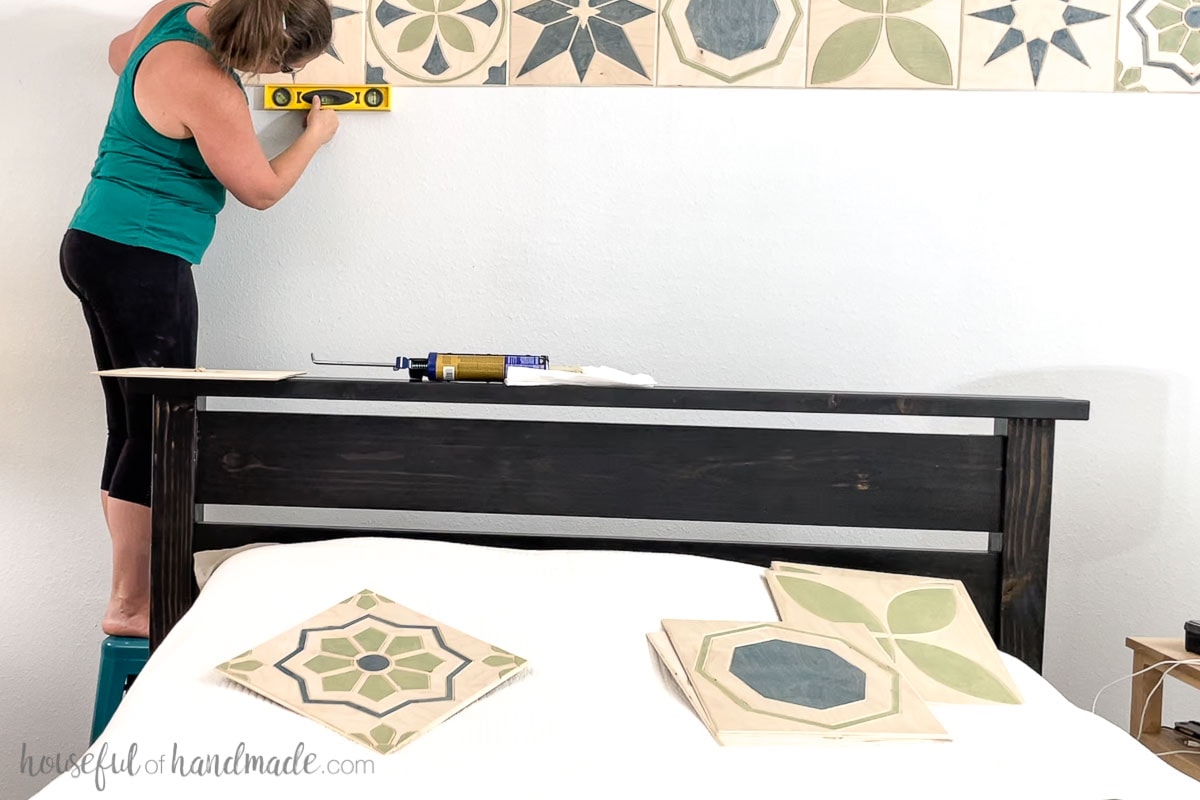
The first row is the most important. You will want to take the extra time to lay it out properly because once it is done, the rest of the wall is installed off of it.
If the top of your wall is not straight, you will have to scribe the top of the tiles to fit in properly. I was lucky that the top of my wall had crown moulding on it that was level, so I used that to go off of.
If you don’t have a level top surface, measure down in the center the width of your tile. Then use a level to draw a level line across the entire wall. Use this as your starting point, not the top of your wall.
Measure carefully the position of your first tile. Mine was centered on the wall so I marked the center of the wall and the center of the tile.
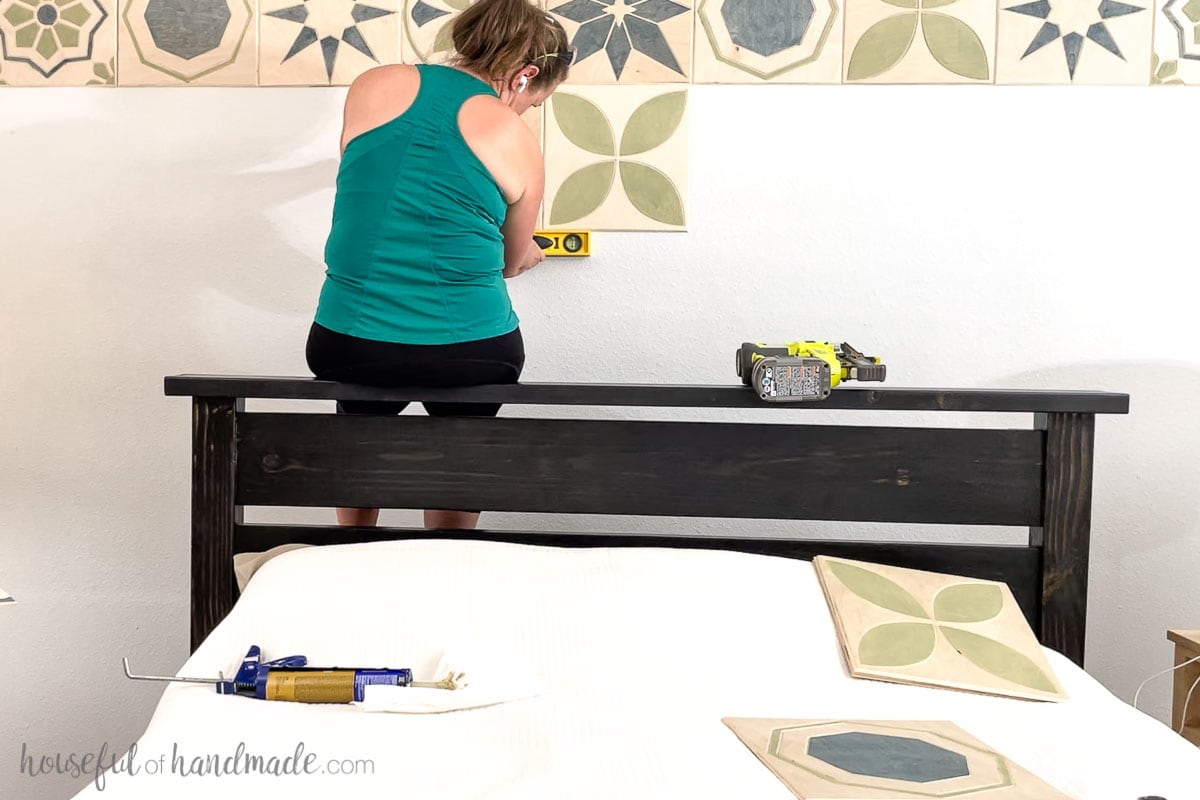
Attach the first tile
On the back of the tile, squeeze a dot of liquid nails in the four corners and in the center. Place the tile on the wall according to the marks made. Used the level to make sure the tile is level and plum on the wall.
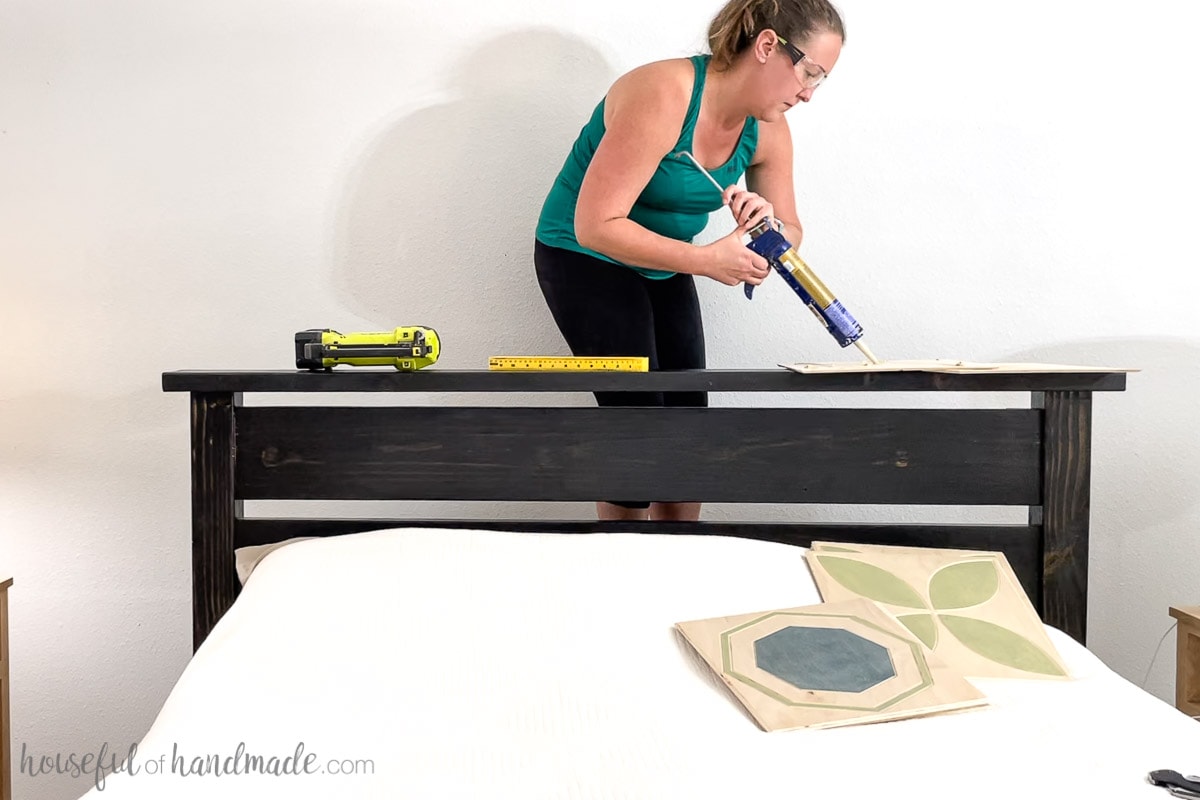
Secure the tile to the wall with the brad nails. Place the nails inside the v-carve channel in the tiles to hide them.
Finish the first row
Now that the first tile is attached, it is time to attach the rest of the first row. Place liquid nails on the back of next tile and place it next to the first.
Use the level to ensure it is level and plumb and attach it to the wall the same way as the first.
It is a good idea to dry fit your tile before adding the liquid nails so if you need to trim the top to sit up against a not even ceiling you can do that first.
Continue adding tiles to your wall all along the top. Use a saw to trim off the top if needed. It is more important that the bottom of your tiles are perfectly level.
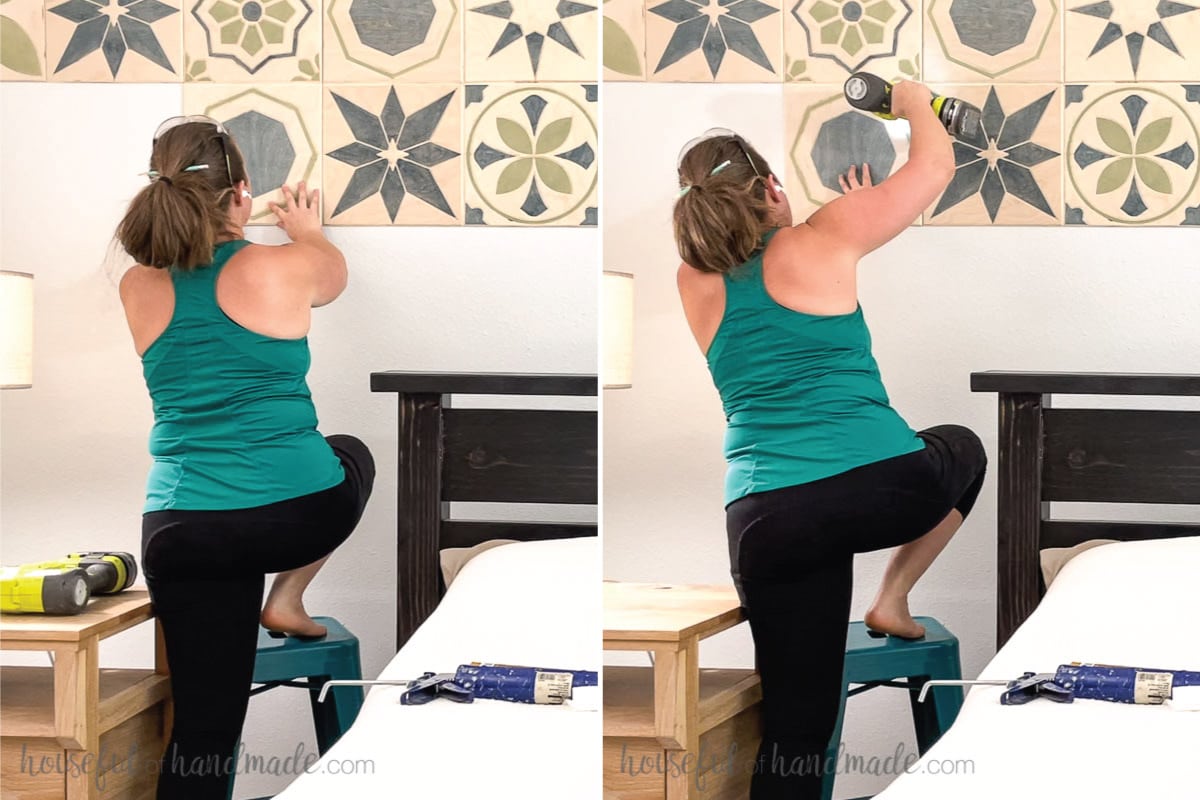
Attach the rest of the tiles
Once the first row is all done, you can move onto the second. I prefer to start in the center and move out from there. Make sure to pay attention to your pattern (or lack thereof) as you attach your tiles.
Continue to check for level and plumb as you go so that the rows of tiles do not get skewed.
Add glue and nail your tiles until you have covered up the entire wall!
If you have outlets or light switches in your wall, measure the opening where the box is on the back of your tile. Then use the jigsaw to cut it out. I like to drill a hole in the corners then saw between them.
Loosen the screws on the outlet or switch holding it into the box so you can slide the wood tile behind the prongs on the top and bottom. Then retighten them. This will ensure the outlet is now flush with the front of the wall and the cover can be reattached properly.
When you get to the bottom row, carefully measure each tile to fit and attach. If you have baseboards, it will be easier to remove the baseboards first, then reattach them on top of the accent wall. This way you do not have to be as precise about the bottom of the tiles.
We do not have baseboards in our bedroom so I carefully measures the tiles to fill the entire wall area to the floor.
And now you are all done!
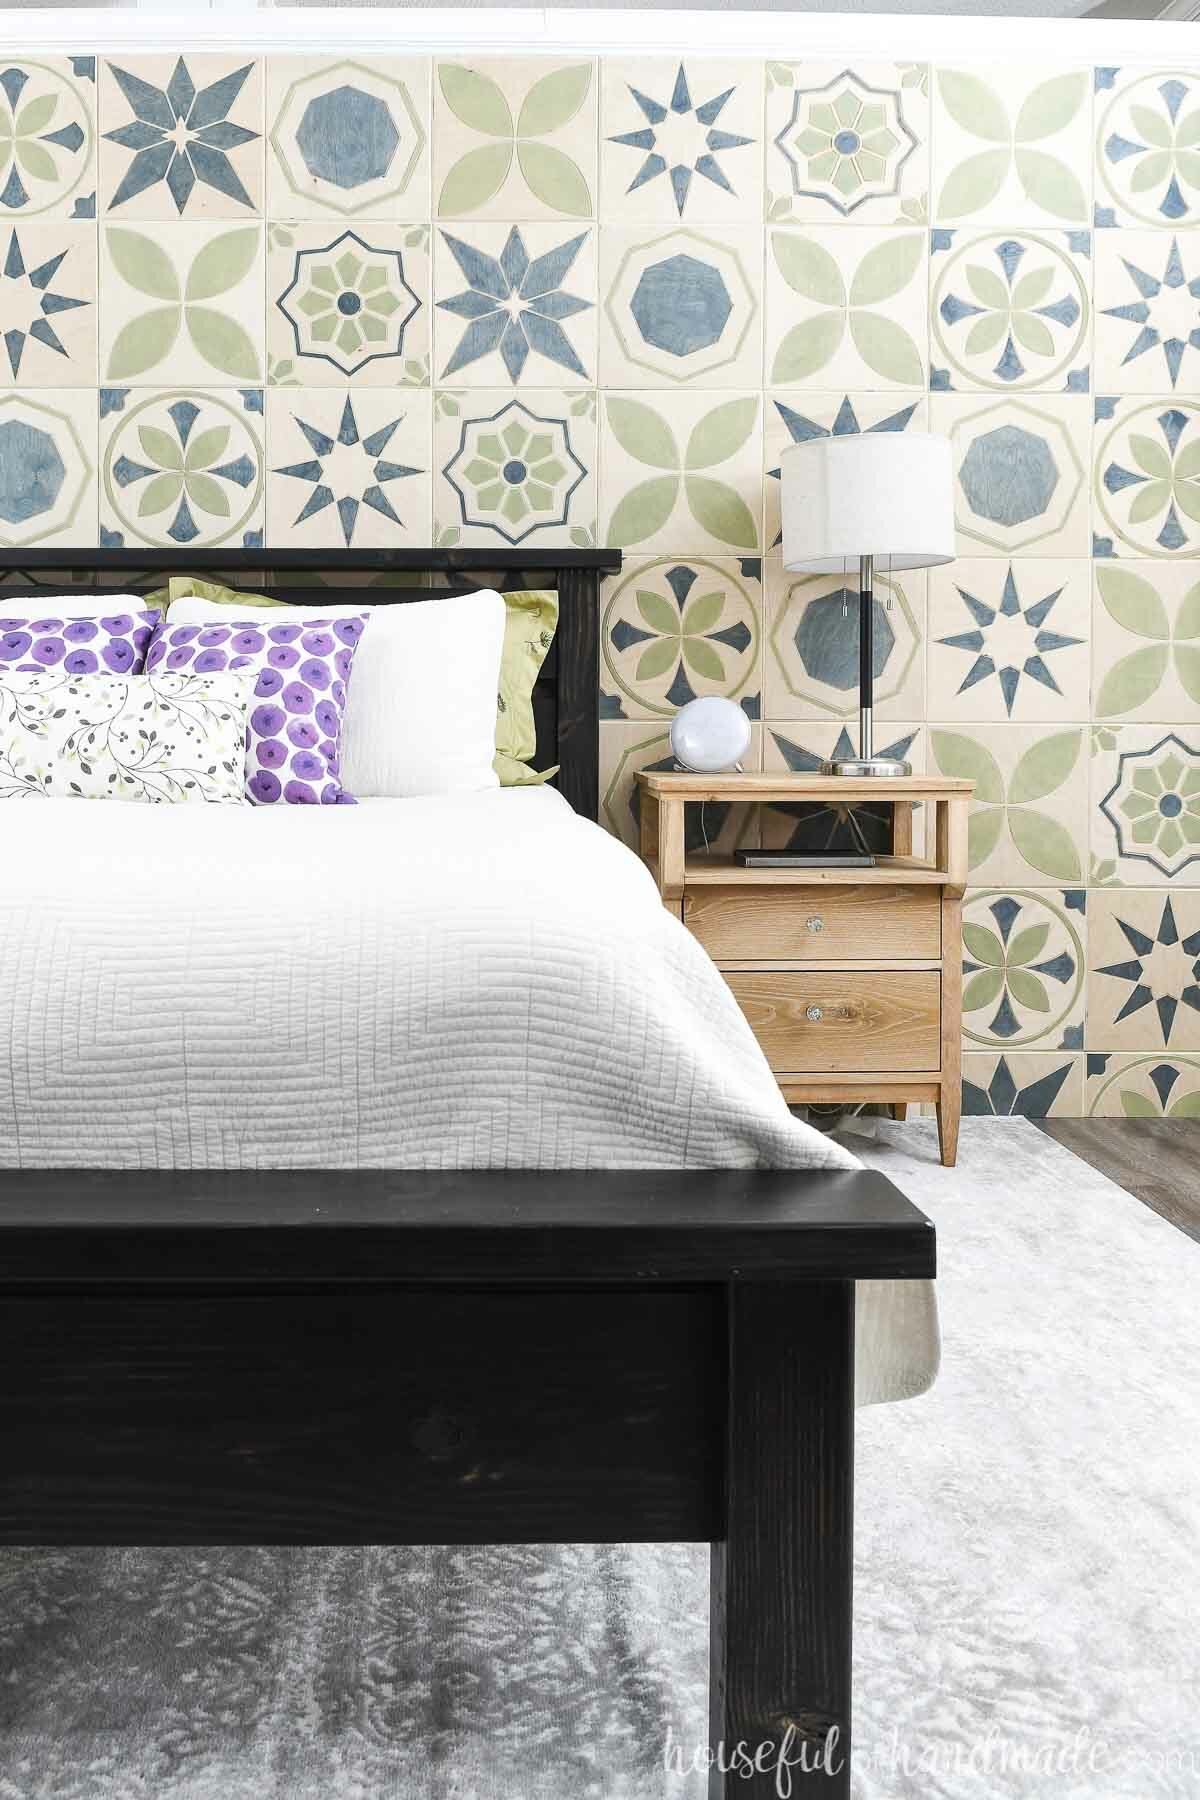
You can sit back and admire your amazing work. I absolutely love the how unique this accent wall is. It is beautiful and sophisticated. It will definitely be a fun conversation piece whenever people come to visit.
But most importantly, I love that I did it myself… with a little help from my X-Carve!
Happy building!

Thank you to Inventables for sponsoring this post. I only recommend products that I use and love and all opinions are 100% my own. Click here to read my full disclosure policy.