
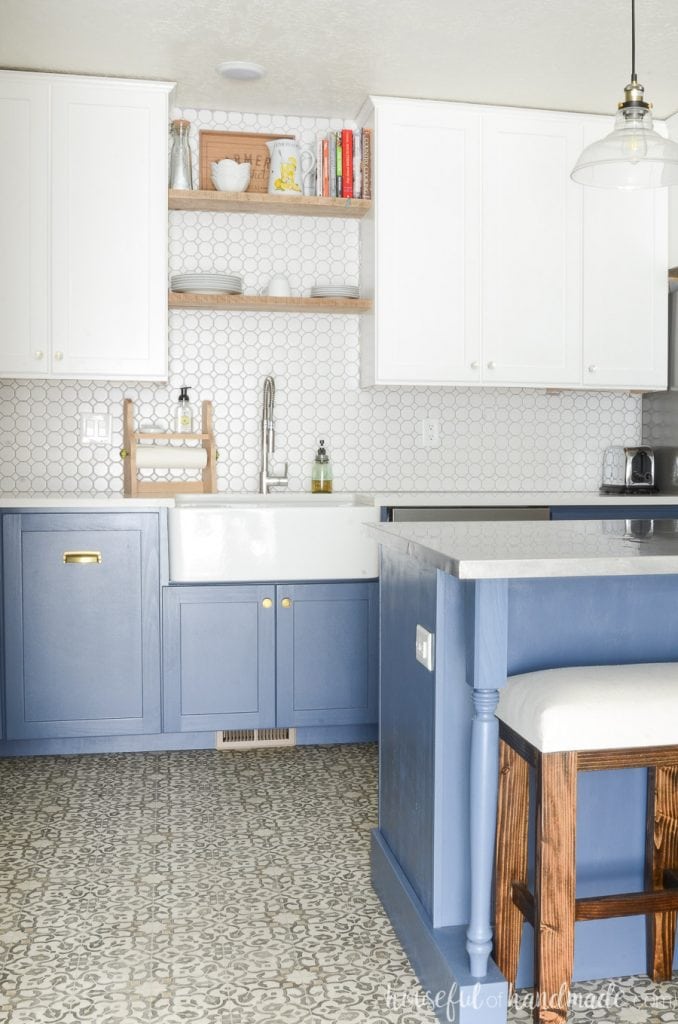
Learn how to build your own farmhouse sink base cabinet.
Even if you are not building a farmhouse, an apron front sink is an amazing option for any modern kitchen. You can see my top reason why and more in this post “What to know before buying a farmhouse sink”.
One of the questions I get the most about our kitchen remodel is how to build the cabinet for a farmhouse sink! Well, today I am answering all your questions.
What is a Farmhouse Sink
A farmhouse sink is technically called an apron front sink. They can be fireclay (like this one we have), porcelain, stainless steel, or other fun metals. But they all have an apron on the front that is visible.
This post may contain affiliate links. As an Amazon Associate I earn from qualifying purchases. Click here to read my full disclosure policy.
Traditional sinks sit inside the cabinet and usually have a false drawer front in the cabinet in front of them. Apron front sinks protrude from the cabinet, showing off the front apron.

Requirements of an Apron Front Sink Base Cabinet
This post is part of my How to Build Cabinets Series.
I go into lots of detail about building base cabinets in this post. Make sure to read them for lots more tips and for questions about your toe kick that you will need to answer before creating your own sink base cabinet plans.
This post is focusing on specifics for an apron front sink base cabinet.
Face Frame vs. Frameless Cabinets
For a farmhouse sink base cabinet, I wouldn’t recommend using a frameless (European style cabinet). The reason is because most apron front sink sides are not going to be perfectly straight on the sides. They might taper in slightly at the bottom.
With a face frame, you can cut the specific shape of your sink out of the face frame, leaving you with a nice fit around it. Since the sides of your frameless cabinet are straight, if your sink has a slight slope to it, you will have to find ways to address the gap it leaves.
Also, the face frame offers some structure to support the front of your sink. These sinks are heavy (especially if you get a fire clay one). And once filled with water need lots of support.
Build the Cabinet to the Sink
I would not recommend you build your cabinet before having your sink on hand.
As mentioned above, the sink is not going to be perfectly straight on the sides. And measurements given in online store descriptions are typically rounded. You will want more precise measurements so your sink fits perfectly.

Take the measurements of the sink. Jot these down to the 1/16”. If the measurement is in between ticks on the tape, go slightly large. An opening too small means your sink will not fit.
- Height: If your sink sits under the countertop, you will need the full measurement of the very top of the sink to the very bottom. If the sink sits on top of the countertop, take the measurement from right under the top lip to the very bottom.
- Width: Measure from one side of the sink to the other. Include the measurement at the very top of the sink and the very bottom. This will let you know if you sink sides are not perfectly straight.
- Depth: Measure the sink from the front to the back. This one is more for cabinet depth and supports and does not affect the shape of the cabinet.
The width of your cabinet will be based off the width of your farmhouse sink and the width of your cabinets face frames. Typical modern face frames are 1 1/2” thick (the width of a 1×2 board). But older kitchens could have much wider face frames.
Use the following formula to figure out the width of your sink base cabinet.
SW + (FW x 2) = CW
- SW = Sink Width
- I used the smallest width of my sink (the bottom measurement) as the total width of the sink because I knew I would be able to cut into face frame to fit the wider part of the sink and not have any gaps.
- FW = Face Frame Board Width
- CW = Cabinet Width
When planning your kitchen, plan on this size of cabinet for your sink base.
If you are wanting to add a farmhouse sink to an existing kitchen, substitute the CW with your current cabinet width and FW with current face frame width and that will tell you how big of an apron front sink you can buy.
FARMHOUSE SINK BASE CABINET PLANS
Now you are all ready to build your new sink base ready for the perfect apron front sink you found! I will be walking you through how to create plans for your own farmhouse sink cabinet.
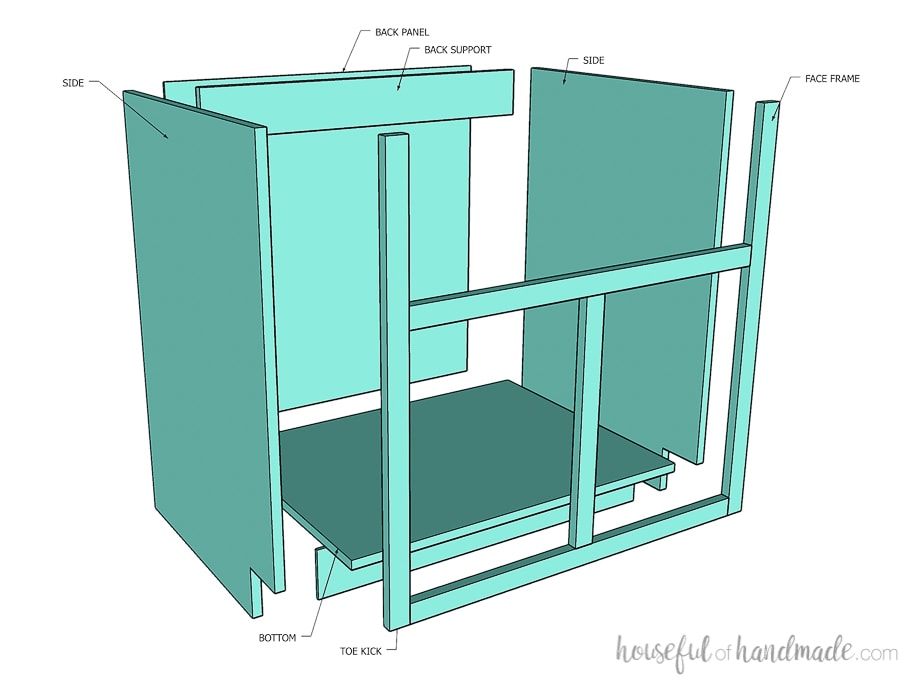
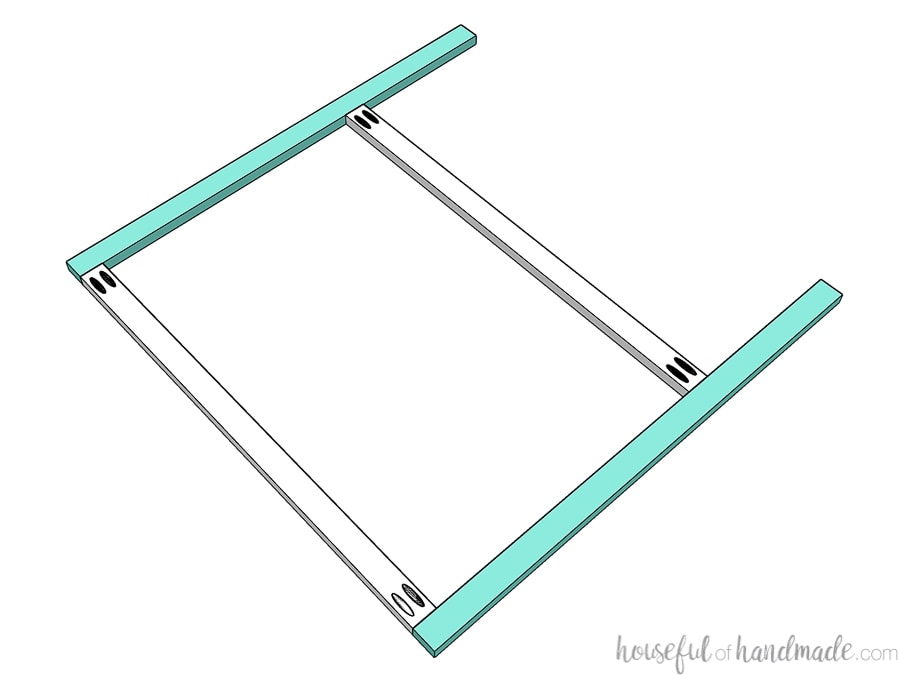
The sink base cabinet will have the following parts:
- 2 side pieces
- 1 bottom piece
- 1 support piece
- Optional: 1 back piece
- Toe kick
- Make sure to read all about toe kicks in the How to Build Base Cabinets post. Also, you will want your toe kick measurements to match the other base cabinets in your kitchen.
- Face frame
- 2 face frame stiles
- 2 face frame rails
- Optional: center stile
To build your sink cabinet you will want to use 3/4” plywood for most of the cabinet box. If you choose to add a back panel, it will be out of 1/4” plywood.
The reason the back piece is optional is because you can build your sink base without it and not have to cut out plumbing holes when installing. Just make sure your wall behind the cabinet is painted to help protect the drywall from any water that will inevitably splash on it.
The face frame will give the front of your cabinet a nice finished look. If you choose to build a frameless cabinet for your farmhouse sink, you will need to finish off the front of the cabinets.
Apron Front Sink Base Cabinet Cut List
Use the following chart to figure out the dimensions for all the pieces of your cabinet.
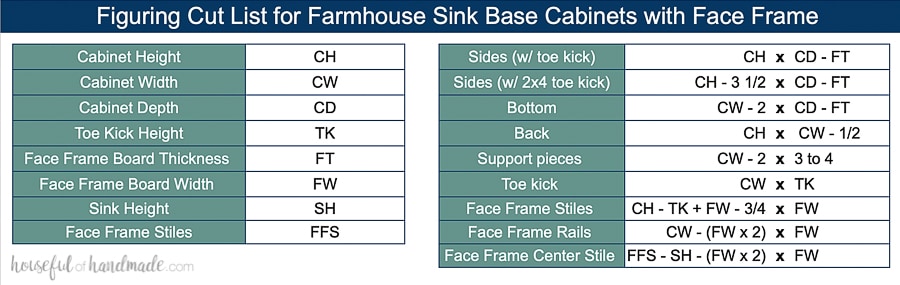
Important notes for face frame cabinets:
- The face frames hang over the sides of the cabinets 1/4″. This makes it easier to install, but if the side of your base cabinet is going be visible, you will need to add a side panel (use 1/4″ plywood and cut it the exact size of the base sides and tack it on) or adjust your measurements to make up for the 1/4″ extra on one side.
- If you are using a back panel, it is not set into the back with a groove, instead it is just nailed on. Because the cabinet is built in, you will only see the back panel if the side of a cabinet is visible. Fix this with the above mentioned side panel (cut it 1/4″ deeper to cover the back panel) or router in grooves and adjust the back panel size to fit in those grooves.
Once you figure out the dimensions for all you pieces, you will need to cut them out.
How to Build A Sink Base Cabinet Box
Once you have your pieces cut out, it’s time to assemble them.
Tools needed (I go into detail on how to build cabinets without expensive tools here)
- Circular saw with guide track or table saw
- Pocket hole jig
- Drill
- Impact Drive
- Jig saw
- Squares
- Measuring tape
- Clamps
- Corner clamps and face frame clamps are super helpful
Supplies needed
- Wood products:
- 3/4″ plywood
- 1/4″ plywood
- 1x boards for face frame
- 2×4 boards for sink support
- Optional: 2×4 boards for toe kick base
- Wood glue
- If using pre-finished plywood, use melamine glue to get strong joints
- 1 1/4″ pocket hole screws
CUT THE TOE KICK
If you are building base cabinets with a toe kick, use a circular saw or jig saw to cut it out of the front of both side boards.
If doing a 2×4 base for cabinets, you do not need to notch out the sides, instead they are cut 3 1/2″ shorter to allow for the cabinet to sit on top of it. Instead of making lots of little bases, I like to make 1 big base for all the cabinets that will be next to each other.
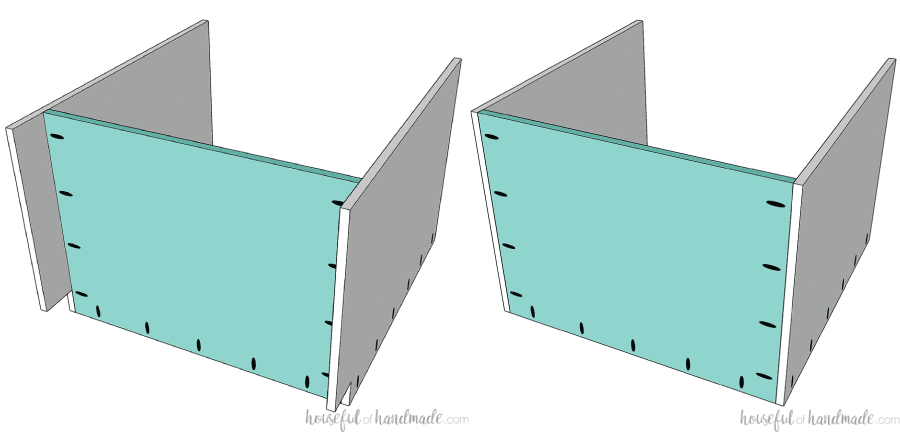
ASSEMBLE THE CABINET BOX
Make sure to read the Tips for a Perfect Cabinet Box section in this post for helpful tips.
Drill pocket holes set for 3/4″ material in the sides of bottom piece. You need to have pocket holes every 4-5 inches for strong cabinet boxes.
Also drill pocket holes in the front of the bottom piece and both side pieces to attach your face frame later.
Line the bottom piece up with the top of the toe kick (or bottom of the side board if doing a 2×4 base for the toe kick). Secure with wood glue and pocket hole screws. Use corner clamps or jigs to make sure the piece is joined at a 90 degree angle.
Repeat with the other side.
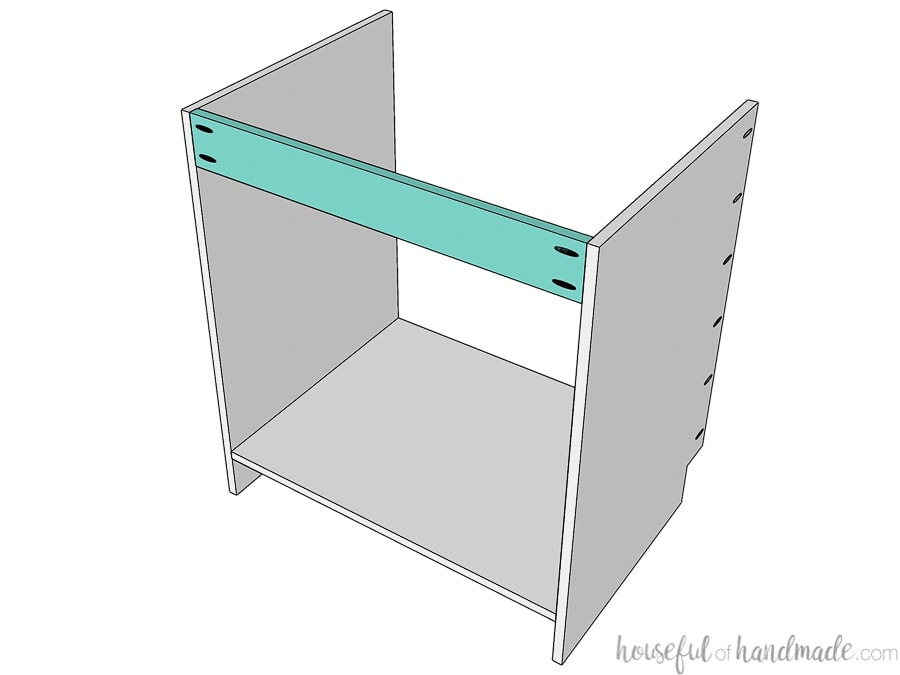
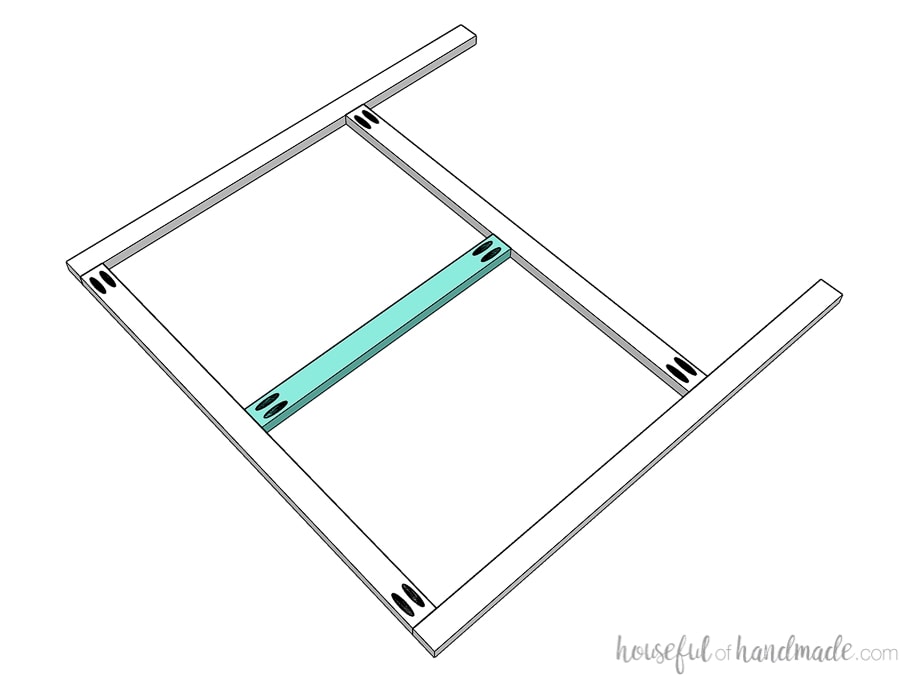
Attach the support piece along the back of the cabinet box at the top. This will help hold the box square and offer support. Use scraps of plywood to cut them. They can be 3-4 inches thick.
Secure it with pocket holes using 1 1/4″ pocket hole screws and glue.
If using, attach the back with wood glue and finishing nails.
If the sides of your cabinet are going to be visible, you may want to router a groove into the back to set the panel inside. Or you can make a side panel slightly bigger to cover the sides and back panel together.
Also, you can cut and attach the toe kick front now, or cut it large to cover an entire bank of cabinets.
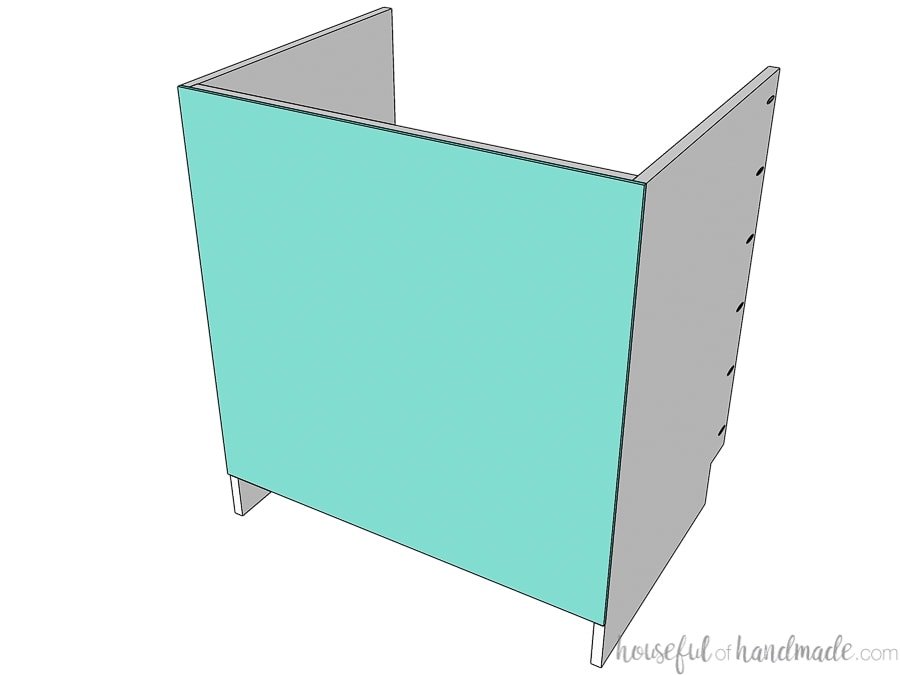
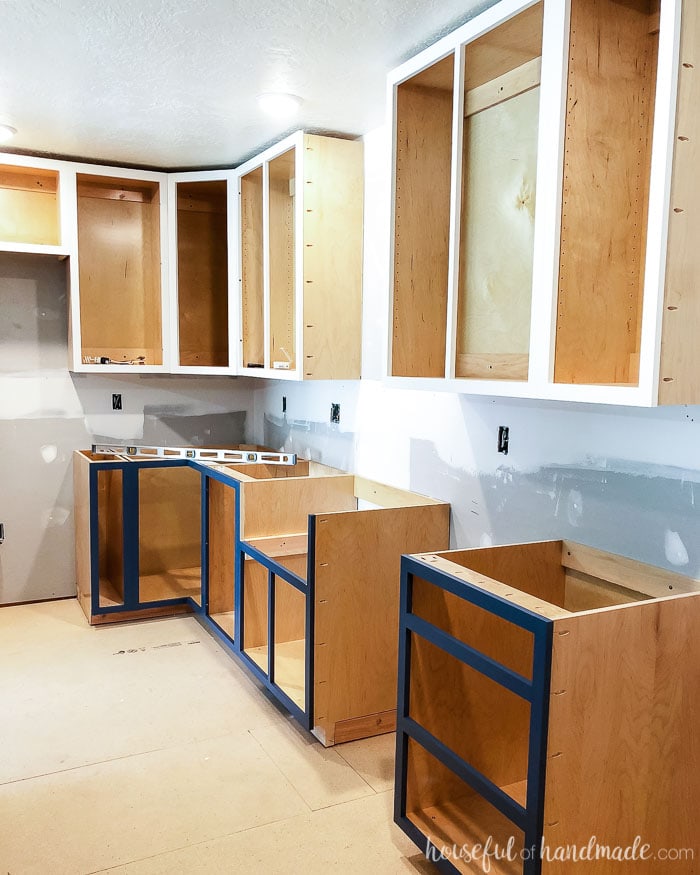
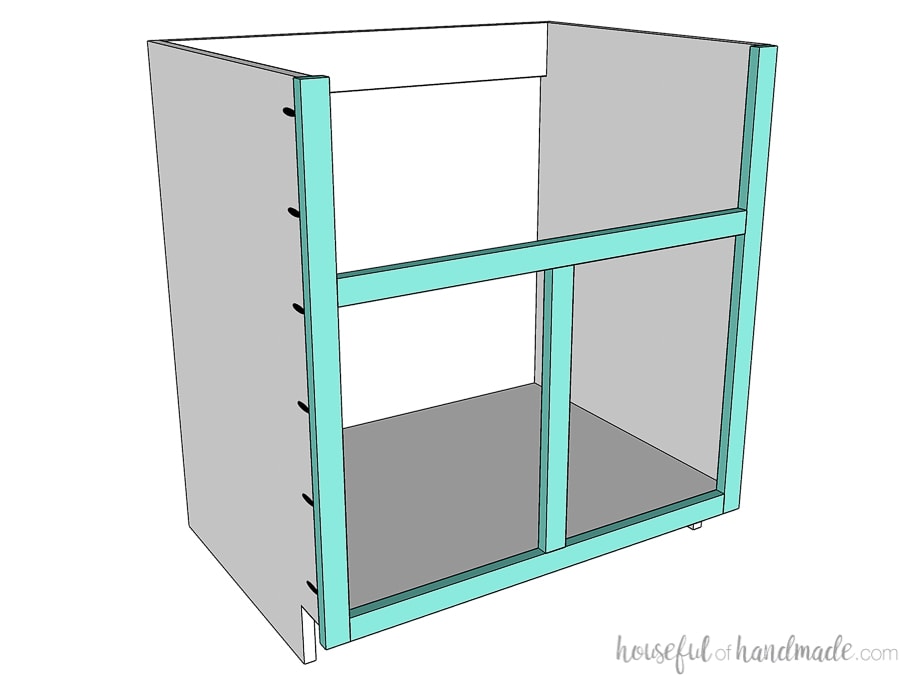
Now your base cabinet carcass is all done!
ASSEMBLE THE FACE FRAME
Cut the rails and stiles for your face frame. Drill holes set for 3/4″ material in each end of the rails.
Attach the rails between the stiles so the bottom one is flush with the bottom of the stile and the top one is set down from the top of the stiles the height of your sink. Use wood glue and 1 1/4″ pocket hole screws.
Use a face frame clamp to keep the frame front flush and tight while attaching them.
If you want to add a center stile to the lower cabinet, it will offer a bit more support for your large sink. Center stiles also make it a little easier to line up and install cabinet doors.
Attach the center stile with pocket holes with 1 1/4″ screws and glue.
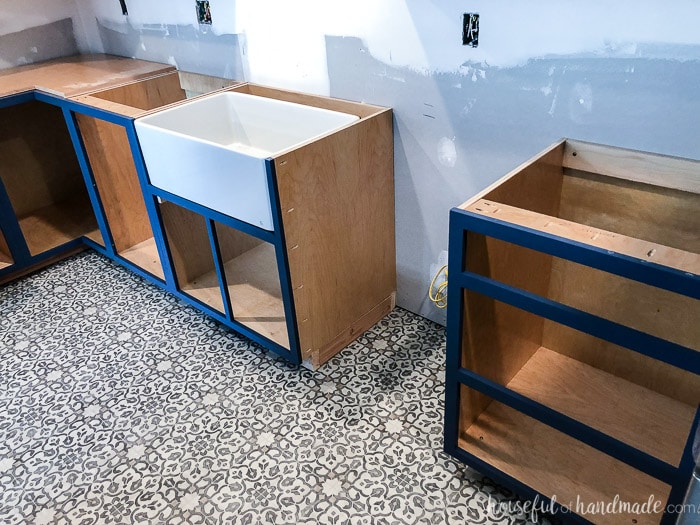
Before attaching the face frame to the cabinet box, you will want to cut out the shape of your sink into the frame if needed.
Measure the top width of the sink and mark that on the top of you face frame. Then draw lines from these marks to the rail (which should be the width of the bottom of your sink).
Cut along the line with your jig saw. Dry fit it to your sink and adjust as needed until the face frame sits comfortably around the sink.
Attach the Face Frame
The face frame will need to sit 1/4″ over each side of the cabinet. Also make sure the top is flush with the top of the cabinet box and the top of the bottom rail is flush with top of the bottom piece.
Add a bit of wood glue to the front of the plywood, then use the pocket holes you already drilled in the sides and base of the cabinet to secure the face frame.
Your cabinet is now built and ready to install.
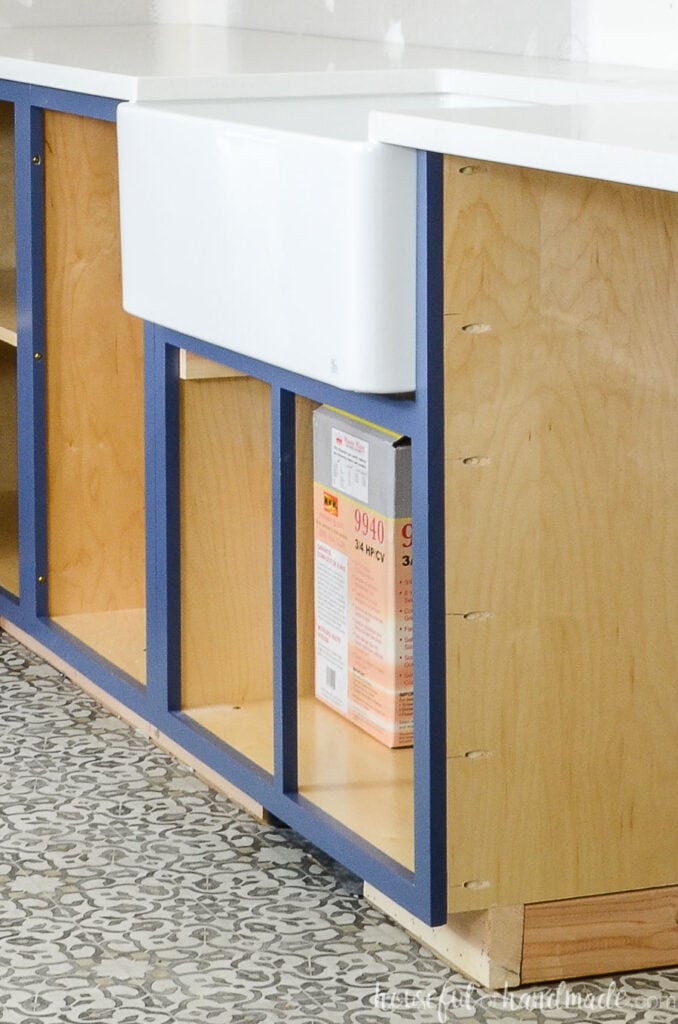
Installing the Farmhouse Sink Supports
After installing the cabinet, you will want to add the sink support pieces. You do this once installed so you can ensure the sink is perfectly level!
The top of your sink supports should be at the top of your face frame rail, but only if your cabinet is 100% level. Make sure to take extra care when installing your sink base to ensure it is level.
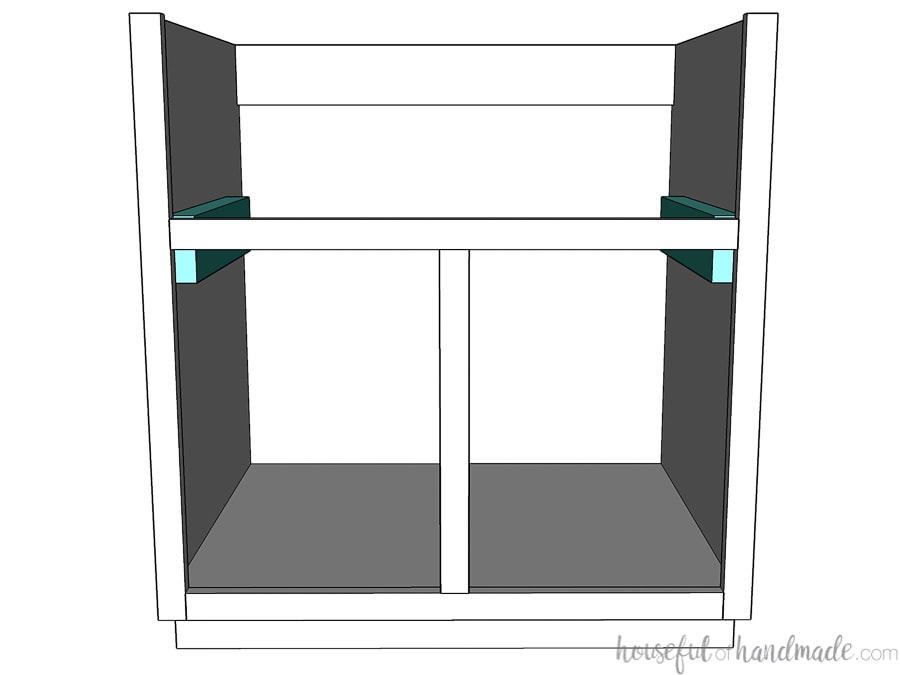
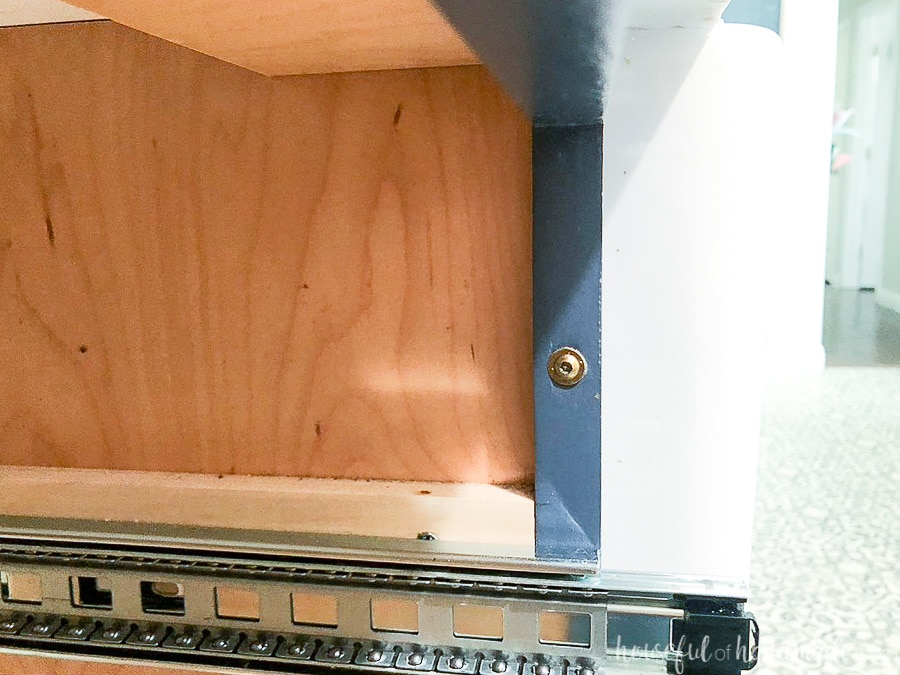
The front corner of the 2×4 is visible when the cabinets are open. But the overhang of the apron makes it so I never even notice it during daily use.
You could cut the corner of your 2×4 off at an angle to help hide it if you want. Or paint it to match the face frame. But you do want the 2×4 close to the front because there is a lot of weight from your heavy sink at that point.

Adding a Farmhouse Sink to an Existing Kitchen Cabinet
One easy way to add a farmhouse sink to your existing kitchen is to just replace the face frame for your sink cabinet.
You can use the formula’s above with the existing cabinet measurements to cut a new face frame to fit around your cabinet.
You will also need to remove your existing countertop and have it re-configured for your new sink. Or this is a great time to upgrade it!
Remove the Existing Face Frame
Then just remove the current face frame (without removing the cabinet). First check for screws from the cabinet or joining cabinets through the sides of the face frames. This is how cabinets are help tightly together when installed.
If your face frame was just nailed on, it should come off with a few hammer taps from the inside of the cabinet.
If it is screwed in (like in the tutorial above) you will have to break the face frame around the screws. Then use a saw to cut the tips of the screws off.
Build your new face frame to the existing cabinet measurements. Finish and paint/stain it.
Attach the New Face Frame
To attach a new face frame to an existing cabinet you have 2 options:
- Use wood glue and finish nails to attach the face frame to the cabinet box. Then fill the holes and touch up to match the paint/stain.
- Drill pocket holes on the inside of the cabinet and attach with pocket holes. The pocket holes will be visible on the inside of your cabinet but you will not have to touch up the face frame.
Whatever way you choose, attach it so the top is flush with top of the cabinet.
Now you can install the 2×4 sink supports as noted above. Then install your farmhouse sink before having your new countertop installed.
And make sure to check out the rest of the How to Build Cabinets series. There are lots of tips and tricks revealed to help you build professional cabinets at a fraction of the cost!
