Our DIY Playhouse: The Railing

by

Kati

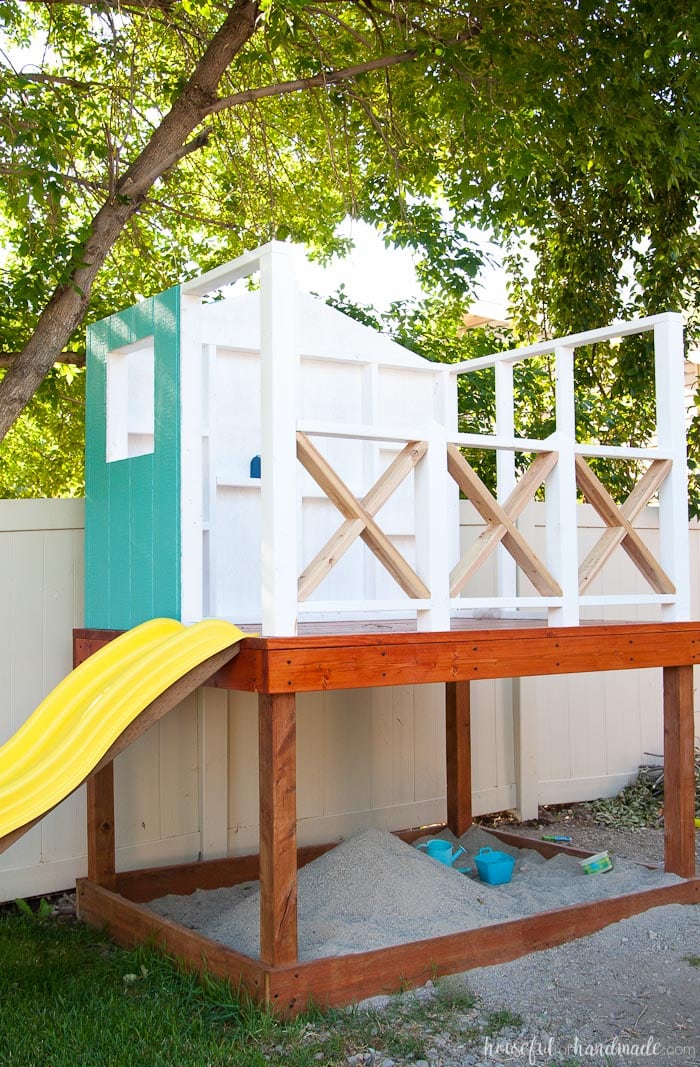
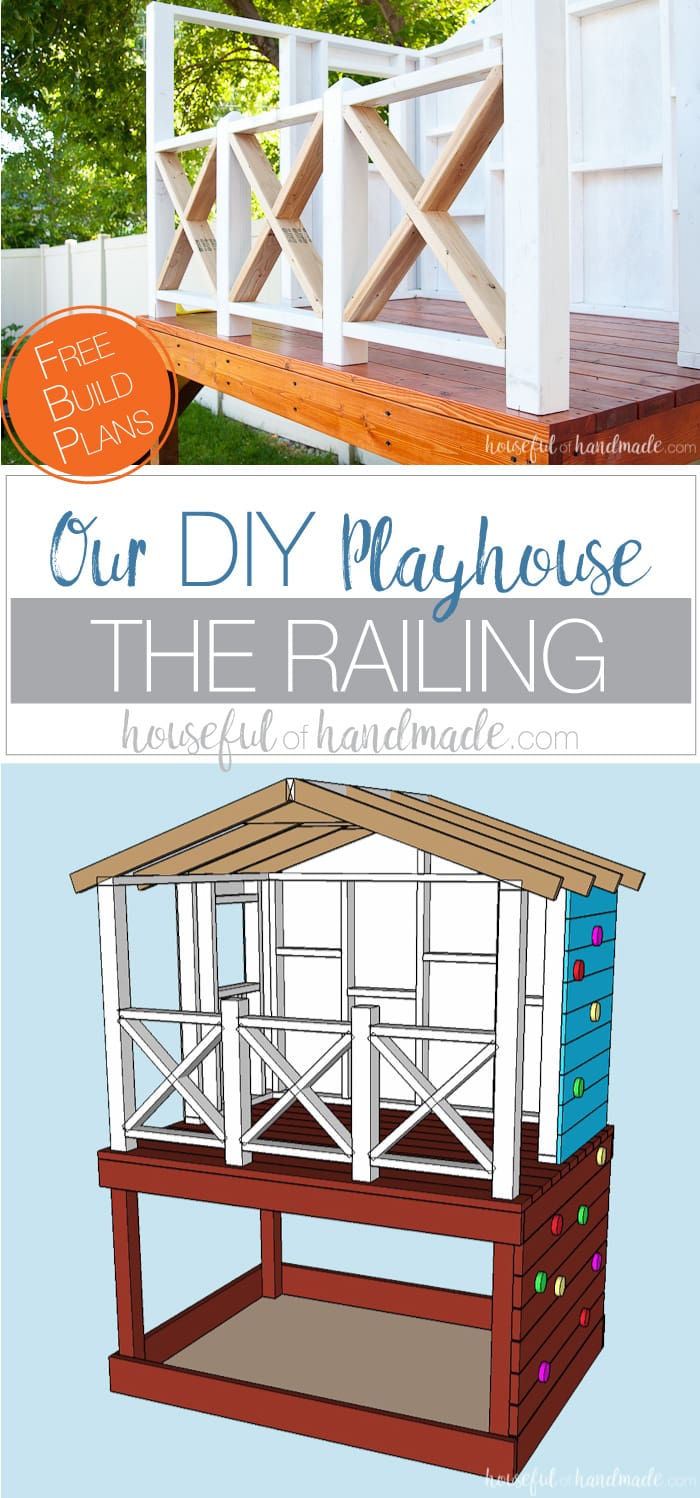
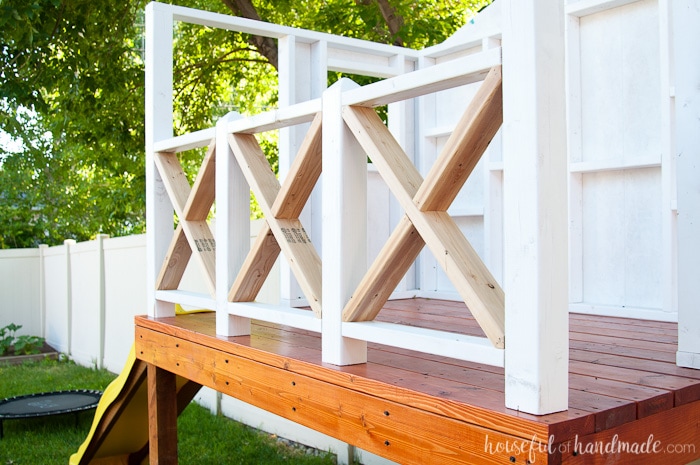
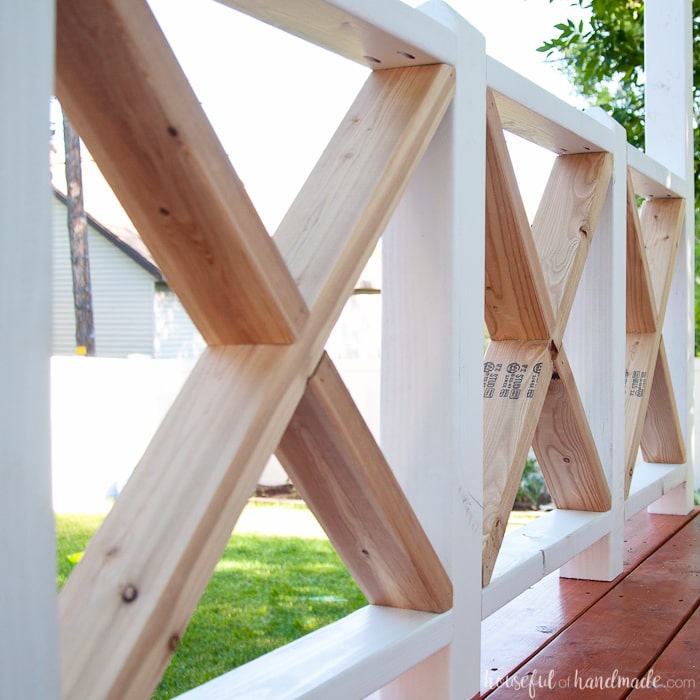
See how we added a cute X railing to our small DIY Playhouse.

With temperatures in the upper 90s this week, I have been slower working on the playhouse. Instead of working on Tuesday, we went to the pool with a friend. Instead of working over the weekend, we took a camping trip to cool off in the mountains.

But luckily we did get a bit of work done. This week we are sharing how we built the DIY playhouse railing, even thought I haven’t finished painting it.

Our DIY Playhouse is coming along! This week we tackled the playhouse railing. The beautiful X railing is perfect for the cute cottage playhouse. See how we are building the playhouse step-by-step including free build plans and time/cost breakdown. Housefulofhandmade.com | DIY Playhouse | Playhouse Build Plans | DIY Swing Set | How to Build a Playhouse | DIY Sandbox | How to Build an X Railing

Even with the extreme temperatures this week, the kids have been having so much fun playing in their new playhouse. It really makes all the sweat and tears worth it.

This post may contain affiliate links. As an Amazon Associate I earn from qualifying purchases. Click here to read my full disclosure policy.
Okay, there really haven’t been many tears. Surprisingly, I haven’t hurt myself on this project (I promise that is really impressive, just ask my husband). But now I have probably jinxed myself, hopefully I will still have all my fingers by this time next week.
Our DIY Playhouse is coming along! This week we tackled the playhouse railing. The beautiful X railing is perfect for the cute cottage playhouse. See how we are building the playhouse step-by-step including free build plans and time/cost breakdown. Housefulofhandmade.com | DIY Playhouse | Playhouse Build Plans | DIY Swing Set | How to Build a Playhouse | DIY Sandbox | How to Build an X Railing

So far we are about 25 hours of work into the playhouse build (minus the many, many trips to the Home Depot). This does include the new railing.

Over just the last week of having the walls up and while working on the playhouse railing, I have earned myself at least that many free hours from the kids because of it.

Yep, they are spending most of their time in the backyard which makes this momma happy!
Our DIY Playhouse is coming along! This week we tackled the playhouse railing. The beautiful X railing is perfect for the cute cottage playhouse. See how we are building the playhouse step-by-step including free build plans and time/cost breakdown. Housefulofhandmade.com | DIY Playhouse | Playhouse Build Plans | DIY Swing Set | How to Build a Playhouse | DIY Sandbox | How to Build an X Railing

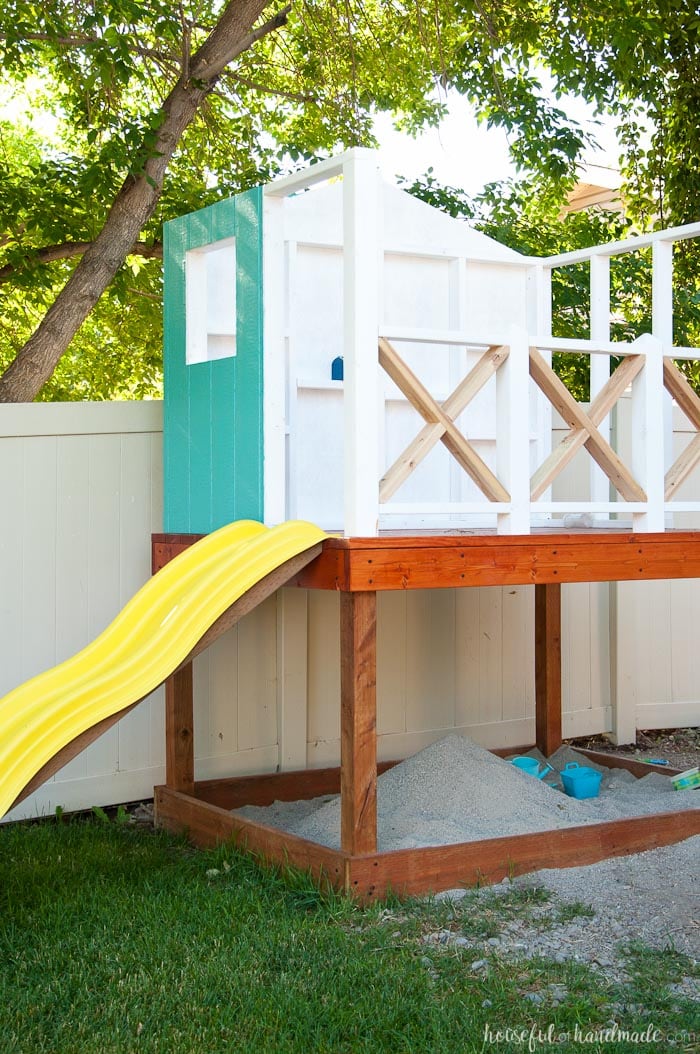
The playhouse has become a clubhouse, a fort, a jail, an obstacle course, and a tree house because the playhouse sits among the branches of the neighbors tree. 

Placing our DIY playhouse up in the branches of the trees turned out to be a great idea. It is keeping the playhouse cool in this crazy heat. And the shade it provides makes for hours and hours of play.
Our DIY Playhouse is coming along! This week we tackled the playhouse railing. The beautiful X railing is perfect for the cute cottage playhouse. See how we are building the playhouse step-by-step including free build plans and time/cost breakdown. Housefulofhandmade.com | DIY Playhouse | Playhouse Build Plans | DIY Swing Set | How to Build a Playhouse | DIY Sandbox | How to Build an X Railing

This week I am hoping for some lower temperatures (why is it already in the 100s???) so that I can get the climbing wall cut, painted and attached. Then the kids will have even more reason to stay outside and give me some peace.

Maybe my house will even stay clean for longer than 20 minutes (okay, that is probably too much to ask).

You can see how we built our deck railings below. And don’t miss the rest of the posts in the series. Click the links below for the rest of the playhouse build tutorials.

THE DECK || THE WALLS || THE SLIDE & CLIMBING WALL || THE ROOF
Our DIY Playhouse is coming along! This week we tackled the playhouse railing. The beautiful X railing is perfect for the cute cottage playhouse. See how we are building the playhouse step-by-step including free build plans and time/cost breakdown. Housefulofhandmade.com | DIY Playhouse | Playhouse Build Plans | DIY Swing Set | How to Build a Playhouse | DIY Sandbox | How to Build an X Railing

Printable PDF Plans

Prefer to print the instructions?

Grab the complete build plans (from all 5 posts) in one easy to follow printable PDF here. The plans include:

  • List of recommended tools
  • Detailed supply lists
  • Easy to read cut list table
  • Step-by-step instructions with diagrams & pictures
  • BONUS: 3D SketchUp file

Material and cut lists include the totals for the entire build, as well as a break down for each step. Makes it easy to buy all at once or purchase as you go. 

Click the link below for everything you need to build your own playhouse and so you can get the kids outside playing for hours on end!

Button to buy playhouse PDF build plans.

How to Build a DIY Playhouse Railing

Tools:

Supplies:

The front opening of the DIY playhouse should be 73″ wide (same as the back wall dimension). Double check the measurement and adjust if necessary.

I built & installed the playhouse railing by myself and it took me about 6 hours total. It would have been much easier to install with a second pair of hands, but was doable without (with a few moments of frustration and maybe a bad word or two).
Our DIY Playhouse is coming along! This week we tackled the playhouse railing. The beautiful X railing is perfect for the cute cottage playhouse. See how we are building the playhouse step-by-step including free build plans and time/cost breakdown. Housefulofhandmade.com | DIY Playhouse | Playhouse Build Plans | DIY Swing Set | How to Build a Playhouse | DIY Sandbox | How to Build an X Railing

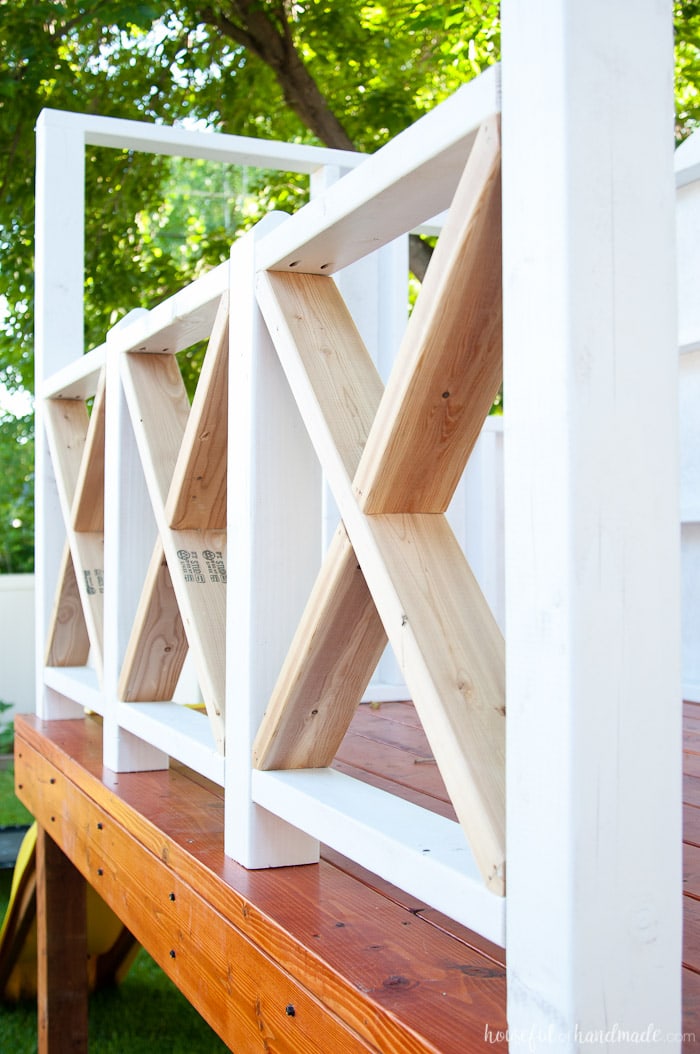
Cut 2 pieces of 4×4 to 30″ long. I trimmed the top of the posts by cutting 1 1/2″ off the top at a 45 degree angle on all sides.
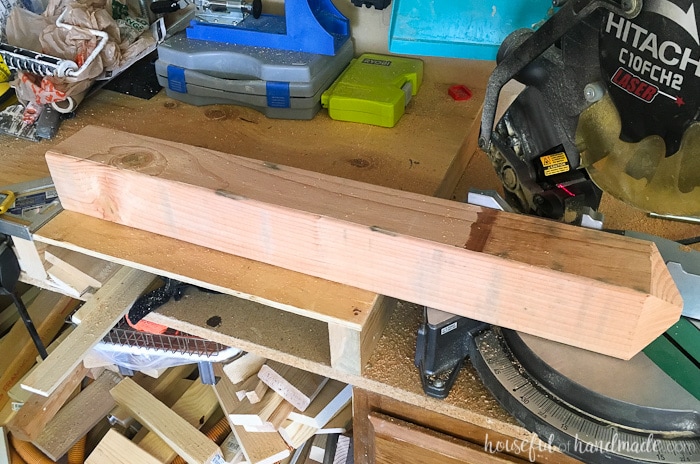
Our DIY Playhouse is coming along! This week we tackled the railing. The beautiful X railing is perfect for the cute cottage playhouse. See how we are building the playhouse step-by-step including free build plans and time/cost breakdown. Housefulofhandmade.com | DIY Playhouse | Playhouse Build Plans | DIY Swing Set | How to Build a Playhouse | DIY Sandbox

Cut 6 pieces of 2×4 to 22″ long. Set the Kreg jig for 1 1/2″ lumber. Drill 2 pocket holes in each end of the 22″ boards.
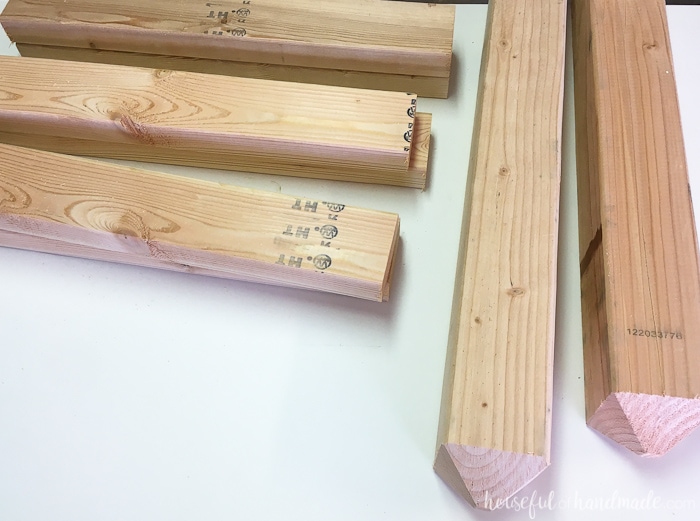
Our DIY Playhouse is coming along! This week we tackled the railing. The beautiful X railing is perfect for the cute cottage playhouse. See how we are building the playhouse step-by-step including free build plans and time/cost breakdown. Housefulofhandmade.com | DIY Playhouse | Playhouse Build Plans | DIY Swing Set | How to Build a Playhouse | DIY Sandbox

I chose to sand and paint all the pieces at this point. I figured it would be better than trying to paint around the deck once installed. I used my FinishMax paint sprayer to make painting the playhouse railing in the summer heat fast and easy.
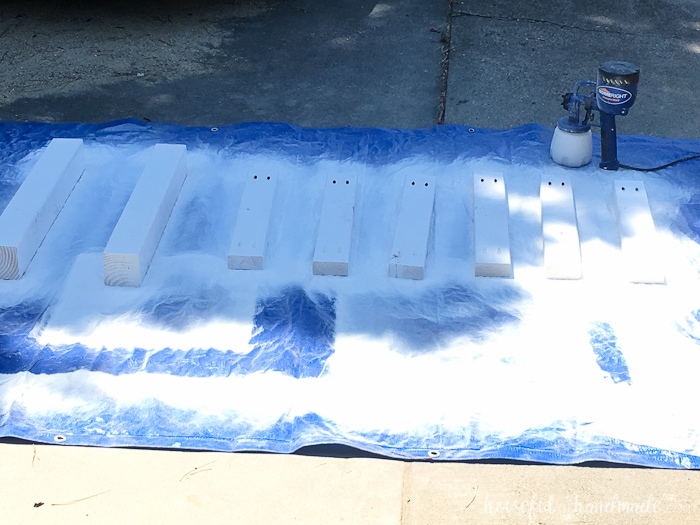
Our DIY Playhouse is coming along! This week we tackled the railing. The beautiful X railing is perfect for the cute cottage playhouse. See how we are building the playhouse step-by-step including free build plans and time/cost breakdown. Housefulofhandmade.com | DIY Playhouse | Playhouse Build Plans | DIY Swing Set | How to Build a Playhouse | DIY Sandbox

Once dry it was time to assemble. This was the part that I wish I had a second pair of hands for.

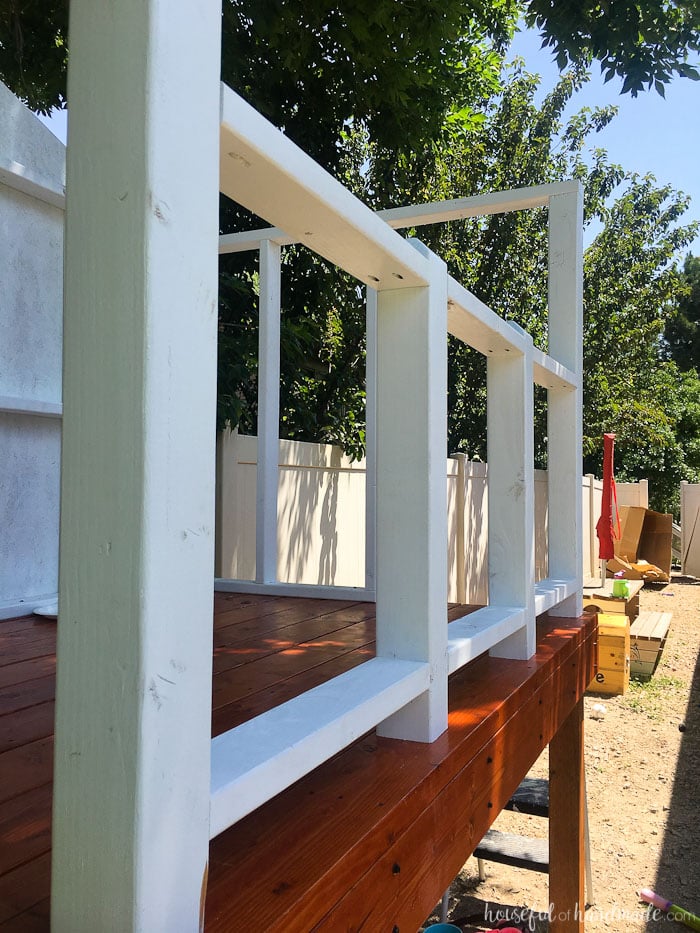
I chose to secure the 2×4 pieces to the post, then the post to the deck, then the 2×4 pieces to the wall. I don’t know if this was the easiest way or not, but it worked.
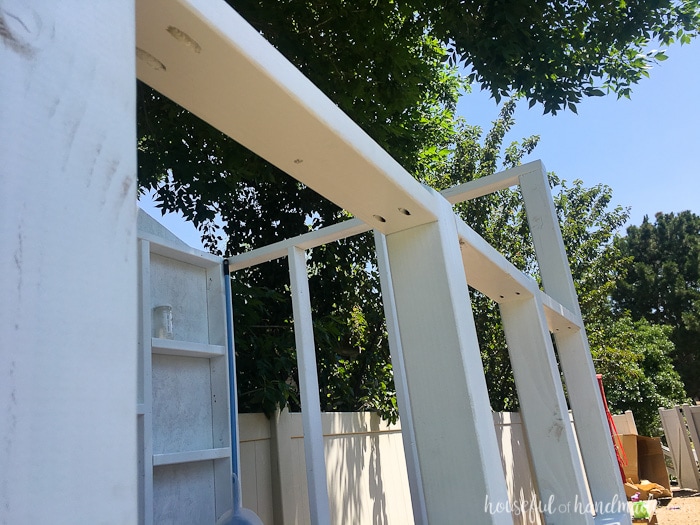
Our DIY Playhouse is coming along! This week we tackled the railing. The beautiful X railing is perfect for the cute cottage playhouse. See how we are building the playhouse step-by-step including free build plans and time/cost breakdown. Housefulofhandmade.com | DIY Playhouse | Playhouse Build Plans | DIY Swing Set | How to Build a Playhouse | DIY Sandbox

Attache the 2×4 pieces to the posts and wall so the bottom 2×4 is 3″ off the ground and the top 2×4 is 26 1/2″ off the ground.
Our DIY Playhouse is coming along! This week we tackled the railing. The beautiful X railing is perfect for the cute cottage playhouse. See how we are building the playhouse step-by-step including free build plans and time/cost breakdown. Housefulofhandmade.com | DIY Playhouse | Playhouse Build Plans | DIY Swing Set | How to Build a Playhouse | DIY Sandbox

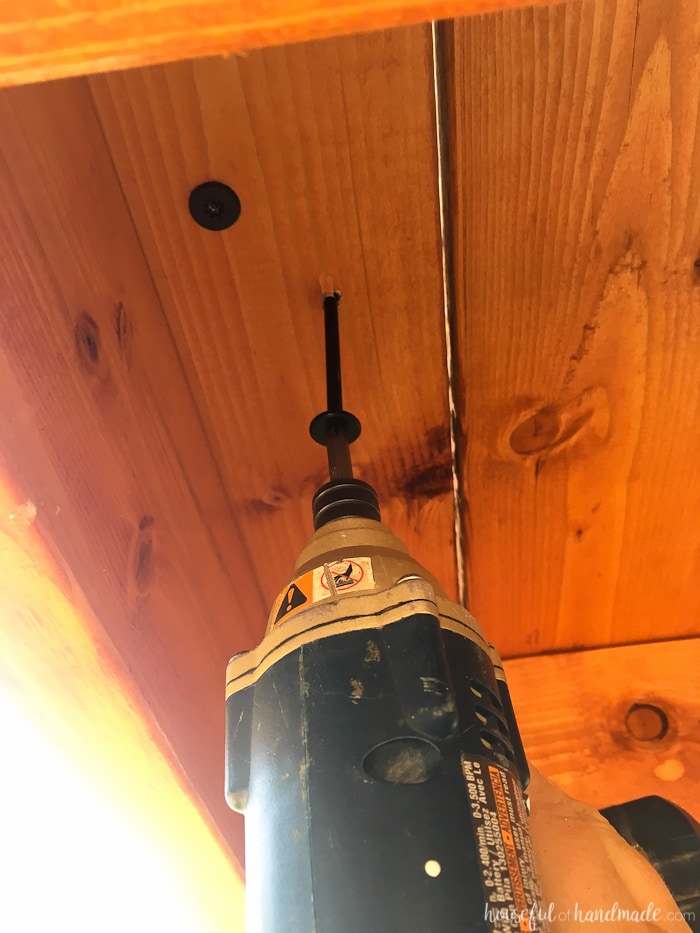
Attach the 4×4 posts to the deck so they are level with the front of the wall. Secure them with 2 4″ screws through the bottom of the deck into each post.
Our DIY Playhouse is coming along! This week we tackled the railing. The beautiful X railing is perfect for the cute cottage playhouse. See how we are building the playhouse step-by-step including free build plans and time/cost breakdown. Housefulofhandmade.com | DIY Playhouse | Playhouse Build Plans | DIY Swing Set | How to Build a Playhouse | DIY Sandbox

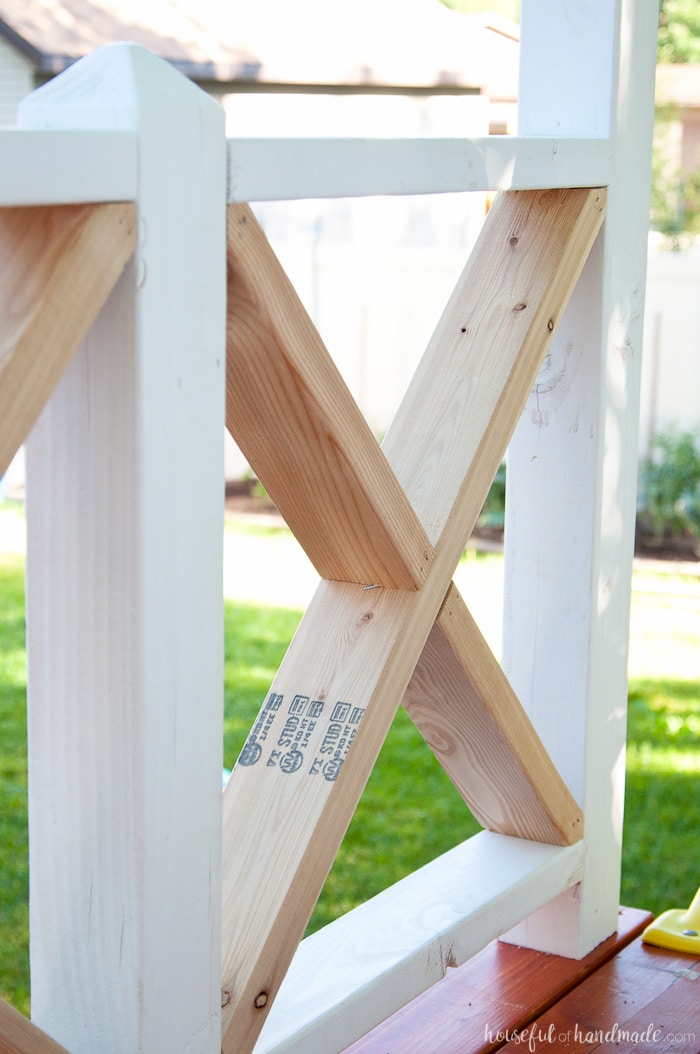
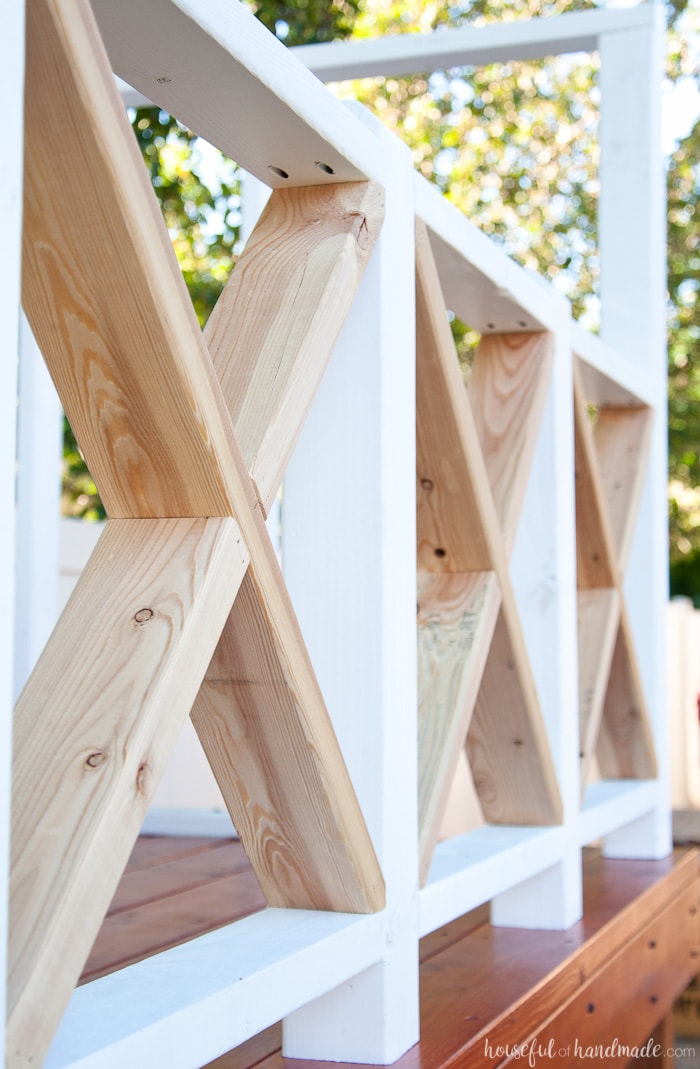
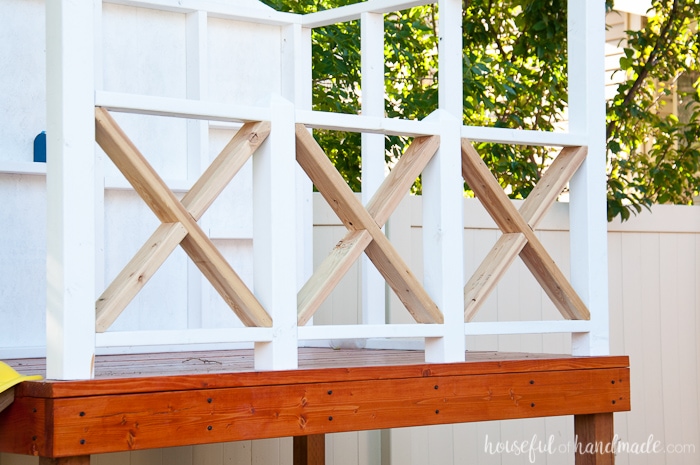
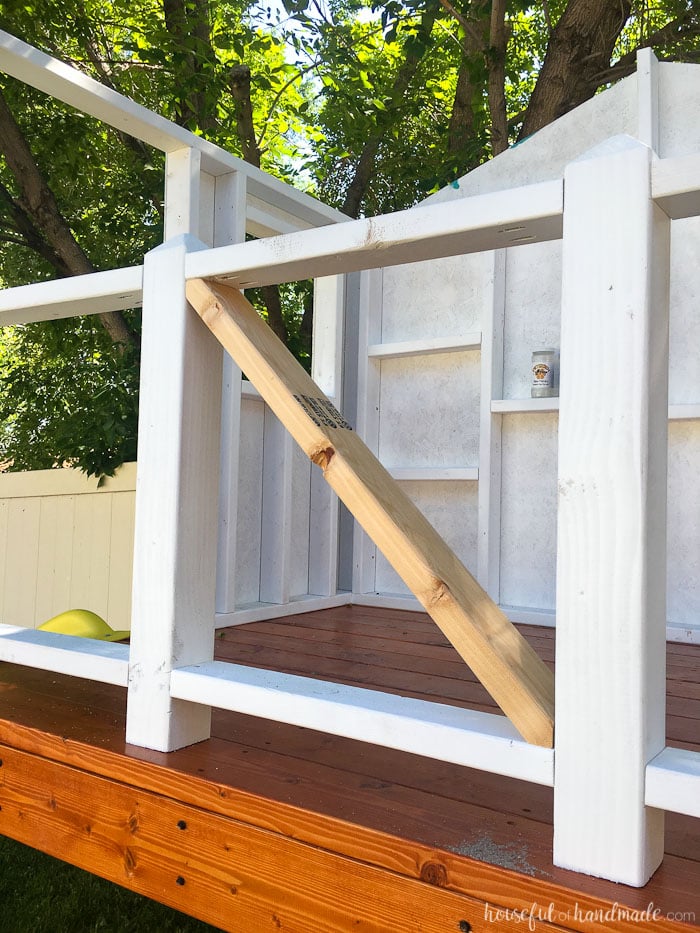
Once the frame is secure, it is time to add the X in the middle. I measured the inside dimension from corner to corner. It was 31″.

Cut 3 2×4 31″ long and cut at a peak at each end by taking 3/4″ off each side at a 45 degree angle.

Secure the first angled board in each railing opening with finishing nails. I used 2 nails in each corner in each side.
Our DIY Playhouse is coming along! This week we tackled the railing. The beautiful X railing is perfect for the cute cottage playhouse. See how we are building the playhouse step-by-step including free build plans and time/cost breakdown. Housefulofhandmade.com | DIY Playhouse | Playhouse Build Plans | DIY Swing Set | How to Build a Playhouse | DIY Sandbox

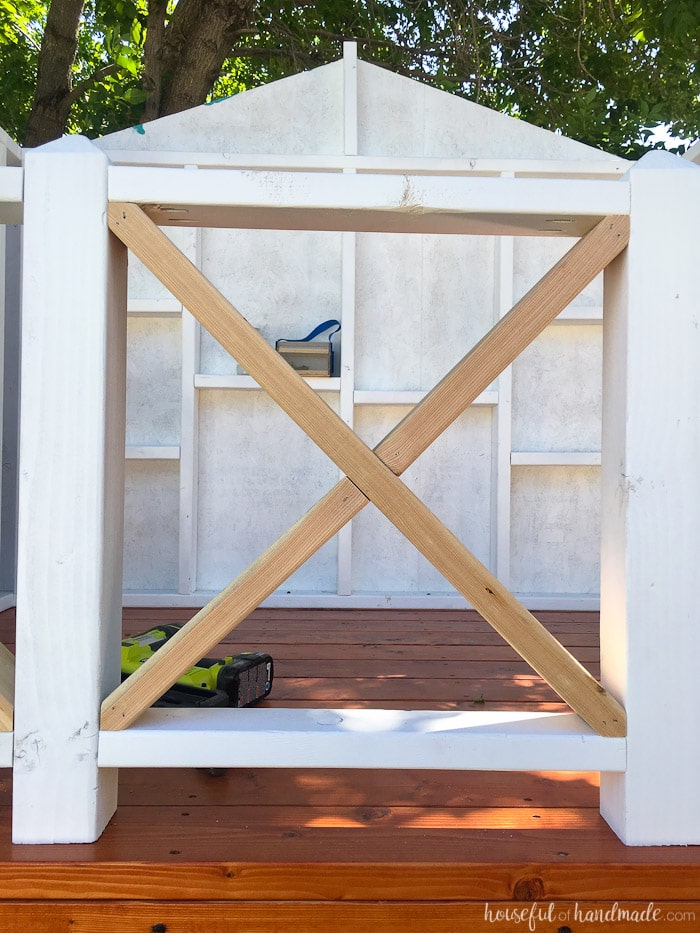
Mark the center of the first angled board. Measure from the corner to the center. Mine were about 14 3/4″ long. Cut one end of the boards with the same peak as the longer angled boards. Secure these into place with the finishing nails too.
Our DIY Playhouse is coming along! This week we tackled the railing. The beautiful X railing is perfect for the cute cottage playhouse. See how we are building the playhouse step-by-step including free build plans and time/cost breakdown. Housefulofhandmade.com | DIY Playhouse | Playhouse Build Plans | DIY Swing Set | How to Build a Playhouse | DIY Sandbox

Now the rest of the railing is ready for paint. I chose to not paint these angled boards before installing because they required a bit more tweaking to get the pieces to fit properly.

And since the X pieces are not touching the deck, it is easier to paint them installed, I just need to do it now that we are back from our camping trip.

And now for the $$$. Here is what we have spent so far:

  • The deck = $196.96
  • The walls = $189.71
  • Slide = $99.99
  • Rock climbing handles = $20.00
Our DIY Playhouse is coming along! This week we tackled the playhouse railing. The beautiful X railing is perfect for the cute cottage playhouse. See how we are building the playhouse step-by-step including free build plans and time/cost breakdown. Housefulofhandmade.com | DIY Playhouse | Playhouse Build Plans | DIY Swing Set | How to Build a Playhouse | DIY Sandbox | How to Build an X Railing

For the railings:

  • (4) 2×4 8′ boards = $12.64
  • 4×4 boards (left over from the wall build)
  • (24) 2 1/2″ pocket hole screws (had on hand but a box of 50 is around $5)
  • (4) 4″ TimberLOK wood screws = $5.12
  • 2″ 16 gauge nails (had on hand but a box of 1000 nails is around $12)
  • Exterior paint (left over from the wall build

Total for Railing: $17.76

Total so far: $524.42
Our DIY Playhouse is coming along! This week we tackled the playhouse railing. The beautiful X railing is perfect for the cute cottage playhouse. See how we are building the playhouse step-by-step including free build plans and time/cost breakdown. Housefulofhandmade.com | DIY Playhouse | Playhouse Build Plans | DIY Swing Set | How to Build a Playhouse | DIY Sandbox | How to Build an X Railing

So now I have to finish washing all our smokey clothes & bedding, then it’s back to work to get this project finished!

-Kati with picture of blog author Kati
Our DIY Playhouse is coming along! This week we tackled the playhouse railing. The beautiful X railing is perfect for the cute cottage playhouse. See how we are building the playhouse step-by-step including free build plans and time/cost breakdown. Housefulofhandmade.com | DIY Playhouse | Playhouse Build Plans | DIY Swing Set | How to Build a Playhouse | DIY Sandbox | How to Build an X Railing

Would you like to save this tutorial?

I'll email this post to you, so you can come back to it later!

10 thoughts on “Our DIY Playhouse: The Railing”

  1. Hi!

    This is beautiful! I wanted to see if you could tell me how many overall hours it took to build the entire playhouse? Trying to decide if this is something I could task my husband with by Christmas. 🙂

    Also, looks like the total was around $530, is that correct?

    Thank you!

    • I am glad you are interested in building it. I am not sure how many hours to build this, but it took several weeks. I worked on it during the week and my husband helped on his days off. We spent around 800 in 2019 for materials.

  2. Beautiful design. How would you calculate the angle cut if my design is wider and therefore 45degrees won’t work?…

    • You should be able to measure your angle. Place a string from corner to corner of the section and then use a carpenters square in the corner and the angle will be where the string points. The square I have has marks with all the angles on the long side.

  3. I’m having to place the slide on the front of the playhouse. Suggestions for the railing if the slide needs to be there too?

    • You will need to adjust the railing. I would suggest putting the slide to one side and just shrinking the railing down, but still having three sections. If you don’t want to try to recalculate the Xs you can do a simpler railing with straight boards in between.

      • Thanks for the reply! Does the railing provide any structural support or is it just for safety?

        • The railing is not structurally supporting the top of the playhouse, but you do want to make sure it is strong enough to withstand kids that will inevitably climb/lean/play on it.

    • Yes the roof is done, I just forgot to update the links. Thanks for the reminder! The links should be working for you now. Happy building!

Comments are closed.