See how we were able to turn our crowded closet into an open dressing area with lots of storage and style.
The $100 walk in closet makeover is done!
Can you believe we totally transformed the space in just 3 weeks with only $100? I can’t either.
This post may contain affiliate links. As an Amazon Associate I earn from qualifying purchases. Click here to read my full disclosure policy.
But I am so happy we did because I love our new walk in closet.
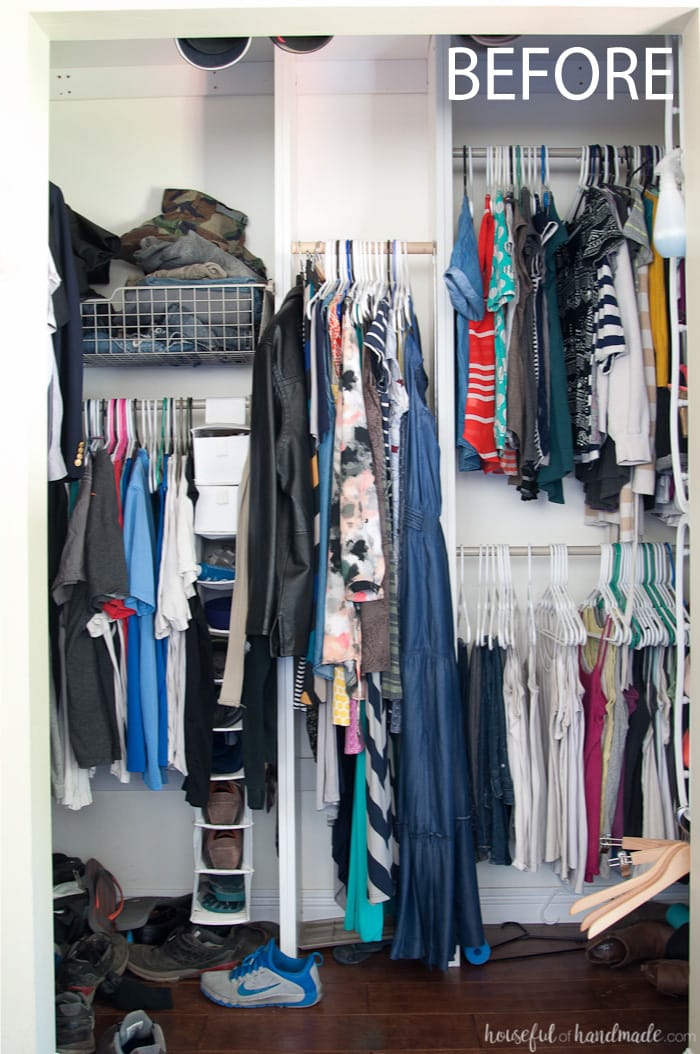
Before, I wouldn’t have even considered it a walk in closet, it was just a deep and cluttered closet.
Now it’s an open and very organized walk in closet with room for us to actually change in it.
This is exactly what I had hoped for the perfect master bedroom closet.
Seriously, do you remember how awful this space looked before?
The closet system was along the back wall. We figured it would give us more room in the closet, you always want to maximize storage.
However, we pretty much ignored the space that was in the far corners. It was where our out-of-fashion clothes went to die.
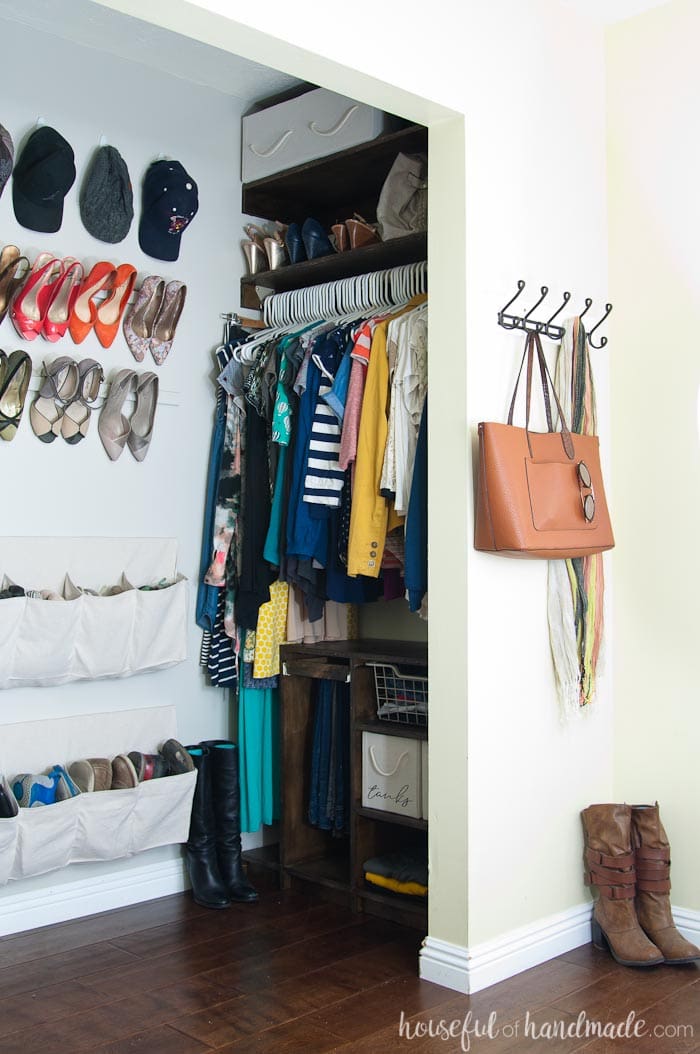
Now we have absolutely no hidden corners. Everything is in full view at all times!
While we gave up actual hang bar space, I feel like we gained so much more usable storage space instead.
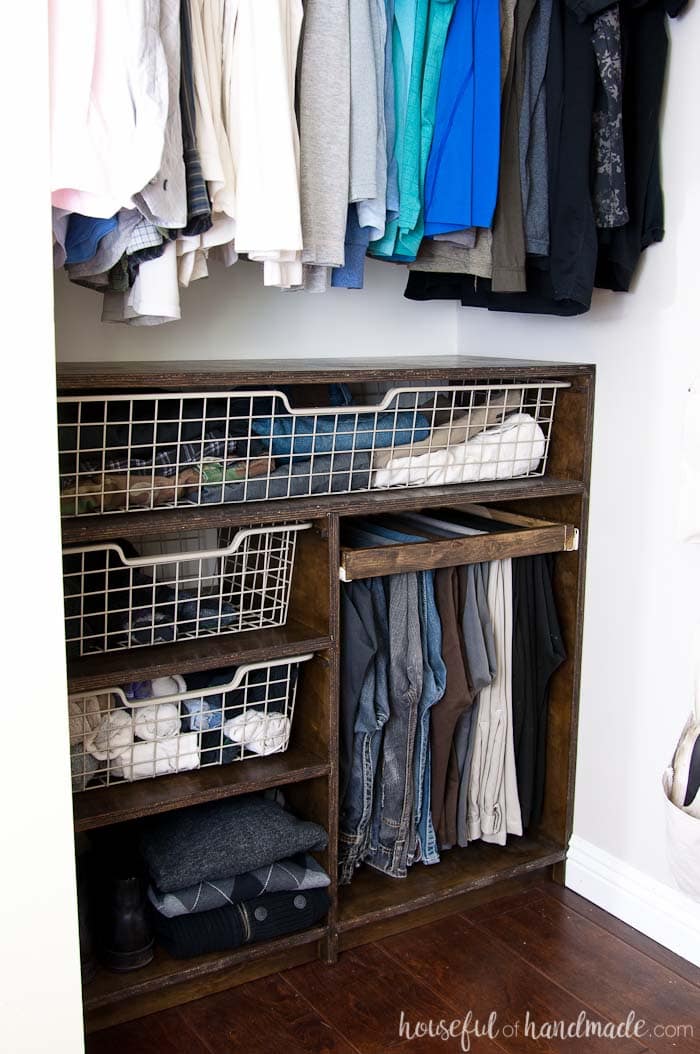
The closet is split into a his side and her side. I created two different plywood storage organizers to fit the needs of each of us.
The plywood closet organizers (and upper shelves) were built out of 2 sheets of $35 plywood (and a couple dollars in other wood).
That is it! All that beautiful storage for less than $80.
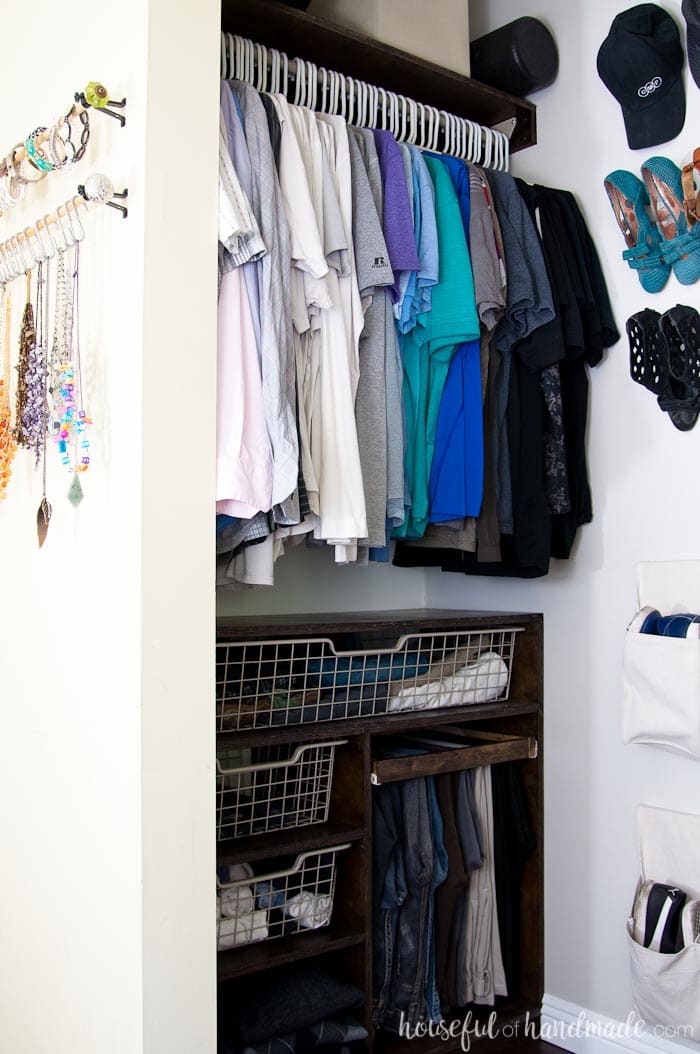
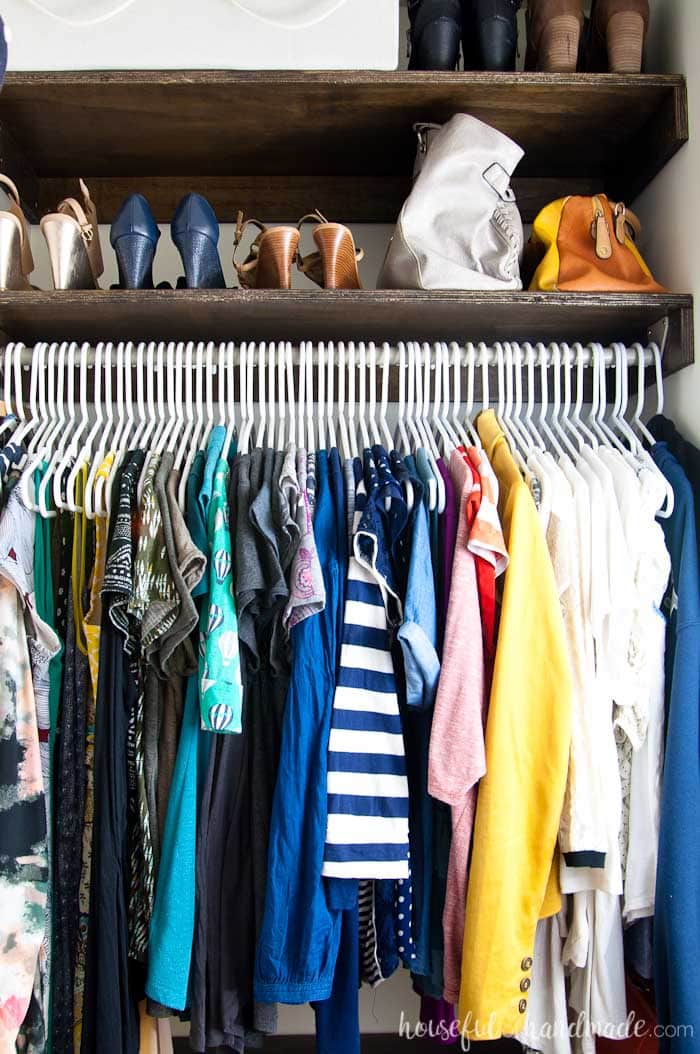
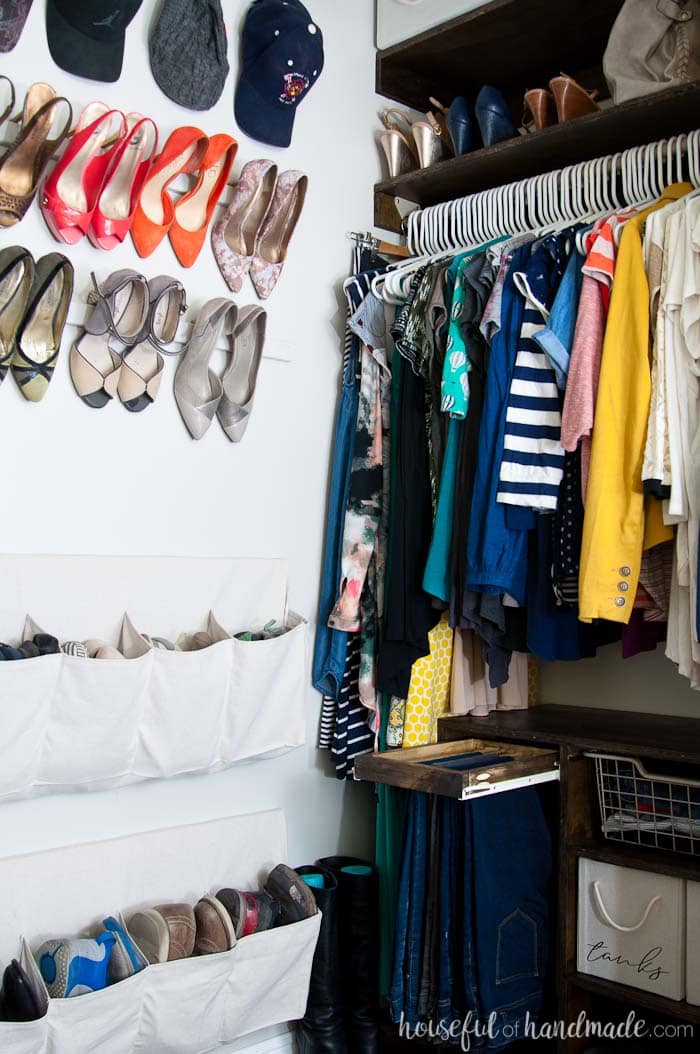
On my side of the closet, I gave myself room for long dresses and skirts. Then the rest of the hanging space is used for blouses.
Below the hang bar is loads of storage for the rest of my clothes.
Baskets and boxes hold smaller items. And sweaters are folded on the shelf (no more hanger marks in the sleeves!).
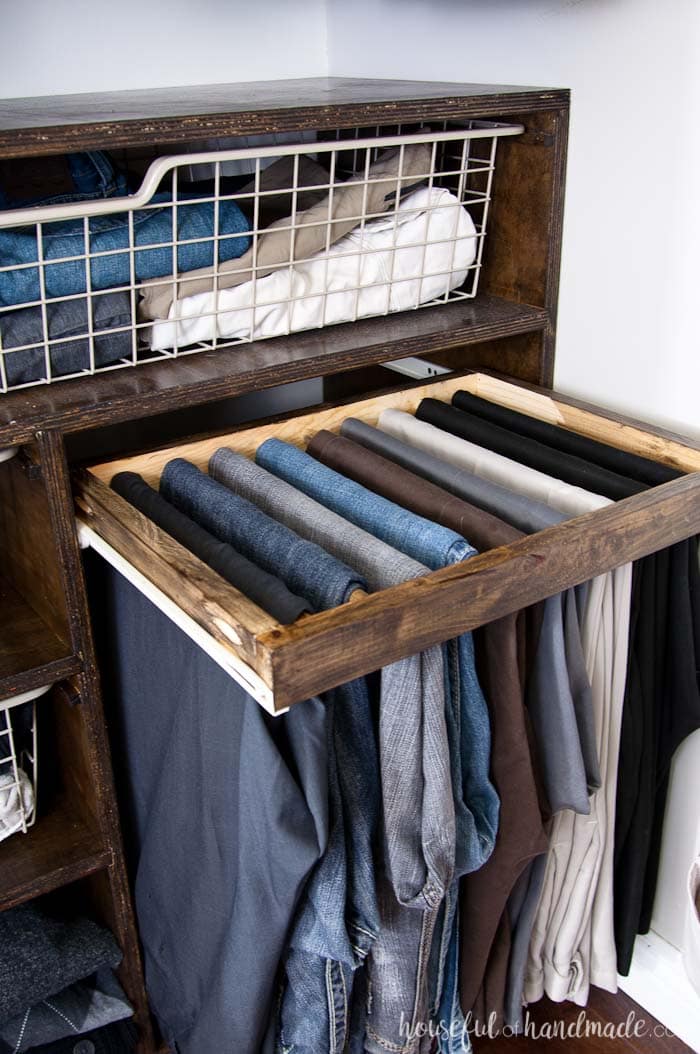
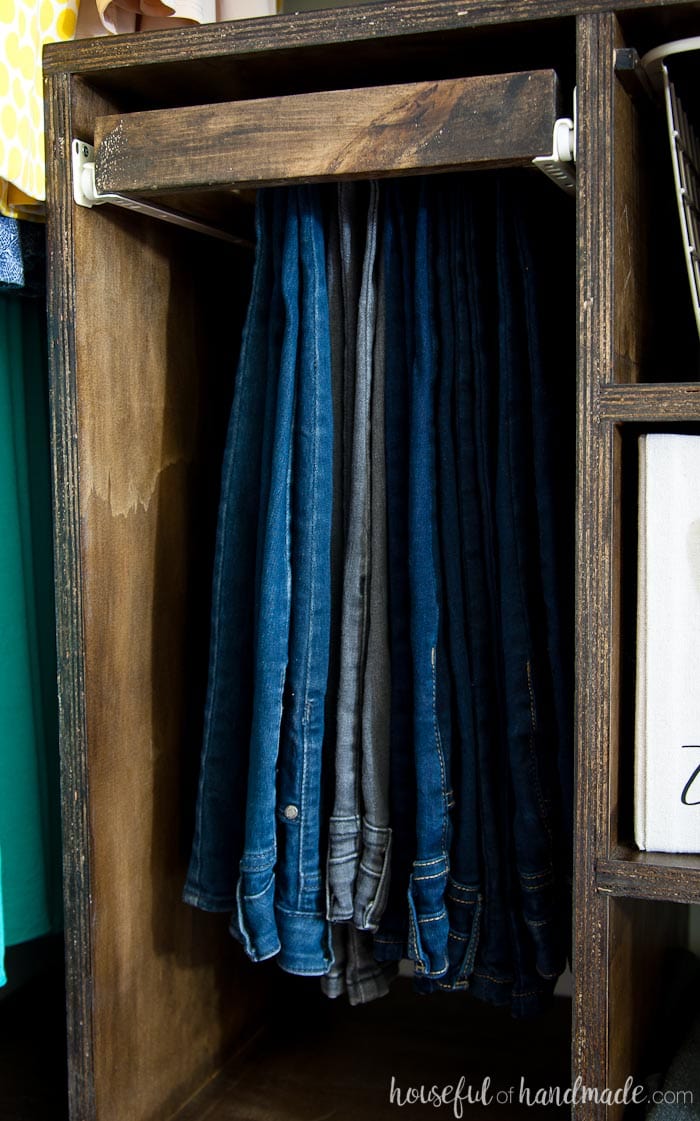
Then a roll out pant rack was added for jeans.
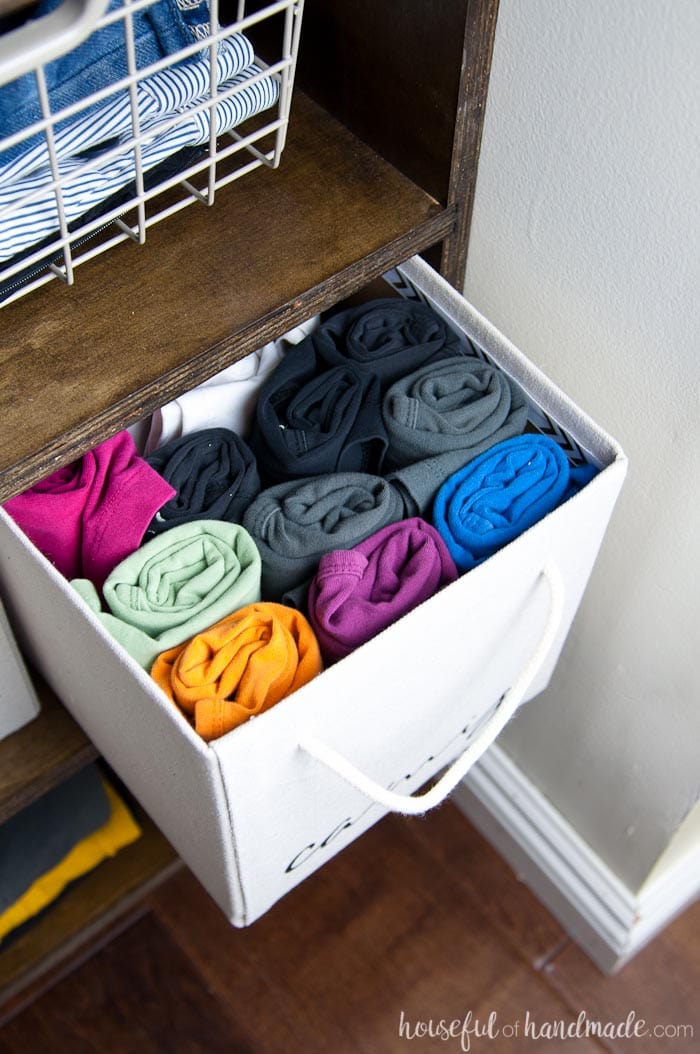
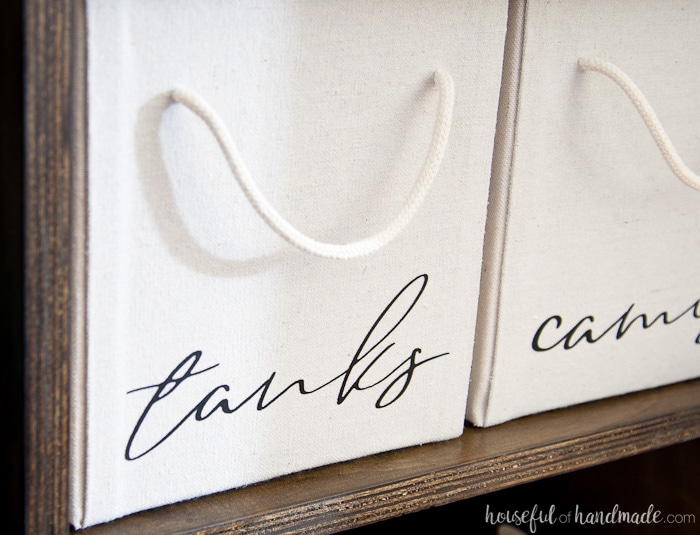
My absolute favorite part of the walk in closet organization are the boxes that hold my tanks and camisoles.
I use to hang all these items. Things that were only used under other clothing or to work in the garage (I am pretty sure all my tanks have paint stains on them).
They took up about 25 inches of hanging space to hang them all.
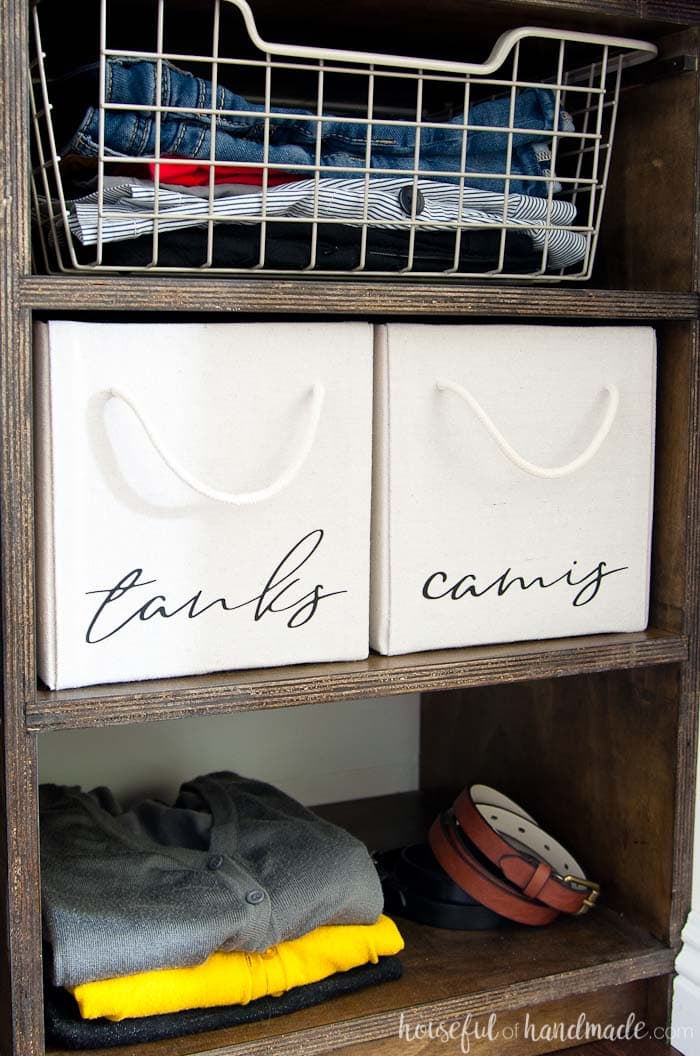
Now they don’t even fill these two tiny boxes.
And how adorable are these boxes with the rope handles and script labels? I promise to share the tutorial for them soon!
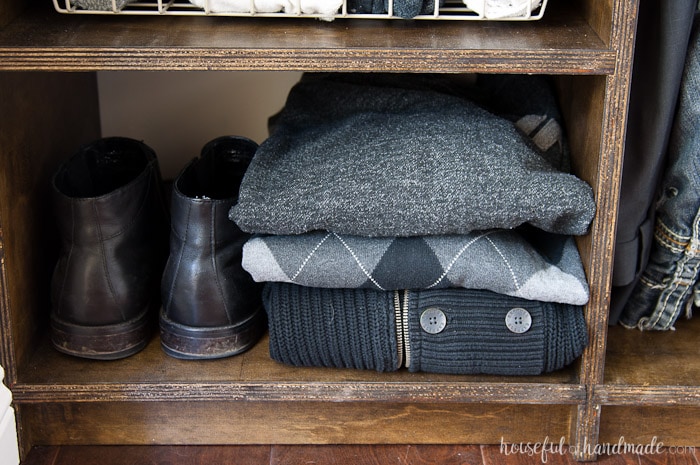
On my husband’s side of the closet, I was able to comfortably mount the hang bar higher. He is 6’3″ so we used that to his advantage in the closet.
His plywood storage organizer offers lots of storage for all his socks! Seriously, I think socks are a weird boy obsession because both him and my son have way too many and always want more.
Then he has a large basket for his shorts and lounge pants. And a much larger pull out pant rack for his dress pants and jeans.
And would you believe that we only have 2 inches less of space on each side of the closet?
If you removed the center hang bar from our old closet and we each had to work with just the space to either side, it would be 2″ more than what we have now!
And now we have created storage solutions to hold all our clothes and offer room to grow. I don’t even miss those 2″.
After finishing up the walk in closet organization systems, we realized how much we LOVED the open feel of our new closet.
We can both be in the closet getting ready and I don’t want to scream!
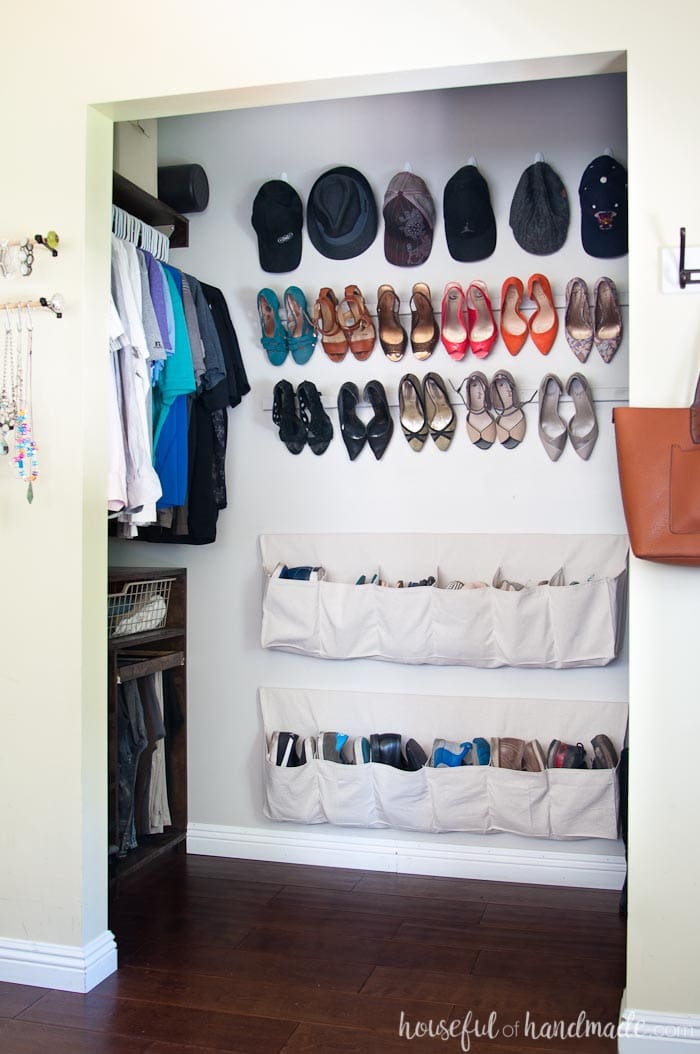
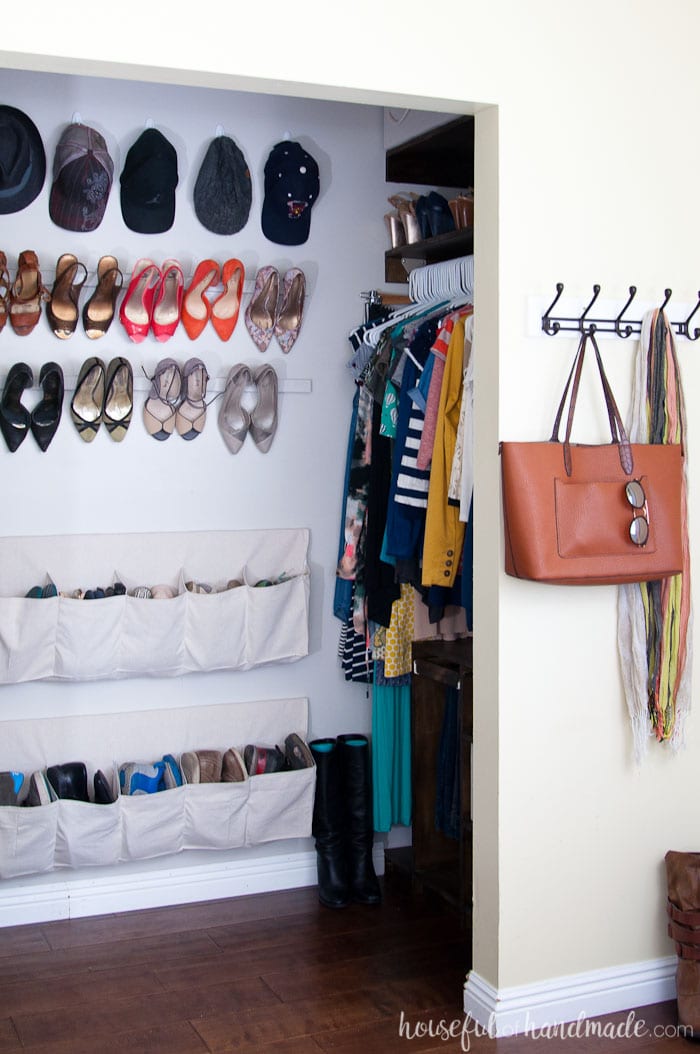
My original plan for shoe storage was to build a shelf with the white laminate covered wood I removed from the closet.
But I didn’t want to add a large piece to the space. So we went back to the drawing board. And what we came up with was so much better.

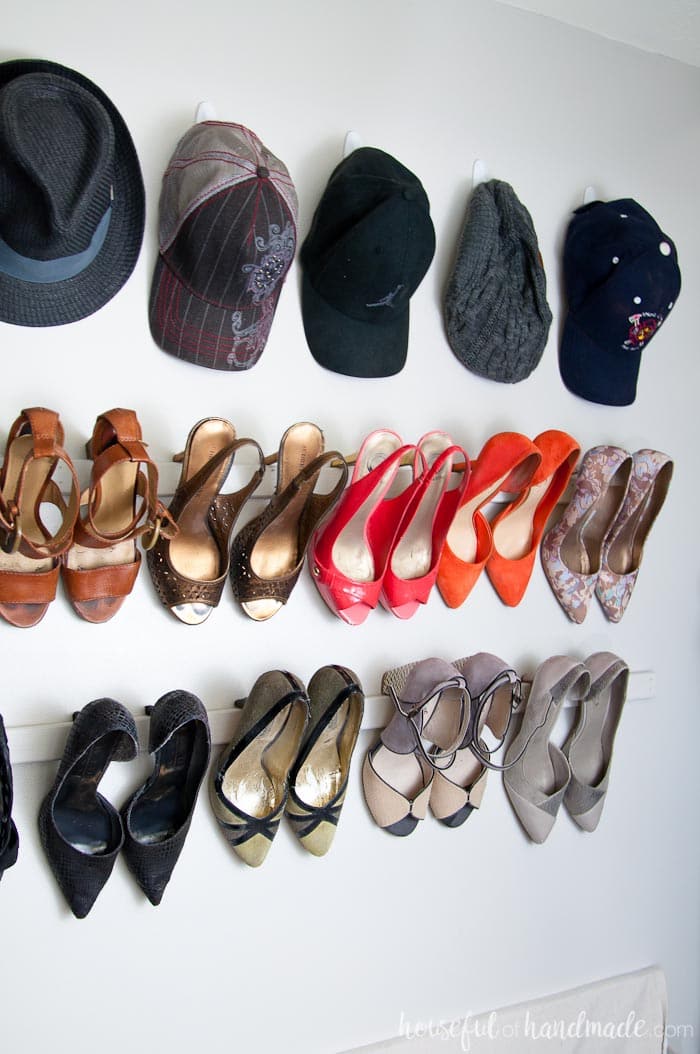
Just check out that shoe storage!!!
I am slightly obsessed with shoes. I used to have over 100 pairs (I know, excessive).
Last year I minimized my show collection because I really wasn’t wearing a lot of them.
Now I am super picky about the shoes I buy. Keeping a handful of comfortable, but beautiful, shoes makes it easier to get ready.
And now I can actually see them all.
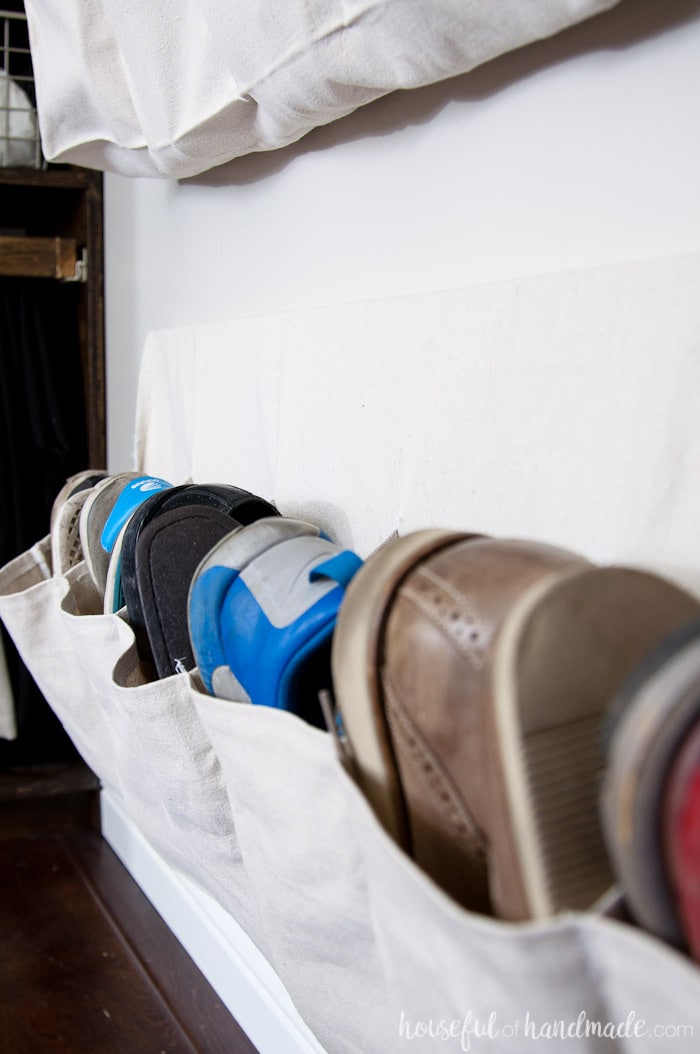
The lower shoe storage is perfect for all my husbands shoes and my non-heeled shoes (aka workout shoes and flip flops).
I sewed these shoe pockets out of drop cloth. Each one took about 45 minutes from start to filling-with-shoes.
They keep the shoes off the floor but keep them in sight, which I love. Tutorial coming soon!
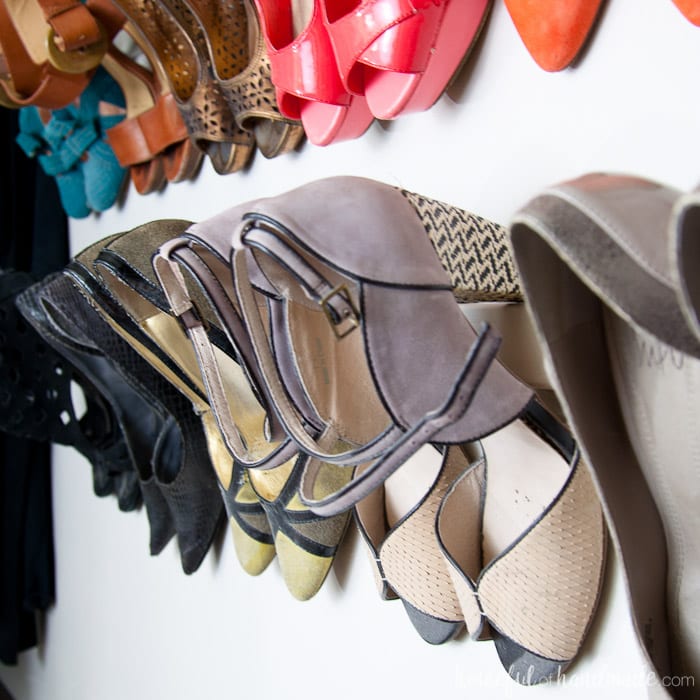
But the upper shoe storage is my favorite!
And it couldn’t have been easier. I have seen heel storage using crown molding, which is beautiful.
But crown molding is expensive. At $2-5 a linear foot, the small shoe storage area that I have would have cost up to $40.
Instead, I discovered that the heels rest just as beautifully on a 1×2 furring strip as they do on crown molding.
So with one 8′ furring strip that cost me $1, I mounted that to the wall and painted it so it would blend in. Then covered it with all my glorious shoes.
Yep $1 total, now I have money for new shoes.
To hang my husband’s hat collection, I added some white Command hooks.
This is the easiest hat storage and I love the way it looks to have the masculine and feminine on the wall together.
See, we can share closet space and still love each other!
And while I was certain I was going to blow the budget away after 1 week, I managed to get super creative and make it work.
- Week 1 spent: $0 (demo is cheap)
- Week 2 spent: $76 to build the plywood closet organizers
- Week 3 spent: $26
- 1/2″ dowels = $7
- 1x2s = bought 1 at $1, but had the rest on hand
- drawer slides = $11
- drop cloth = $7
- rope = left over from nautical art display wall
- baseboards = reused what was already in the closet
- Command hooks = were already in the closet, just moved them around a bit
- boxes = on hand thanks to Amazon and bulk groceries
Total for the amazing walk in closet transformation: $102!!!!
So did we completely transform our walk in closet? I would say so.
The new open feel of the closet makes it more like a dressing room instead of just a closet. And it makes our master bedroom feel bigger too.
I totally love it!
Now I need to clean my master bedroom and get my beautiful retreat back.
