Bifold corner cabinets are a great way to add storage to your next cabinet project. Whether it is a DIY kitchen, built-ins, vanity, or a built-in desk.
This type of corner cabinet fills the entire corner with a cabinet making it accessible for storage. To allow easy access to contents in the back of the cabinet, you can even install a pie-shaped lazy Susan inside it.
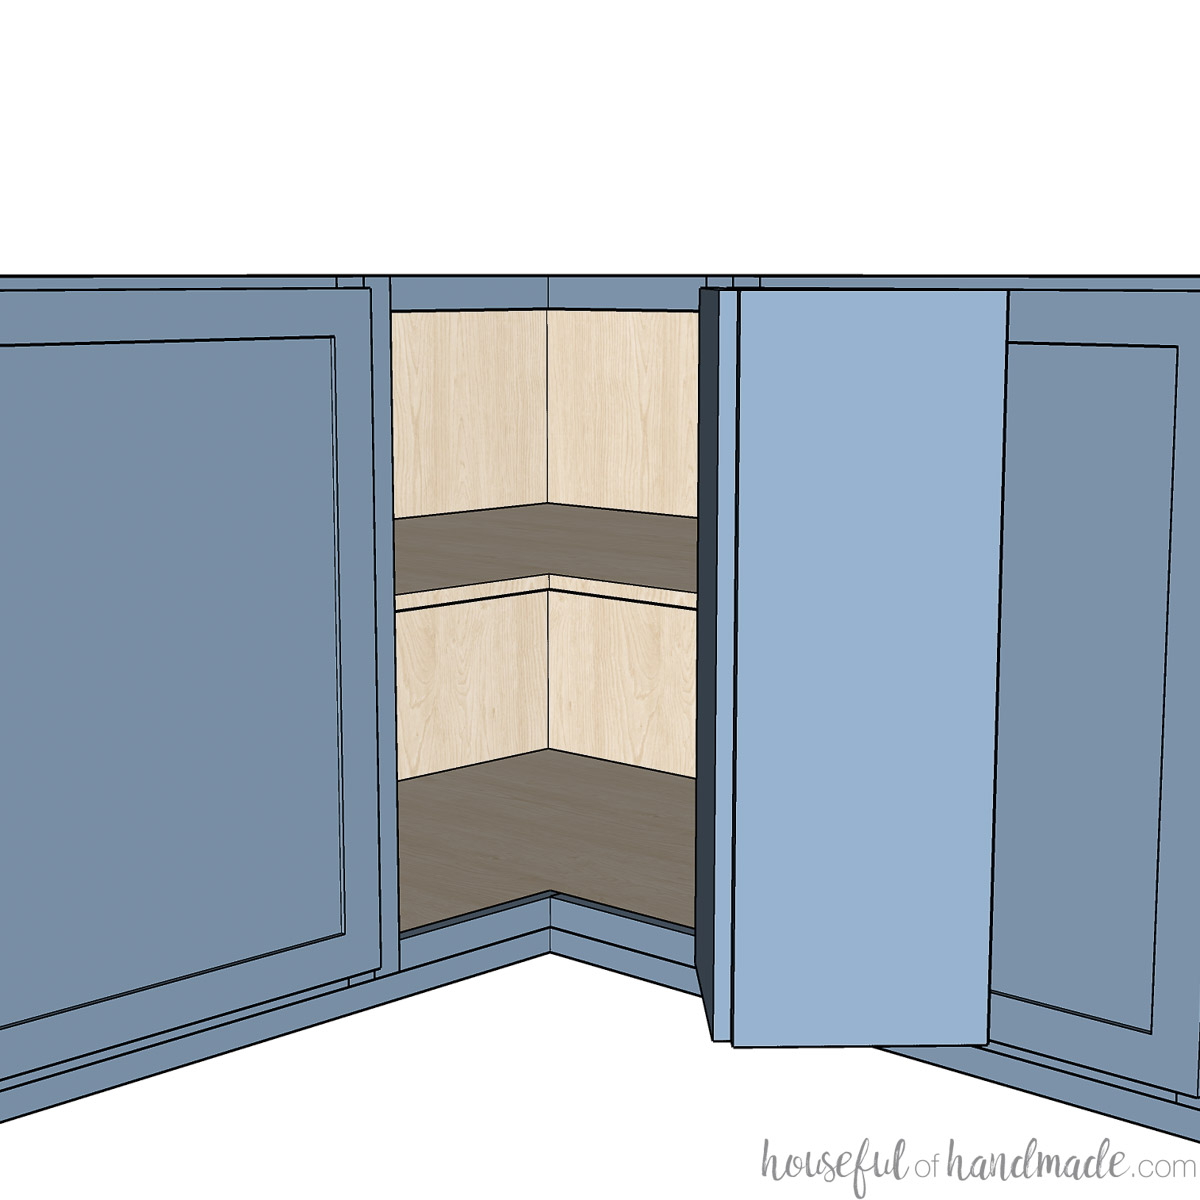
Or add shelves (adjustable or stationary) to your corner base cabinet. I like this method for storing larger kitchen items, like small appliances or serving dishes.
This post may contain affiliate links. As an Amazon Associate I earn from qualifying purchases. Click here to read my full disclosure policy.
If a bi-fold cabinet is not what you are looking for, learn about all the other types of DIY corner cabinets to find the right one for your project.
Make sure to read all about how to build base cabinets to figure out basics for all your cabinets such as toe kick and cabinet height/depth. Also, make sure to read about the differences between styles of cabinets in How to Build DIY Cabinets.
Benefits of a Bifold Corner Cabinet
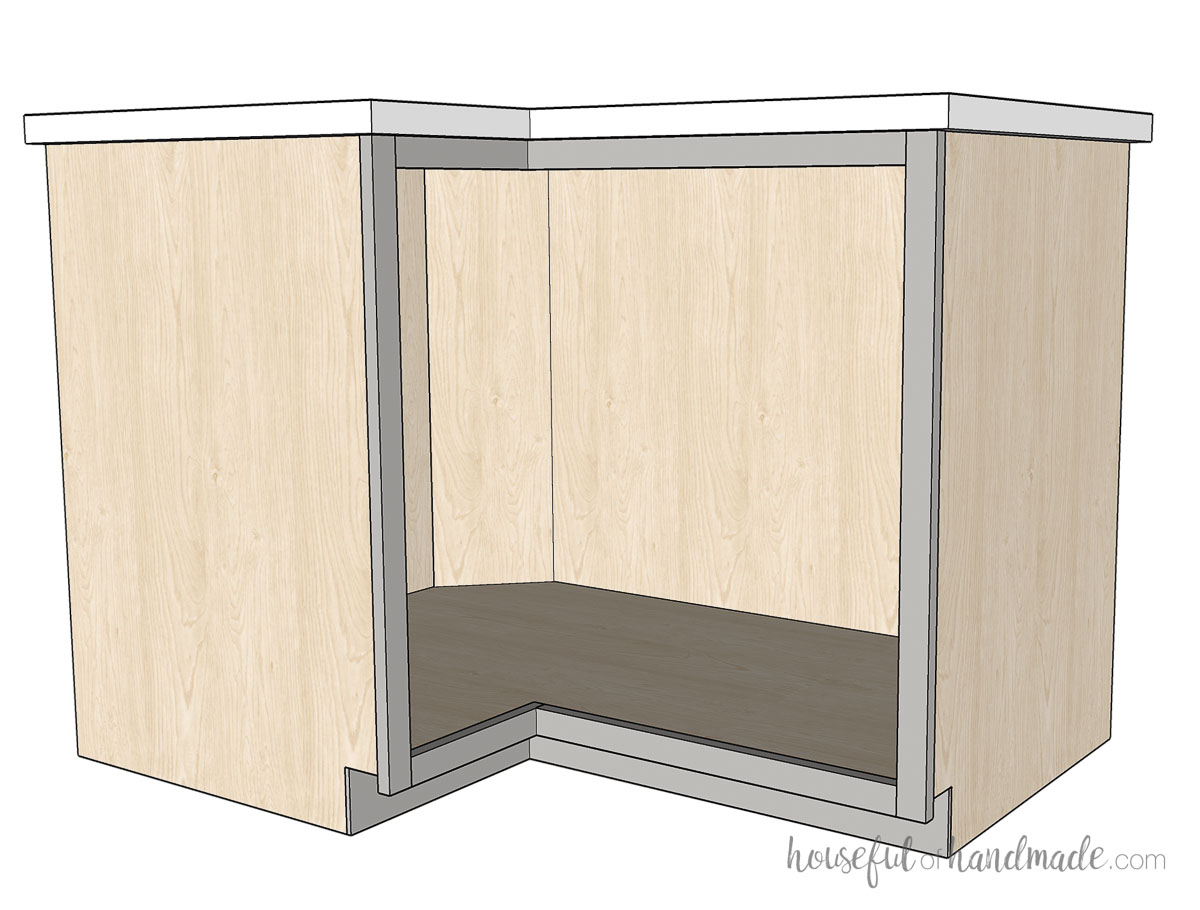
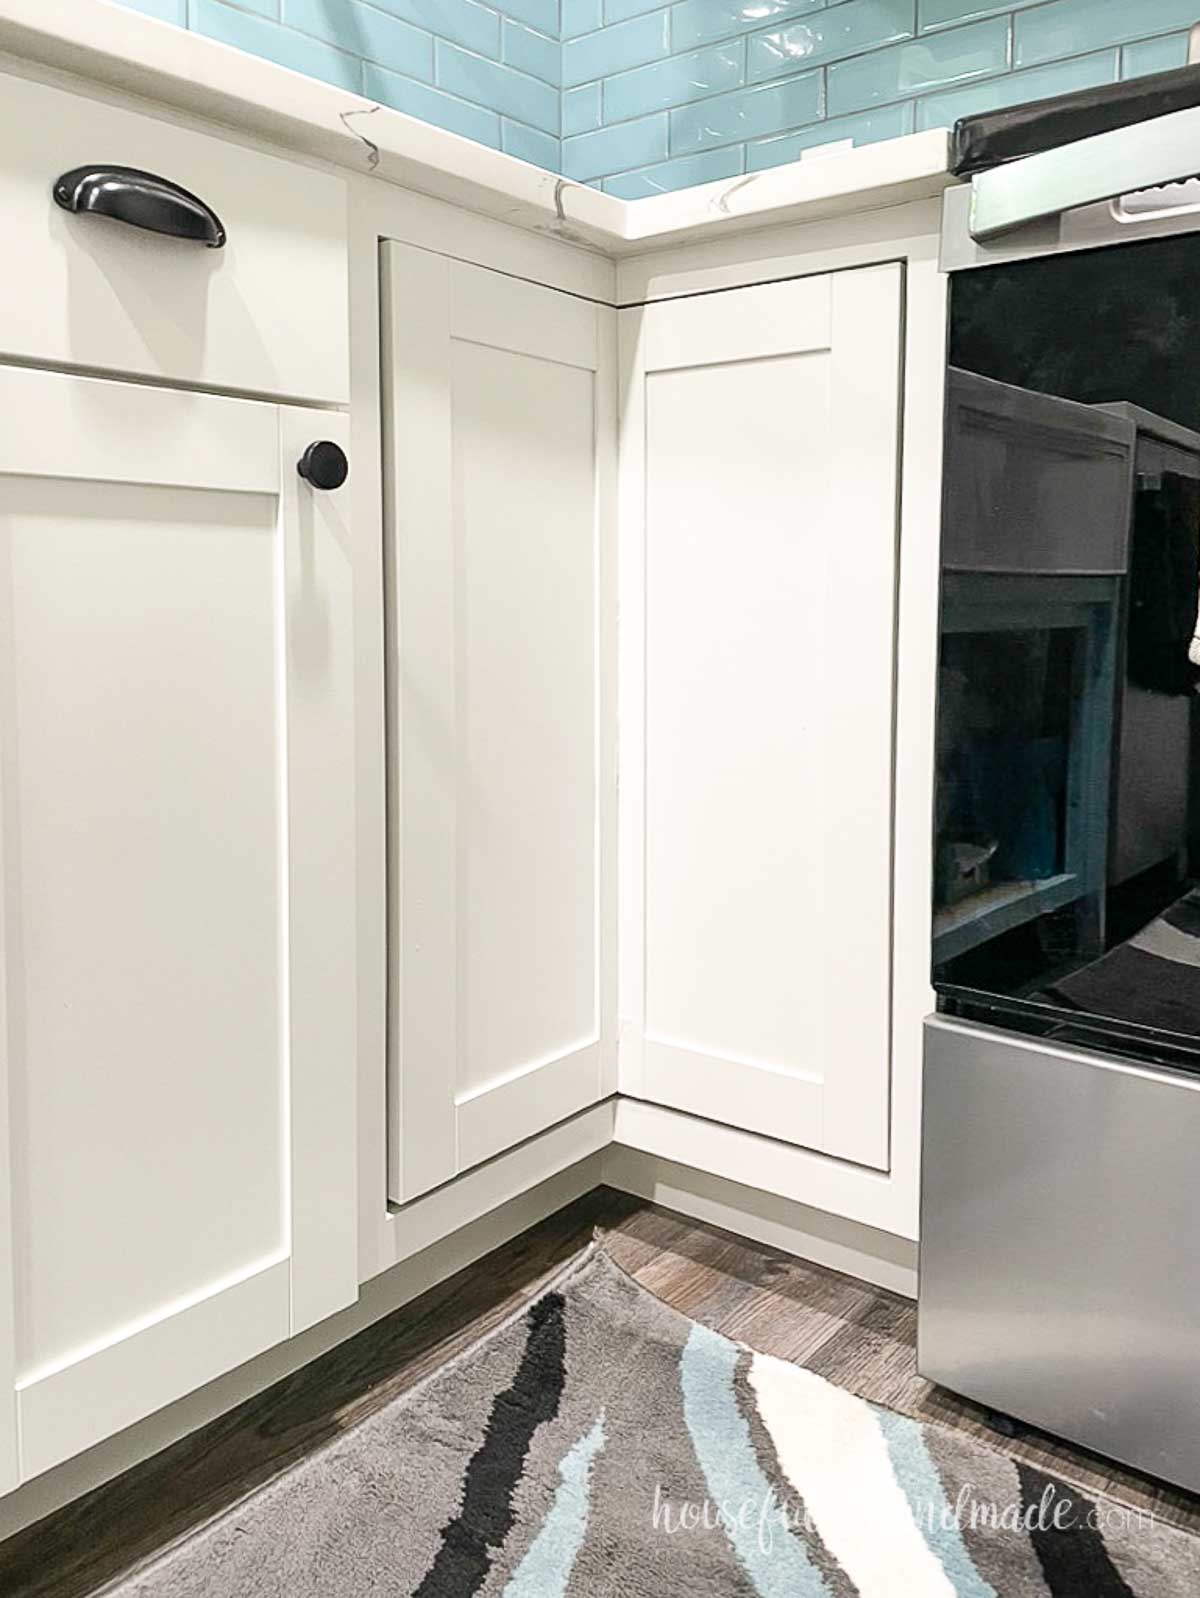
A bi-fold corner cabinet is the perfect way to create a ton of storage in a corner.
These cabinets are easy to build, the only angled cuts needed are in the very back. So if your angles are not perfect, they are hard to see anyway!
A bifold offers a ton of storage in the corner. There is only a slight angle in the very back to allow it to sit tightly into the corner of your wall. Other than that, the entire space is available for storage.
The opening on the front of the cabinet is not as big as the space inside. You will need to take that into account when deciding what items you will store inside it.
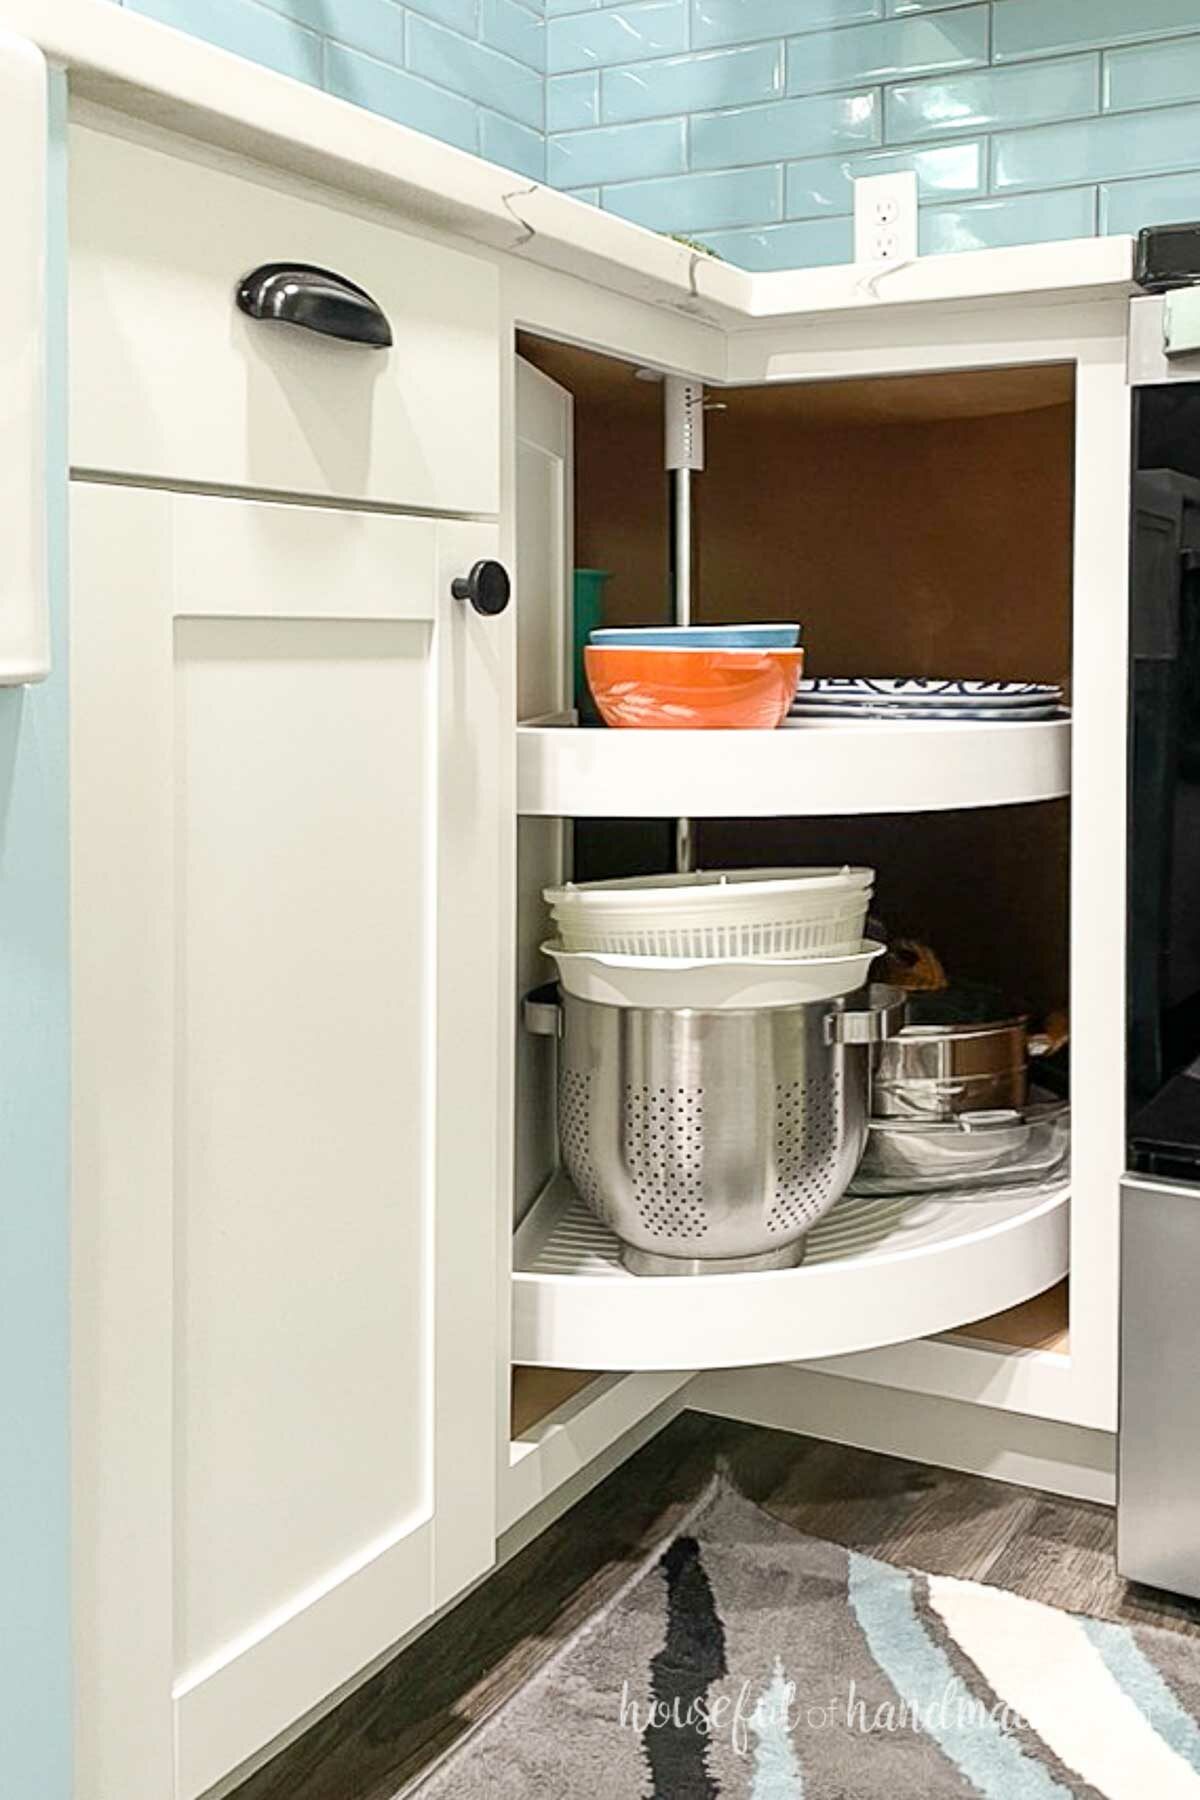
A lazy Susan style turntable can be added to a bifold corner cabinet to make it easier to access items in the back. This turns your simple cabinet into a huge storage space.
Lazy Susans do have weight limits so find one that can hold the weight of the items you want to store inside. I like using turntables for storing small, light-weight pantry items.
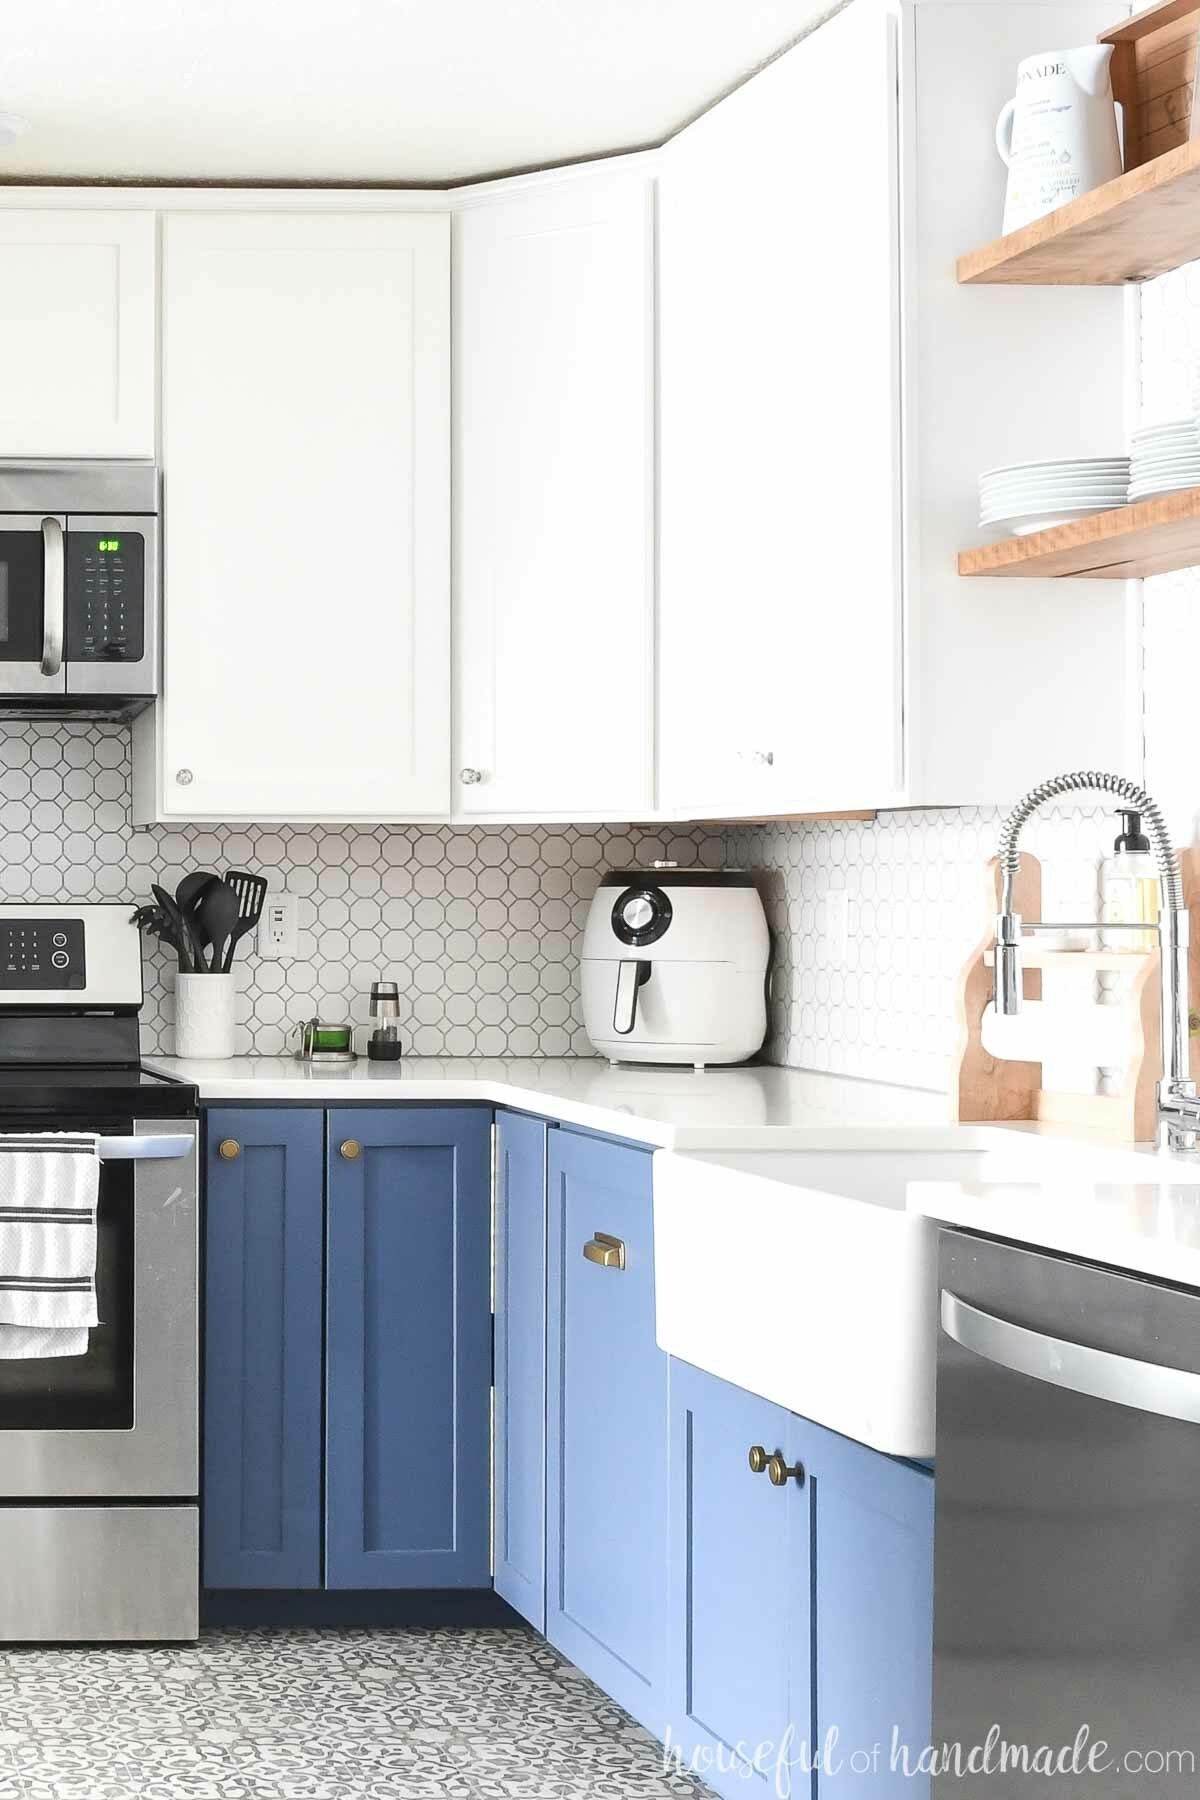
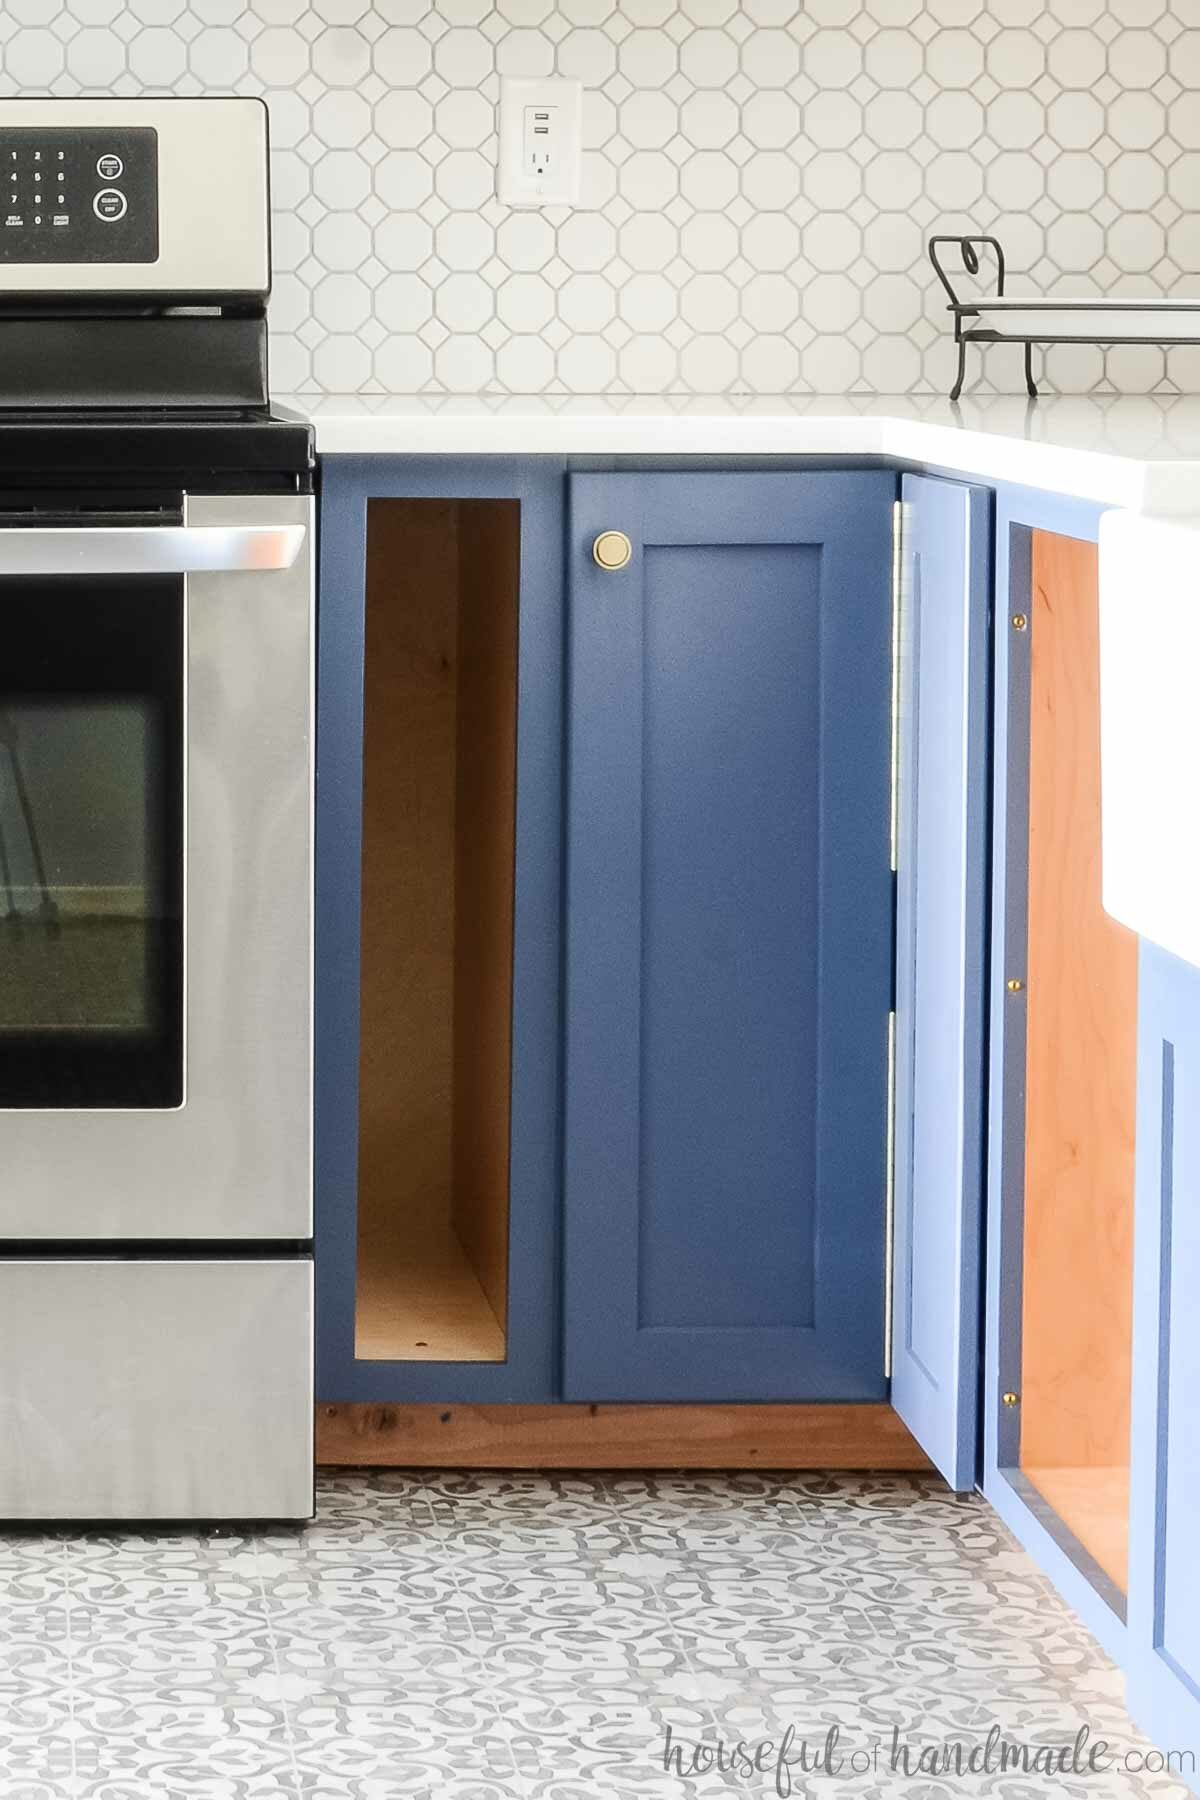
However, to keep my countertops clutter free, I used my DIY bifold corner base cabinet in my last kitchen to store away small appliances.
I kept the more frequently used appliances in the front. The larger items are harder to get lost in a corner cabinet, and they are quick to shuffle to access the things in the back when needed.
Custom Corner Cabinet
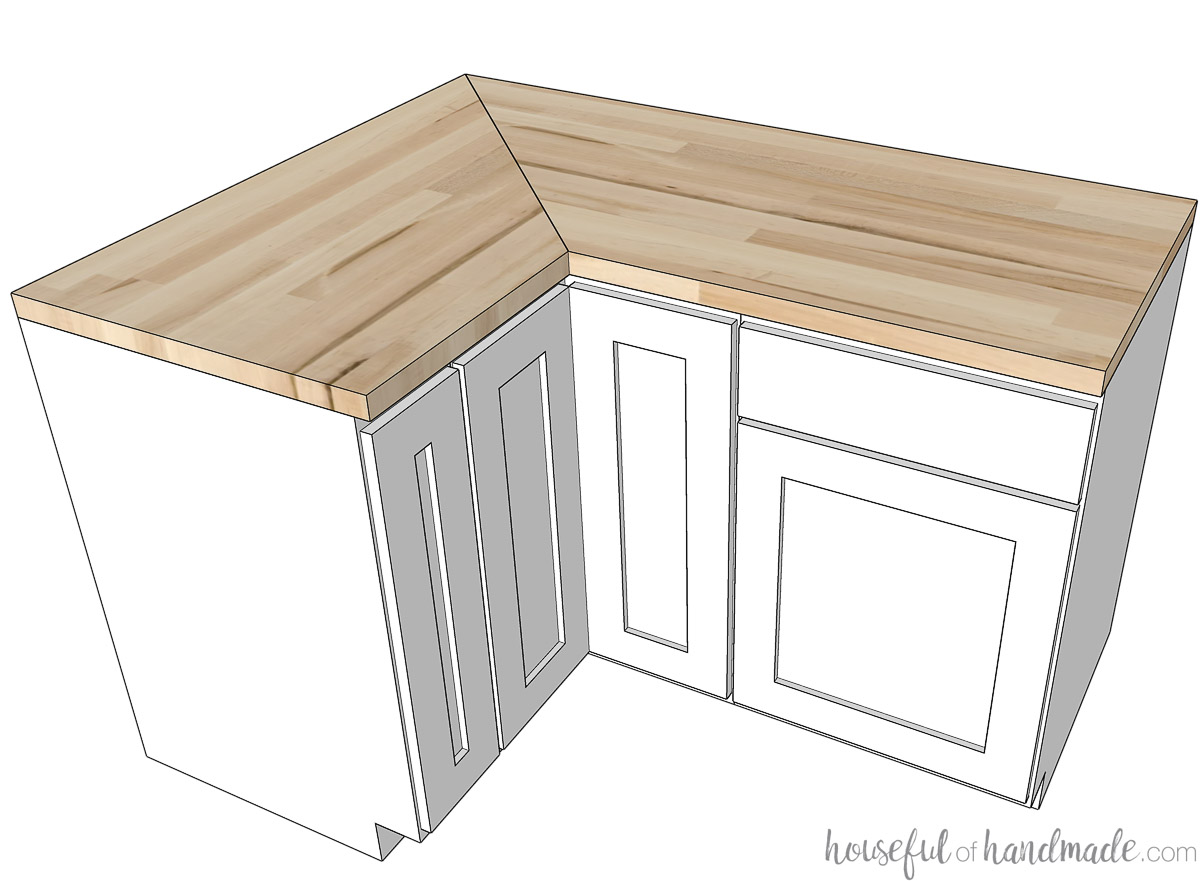
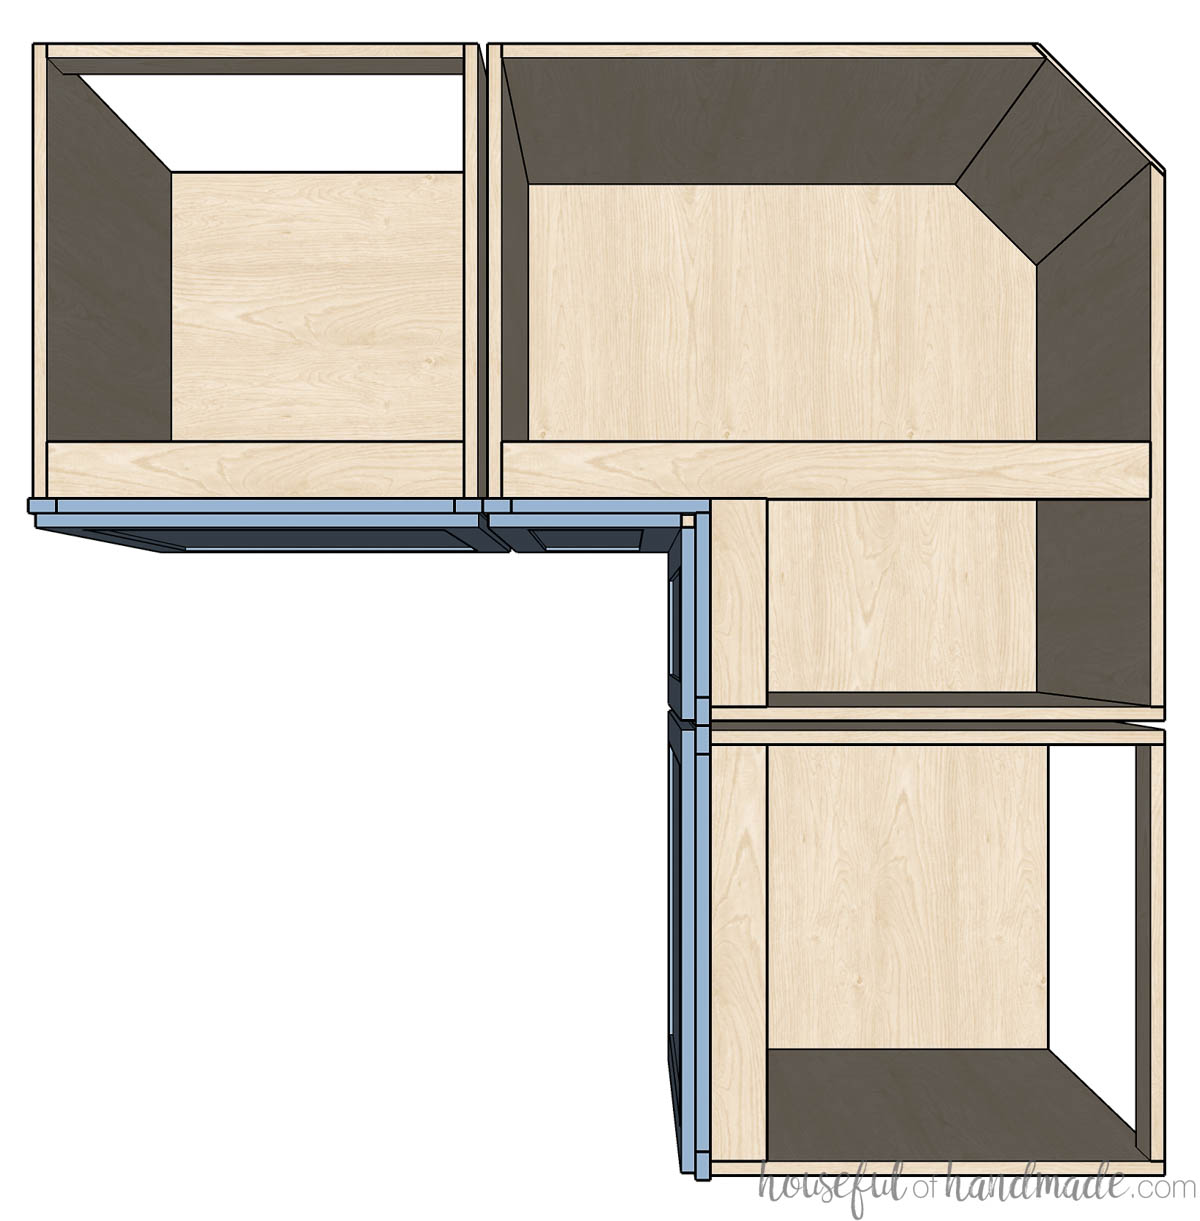
The best part of building your own corner base cabinet is you can create a cabinet in any size or configuration you want!
Typically corner base cabinets are 36″ X 36″ which gives you an opening of approximately 12″ x 12″ (or 15″ across).
A larger cabinet will give you a larger opening to access the items stored inside. Or you can build the cabinet so it is not square (i.e., a 36″ x 48″ base cabinet).
Look at your storage needs and build a cabinet that will best hold the items you plan to place inside.
Corner Base Cabinet Plans
Once you have figured out the answers to the questions above, it it time to create plans for your own bi-fold base cabinet! I will walk you through how to create plans for your custom corner cabinets and so you will be ready to start building.
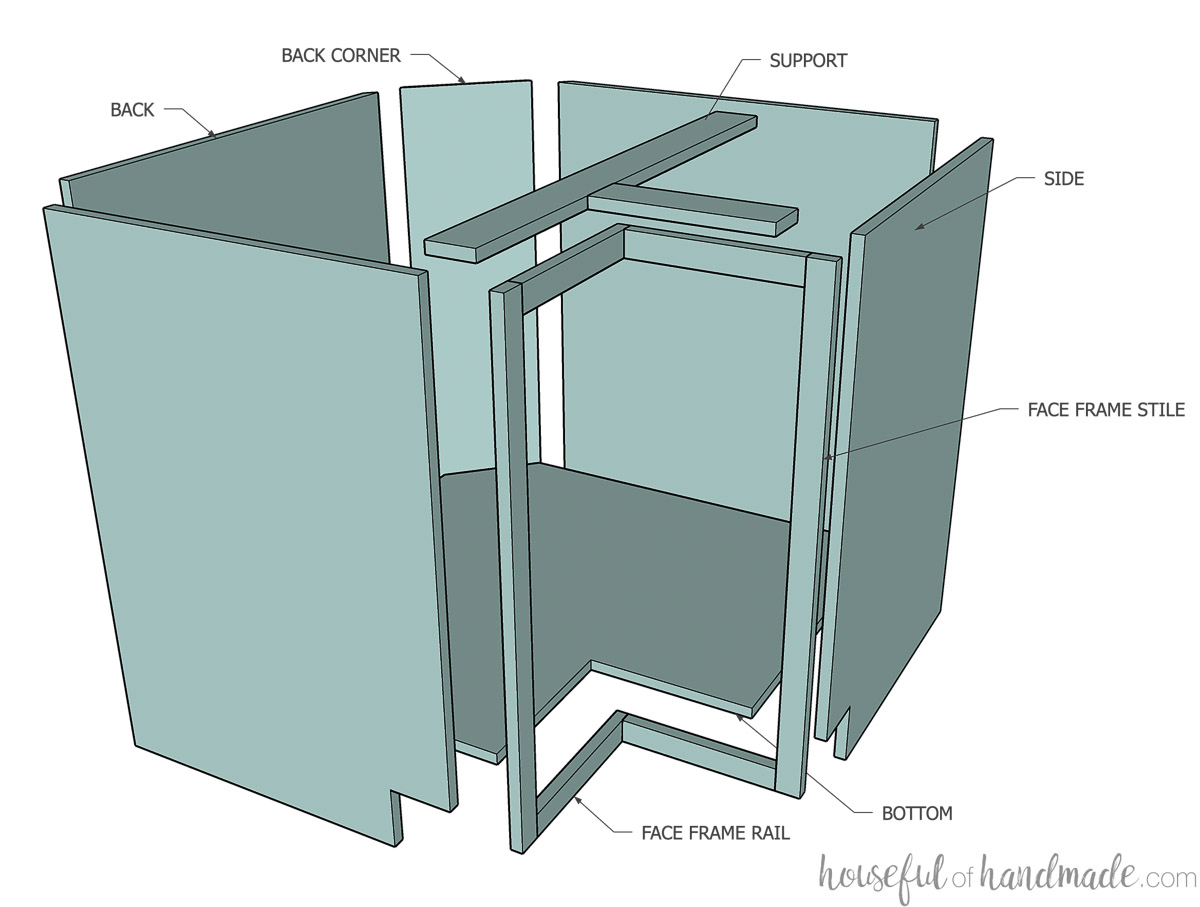
Each bi-fold base cabinet will have the following parts:
- 2 side pieces
- 2 back pieces
- 1 bottom piece
- 1 back corner piece
- 2 support pieces
- Optional: toe kick
- Optional: face frame
- 2 face frame stiles
- 4 face frame rails
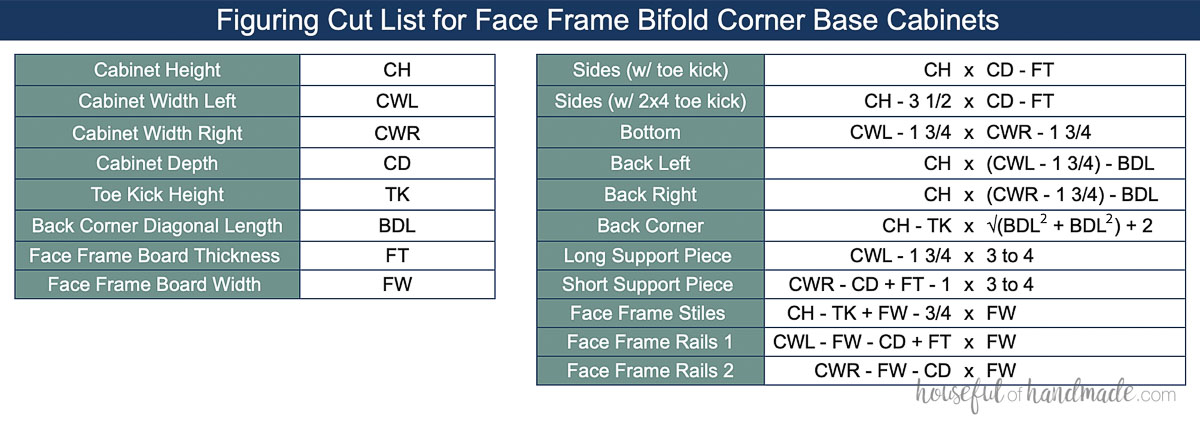
How to Figure Cabinet Cut List
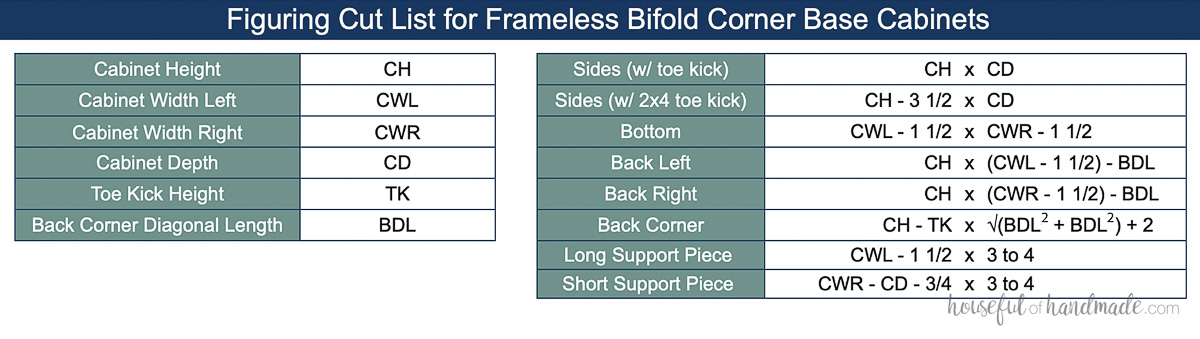
Use the following charts to figure out the dimensions for all the pieces of your face frame or framelesss bi-fold corner base cabinets. All measurements are in inches.
The cabinet width refers to the width of the cabinet from the wall to the edge of the cabinet on each side of the corner (right or left). The cabinet depth will be the same depth as the base cabinets on either side.
For example, a standard 36″ x 36″ corner base cabinet will have a cabinet width right (CWR) and cabinet width left (CWL) of 36″ and the cabinet depth will be 24″.
For square corner cabinets, the CWR and CWL are the same. If you want a non-square corner cabinet, you can change either the CWR or CWL to make it longer.
The back corner diagonal length (BDL) refers to the length from the corner along each side that you are cutting the back off. You will use the same measurement on each side so the cut if is at a 45 degree angle.
This is necessary to ensure your cabinet fits tight into the corner (since most corners are not perfectly square because of the drywall mud used to seal the corners. ).
If you want a less deep corner for things to get lost in, you can cut a deeper diagonal. If adding a turntable to your cabinet, refer to the dimensions needed to ensure you do not take off too much in the corner.
To figure the width for the back corner piece, it requires square root calculations because it is on a diagonal. I included the calculation in the charts, or the easier way is to build the box and then measure where your back piece will go and cut it to fit.
Face Frame Corner Cabinet Cut List
Important notes for face frame cabinets:
- The face frames hang over the sides of the cabinets 1/4″. This makes it easier to install, but if the side of your corner base cabinet is going be visible, you will need to add a side panel (use 1/4″ plywood and cut it the exact size of the base sides and tack it on) or adjust your measurements to make up for the 1/4″ extra on one side.
- If you are adding 1/4″ plywood to the back of your other base cabinets (not inset in a groove), you will need to cut your corner cabinet sides 1/4″ wider since they will not have the backing the same way. Or you can cut them all the same width (easier when doing a lot of cabinets) and use a shim when attaching the corner cabinet to the wall so the face frames are flush.
Frameless Corner Cabinet Cut List
Important notes for frameless cabinets:
- Plywood is not actually 3/4″ thick, it is slightly smaller. And not all plywood is the exact same. I would recommend you tightly press two pieces of the plywood you are using together and measure it. You can substitute this measurement for the 1 1/2″ you subtract for the bottom and support pieces. This will give you more exacting cabinet widths.
- If you are adding 1/4″ plywood to the back of your other base cabinets (not inset in a groove), you will need to cut your corner cabinet sides 1/4″ wider since they will not have the backing the same way. Or you can cut them all the same width (easier when doing a lot of cabinets) and use a shim when attaching the corner cabinet to the wall so the fronts are flush.
How to Build a Bi-Fold Corner Base Cabinet Box
Tools & Materials
This post only addresses tools and supplies needed to build the cabinet boxes. I go into detail on the inexpensive tools I use to build cabinets here.
For details on tools and materials needed to build cabinet doors, check out these 3 ways to build DIY cabinet doors.
Tools needed:
- Miter saw
- I recently upgraded to this larger sliding miter saw (watch for it to go on sale), but all my projects before were built with this inexpensive miter saw that I loved.
- Table saw or Circular saw with guide track
- Jigsaw or bandsaw
- Pocket hole jig
- Drill
- Impact driver (optional, but I love not having to switch bits with the drill)
- Brad nailer
- Right angle clamp
- Face clamps
- Squares
- Optional: Shelf pin jig
Supplies:
- Wood products:
- 3/4″ plywood
- 1/4″ plywood
- Optional: 1x boards for face frame cabinets
- Optional: Plywood edge banding for frameless cabinets
- Optional: 2×4 boards for toe kick base
- Wood glue
- If using pre-finished plywood, use melamine glue to get strong joints
- 1 1/4″ pocket hole screws
- 5/8″ brad nails
STEP 1- Cut out the pieces
Cut out your plywood pieces according to the cut list.
All the cabinet box pieces are cut from 3/4″ plywood except the back corner piece. Cut the back edges of the back pieces at a 45 degree angle so the back corner piece sits flat.
Cut a notch out of the bottom piece at a 90 degree angle with a circular saw, jig saw, or band saw . The sides should be flush with the front of the side pieces on each edge.
Also cut the back diagonal off at a 45 degree angle around 4-8″ in from the back.
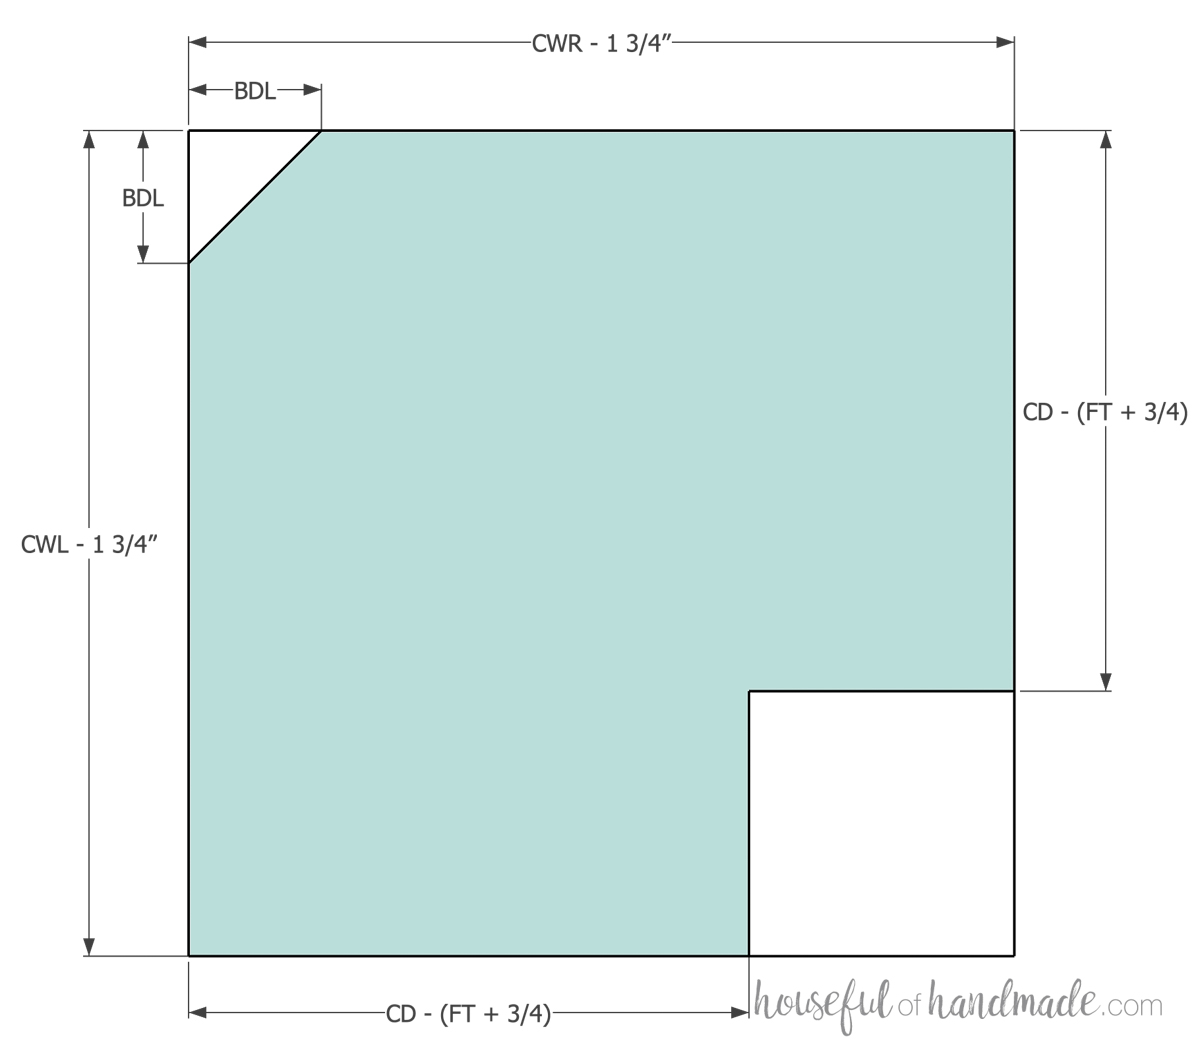
If you are building base cabinets with a toe kick, notch it out of the front of both side boards. If doing a 2×4 base for cabinets, you do not need to notch out the sides (refer to the DIY base cabinet post for more details).
STEP 2- Drill pocket holes
Set your pocket hole jig and bit to drill in 3/4″ thick material.
Drill pocket holes on the following pieces:
- Around the perimeter of the bottom piece
- On the non-angled side of the back pieces
- On the front of the side pieces
- On both ends of the support pieces
If building face frame cabinets, also add pocket holes to the following pieces:
- On the front of the side pieces
- Both sides of the shorter face frame rails
- One side of the longer face frame rails
STEP 3- Assemble the box
Use wood glue (or melamine glue if building with prefinished plywood) and 1 1/4″ pocket hole screws on all joints.
Start by attaching the back pieces to the bottom piece. Make sure the sides are flush at the front and the angles on the back blend into the diagonal cut off.
If using a 2×4 toe kick base, the bottom will be flush. If using a notched in toe kick, attach the bottom so it will be flush with the bottom of the toe kick notch.
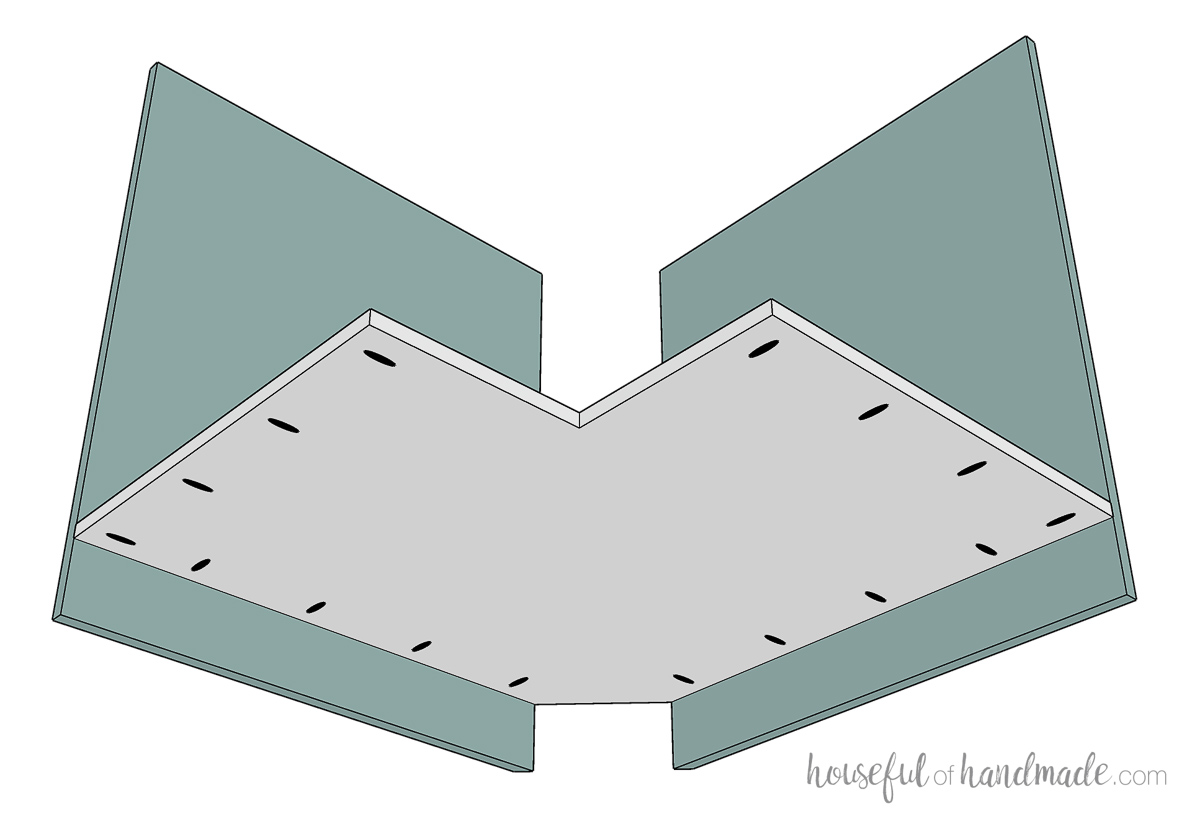
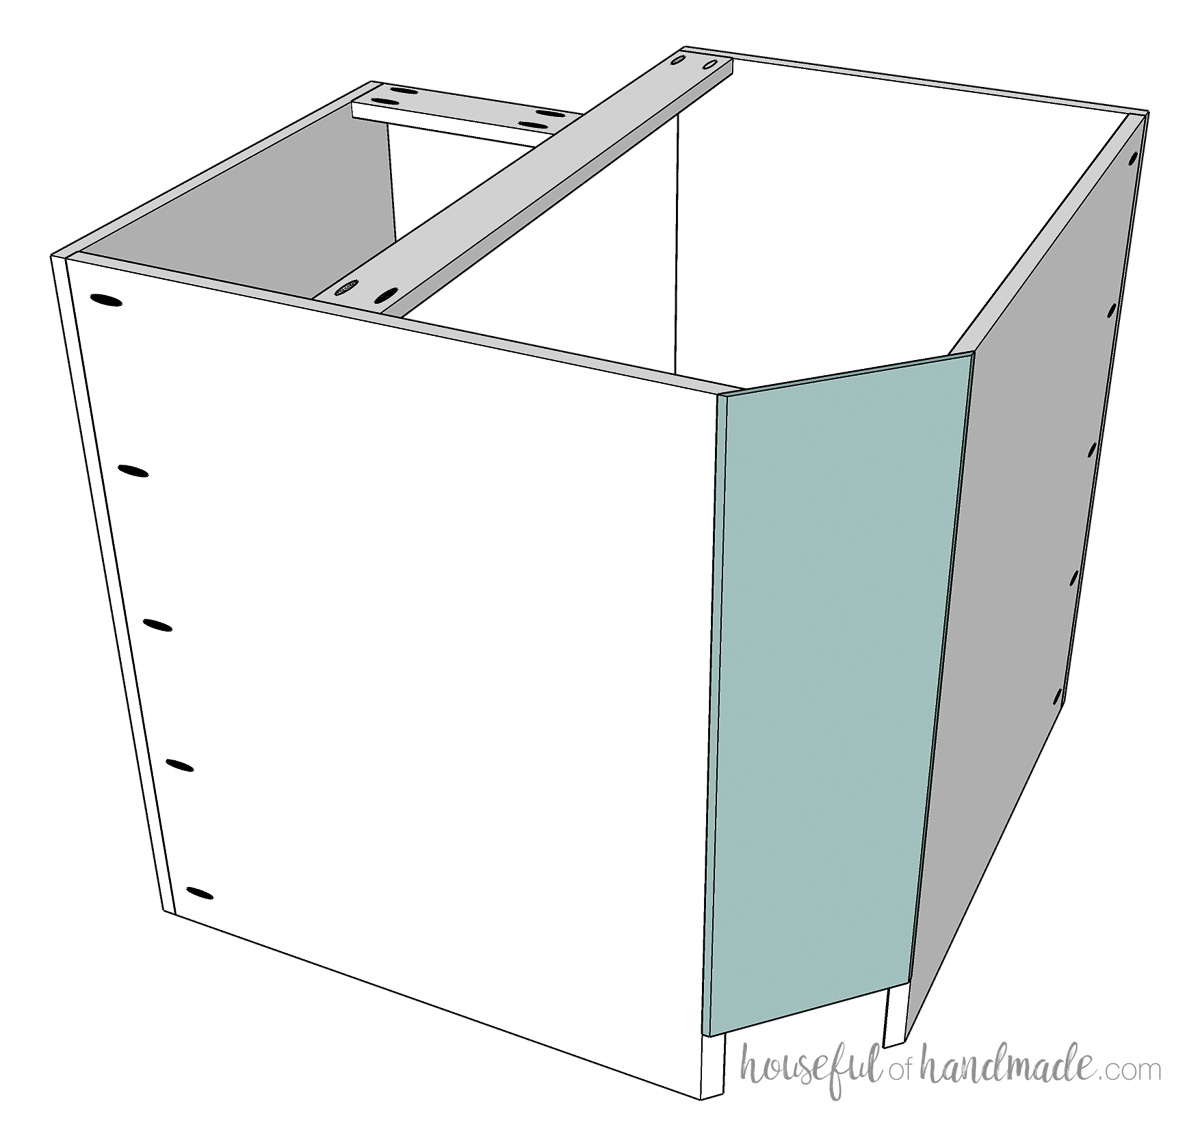
Then attach the side pieces.
Secure them to the bottom and the back pieces with the previously drilled pocket holes.

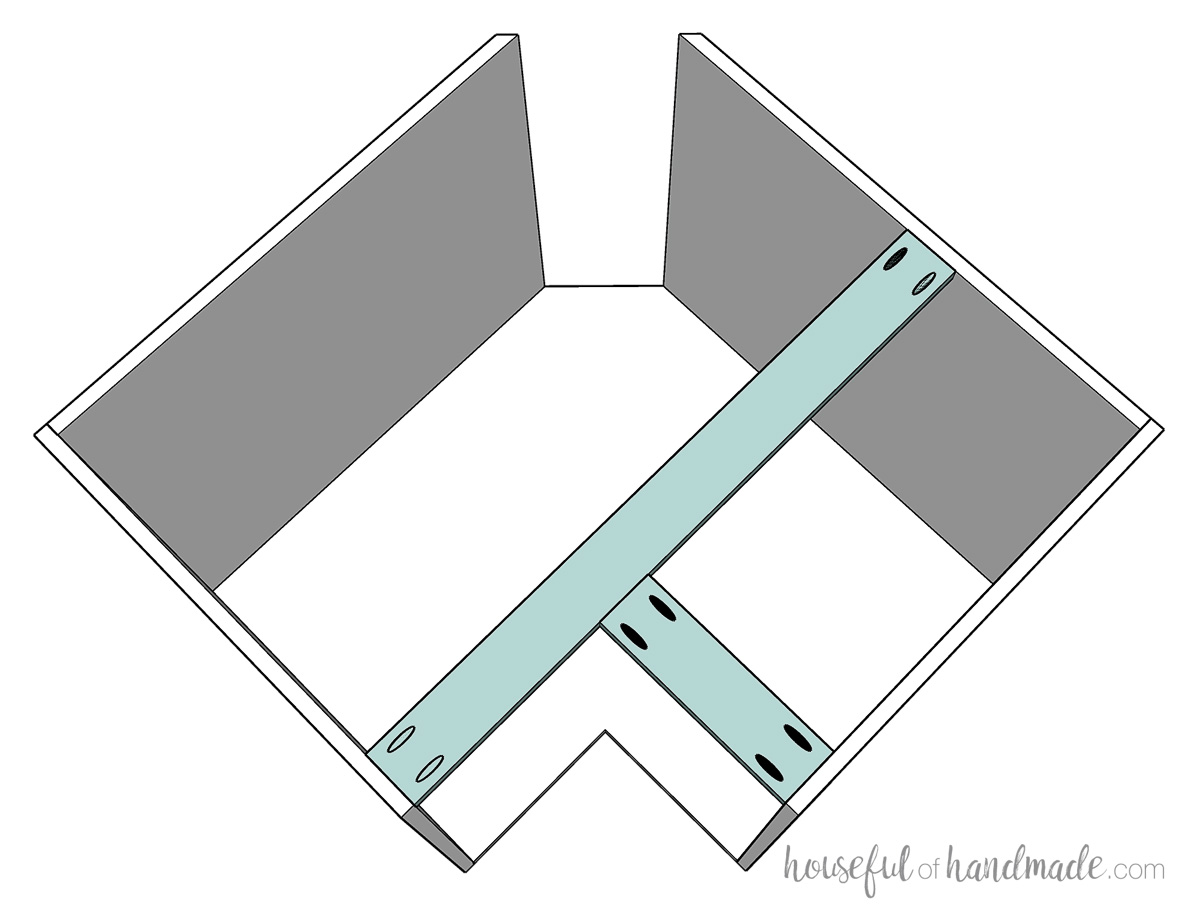
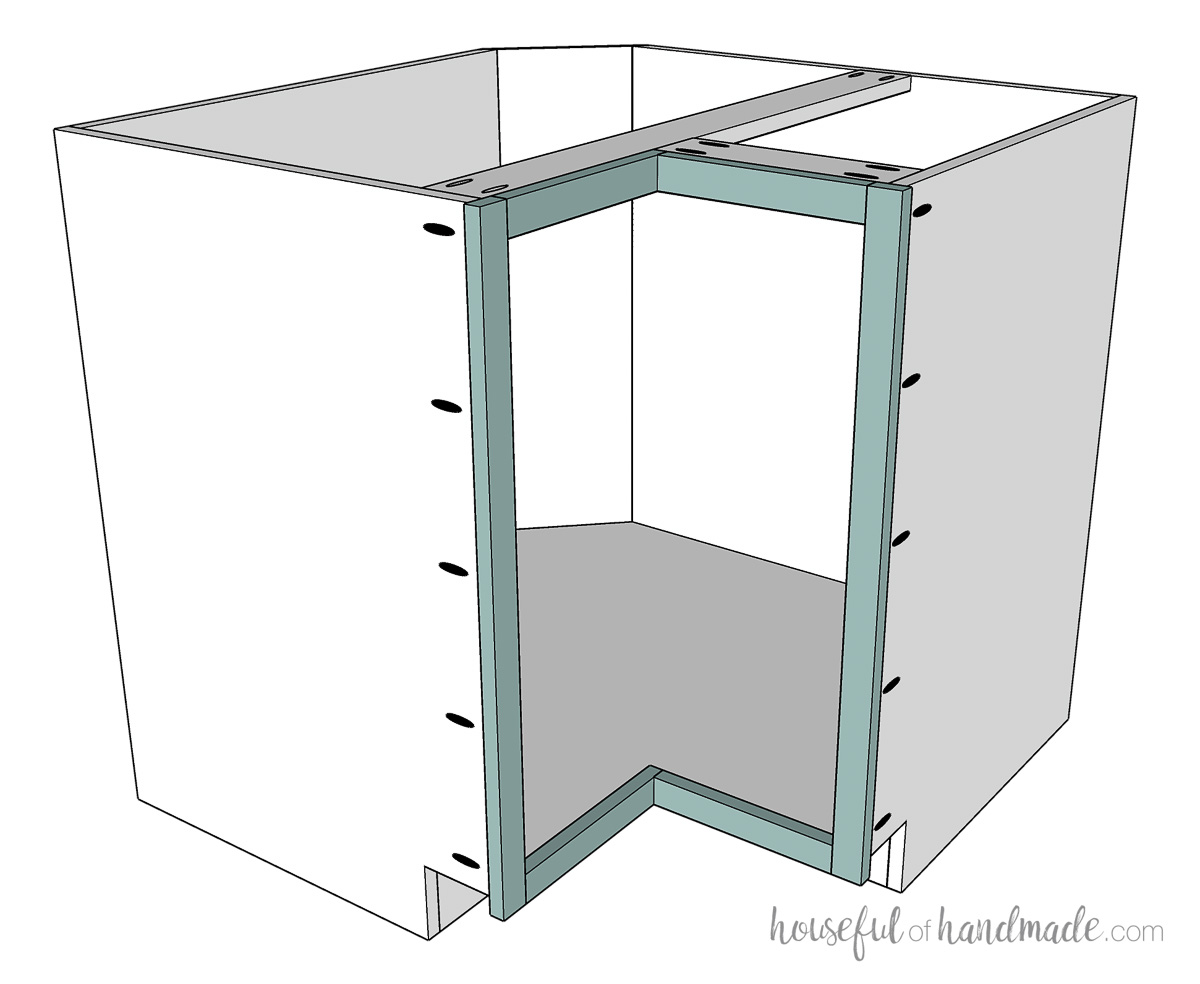
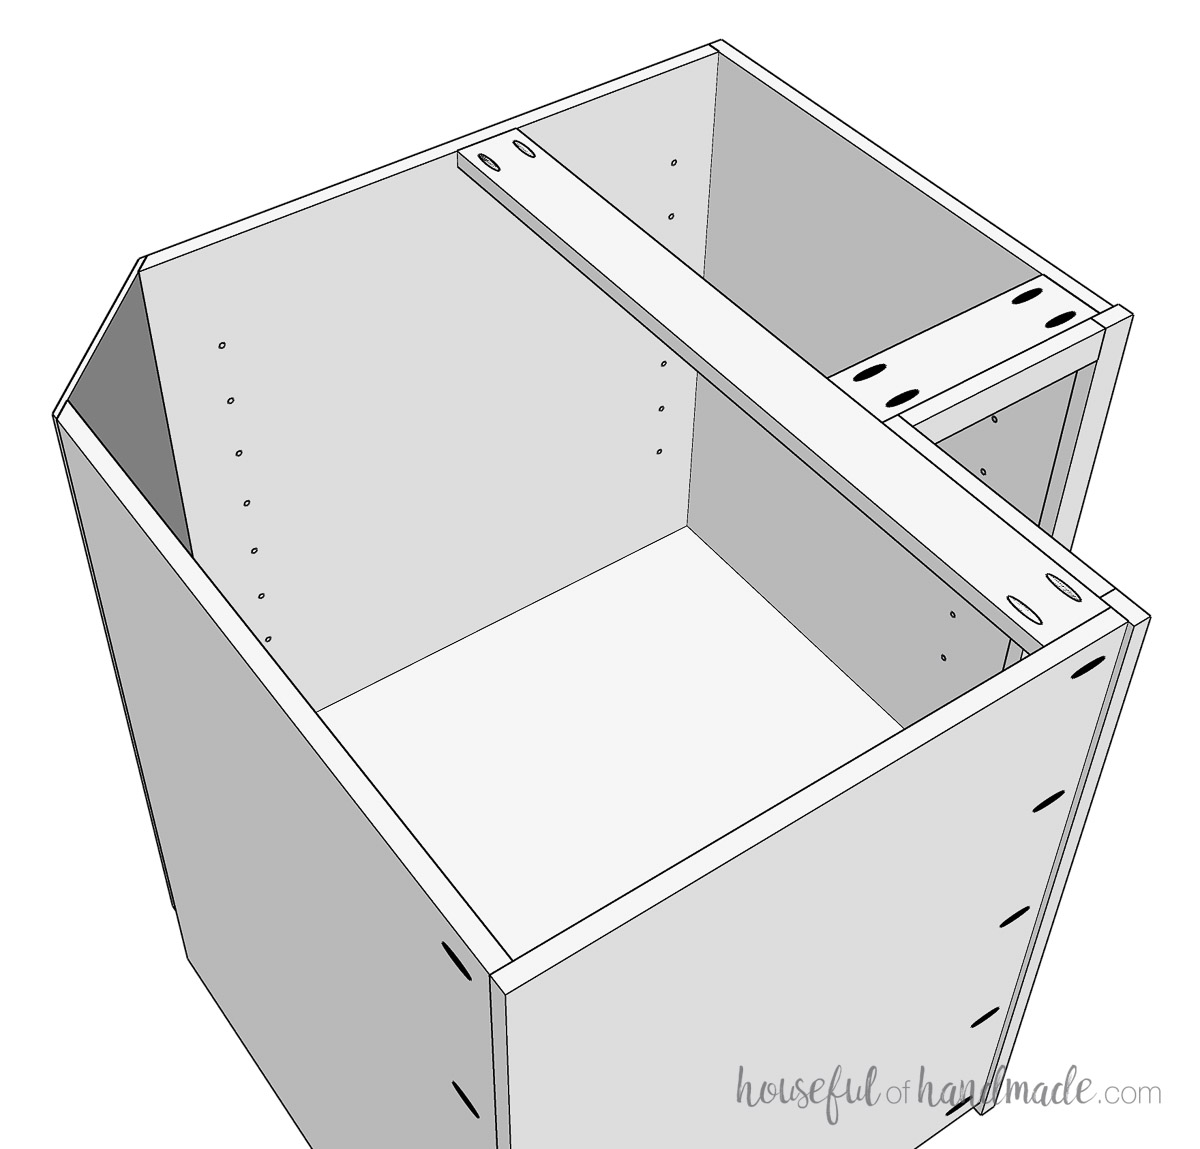
Attach the two support pieces to the top of the cabinet and to each other.
These pieces will mimic the 90 degree notch in the bottom piece and need to be even with it.
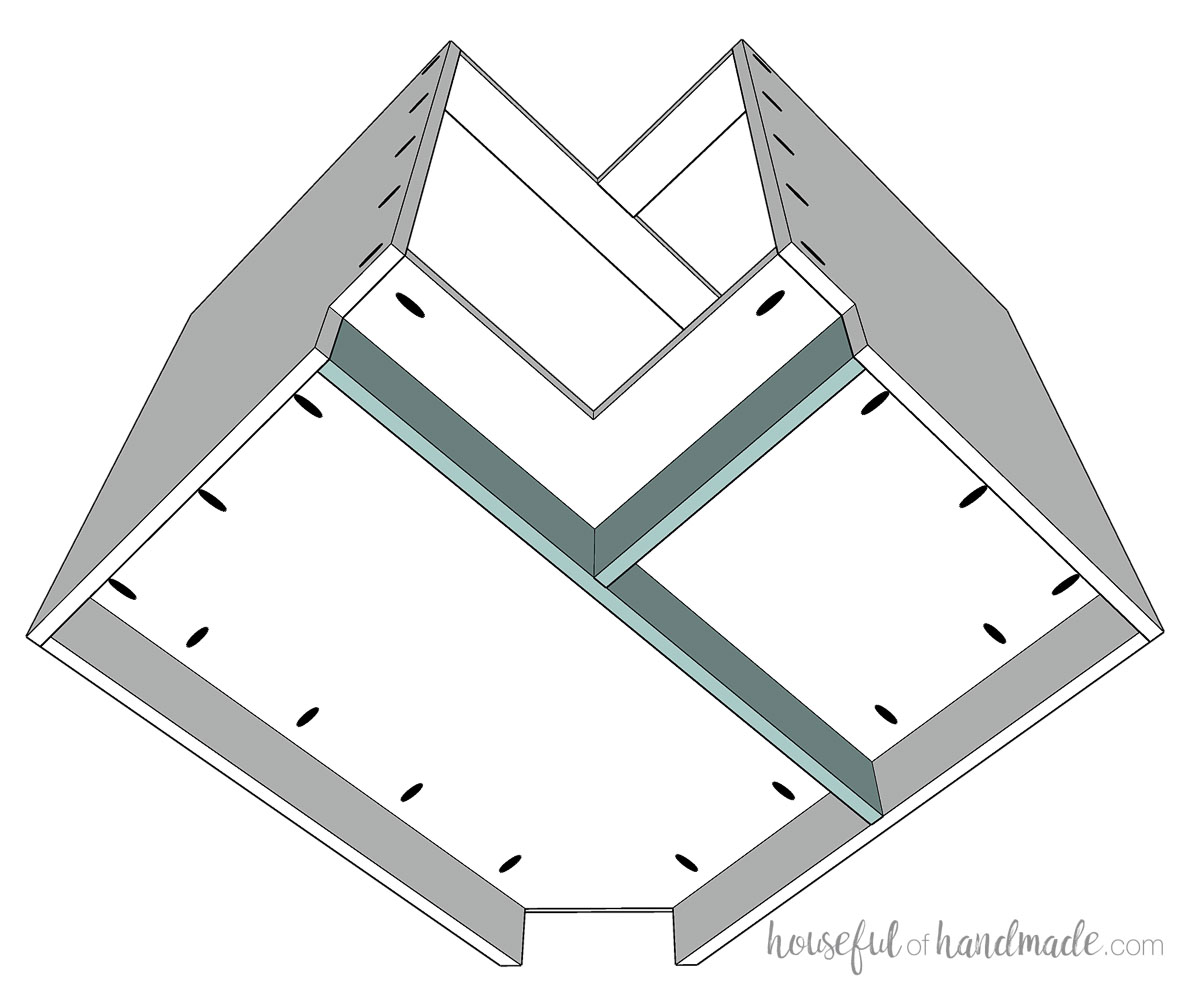
Finish off the back of the cabinet with the 1/4″ thick back corner piece. Secure with brad nails.
The back corner piece will be cut at a 45 degree angle on both sides. It also does not need to be the full length to the ground, you can stop it at the bottom piece to save lumber.
If you are using a notched toe kick, I recommend cutting 1 long piece of 1/4″ plywood to cover the front of the cabinets instead of having a bunch of smaller toe kicks to line up.
But you will need to add some toe kick support pieces to the bottom of your corner cabinet to attach the longer toe kick pieces to.
Use scraps of 3/4″ plywood to create a back for your toe kick.
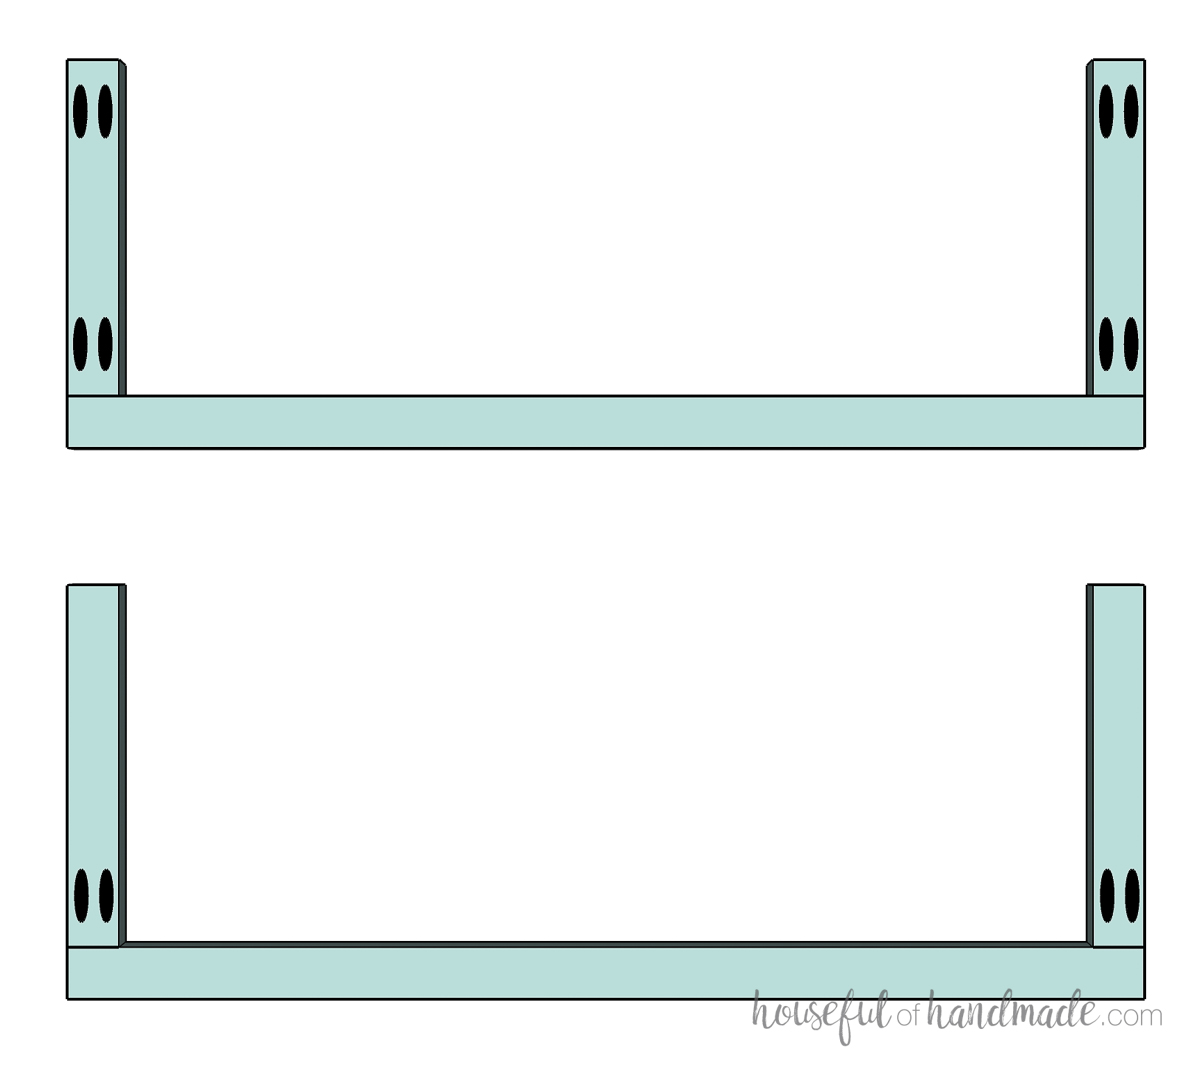
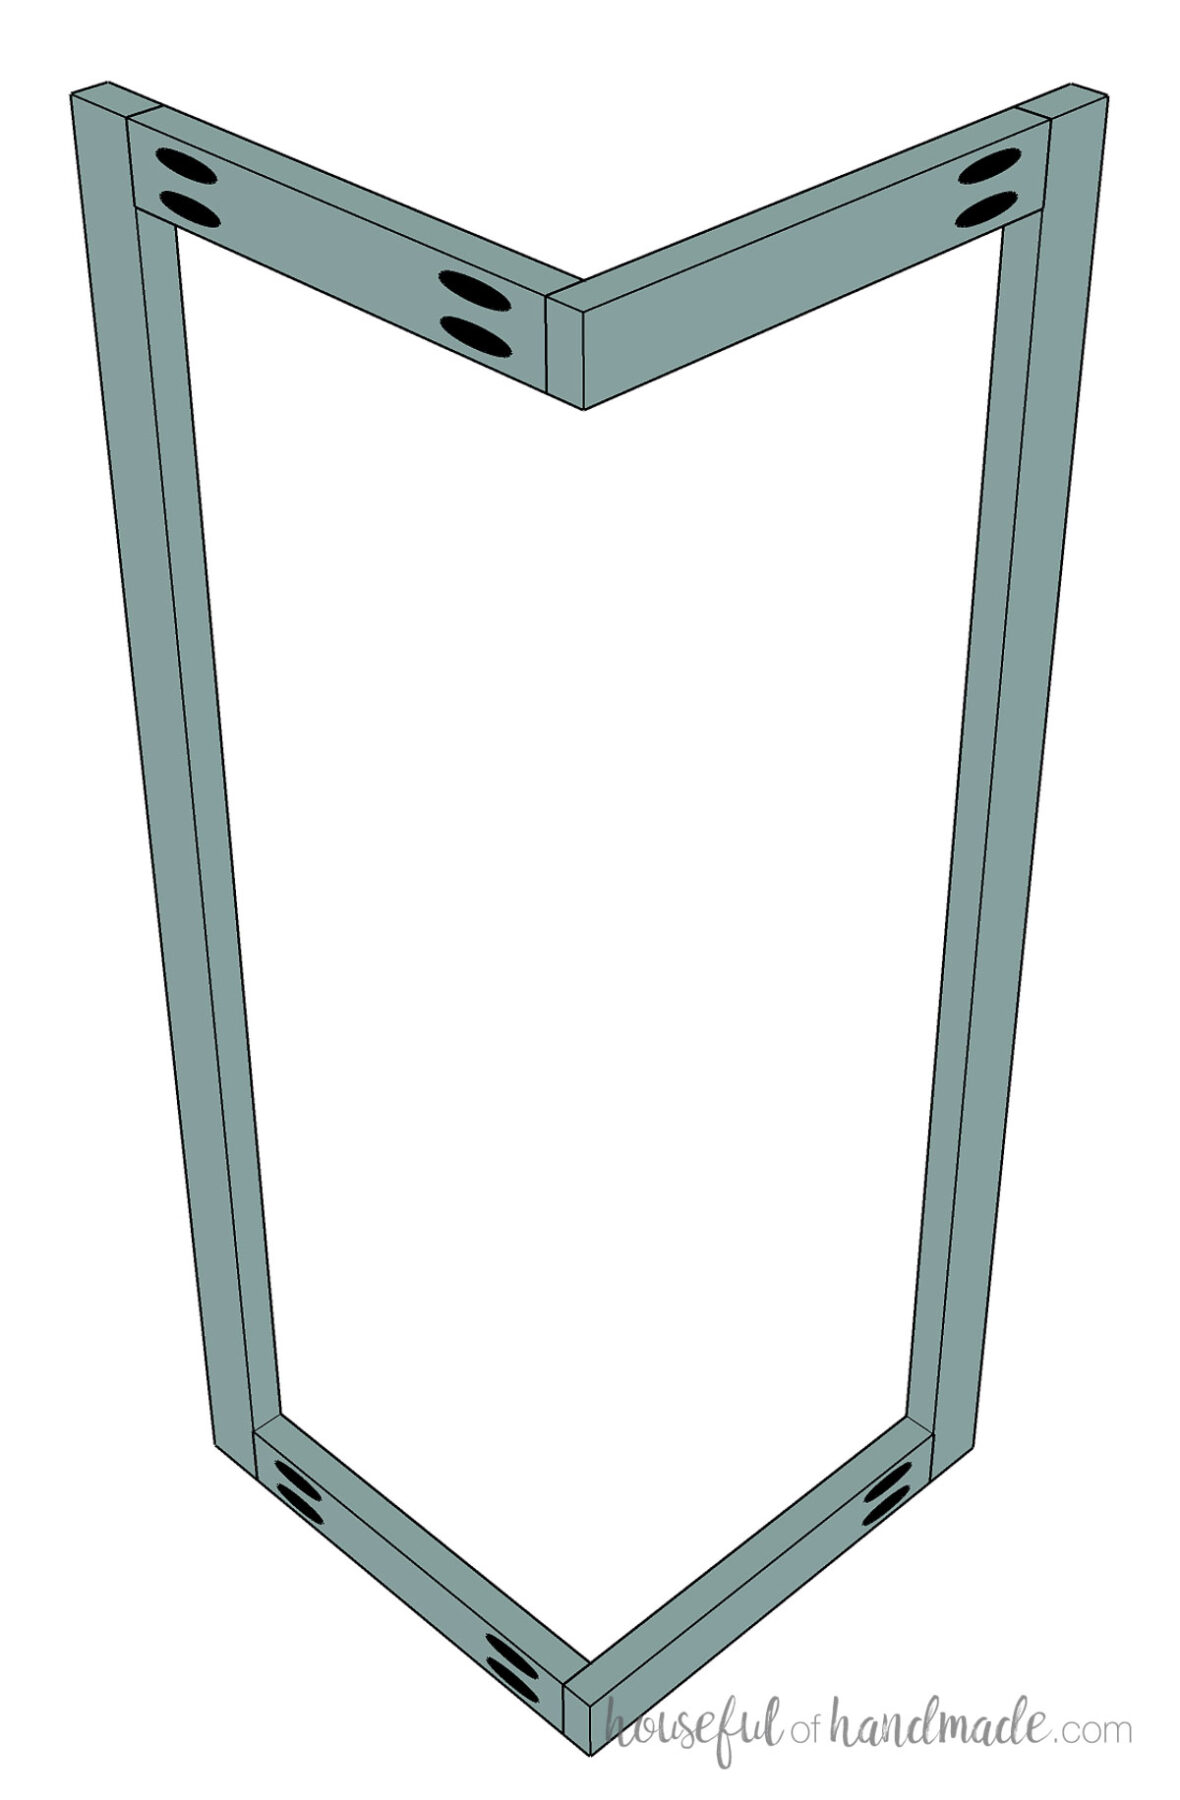
STEP 4- Assemble the face frame
For face frame cabinets, you will need to assemble the face frame at a 90 degree angle to match the notch.
Build each side flat. Attach two identical rails to each stile so they are flush.
Use face frame clamps to keep your face frames flat as you secure them with wood glue and 1 1/4″ pocket hole screws.
Then use 90 degree clamps to attach the two face frame pieces together.
Ensure the pocket holes are hidden on the back of the face frame when assembled.
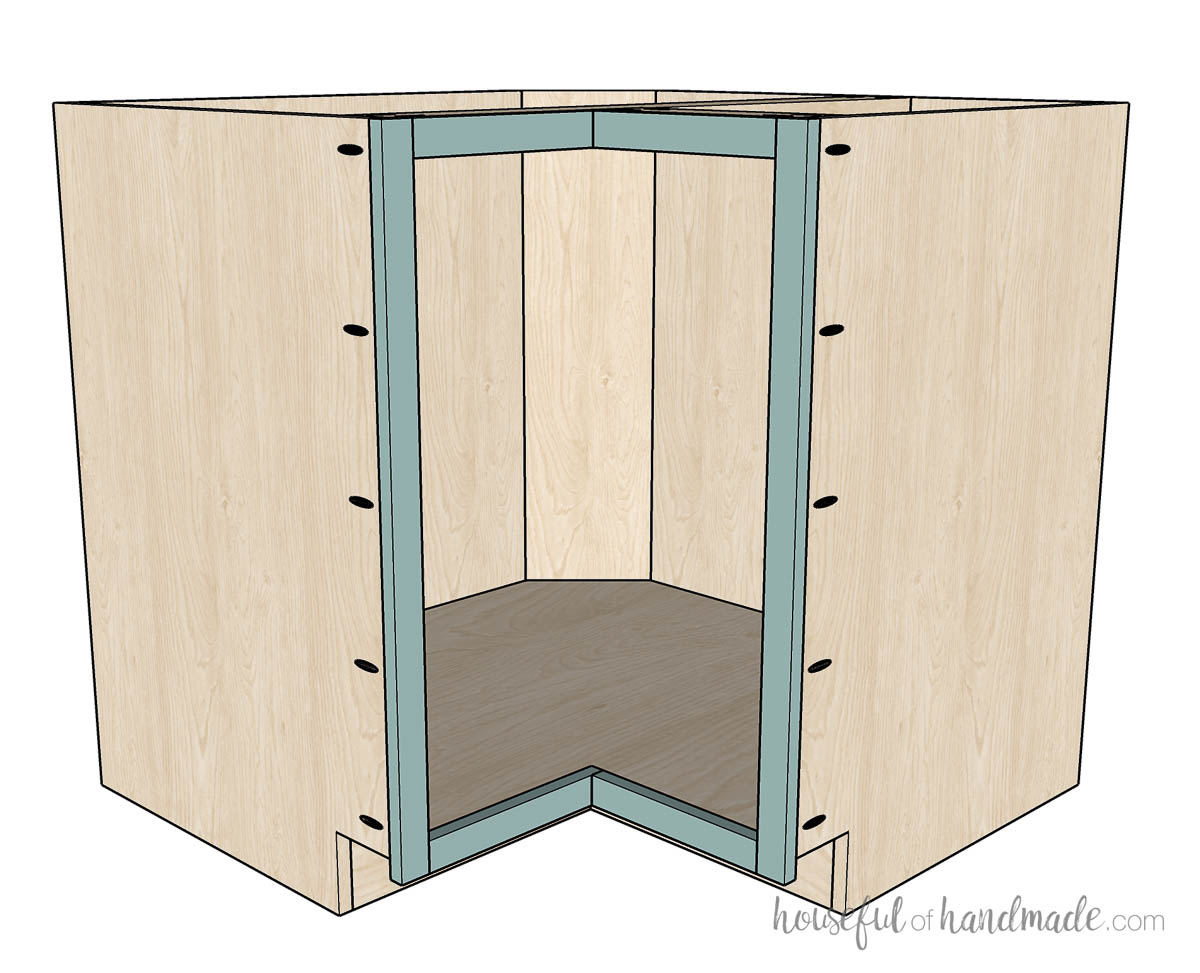
STEP 5- Finish the cabinet
For face frame cabinets:
If you want to paint/stain the face frame and the cabinet box the same color, you can attach the face frame now.
If you used prefinished plywood, paint/stain/seal the front and sides of the face frame before attaching it. Learn how to paint unfinished cabinets here.
To attach the face frame, add wood glue to the edge of the plywood cabinet carcass.
Clamp the face frame to the cabinet box making sure it is square and the face frame hangs over the edge 1/4″. Secure with 1 1/4″ pocket hole screws with the previously drilled pocket holes on the side pieces.
For frameless cabinets:
Cover the front exposed edges of the cabinet box with iron-on edge banding. Trim around the edge to make it flush.
Now you can paint/stain/seal your cabinets. You can read about how to get a smooth professional paint finish here.
To add shelves to your corner cabinet:
Use a shelf pin jig to drill holes for adjustable shelves in the back and side pieces.
I like to use 6 shelf pins for each corner shelf. Drill them in both sides of the back pieces and on the front side of the side pieces.
You cannot use only 4 shelf pins like a standard cabinet or your shelves may tip.
Now your DIY corner cabinets is ready to install!
Premium cabinet plans include:
- Recommended Tools
- Shopping list
- How to figure cut list for custom cabinets
- Step-by-step instructions with 3D renderings
- Plywood layout tips and examples
- Cabinet making tips & techniques
- Helpful resources
- BONUS: Cabinet cut list calculator
- BONUS: Cut lists for standard sized cabinets
- BONUS: 3D SketchUp file of basic cabinet
Adding doors to a bifold corner base cabinet
When it comes time to add doors to your bifold corner cabinet, I recommend building 2 doors to cover the cabinet opening. Then hinge the 2 doors together in the center.
This way the cabinet door can lay flat when open making it easier to access the inside of the cabinet.
For the hinge, you can use a simple piano hinge or a special bi-fold hinge. A piano hinge will be visible or you can find concealed bifold hinges.
Either way, the hinges that attach the assembled door to the cabinet need to have a high opening angle (170°). This moves the door out of the way of the opening more, making it easier to access items inside.
Or if using a turntable, you can have the door attached to it. This will give your door an inset appearance.
Learn the difference between inset and overlay doors in this post on understanding cabinet door sizes and hinges.
Make sure the lazy Susan you purchase is made to have the doors attached. Then permanently attach the doors together instead of hinges.
You did it! You build your very own bifold corner base cabinet.
Now you can feel confident tackling any other cabinet projects because this is one of the hardest ones!
Happy building,
