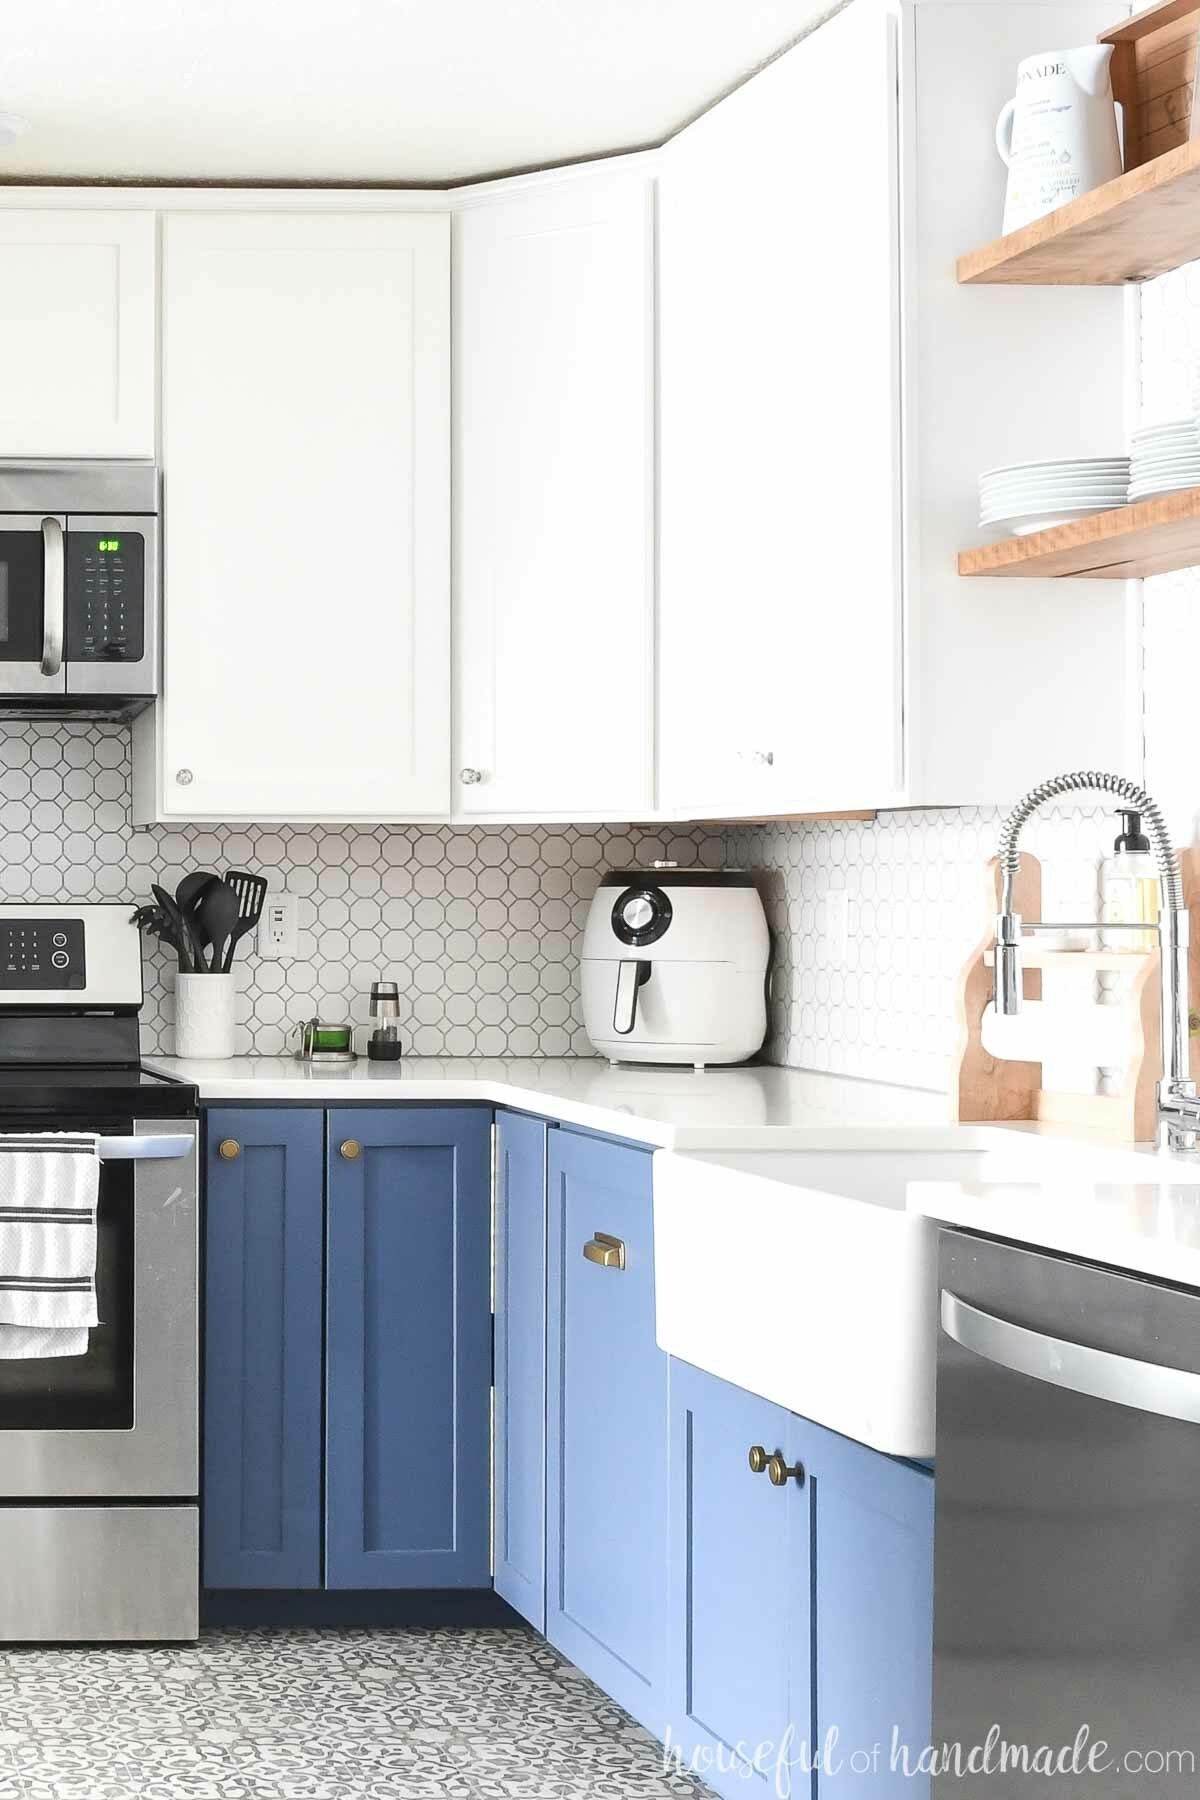
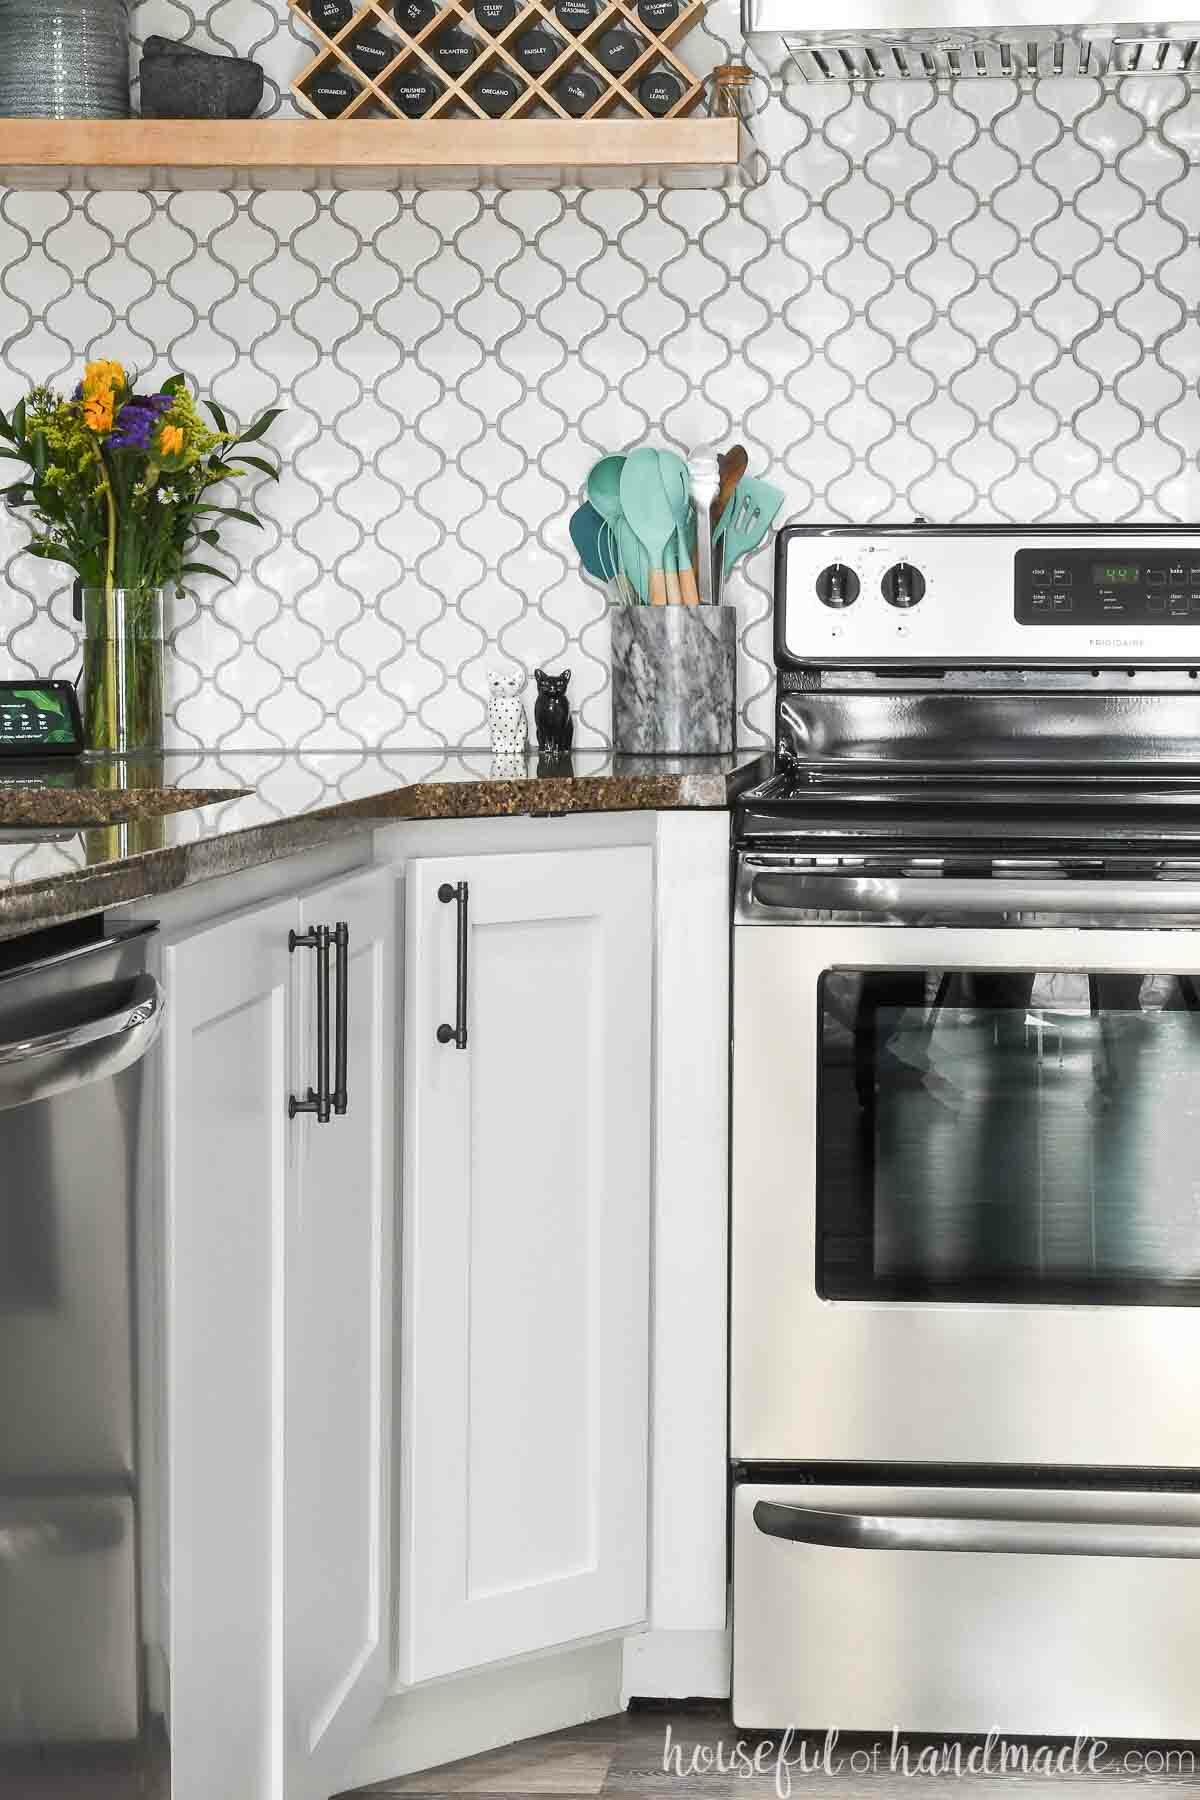
Corner cabinets are the most complicated cabinet when building DIY cabinets. But they are a great way to take advantage of all the corner space.
Corner cabinets can be used in both base cabinets and wall cabinets. They are only used to connect two runs of cabinets in a corner. If you want to end a bank of cabinets in a corner, just use a standard cabinet.
Make sure to read the general how to build cabinets post here so you can see the different styles of cabinets, pros and cons of each, a general overview of cabinet parts and general assembly.
This post may contain affiliate links. As an Amazon Associate I earn from qualifying purchases. Click here to read my full disclosure policy.
In this post we will look at specific design elements and assembly for corner cabinets.
Types of Corner Cabinets
There are 3 main types of corner cabinets. Each has their own pros and cons. Which one you use in your next cabinet project is based on your specific space and storage needs.
Bifold Corner Cabinet
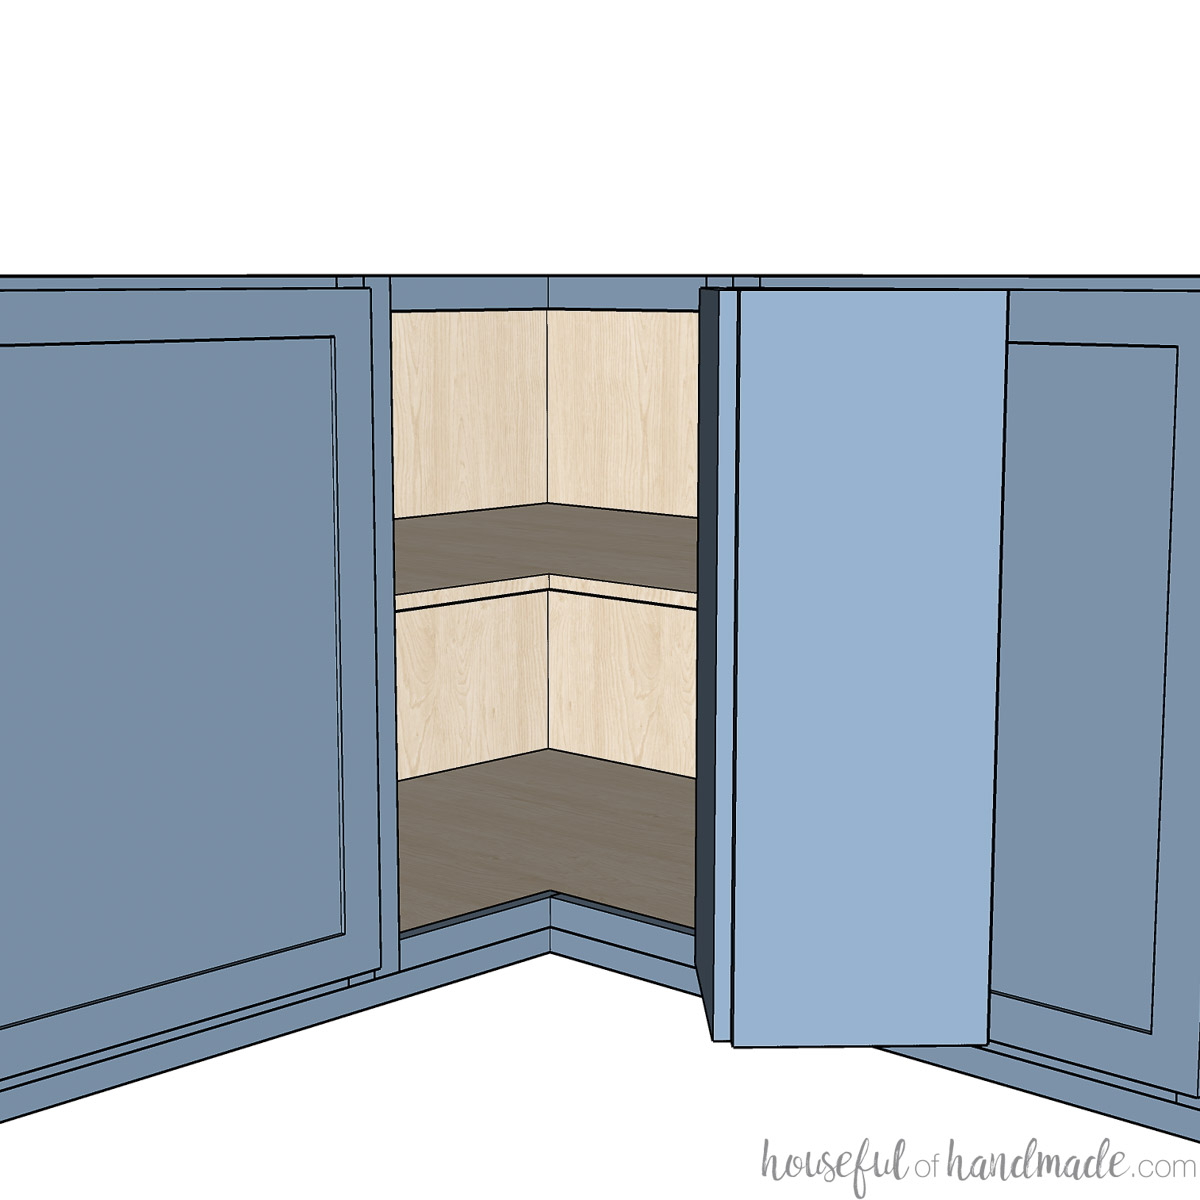
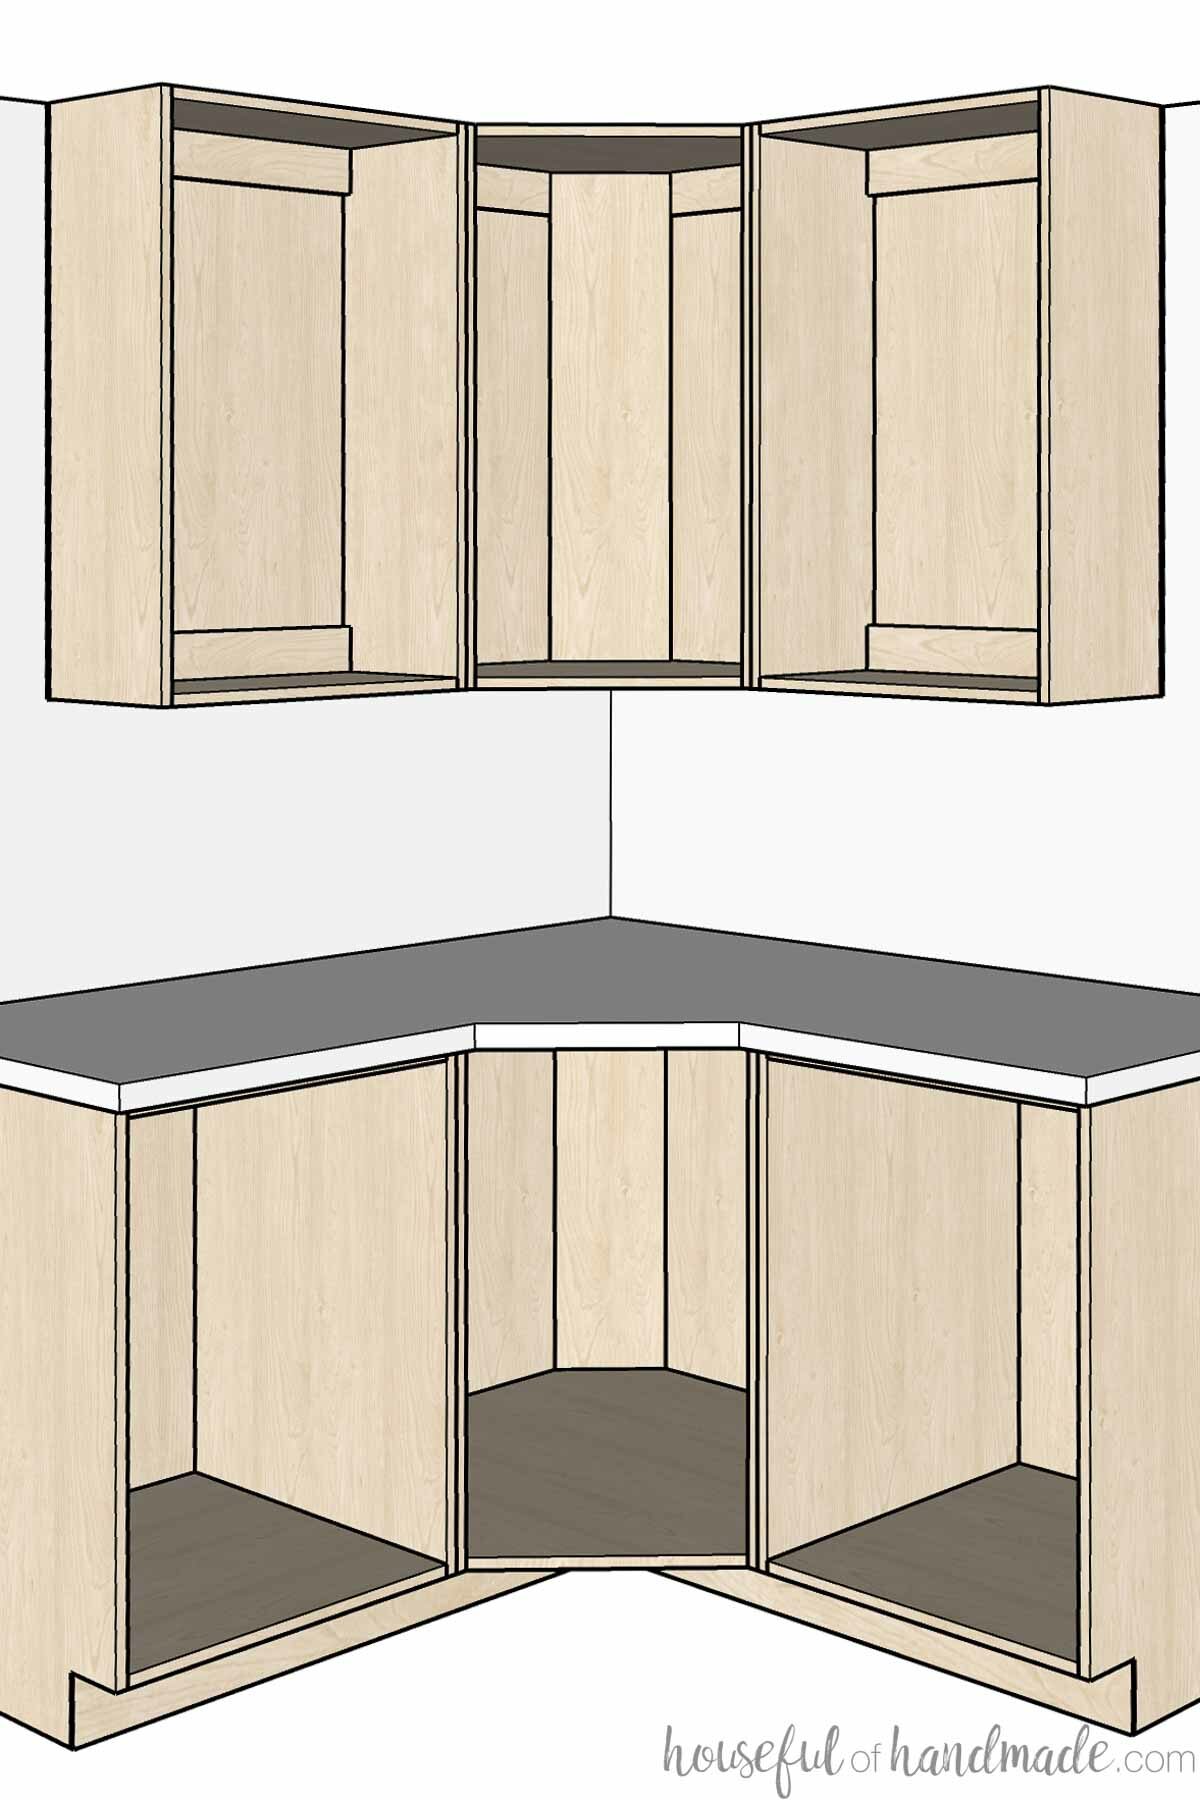
A bifold corner cabinet can be used as a wall or base cabinet. If you want to add a lazy Susan to your corner base cabinet, this is the style of corner cabinet you need.
The front of a bi-fold cabinet is notched out to match the cabinets to either side of it. It is typically sized as a square (ie, 36″ x 36″ or 12″ x 12″).
But because you are making it yourself, you can build it any size to fit what you want to store in it.
The face frame of a bifold corner cabinet is assembled at a 90 degree angle to match the notched out area. This means you also need a 90 degree cabinet door.
I recommend building 2 doors to cover the cabinet opening, and using a hinge in the center. This way the cabinet door can lay flat when open making it easier to access the inside of the cabinet.
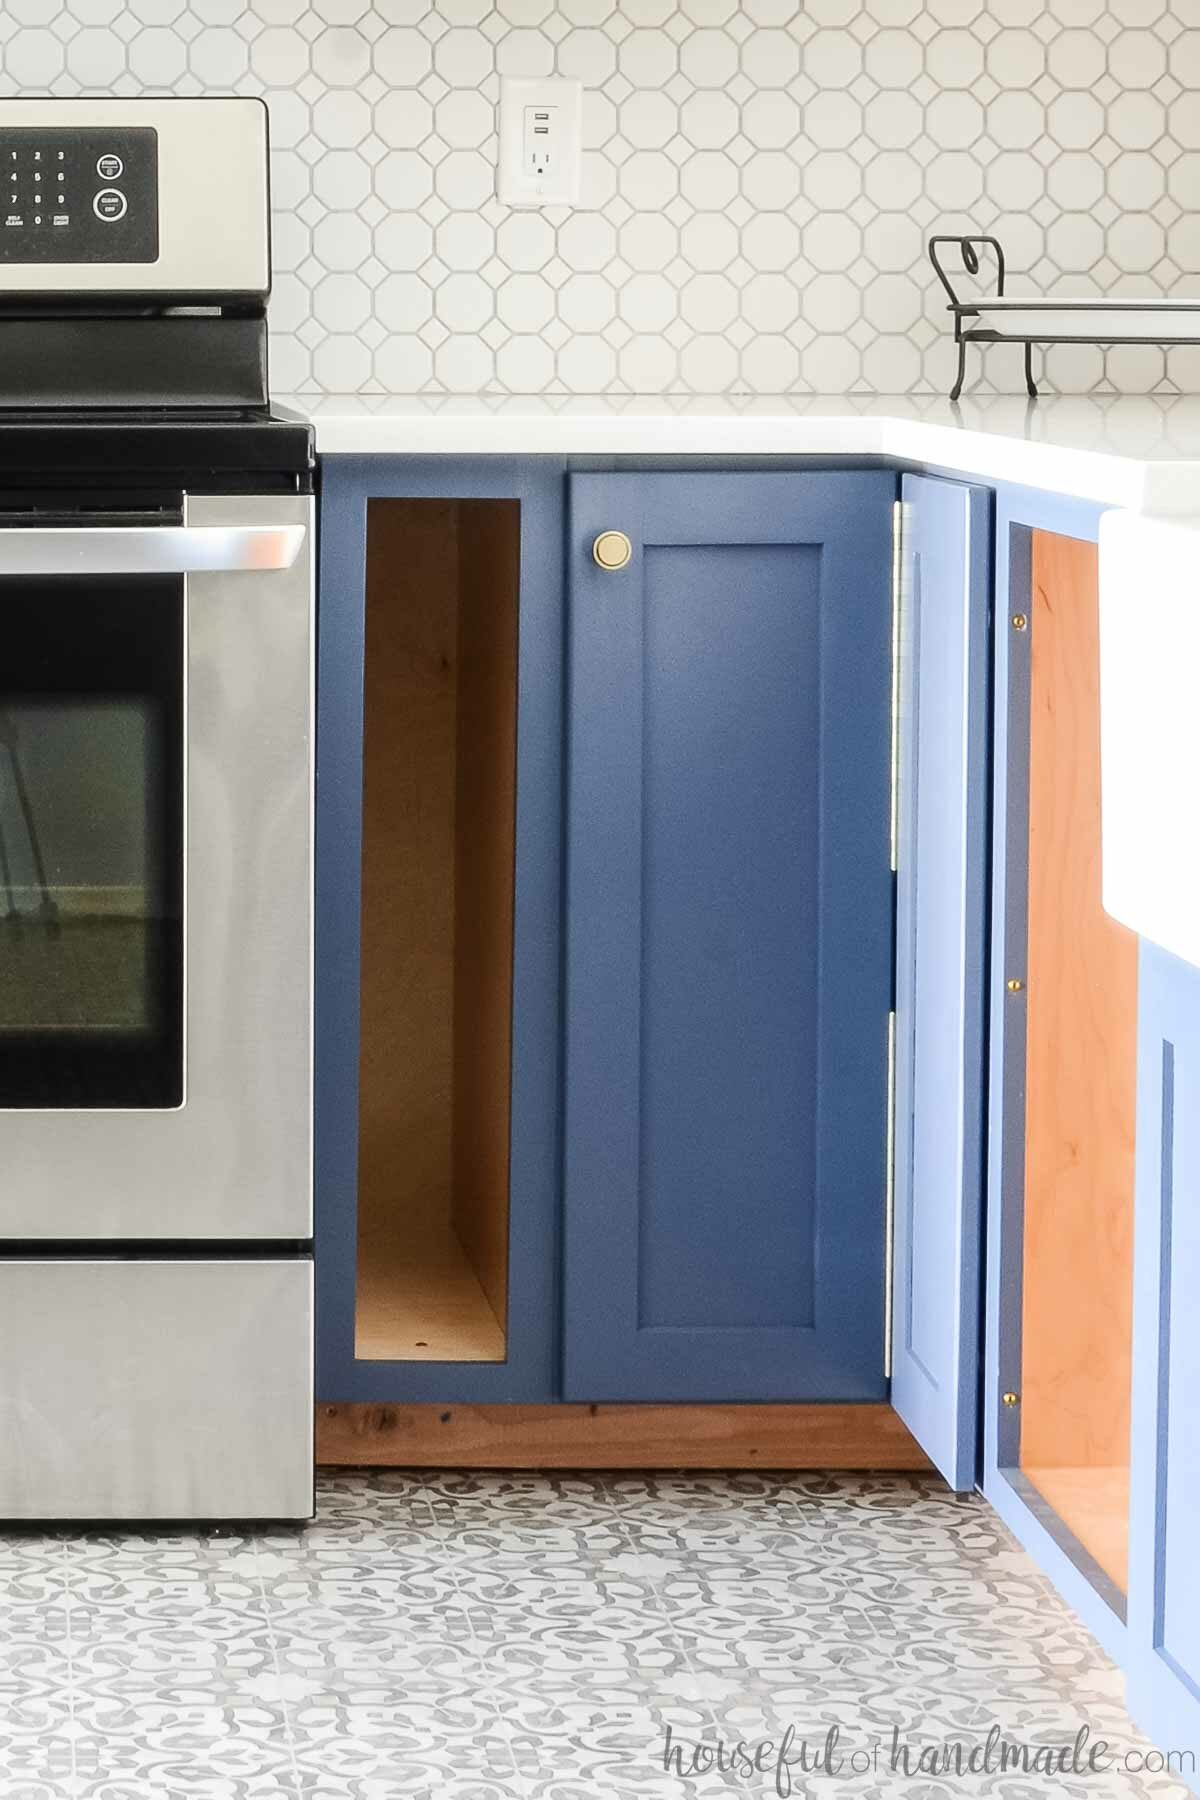
For the hinge, you can use a simple piano hinge or a special bi-fold hinge. A piano hinge will be visible (see photo above). You can find concealed bi-fold hinges.
Either way, the hinges that attach the door to the cabinet need to have a high opening angle (170°). This moves the door out of the way of the opening more, making it easier to access items inside.
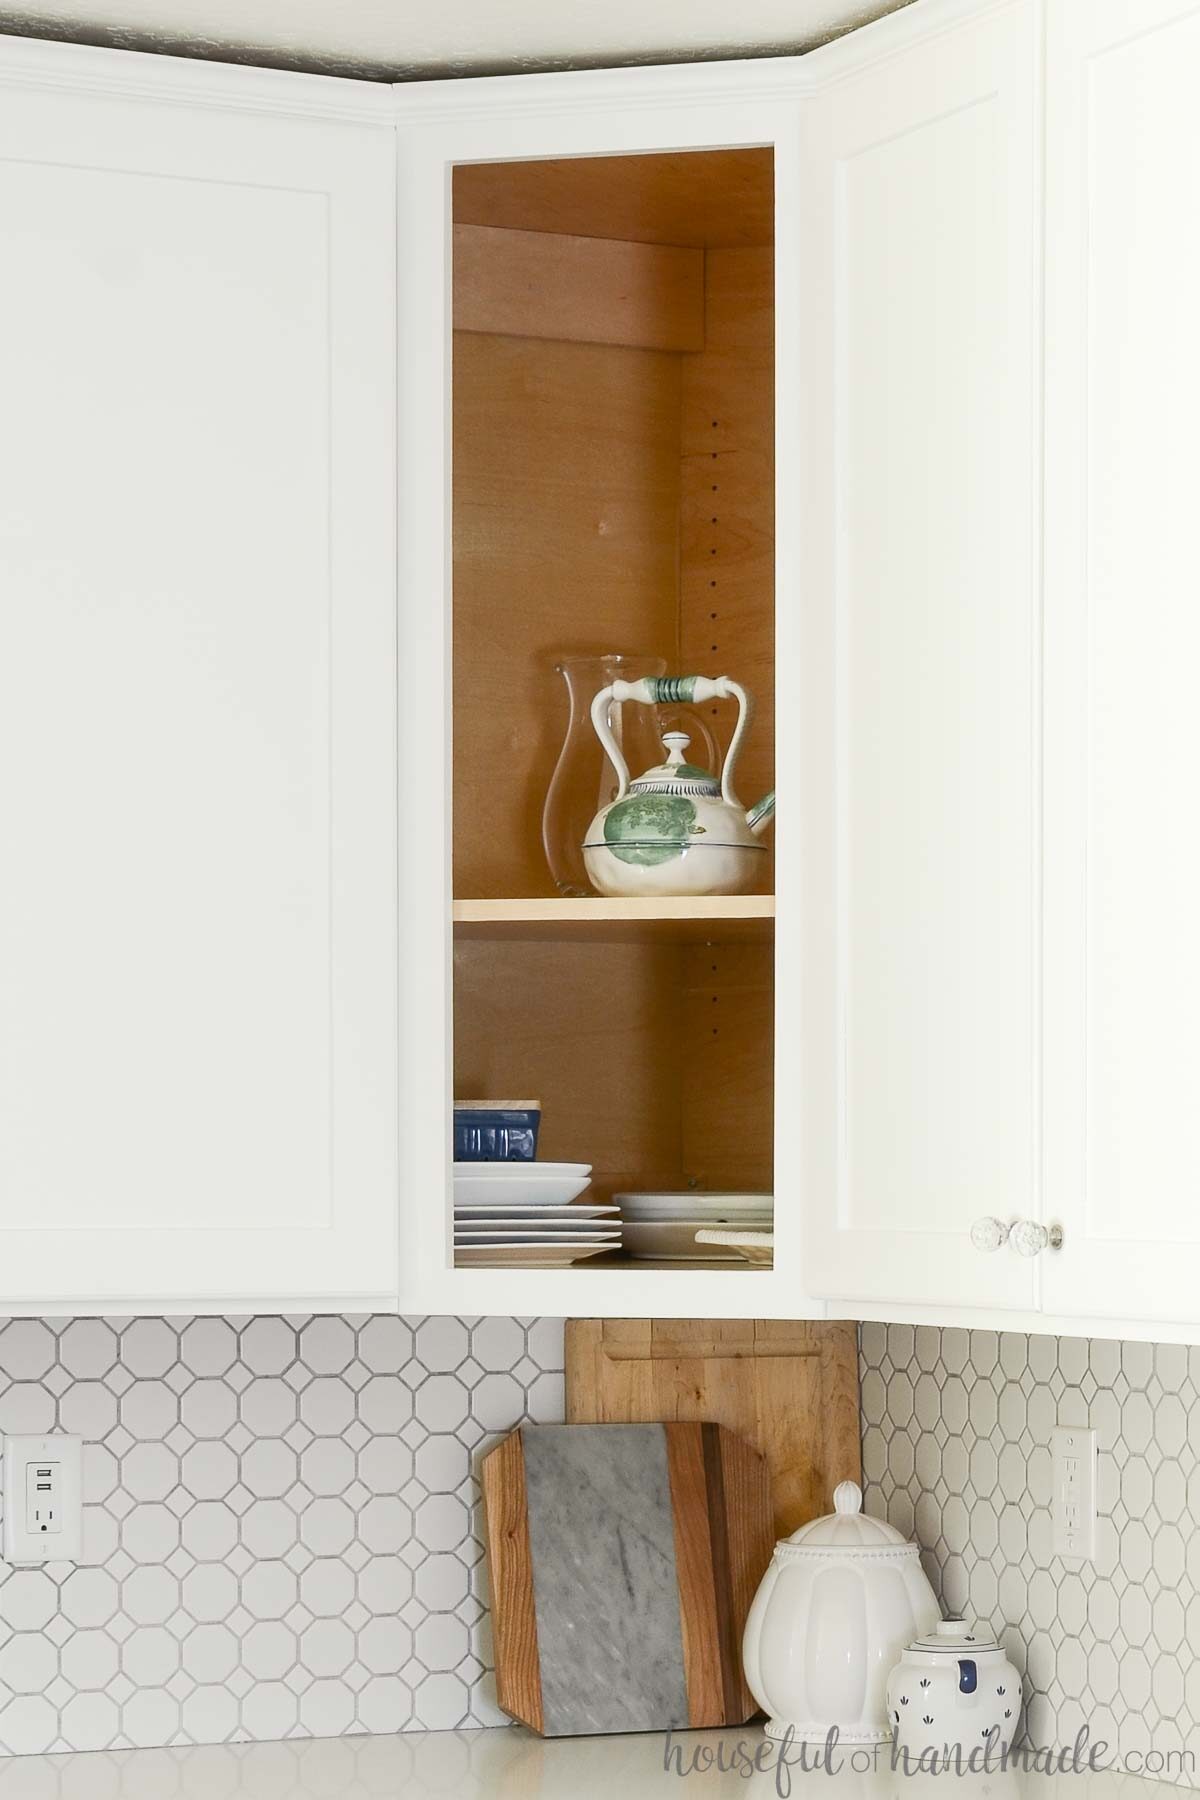
Diagonal Corner Cabinet
Diagonal corner cabinets are typically used on the wall. They are a great wall cabinet for larger items like platters since they create a deeper cabinet than the standard 12″.
But you could also use a diagonal corner cabinet for a base cabinet if it works with your design and space. Just know that the corner will be at an angle instead of a 90 degree.
Face frame diagonal cabinets can be a bit more challenging to get the front to line up. It requires the face frame and side pieces to be cut at a 45 degree angle.
Frameless (or European style) corner cabinets do not have any angled cuts at the front of the cabinet. But you may need to order special hinges because the door will not close at a 90 degree angle to the cabinet like other cabinets.
Also for face frame diagonal corner cabinets, you need to have a larger face frame or less overlay on your corner cabinet door to prevent it from bumping up against the doors on the adjacent cabinets.
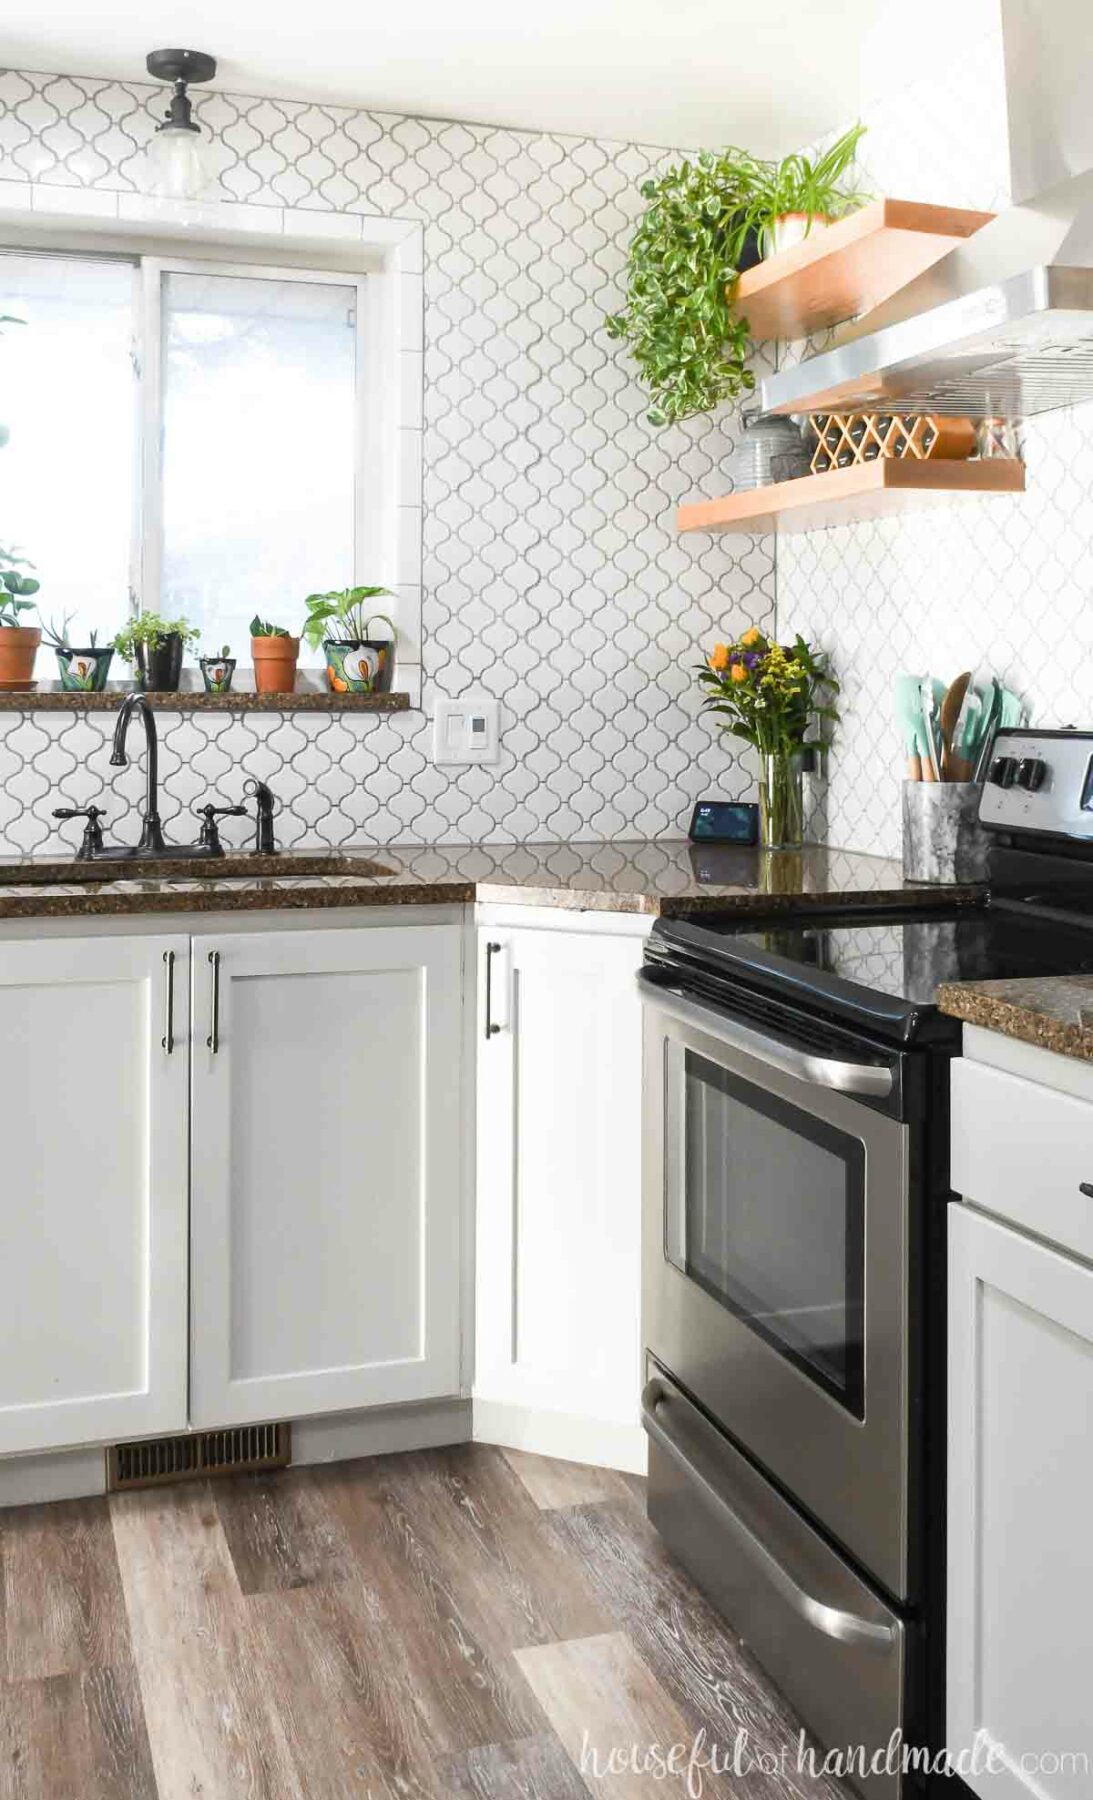
In my kitchen remodel, I used 1 1/2″ wide face frames on my cabinets with a 1 1/4″ cabinet overlay. For my diagonal wall cabinet, I had to use a 1/2″ overlay (with a 1/2″ overlay hinge) on the door because the larger overlay did not fit.
Learn more about door sizes, hinges and overlays here.
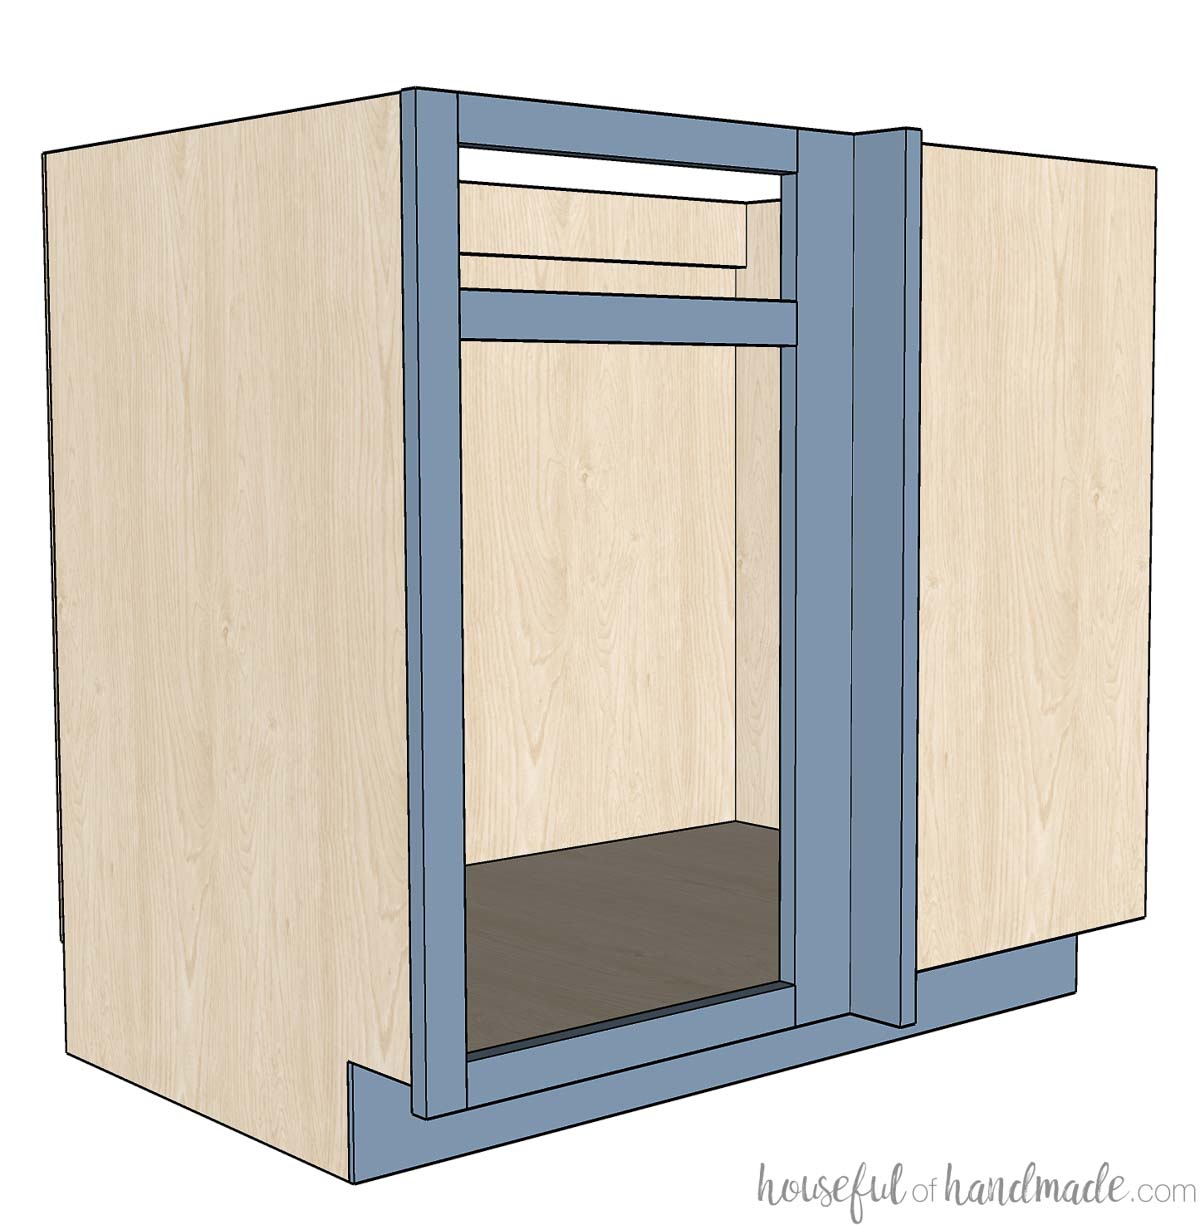
Blind Corner Cabinet
A blind corner cabinet can be used as a wall cabinet or base cabinet. It looks like a regular cabinet from the front, but when you open it up, the cabinet goes back behind the adjacent cabinet.
Since base cabinets are typically 24″ deep, the hidden part of a blind base cabinets usually does not go all the way to the back wall.
Otherwise it would be too hard to reach the items in the very back. But the gap in the back vanishes when the countertops are installed.
However, blind corner wall cabinets do need to go all the way to the back wall since there is no easy way to hide a gap. And then it can be secured firmly to the back wall to help hold the weight of the cabinet.
You can buy fancy slide out shelves or pull out organizers for your blind corner cabinet to make it easy to access items in the back corner. If you plan to use one of these inserts, make sure to build your cabinet to fit the required dimensions.
Blind corner cabinets require a wide stile and spacer in the corner. This allows the doors in the corners to open without bumping into each other or the door pulls.
This can affect the look if you prefer a modern kitchen with very small face frames and full overlay doors.
Custom Corner Cabinet Ideas
The best part of building your own cabinets is that you can customize them however you want!
Here are a few ideas for creating a custom corner cabinet:
- Create an open shelf (no doors) bi-fold corner wall cabinet for display items
- Build an extra tall diagonal wall cabinet to sit on top of your countertop for added storage
- Add a drawer above a blind corner cabinet base cabinet
The possibilities are endless when you make your own DIY cabinets!
How to Build a Corner Cabinet Box
Tools & Materials
This post only addresses tools and supplies needed to build the cabinet boxes. I go into detail on how to build cabinets without expensive tools here.
For details on tools and materials needed to build cabinet doors, check out these 3 ways to build DIY cabinet doors.
Tools needed:
- Miter saw
- I recently upgraded to this larger sliding miter saw (watch for it to go on sale), but all my projects before were built with this inexpensive miter saw that I loved.
- Table saw or Circular saw with guide track
- Pocket hole jig
- Drill
- Impact driver (optional, but I love not having to switch bits with the drill)
- Right angle clamp
- Face clamps
- Squares
- Optional: Shelf pin jig
Supplies:
- Wood products:
- 3/4″ plywood
- 1/4″ plywood
- Optional: 1x boards for face frame cabinets
- Optional: Plywood edge banding for frameless cabinets
- Optional: 2×4 boards for toe kick base
- Wood glue
- If using pre-finished plywood, use melamine glue to get strong joints
- 1 1/4″ pocket hole screws
Since there are many different types of corner cabinet boxes, this post will be a general overview of how to build corner cabinets. Read How to Build Base Cabinets and How to Build Wall Cabinets first to answer specific questions about those design elements.
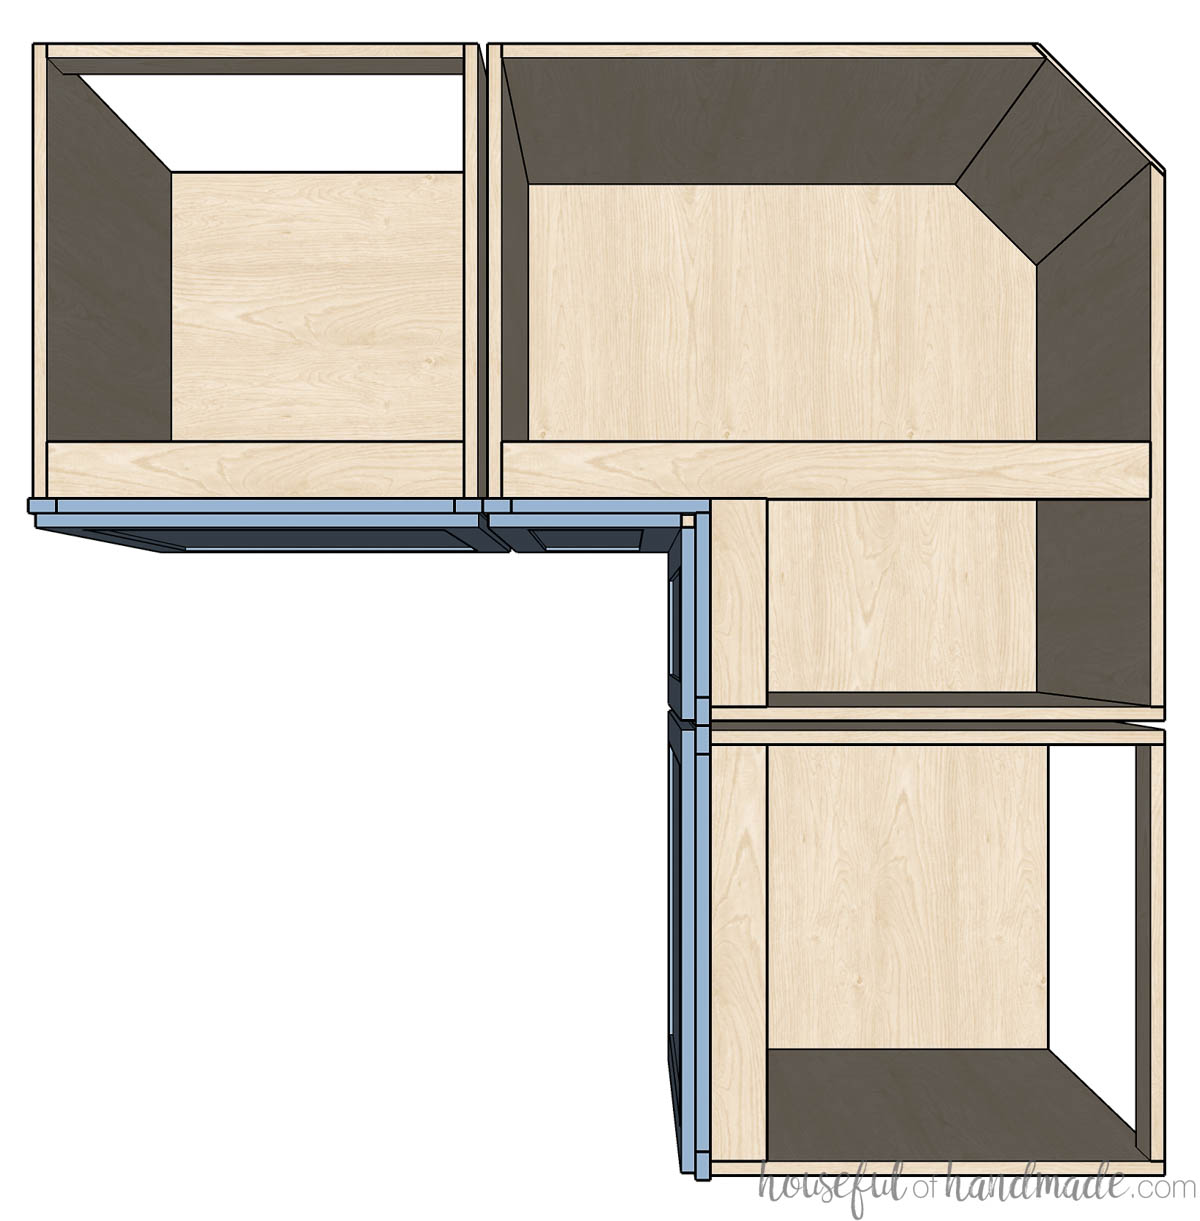
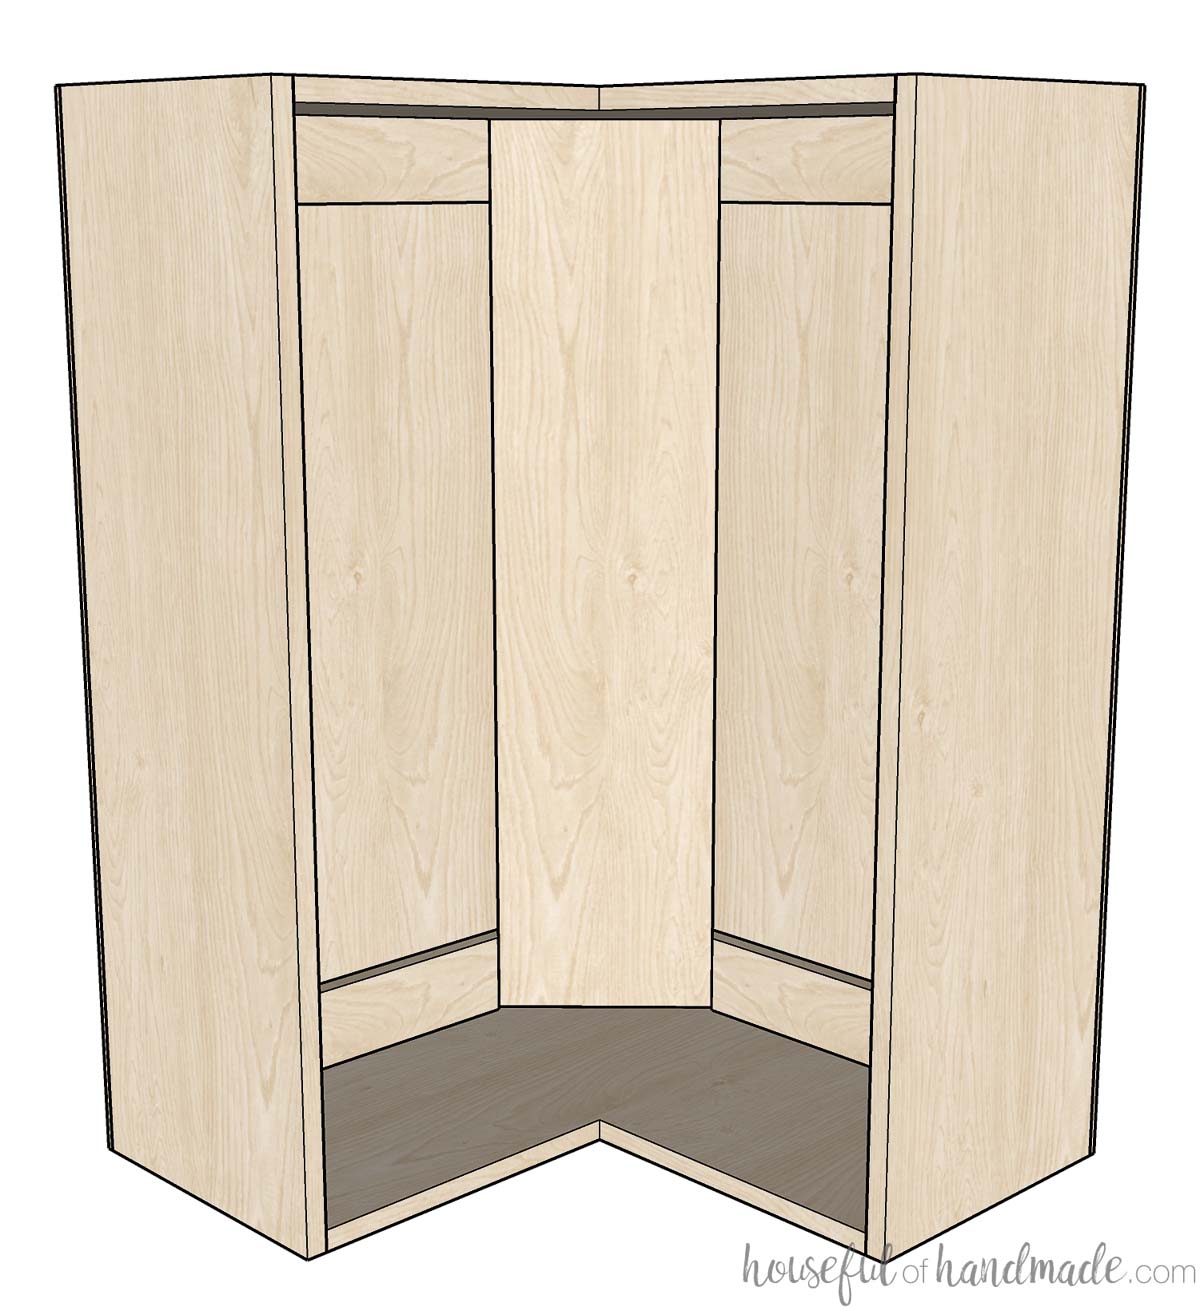
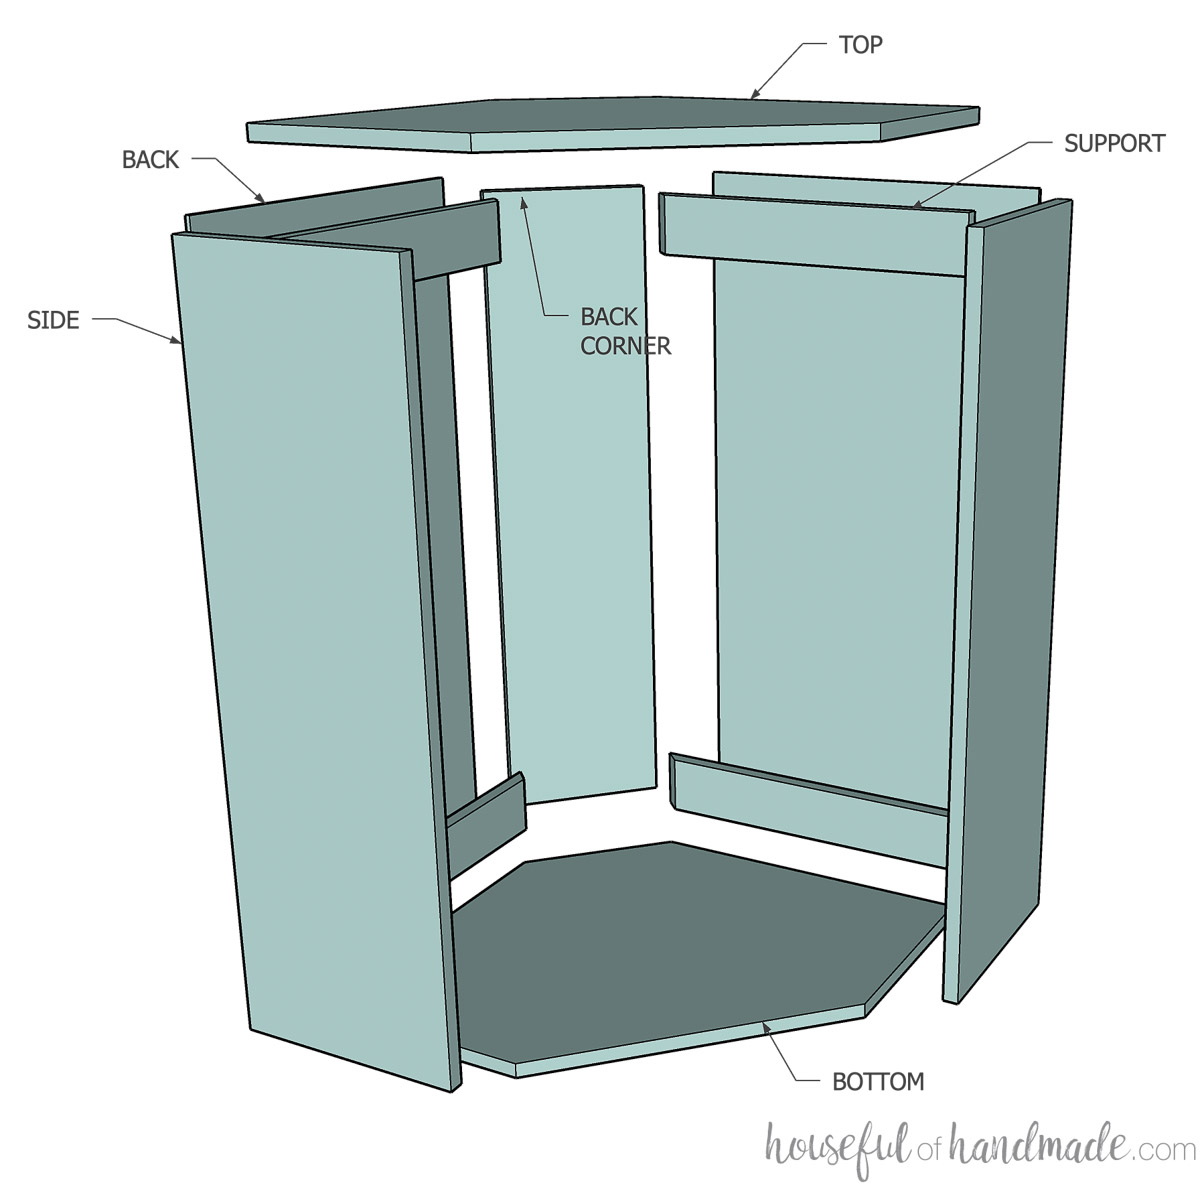
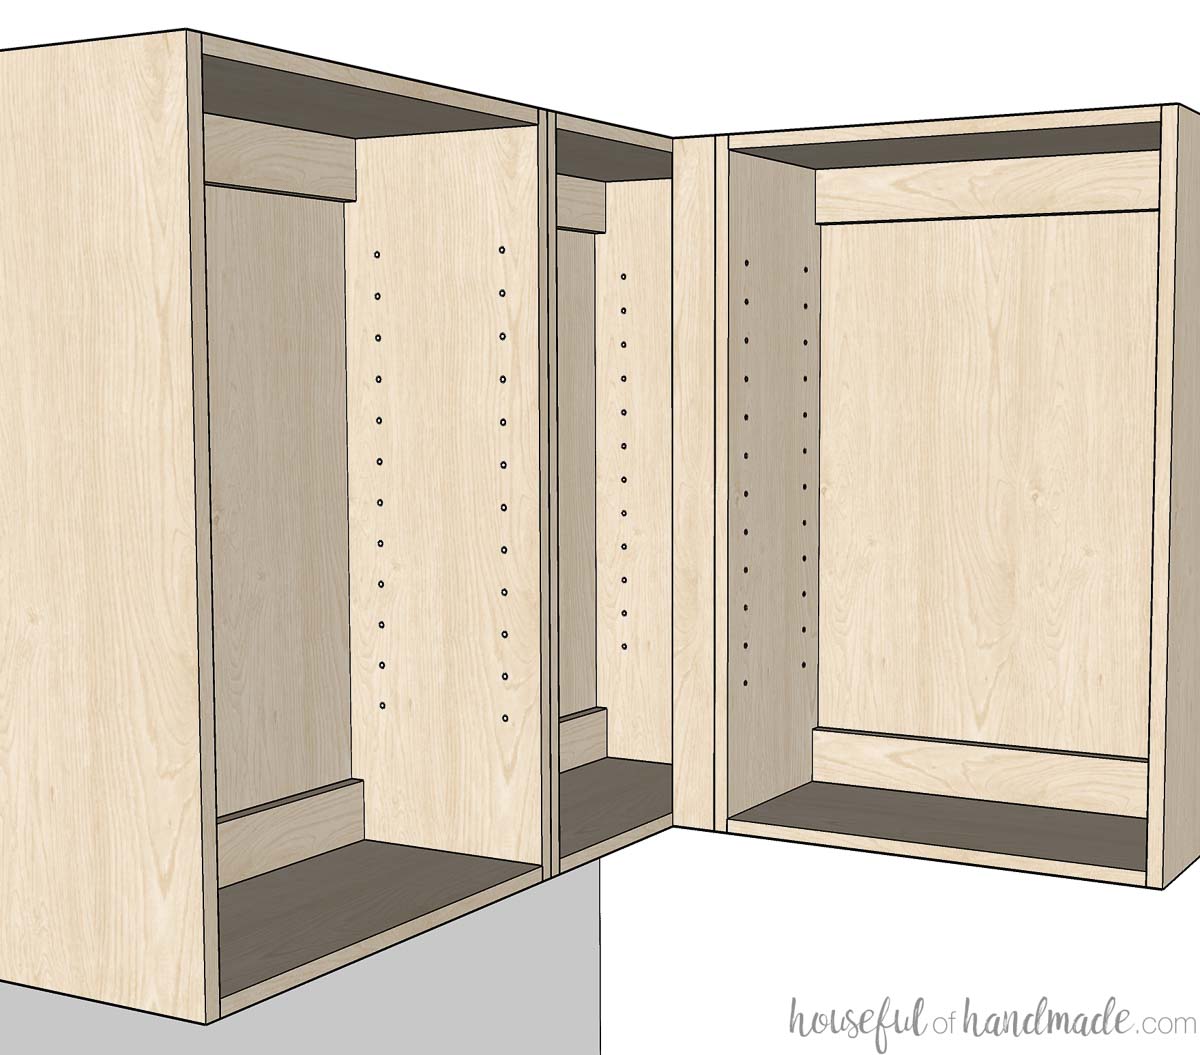
Bi-Fold Corner Cabinet Box
Each bi-fold corner cabinet will have the following parts:
- 2 side pieces
- 2 back pieces
- 1 bottom piece
- 1 back corner piece
- 2-4 support pieces
Optional pieces needed for specific cabinet types:
- Toe kick (for base cabinets)
- Top piece (not needed for base cabinets with countertop)
- Face frame (for face frame cabinets)
- 2 face frame stiles
- 4 face frame rails
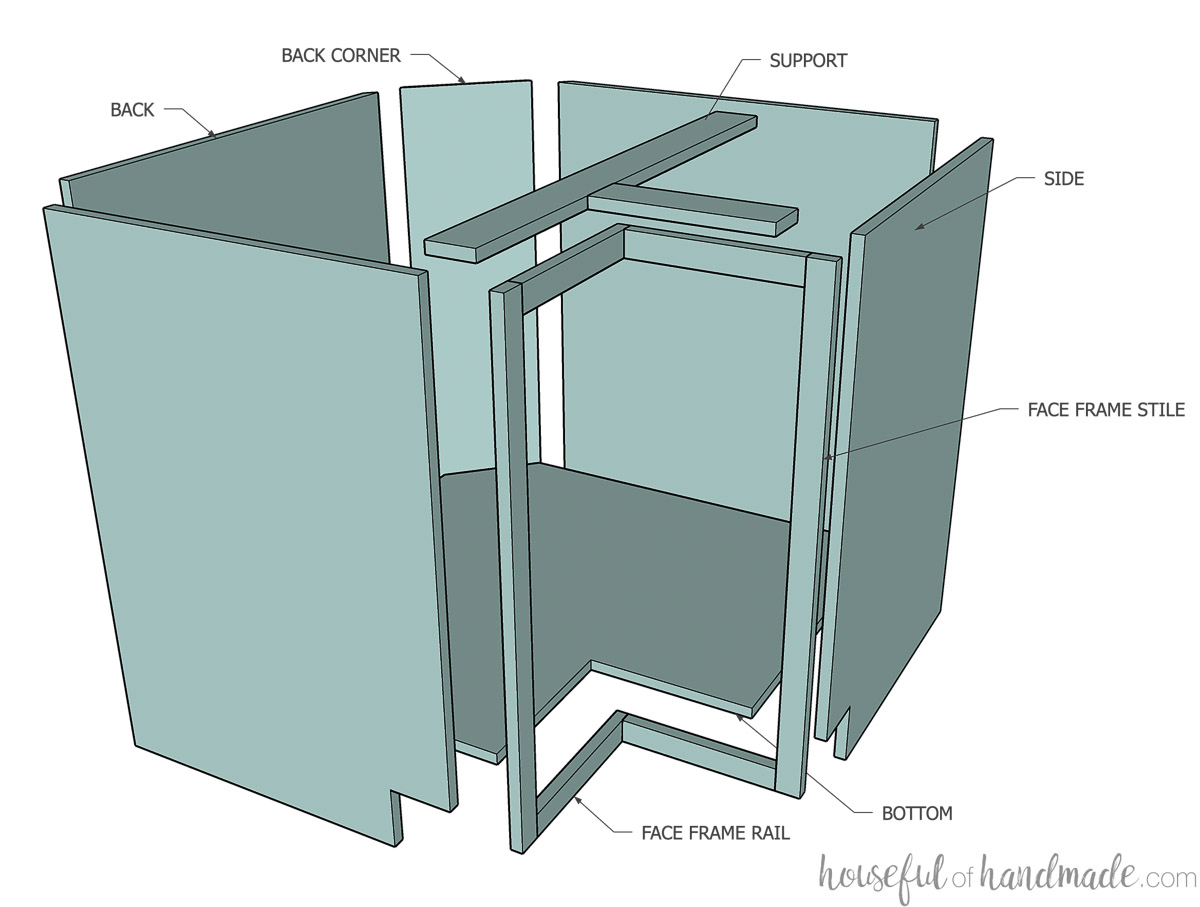
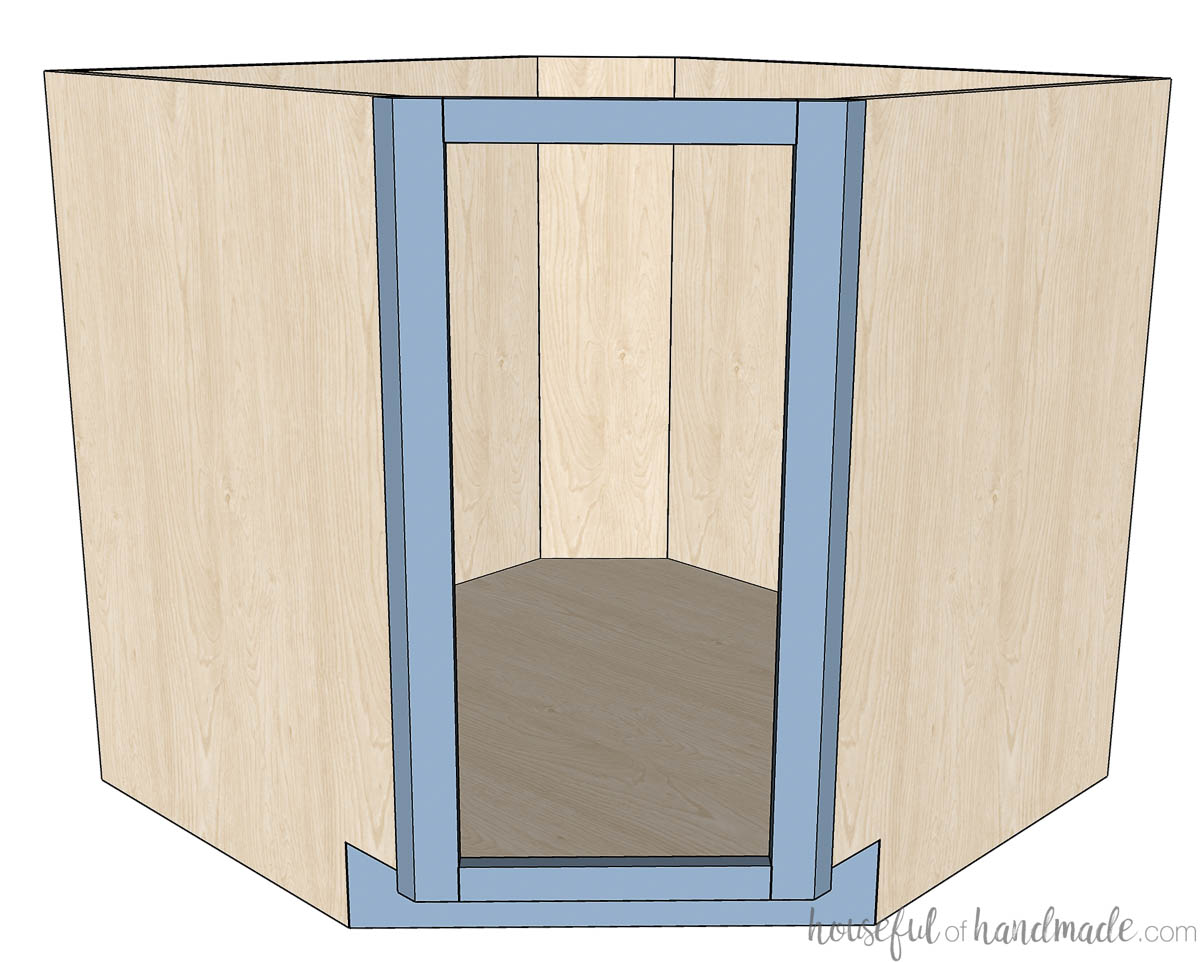
Notch out the bottom and top (if using) at a 90 degree angle so it is flush with the front of the side pieces on each edge.
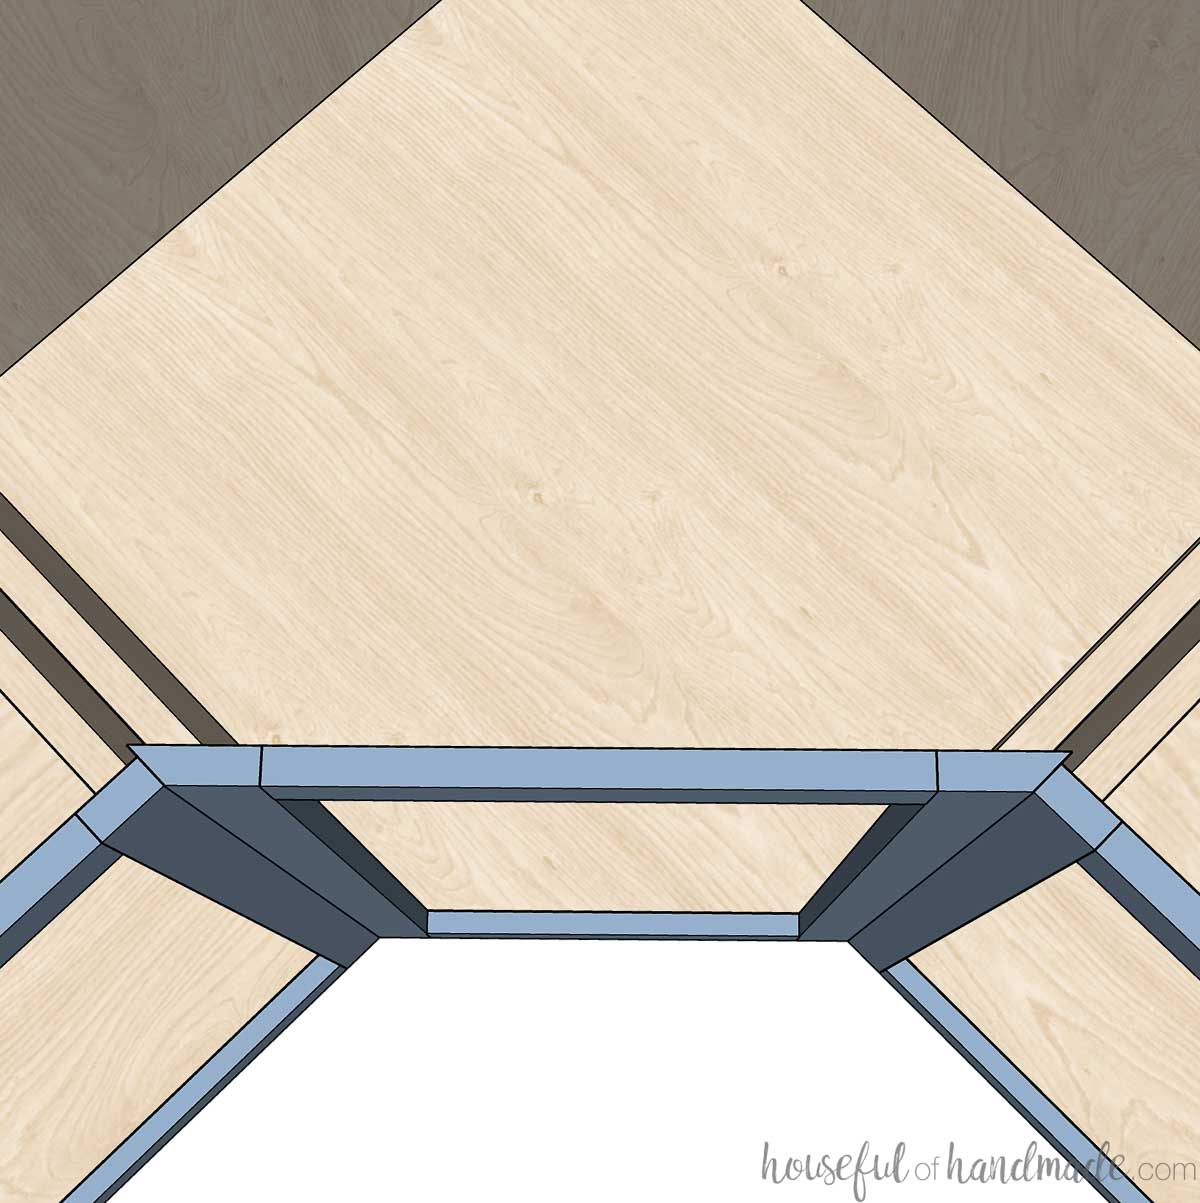
The back is also cut at a 45 degree angle about 4-8″ in from the back. This is necessary to ensure the box fits into the corner properly since most corners are not exactly 90 degrees because of the drywall mud used to seal the corners.
For face frame cabinets, you will need to assemble the face frame at a 90 degree angle to match the notch. Build each side flat, then attach them together at the top and bottom.
For base cabinets, the back pieces are built with 3/4″ plywood and the back corner is made from 1/4″ plywood. Cut the back edges of the back pieces at a 45 degree angle so the back corner piece sits flat.
For wall cabinets, the back corner piece can be cut out of 3/4″ plywood with the back pieces out of 1/4″ plywood.
Use support pieces at the top and bottom of the cabinet to connect the back corner to the sides. Attach the cabinet to the wall into studs through these support pieces.
Assemble the pieces like you would any base or wall cabinet.
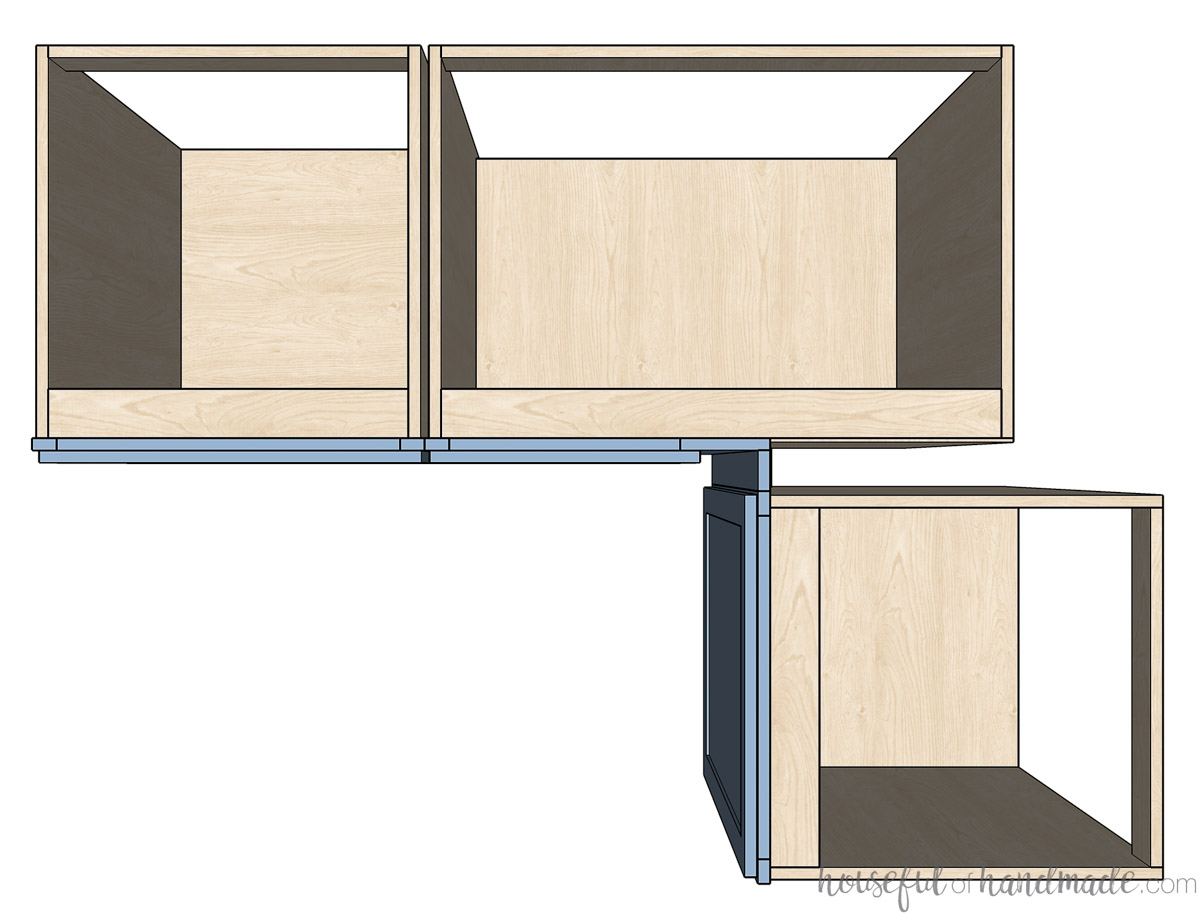
Diagonal Corner Cabinet Box
Each diagonal corner cabinet will have the following parts:
- 2 side pieces
- 2 back pieces
- 1 bottom piece
- 1 back corner piece
- 2-4 support pieces
Optional pieces needed for specific cabinet types:
- Toe kick (for base cabinets)
- Top piece (not needed for base cabinets with countertop)
- Face frame (for face frame cabinets)
- 2 face frame stiles
- 2 face frame rails
Cut the bottom and top pieces (if using) so the sides match the side pieces. Then draw a straight line between them and cut that off. For a square box this will be a 45 degree angle.
The back is also cut at a 45 degree angle about 4-8″ in from the back. This is necessary to ensure the box fits into the corner properly since most corners are not exactly 90 degrees because of the drywall mud used to seal the corners.
For face frame cabinets, you will need to rip the front edges of the side boards at a 45 degree angle. Then you will also rip the outside edges of the face frame at a 45 degree angle.
Frameless diagonal cabinets are not cut at an angle. The sides match the sides of the connecting cabinets.
For base cabinets, the back pieces are built with 3/4″ plywood and the back corner is made from 1/4″ plywood. Cut the back edges of the back pieces at a 45 degree angle so the back corner piece sits flat.
For wall cabinets, the back corner piece can be cut out of 3/4″ plywood with the back pieces out of 1/4″ plywood.
Use support pieces at the top and bottom of the cabinet to connect the back corner to the sides. Attach the cabinet to the wall into studs through these support pieces.
Assemble the pieces like you would any base or wall cabinet.
Blind Corner Cabinet Box
Each blind corner cabinet will have the following parts:
- 2 side pieces
- 1 back pieces
- 1 bottom piece
- 2 support pieces
- 1 space piece
Optional pieces needed for specific cabinet types:
- Toe kick (for base cabinets)
- Top piece (not needed for base cabinets with countertop)
- Face frame (for face frame cabinets)
- 2 face frame stiles
- 2 face frame rails
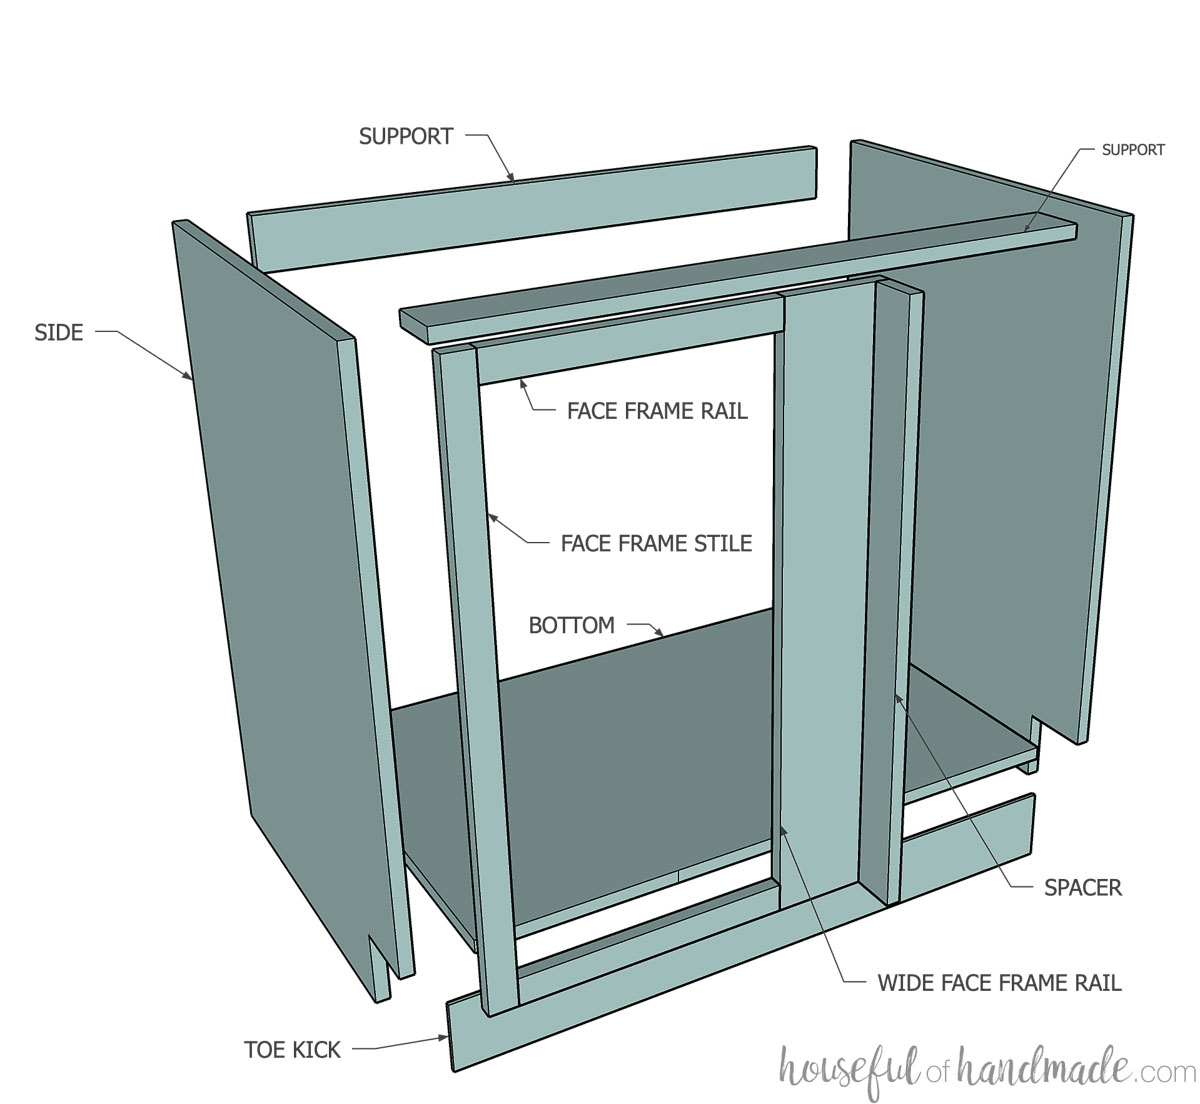
For blind corner cabinets, build those the way you would a standard base cabinet or wall cabinet but with a face frame over only the visible parts.
Make sure to use a wider stile on the side of the cabinet that goes into the corner. Then add a spacer at a 90 degree angle to the side.
This needs to be flush with the face frame for the connecting cabinets. Make the space as wide as needed for additional clearance for cabinet doors/pulls.
Use 1/4″ plywood (the same you use for the back) to cover the open area in the corner so it is not open to the side of the other cabinet.
Now you have a general overview of how to build your own corner cabinets and all the different types.
Stay tuned for more cabinet building posts, including detailed how to’s for each different corner cabinet seen here.
Happy building!
