In this post we will look at specific dimensions and assembly for building wall cabinets.
Make sure to read the general how to build cabinets post here so you can see the different types of cabinets, pros and cons of each, a general overview of cabinet parts and general assembly.
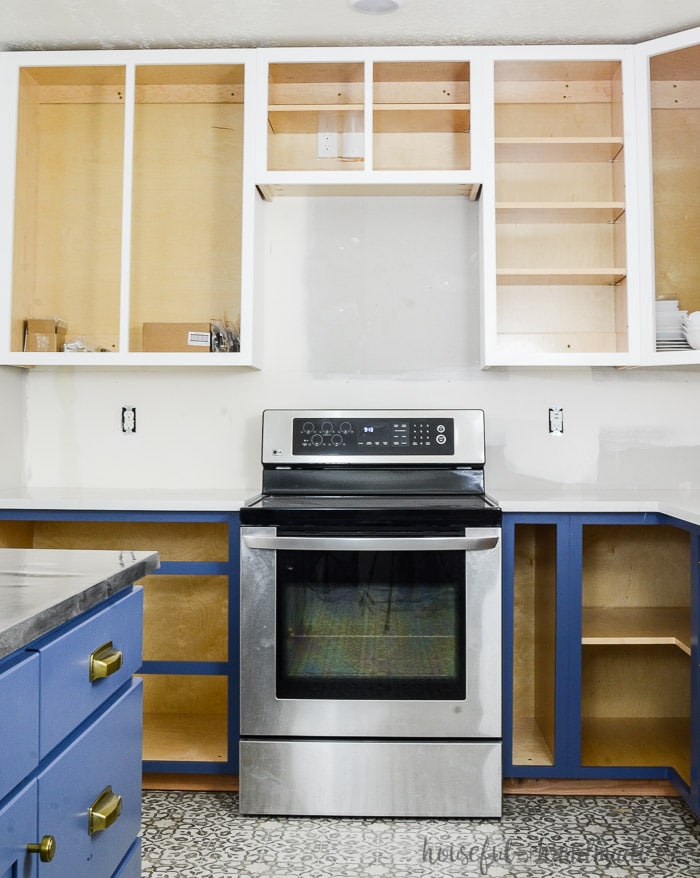
Wall cabinets are the type of cabinets you will use to build upper kitchen cabinets, laundry room cabinets, and built-in bookcases. You can also use them to add upper storage in bathrooms or closets.
This post may contain affiliate links. As an Amazon Associate I earn from qualifying purchases. Click here to read my full disclosure policy.
Things that make a wall cabinet unique:
- They float on the wall.
- They do not have drawers in them.
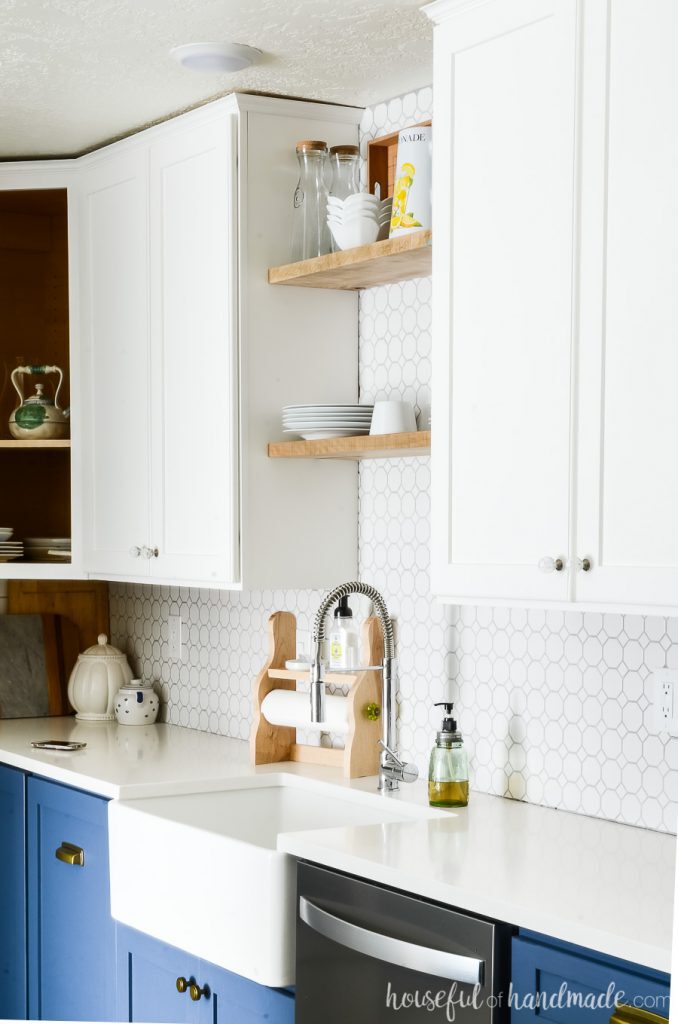
Table of contents
Things to Consider when Building Wall Cabinets
When you are building your own wall cabinets, you need to figure out a few things before making your wall cabinet plans. Let’s look at the different options you have when building wall cabinets so you can make some decisions.
What style of cabinet do you want?
You can build your wall cabinets as face frame cabinets or frameless (European style) cabinets. Read all about the different types of cabinets (including pictures) here to see what type is right for you.
How Tall are Wall Cabinets?
The height of your wall cabinet will depend on how tall your ceilings are in the area you are installing them and how much clearance you need under your cabinets. But you can make them any height you want, that is the beauty of DIY! Here are some standard heights to help get you started in your own kitchen design.
Standard kitchen wall cabinets can range in height from 12″ to 42″ depending on where you install them.
- Standard cabinets: 36″
- Tall cabinets: 42″
- Above stove cabinets: 12″ to 18″
- Above refrigerator cabinets: 18″ to 24″
Wall cabinets in a kitchen need clearance to allow you to use the countertops underneath. Here are standard recommendations for clearances needed:
- 18″ above the countertop
- 24″ above the stove (this is the clearance for the hood or microwave, cabinets will start above that)
- 24″ to 36″ above the sink
For laundry room cabinets, if you have a top loading washing machine, you need to leave enough space below the cabinet to fully open the door.
For built-ins, there is usually no clearance needed from the base cabinets on the bottom (if you are using them). And you can go all the way to the ceiling or leave room above for display.
If you are planning to add crown molding to the top of you cabinets, you will need to leave a small gap at the top instead of going all the way to the ceiling. This will then be covered up with the crown molding.
How Deep are Wall Cabinets?
The depth of your wall cabinets is similar to the height, it depends on what type of cabinet you are building. But again, you are making this custom so you can do what you want!
Here are some standard depth recommendations for various wall cabinets.
- Kitchen Cabinets: 12″ is standard, but you can go up to 18″
- Over Refrigerator Cabinets: 18″ to 30″
- Pantry Cabinet: 24″ to 30″
- Built ins: bookcases are typically 12″ deep
Wall Cabinet Plans
Once you have figured out the answers to the questions above, it it time to create plans for your own wall cabinets! I will walk you through how to create plans for your custom wall cabinets and so you will be ready to start building.
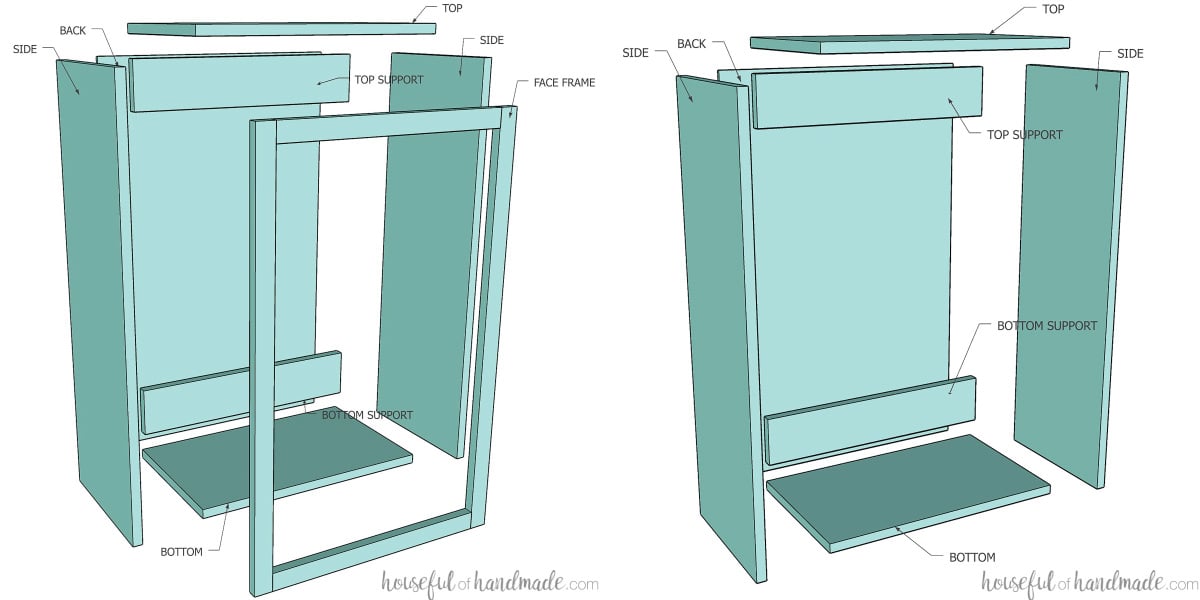
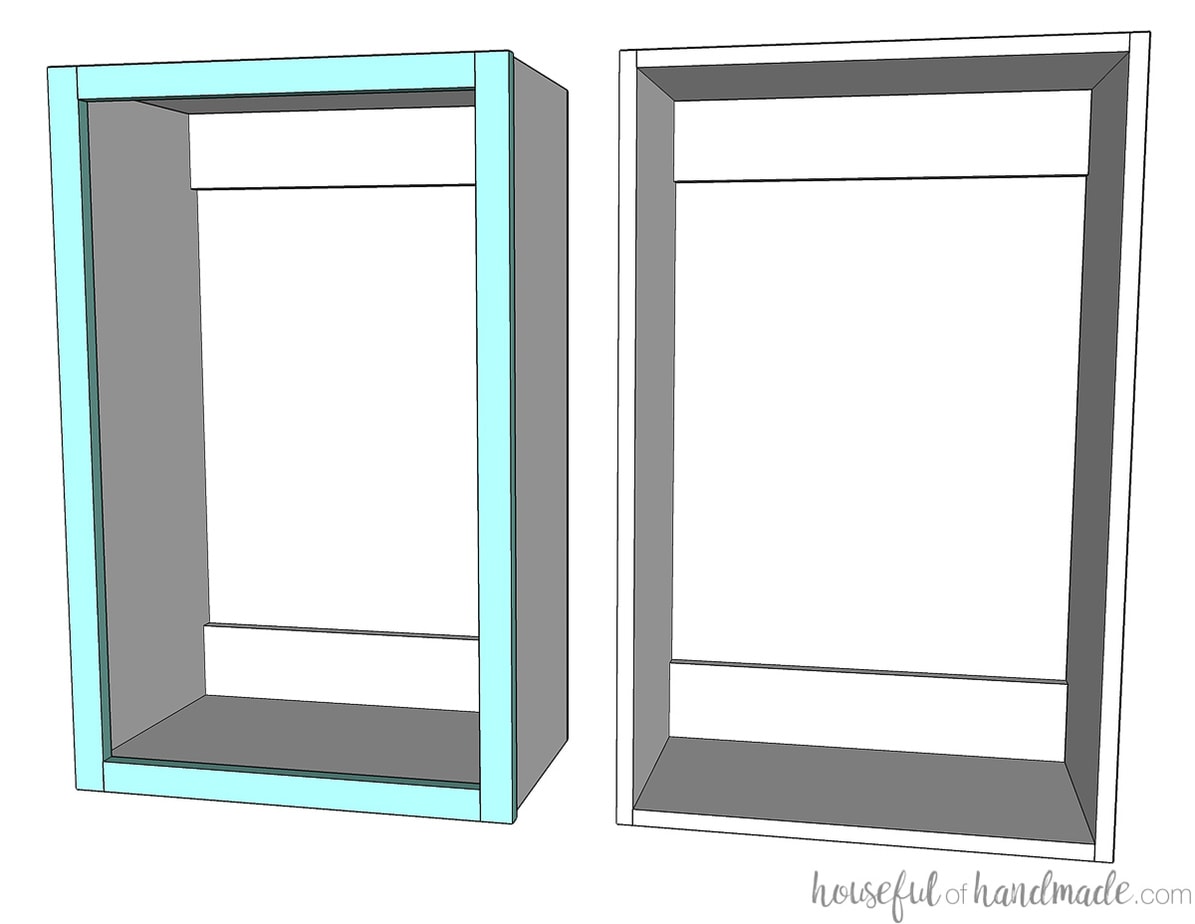
Each wall cabinet will have the following parts:
- 2 side pieces
- 2 top/bottom pieces
- 1 back piece
- 2 support pieces
- 2-3 shelves
- Optional: face frame
- 2 face frame stiles
- 2 face frame rails
- 1 additional face frame stile if you want to add a center stile
To build your wall cabinets, you will want to use 3/4″ plywood for the outside of the cabinet box and 1/4″ plywood for the back.
To finish off the front of the plywood edges, you will need to either use edge banding to create a frameless cabinet or a face frame to create a face frame cabinet.
Face frames are typically built from 1×2 boards (which are actually 3/4″ thick and 1 1/2″ wide). If you want a larger more noticeable frame, you can use wider boards.
Face Frame Wall Cabinet Cut List
Use the following chart to figure out the dimensions for your all the piece of your face frame wall cabinets.
Or use the cut list calculator included in the PDF plans.
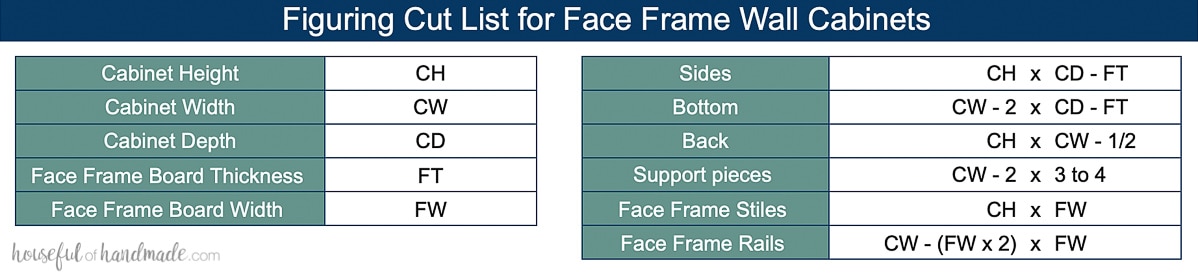
Important notes for face frame cabinets:
- The face frames hang over the sides of the cabinets 1/4″. This makes it easier to install, but if the side of your wall cabinet is going be visible, you will need to add a side panel (use 1/4″ plywood and cut it the exact size of the base sides and tack it on) or adjust your measurements to make up for the 1/4″ extra on one side.
- The back panel is not set into the back with a groove, instead it is just nailed on. Because the cabinet is built in, you will only see the back panel if the side of a cabinet is visible. Fix this with the above mentioned panel (cut it 1/4″ deeper to cover the back panel) or router in grooves and adjust the back panel size to fit in those grooves.
Frameless Wall Cabinet Cut List
Use the following chart to figure out the dimensions for your all the piece of your frameless wall cabinets.

Important notes for frameless cabinets:
- Plywood is not actually 3/4″ thick, it is slightly smaller. And not all plywood is the exact same. I would recommend you tightly press two pieces of the plywood you are using together and measure it. You can substitute this measurement for the 1 1/2″ you subtract for the bottom and support pieces. This will give you more exacting cabinet widths.
- The back panel is not set into the back with a groove, instead it is just nailed on. Because the cabinet is built in, you will only see the back panel if the side of a cabinet is visible. If you are going to have visible cabinet sides, router in grooves and adjust the back panel size to fit in those grooves.
How to Build a Wall Cabinet Box
Tools & Materials
Recommended Tools:
- Circular saw with guide track or Table saw
- Miter saw
- I recently upgraded to this larger sliding miter saw (watch for it to go on sale), but all my projects before were built with this inexpensive miter saw that I loved.
- Pocket hole jig
- Drill
- Impact driver (optional, but I love not having to switch bits with the drill)
- Squares
- Measuring tape
- Clamps
- Right angle clamps and face frame clamps are super helpful
I go into detail on how to build cabinets without expensive tools here. These were all the tools I used to build my first kitchen cabinets.
Supplies:
- Wood products:
- 3/4″ plywood
- 1/4″ plywood
- Optional: 1x boards for face frame cabinets
- Optional: Plywood edge banding for frameless cabinets
- Wood glue
- If using pre-finished plywood, use melamine glue to get strong joints
- 1 1/4″ pocket hole screws
STEP 1- Cut out the pieces
Cut out your pieces according to the cut list you determined above. Or use the cut list calculator that comes with the PDF build plans.
Learn how to easily cut plywood with a circular saw here.
Drill pocket holes set for 3/4″ material in the sides of the top and bottom pieces.
You need to have pocket holes every 4-5 inches for strong cabinet boxes. For my 12″ wall cabinets I use 4 pocket holes on each side for extra strength.
For face frame cabinets: also drill pocket holes in the front of the top, bottom and both side pieces.
For frameless cabinets: iron on the edge banding to the front off all the pieces before assembly.
STEP 2- Assemble the Cabinet Box
Make sure to read the Tips for a Perfect Cabinet Box section in this post for helpful tips.
For face frame wall cabinets, the bottom piece will be set up from the bottom of the sides so the top of the shelf is flush with the top of the face frame.
So if you have a 1 1/2″ wide face frame, you will attach the bottom so the top of it is 1 1/2″ up from the bottom of the sides.
Secure the bottom with wood glue and 1 1/4″ pocket hole screws to the side pieces. Use corner clamps to make sure the piece is joined at a 90 degree angle.
Then attach the top so it is flush with the top of the sides. Place the top so the pocket holes are on the top of your cabinet, not inside.
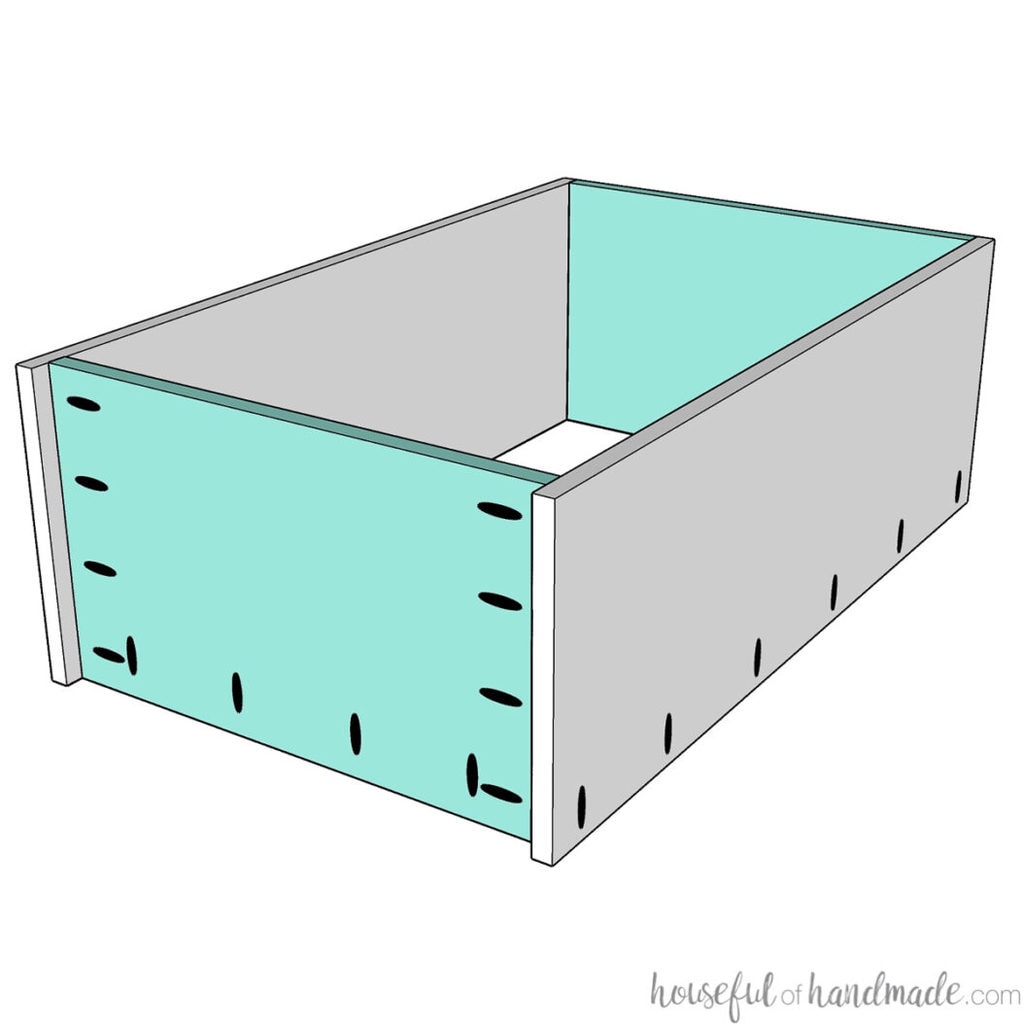
Attach 2 support pieces. These will be where you will attach the cabinet to the wall. Use scraps of plywood to cut them. They can be 3-4″ thick.
The supports will be on the back of the box. One will be along the top just under the top piece and the other will be just above the bottom piece. Attach them with pocket holes using 1 1/4″ pocket hole screws.
I also like to attach them to the top and bottom pieces with a couple pocket holes along the edge as well.
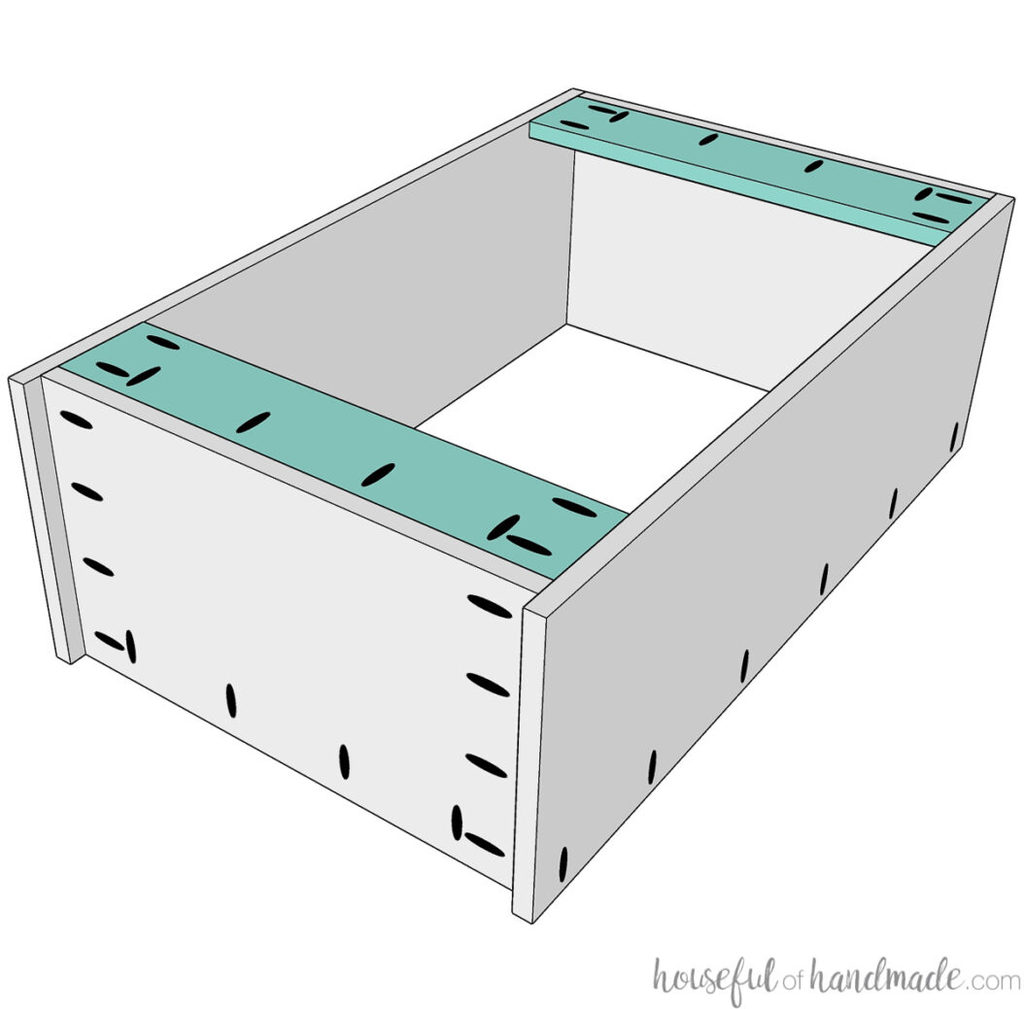
Attach the back with wood glue and finishing nails.
If the sides of your cabinet are going to be visible, you may want to router a groove into the back to set the panel inside (you will also need to set your support pieces in 1/4″ from the back of the sides).
You could also make a side panel slightly bigger to cover the sides and back panel together or use a piece of trim to cover the back panel.
If you do not want to see the support pieces inside your cabinet, you can add the back panel in front of them. But I find the supports blend in nicely with the back of the cabinet. And you only see it with the doors open.

Now your wall cabinet carcass is all done!
For frameless cabinets, skip to Step 4.
For face frame cabinets, proceed to the next step.
STEP 3- Assemble the Face Frame
Cut the rails and stiles for your face frame. Drill holes set for 3/4″ material in each end of the rails.
Attach the rails between the stiles so they are flush with the top or bottom. Use wood glue and 1 1/4″ pocket hole screws.
Use a face frame clamp to keep the frame front flush and tight while attaching them.
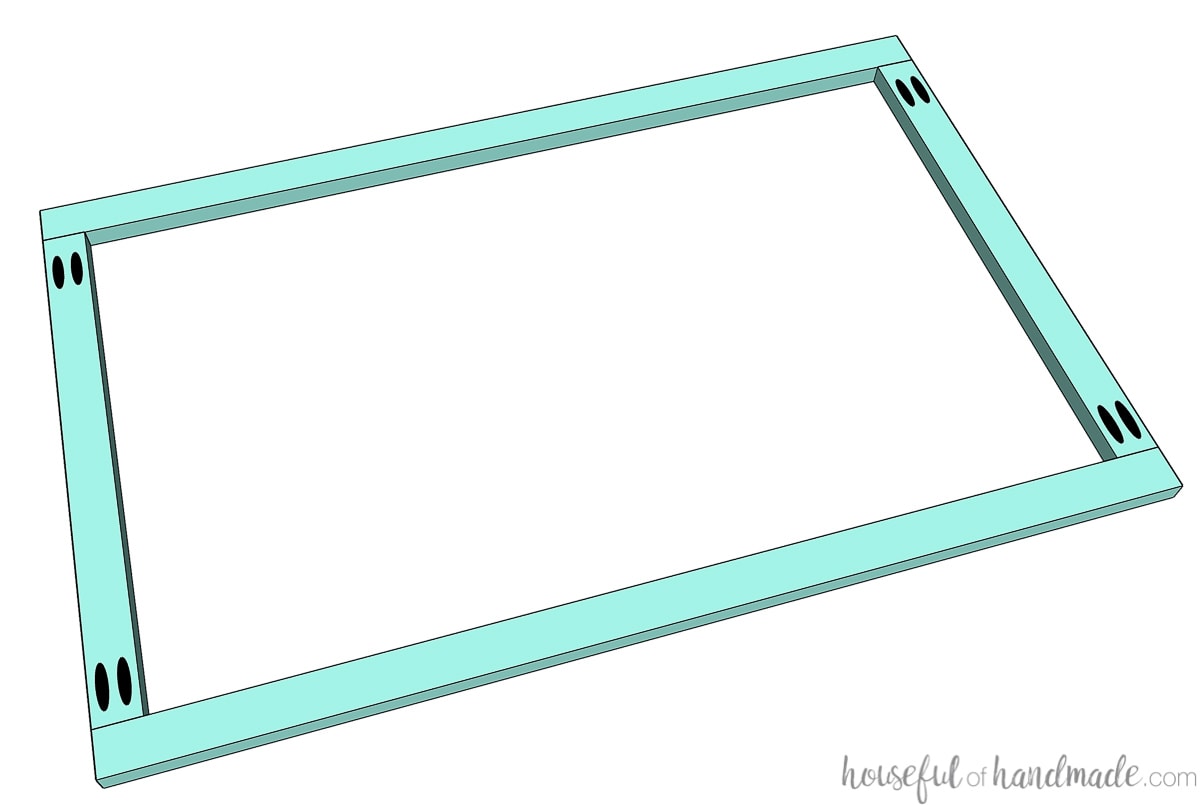
Now the face frame is ready to attach to the front of your cabinet box.
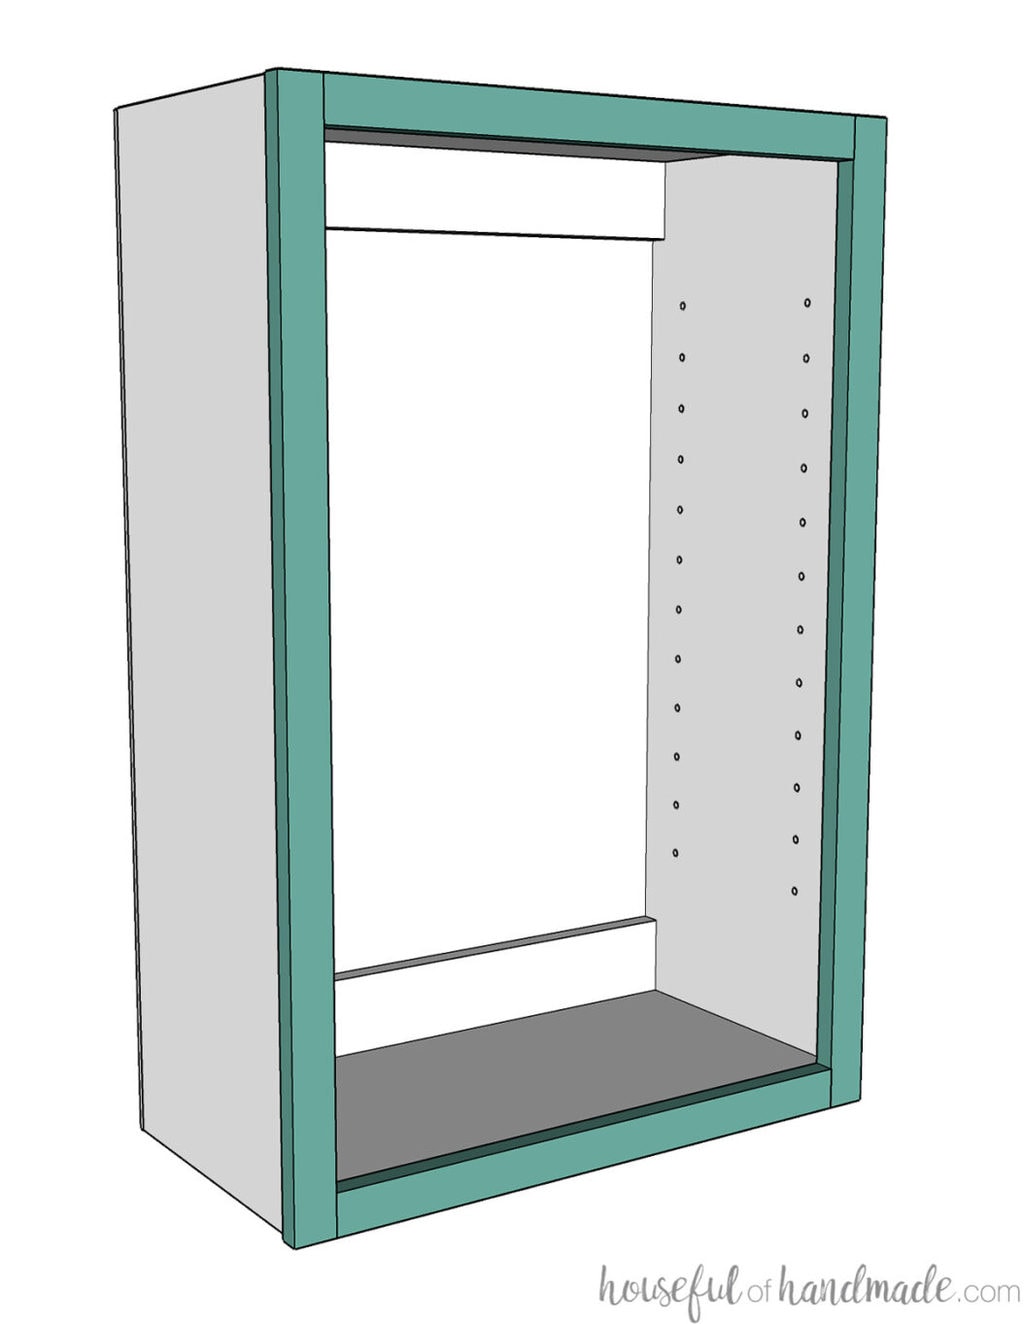
The face frame will need to sit 1/4″ over each side of the cabinet. The top of the face frame will be flush with the top of the cabinet box and the bottom of the face frame will be flush with the bottom on the side pieces.
Also, the top of the bottom rail piece will be flush with the top of the bottom shelf.
Add a bit of wood glue to the front of the plywood, then use the pocket holes you already drilled in the sides, top and bottom of the cabinet to secure the face frame.
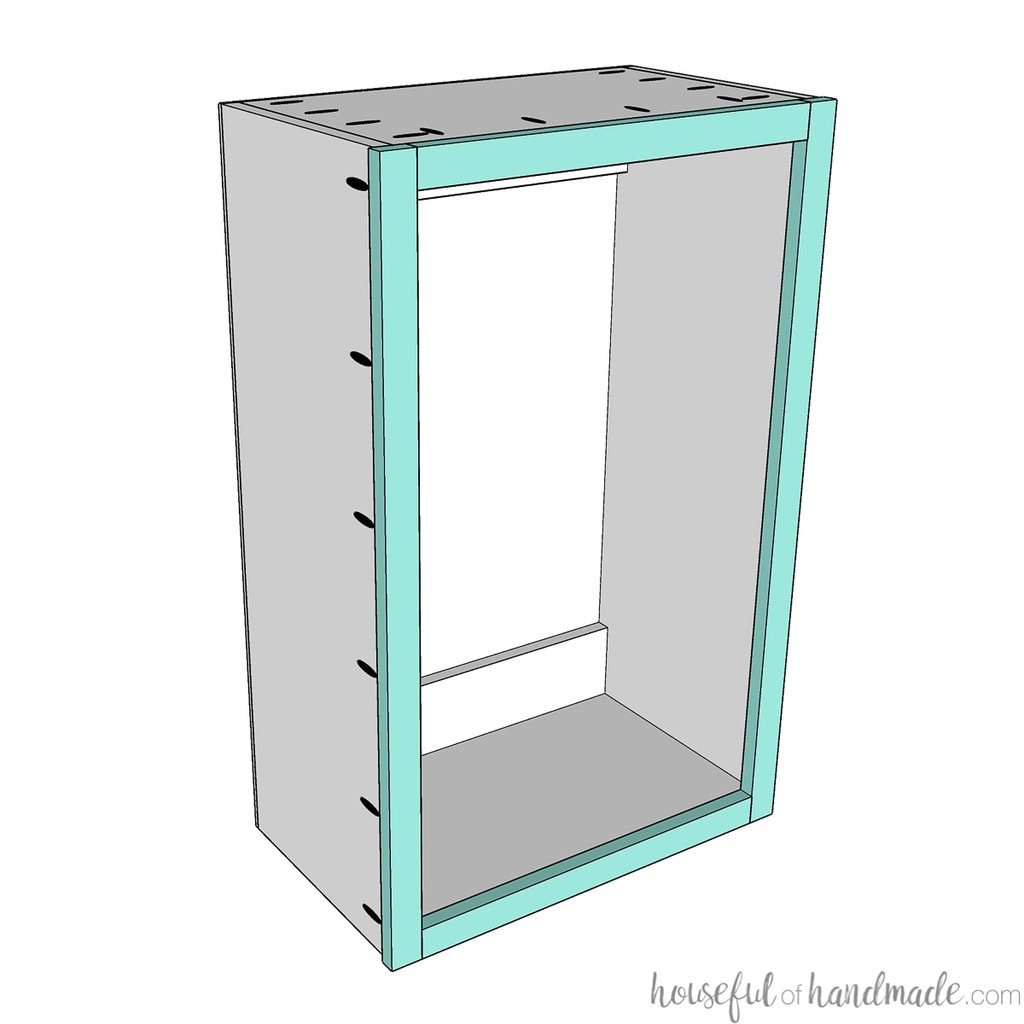
STEP 4- Add Shelves
There are many ways to add adjustable shelves to your DIY cabinets. But I have found the easiest and most cost effective way is to use shelf pins with a simple shelf pin jig.
I use the Kreg shelf pin jig to quickly add holes for shelf pins. There are two different bits for the jig (5mm and 1/4″) so make sure to check that you have the correct sized pins for your bit (or buy both).
There are many different types of shelf pins, anywhere from a straight cylinder to and L. I prefer the L shaped pins. The shelf helps to hold the pins in the sides of cabinet and my shelves are very secure.
When drilling holes, don’t bother drilling holes in the bottom and top approximately 6″ unless you have a need for a very short shelf area. Instead, use a scrap of wood as a spacer on the bottom of the shelf pin jig to ensure the holes for the pins stay even across all 4 rows.
STEP 5- Add doors
Door are necessary to finish off the cabinet box. They keep things hidden, as well as keeping them clean and dust free.
There are many different kinds of doors you can build for your cabinets. But before deciding on style, it is important to understand cabinet door sizes and hinges.
Once you have determined the cabinet door sizes, you can build your own DIY shaker style cabinet doors or easy slab cabinet doors from plywood. Or you can also build glass panel cabinet doors for added style.
Once your doors are built, install your doors with concealed hinges with this tutorial.

Now your cabinet is ready to install.
Premium cabinet plans include:
- Recommended Tools
- Shopping list
- How to figure cut list for custom cabinets
- Step-by-step instructions with 3D renderings
- Plywood layout tips and examples
- Cabinet making tips & techniques
- Helpful resources
- BONUS: Cabinet cut list calculator
- BONUS: Cut lists for standard sized cabinets
- BONUS: 3D SketchUp file of basic cabinet
Tips for a Professional Cabinet that are Easy to Install
1- Router tiny chamfers on the side edges of the face frames. That way, if the cabinets do not sit perfectly flush during install, it is not as obvious.
2- For any exposed sides of cabinets, you will want to cut 1/4" panels to cover the sides. This will hide the pocket holes and make the side of the face frame flush with the cabinet.
3- Build your cabinet box with pre-finished plywood, then all you have to do is paint/finish the face frames to have your cabinets ready to install. See how we painted our unfinished cabinets here.
4- Add a center stile for large wall cabinets to give extra support to the center and make installing cabinet doors easier (no need to stress about the center reveal as much).
5- For face frame wall cabinets that are deeper than the cabinet next to it, apply the 1/4" plywood side panel from the front of the cabinet to 1-2" past where the cabinet next to it will sit (no need for the extra plywood that will be hidden) before install. That will also make sure the cabinets are not 1/4" short of the final measurement since the shallower cabinet will not have the face frame to sit up against.
And if there are any questions or things I forgot, leave a comment and I will do my best to answer. I want to give you the confidence to build your own cabinets too!
