I loved the wall mounted jewelry organizer that I made in our last home, but since it was built into the wall, it had to stay.
Instead of trying to figure out a place for one in this house, I decided to make a large DIY jewelry box that can sit on my vanity or dresser instead.
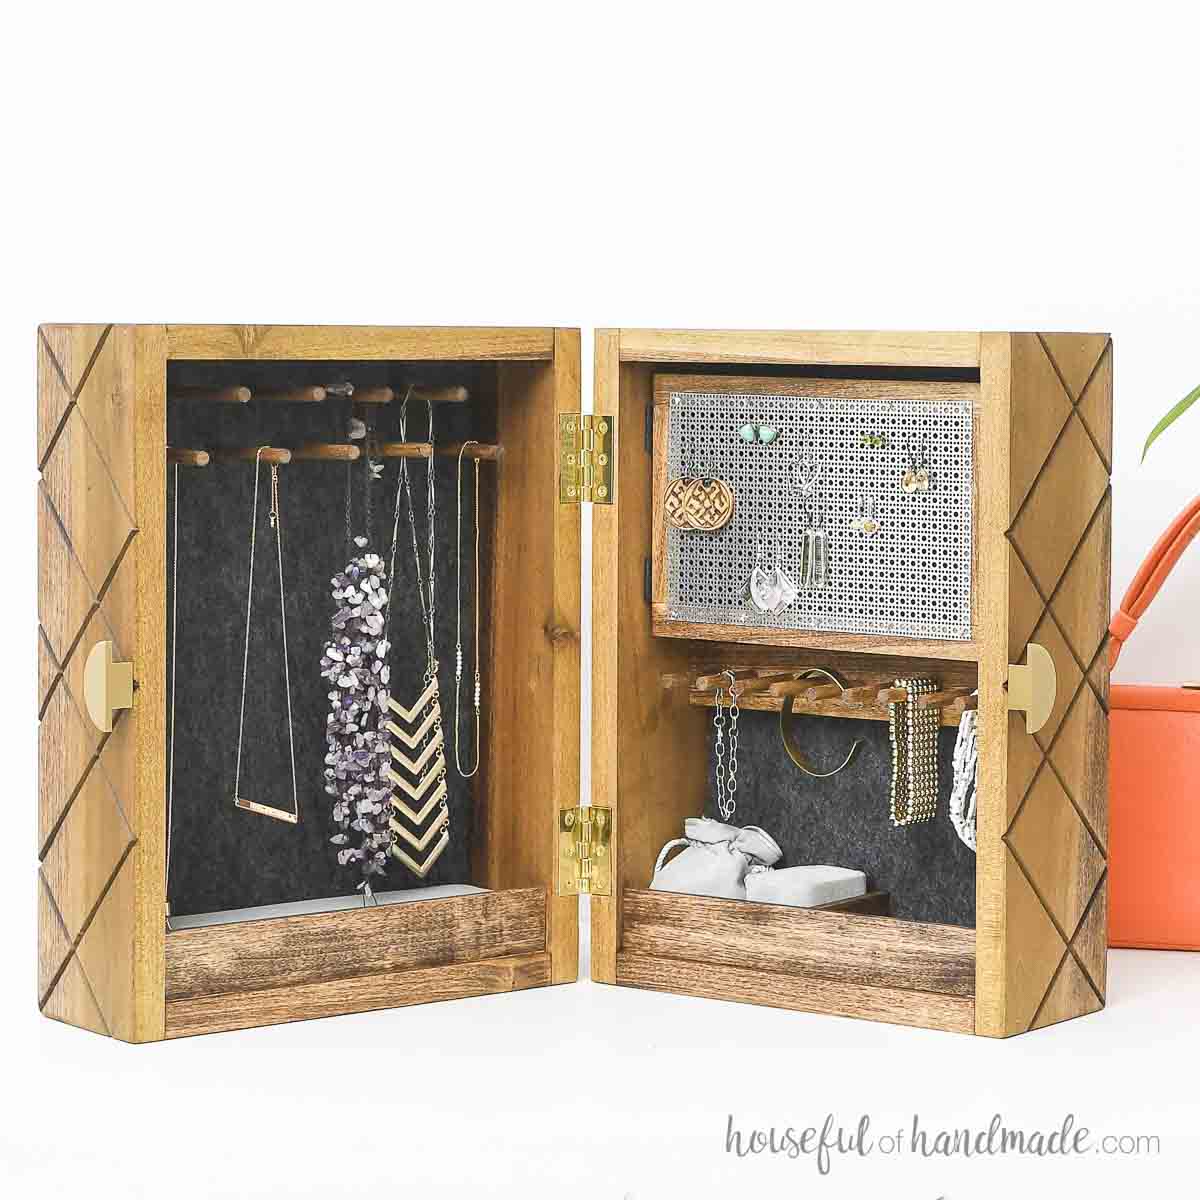
This is a more modern take on a jewelry box. Instead of tiny drawers for tiny necklaces and bracelets, there are pegs with lots of space for any type of jewelry you have.
This post may contain affiliate links. As an Amazon Associate I earn from qualifying purchases. Click here to read my full disclosure policy.
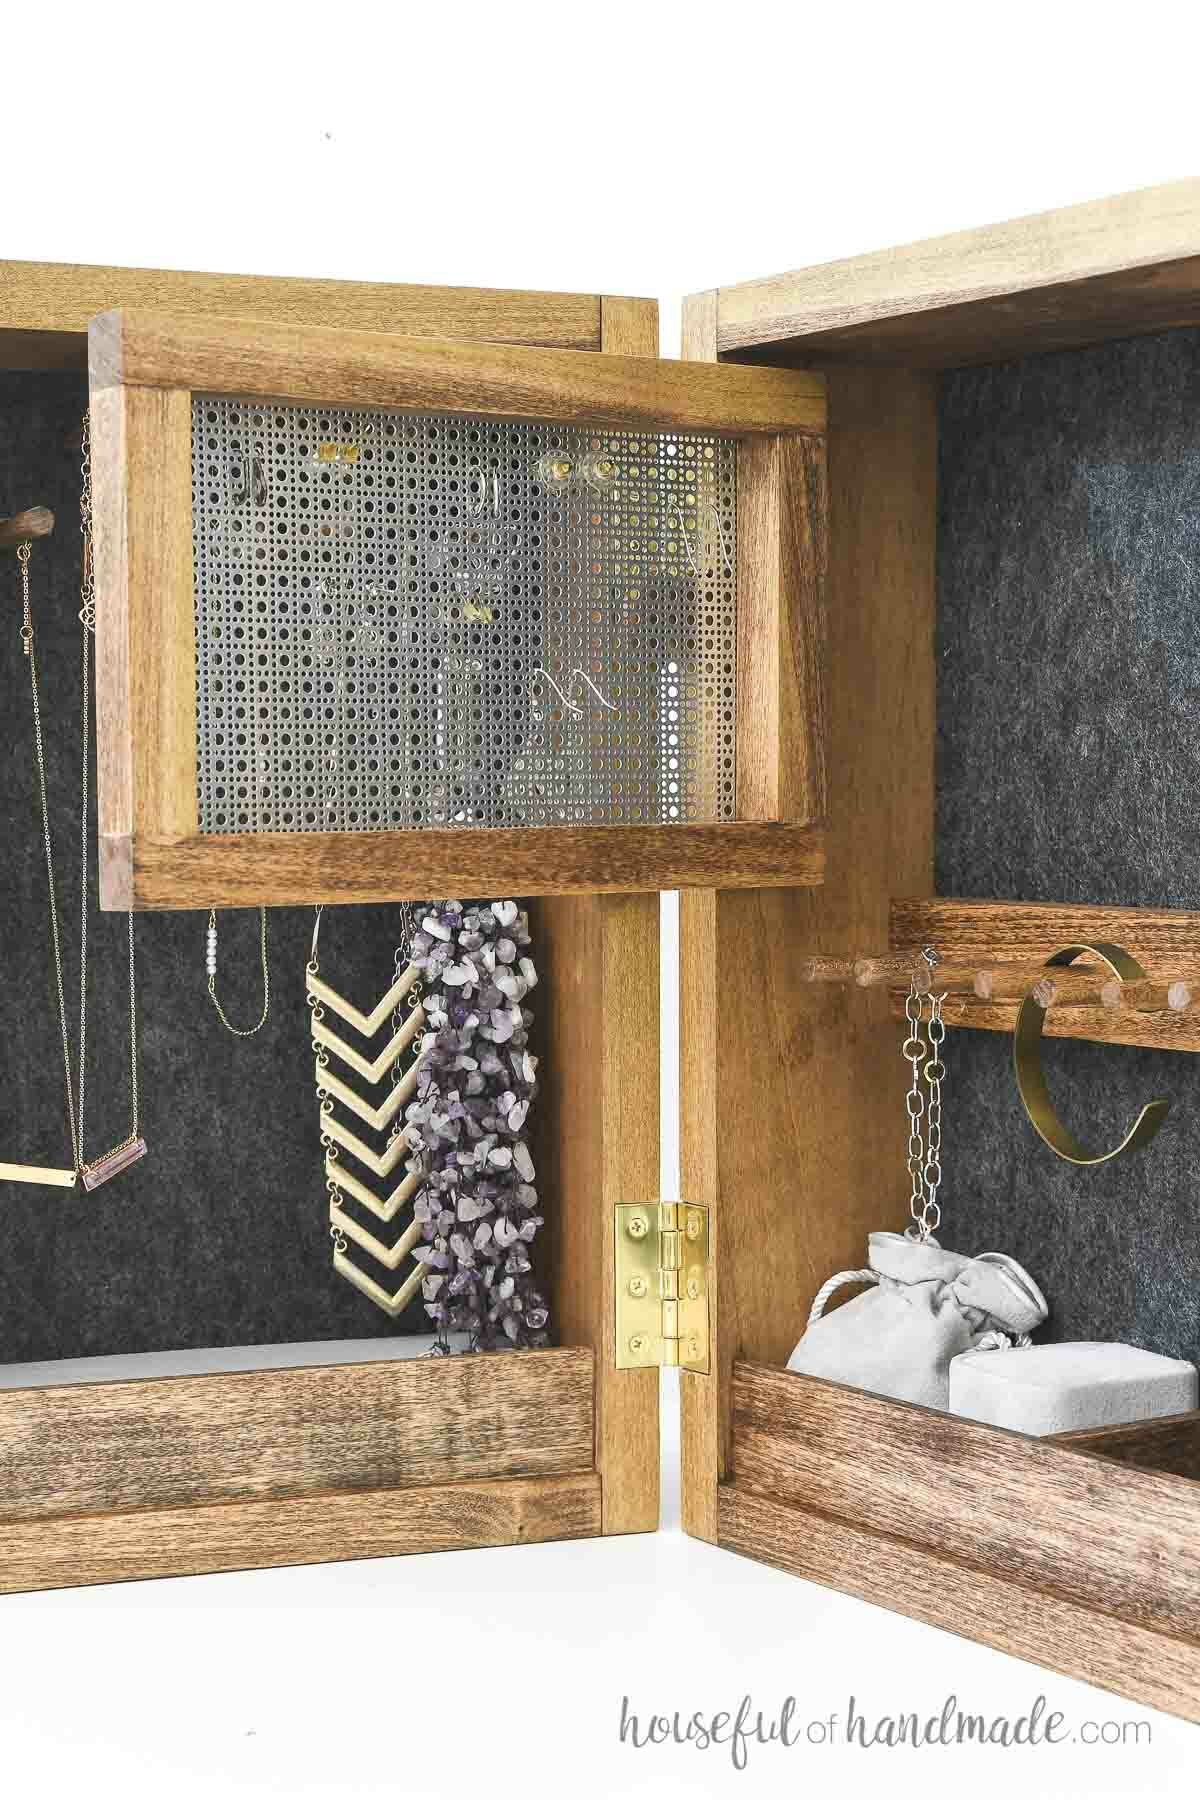
And the jewelry box hinges open to make all the space inside easily accessible. Then slides closed to protect and store it away.
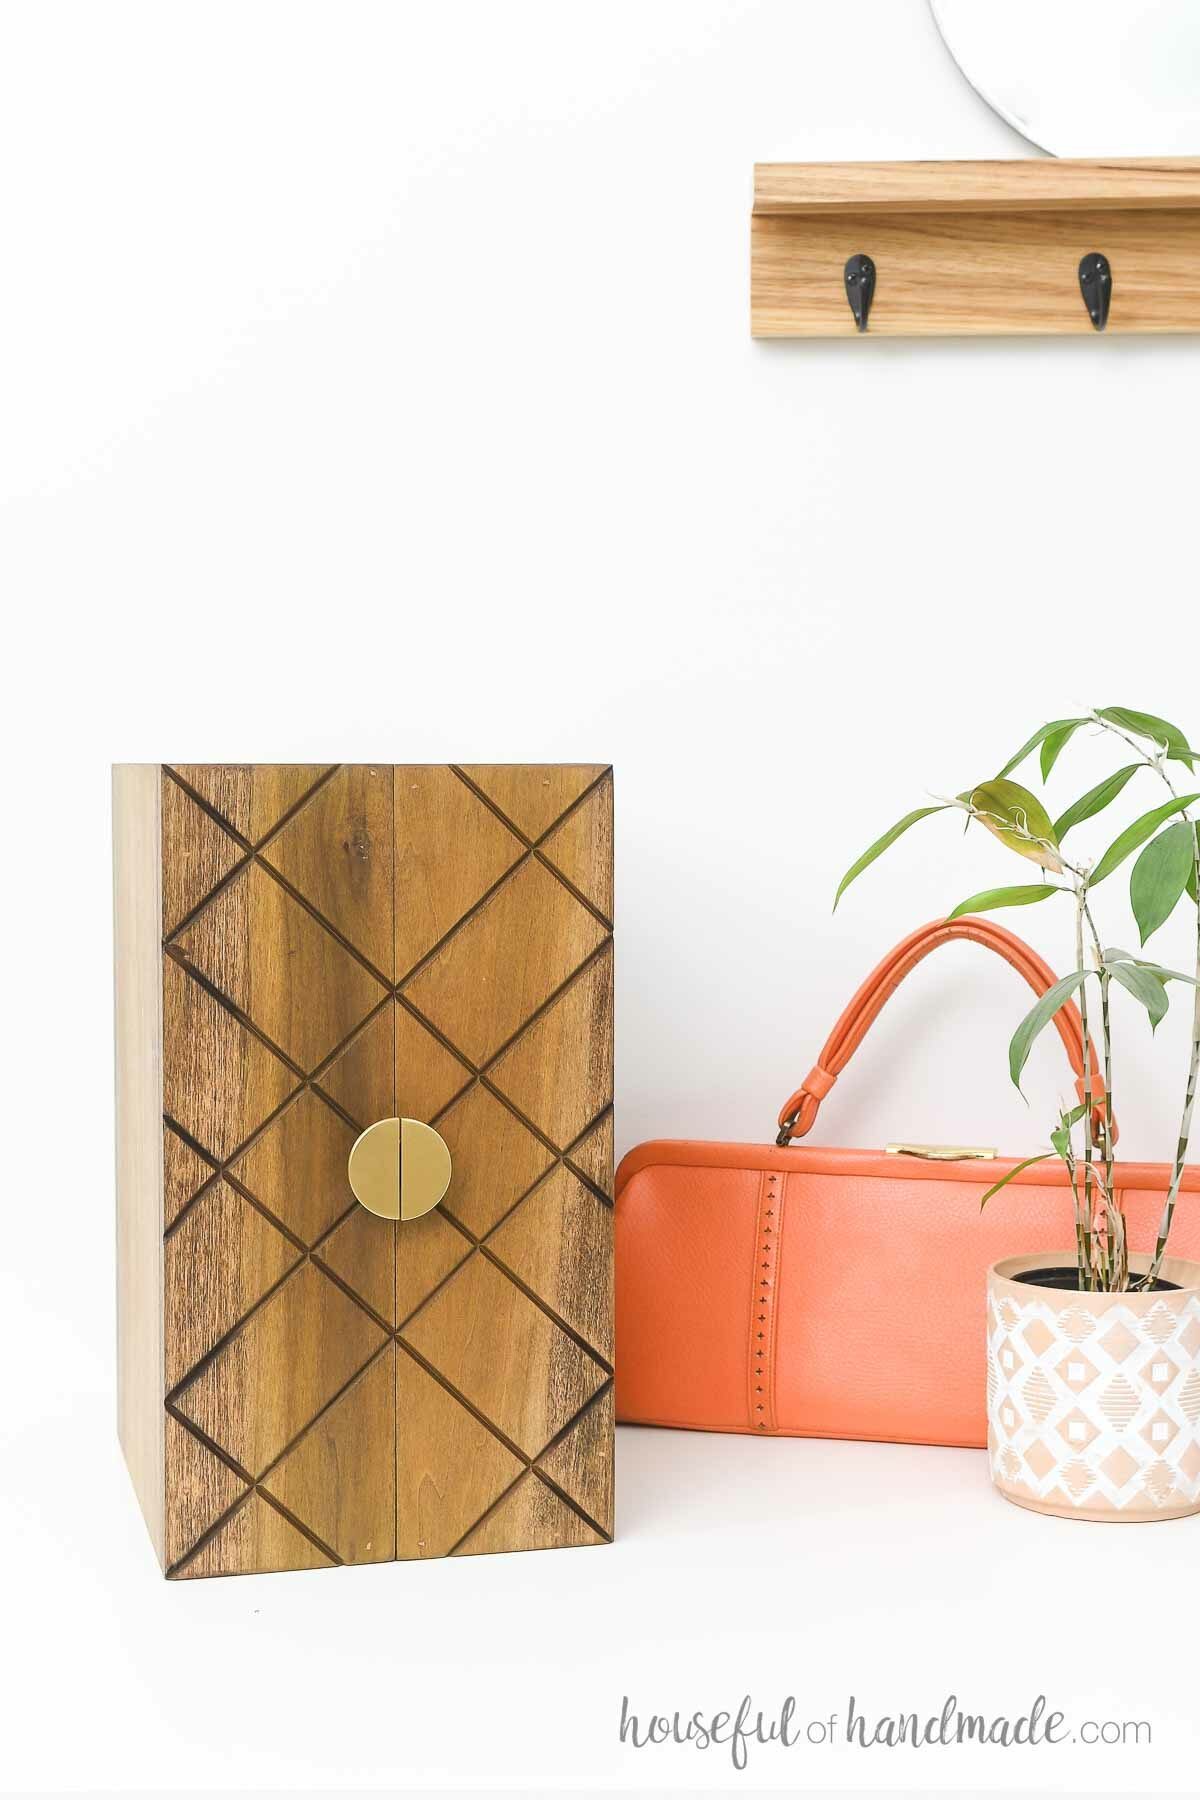
Wood Jewelry Organizer
Not only will this jewelry box store away your favorite jewels, it also is perfect for keeping it all organized!
One side is made specifically for necklaces. The top has log pegs to hang necklaces on.
The bottom has a little cubby for holding pendants from longer necklaces so they don’t get in the way of closing your jewelry box.

The other side has a spot for earring, bracelets and more cubbies on the bottom. Perfect for smaller items like pins and rings.
You could add some fabric tubes to your cubby to make them perfect for nestling rings. Perfect little ring pillows.
The bracelet pegs have lots of space for larger and smaller bracelets. They even work for hard bangles and cuffs.

The earring organizer is made from decorative sheet metal. The tiny holes make it easy to hang your earrings.
Plus the earring holder is hinged so you can use it for stud earrings too. Just place the stud in one of the holes and swing it so you can place the back on it for storage.
How to Build a Wood Jewelry Box
Tools & Materials
Recommended Tools:
- Miter saw
- I recently upgraded to this larger sliding miter saw (watch for it to go on sale), but all my projects before were built with this inexpensive miter saw that I loved.
- Trim router
- Brad nailer
- Drill
- Impact driver (optional, but I love not having to switch bits with the drill)
- Speed square
- Metal snips
- Sander
Supplies:
- Wood products
- (1) 1×6 board, 3′ long
- (1) 1×12 board, 3′ long
- (1) 1×4 board, 8′ long
- (1) 1×2 board, 1′ long
- (1) 1/4″ x 1 1/2″ board, 3′ long
- (2) 5/16″ dowels, 4′ long
- 1 1/4″ brad nails
- Decorative sheet metal
- Felt or velvet (optional)
- (2) 1″ x 1″ hinges with screws
- (2) 2″ x 1 3/8″ hinges with screws
- (2) decorative drawer pulls
- Wood glue
Overall Dimensions
The closed jewelry box is 15″ tall by 8 1/2″ wide and 12″ deep. Opened up, each side is 4 1/2″ deep and it can become 24″ wide.

Cut List
Cut out the pieces according to the easy to read cut table in the PDF plans.

STEP 1- Add design to the front pieces
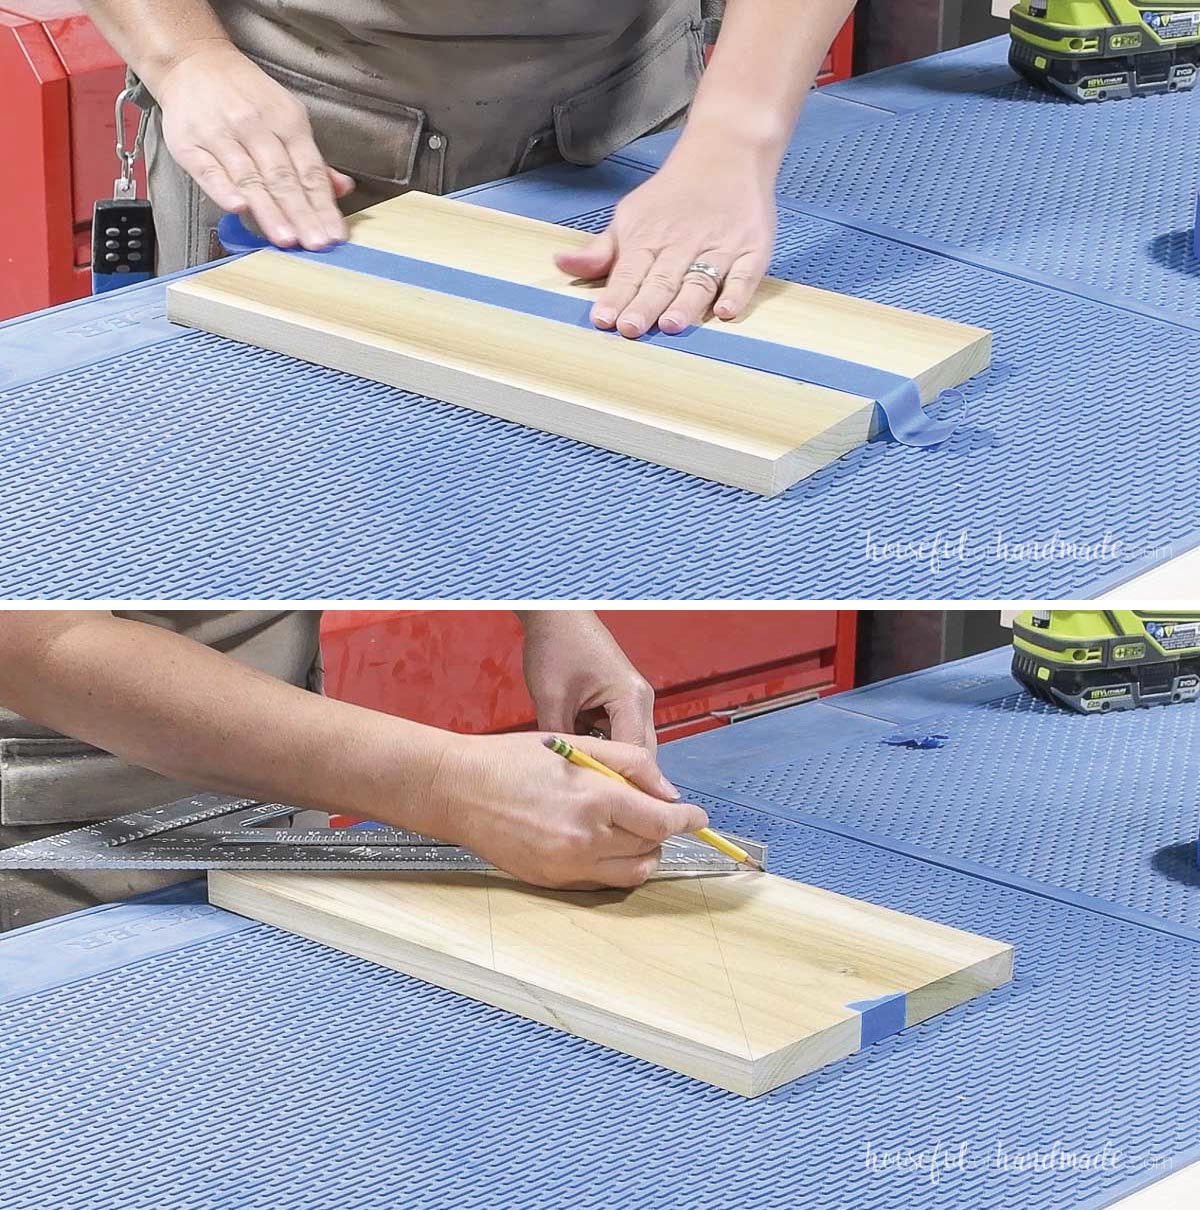
Tape the two front pieces together down the center.
Draw 45 degree angle lines on the boards with a speed square. Add as many or as little lines as you want for your design.
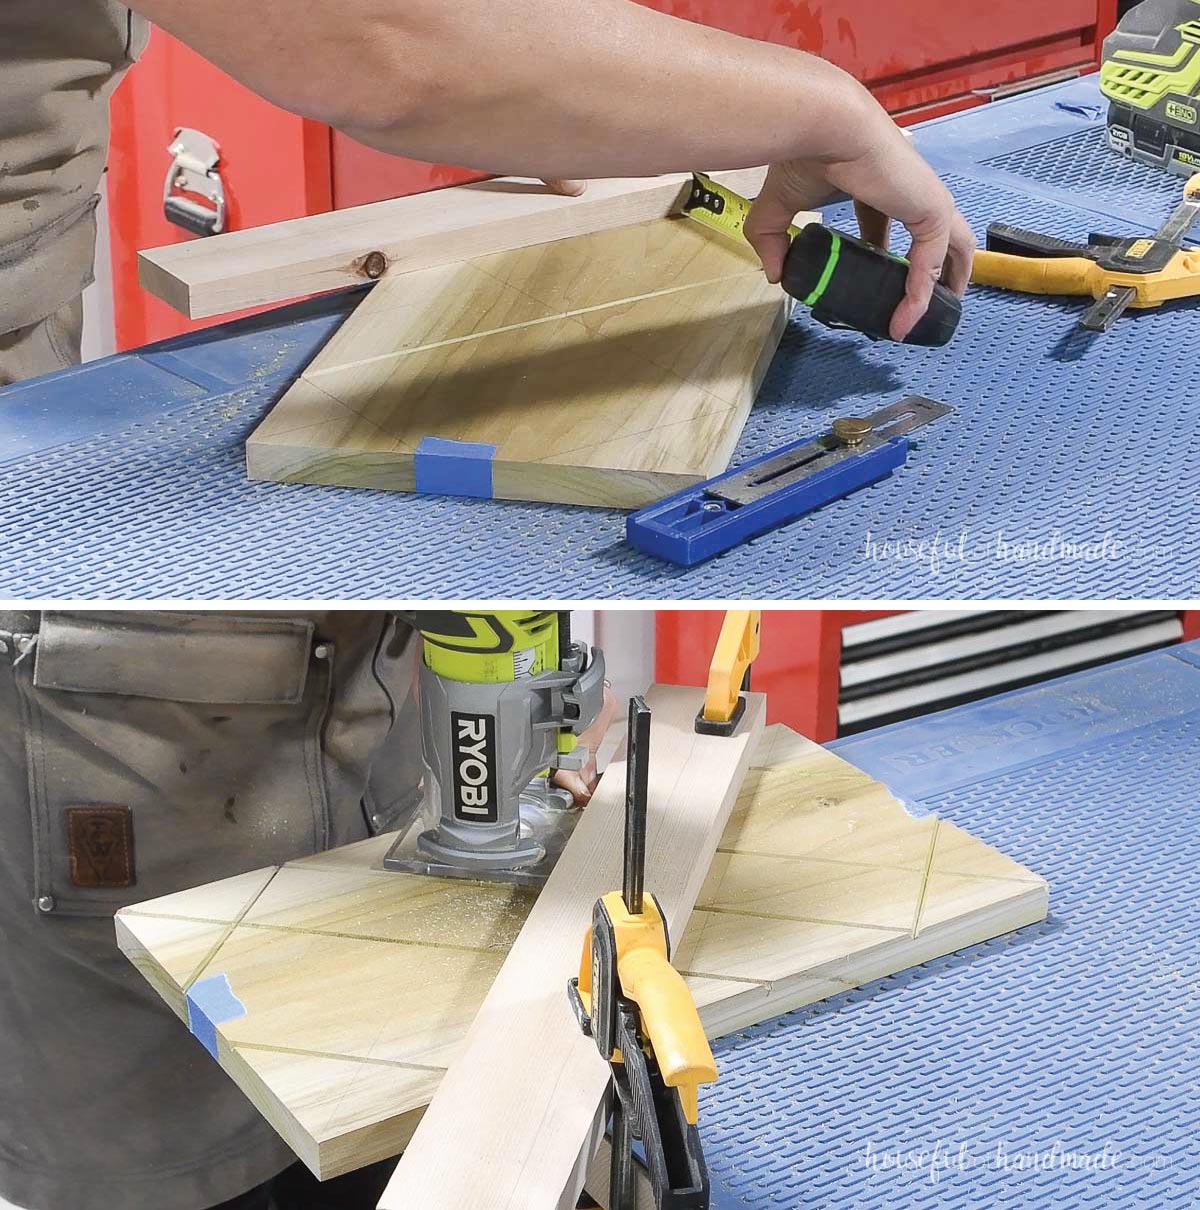
Using a v-bit in a trim router, measure from the center of the router bit to the edge of the base. Clamp a scrap board so it is the same distance from the line you are routing.
Cut a 1/8” deep groove in the board along the line. To get a clean groove, run the router through a second time before unclamping the board.
Repeat until all your lines are routed. Then remove your tape. It’s a good idea to mark your center seam so you can attach the fronts properly later.
You could also add a design to the front of the jewelry box with paint or a stencil.
STEP 2- Build the two box pieces
Attach the back board to the side board so it is flush on the top/bottom and back. Secure with wood glue and 1 1/4” brad nails.
Then attach the top and bottom boards so they are flush with the front of the side and top/bottom. Secure with wood glue and 1 1/4” brad nails.
Repeat for the second side, but make sure to mirror the pieces.
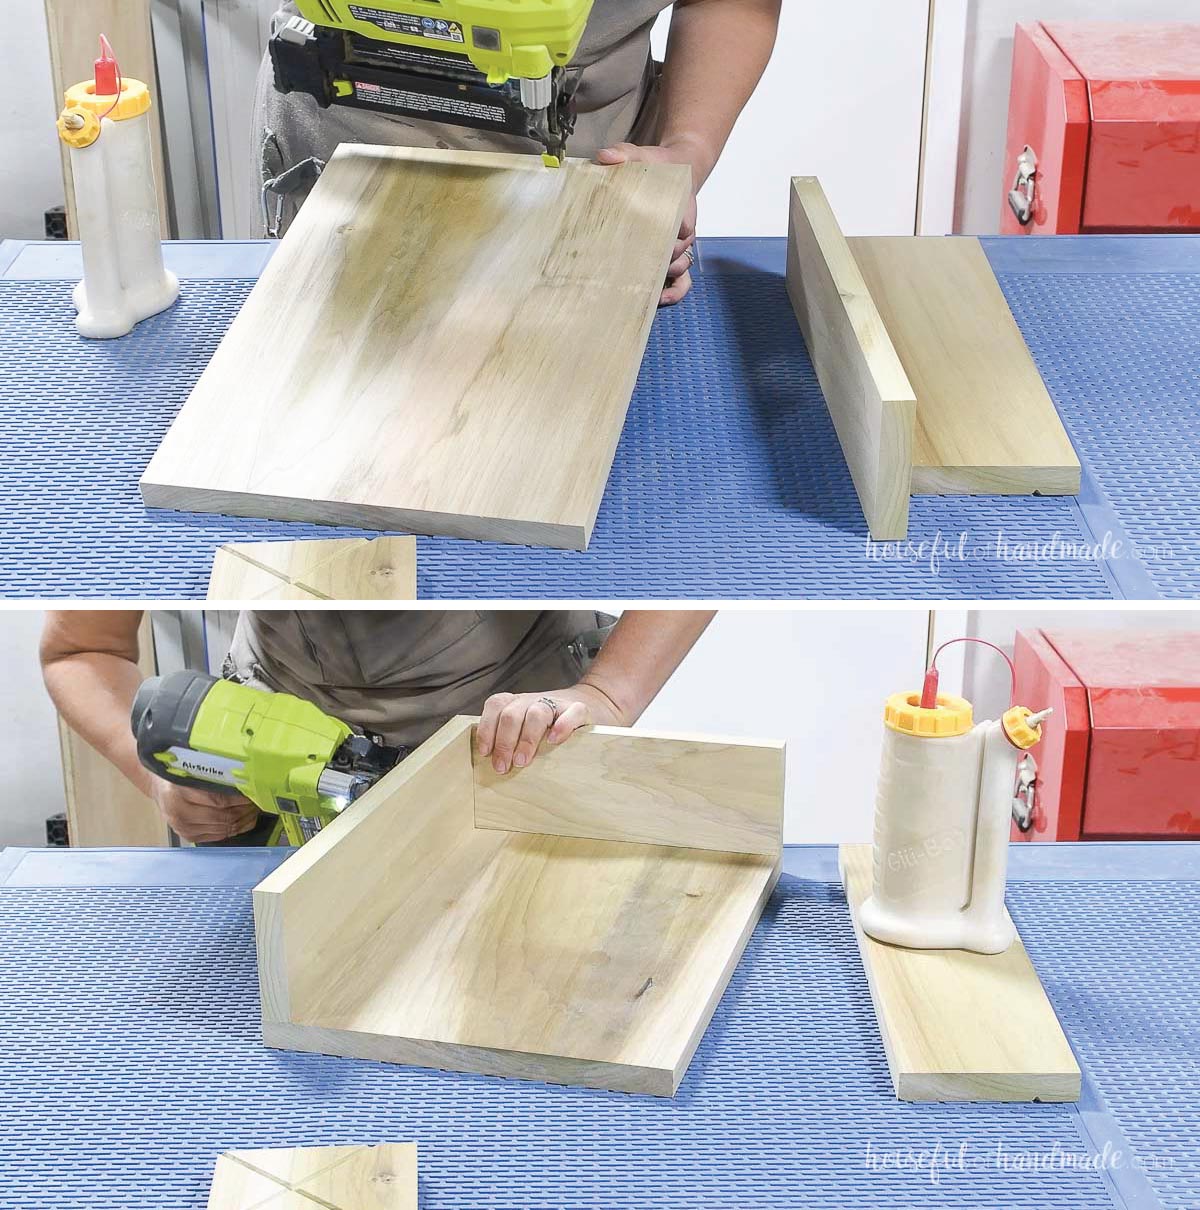
Next add the front piece to the front of the assembled sides. Make sure the boards are lined up so the design flows from one board to the other.
The front should be flush on the top/bottom and sides. Secure with wood glue and brad nails.
Repeat for the second side so you have two mirrored pieces.

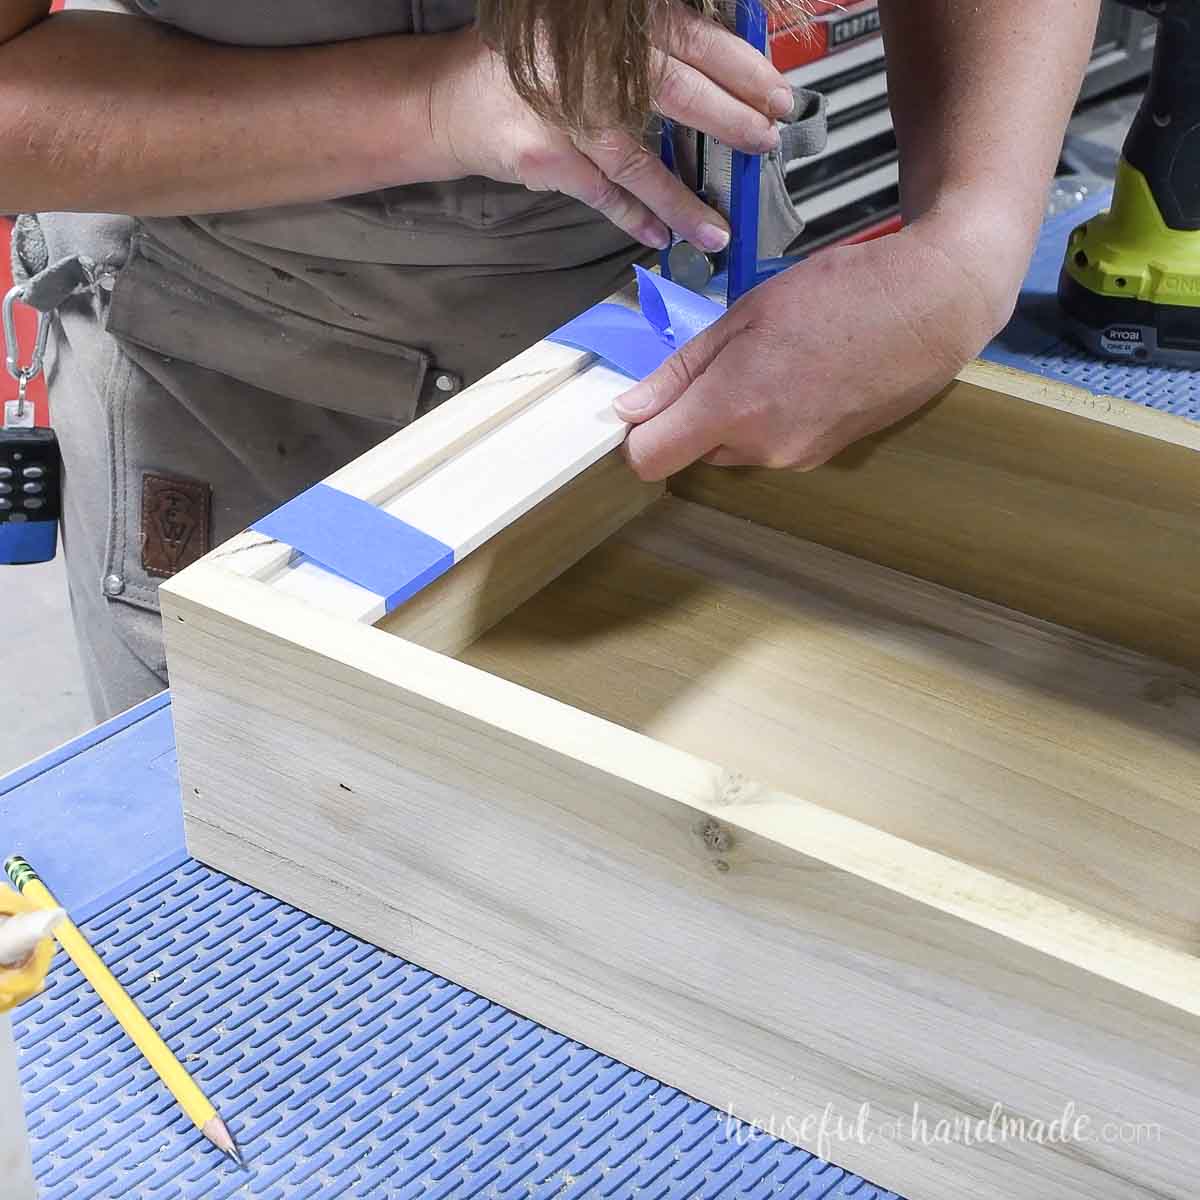
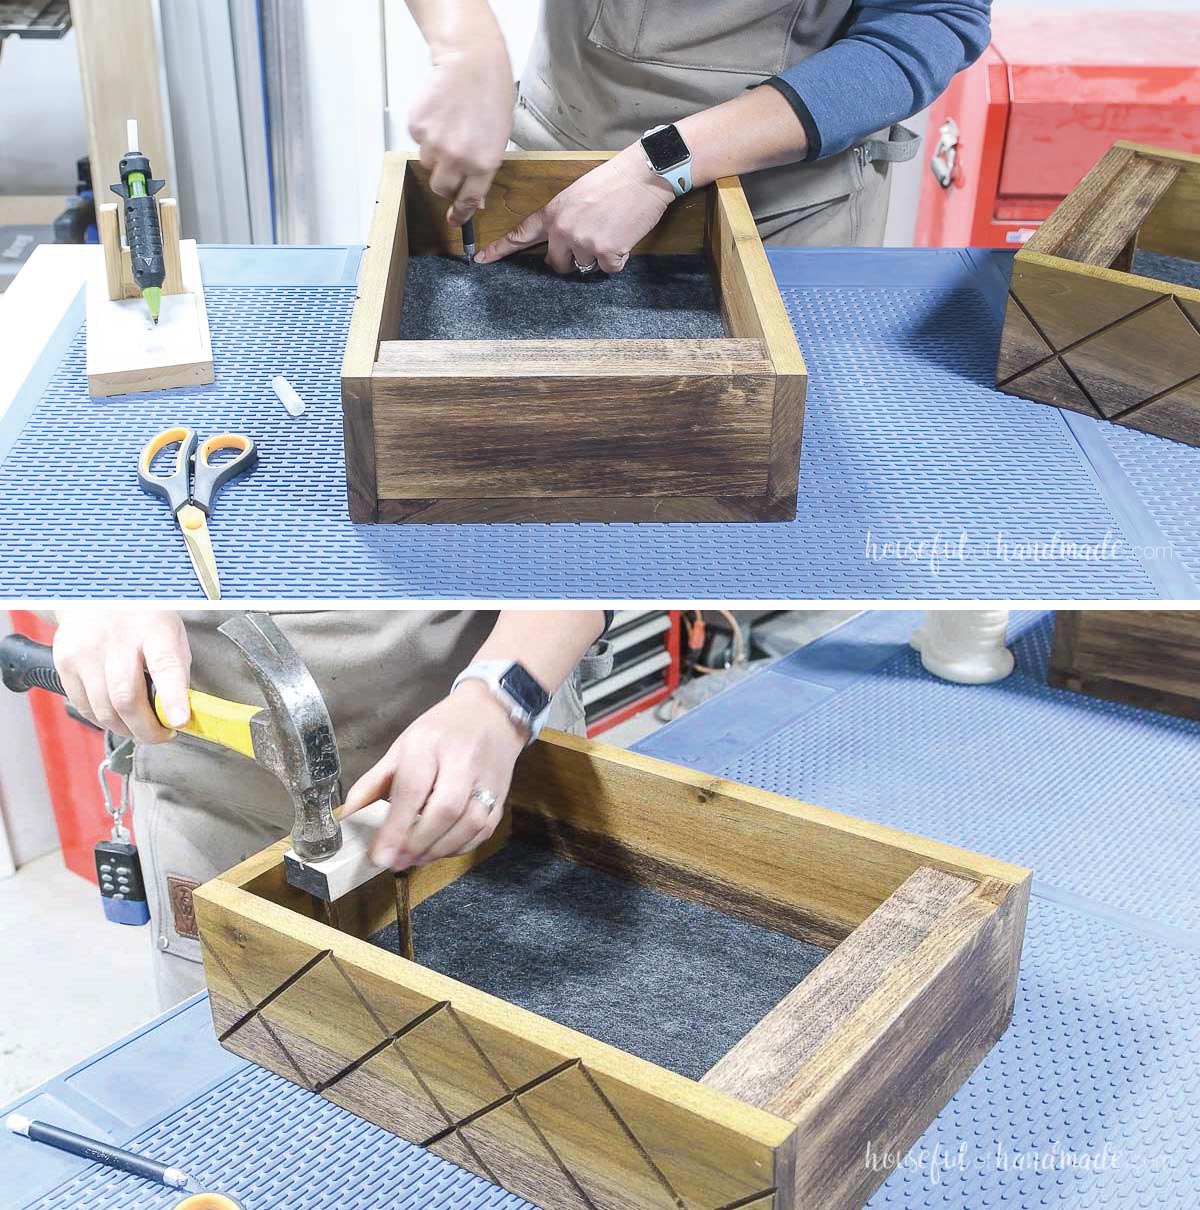
Glue the bottom cubby pieces to create a lower compartment for rings and other small items.
Set the front piece back 1/4” from the inside. Add 1 or 2 diverse to bottom as desired. Use blue painters to tape to hold the pieces while the glue dries.
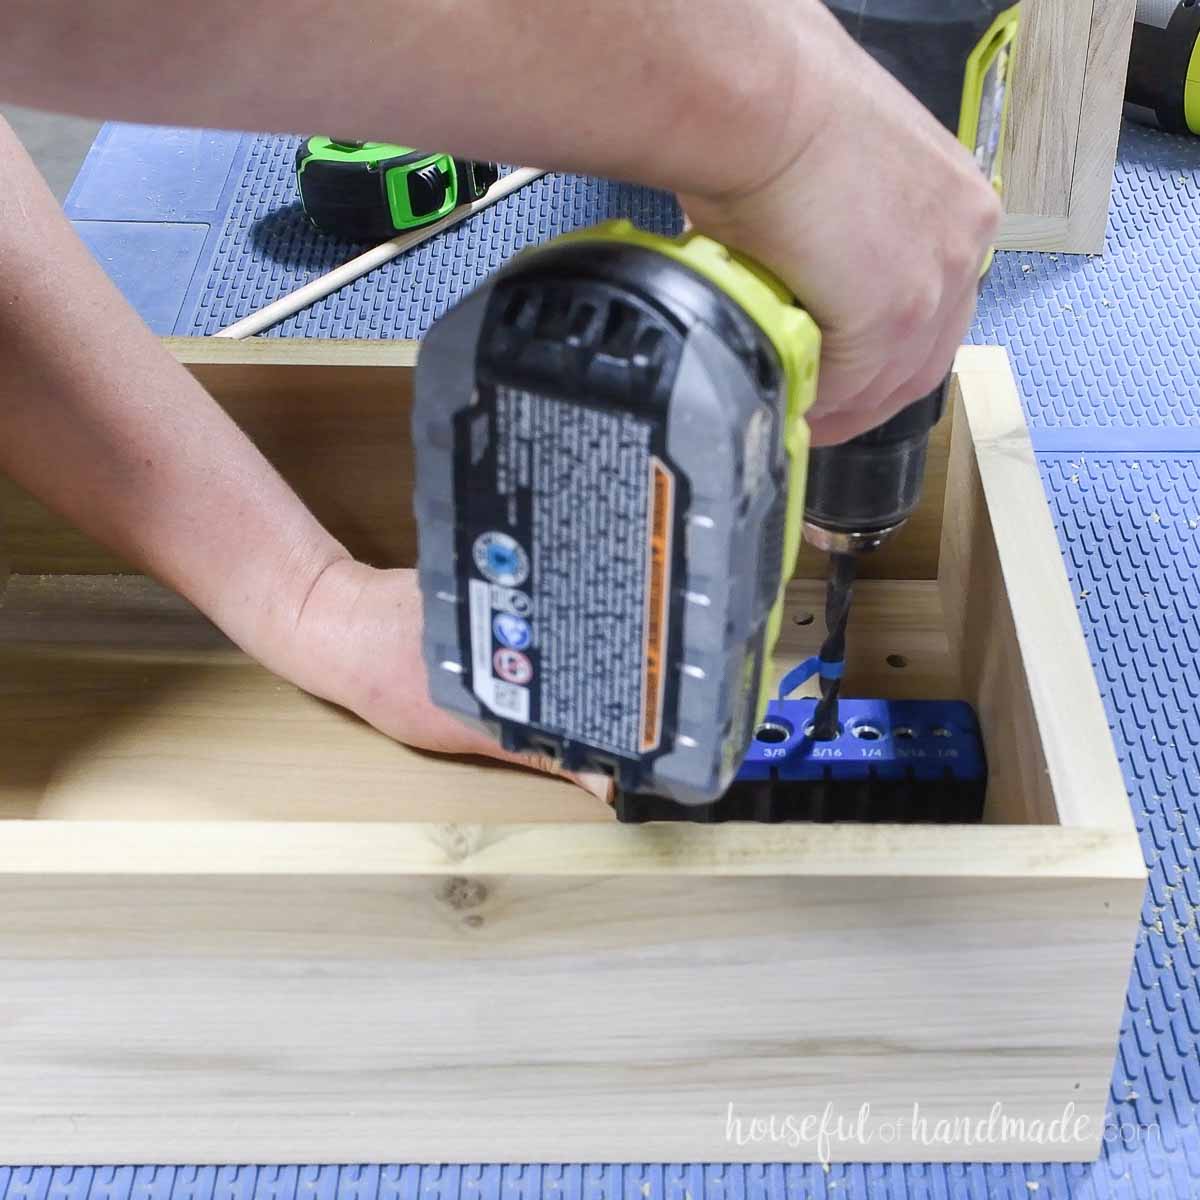
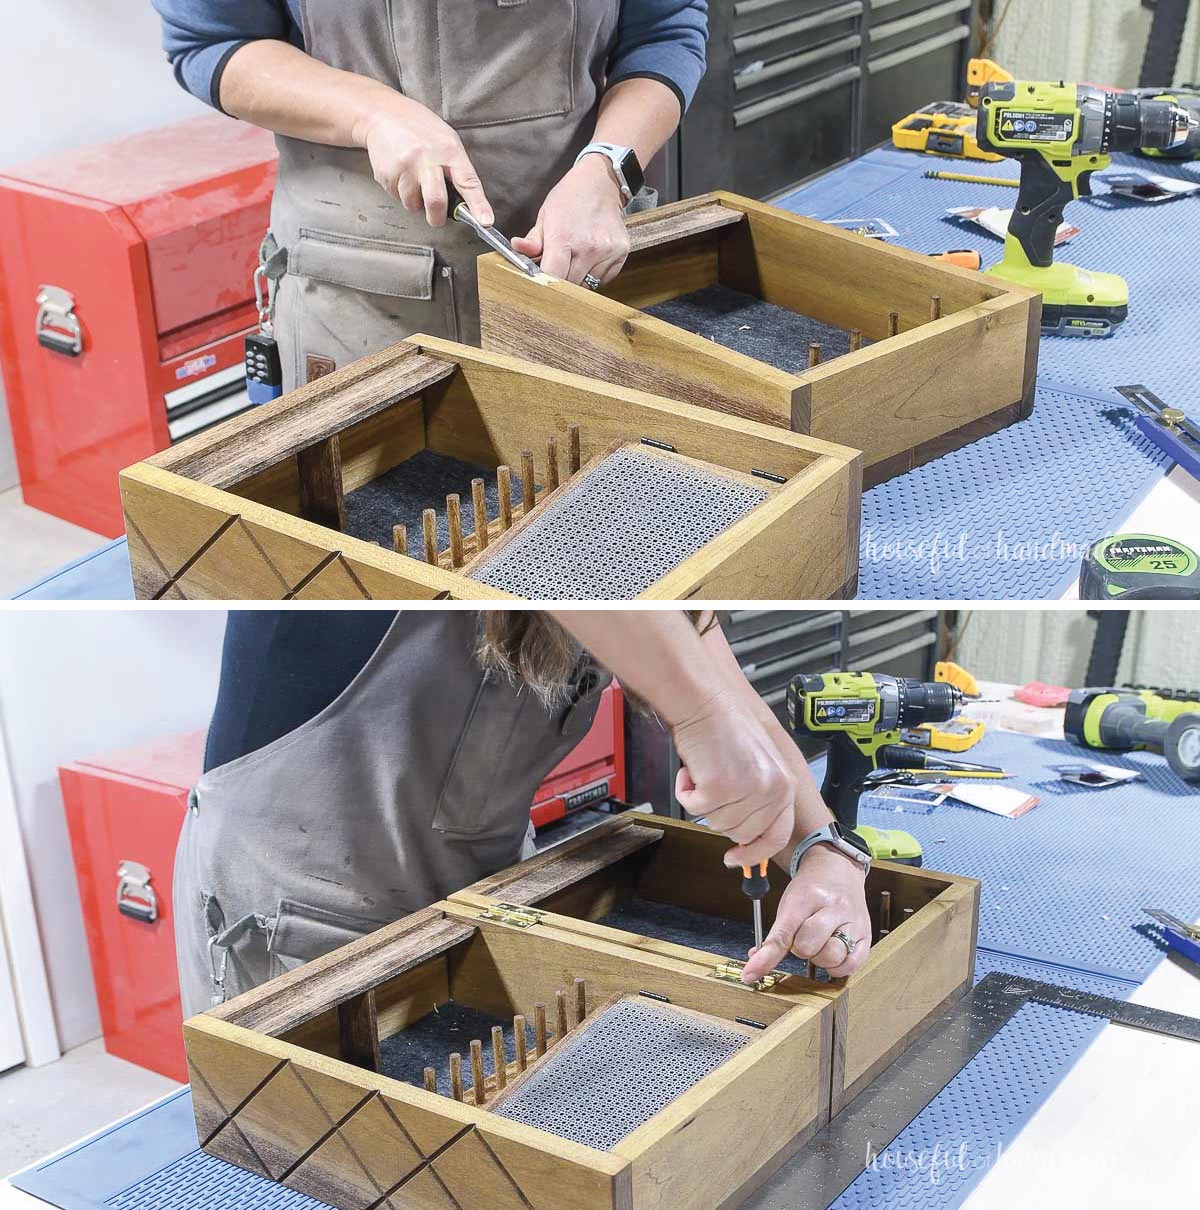
In the back of one side piece, drill 5/16” holes 1/2” deep for the necklace pegs.
I space them so there were two rows, one 1” below the top and the other 2” down. Center the middle hole and drill the rest 1” to the side of that.
Be careful to only drill 1/2” deep so you do not drill through the side of the jewelry box.
STEP 3- Add pegs for hanging jewelry
If you want to add the felt or velvet backing to your jewelry box, sand and finish the pieces now. If not, you can finish after installing pegs.
Using hot glue or spray glue, secure your fabric in the back of the two assembled sides. Cut around the bottom dividers if you have them.
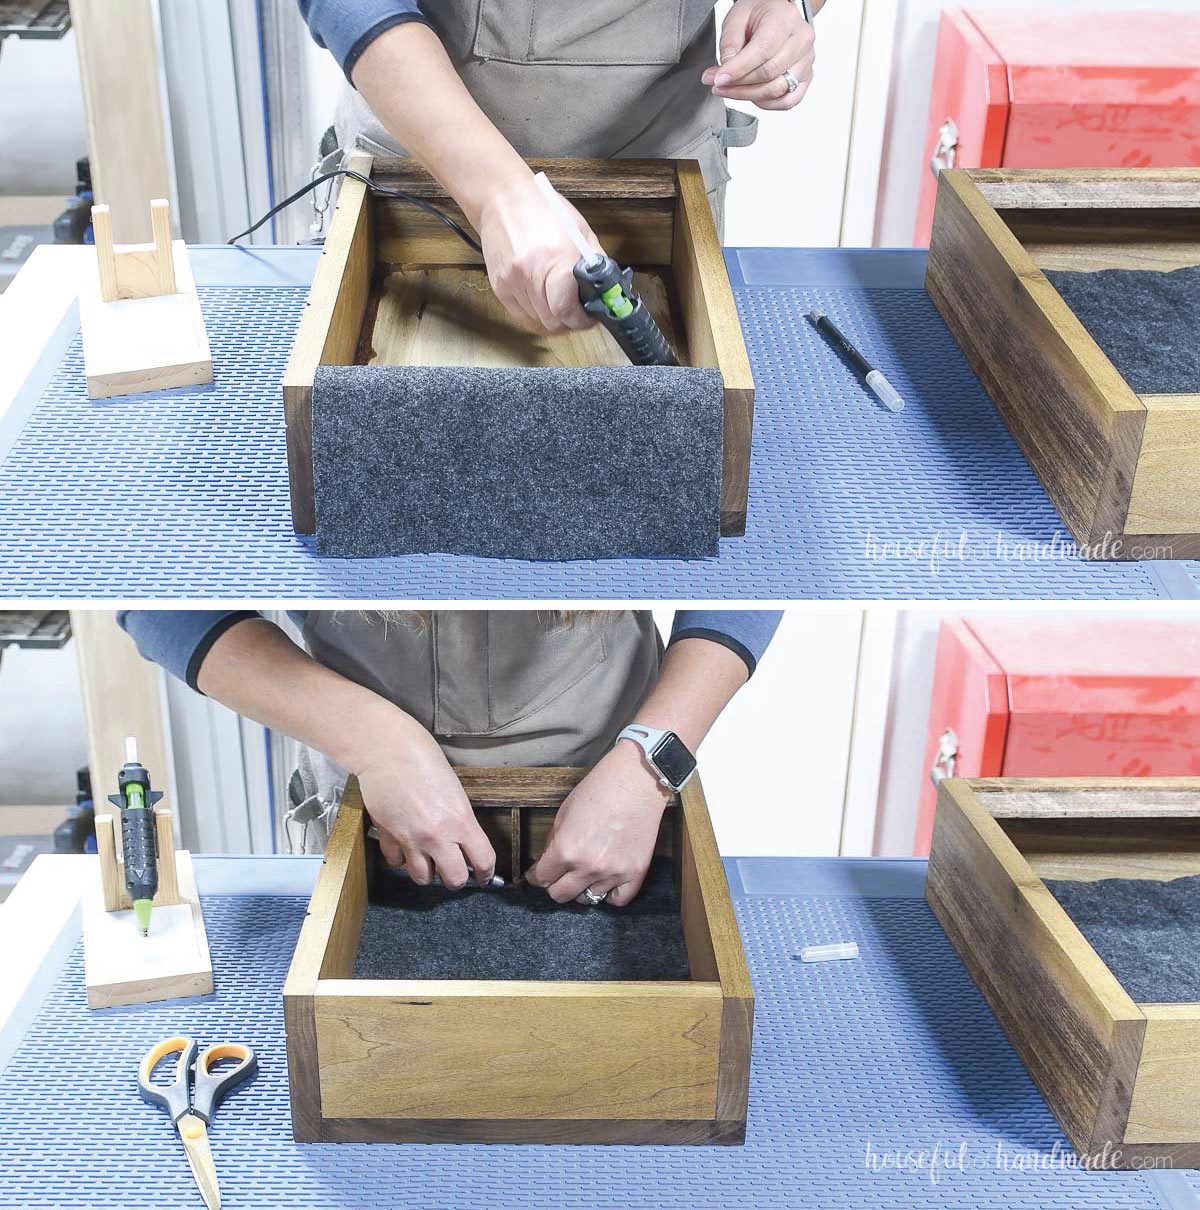
Also, cut the fabric away from the holes for the pegs. I did this by sliding an X-acto knife around the edges of the hole.
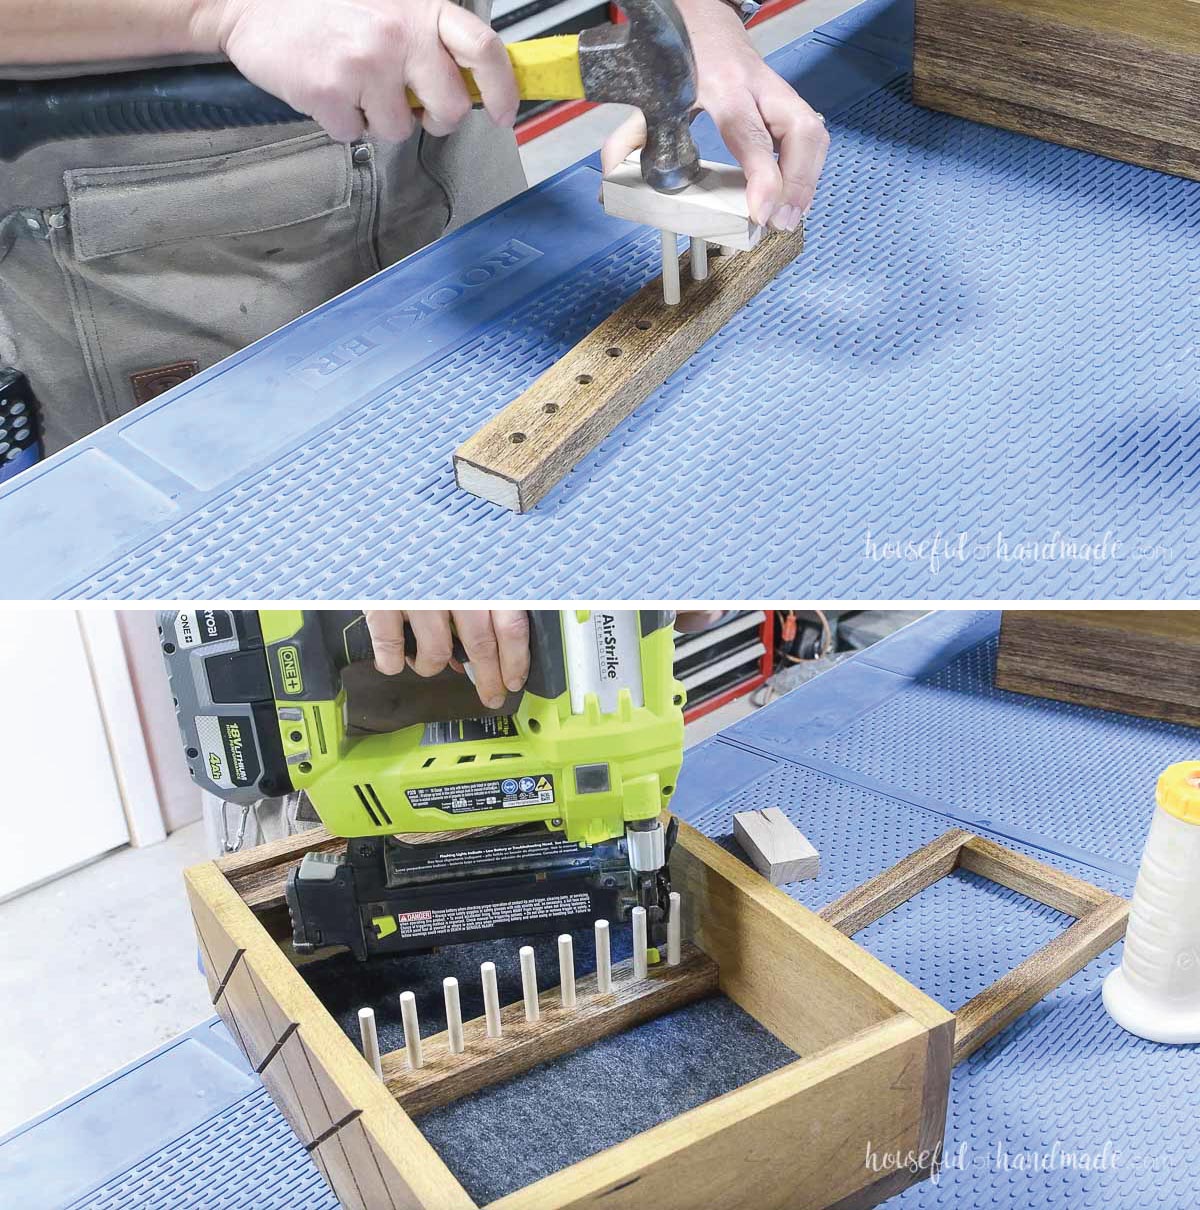
Add a drop of wood glue into the peg holes.
Then place the necklace pegs inside and tap them firmly into place with a hammer. Use a scrap of wood to protect the end of the pegs as you hammer them in.
Drill 5/16” holes 1/2” deep for the bracelet pegs in the bracelet holder board.
I space them so the row was centered on the board. Then center the middle hole and drill the rest 1” to the side of that.
Sand and finish the bracelet holder. Then place it over the fabric backing (if using) and secure with brad nails into the back so it is 6 1/2” down from the top.
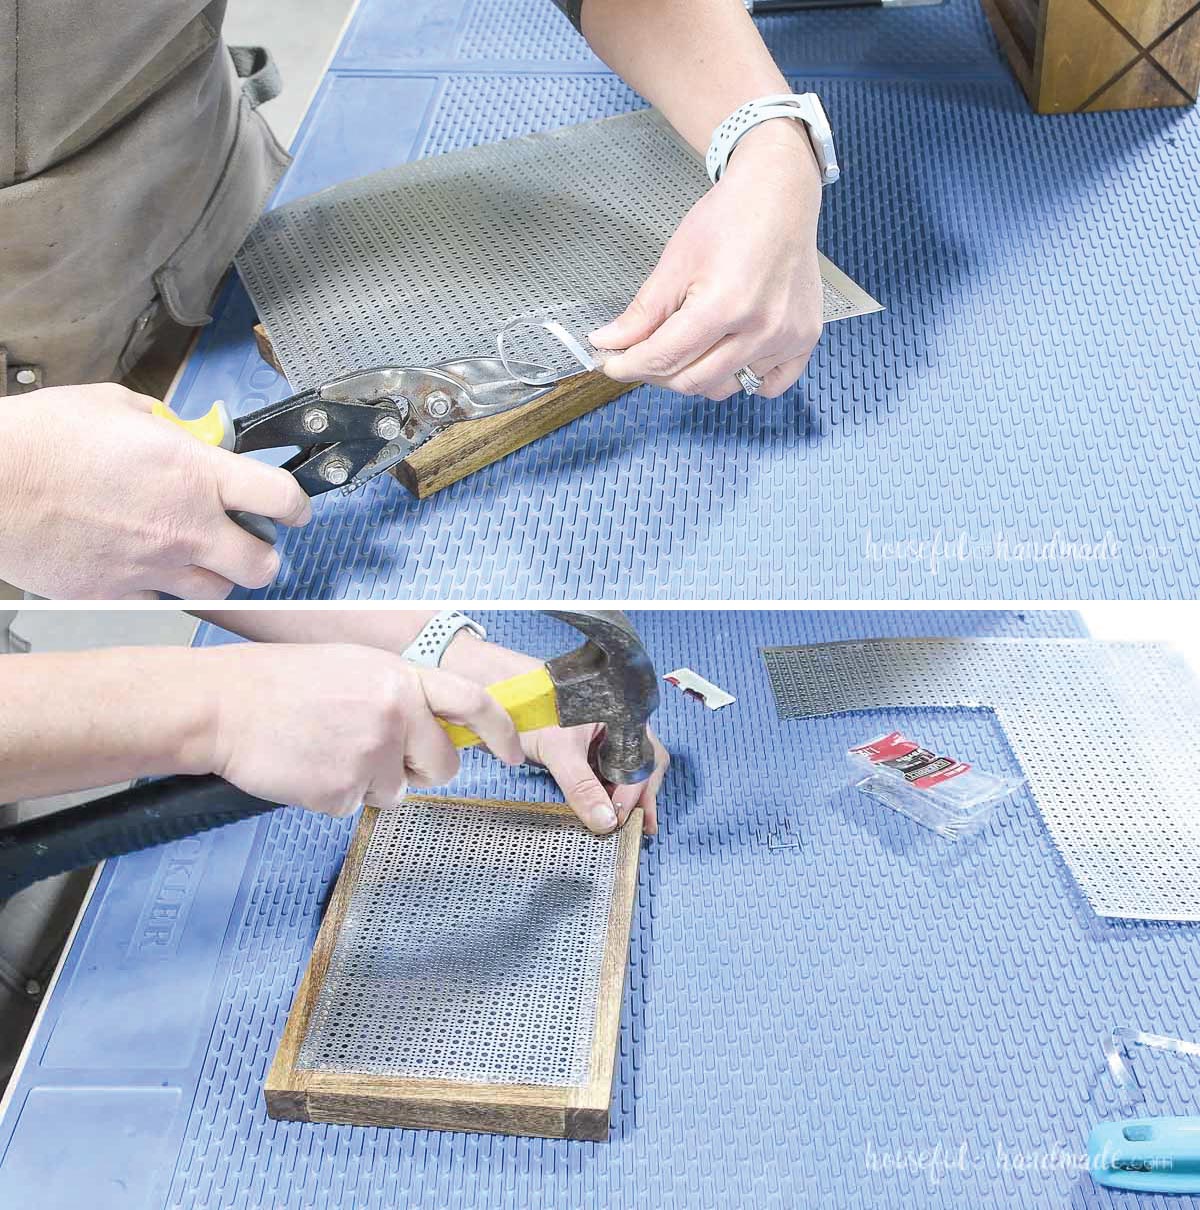
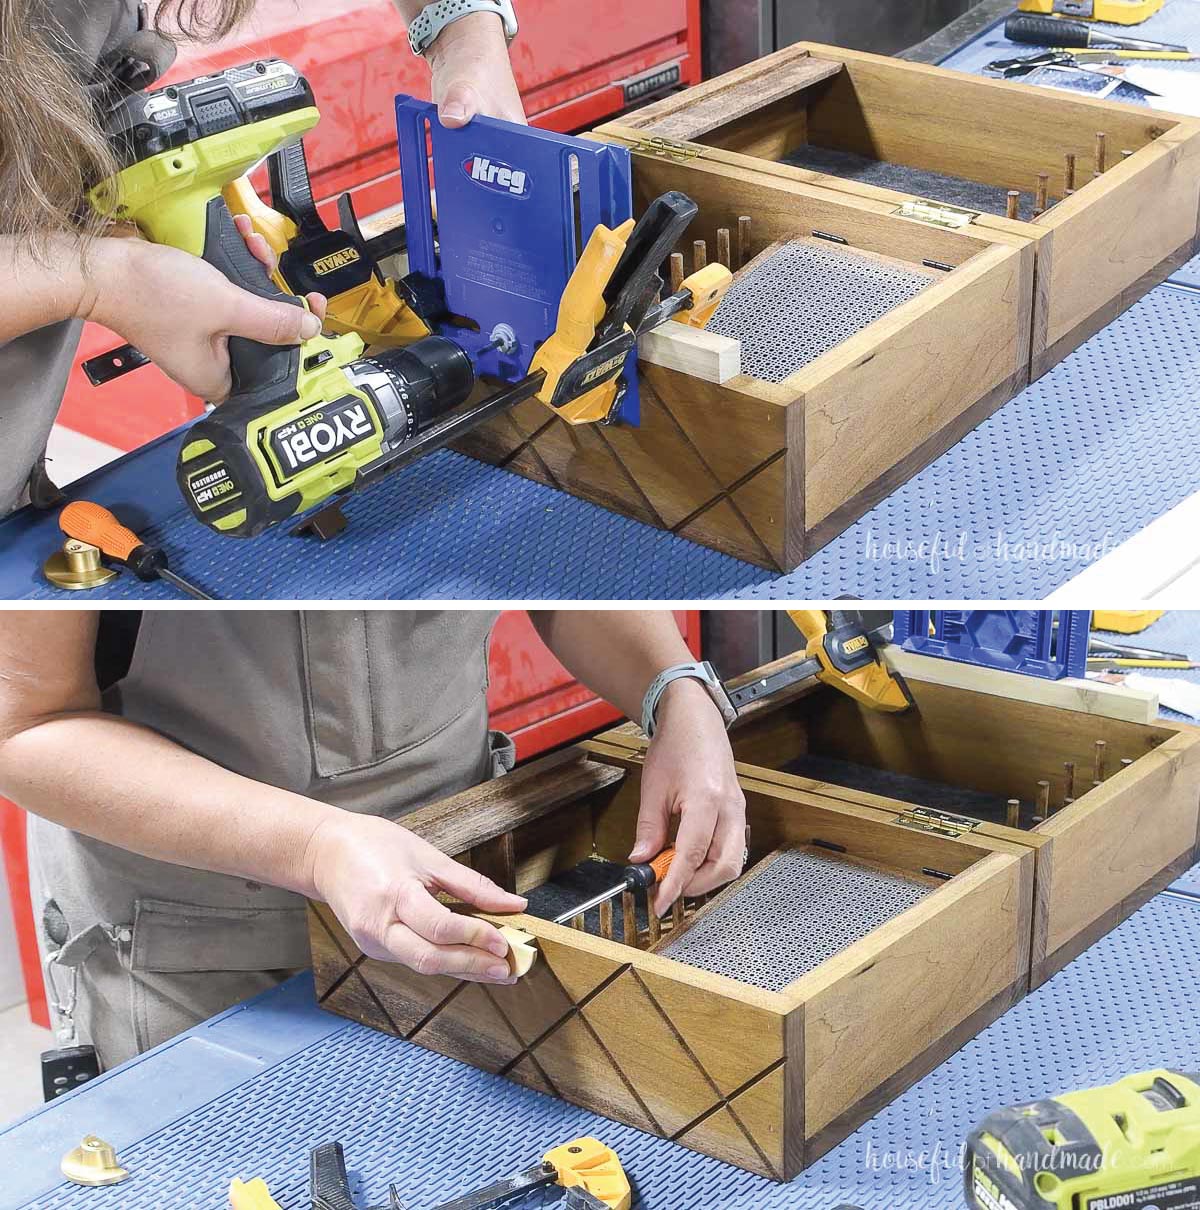
STEP 4- Build earring holder
Build the earring holder by attaching the two side pieces between the top/bottom piece. Secure with wood glue and 1 1/4” brad nails.
Sand and finish the pieces.
Cut the decorative metal sheet with metal snips and place it over the wood frame. Center it and secure with 5/8” wire nails through the holes in the decoration.
This is the same type of sheet metal I used for this simple earring stands as well. It works so well for earring storage.
Add the 1” x 1” hinges to the side of the earring holder. Then attach it to the top side above the bracelet holder.
Set the earring holder back 1” from the front so there is room for the earrings in the box when closed.
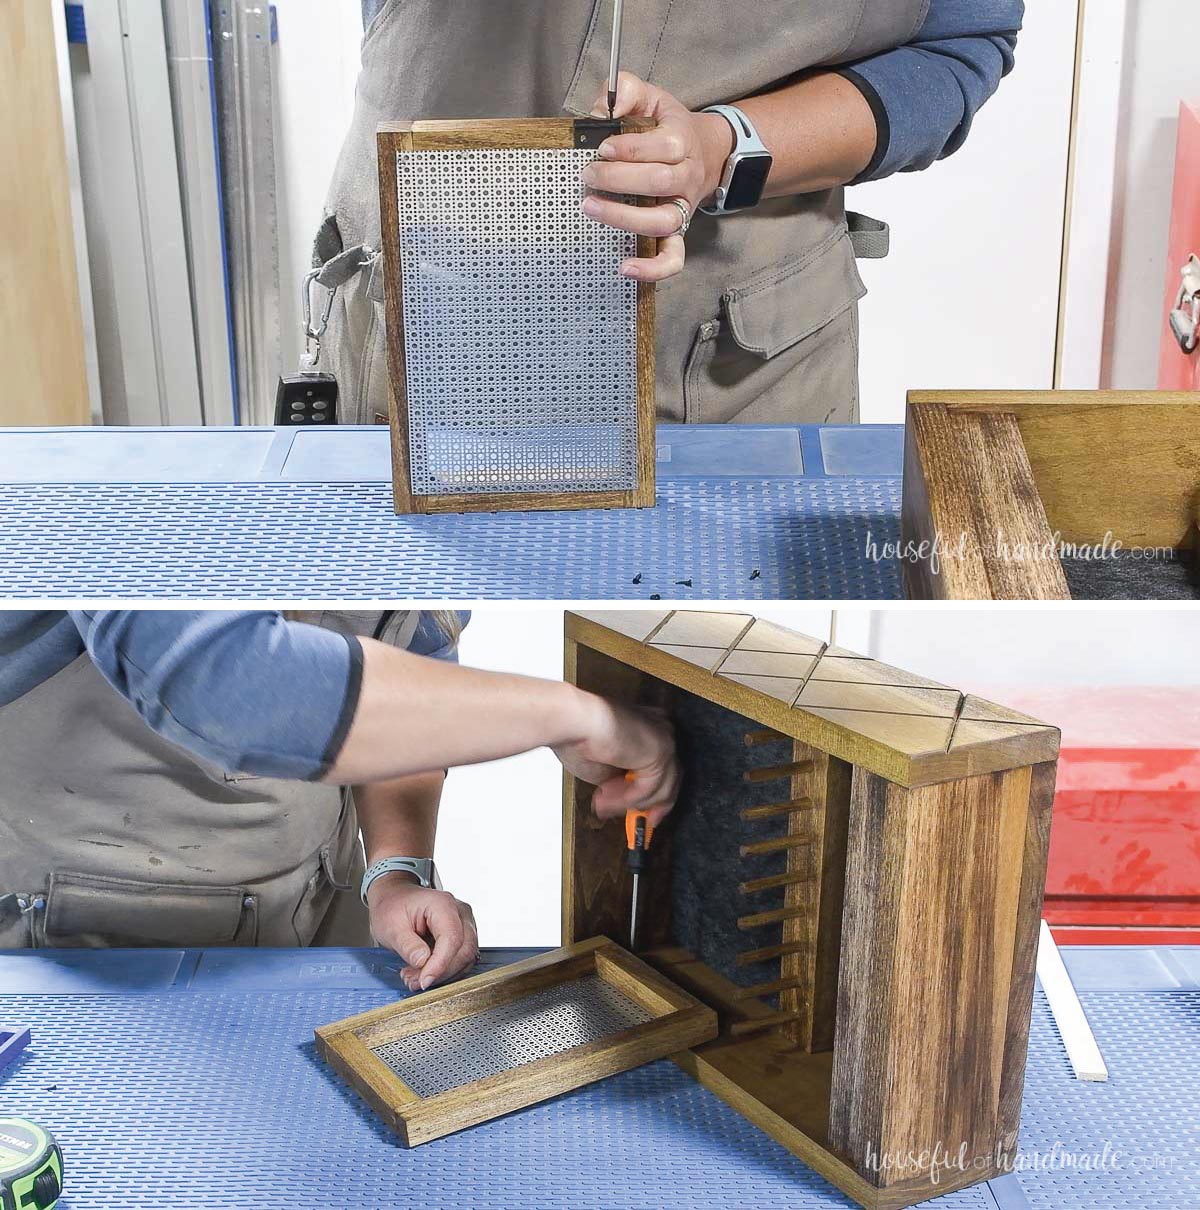
STEP 5- Add hinges and handles
Carve out a groove in the back boards for the 2” x 1 3/8” hinges to sit into. If you prefer, you can skip carving but your jewelry box will have a gap in the back when closed.
Attach the hinges so the two pieces can close flat then open.
Add a drawer knob or pull to the front of the jewelry box.
I used a semicircle knob so I placed them right up against the edge.
The center of the hole is 1/4” back. The hardware jig only goes to 1″ away from the top so I added a scrap of the 1×1 board underneath it to get the hardware hole where I wanted it.
Now you can load up your new jewelry box with all your pretty things and keep them organized.
You did it!
Premium plans include:
- Recommended Tools
- Shopping list
- Easy to read cut list table
- Cut diagrams
- Step-by-step instructions with 3D renderings
- Helpful resources
- BONUS: 3D SketchUp file
I just love having the perfect place for all my pretty things. And it looks amazing on my vanity too.
DIY Gift Ideas
This DIY jewelry box makes an amazing DIY gift!
And with the holidays fast approaching, I teamed up with my friend Shara from Woodshop Diaries to share 5 easy DIY gift for everyone on your list.
Check back everyday until Thanksgiving for new gift ideas.


Happy building!
