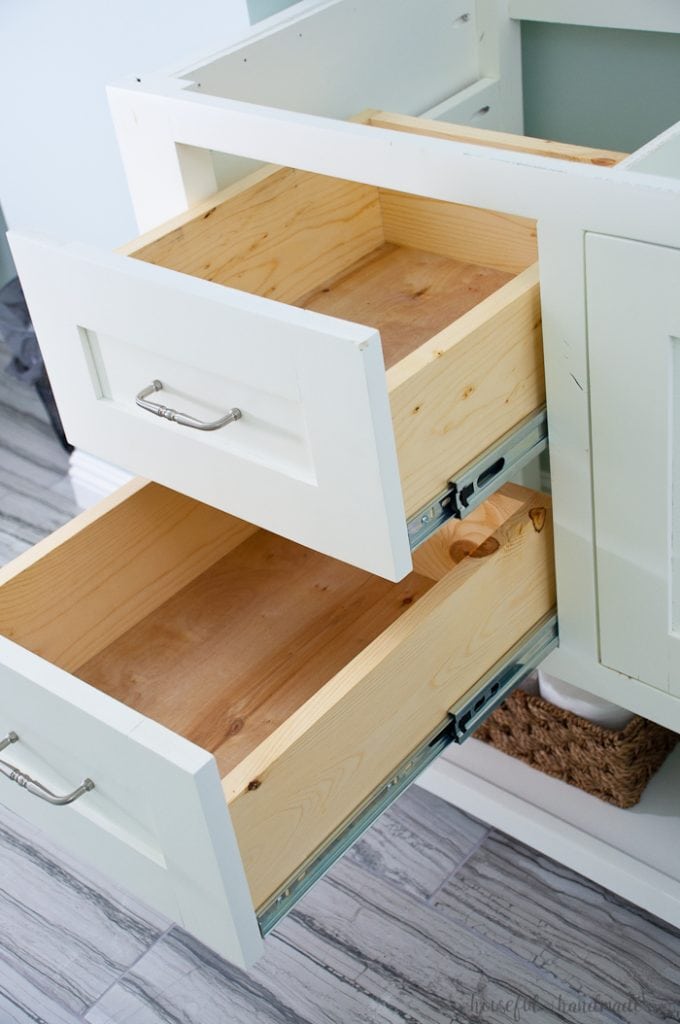
If you are new to woodworking or cabinetry you might be afraid to try building your own drawers. Words like dovetail and box joints sound so complicated.
But what if I told you you could make strong, sturdy drawers without the complicated joinery? These 3 drawer box designs are perfect for any woodworker who wants to build drawers that are easy and fast!
I have used these methods of building drawers in all my builds since I started building 6+ years ago. I have not had a drawer fail or break, even with lots of use!
This post may contain affiliate links. As an Amazon Associate I earn from qualifying purchases. Click here to read my full disclosure policy.
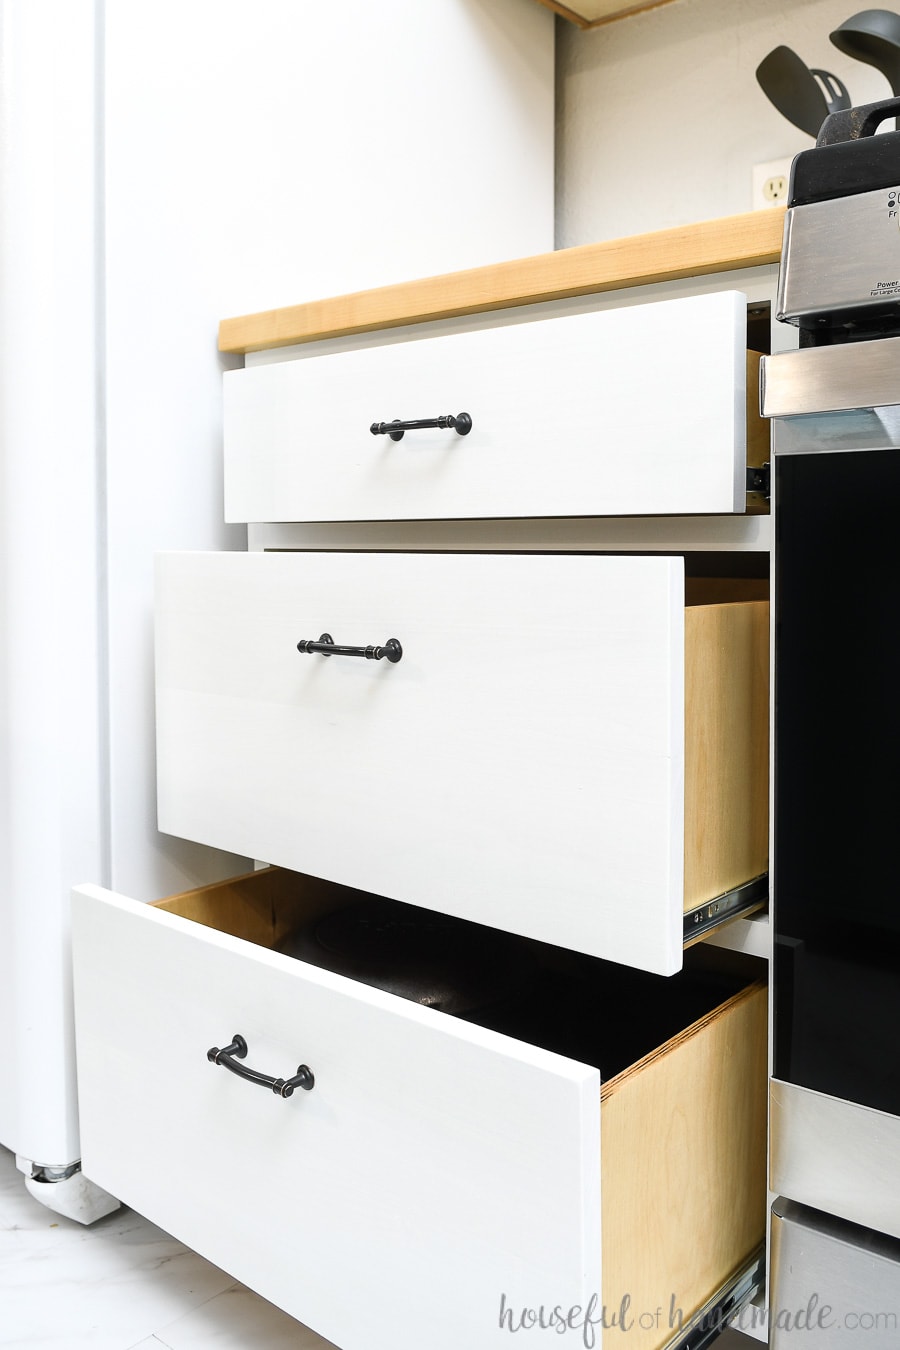
Table of contents
Parts of a Drawer
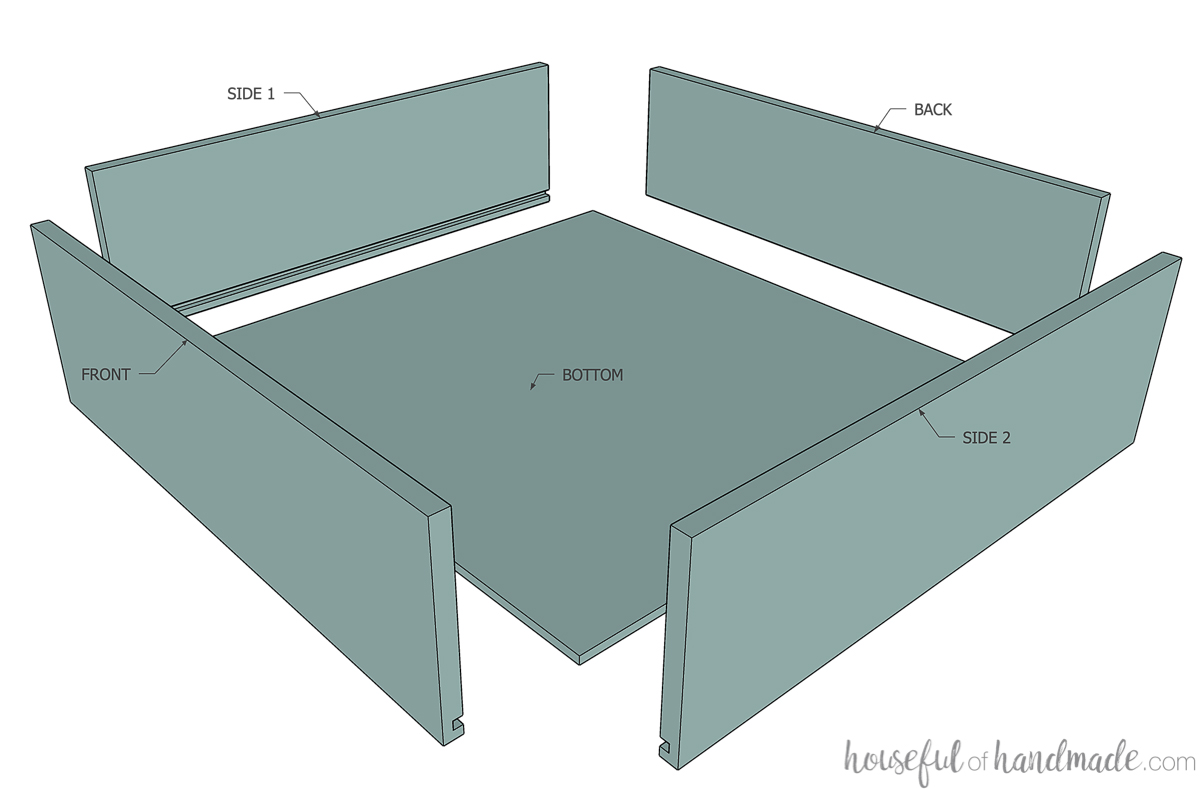
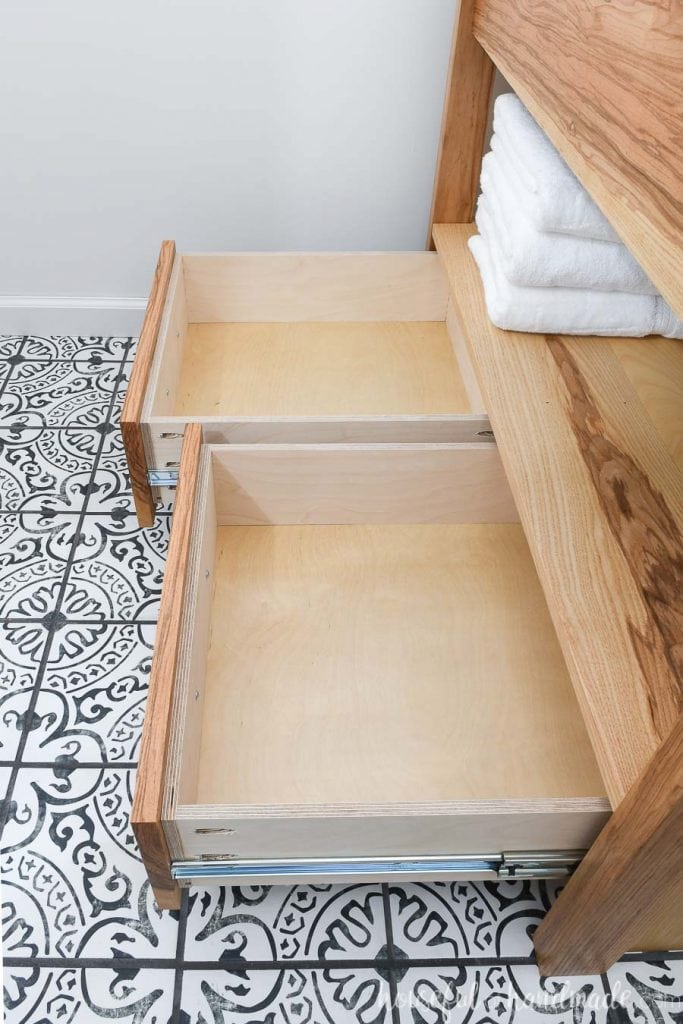
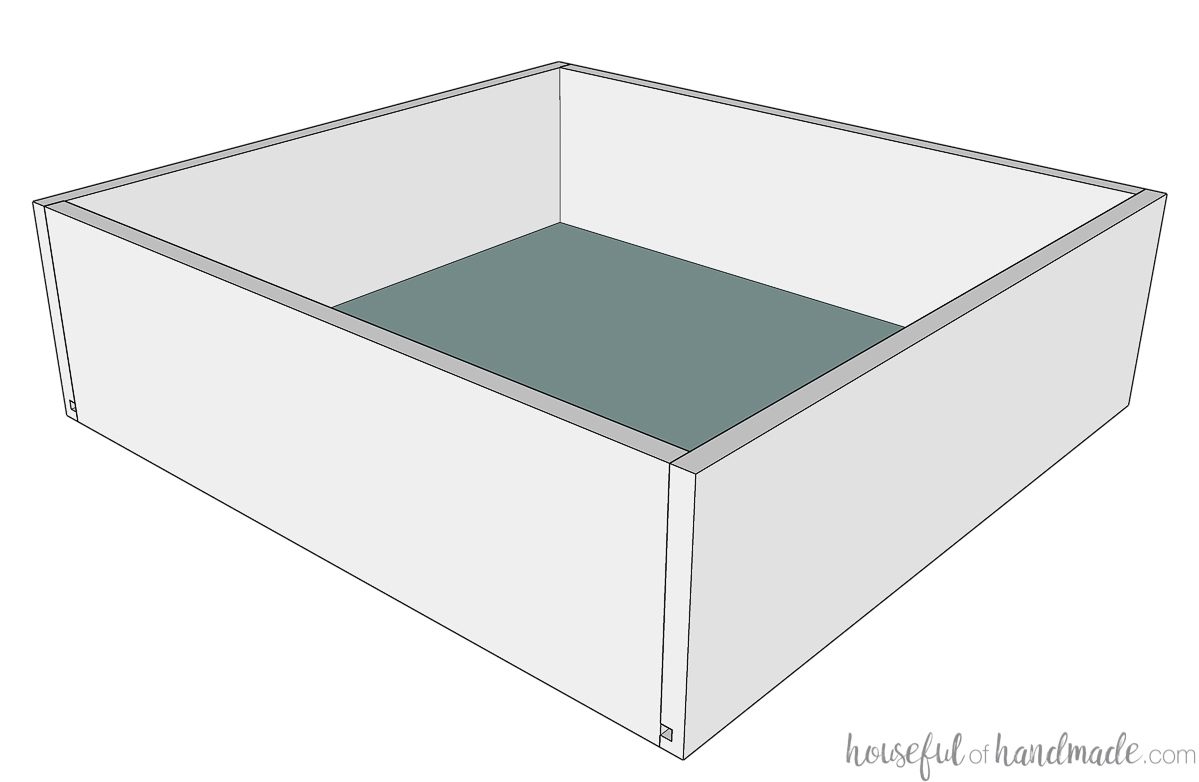
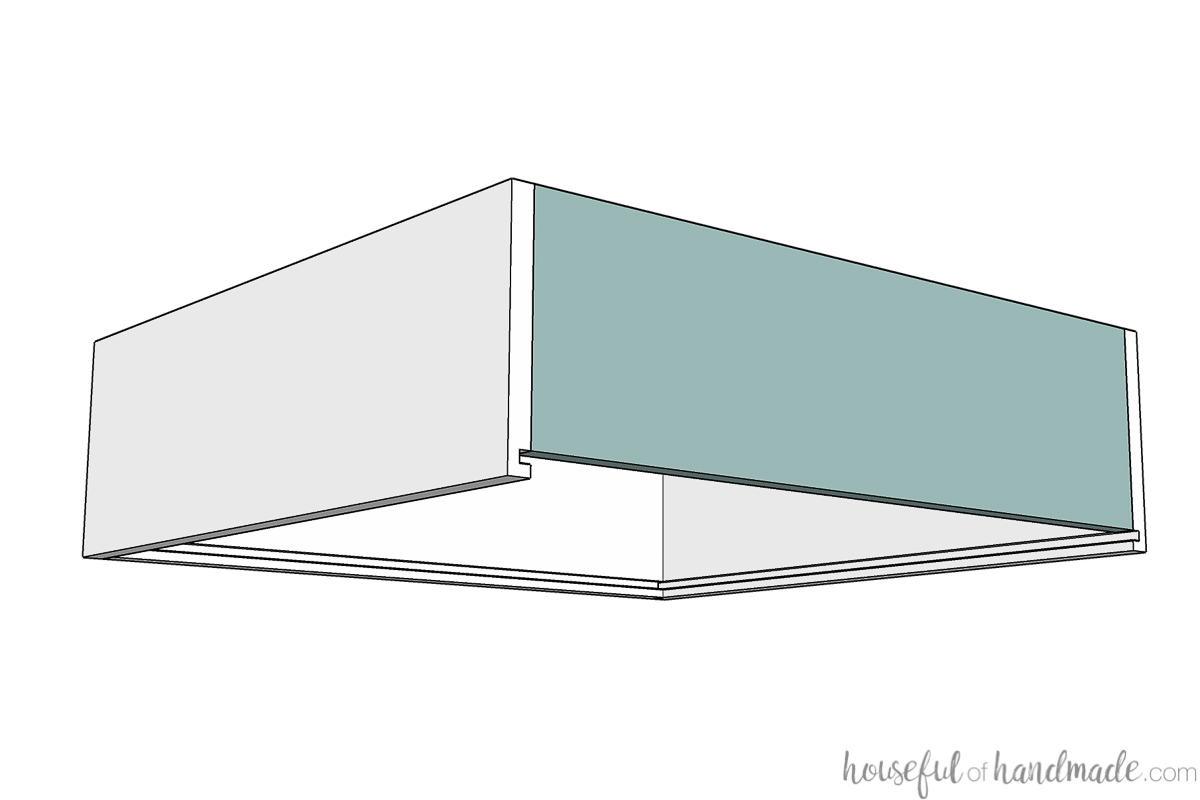
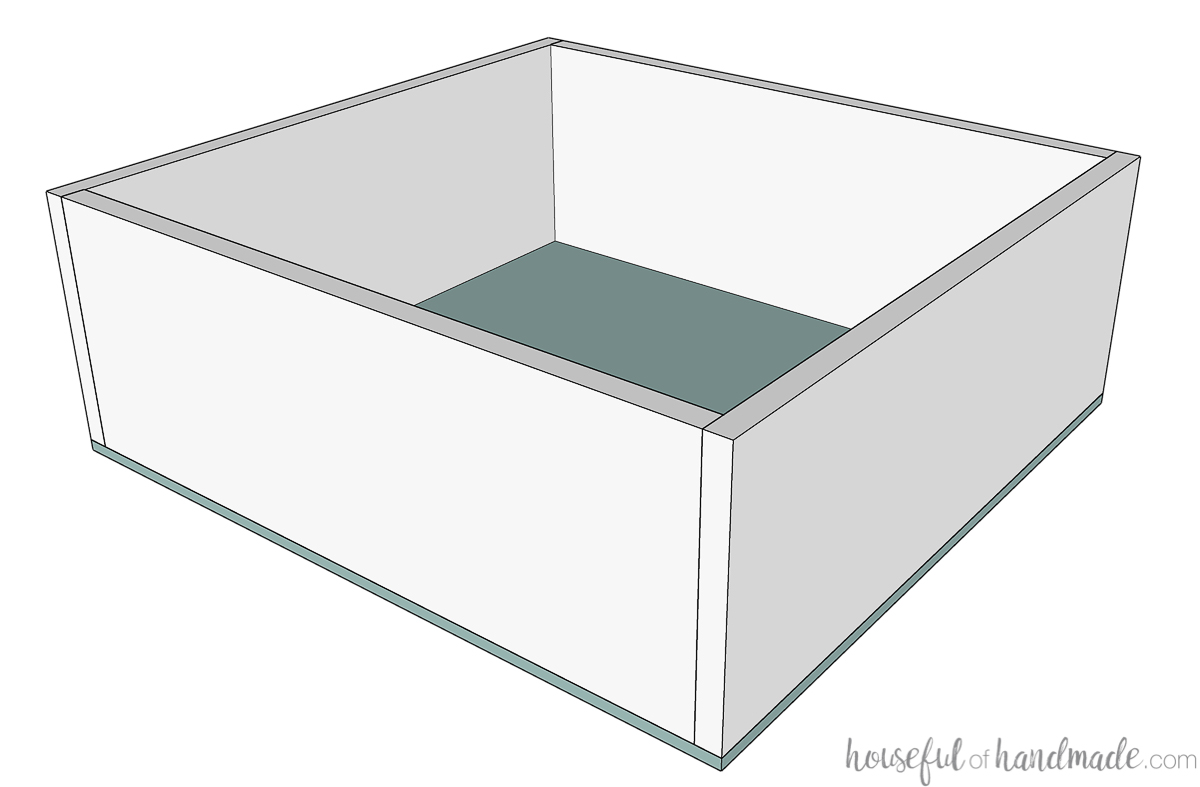
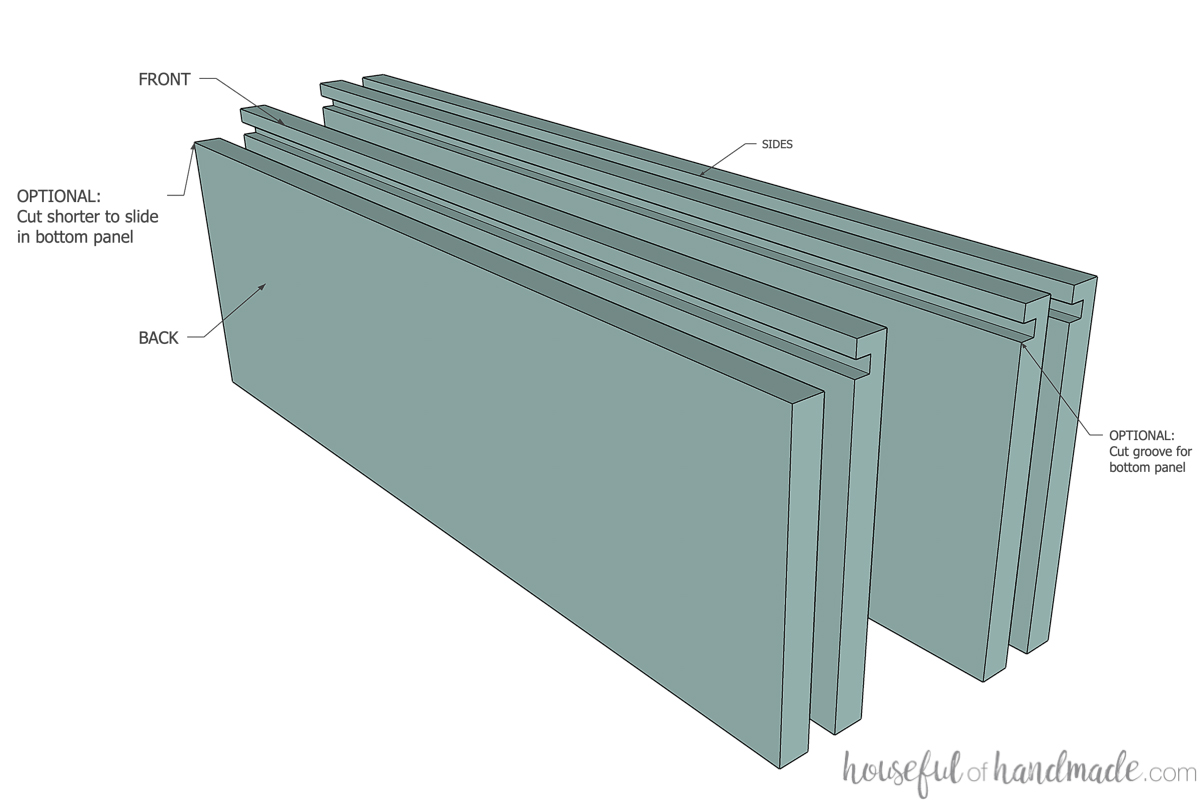
Each drawer box is made up of 2 side pieces, 2 front/back pieces, and 1 bottom panel. The exact measurements of each piece depends on the final size of the drawer opening and the drawer slides you are using.
The measurements will also be determined by which of the following methods you use to construct your drawers.
How to figure out the measurements for your drawer boxes is detailed under each method below.
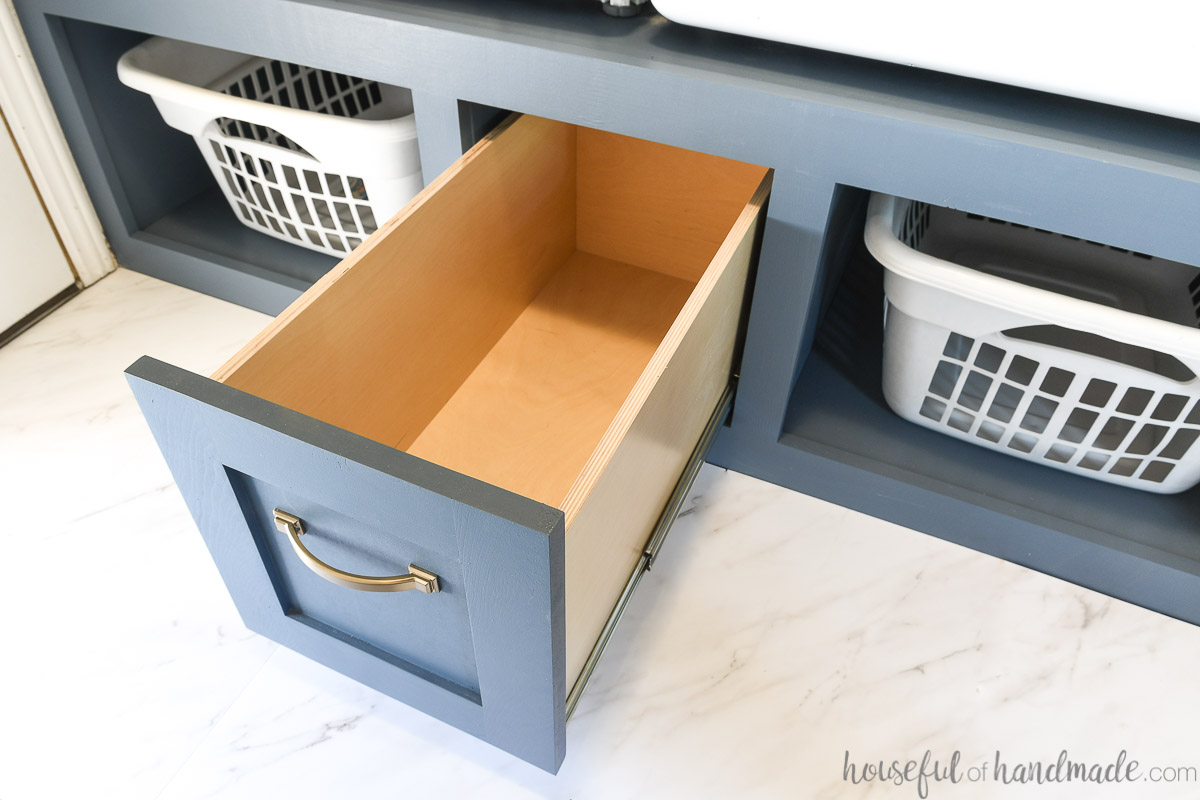
Typically the sides of the drawer box will run the full length of the drawer and the front/back will sit inside them. The only time you would change this is when you want the front of the drawer box to be the drawer front (like in this wall-mounted desk build).
What Wood to Use for Drawers?
Drawers can be made out of any wood, but it has to be very straight. Any warping, cupping or twisting in your boards will result in twisty, un-square drawer boxes.
Un-square drawer boxes will result in challenges when trying to install your drawers. So pick the right wood to set yourself up for success!
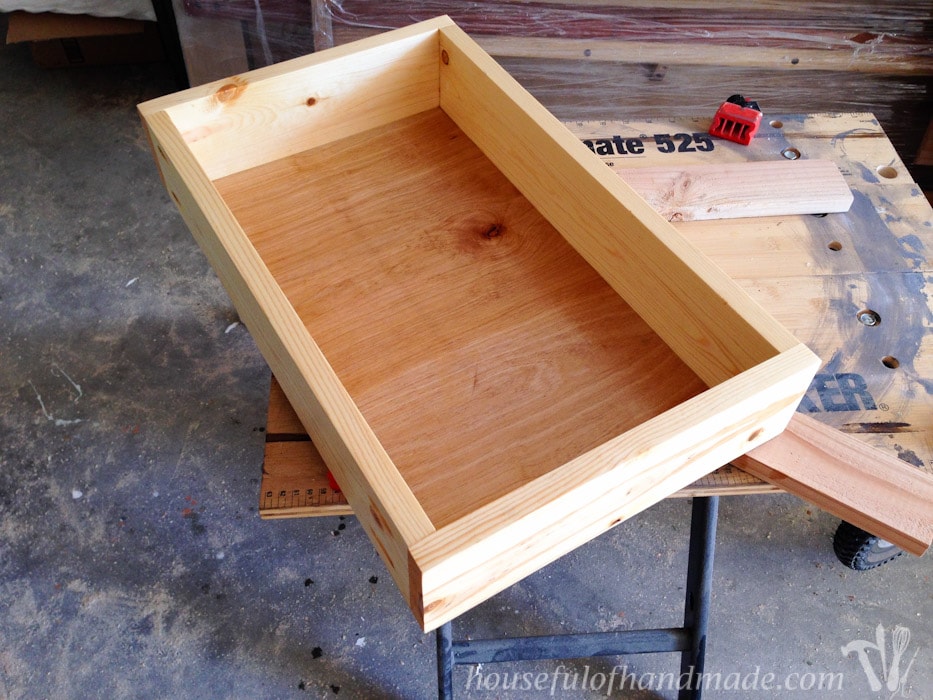
Drawer box sides
The best way I have found to ensure straight boards is to use plywood. You can cut the plywood to any size and take the time to make sure your pieces are straight and square.
But not all plywood is created equal. The best plywood for building drawer boxes is Baltic Birch.
Baltic birch plywood is a quality plywood made from layers of birch veneer instead of other secondary wood material like other plywoods. This leads to a void-free plywood (no holes in the layers). It also means you get stronger screw holding and a pretty edge.
Baltic birch does typically come in odd-sized 5′ x 5′ sheets. It’s important to know this when planning how much plywood you need for your drawers.
I typically use 1/2″ thick baltic birch plywood for my drawer boxes. The 1/2″ thick drawer boxes are strong enough for regular use.
They also allow for a slightly larger drawers because the walls of the box are thinner. And I’ll happily take every extra inch of storage I can get!
EXPERT TIP:
Build drawers out of prefinished plywood. Then your drawers are already sealed as soon as they are built. But make sure to use a melamine glue when building since wood glue will not work on prefinished ply.
You can also use 3/4″ plywood or straight boards for your drawer boxes. The first drawers I built (on this easy coffee bar table build) were made with 1×4 whitewood from my local home improvement store and they work great!
If using boards for your drawers, just take the time to check each board from every angle to ensure it is straight (see how to in this guide to buying lumber).
Drawer box bottom
The bottom of a drawer box is typically made out of 1/4″ plywood. The thinner plywood is great for normal drawers that will not hold heavy items.
Use 3/8″ or 1/2″ plywood for drawer bottoms for large drawer or for drawers with extra weight in them.
For large drawers, one problem with the 1/4″ plywood could be sagging. Since the bottom is only supported around the perimeter of the drawer, a very large drawer bottom can sag.
A thicker bottom material can help alleviate sagging. Or you could add a center support in the drawer bottom for extra support.
How to Attach a Drawer Bottom?
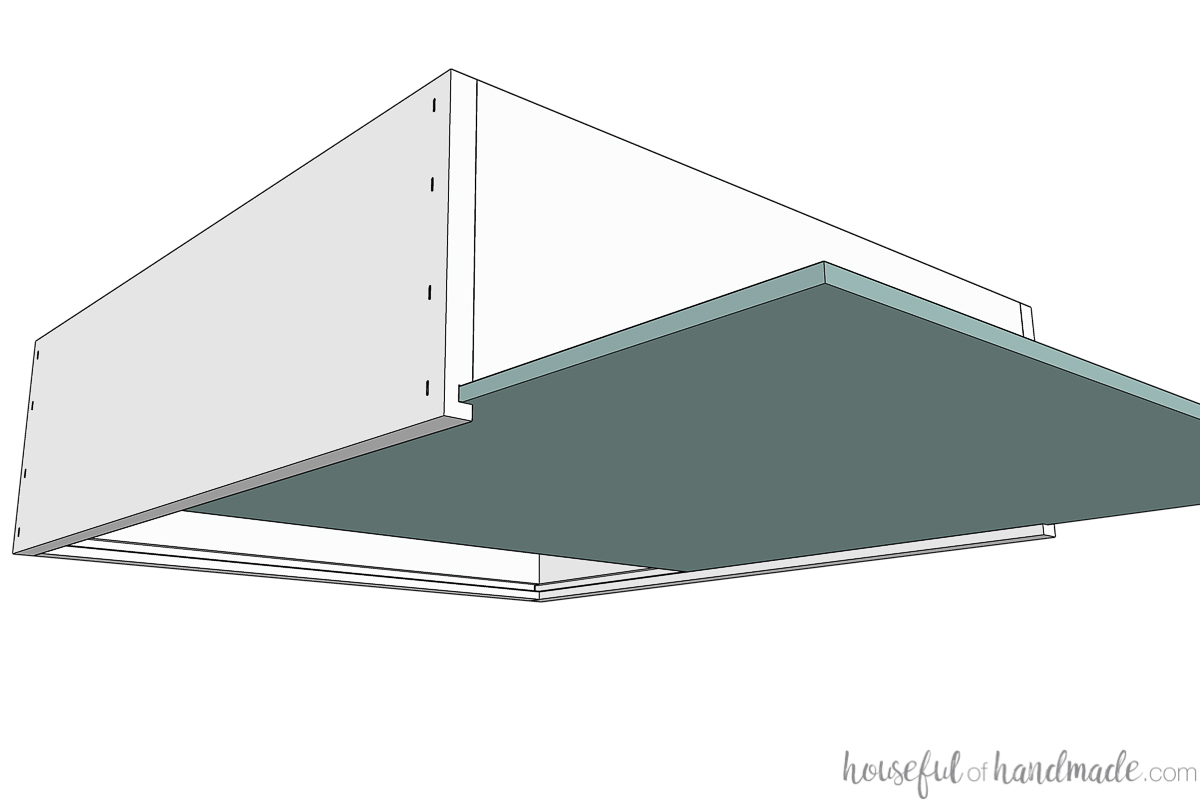
There are two ways you can attach a drawer bottom: in a groove or not.
Attaching the drawer bottom in a groove
The groove method is most common and creates a really nice drawer bottom. The drawer bottom is completely hidden inside the groove.
You can see the groove on the front and back of the drawer box, but it is hidden behind the drawer front or inside the cabinet.
You will need to have tools to make a groove in the drawer box sides/front/back to use this method. The best tools for cutting grooves in wood are a router or a table saw.
To cut a groove in the boards with a router, you can use a simple, inexpensive (and very versatile) trim router. Or have a more fancy router in a router table.
The most important thing is that you use a guide/fence of some kind to make sure your groove is straight and in the exact same spot on all the drawer box pieces.
To cut a groove on a table saw, you can use a dado blade. Or my favorite method is to make a few passes with a standard blade, just slightly move the fence each time until the groove is the the right size.
Using a router table or table saw makes it easy to ensure the grooves are the exact same distance from the top (or bottom) of the drawer box on all pieces.
How to replace a bottom panel in a drawer
One of the benefits of using a groove to add your bottom panel is you can replace a broken or sagging bottom easily if you do one additional step!
- Cut the back piece of your drawer so the bottom ends at the top of the groove.
That way when you assemble your drawer, the top is flush. Then you slide the groove into the drawer box and tack into place on the underside of the back piece with a couple nails.
If your drawer bottom ever gets damaged, you can pry the nails off the back piece and slide out the bottom panel.
Slide in the new one and you are all fixed!
Attaching the drawer bottom without grooves
If you do not have a way to make grooves for your drawer box bottom (or just don’t want to), don’t worry, you can still DIY your own drawers!
You can staple/nail your drawer bottom directly to the bottom of the drawer box. This is not the “preferred” method for traditional woodworking, but I am not a stickler for tradition.
Attaching your drawer bottom to the bottom without a groove can leave the sides of the bottom visible on the sides of the drawer (cut the bottom slightly smaller to minimize this).
It is also more likely the bottom of the drawer can fall off. Wood glue and not putting heavy stuff in your drawer will help prevent this. But it is still possible.
Also you probably “shouldn’t” glue the entire bottom piece on because you need to account for wood movement. However, plywood does expand and contract less than solid wood.
And I have never had an issue with glued together, non-traditional drawer boxes (I have made many).
My thoughts are: it’s better to start off making something, even if it is not perfect or “right”. Then you can improve your technique as your skills improve.
So don’t let someone tell you it is wrong just because it is not the way they do it!
Printable PDF Woodworking Plans
Save over 60% with the bundle of all 3 drawer building PDF guides.

What Size Should my Drawer Box Be?
Figuring out what size to build your drawer might seem confusing, but it is not!
You will need to know 2 things before determining your drawer box size:
- The exact size of your drawer opening
- The clearance needed for the drawer slides you are using
Then you can determine the size of your drawer box as follows:
FINAL DRAWER WIDTH = Width of Opening – Slide clearance
FINAL DRAWER HEIGHT = Height of Opening – at least 3/4″ (1/4″ clearance for bottom + 1/2″ clearance for top)
FINAL DRAWER LENGTH = Slide Length that fits in Drawer Opening without Hitting the Back
You can build your drawer shallower than the listed height. And if using bottom or center drawer slides you may need more clearance than the 1/4″ noted.
But I like to build mine so the sides are as tall as possible for more storage.
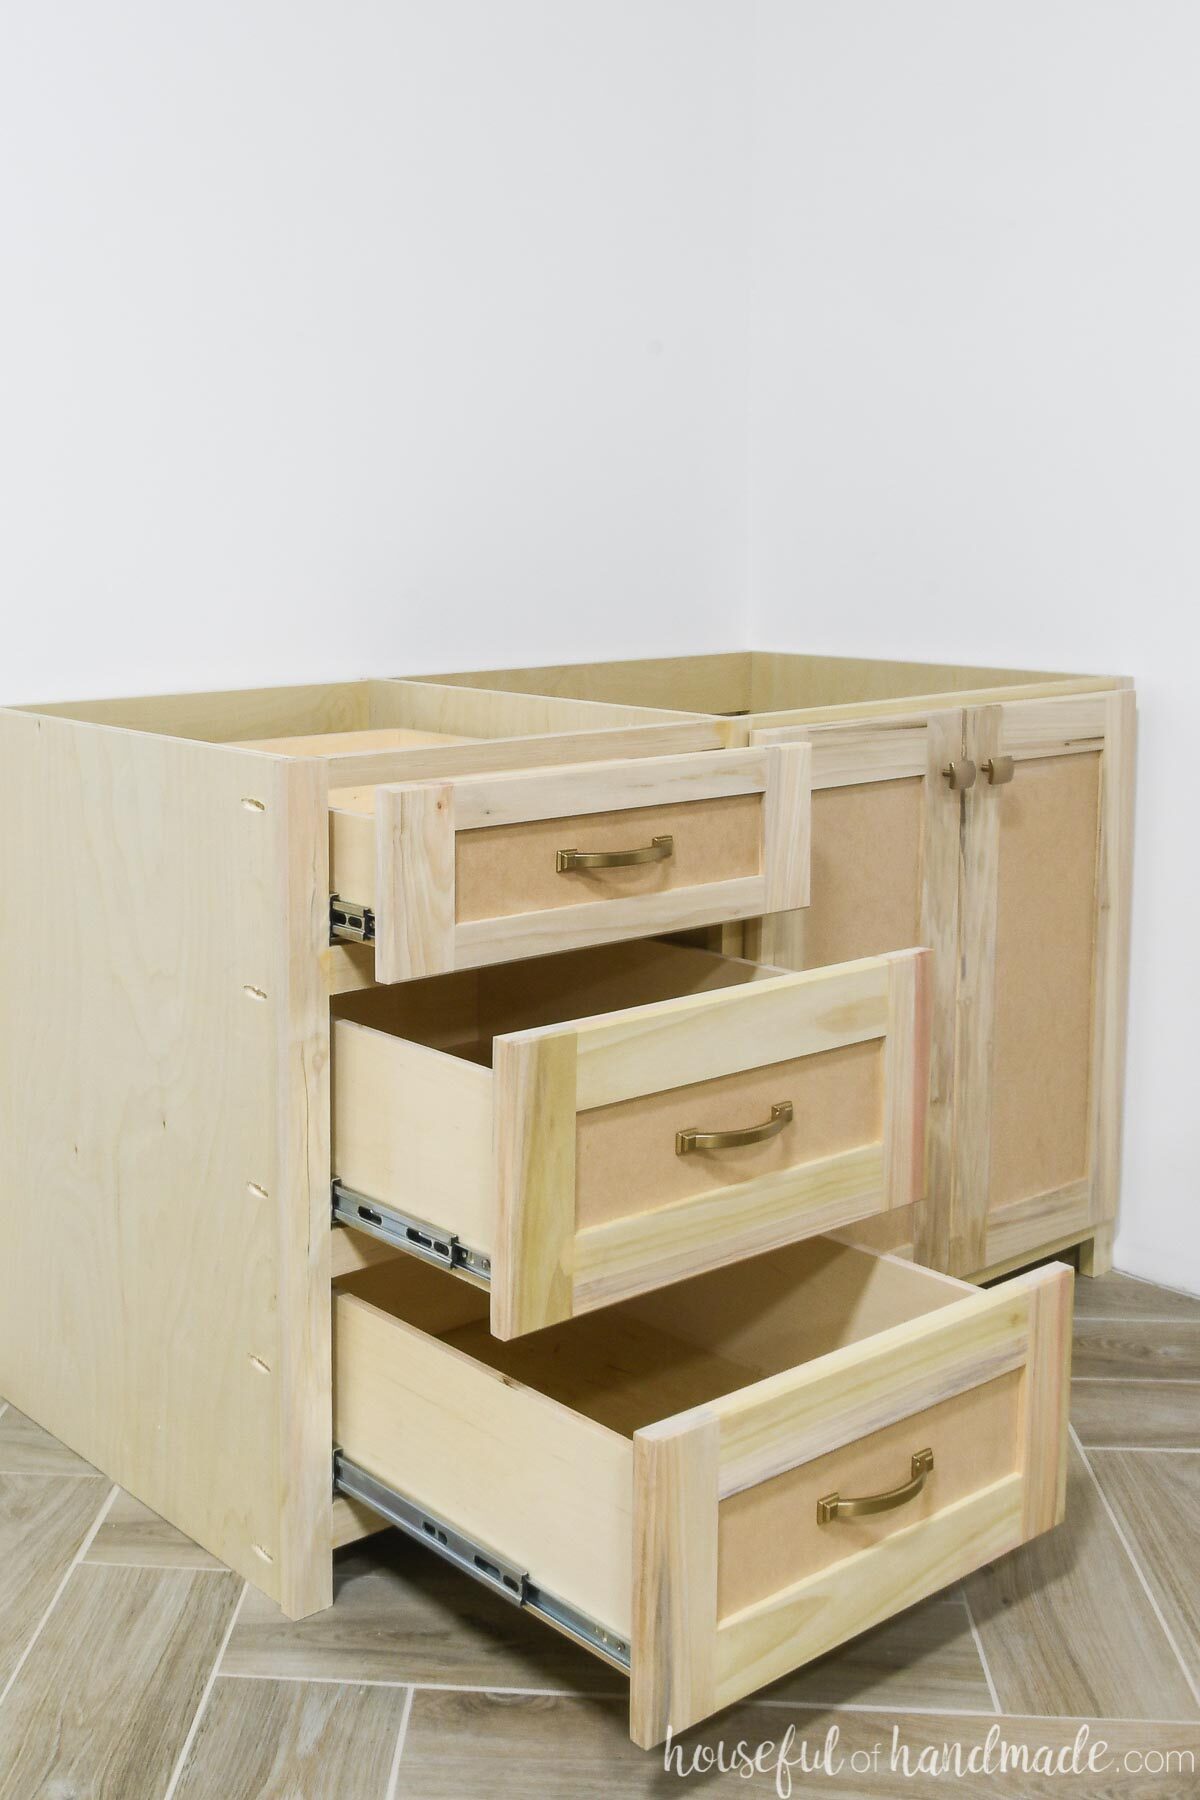
Once you have finished your drawer boxes, learn how to easily line up and install drawer fronts here.
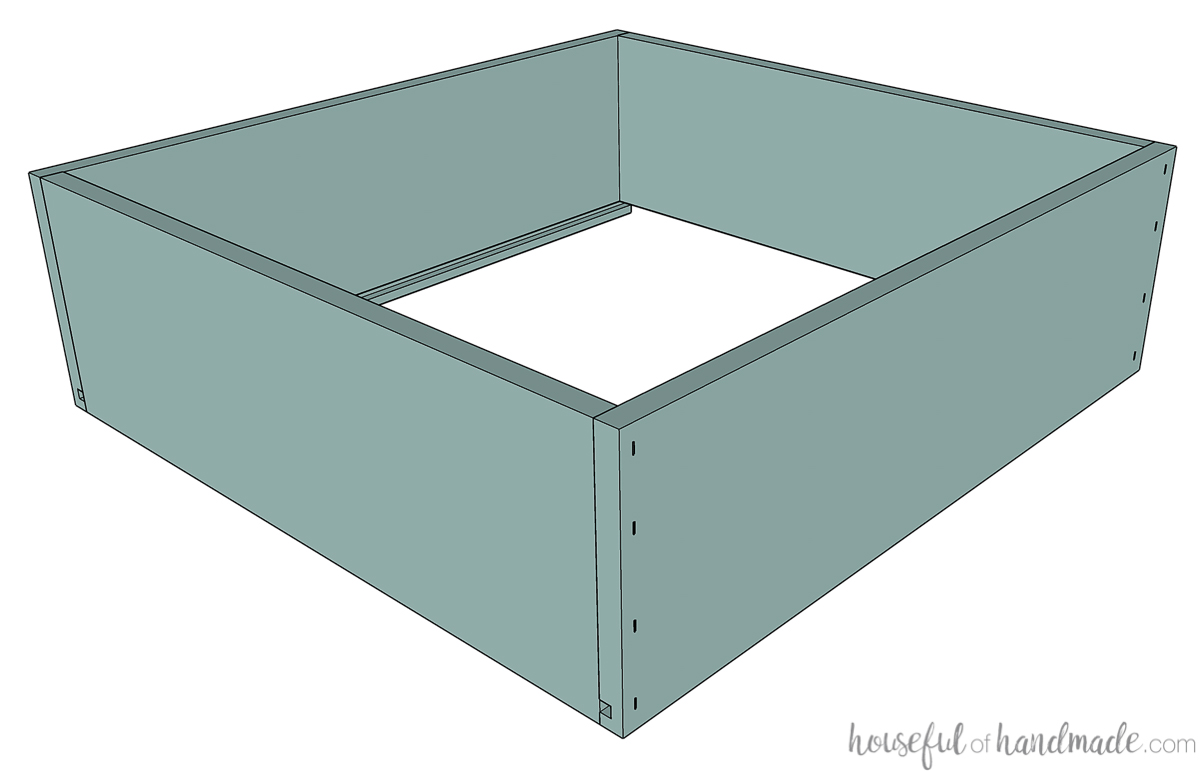
How to Build Drawers with Pocket Holes
Using pocket holes for your DIY drawers leaves you with a very nice drawer box that is super sturdy. And the pocket holes are completely hidden behind the drawer front or on the very back of the drawer box.
If you are using the front of the drawer box for as the drawer face, like I did for this simple console table build, you will need to move the pocket holes from the front/back boards to the sides. This will make them visible on the side of the drawer.
You can build a drawer box with pocket holes and attach the bottom with or without a groove (as noted above).
Pocket Hole Drawers Cut List
Decide on the final dimensions of your drawer box. Then use the following formula to cut out all your pieces:
- FRONT/BACK: Drawer Width – (2 x board thickness) x Drawer Height
- SIDES: Drawer Length x Drawer Height
- BOTTOM PANEL:
- In a Groove = Inside Drawer Width + 3/8″* x Inside Drawer Length + 3/8″*
- No Groove = Drawer Width x Drawer Length
*This measurement is for a 1/4″ deep groove. I like to cut the panel 1/8″ smaller than the total opening to make it easier to slide the panel into the assembled drawer.
EXPERT TIP:
Plywood is usually slightly thinner than 1/2″ or 3/4″ so make sure to measure your plywood when figuring your cut list.
Premium plans include:
- Recommended Tools
- Materials list
- How to figure cut list for any size drawer
- Step-by-step instructions with 3D renderings
- Drawer building tips & techniques
- Helpful resources
- BONUS: 3D SketchUp file
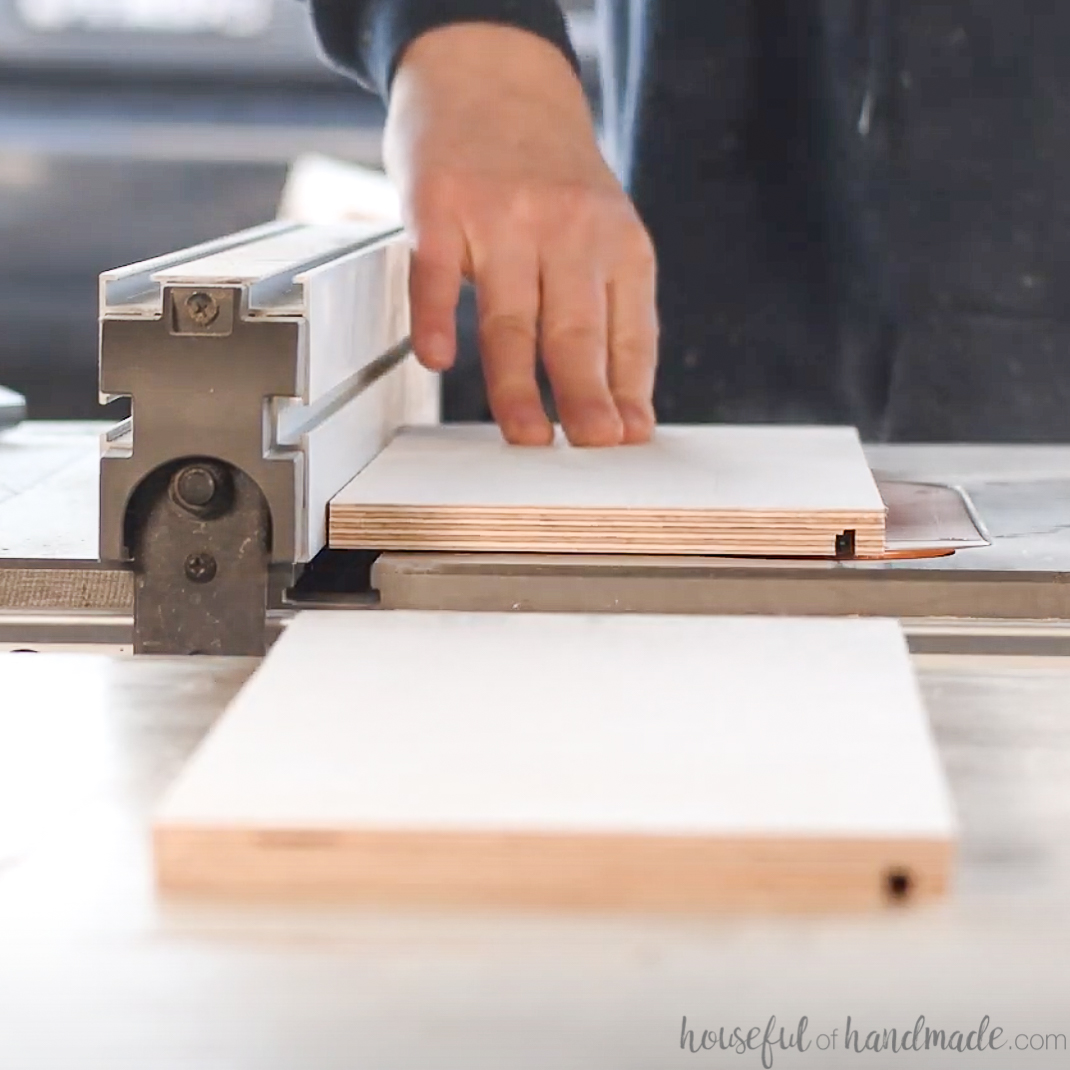
STEP 1- Cut your pieces
Cut out all your pieces (see tips below to ensure nice square drawers).
Cut the sides from your desired wood and your bottom panel out of 1/4″ plywood. Use a circular saw with guide track or table saw to make cutting plywood quick and easy.
If using a groove to attach the bottom panel, cut the groove in both side pieces and trim the back panel to match the top of the groove if desired (see above).
STEP 2- Assemble drawer box
Set your pocket jig for the thickness of your side/front/back material. Drill pockets hole in the sides of your front/back pieces on the opposite side of your groove (if using).
The number of pocket holes will depend on the depth of the drawer. I like to add pocket holes every 2-3″ on my drawers.
Attach the side pieces to the front piece with wood glue and pocket holes screws. Do not skip the wood glue on drawers, it adds a lot of strength.
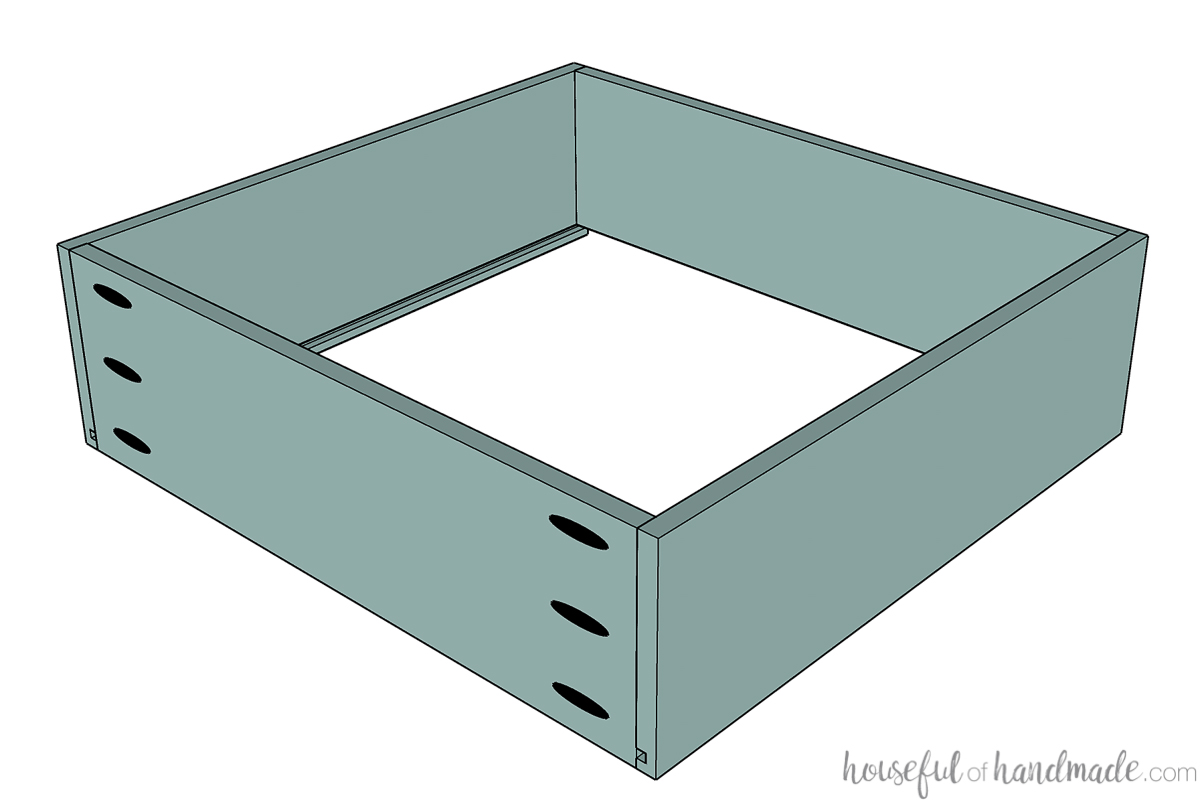
If you are attaching the bottom without a groove or trimmed your drawer box back, attach the back piece it between the sides so the top is flush now.
If not, you will need to insert your side panel before attaching the back.
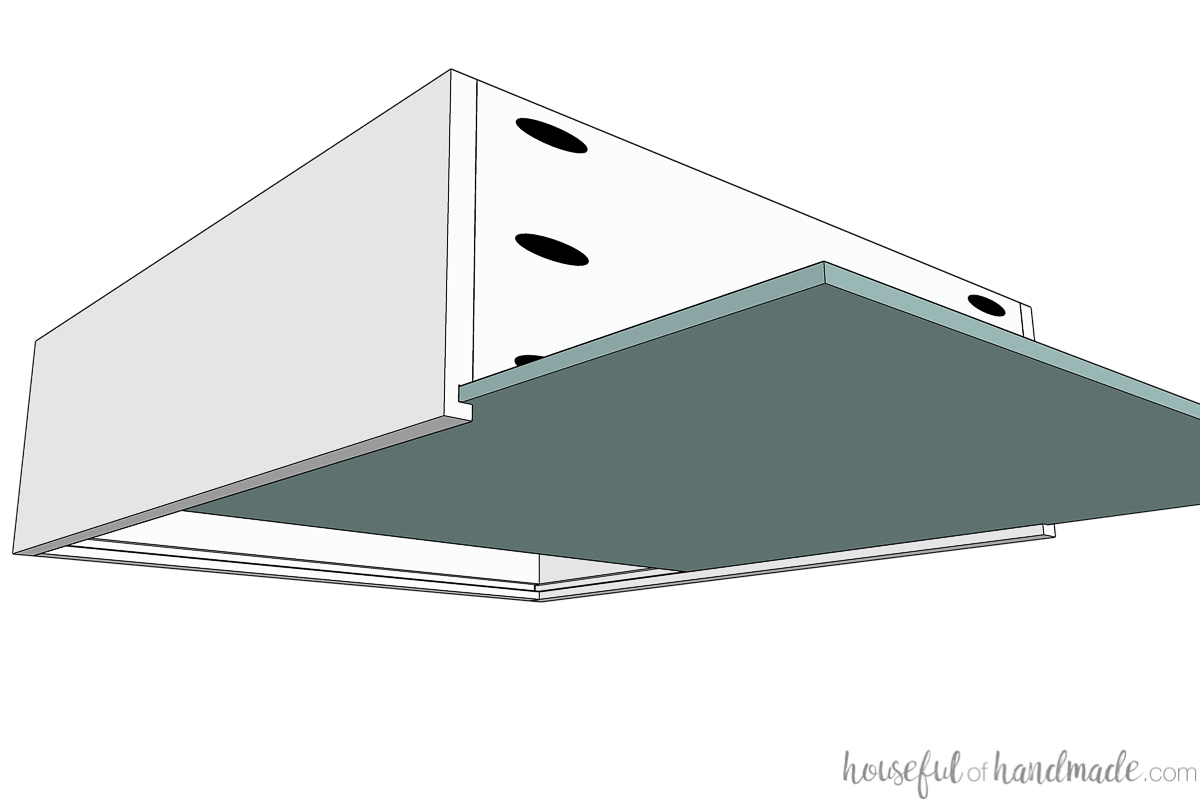
STEP 3- Attach bottom panel
For a grooved bottom, slide the panel into the groove from the back of the drawer box.
Ensure your drawer box is square first. Then nail the bottom panel into place at the back or attach the back piece to secure it.
For a bottom without a groove, add wood glue to the bottom of your drawer box and place the panel on it.
Make sure your box is square then tack it into place with brad nails or staples.
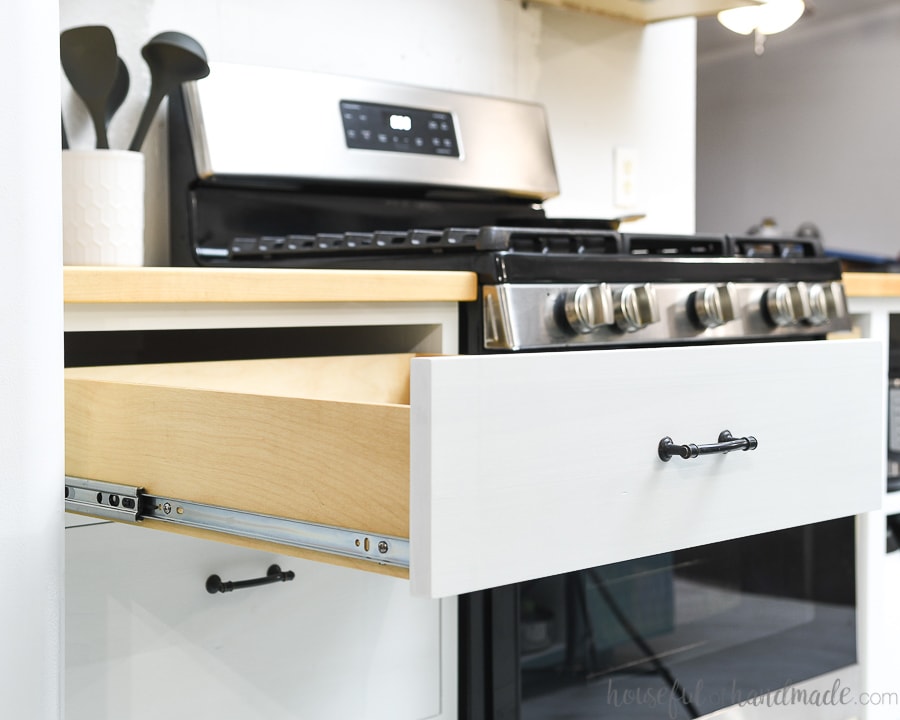
No you are ready to sand/seal your drawers and install them. Learn how to Install drawers with ball-bearing slides here.
How to Build Drawers Fast
This box is put together with just wood glue and pneumatic staples. You can use nails if you want, but if you have ever tried to remove a pneumatic staple you know how much more hold they have. So I always opt for staples in my quick drawer box.
I love using this method when I have lots of drawers to make in a little time. This is the method I used to make most of the drawers in our DIY kitchen remodel a couple years ago.
And guess what… I had one of the store bought dovetail drawers come apart in the kitchen island that we had but none of the staple gun drawer boxes came apart!
The one downside to this method over the pocket hole drawer box, the staples are visible on the side of the drawer box. You can solve this by using finish nails instead of staples and filling the holes with wood filler.
Fast Drawers Cut List
Decide on the final dimensions of your drawer box. Then use the following formula to cut out all your pieces:
- FRONT/BACK: Drawer Width – (2 x board thickness) x Drawer Height
- SIDES: Drawer Length x Drawer Height
- BOTTOM PANEL:
- In a Groove = Inside Drawer Width + 3/8″* x Inside Drawer Length + 3/8″*
- No Groove = Drawer Width x Drawer Length
*This measurement is for a 1/4″ deep groove. I like to cut the panel 1/8″ smaller than the total opening to make it easier to slide the panel into the assembled drawer.
Premium plans include:
- Recommended Tools
- Materials list
- How to figure cut list for any size drawer
- Step-by-step instructions with 3D renderings
- Drawer building tips & techniques
- Helpful resources
- BONUS: 3D SketchUp file
STEP 1- Cut your pieces
Cut out all your pieces (see tips below to ensure nice square drawers).
Cut the side pieces from your chosen wood and your bottom panel out of 1/4″ plywood. Use a circular saw with guide track or table saw to make cutting plywood quick and easy.
If using a groove to attach the bottom panel, cut the 1/4″ deep groove in both side pieces the same thickness as your bottom panel. Then trim the back panel to match the top of the groove if desired (see above).
STEP 2- Assemble drawer box
Attach the side pieces to the front piece with wood glue and pneumatic staples (or nails). Do not skip the wood glue on drawers, it adds a lot of strength.
If using 1/2″ thick boards for your drawer, use 1- 1 1/4″ staples. If using 3/4″ thick boards, use 1 1/4-1 1/2″ staples.
If you are attaching the bottom without a groove or if you trimmed your drawer box back, attach the back piece it between the sides so the top is flush now.
If not, you will need to insert your side panel before attaching the back.
STEP 3- Attach bottom panel
For a grooved bottom, slide the panel into the groove from the back of the drawer box.
Ensure your drawer box is square first. Then nail the bottom panel into place at the back or attach the back piece to secure it.
For a bottom without a groove, add wood glue to the bottom of your drawer box and place the panel on it.
Make sure your box is square then tack the bottom into place with brad nails or staples.
No you are ready to sand/seal your drawers before installing them. Learn how to Install drawers with ball-bearing slides here.
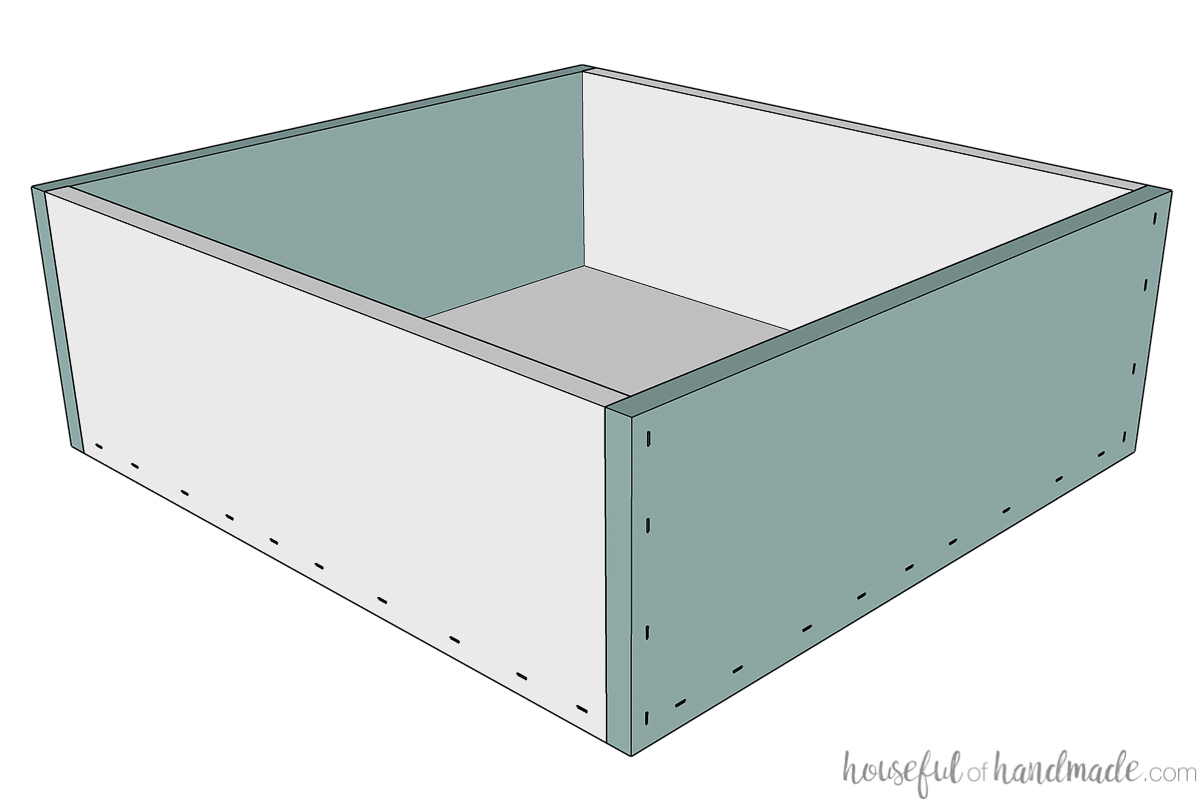
How to Build Drawers for Heavy Items
If you want to make a drawer that can hold some weight, using a 1/4″ plywood for the bottom panel might not be your best choice. Instead, build this easy and very sturdy box out of 1/2″ or 3/4″ plywood.
To make the thick bottom drawer box, I use the staple gun to secure all the parts together. You could go through the time of cutting a groove in the sides for the drawer bottom to rest in, but then you loose even more depth on your drawer.
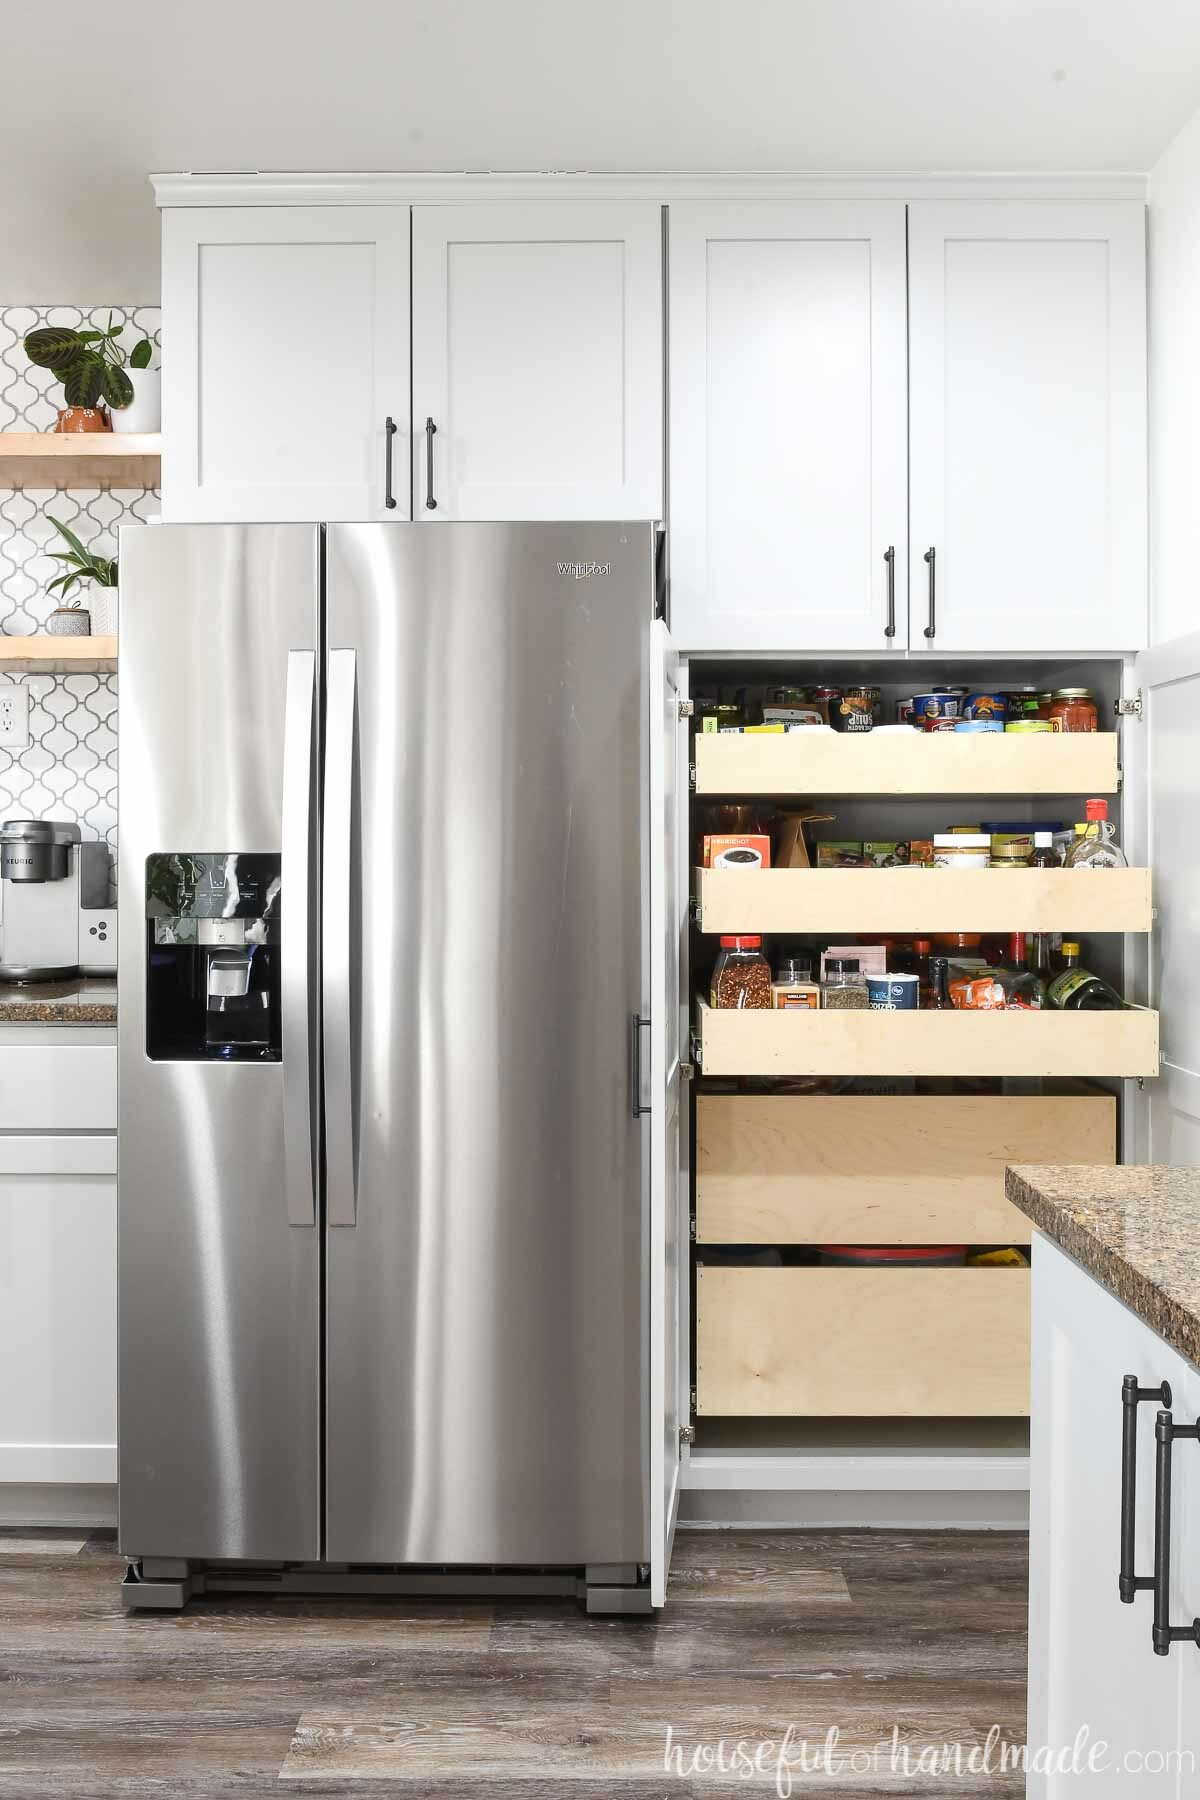
Instead, the bottom is held in place just like the sides, with wood glue and staples. I have used this drawer box in the pantry of our kitchen and for shop drawers and the extra thick bottom allows for more weight in the boxes.
Just make sure you also use heavy duty drawer slides that are rated for the amount of weight you want to store in the drawer.
Heavy Bottom Drawers Cut List
Decide on the final dimensions of your drawer box. Then use the following formula to cut out all your pieces:
- FRONT/BACK: Drawer Width – (2 x board thickness) x Drawer Height
- SIDES: Drawer Length x Drawer Height
- BOTTOM PANEL: Inside Drawer Width x Inside Drawer Length
Premium plans include:
- Recommended Tools
- Materials list
- How to figure cut list for any size drawer
- Step-by-step instructions with 3D renderings
- Drawer building tips & techniques
- Helpful resources
- BONUS: 3D SketchUp file
STEP 1- Cut your pieces
Cut out all your pieces (see tips below to ensure nice square drawers).
Cut your bottom panel out of 1/2″ or 3/4″ thick plywood.
STEP 2- Assemble drawer box
Attach the front and back pieces to the bottom panel so it is flush at the bottom.
Secure with wood glue and staples/nails every 2-3″. Do not skip the wood glue, it adds a lot of strength.

Add glue to one side (bottom and front/back pieces) and lay a side piece on it. Line it up and secure with staples/nails every 2-3″.
Repeat for the other side piece.
Now you are ready to sand/seal all your drawers and install them. Learn how to Install drawers with ball-bearing slides here.
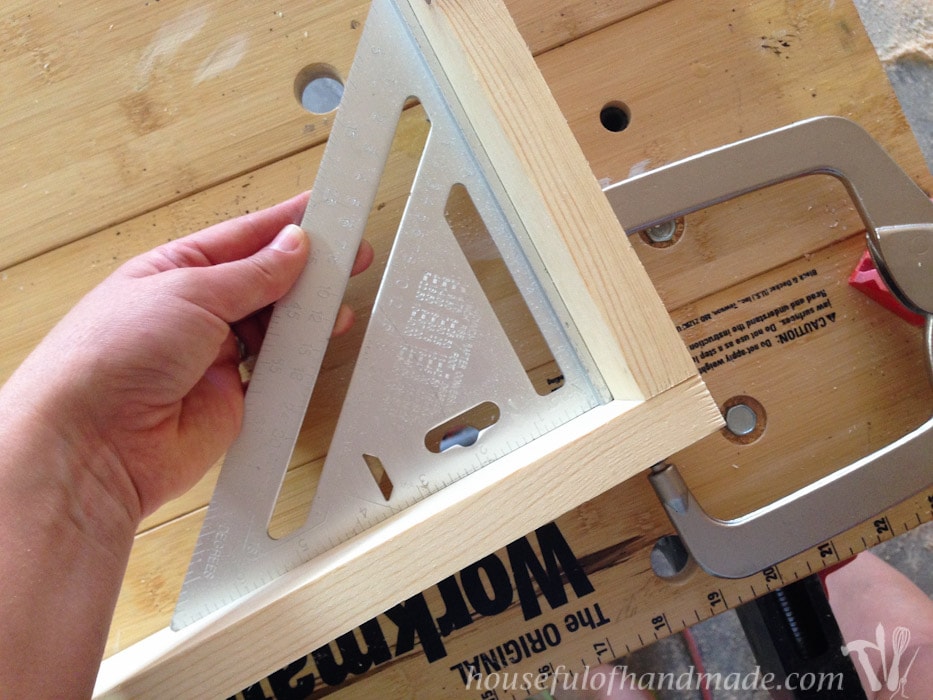
Tips for Building a Square Drawer
The key to building square drawers is starting with square pieces! Use these tips to ensure each piece is cut out square so you have a successful drawer build.
- Before cutting any wood, make sure the blade is set to a true 90 degree angle to the bed/plate of the tool. Even being off by 1 degree can cause you boxes and face frames to be wonky and un-square.
- You cannot measure out all the pieces and then cut them. The blade will remove a section of the plywood (known as kerf) when you cut making your cuts slightly short (resulting in non-square cabinet boxes). Instead, measure out the first cut and cut it. Then measure from new edge to the next cut line and cut. Also, make sure the edge of the blade is on the outside edge of the cut line so the full amount measured is left behind.
- Quickly check all cut pieces for square by measuring from the top right corner across the piece to the lower left corner. Note the measurement. Then measure the opposite two corners. If the measurements are exactly the same, your piece is square.
Then when assembling your drawer, check each corner for square as you assemble.
I tried to cover everything you might need to build your own DIY drawers. But if not, please leave a comment and I will answer it for you.
Happy Building!
