Upgrade your kitchen with a DIY pull out trash can cabinet.
Having your trash can hidden behind a kitchen cabinet is one luxury that everyone can have! The unsightly garbage is hidden, but even better, the smells are contained in the cabinet as well.
Building a trash can cabinet does require a little it of math to make sure you have the correct amount of spacing for you trash bins. Or you can use one of my pre-figured trash cabinet plans!
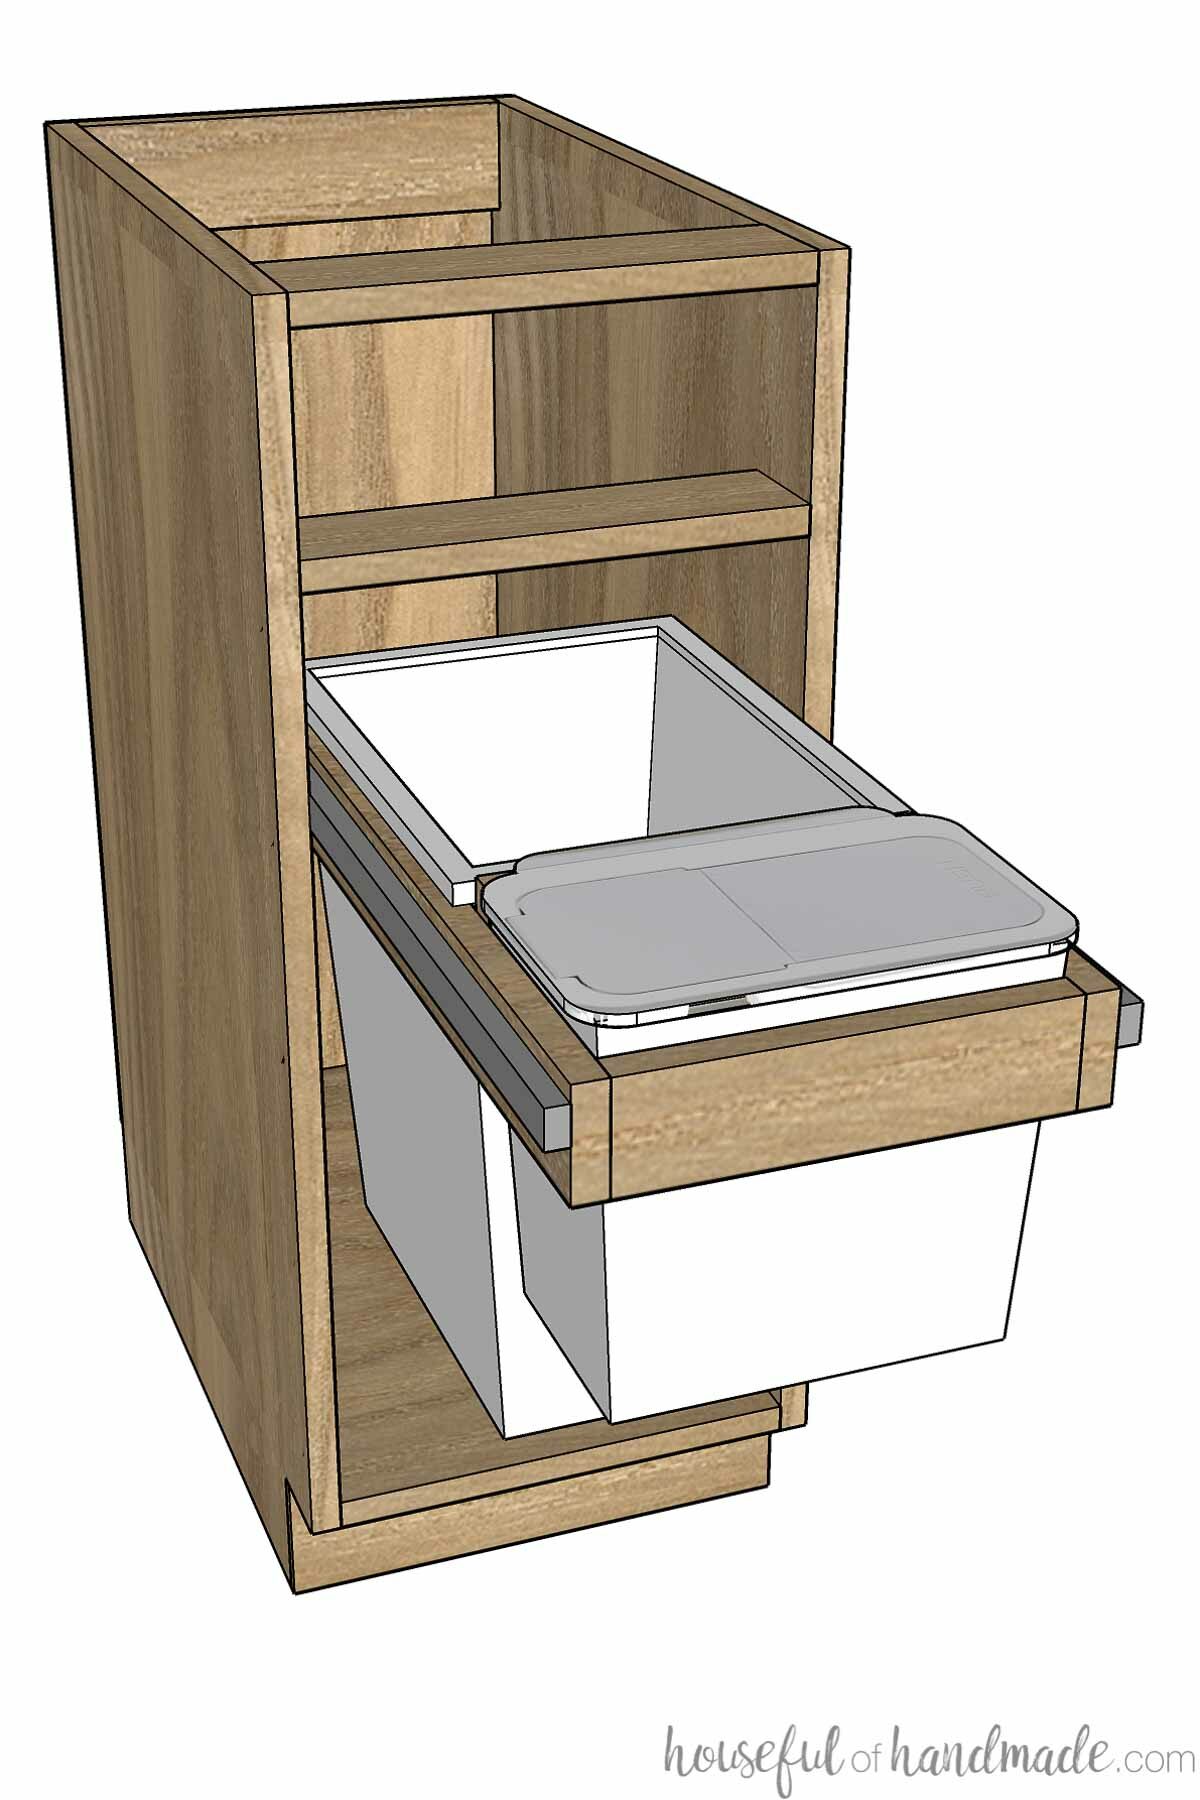
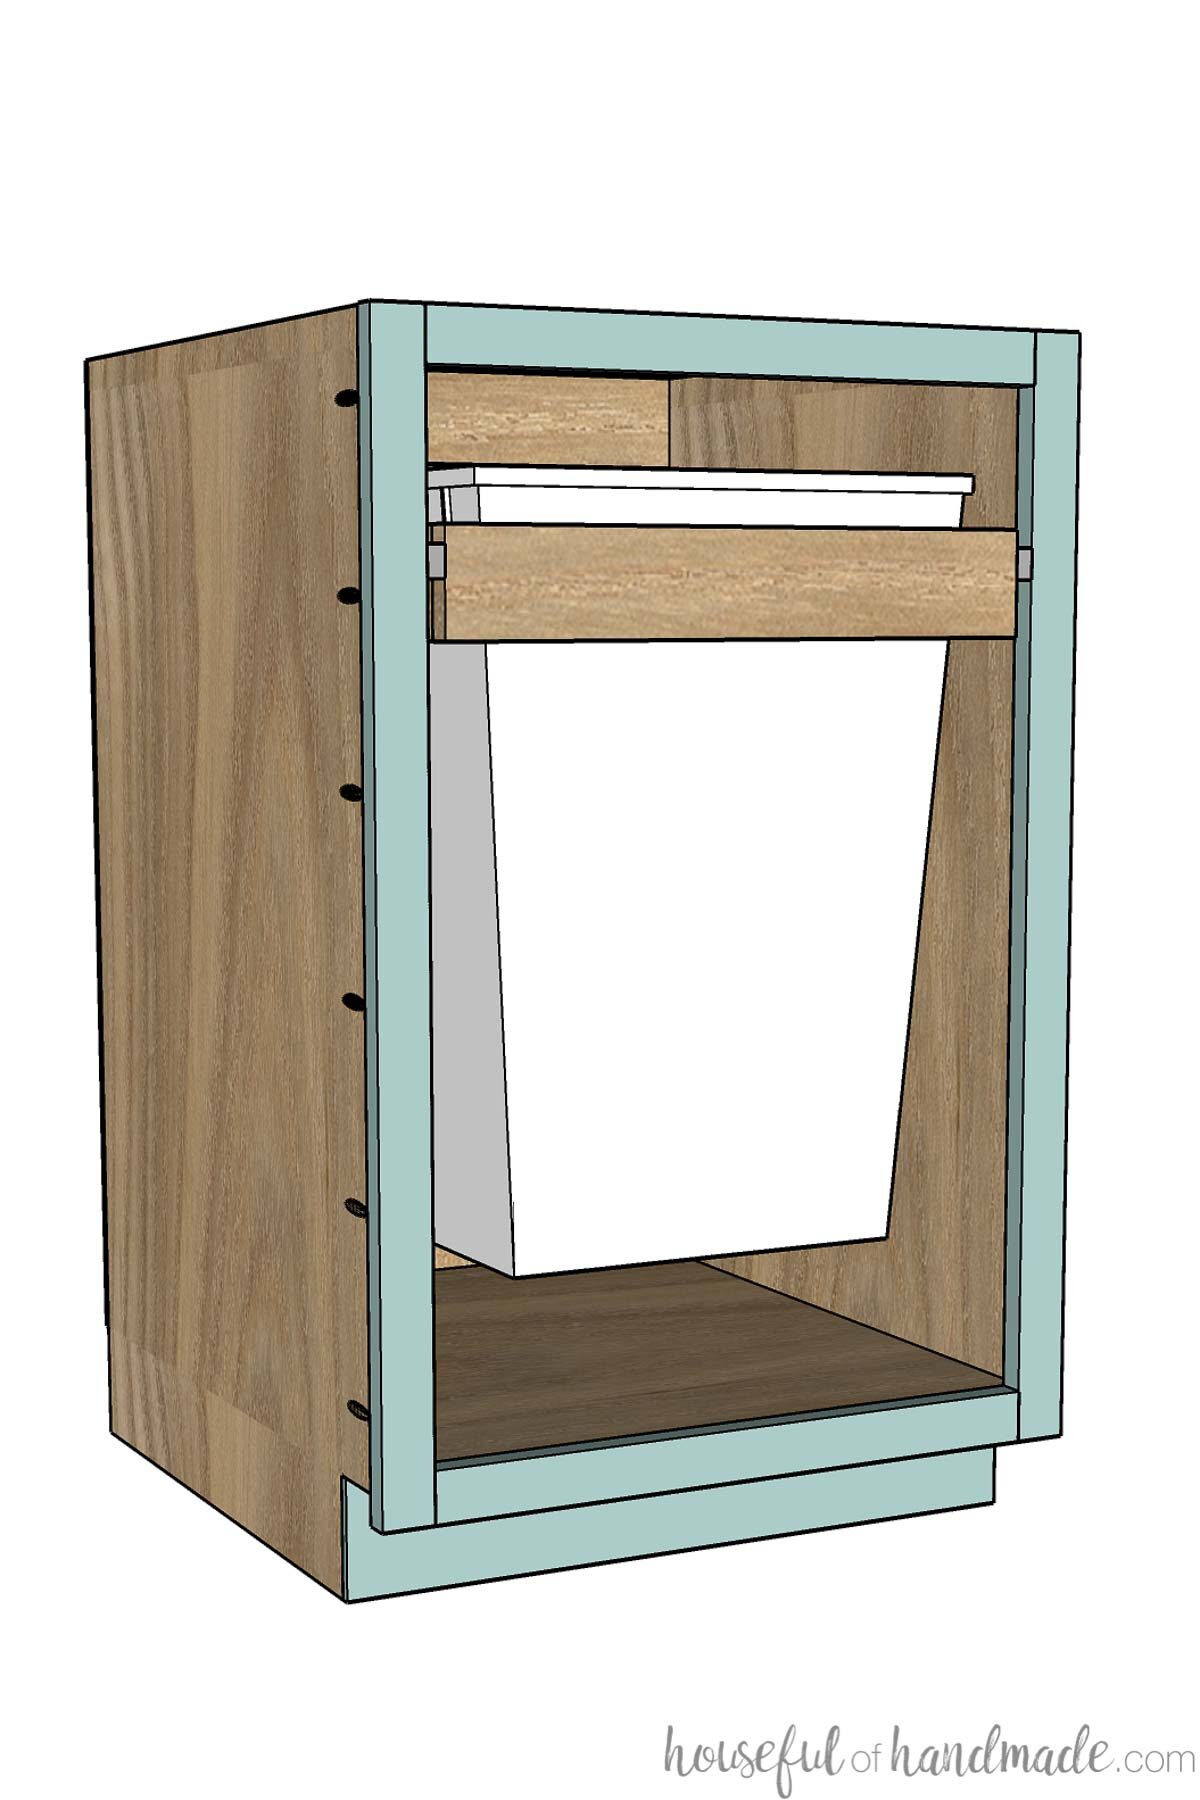
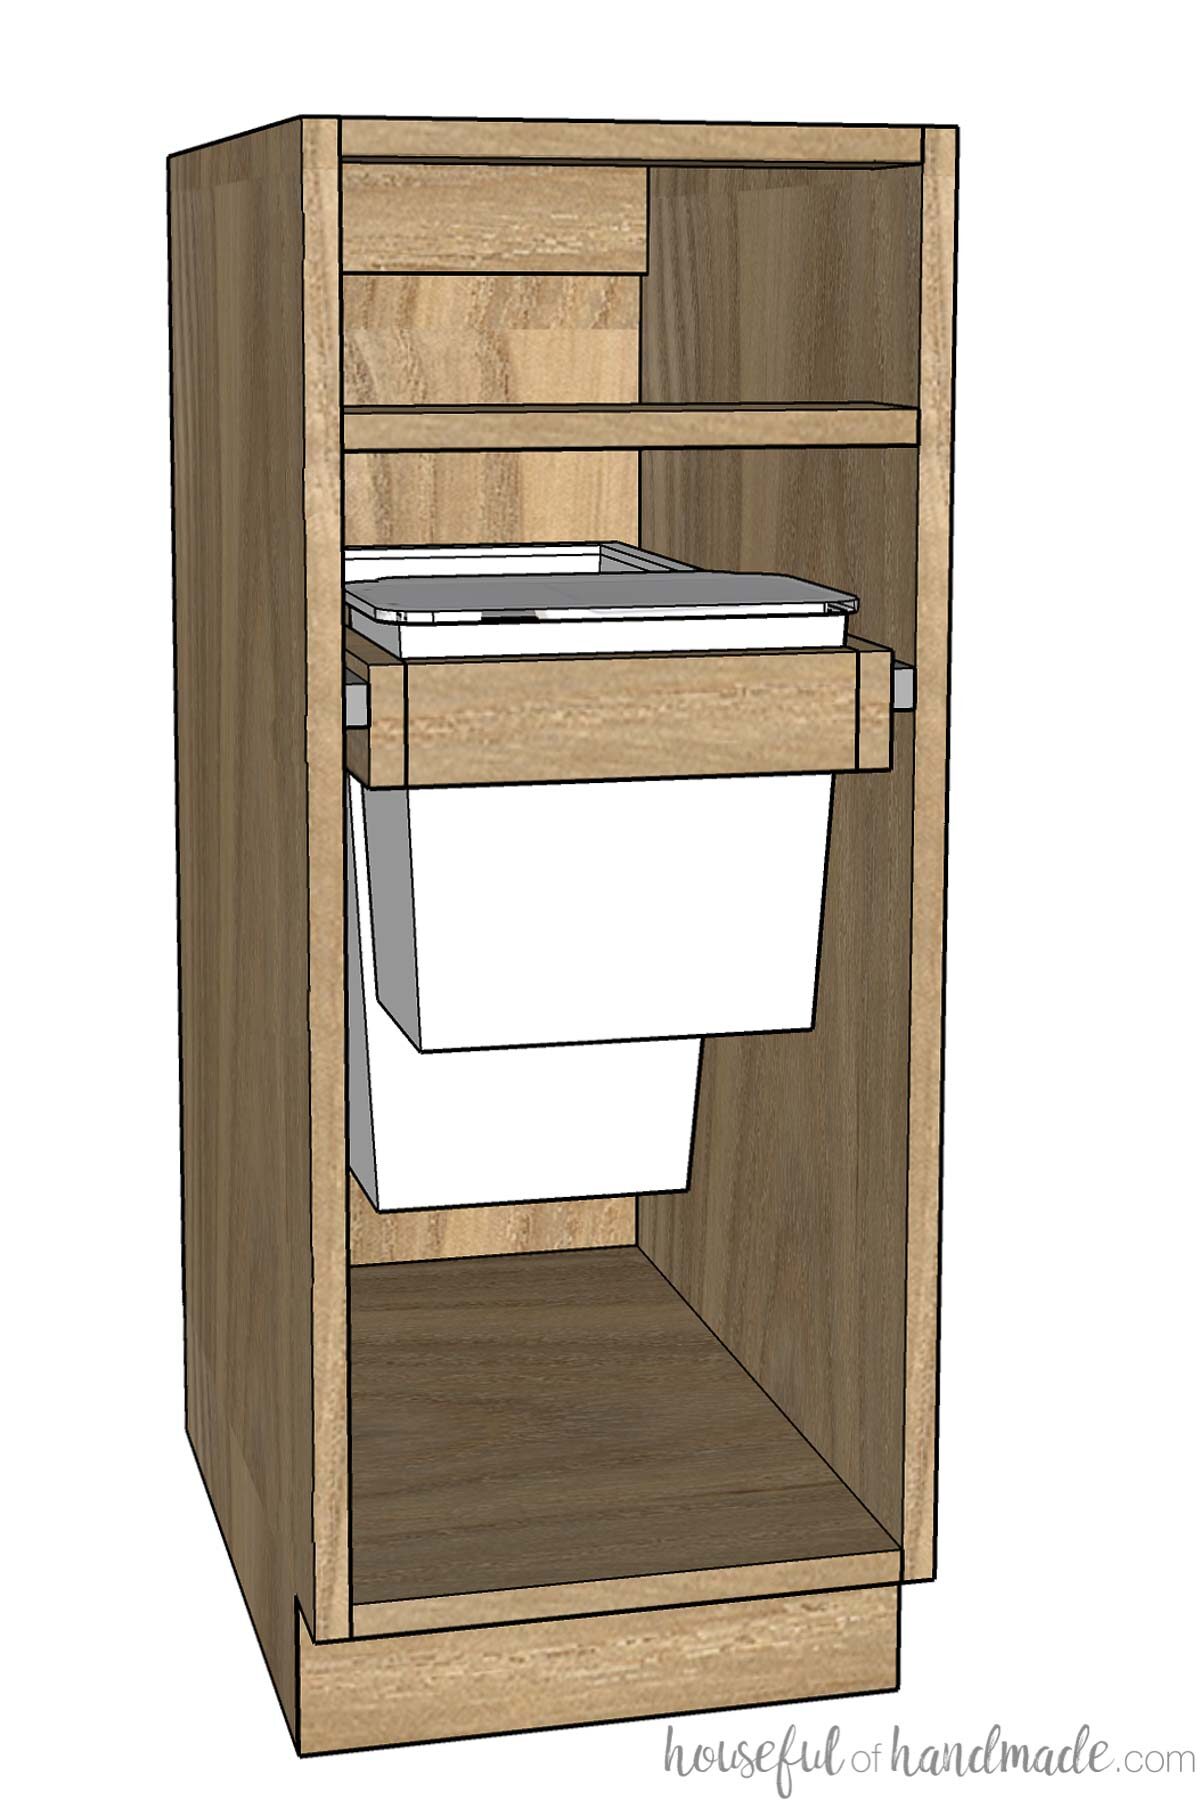
A pull out garbage cabinet will have the same configurations as all the rest of your base cabinets.
This post may contain affiliate links. As an Amazon Associate I earn from qualifying purchases. Click here to read my full disclosure policy.

Make sure to read all about how to build base cabinets in this post to figure out your toe kick and cabinet height and depth. Also, make sure to read the difference between a face frame and frameless (or European) cabinet in the How to Build Cabinets post.
Prefab Trash Cabinet Insert vs. Building Your Own
There are many different kinds of pull out trash can cabinet inserts that can be purchased. These can be added to new or existing cabinets.
But I chose to build my own garbage can cabinet for three reasons:
- To save even more money on our kitchen remodels.
- To get the perfect configuration of trash cans for our home.
- The drawer slides on prefab inserts I have used at other peoples houses are not as good of quality (especially for the price), they do not hold the cabinet door tightly against the cabinet.
Even if you are not building your own cabinets or remodeling your kitchen, you can use the information in this post to build a trash can holder to add to an existing cabinet.
The amount of wood needed to build an insert to hold 1 or 2 trash cans is very minimal. Both of the inserts I have built were made out of plywood scraps left over from building the cabinet boxes.
The plywood is strong and easy to work with, but it does leave exposed plywood edges. If you want, you can cover the plywood edges in edge banding. Or you can use scraps of the wood used to build your face frame to make your insert.
What Kind of Drawer Slides do you Need for a Pull Out Trash Cabinets?
In order to make your trash can easy to access, you will use drawer slides on each side of the cabinet. The cabinet front will have a standard cabinet door on it, but will open and close like a drawer. I go into depth about drawer slides in this How to Build Drawer Base Cabinets post.
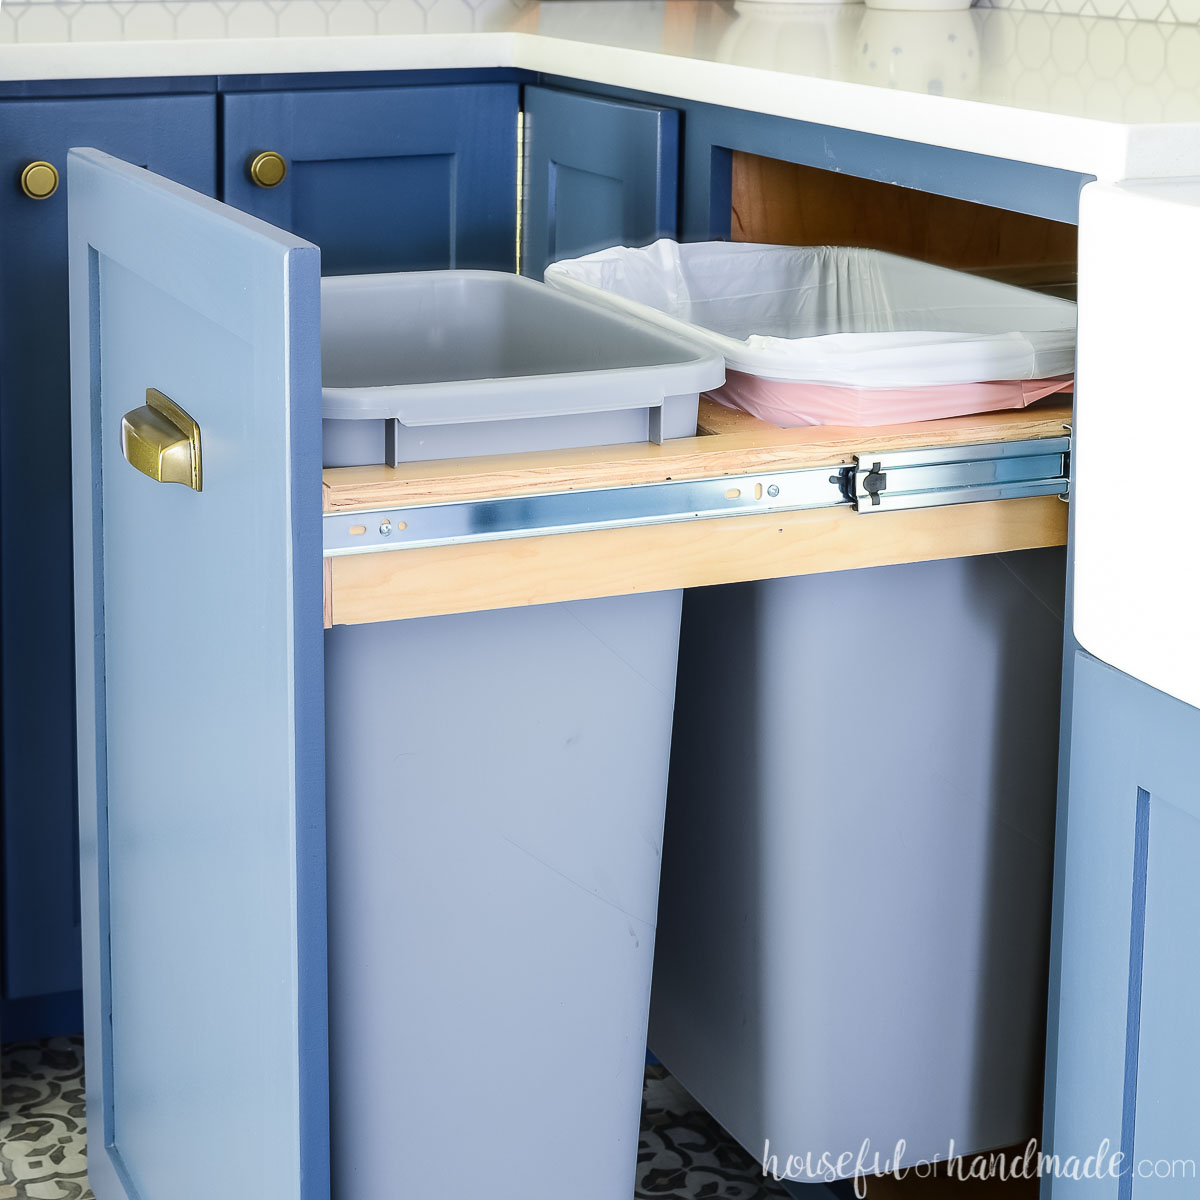
To get the most functionality and ease of use from your pull out trash cabinet, I suggest using over-extension drawer slides. These slides will pull out up to 1” past the opening of the cabinet.
For the first pull out trash cabinet I built, I used standard full extension drawer slides. Once the countertop was installed, the back trash bin was still accessible. But you were not able to remove the bin without releasing the drawer slides to pull the cabinet out another inch.
The reason for this is that the countertop is typically installed with an overhang over the front of the cabinets. With full extension drawer slides, the back couple inches of the cabinet are now hidden by the overhang.
You can still easily add trash to the bin and even remove the full trash bag. But the entire bin will not remove without being opened past the overhang.
When you use over-extension drawer slides, you can pull the cabinet out past the cabinet box. This brings the trash further out so the countertop overhang is no longer in the way.
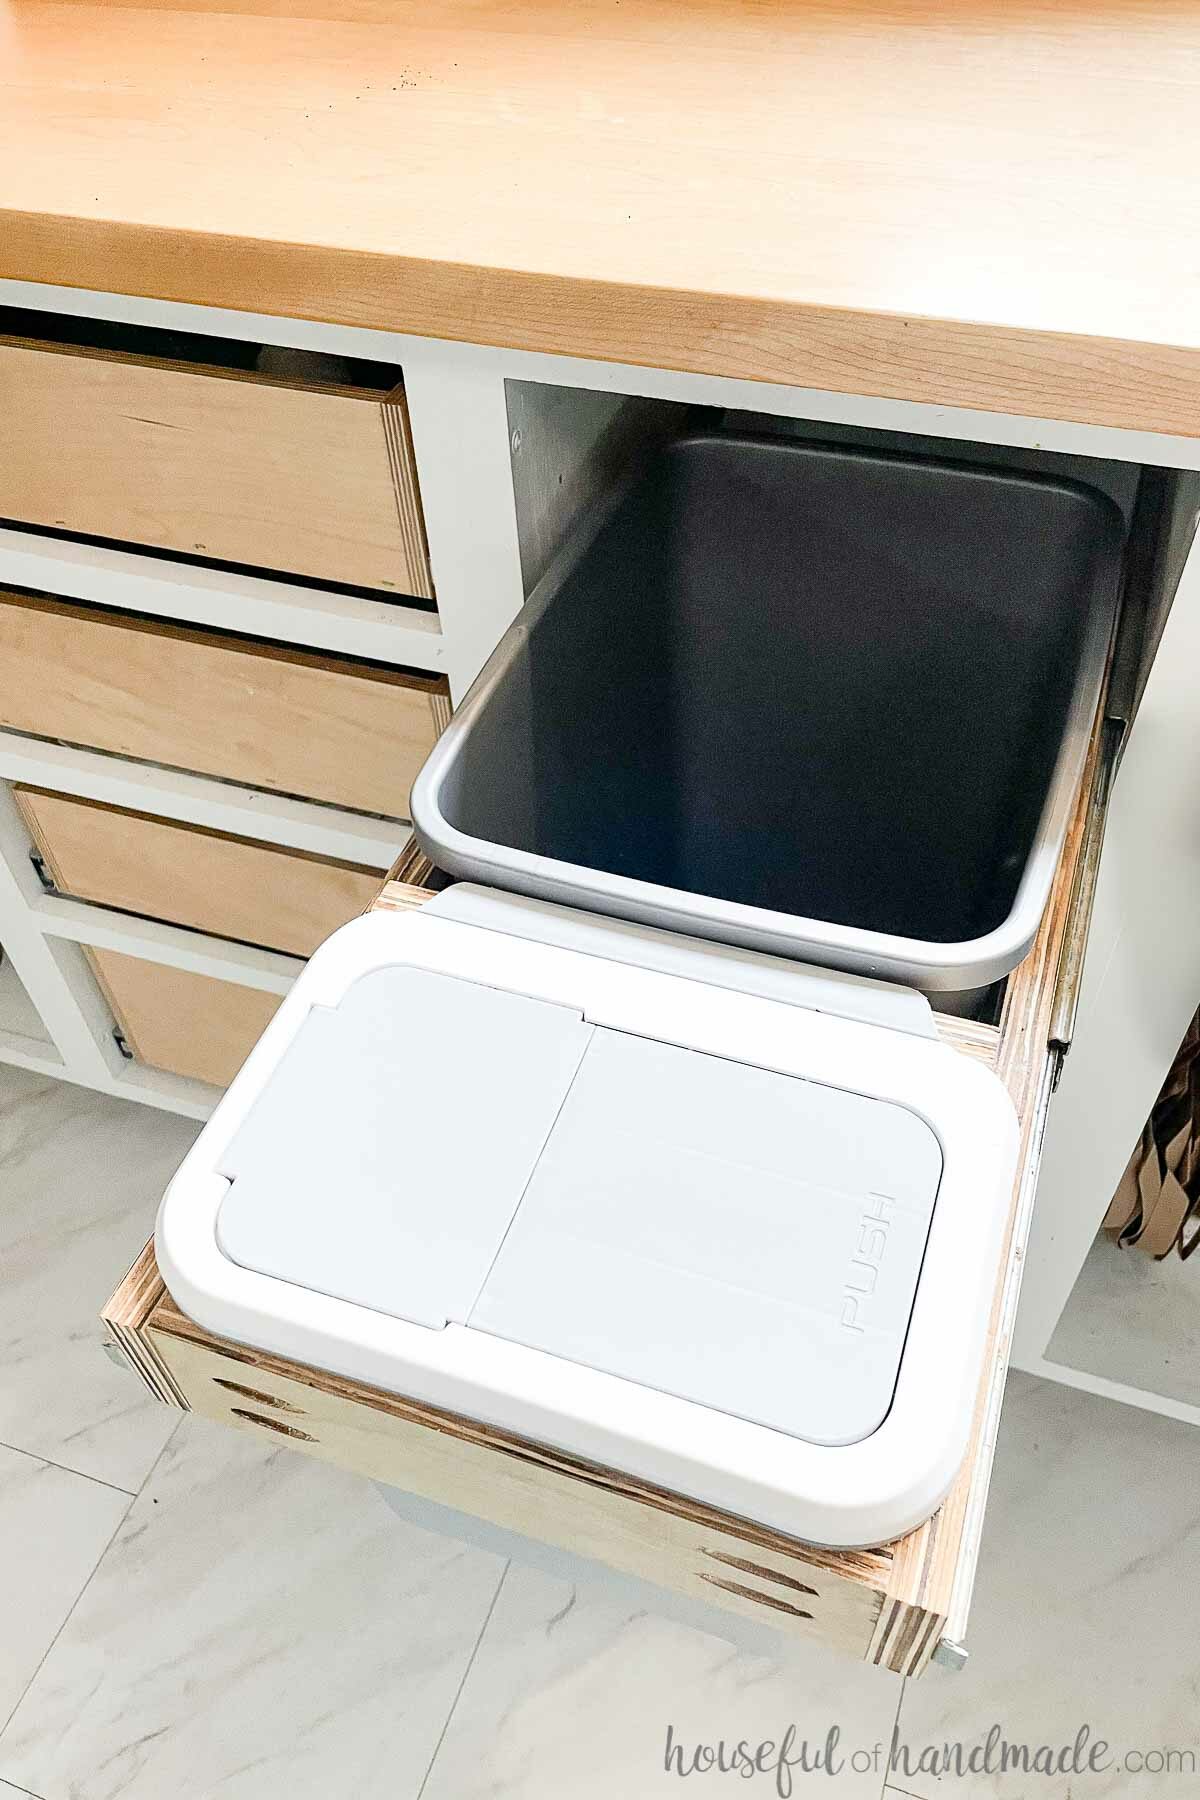
Do you need a special trash can for a pull out cabinet?
When picking out a trash can for your cabinet, you need one with a strong lip around the top. The lip is what sits on top of the sliding part of the garbage can cabinet.
You can build your cabinet any size to fit any trash can you want. You can even use a trash can with a lid on it.
To build your trash can cabinet, you will need to measure the garbage can right under the lip. Make sure that most of the lip will be sitting on top of the pull out slider, but do not make the opening so tight that it is hard to remove the trash can.
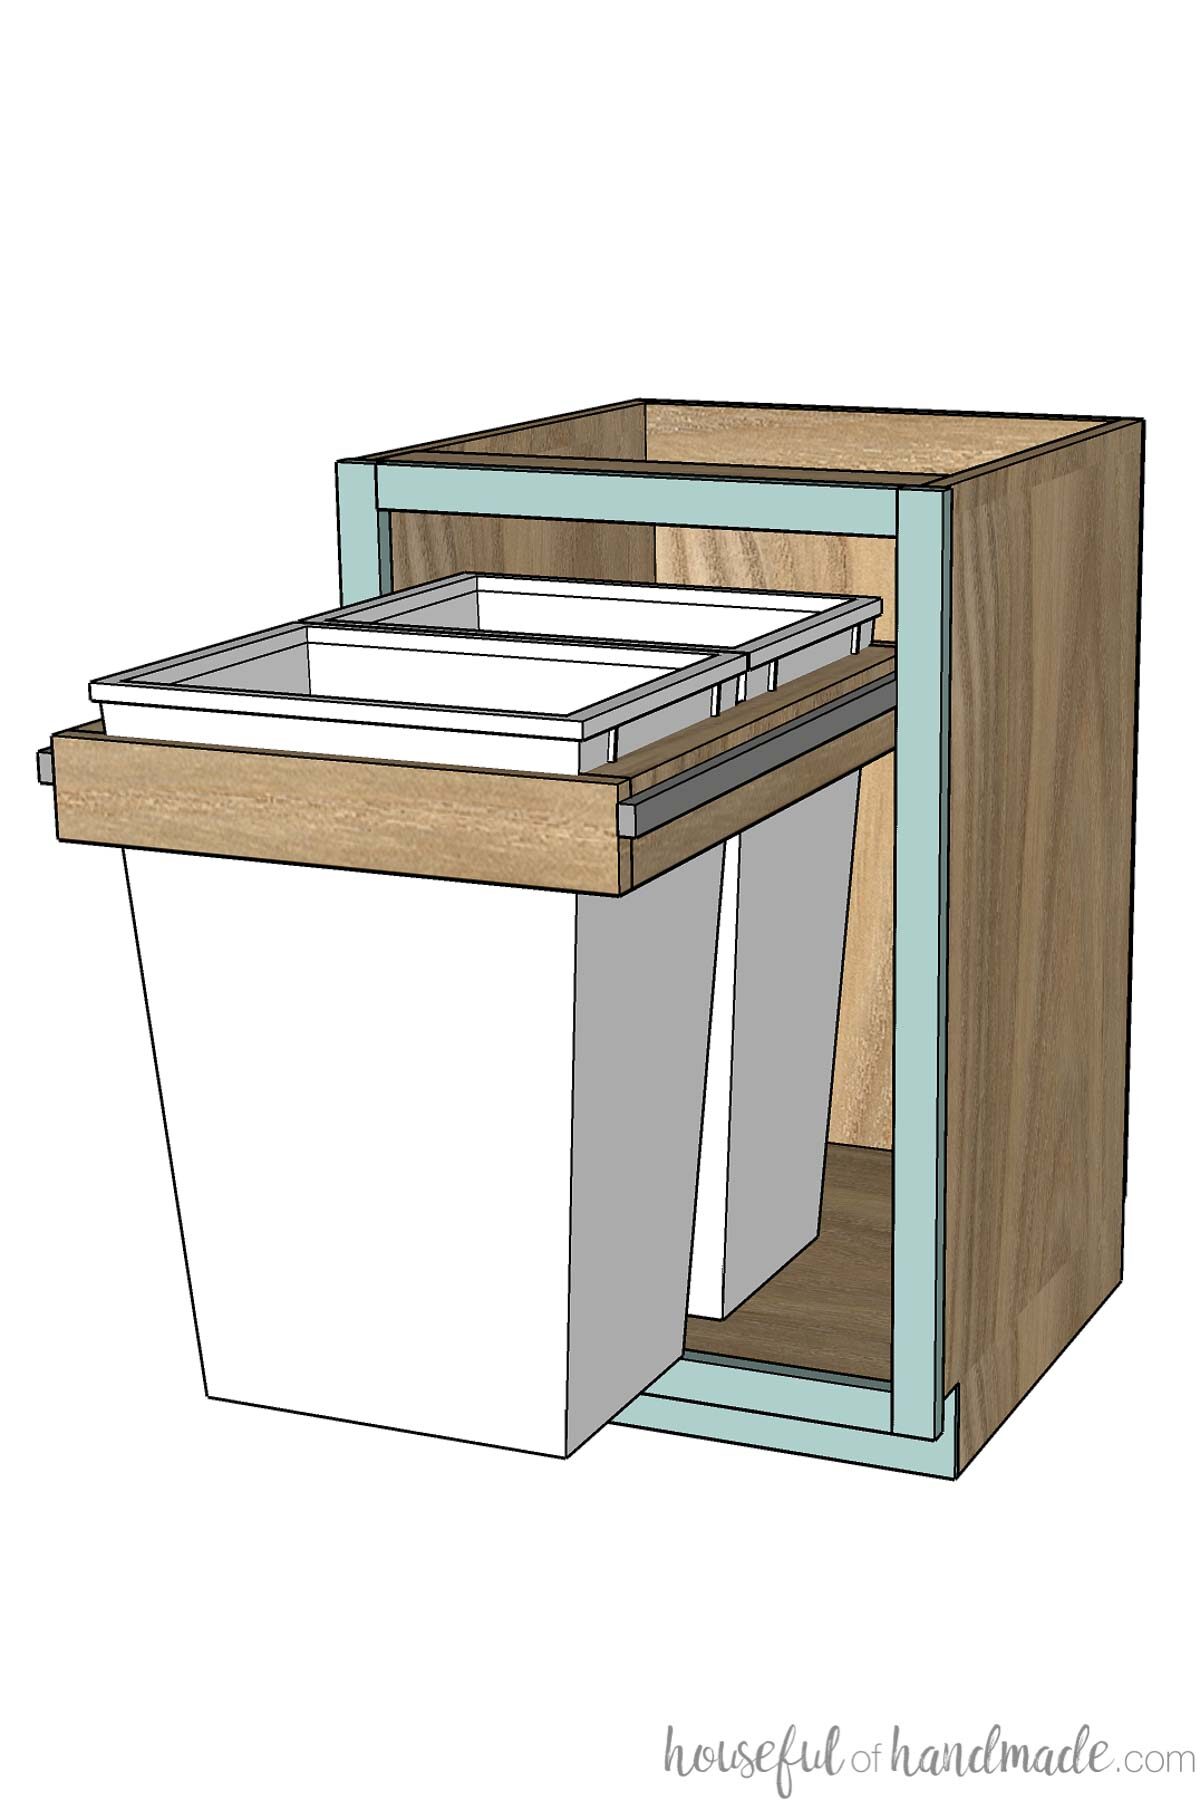
I prefer building a trash can cabinet that holds the cans around the top instead of the bottom. This is because when you pull open the cabinet you use the handle toward the top of the door.
If the slides are all the way at the bottom of the cabinet (under the base of the trash cans), you need to add additional supports so that it doesn’t put unnecessary strain where the door attachs to the insert over time.
With the trash cans held around the top of the cans, you are putting the slides right under the handle. This makes it easier to pull the cabinet open without worrying about the possibility of the door coming.
Custom Trash Can Cabinet
The best part of building your own pull out trash cabinet is you can create any configuration you want! First pick out the garbage cans that you need, then build a custom trash cabinet for them.
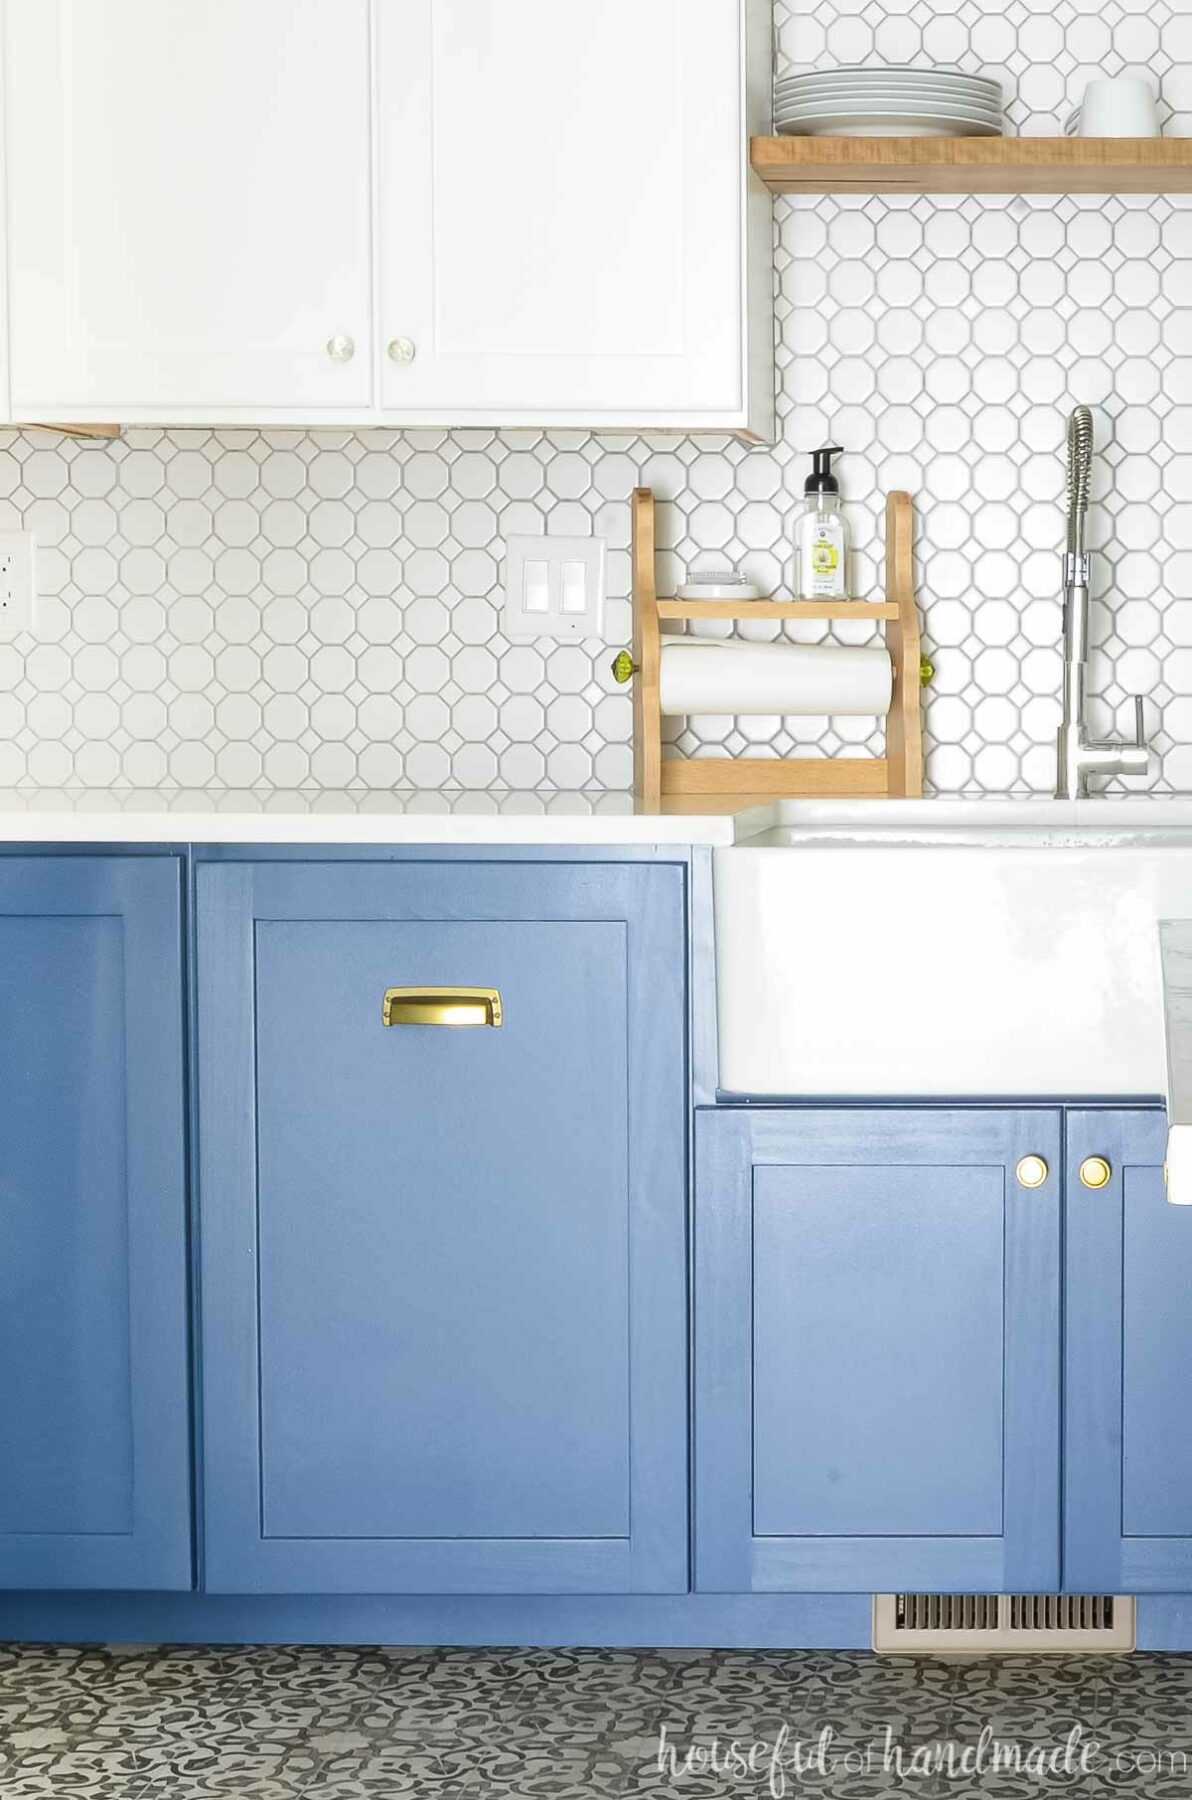
In my two-tone kitchen I created a large trash can cabinet that held 2 full sized kitchen garbage cans. One was used for recycle and the other used for trash.
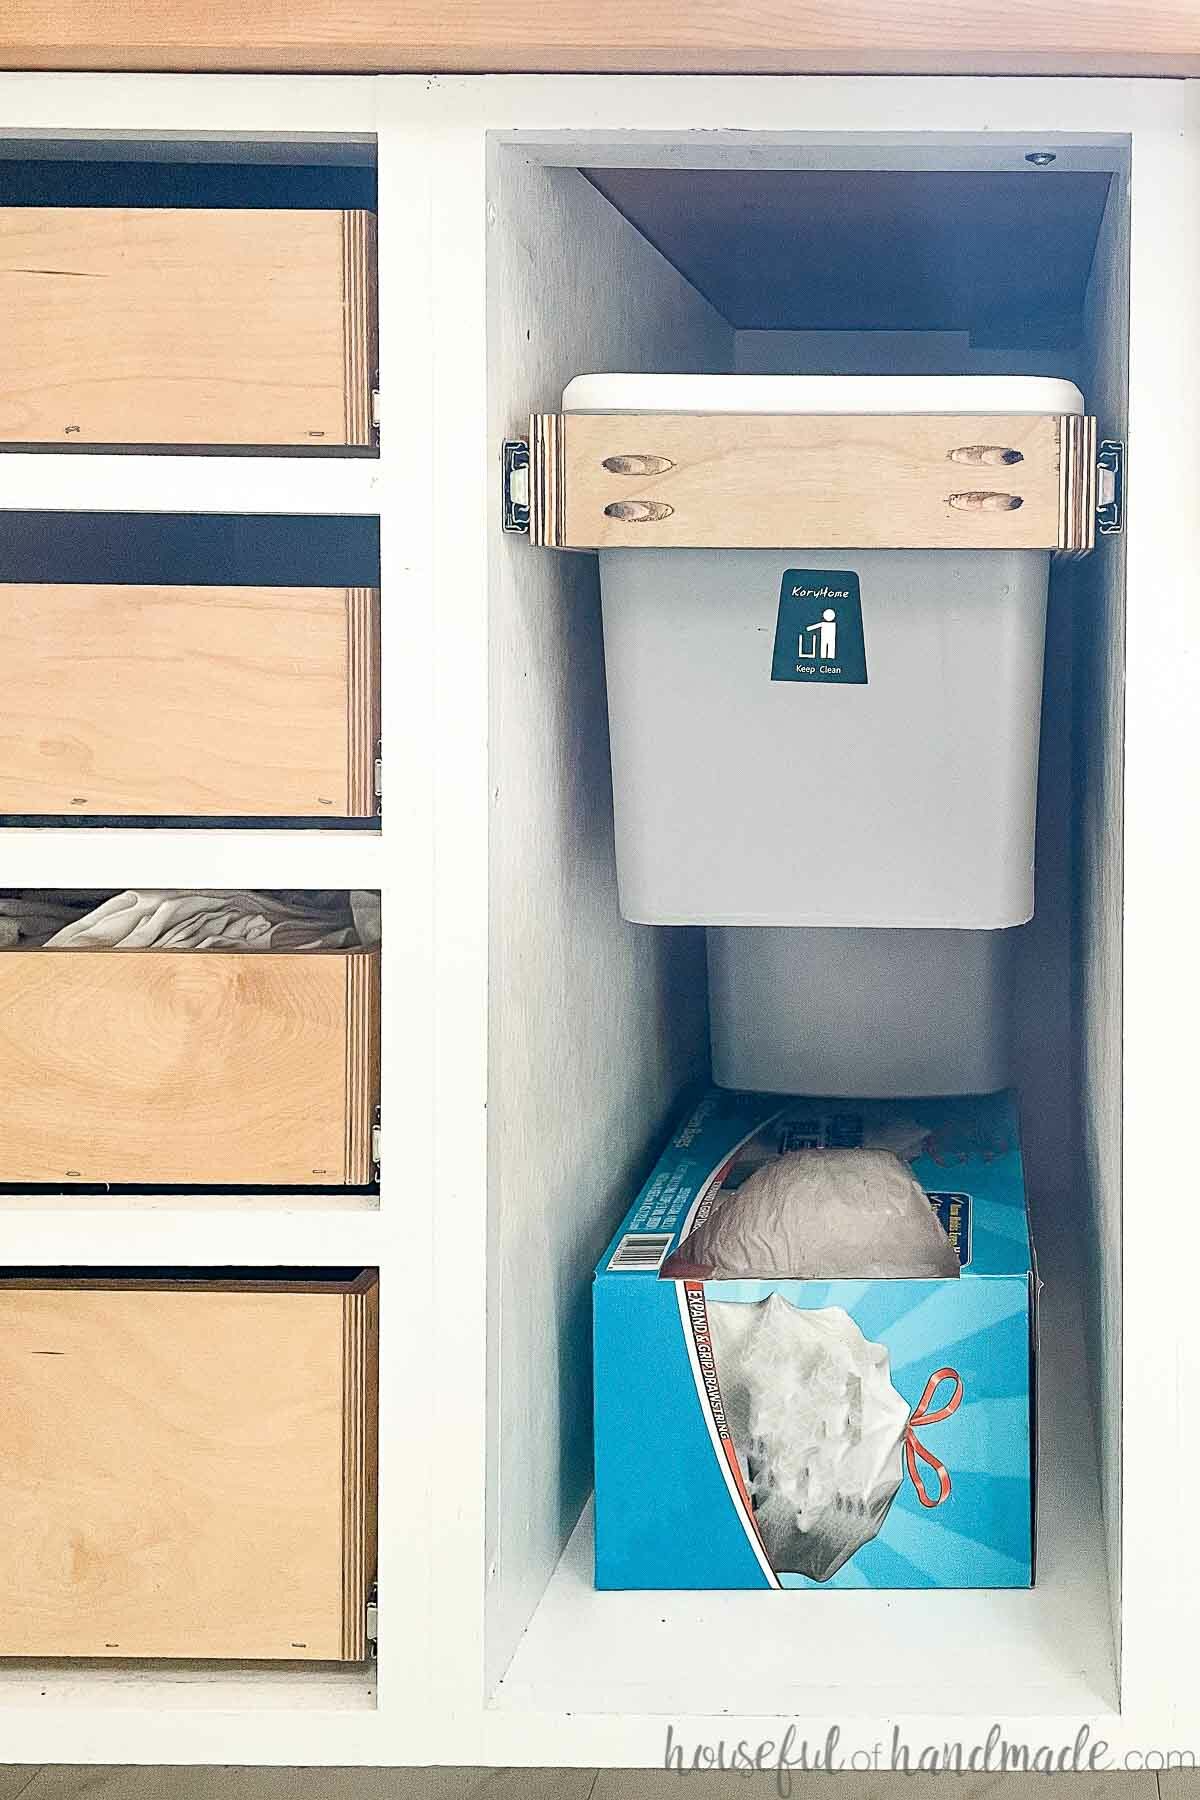
In our current kitchen, we do not have a recycle pick up service. So I created a cabinet with a full sized trash can on its side and a smaller bin for compost in front.
This can arrangement made the entire cabinet smaller and left me with more space for other cabinets in my kitchen.
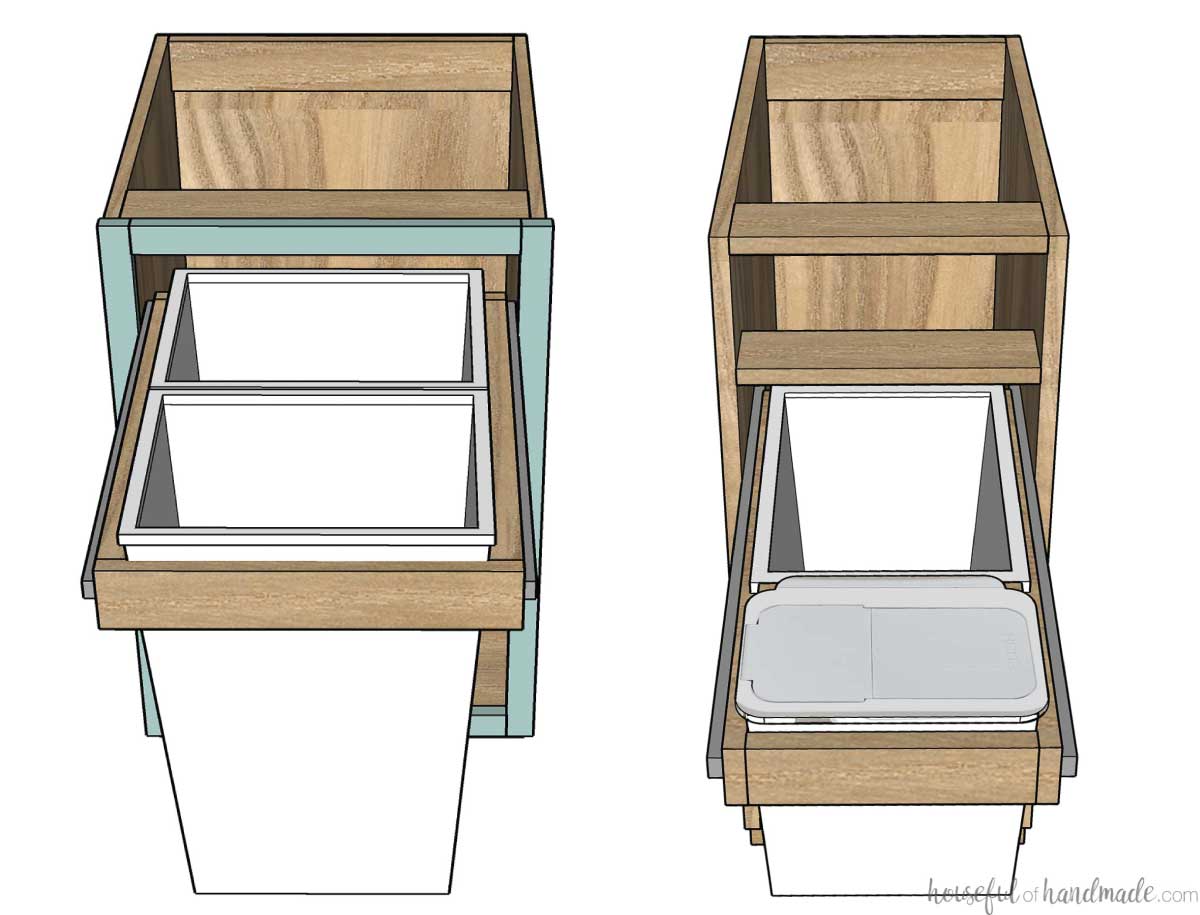
You can also add drawers above or below your trash cans in a cabinet. This drawer can come in handy for holding trash bags or cleaning supplies.
For our smaller trash can cabinet, I installed the sliding garbage can insert higher in the cabinet. This left a large area under the trash cans to hold a box of trash bags.
It served the same purpose as a drawer would without the added cost of another set of drawer slides and the wood needed to build drawer box and drawer front.
Pull Out Trash Can Cabinet Plans
Once you have answered all the questions above, it it time to create plans for your own garbage can cabinet! I will walk you through how to create plans for your custom pull out trash cabinet and so you will be ready to start building.
Before you can determine the size of cabinet you need for your pull out trash can, you will first create a plan for the sliding trash can insert.
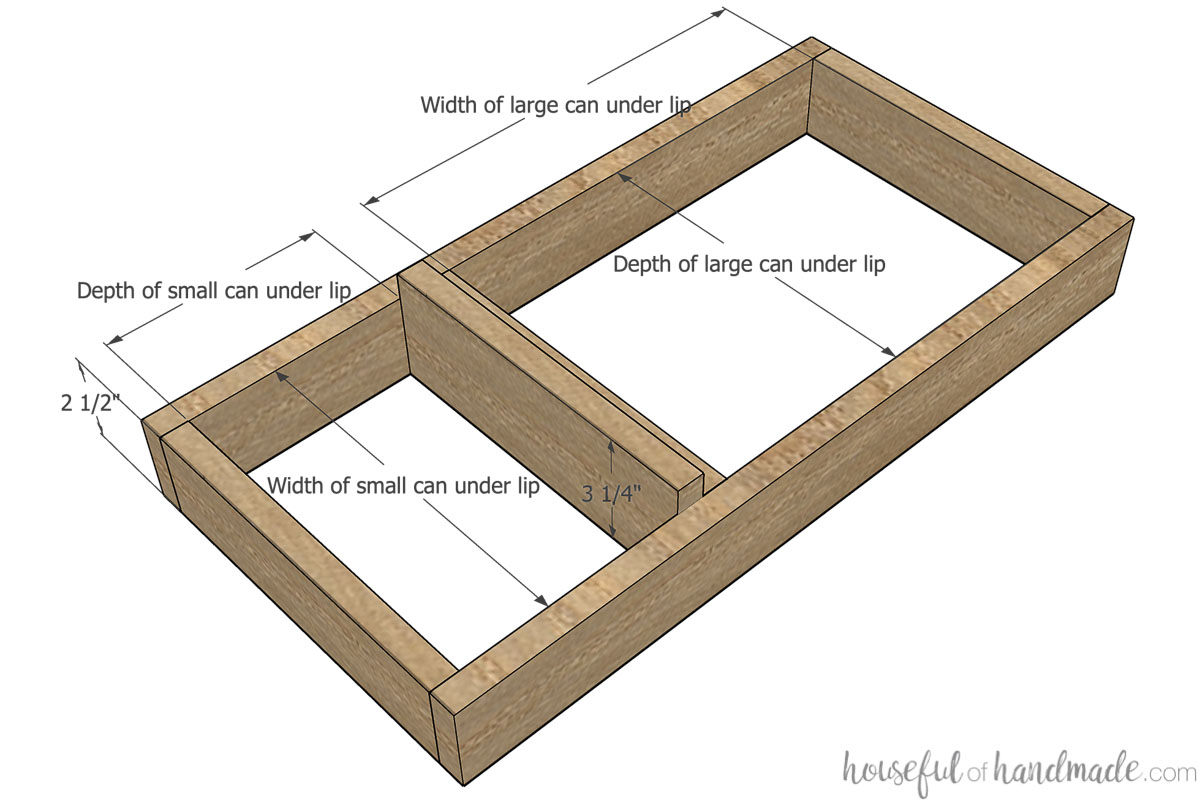
Each pull out trash can holder will have the following parts:
- 2 side pieces
- 1 front piece
- 1 back piece
- 1 or 2 center dividers
- Optional: Top frame
- 2 sides and 1 center divider
Measure the trash can right under the lip. If there are extra bumps/tabs under the lid, measure right under those.
Then you will want to determine what kind of trash can insert you want and follow the instructions below to create a cut list and build it.
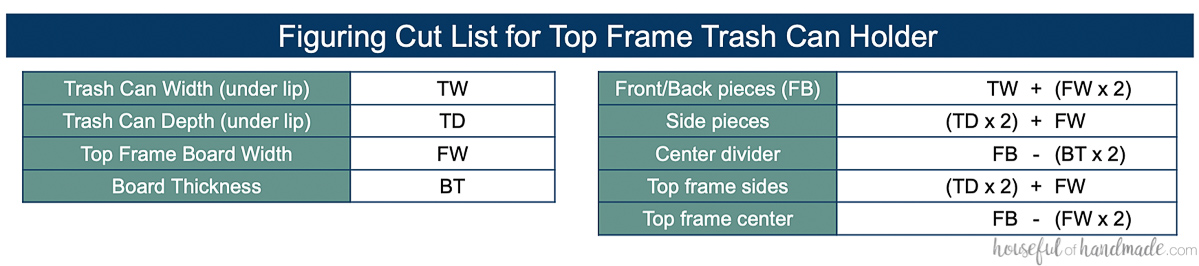
Top Frame Holder Cut List
The top frame holder gives a more finished look to your trash can pull out. This can be made with scraps of plywood or you can use 1x lumber.
You can cover up the edges of the plywood with edge banding for a finished look and to seal the edges from inevitable spills.
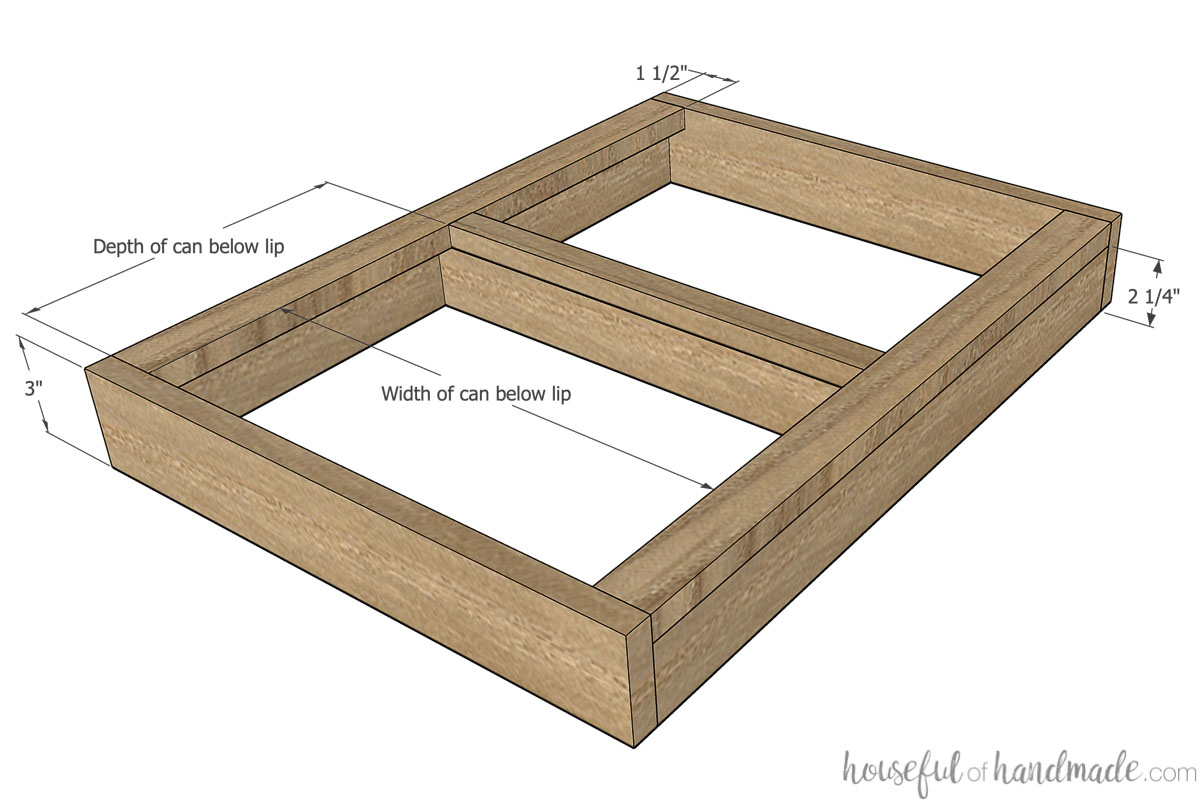
The thickness of the front/back and side pieces can be adjusted as needed. If using 1x wood, you could use a 1×4 for the front/back (actual width is 3 1/2″).
The sides will need to be the width of the front/back pieces minus the thickness of the top frame pieces. I used 3/4″ plywood so I subtracted 3/4″ from the front/back pieces to determine the width.
One important thing to pay attention to is the depth of your cabinet. If you have a 24″ cabinet, you can only build a slider that is 23″ deep. You may have to look around for trash cans in the size you need to get the configuration you want.
Use the following chart to determine the exact cut list you need for your own custom trash can insert:
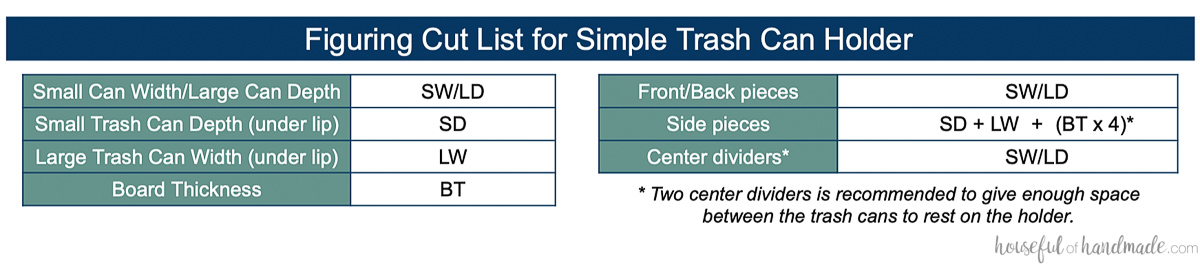
Simple Frame Can Holder Cut List
This simple frame is great for squeezing every last inch out of your kitchen. There is not top frame which adds width to the trash can cabinet.
For my kitchen I added a compost bin with a lid, the bin I chose has a lip on the back (it is made to be able to hang on the outside of a cabinet). So I added a second center support piece that sits up higher for it to hang over.
This also adds extra space between the two garbage cans. This is necessary so they both lay flat on the top of the holder and not overlapping each other.
This simple holder an be built out of plywood scraps or 1x wood as well. You can cover plywood edges with edge banding to give it a more finished look. I kept it simple and just sealed the edges with multiple coats of polyurethane.
Again, make sure to pay attention to is the depth of your cabinet. If you have a 24″ cabinet, you can only build a slider that is 23″ deep. You may have to shop around for trash cans in the size you need to get the configuration you want.
Use the following chart to determine the exact cut list you need for the simple trash can holder:
Build the Trash Can Holder
For both trash can inserts I used 3/4″ lumber (plywood or 1x lumber) and pocket holes. Set your pocket hole jig for 3/4″ thick material before drilling holes.
Use 1 1/4″ pocket hole screws and wood glue to secure.
If using edge banding on your plywood, cut all the pieces and apply the edge banding before assembly.
Top Frame Trash Can Insert
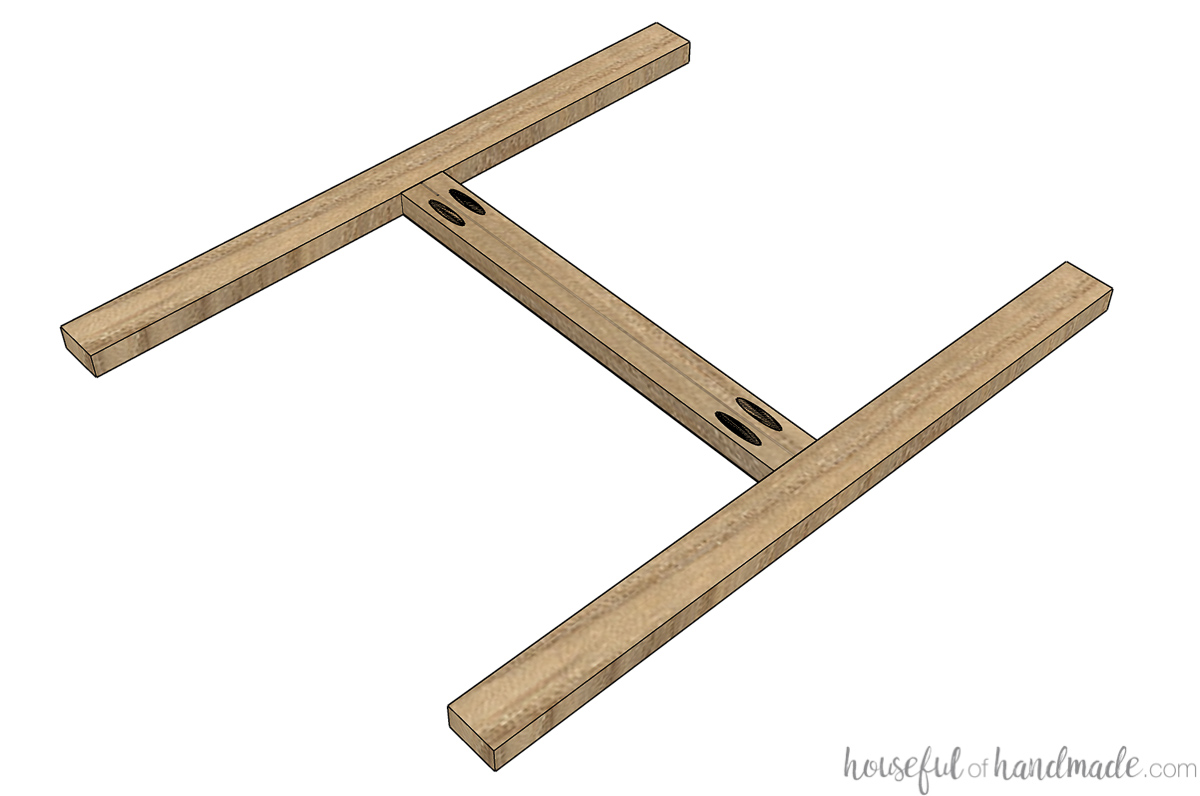
Drill pocket holes in both ends of the side pieces and center divider.
Attach the sides to the front/back pieces. Set the side down from the top of the front/back pieces the thickness of the top frame boards.
Attach the center divider centered on the sides.
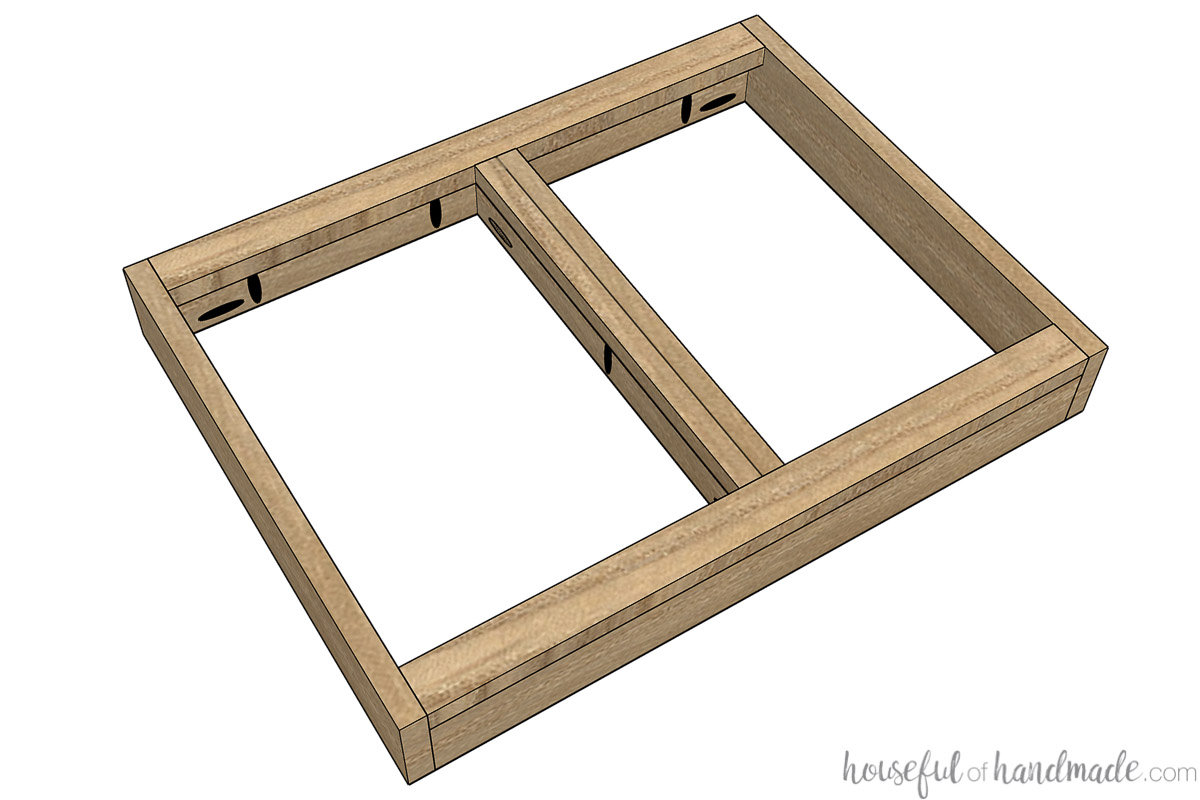
Drill pocket holes on both ends of the the top frame center piece.
Assemble the top frame center piece to the top frame sides so it is centered. Use a face clamp to hold the boards flush while securing,
Drill a few pocket hole screws on the bottom frame side pieces and center divider facing up.
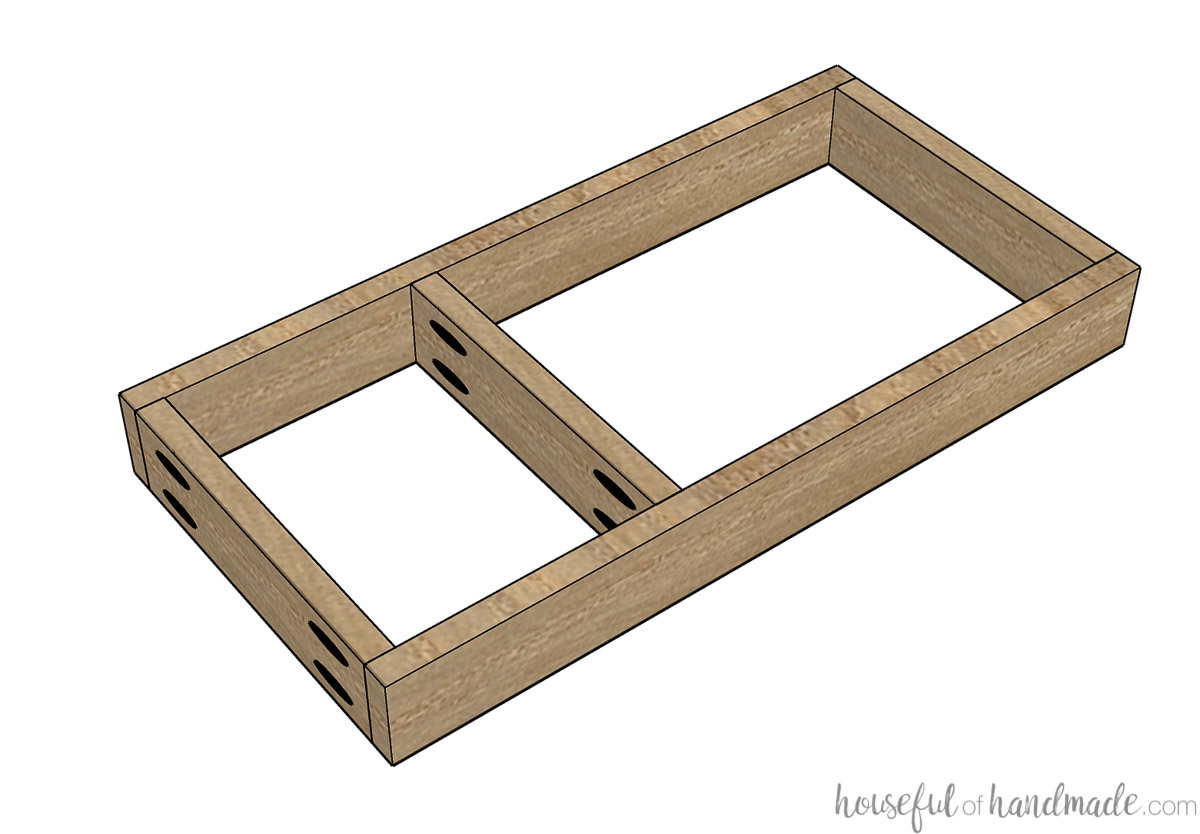
Lay the top frame on top of the bottom frame. Secure with screws and wood glue.
You could also just glue and use a finish nailer to attach the top frame to the bottom, but then you would have visible holes in the top frame. Using pocket holes the way I did hides them all inside the frame so they are only visible when the trash can is lifted out of the holder.
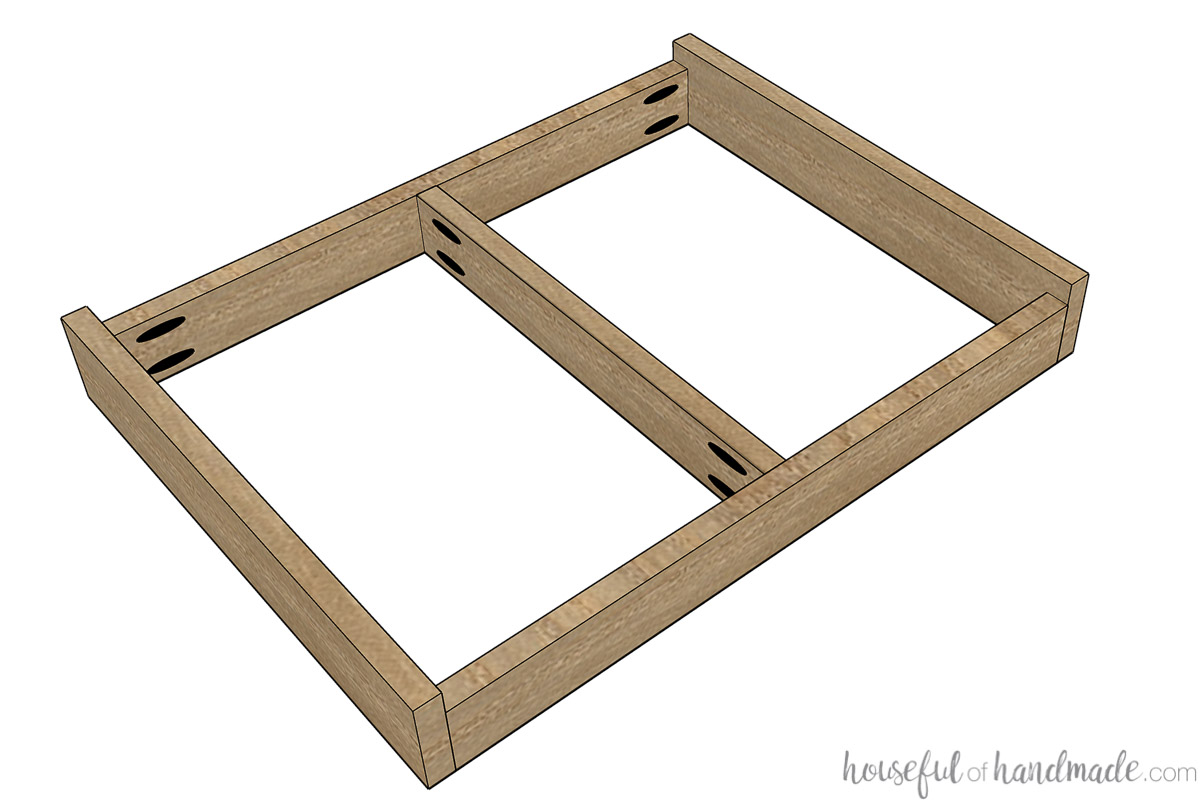
Simple Trash Can Insert
Drill pocket holes in both ends of the front/back pieces and 1 center divider.
Attach the front/back pieces to the side pieces. Make sure the tops of all the pieces are flush.
Attach the center divider according to the dimensions of your trash cans.
Attach the second center divider to the one installed in the holder with wood glue and brad nails or a couple screws. This will hide the pocket hole screws on the first divider.
- If you are using the compost bin that has a lip on it, cut the second divider so it is 3/4″ wider than the other boards and sticks up 3/4″ from the top of the holder.
- If not, cut the second center divider the same width and keep the top of all pieces flush.
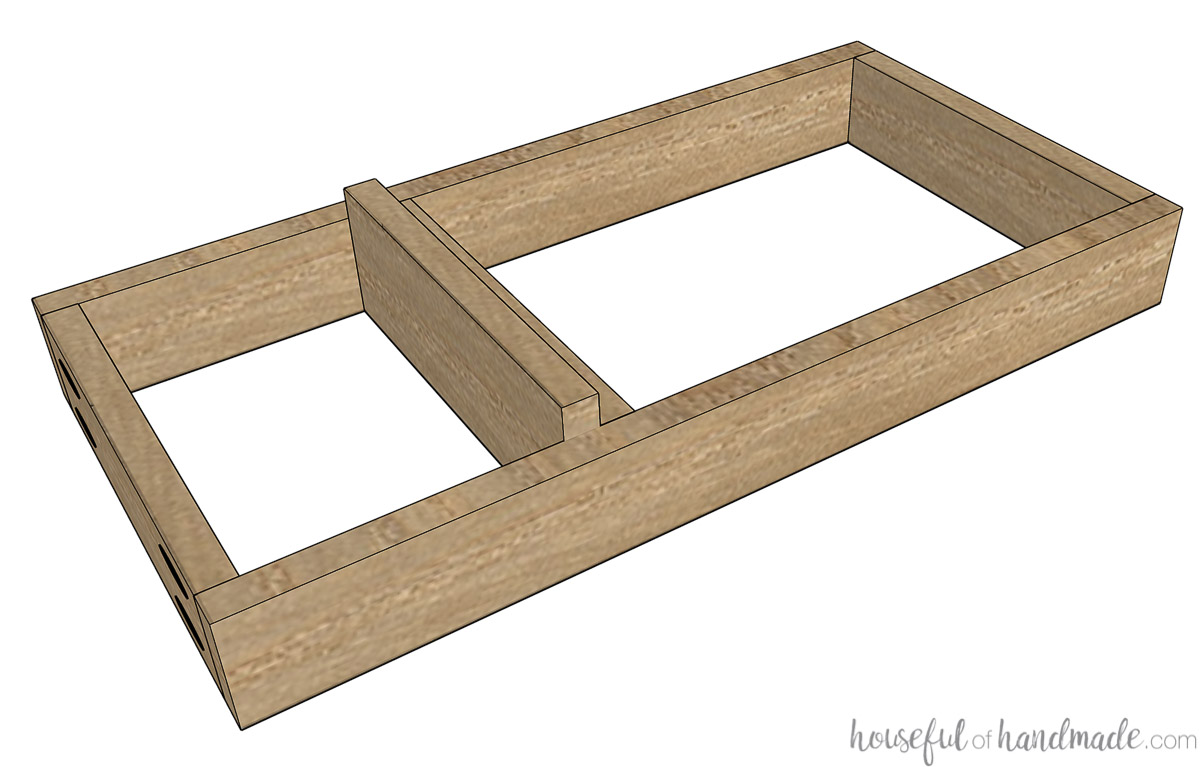
If you place the pocket holes for the front/back pieces so they are on the outside of the frame, the front will be covered up when you install the cabinet door and the back will be hidden inside the cabinet.
Build the Garbage Can Cabinet
Once you have figured out the trash can holder, it is time to determined the size of cabinet you need for it. We will start by determining the opening in the cabinet needed with the following formula:
Width of Trash Can Holder + (Clearance Required for Drawer Slides x 2) = Cabinet Opening
I used ball bearing drawer slides that require 1/2″ clearance on each side of the drawer. So I added 1″ to the width of the final trash can holder to determine the cabinet opening.
Now you can take that opening needed and figure out the cabinet width.
- For face frame cabinets: (Face Frame Width x 2) + Cabinet Opening = Cabinet Width
- For frameless cabinets: (Plywood Thickness x 2) + Cabinet Opening = Cabinet Width
Now you can build a base cabinet to install the trash can holder into. Follow the instructions from the base cabinet build plans. This post also includes formulas for you to determine your cut list for the entire cabinet.
The cabinet will be built the same as all the other base cabinets in your kitchen.
Install the Trash Can Holder
To install the trash can holder, you will install it just as you would a drawer. Place your trash cans in the holder and measure how much they stick out above and below and make sure to leave enough room for it.
Attach the drawer slides to the side of the cabinet and the side of the trash can holder. Learn how to install drawers with ball bearing drawer slides here.
Then build a DIY cabinet door for your new cabinet. You will attach the cabinet door to the trash can holder with wood screws through the front piece of the trash can holder into the door. Use 4 screws to secure and keep the door from twisting.
Then attach your cabinet pull or knob and you are done!
Now you can drop your trash cans in the holder and hide them away from view!
Make sure to check out more pictures of our blue and white two-toned kitchen remodel here. And check out these posts to learn all about building cabinets for a new kitchen, bath, desk, built-ins and more!
Happy building!
