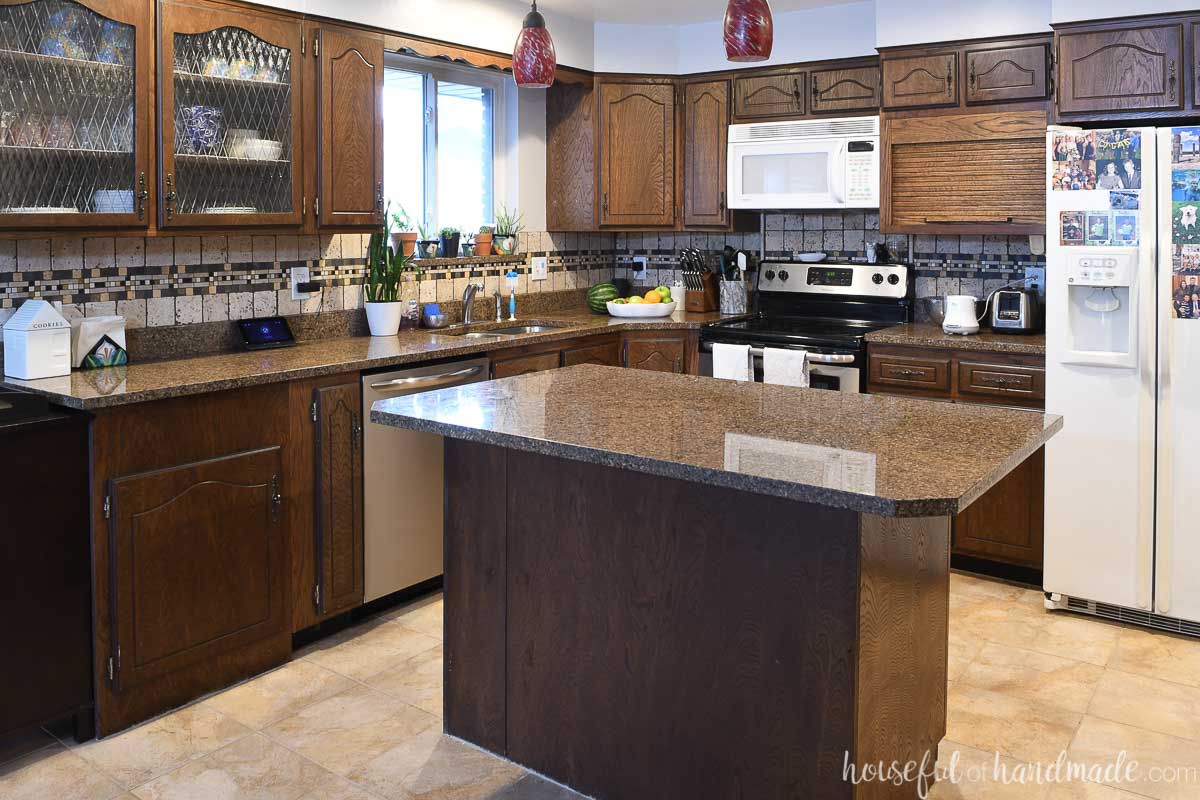
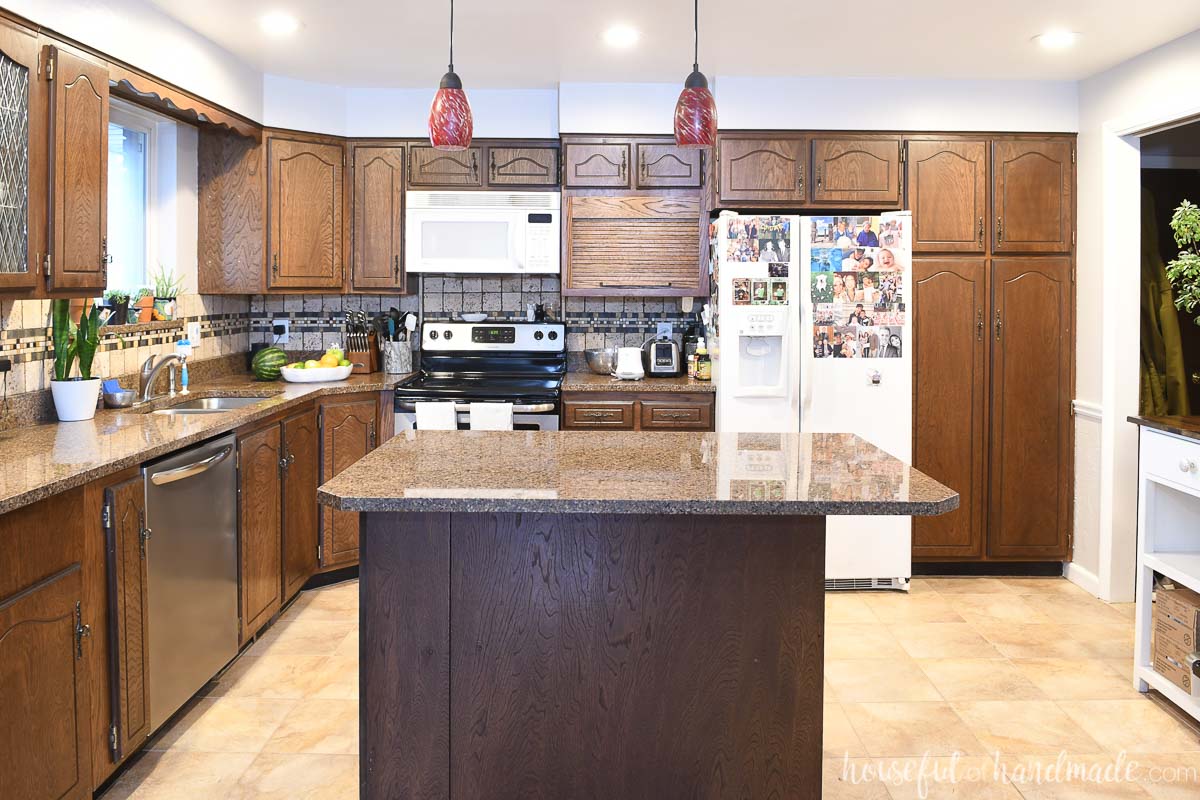
A few years ago we remodeled my brother and sister-in-laws dark 80s kitchen into a bright, modern kitchen on a budget.
I shared the remodel plan and some of the projects along the way, but never shared the final big reveal… until today!
This kitchen remodel was a large DIY project. We taught my brother-in-law some DIY skills and put in lots of hours of work to keep the budget low. It took us almost the entire summer of working weekends.
This post may contain affiliate links. As an Amazon Associate I earn from qualifying purchases. Click here to read my full disclosure policy.
But the end result was creating an amazing kitchen and creating amazing memories along the way with some of my favorite people!
Take a look at the before and after photos of this stunning kitchen transformation. And I will share how we managed to make such a huge impact on such a small budget.
Modern Kitchen Remodel Before and After
The main purpose of this kitchen remodel was to update the kitchen to match the young, hip couple that lived there. And to make it better for entertaining.
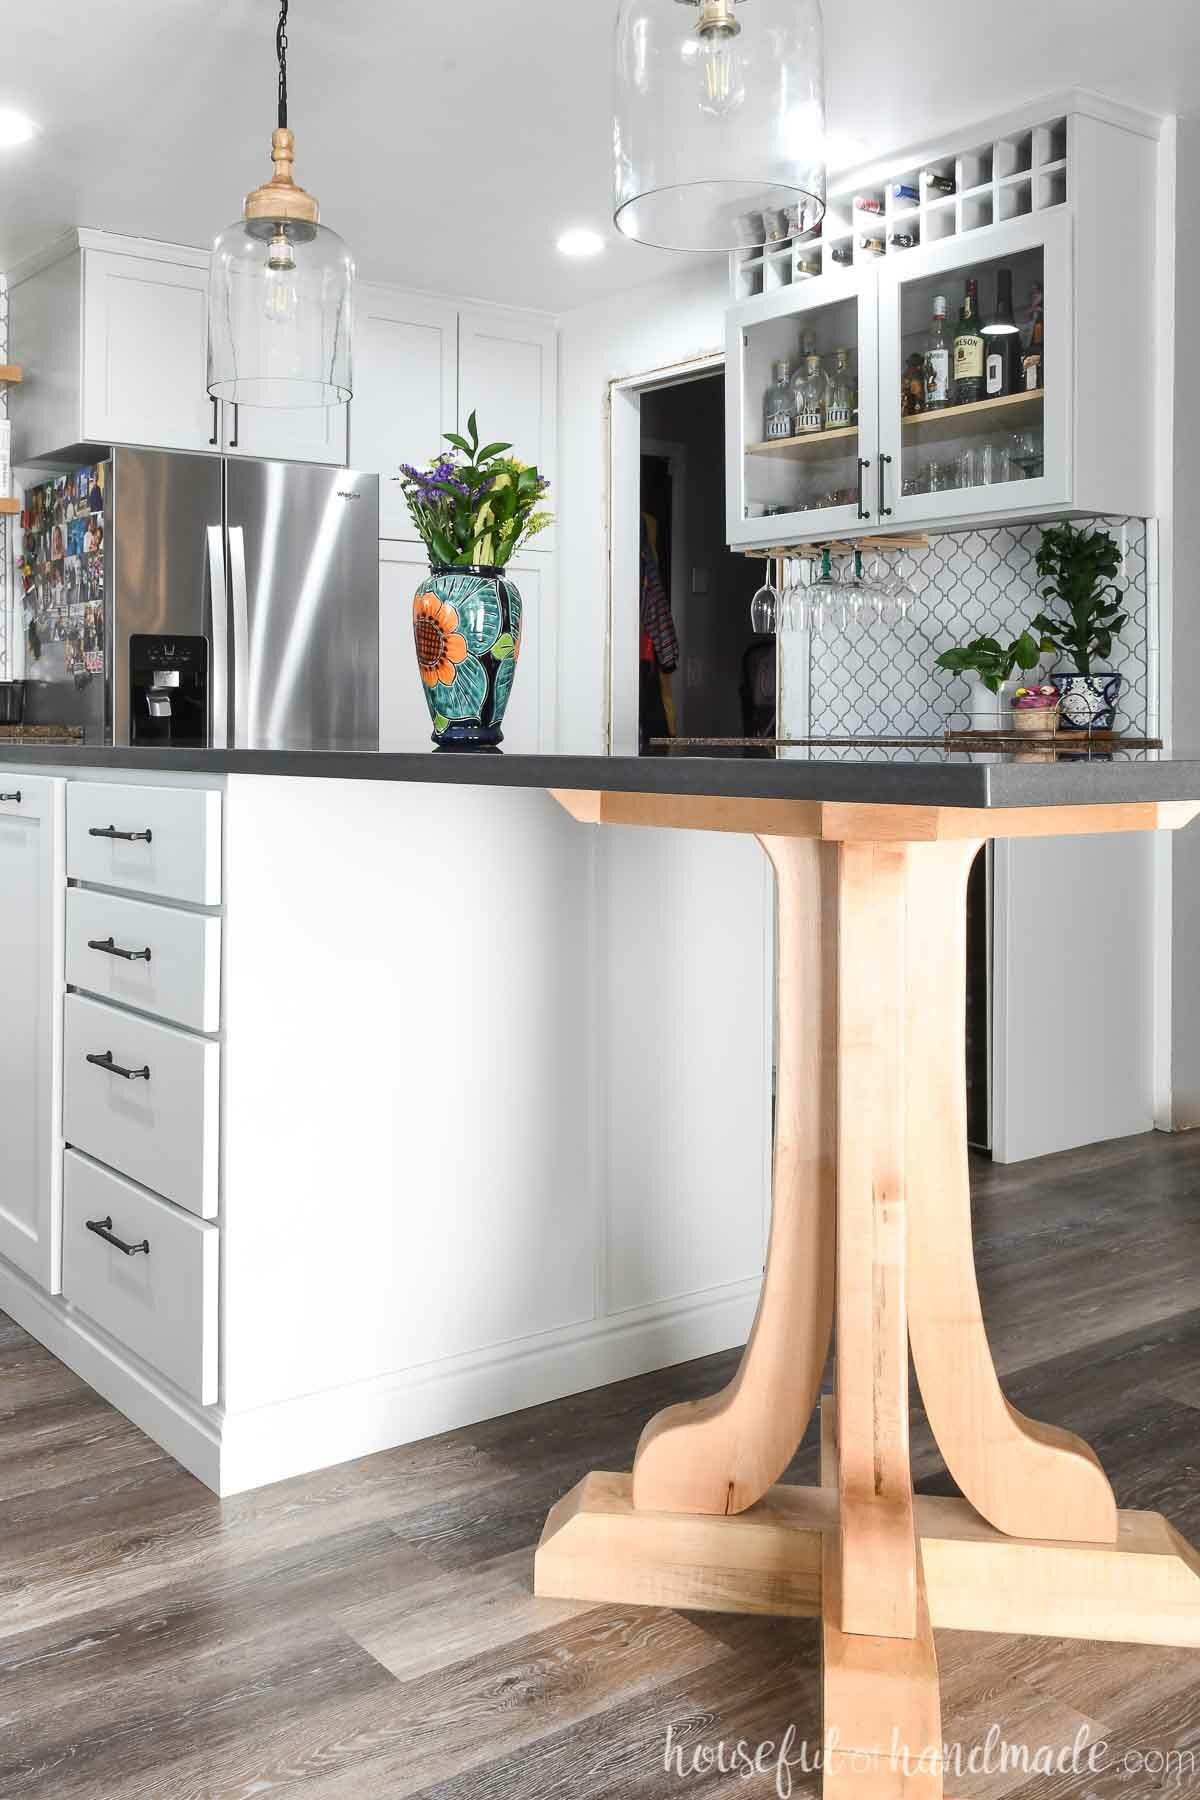
New Kitchen Island for Entertaining
The kitchen felt squeezed into the side of room with a large open space on the other side. I guess the open space was for a dining table, but there was another dining space right next to it, so it sat empty and unused.
The kitchen island was too small for the entertaining and cooking they love to do. And it left a lot of wasted space in the kitchen.
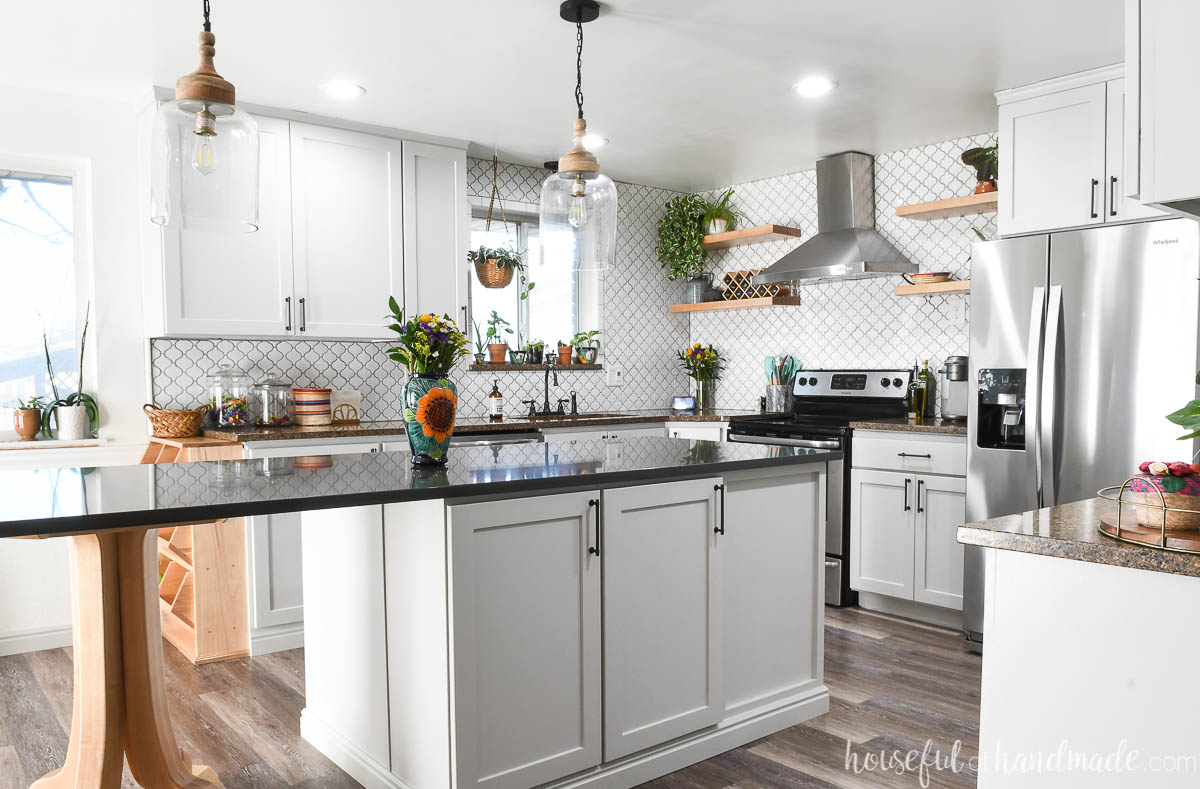
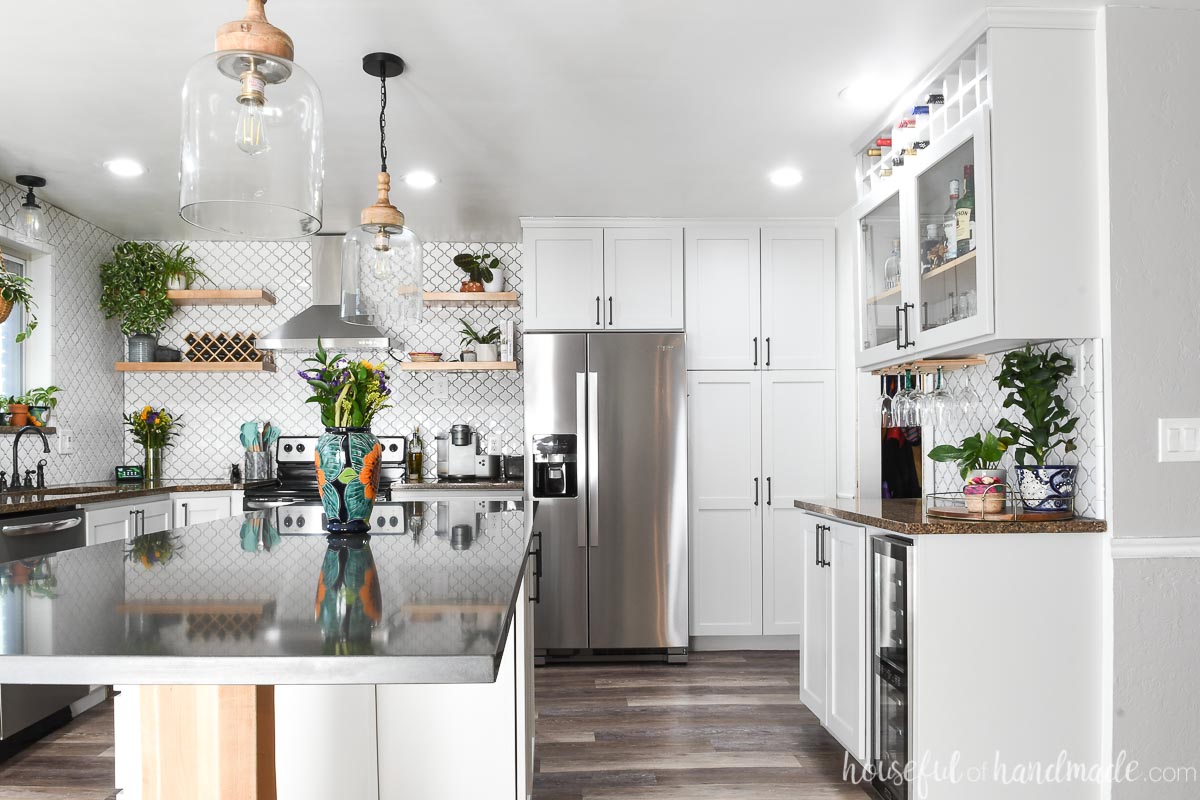
So we removed the too small kitchen island and turned the island orientation. Using up the wasted space from before, we added a 9′ long kitchen island.
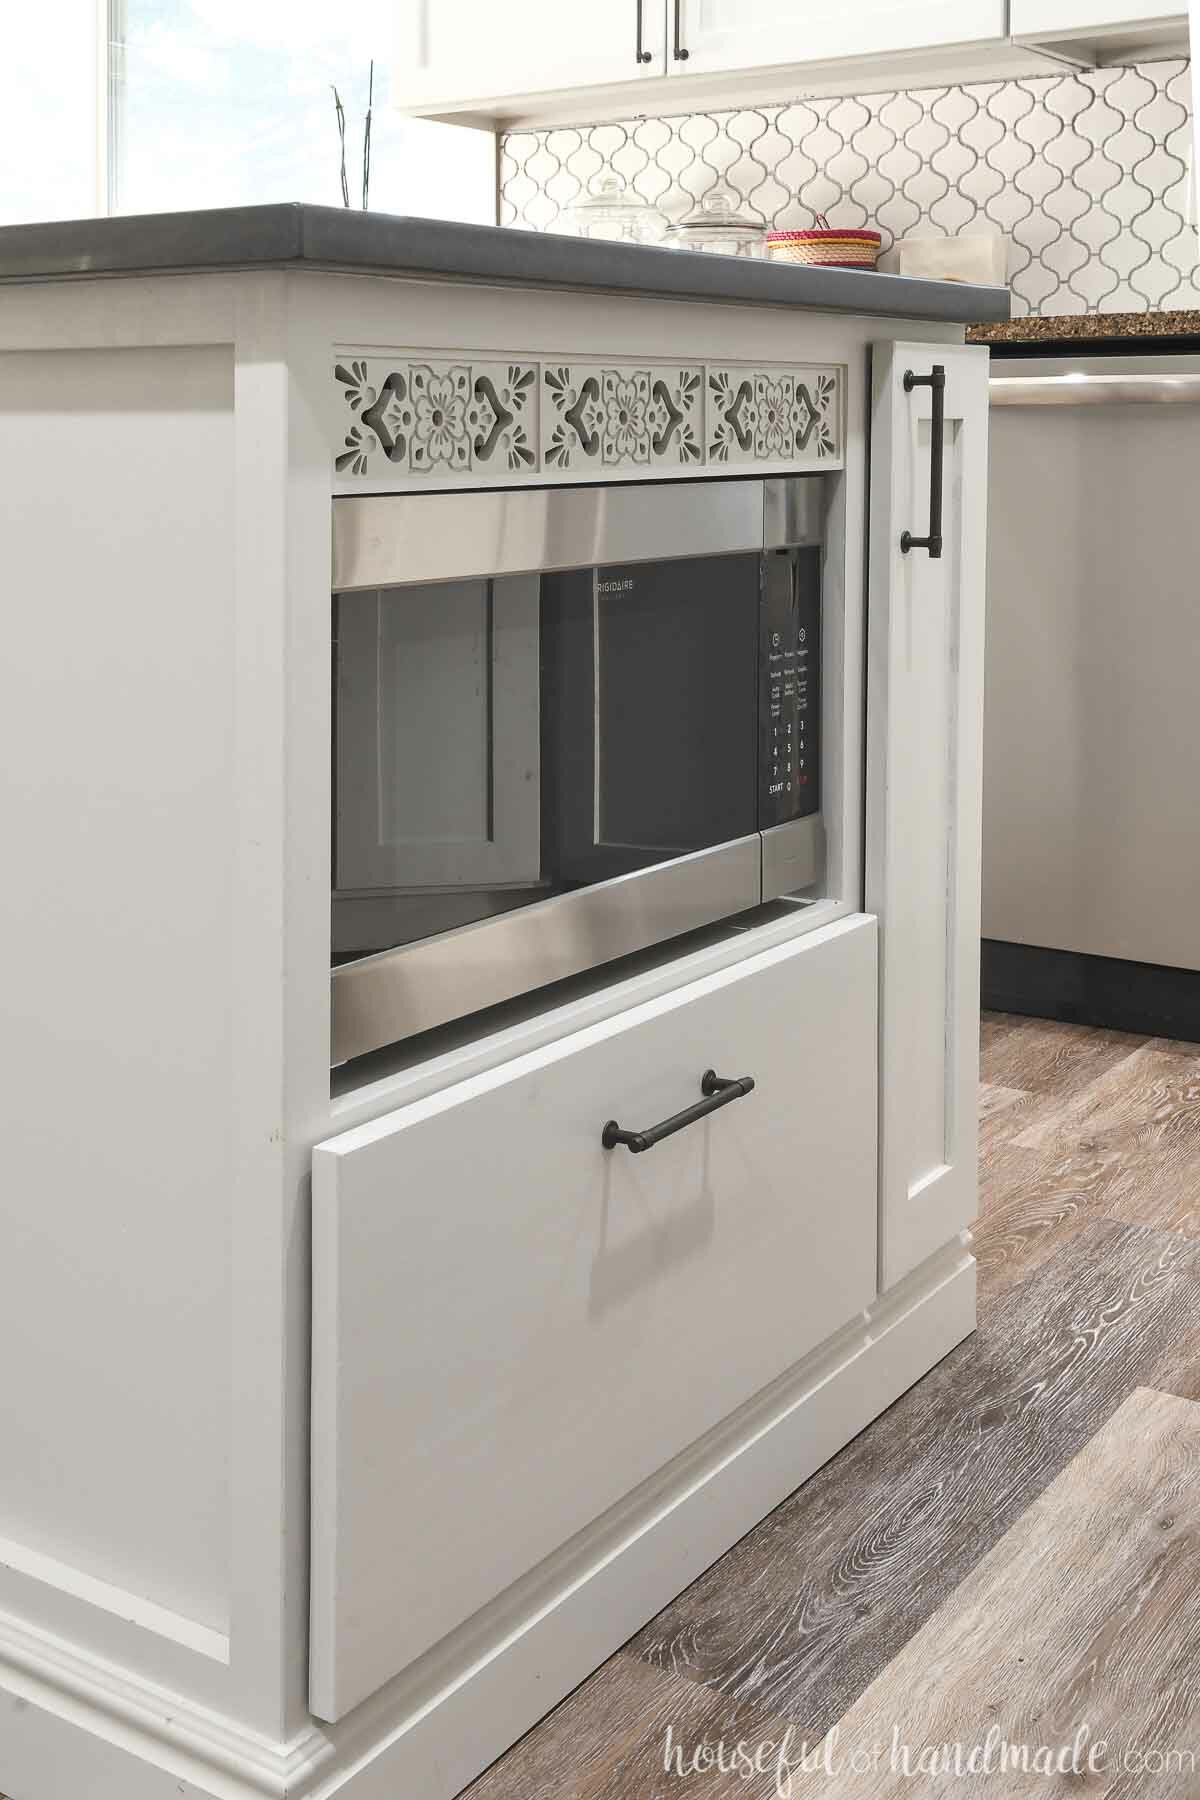
In the island on the side closest to the stove, we have new cabinets for storage and a “built in” microwave. On the side by the dining room, we swapped the cabinets out for a pedestal table base to create an eat at island.
The kids can easily sit up to the bar for quick meals. And when entertaining, this giant kitchen island is the perfect place to gather around.
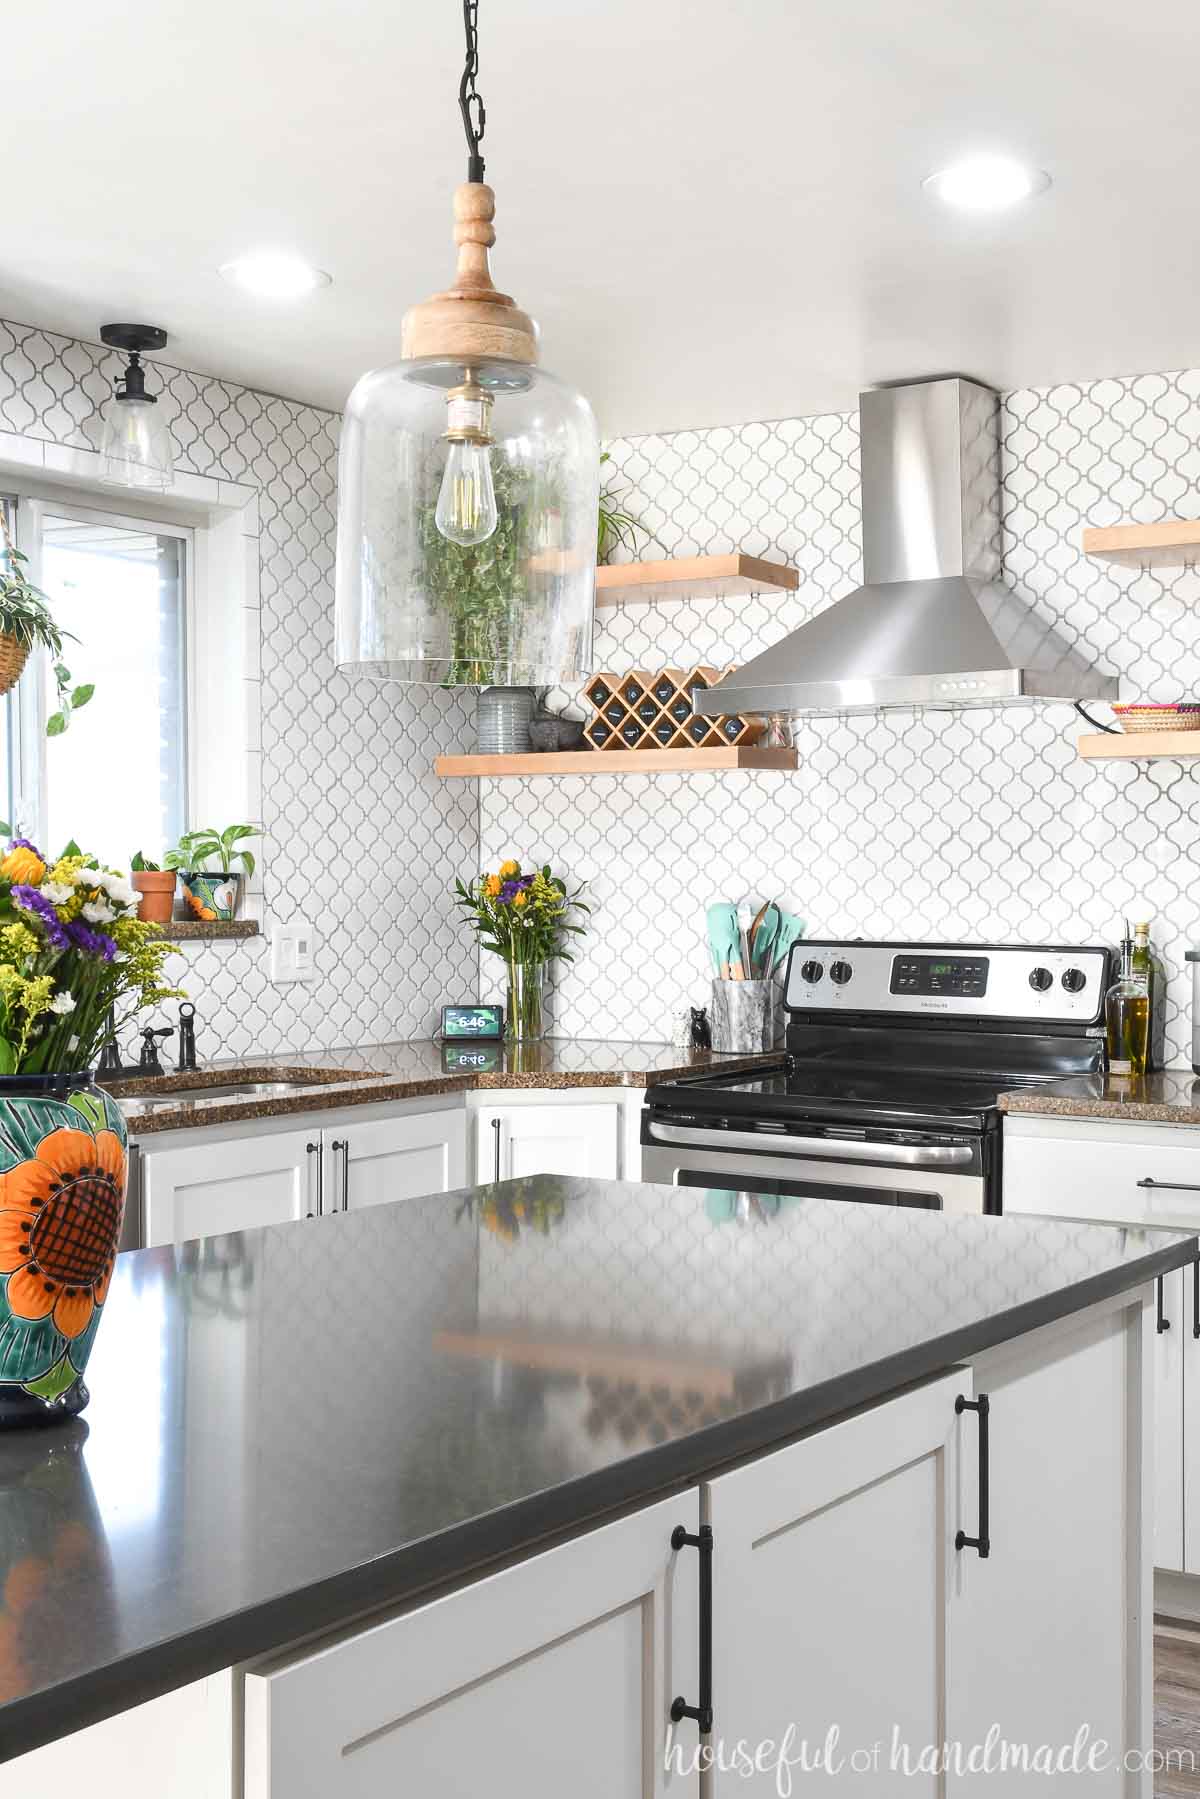
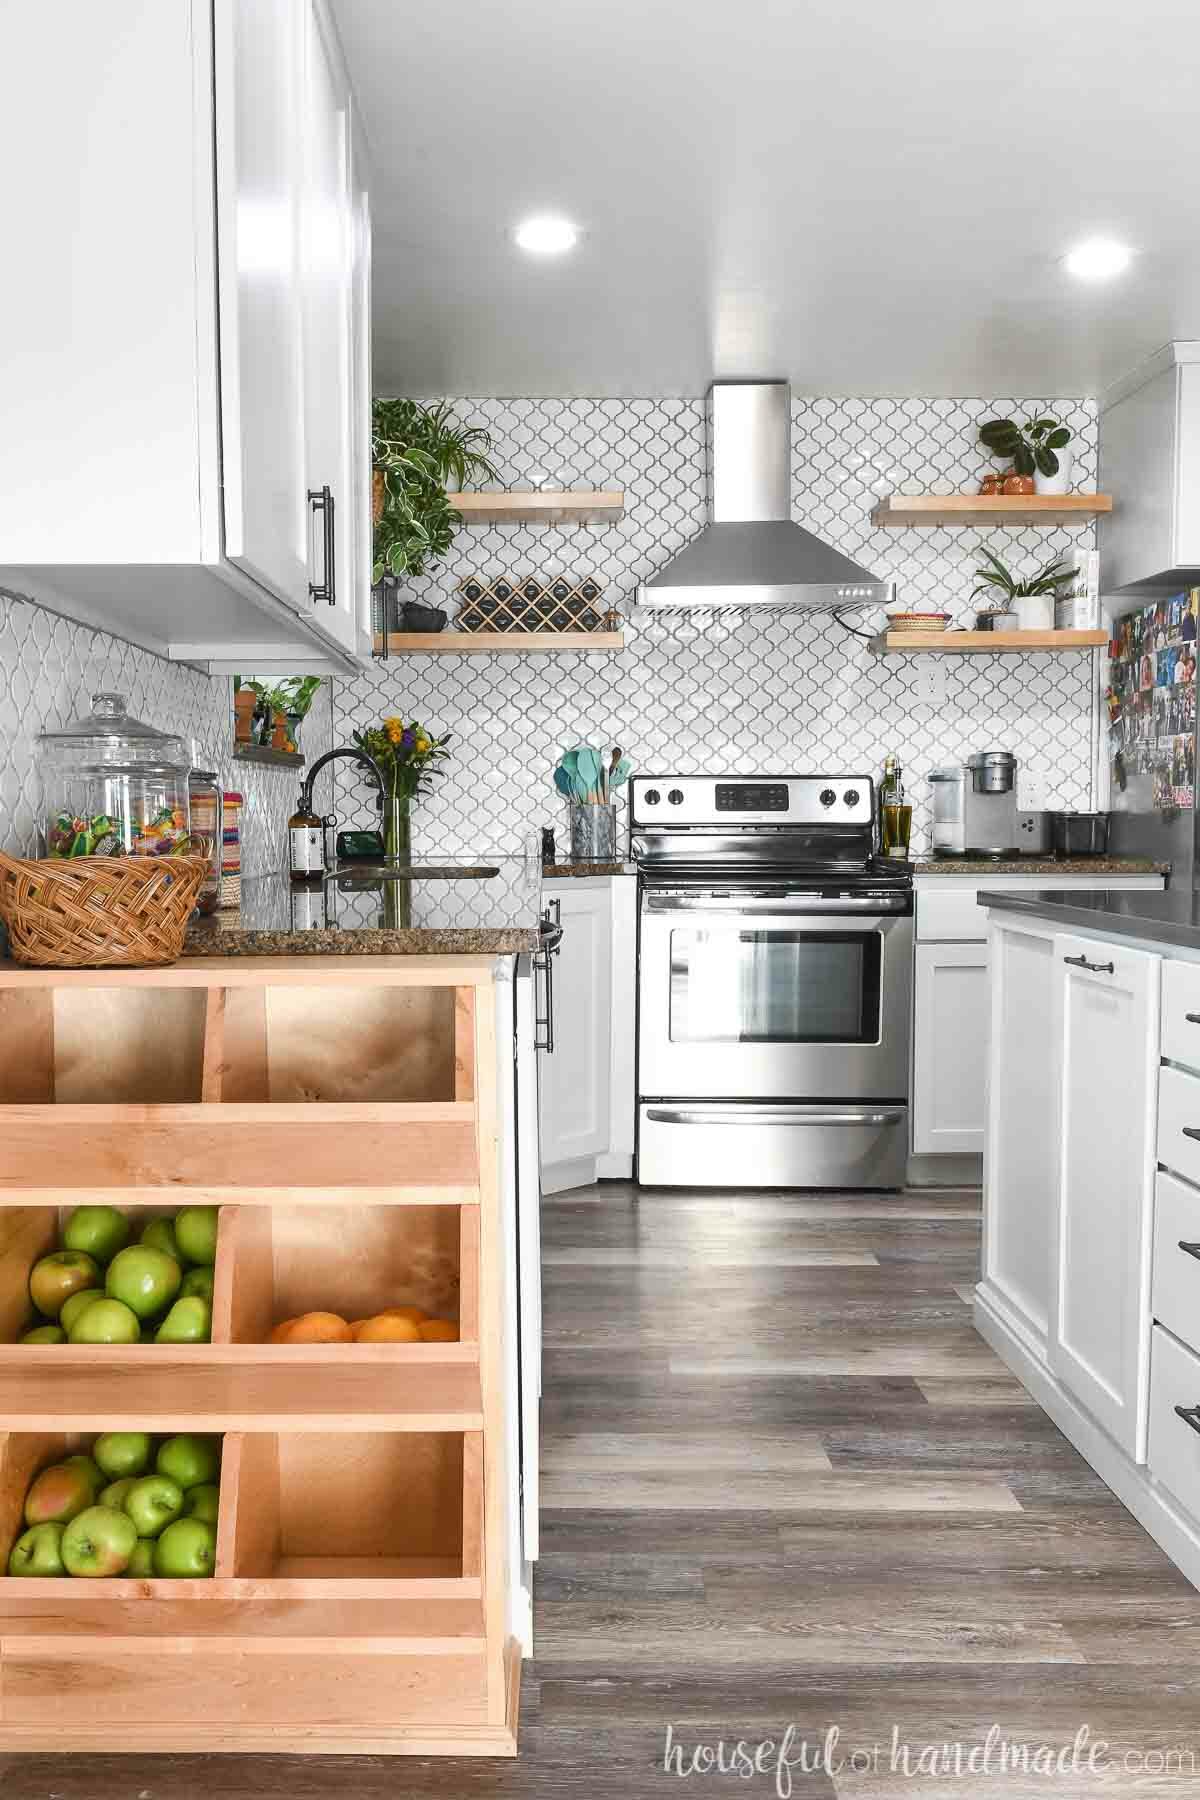
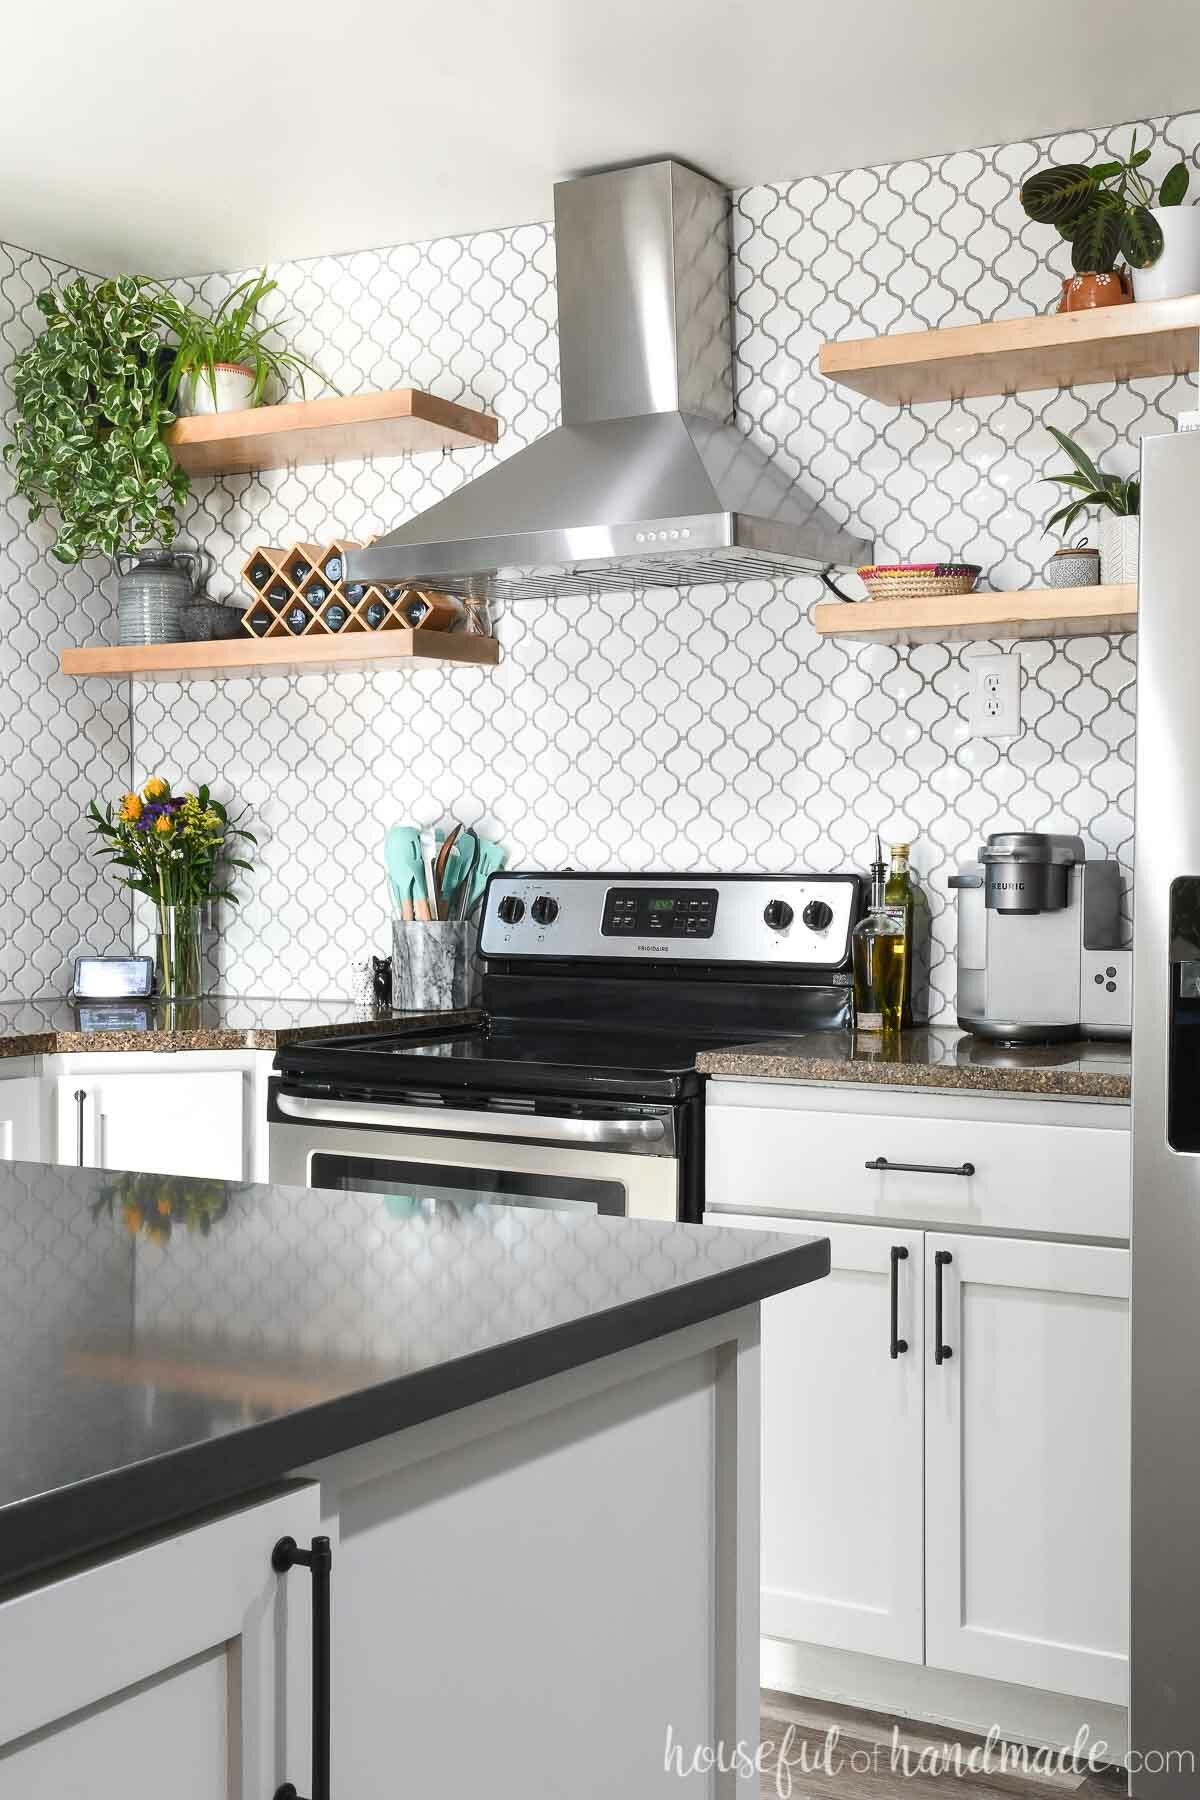
Gorgeous Open Shelving
An easy way to modernize a kitchen on a budget is to use open shelving!
Removing cabinets does not cost a thing. And shelves cost a lot less than a cabinet.
If you don’t want floating shelves, you could just remove the cabinet doors from existing upper cabinets and paint them. Leaving the cabinets without a door creates the same open feel without losing as much storage.
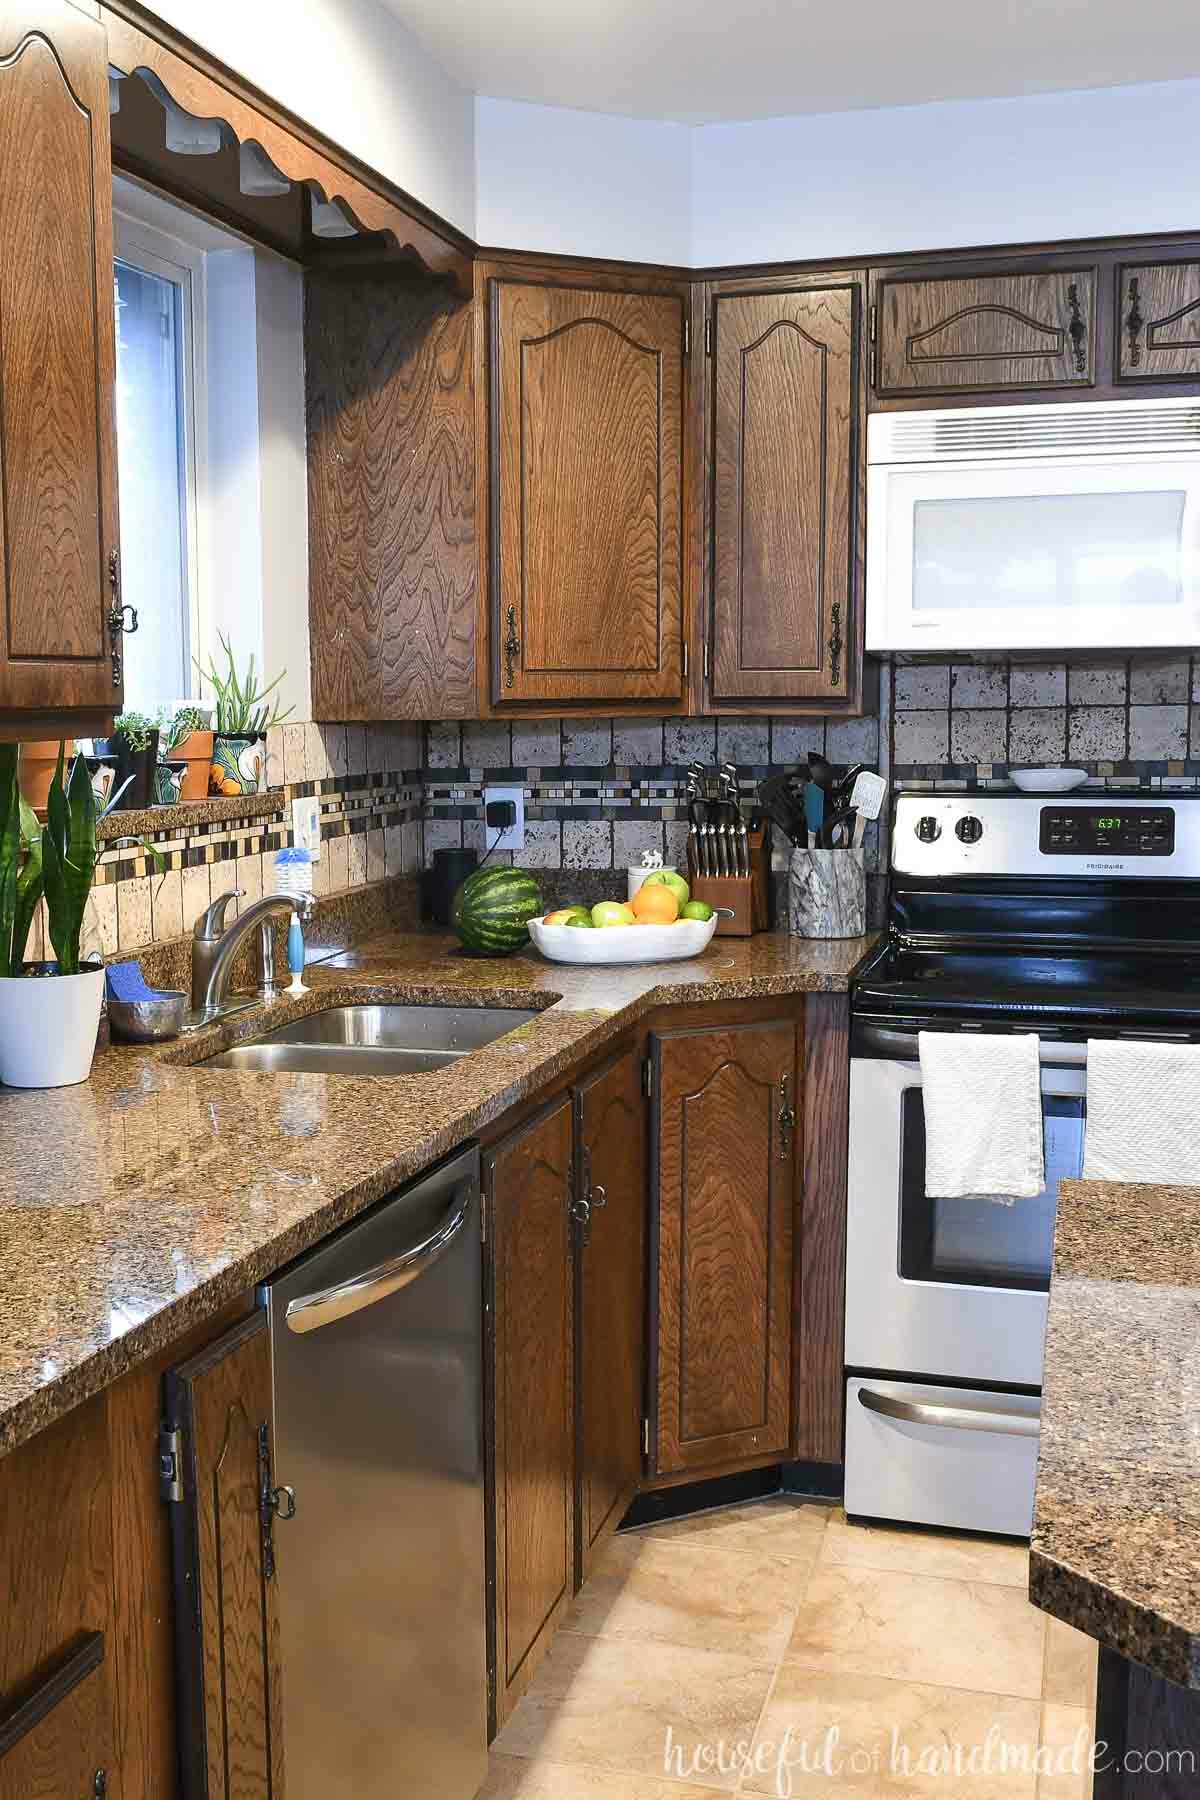
Removing all the dark, heavy cabinets in the corner and around the stove created a much more open feel to the kitchen. And it makes the space feel much larger than it was before.
All the items that were previously stored in the upper cabinets were easily moved to the new cabinets in the kitchen island.
Now the solid maple floating shelves are left for mostly decorative items. It leaves the kitchen feeling very clean and spacious.
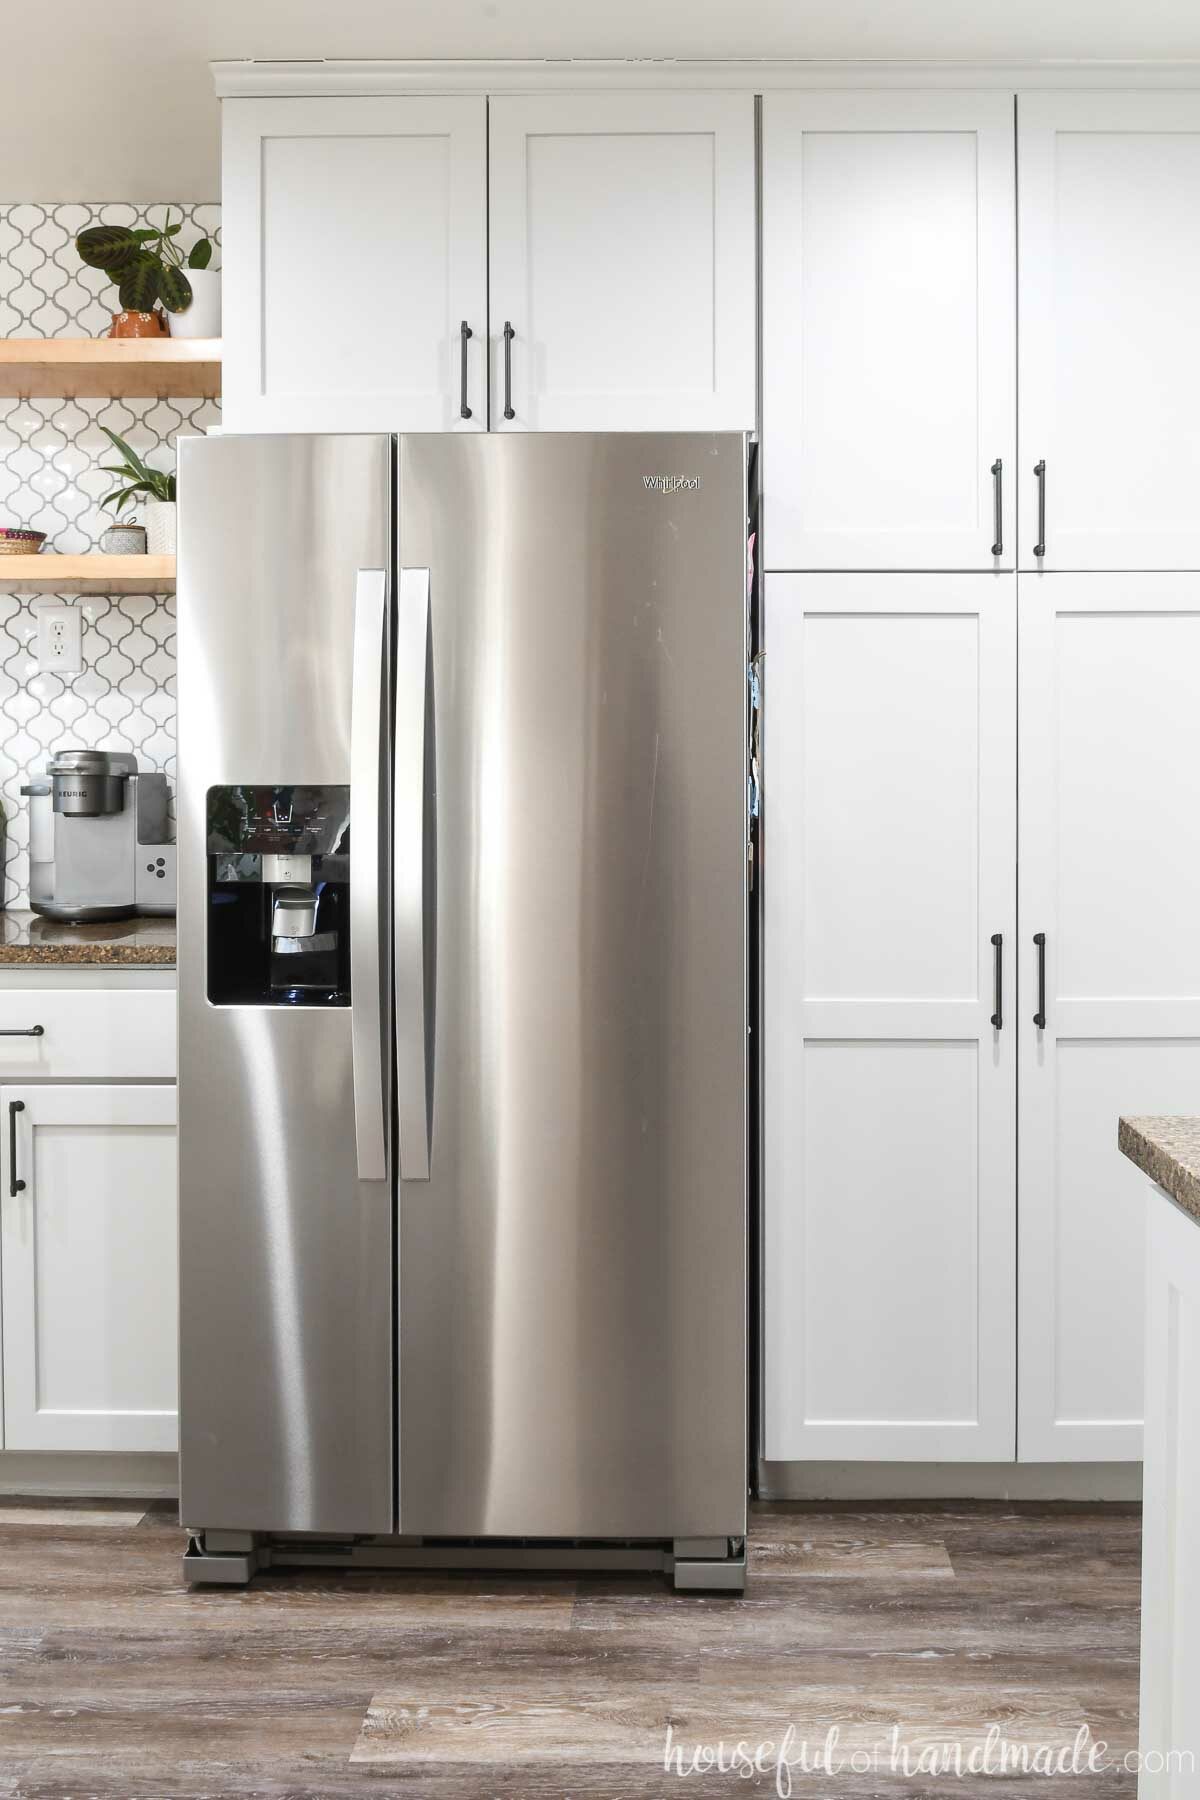
Extending Cabinets to the Ceiling
When we pulled down the upper cabinets to make room for the new shelves, we discovered the cabinet boxes for the upper cabinets went behind the soffit. Big win!
We were able to remove the face frames from the cabinets we were keeping and replace them with face frames that went all the way to the ceiling.
The taller cabinets make the entire kitchen feel more grande and modern. The upper shelf in the cabinets is not adjustable, but offers a lot of storage for lesser used items.
If you have a soffit on your cabinets, you might get lucky like us, but probably not. instead, you could still create the look that you cabinets go all the way to the ceiling by getting creative with paint and trim.
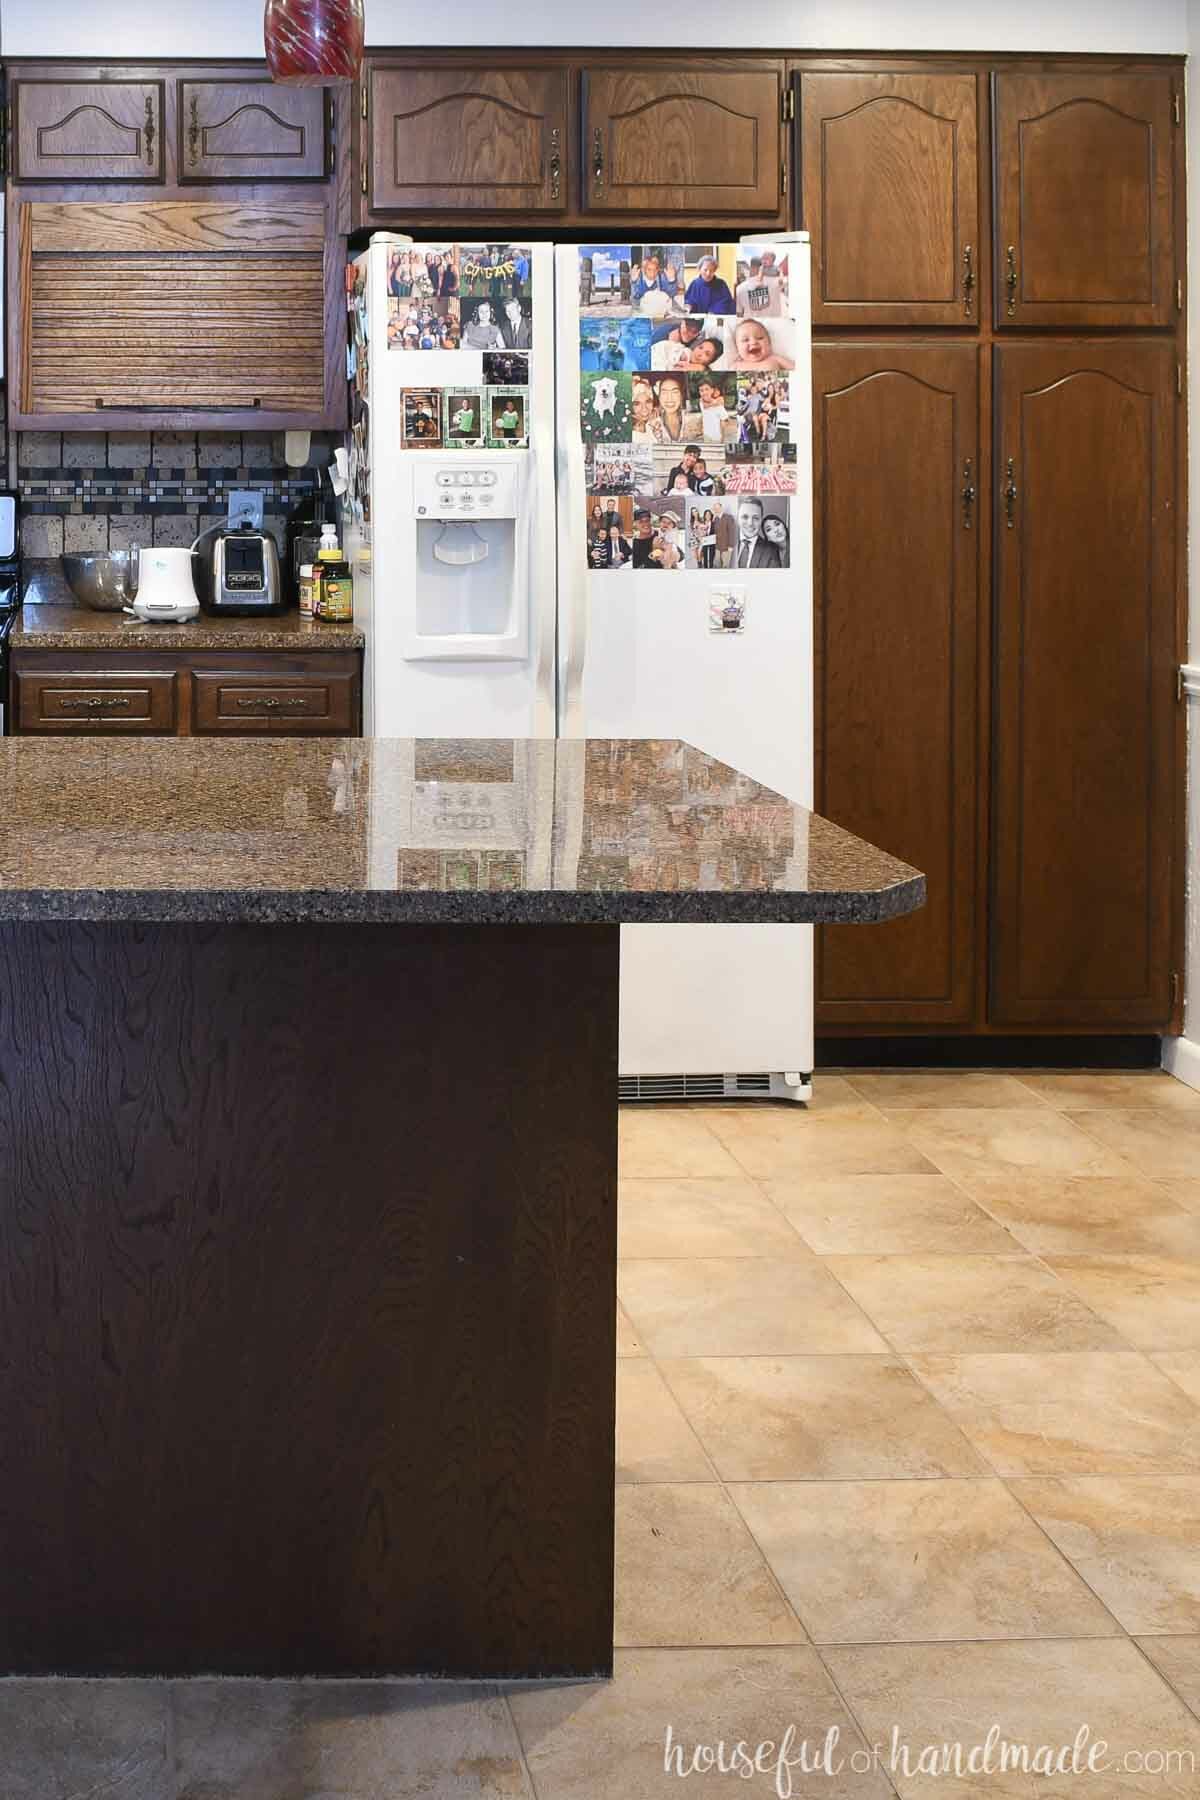
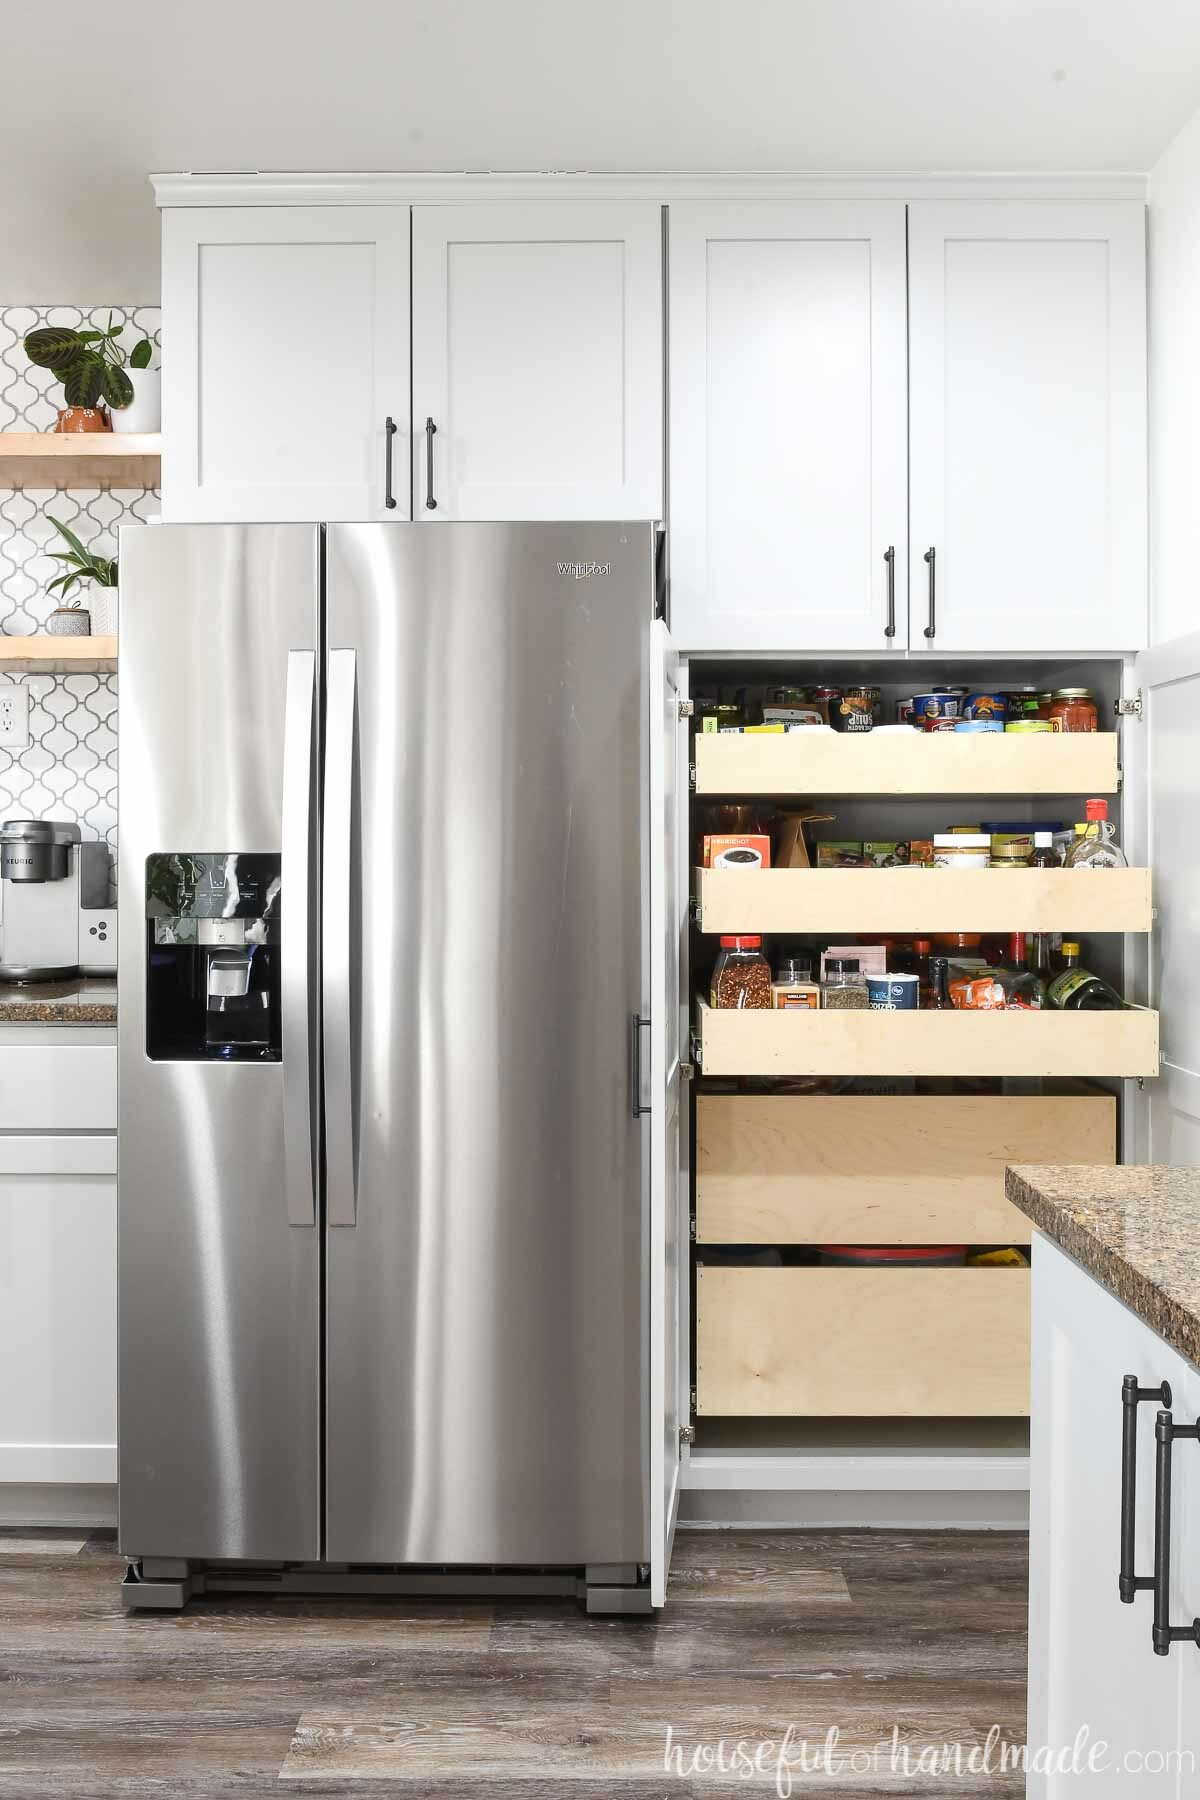
Improving the Pantry with Pull Out Shelves
The panty cabinets next to the fridge offered lots of storage, but it was a hot mess inside! It is too easy to loose items in the back of the 24″ deep pantry shelves.
Even though the improvements made to the pantry cannot be seen from the outside, they were totally worth the expense.
See how we converted the pantry to have pull out drawers here.
When I updated the face frame, I left the center stile off and that made it possible to add pull out shelves to the pantry.
Deeper drawers were added to the bottom of the pantry to hold bagged items like chips and pasta. And shallower drawers were used as pull out shelves for the top of the panty.
Now you can easily find and reach everything in the pantry. This adds so much storage to the kitchen without needing more cabinets.
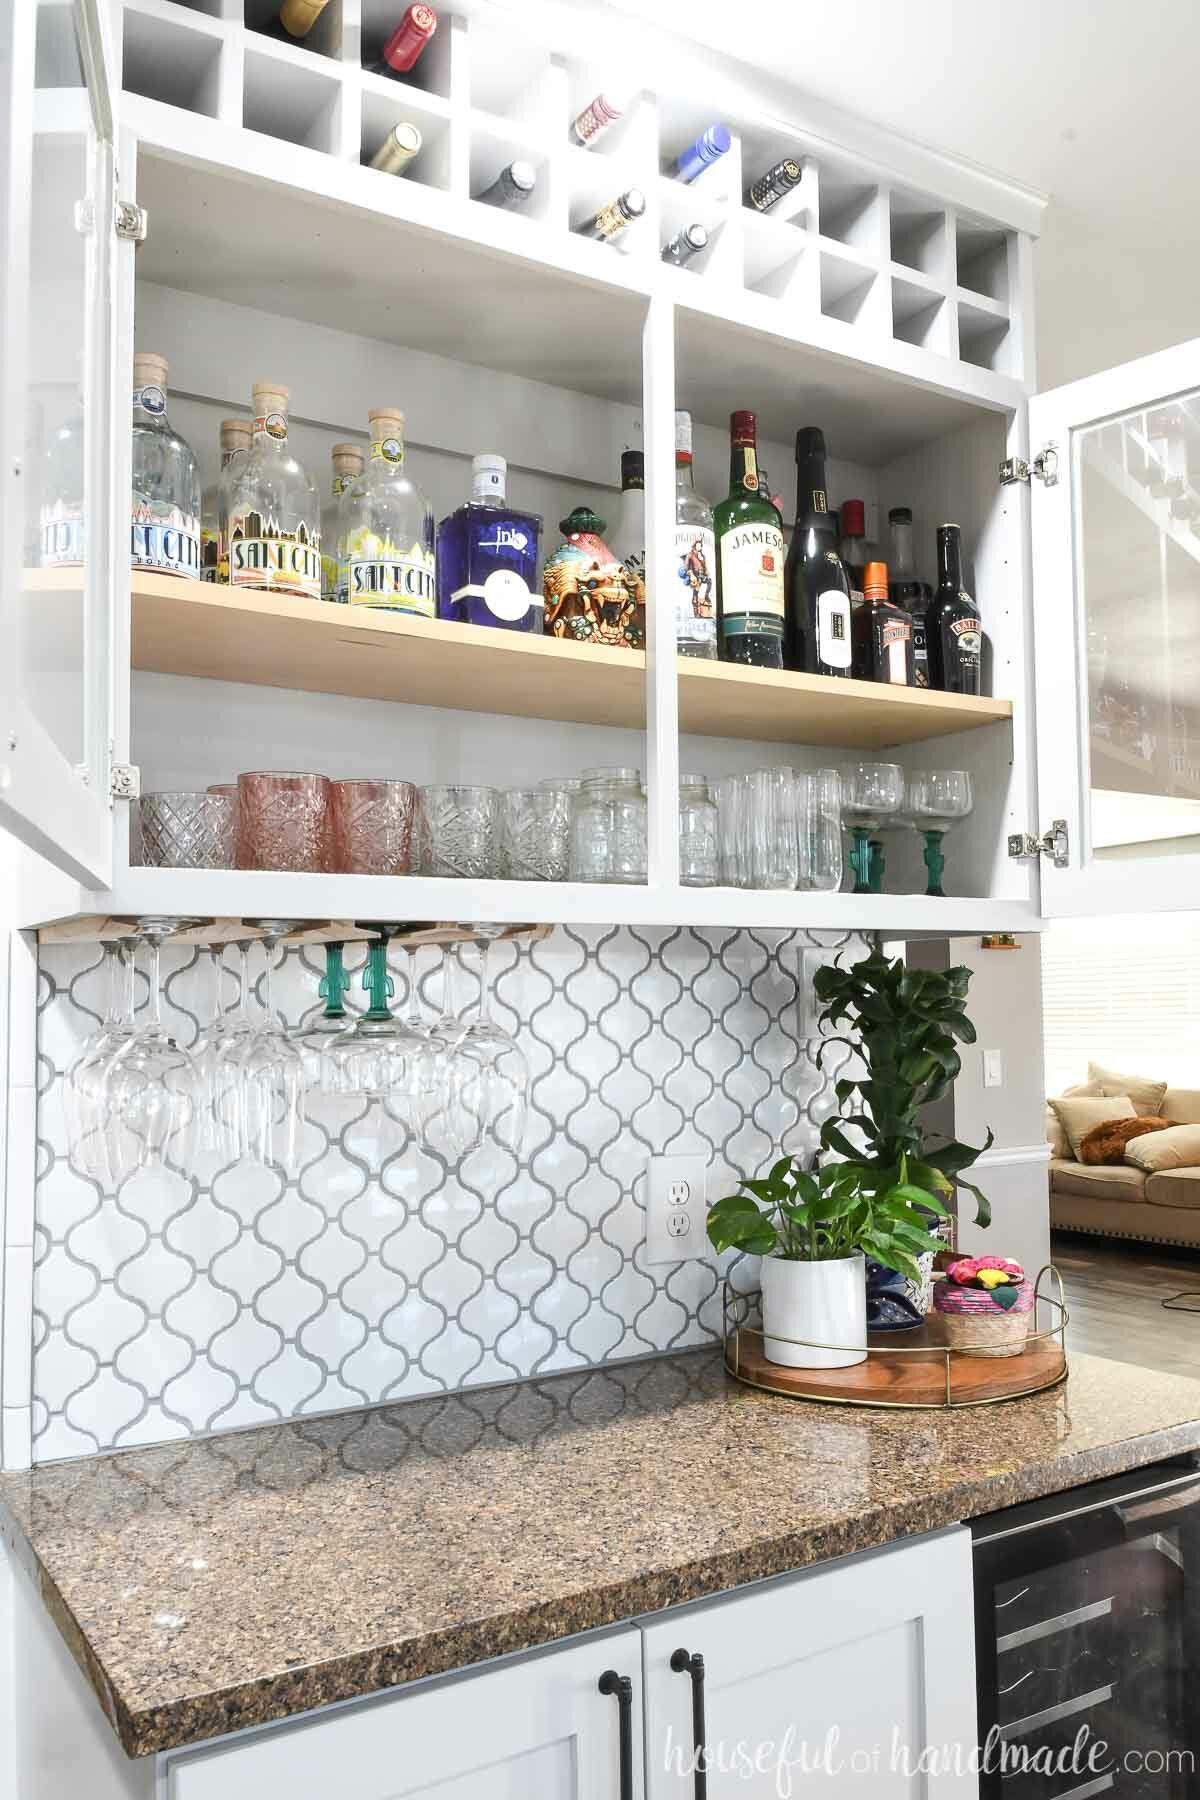
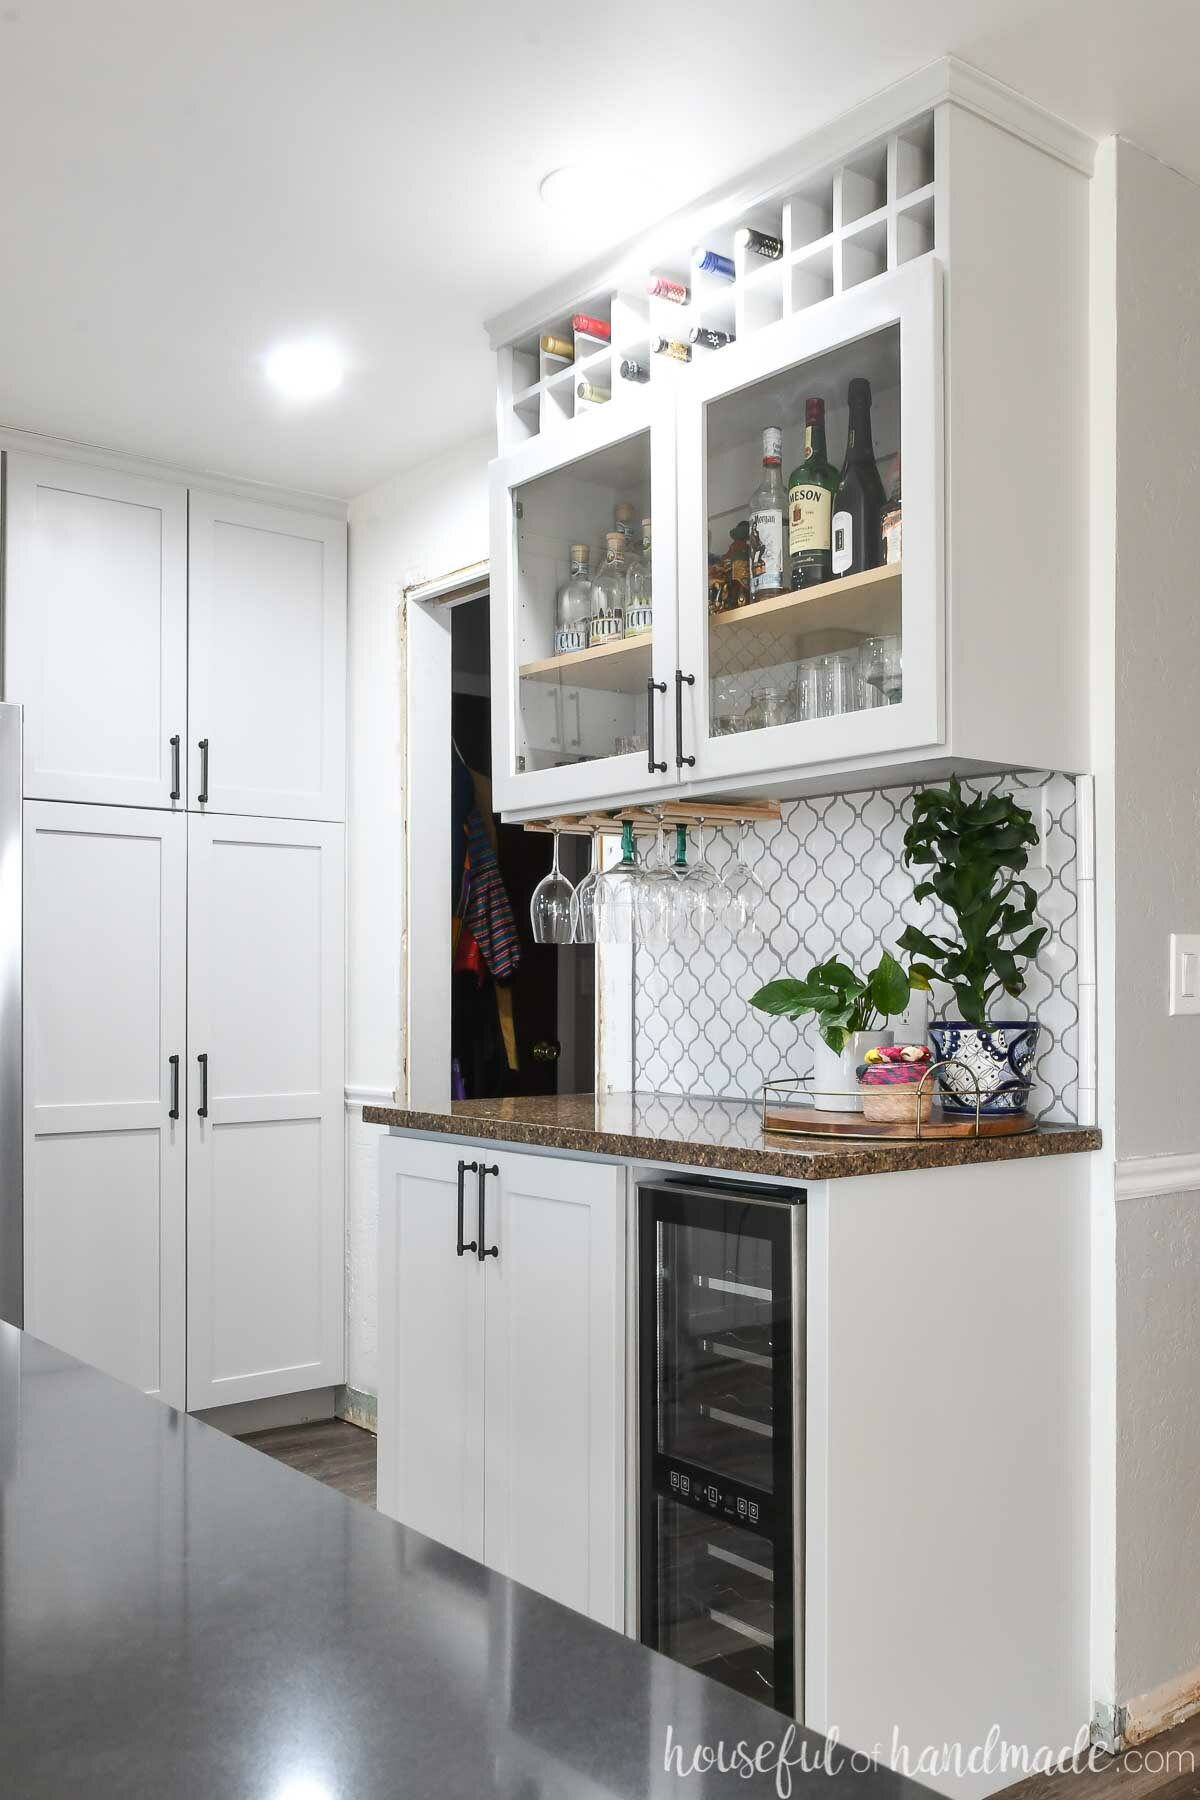
DIY Dry Bar Cabinet
When my brother and sister-in-law moved into their home, there was a built in desk on the small wall in front of the pantry. They did not use it and removed it a couple years ago.
But luckily they never got around to tossing the piece of granite that was the desk top. So when they asked for a dry bar to be added to their kitchen, I knew exactly what to do!
I used the piece of granite as the countertop and built my own cabinets to create the perfect wall for entertaining. Stay tuned for complete build plans for this dry bar!
Adding special design touches
One of the challenges I had when designing the kitchen for my in-laws was her contrasting design ideas. She wanted a modern kitchen with lots of grays, but then kept finding pictures of very earthy rooms as inspiration.
She loved the terra cotta, colorful hand-painted tiles, and natural wood from Mexico, where her mother is from. So my goal was to add touches of Mexican design… but keep it contemporary and modern.
The first thing I did was incorporate natural wood into the kitchen. Painted cabinets can sometimes feel very bland, especially in a cool color like gray. But we warmed up the kitchen with beautiful maple wood.
The light color of the maple kept the look contemporary, but added loads of warmth. And I added it throughout the entire kitchen. My trick is to use it in at least 3 places so it doesn’t feel like an afterthought.
- Chunky maple wood floating shelves.
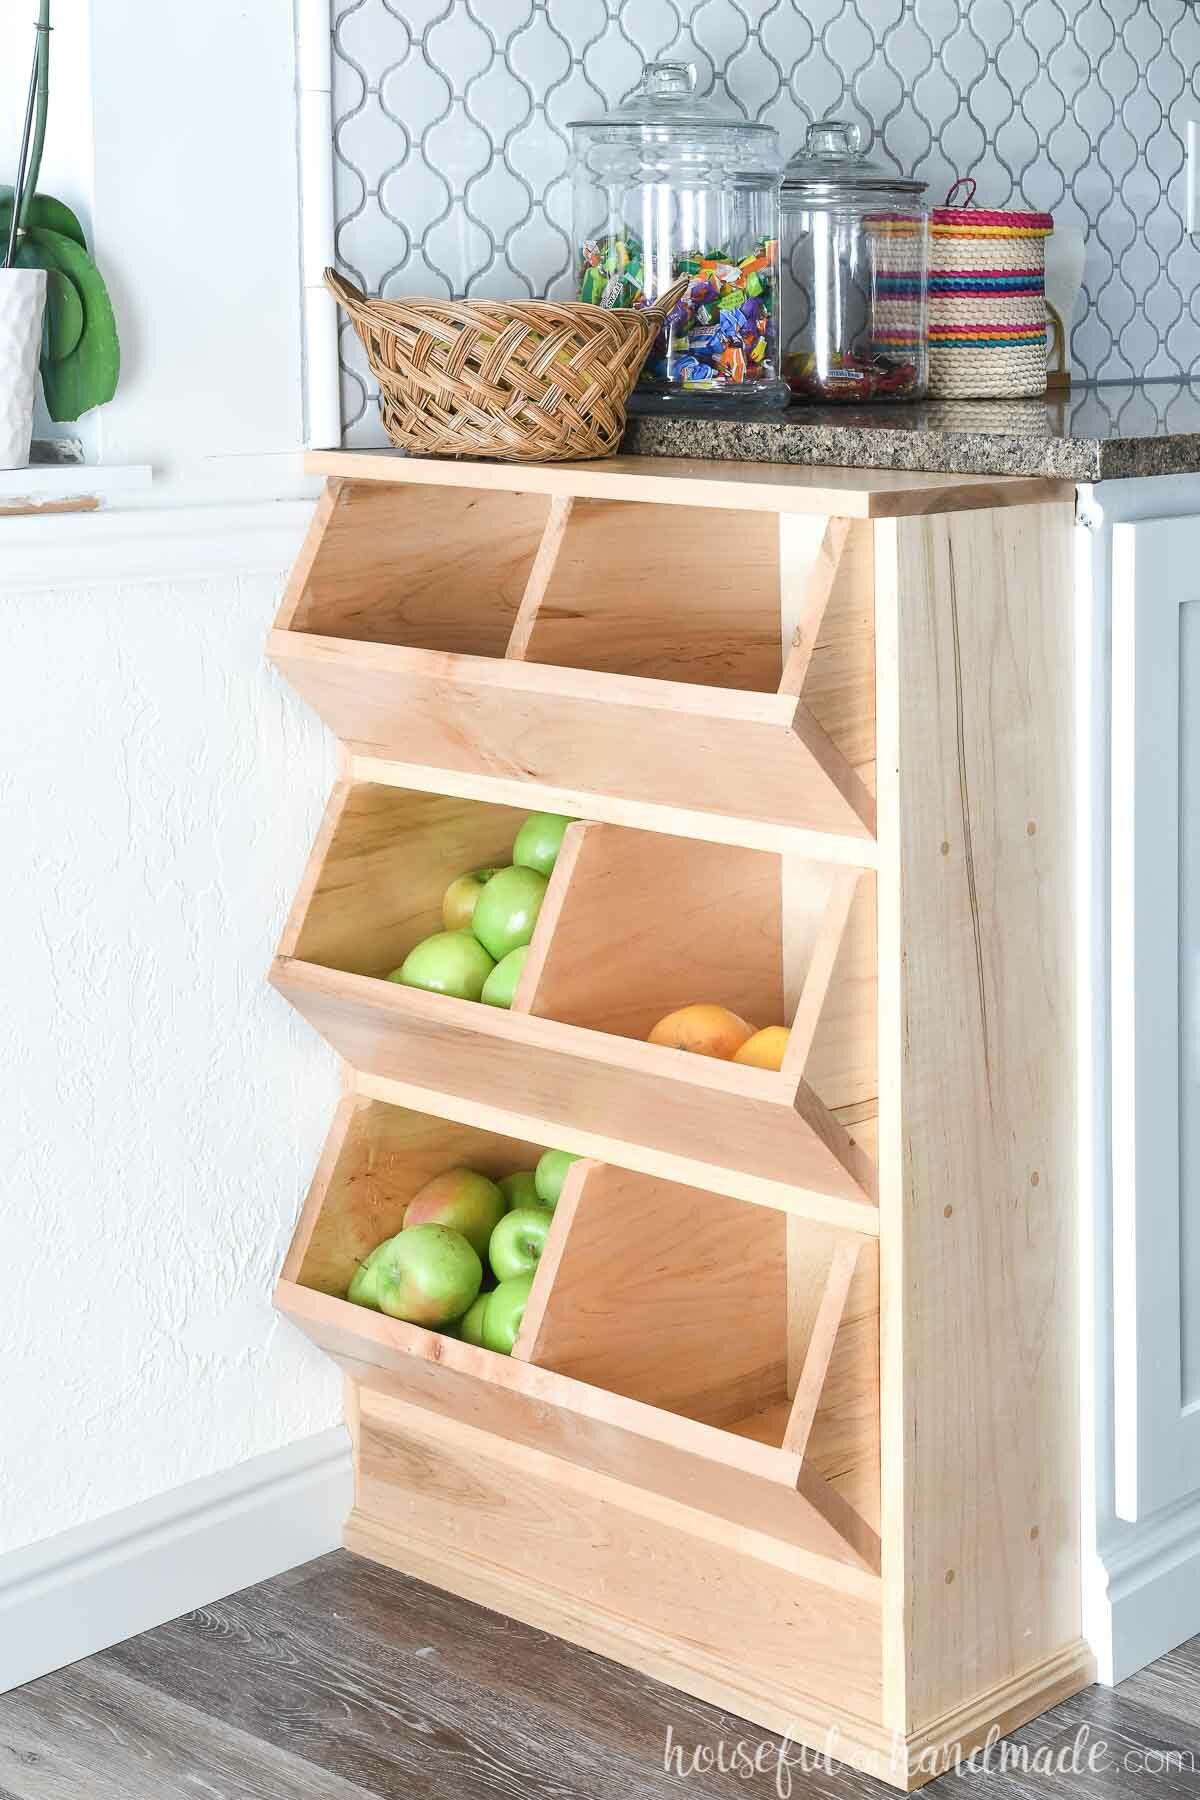
- Natural wood vegetable bins built into the end of the cabinets (they were added to make the upper and lower cabinets line up).
- Maple pedestal base on one side of the kitchen island.
- Wood accented pendants over the kitchen island.
We also added some smaller touches of Mexican design throughout the kitchen. Some more permanent and others with just colorful decor.
One of my favorite special touches was born from a budget necessity.
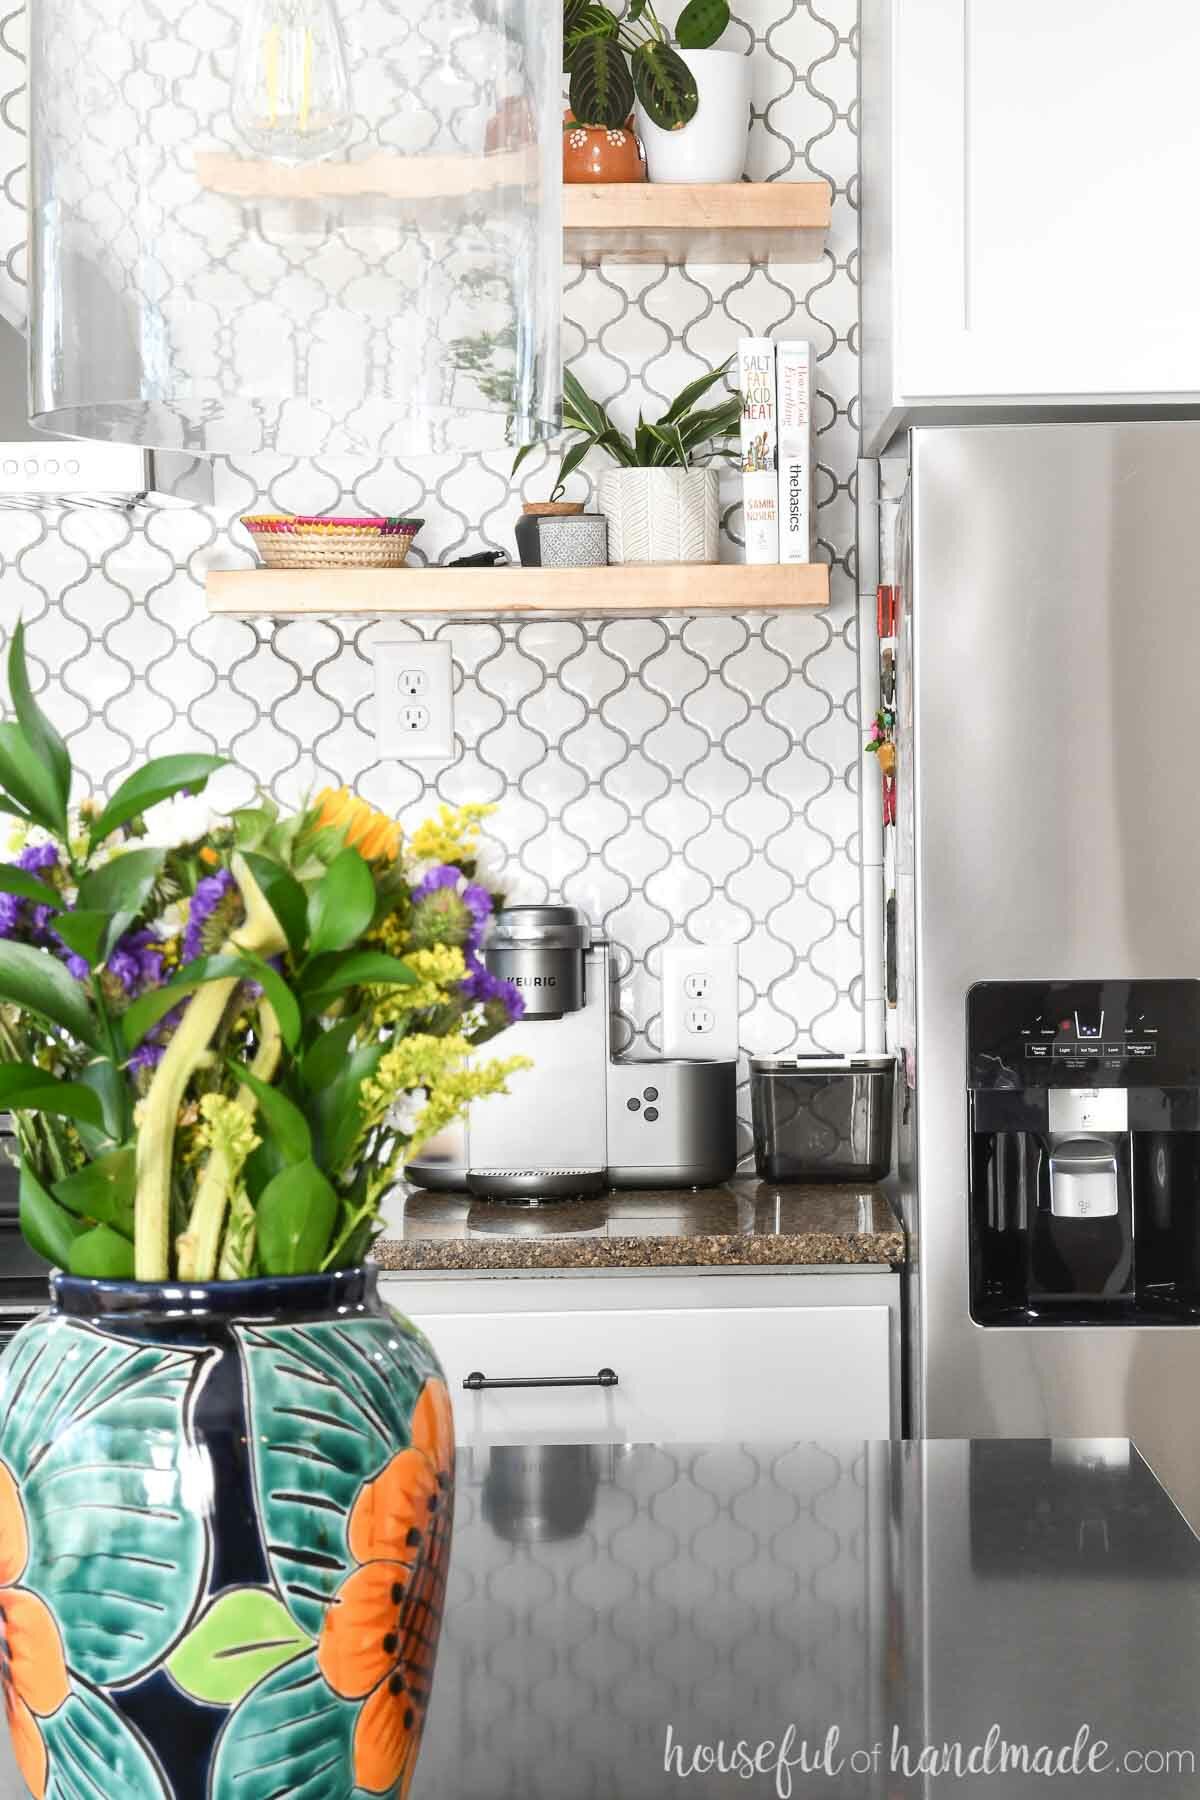
A built in microwave is 3-4 times more expensive than a countertop one. But to make it look built-in, but still allow airflow, I created a cut out design based on Mexican patterned tiles to frame the microwave into the new kitchen island.
It is painted the same color as the cabinets so it blends in, but the design really stands out!
How Remodel a Kitchen on a Budget
Apart from DIYs, one of the easiest ways to save money on a kitchen remodel is to use what you already have!
Reuse your Kitchen Cabinets
In this kitchen, the cabinets were in great shape. The custom cabinets were well made with real wood. They just needed a facelift.
Reusing all of the cabinets around the perimeter of the kitchen save us thousands of dollars. We painted the kitchen cabinets with a tough primer and a cabinet enamel paint. And all the cabinet doors and drawer fronts were replaced with brand new shaker style doors.
Changing the cabinet doors on an existing cabinet will instantly change the entire look of the cabinet. These DIY cabinet doors were a great use of time and budget.
Work with Outdated Countertops
One of the things my brother-in-law hated about the kitchen was the outdated granite countertops. But they just couldn’t afford to replace them and granite is a great countertop.
So to make him fall in love with the dated brown granite, we worked the colors into the new color scheme.
The brown granite had tones of gray and black. Painting the kitchen cabinets a light gray brightened the entire room (granite included) and brought out the gray tones.
Then we highlighted the black tones by adding a new black quartz countertop to the large DIY kitchen island that I built.
The modern black countertop was not cheap! But it becomes the focus in the kitchen making the outdated granite blend into the background.
And lastly, we incorporated a lot of natural warm wood throughout the kitchen to blend into the brown in the granite.
Work with the Existing Layout
Changing the location of plumbing and electrical will immediately increase your kitchen remodel budget! Unless the location of your sink and appliances is totally crazy, work with it to save money.
Even if you reuse your cabinets, you can still move them around. If you have a peninsula in kitchen, remove those cabinets and turn them into a kitchen island instead.
We added tons of counter space and storage by rotating the kitchen island. Instead of a small 40″ wide by 36″ deep island, we rotated it and created a 40″ deep by 9′ long island.
This added a ton of storage, room for a built in microwave, and a place for an eat in kitchen. For our kitchen we reused the cabinets around the perimeter of the kitchen and used new cabinets for the kitchen island, saving us a lot of money in our budget.

Splurge on Small Items with Big Impact
High end finished feel so luxurious, but cost a lot. Remodeling a kitchen on a budget does not mean you cannot have some luxuries, just that you need to be smart about where you splurge.
If you splurge on smaller items you will have a big impact on the design without a big impact on the budget!
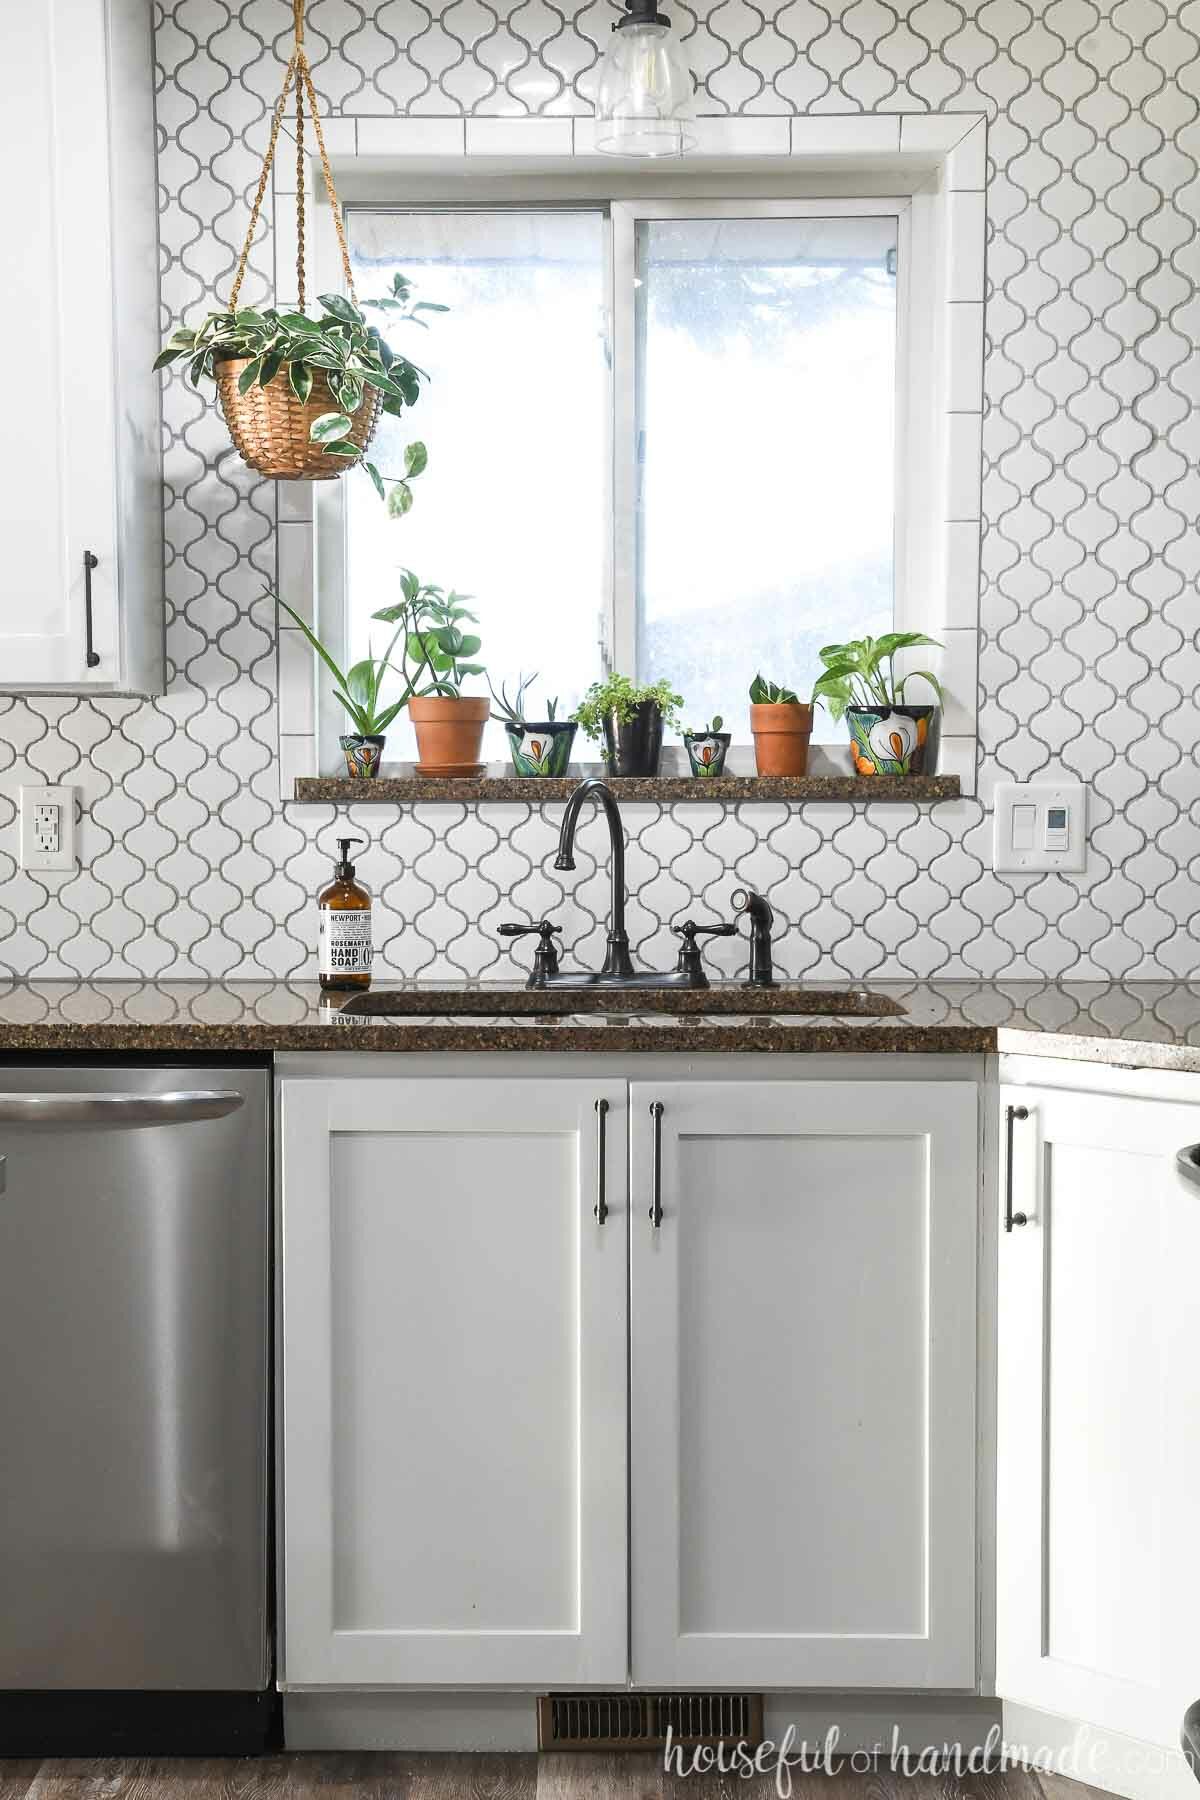
To create a huge statement in this kitchen, we added tile on the entire wall around the open shelves. It looks dramatic and expensive.
We splurged by adding tile to the entire wall instead of just to the bottom of the shelves and used a more expensive arabesque shaped tile which brought in the Mexican flair that my sister-in-law desired.
It has a huge design impact and really brightens up the space. And this splurge added only a few hundred dollars to the budget. Doesn’t it look like it was much more expensive?
Another way we spent wisely was to find a basic vent hood. A simple stainless steel hood with charcoal filters gives the appearance of a high-end vent hood with a small price-tag. And all it needs to do is vent, no need for all those fancy features.
So have fun splurging on a few things to make your budget kitchen remodel feel expensive:
- Have a small kitchen island? Splurge on high end solid surface countertop for the island and use a cheaper option on the rest of the countertops.
- Splurge on a fun center light fixture and save on basic can lights everywhere else.
- Buy a fancy new faucet for your sink and save on the actual sink. The faucet is more visible and has modern features that will make you feel spoiled.
- Splurge on tile/material you used for the backsplash. Then save on material for the flooring since it is a much larger area.

Kitchen Remodel Costs
A big kitchen remodel is not cheap, but I think we managed to make a huge impact on a small budget.
The total budget for this remodel was $8000. This included 825 square feet of vinyl flooring for the entire main floor of the home. It did not include the new fridge, which they decided to upgrade after the kitchen was done.
Here is our budget breakdown. I am sharing the numbers to help you understand where the costs for a DIY kitchen remodel come from. Be aware that prices change all the time and by location.
Also note, there are no labor costs in our budget (except for the island countertop) because we DIYed it all. Sweat equity is a great way to save money!
- Wood for new cabinets/face frames
- 3/4″ birch plywood for cabinet boxes – $375
- Poplar 1x2s for face frames – $200
- 1/2″ baltic birch plywood for drawers – $120
- Wood for new cabinet doors
- Poplar 1×3 for door frames – $465
- 1/4 MDF for center panels – $40
- Maple hardwood
- 6/4 maple for shelves – $150
- 4/4 maple for veggie bin – $175
- 8/4 maple for pedestal – $300
Total spent on wood was $1825.00. This included all wood needed throughout the modern kitchen remodel, including new cabinets, doors and drawers.
- Vinyl plank flooring – $1600 ($1.89 a square foot)
- Cabinet primer & paint – $325
- Drawer slides – $242
- Door hinges – $265
- Knobs & pulls – $65
- Crown molding – $100
- Quartz countertop for island (installed) – $1600
- Pull out trash can cabinet kit – $100
- Porcelain arabesque tile – $325
- Tiling supplies – $200
- Open shelf brackets – $198
- Hood – $200
- Microwave – $325
- Wine fridge – $250
- Lights over island – $330
- Light over sink – $50
The total budget came in at exactly $8000. There were some small purchases that were made here and there not captured in the budget, but in the end we were very close to our target.
If they would have hired out the same kitchen remodel, it would have cost them well over $20,000!
And it gave my brother-in-law the confidence to tackle many more DIY projects in his home. I love create new DIY enthusiasts!
