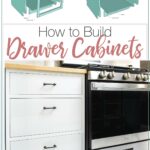
Drawer base cabinets are the type of cabinets you will use to build lower kitchen cabinets, kitchen islands, and bathroom vanities that are just a bank of drawers.
Things that make a drawer base cabinet unique:
- They are sectioned off to hold multiple drawers.
- They do not have a top and instead are covered with a countertop.
- They have a toe kick area.
- They are deeper than other cabinets.
Make sure to read the general how to build cabinets post here so you can see the different types of cabinets, pros and cons of each, a general overview of cabinet parts and general assembly. In this post we will look at specific dimensions and assembly for drawer base cabinets.
This post may contain affiliate links. As an Amazon Associate I earn from qualifying purchases. Click here to read my full disclosure policy.
Table of contents
Things to Consider when Building Drawer Base Cabinets
When you are building your own base cabinets, there are a few things to figure out before making your base cabinet plans. All these items will be the same for your regular base cabinets and your drawer base cabinets.
I have detailed all the things to consider in the How to Build Base Cabinets post and How to Build Cabinets post so make sure to refer to them for all the details. Here is a list of the items to review in those posts and determine before moving on to the drawer base cabinet particulars before.
- What style of cabinet do you want?
- How tall to make your base cabinets?
- How deep to make your base cabinets?
- What type and size do you want your toe kick?
How many drawers to add to your cabinet?
How many drawers you can add to your cabinet depends on the size of your cabinet and how deep you want your drawers. Learn how to build easy DIY drawers here.
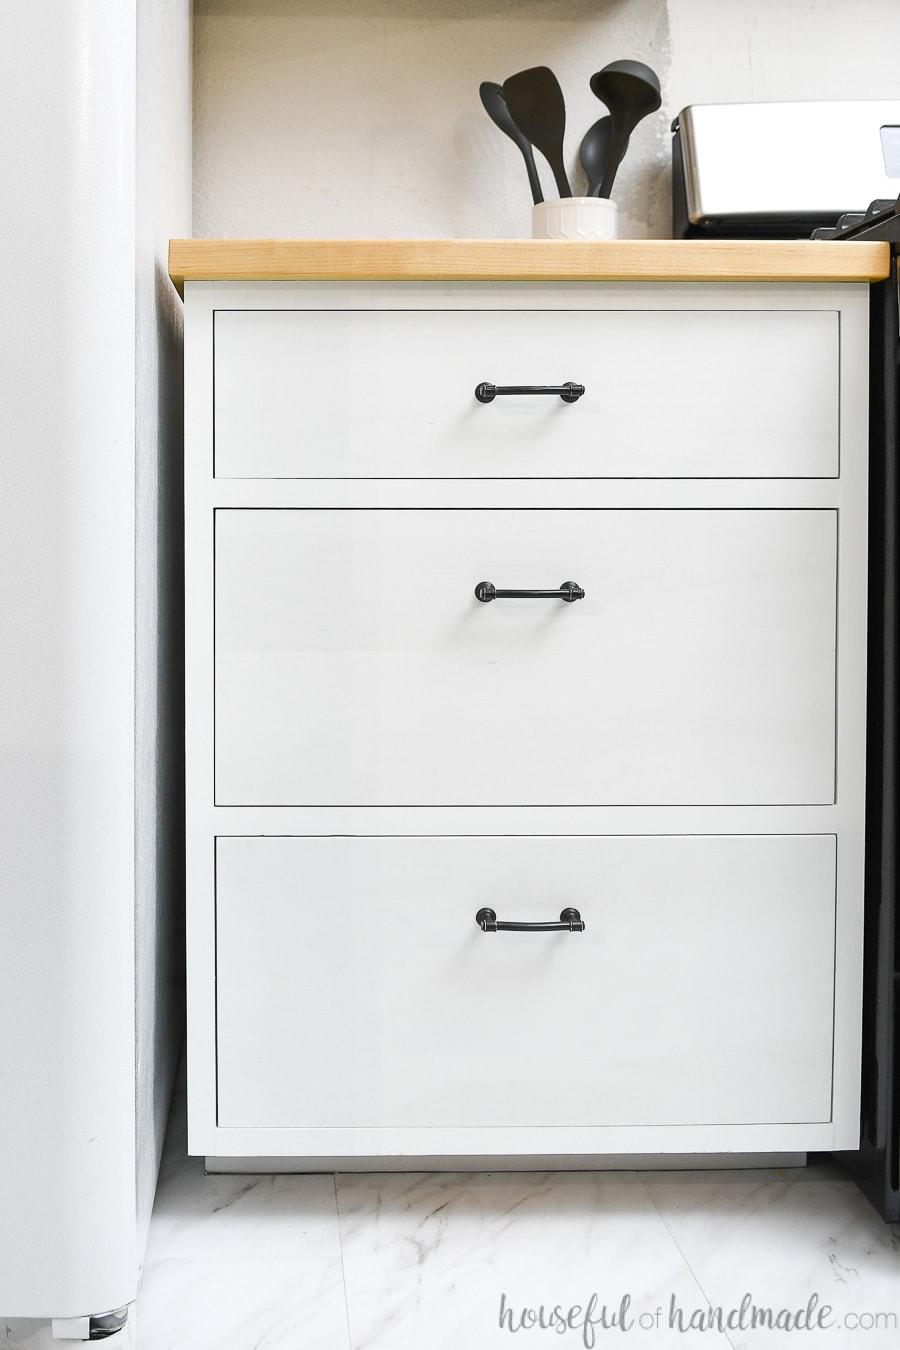
For a standard sized kitchen drawer base cabinet, you can add 4 drawers to get shallower drawers or 3 drawers to get deeper drawers.
Typically in a kitchen, the top drawer of a drawer base cabinet matches any top drawers you have over your other base cabinets. Then the rest of the drawers can be any size you want.
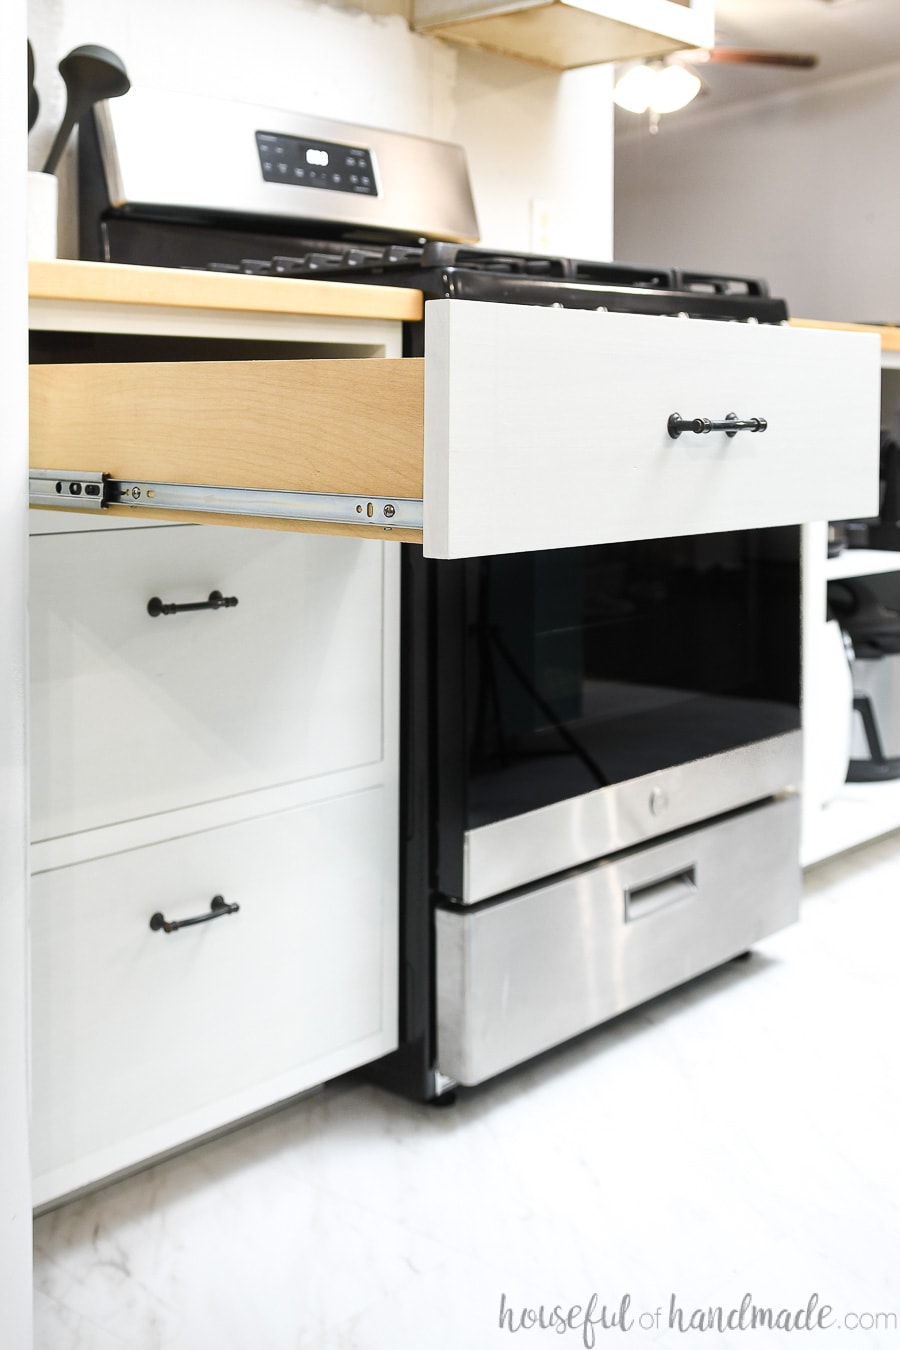
Next to our stove, I opted for 3 drawers. The top drawer matched all the top drawers in the kitchen in depth (I like a 6″ drawer opening with a 4 1/2″ deep drawer in it). Then I split the remaining cabinet opening in half for 2 more deep drawers.
These deep drawers are great for holding items like post and pans, plates, and more.
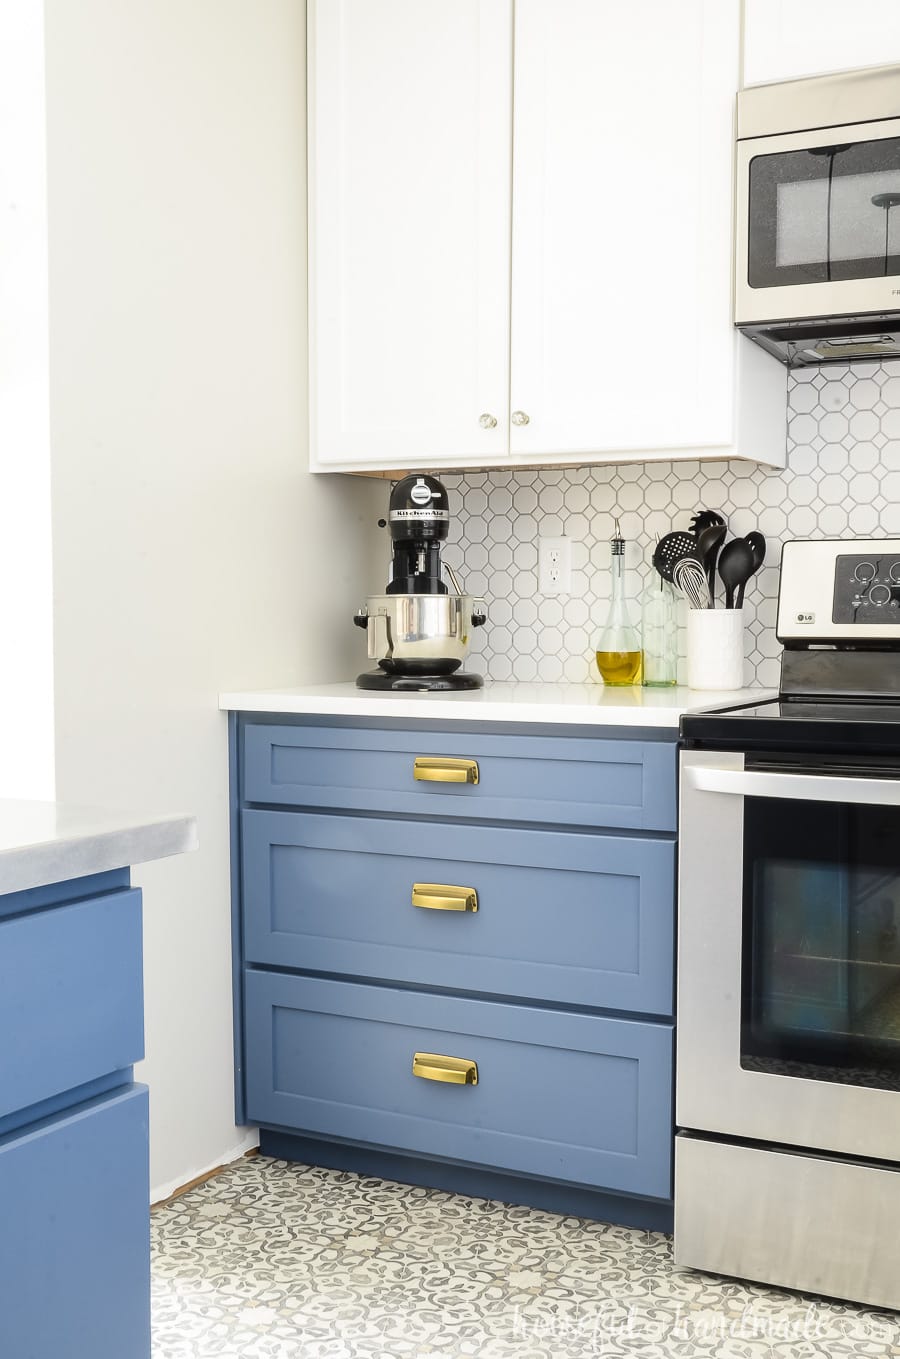
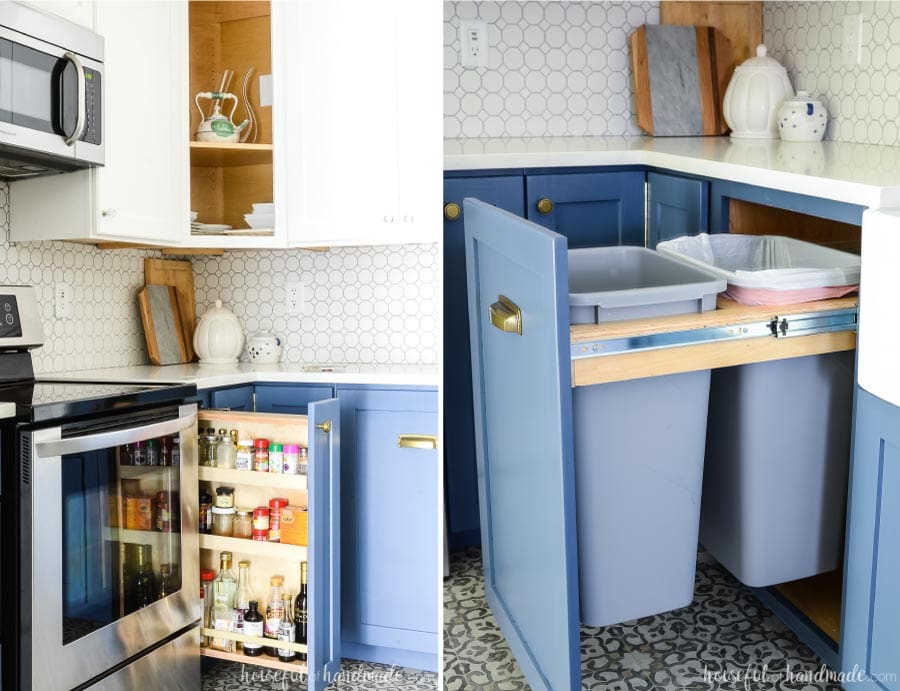
Next to my sink, I like using 4 shallower drawers. I made the top 3 drawers all the same size (to match the top drawers of the kitchen). That left me with a slightly deeper bottom drawer. Not as deep as the 3 drawer stack, but quite nice.
These shallower drawers are great for things like utensils, knives, dish towels, storage bags, and more.
Also, each drawer will require a set of drawer slides and a drawer box. Drawer slides can be a big expense in a kitchen build and more wood is required for each drawer box.
So think about your budget as you plan your kitchen layout. The more drawers you add, the more money it will cost to build.
Choosing the right Drawer Slides
Your drawers will require drawer slides to make them useable. There are many options when it comes to drawer slides and the actual slides can vary in cost from $5 to $40 or more a pair.
The first thing you need to decide before purchasing your drawer slides, is the extension. Extension refers to how far out the drawer will be when the slide is fully extended.
You can find drawer slides in the following extensions:
- 3/4 extension
- Full extension
- Over travel
3/4 Extension Drawer Slides
The 3/4 extension slides are the least expensive and what was typically used in older kitchens. When the drawer is fully slide out, 1/4 of the drawer will remain in the cabinet. This may sound like plenty but there are other things to consider.
If the drawer front is inset into the cabinet, the drawer starts 3/4″ into the cabinet carcass. You will also have a countertop overhang that can block another 1-2″ of the cabinet box.
Using the 3/4 extension slides may mean you only have easy access to 1/2 of your cabinet drawer.You will need to decide if the inconvenience of items hiding in the back of the drawer is worth the cost savings.
Full Extension Drawer Slides
Full extension drawer slides will fully extend so the rear of the drawer is close to the front of the drawer slide when fully extended. With inset cabinet doors, you will have approximately the back 1/2″ of the cabinet in the carcass.
Full extension drawer slides are common in most modern kitchens because it allows easy access to all areas of the drawer. You can utilize drawer dividers to organize your drawers without worrying about reaching items in the back.
These drawer slides can range in price from $15-$30 depending on the length of the slide and other features you choose (as noted below).
Over Travel Drawer Slides
Over travel drawer slides will allow the drawer to come out of the cabinet carcass 1-2″. This will allow complete access to the entire drawer without worrying about inset doors or countertop overhang.
These slides can cost a few dollars more than full extension drawer slides. You can decide if having easy access to even the farthest back parts of the drawer are worth the extra cost.
I used over travel drawer slides on the pull out trash can cabinet in our kitchen to make it easy to remove the trash can as needed. They would also be helpful for a pull out spice cabinet that sits next to an oven since ovens usually are a few inches deeper than the cabinets.
More Drawer Slide Features
After deciding what extension you want for your cabinet drawers, you can start looking at other features as well. I will not go into full depth on these features in this post but will be doing a post about building cabinet drawers later that includes them.
- Soft close
- Weight limits
- Mounting style (side, center or under mount)
- Finish
These different features can change the cost of your drawer slides so you will want to decide what features you want to fit in your own budget.
And for more information on drawers, check out this post for tips & trick on how to install cabinet drawers.
Drawer Base Cabinet Plans
Once you have figured out the answers to the questions above, it it time to create plans for your own drawer base cabinets! I will walk you through how to create plans for your custom drawer base cabinets and so you will be ready to start building.
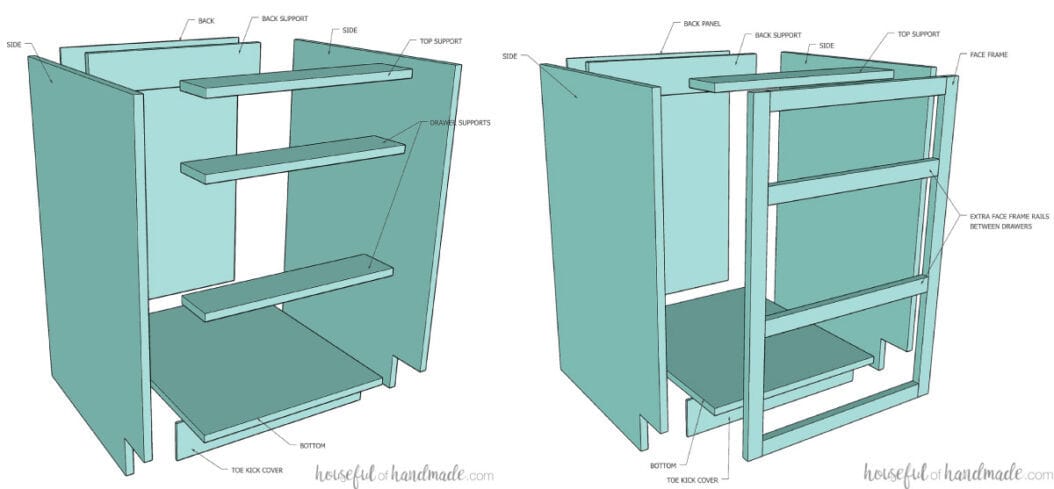
Each drawer base cabinet will have the following parts:
- 2 side pieces
- 1 bottom piece
- 1 back piece
- 2 support pieces
- Optional: additional support piece to go between each drawer for frameless base cabinet
- 1 toe kick cover piece
- Can be cut individually for each cabinet or better yet, cut one long cover to go over the entire toe kick area on each bank of cabinets as one piece
- Optional: toe kick
- Optional: face frame
- 2 face frame stiles
- 2 face frame rails
- Additional face frame rails to go between each drawer
To build your drawer base cabinets, you will want to use 3/4″ plywood for the most of the cabinet box. I recommend using 1/4″ plywood for the back and toe kick cover to save money and make your box lighter.
To finish off the front of the plywood edges, you will need to either use edge banding to create a frameless cabinet or a face frame to create a face frame cabinet.
Face frames are typically built from 1×2 boards (which are actually 3/4″ thick and 1 1/2″ wide). If you want a larger more noticeable frame, you can use wide boards.
Now Available
PDF Cabinet Building Guides
Create Custom Cabinets Easily
Our cabinet building guides will help you build your own cabinets in any size! PDF guide can be printed or are easy to view on your phone or tablet. Includes cut list calculations, shopping list, step-by-step instructions, 3D diagrams, plywood layout tips and a bonus SketchUp file!

Face Frame Drawer Base Cabinet Cut List
Use the following chart to figure out the dimensions for your all the piece of your face frame drawer base cabinets.
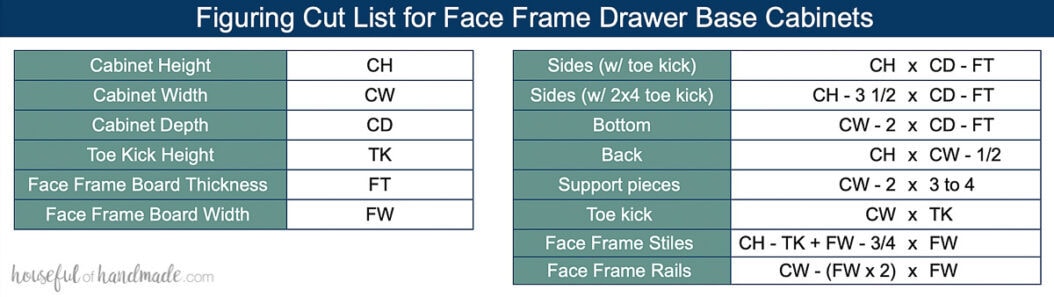
Important notes for face frame cabinets:
- The face frames hang over the sides of the cabinets 1/4″. This makes it easier to install, but if the side of your drawer base cabinet is going be visible, you will need to add a side panel (use 1/4″ plywood and cut it the exact size of the base sides and tack it on) or adjust your measurements to make up for the 1/4″ extra on one side.
- The back panel is not set into the back with a groove, instead it is just nailed on. Because the cabinet is built in, you will only see the back panel if the side of a cabinet is visible. Fix this with the above mentioned panel (cut it 1/4″ deeper to cover the back panel) or router in grooves and adjust the back panel size to fit in those grooves.
Once you figure out the dimensions for all you pieces, you will need to cut them out.
Frameless Drawer Base Cabinet Cut List
Use the following chart to figure out the dimensions for your all the piece of your frameless drawer base cabinets.
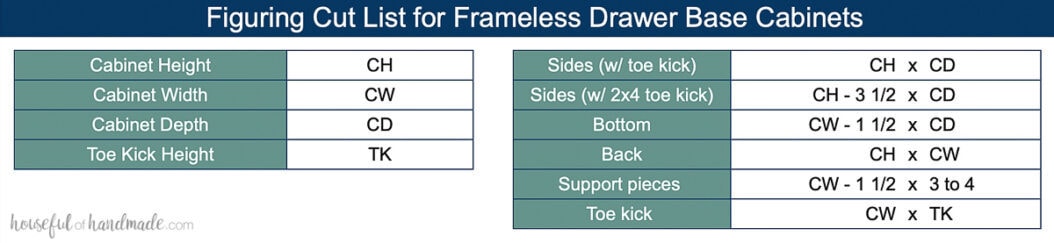
Important notes for frameless cabinets:
- Plywood is not actually 3/4″ thick, it is slightly smaller. And not all plywood is the exact same. I would recommend you tightly press two pieces of the plywood you are using together and measure it. You can substitute this measurement for the 1 1/2″ you subtract for the bottom and support pieces. This will give you more exacting cabinet widths.
- The back panel is not set into the back with a groove, instead it is just nailed on. Because the cabinet is built in, you will only see the back panel if the side of a cabinet is visible. If you are going to have visible cabinet sides, router in grooves and adjust the back panel size to fit in those grooves.
How to Build a Drawer Base Cabinet Box
Tools & Materials
Recommended Tools:
- Circular saw with guide track or Table saw
- Miter saw
- I recently upgraded to this larger sliding miter saw (watch for it to go on sale), but all my projects before were built with this inexpensive miter saw that I loved.
- Pocket hole jig
- Drill
- Impact driver (optional, but I love not having to switch bits with the drill)
- Squares
- Measuring tape
- Clamps
- Right angle clamps and face frame clamps are super helpful
I go into detail on how to build cabinets without expensive tools here. These were all the tools I used to build my first kitchen cabinets.
Supplies:
- Wood products:
- 3/4″ plywood
- 1/4″ plywood
- Optional: 1x boards for face frame cabinets
- Optional: Plywood edge banding for frameless cabinets
- Optional: 2×4 boards for toe kick base
- Wood glue
- If using pre-finished plywood, use melamine glue to get strong joints
- 1 1/4″ pocket hole screws
STEP 1- Cut out the Pieces
Cut out your pieces according to the cut list you determined above.
If you are building drawer base cabinets with a toe kick, use a circular saw or jig saw to notch the toe kick out of the front of both side boards.
If doing a 2×4 base for cabinets, you do not need to notch out the sides, instead the sides are cut 3 1/2″ shorter to allow for the cabinet to sit on top of the 2×4 base.
Instead of making lots of little 2×4 bases, I like to make 1 big base for all the cabinets that will be next to each other.
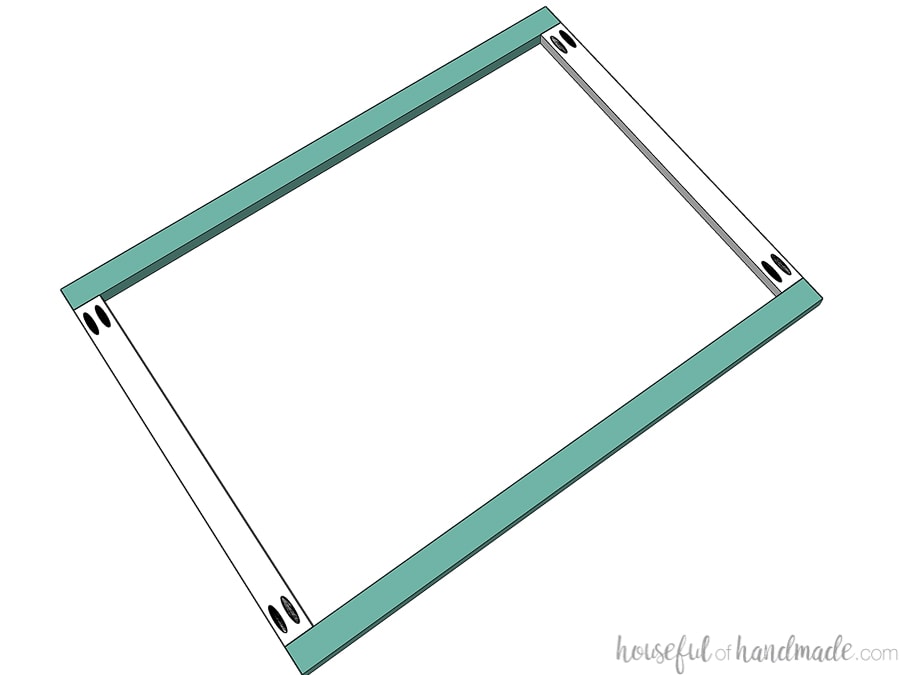
STEP 2- Assemble the Cabinet Box
Make sure to read the Tips for a Perfect Cabinet Box section in this post for helpful tips.
Drill pocket holes set for 3/4″ material in the sides of the bottom piece for your drawer base cabinet. You need to have pocket holes approximately every 5-6 inches for strong cabinet boxes.
For face frame cabinets: you will also need to drill pocket holes in the front of the bottom piece and both side pieces to attach the face frame later.
Line the bottom piece up with the top of the toe kick (or bottom of the side board if doing a 2×4 base for the toe kick). Secure with wood glue and pocket hole screws. Use corner clamps to make sure the piece is joined at a 90 degree angle.
Repeat with the other side.
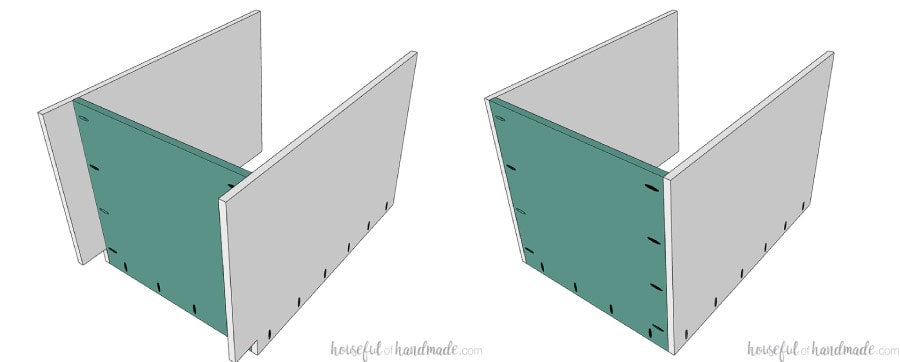
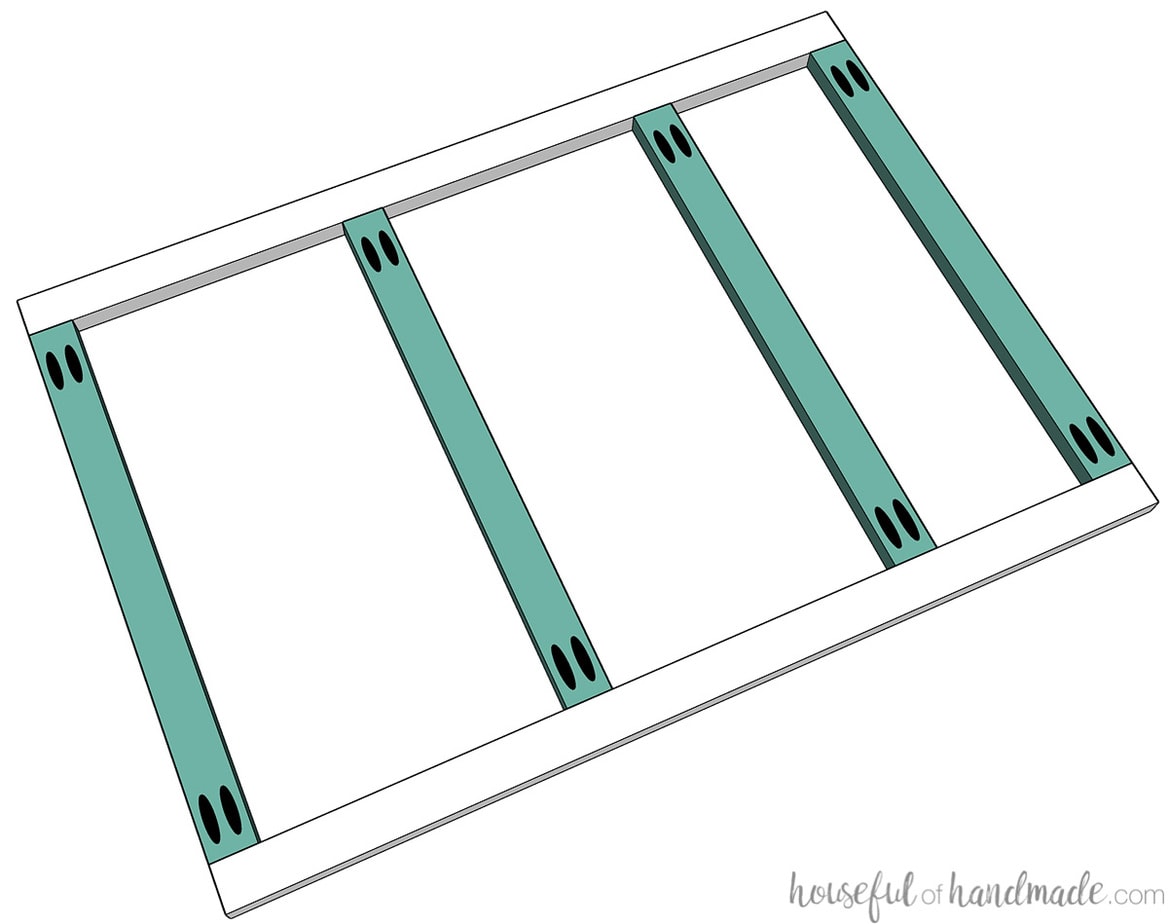
Attach 2 support pieces. These will help hold the box square and offer support.
Use scraps of plywood leftover after cutting the sides and base pieces to cut them. They can be 3-4 inches thick.
One support piece will be along the top of the box and one will be along the top back. Attach them with pocket holes using 1 1/4″ pocket hole screws.

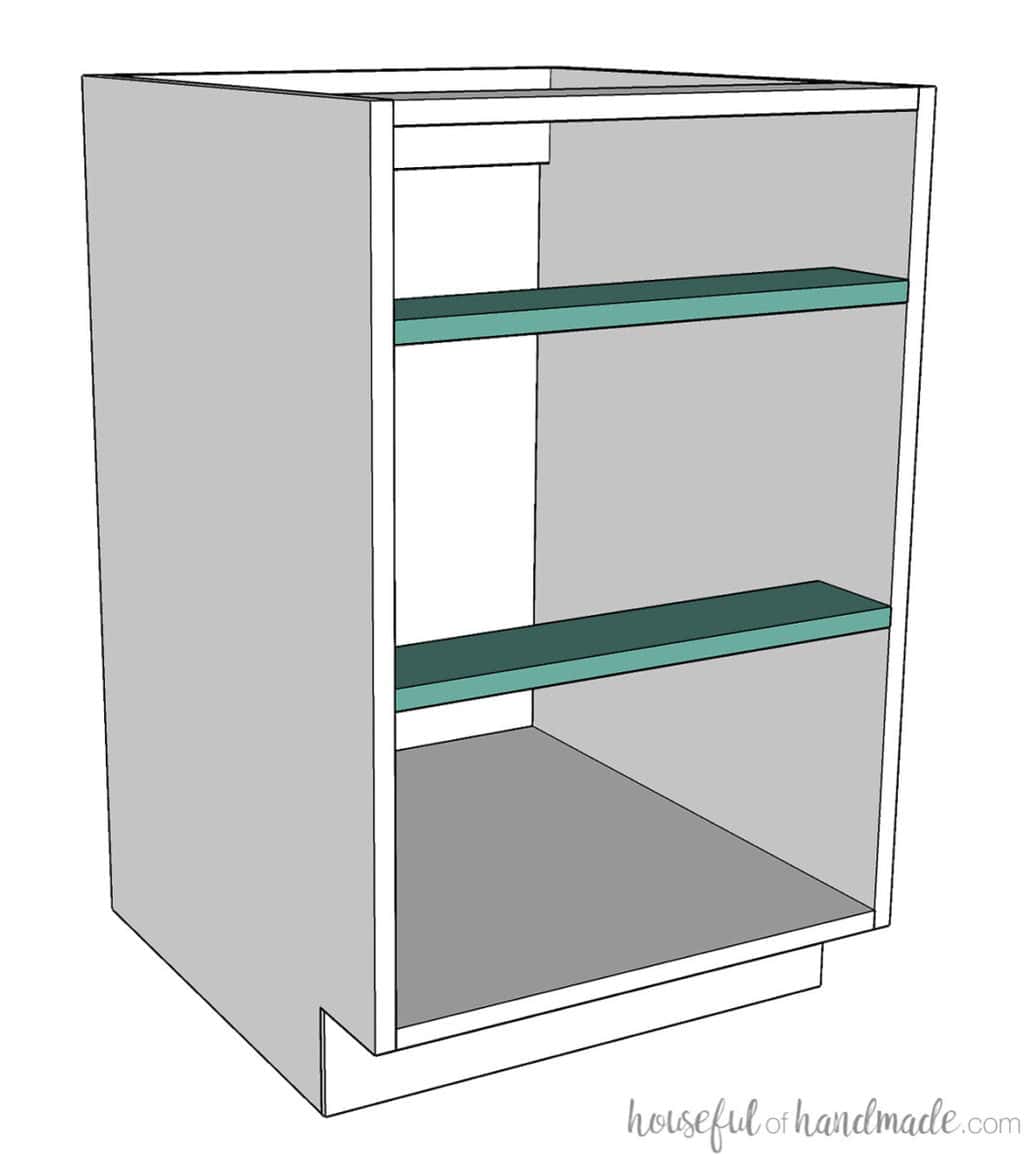
If you are building a frameless cabinet with drawers, use additional support board to separate each drawer box.
You can make the drawer as deep or shallow as you want, but you need at least 1/2″ of extra height in your drawer area than the size of your drawer box.
I prefer to have 1″ of extra height over the size of my drawer. That way any items in the drawer have more headroom in case they protrude above the drawer box so they do not cause the drawer to get stuck.
So if you want a 4 1/2″ deep drawer (roughly 4″ of space after inserting the drawer base), you need to install the drawer support piece at least 5″ below the top support, but preferably 5 1/2″.
Then repeat with remaining additional supports until you have separated the entire base into drawer sections.
Attach the back with wood glue and finishing nails.
If the sides of your cabinet are going to be visible, you may want to router a groove into the back to set the panel inside. Or you can make a side panel slightly bigger to cover the sides and back panel together.
Also, you can cut and attach the toe kick front now, or cut it large to cover an entire bank of cabinets.
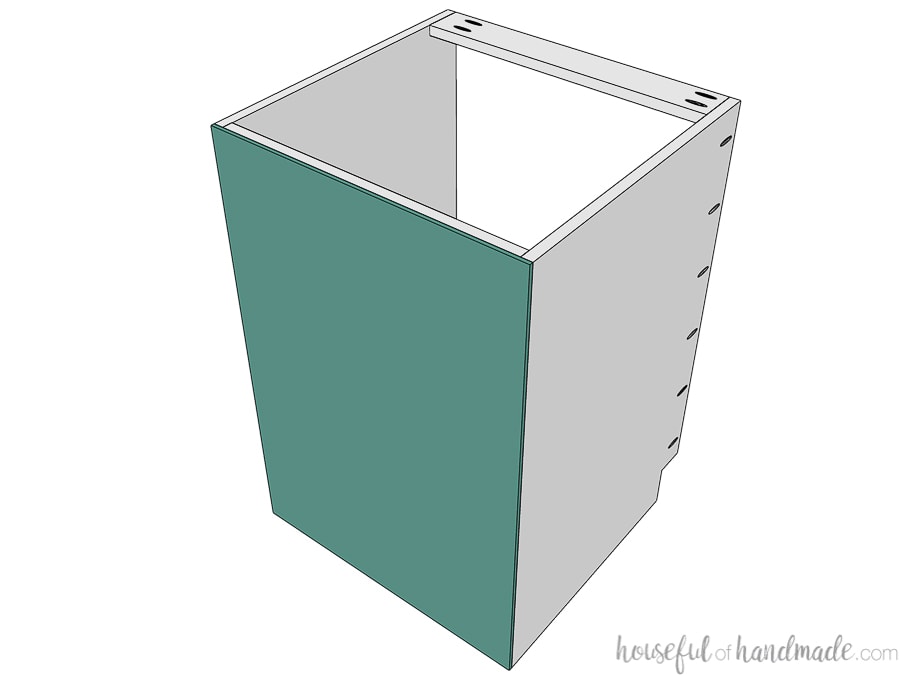
Now your drawer base cabinet carcass is all done!
For frameless cabinets, cover the front of the plywood with edge banding.
For face frame cabinets, proceed to the next steps.
STEP 3- Assemble the Face Frame
Cut the rails and stiles for your face frame. Drill holes set for 3/4″ material in each end of the rails.
Attach the rails between the stiles so they are flush with the top or bottom. Use wood glue and 1 1/4″ pocket hole screws.
Use a face frame clamp to keep the frame front flush and tight while attaching them.
If you are building a face frame base cabinet with a drawer, cut a 3rd face frame rail and secure it the same way you did the top and bottom rails.
You can make the drawer as deep or shallow as you want, but you need at least 1/2″ of extra height in your drawer area than the size of your drawer box.
So if you want a 4 1/2″ deep drawer (roughly 4″ of space after inserting the drawer base), you need to install the drawer rail piece 5″ below the top support.
Now the face frame is ready to attach to the front of your cabinet box.
The face frame will need to sit 1/4″ over each side of the cabinet. Also make sure the top is flush with the top of the cabinet box and the top of the bottom rail is flush with top of the bottom.
Add a bit of wood glue to the front of the plywood, then use the pocket holes you already drilled in the sides and base of the cabinet to secure the face frame.

STEP 4- Add drawers and drawer fronts
I like to build my cabinet drawers from 1/2″ plywood. Plywood is straight and can be cut easily to any size so it makes wonderful drawers.
You can build easy DIY drawers 3 ways here. None of these drawers requires fancy joints but they are all very strong.
Then learn to install cabinet doors here.
To cover the front of you drawer you will want a drawer front. Build these to match your doors. Learn to build your own DIY shaker style cabinet doors or easy slab cabinet doors from plywood.
And lastly, learn how to attach drawer fronts here.
Your cabinet is now built and ready to install.
Tips for a Professional Cabinet that are Easy to Install
1- Router tiny chamfers on the side edges of the face frames. That way, if the cabinets do not sit perfectly flush during install, it is not as obvious.
2- For any exposed sides of cabinets, you will want to cut 1/4″ panels to cover the sides. This will hide the pocket holes and make the side of the face frame flush with the cabinet.
3- Cut the toe kick panel to cover an entire section of cabinets instead of individual cabinets to eliminate another edge that needs to be lined up perfectly.
4- Build your cabinet box with pre-finished plywood, then all you have to do is paint/finish the face frames to have your cabinets ready to install. See how we painted our unfinished cabinets here.
5- Add a center stile for large base cabinets to give extra support to the center and make installing cabinet doors easier (no need to stress about the center reveal as much).
And if there are any questions or things I forgot, leave a message and I will do my best to answer. I want to give you the confidence to build your own cabinets too!
