
Remodeling a bathroom on a budget can be done! I know, this is the second one we’ve done in our current home (you can check out the master bathroom remodel here).
One of the priciest parts of any bathroom is the vanity. But you can build one yourself and save tons!
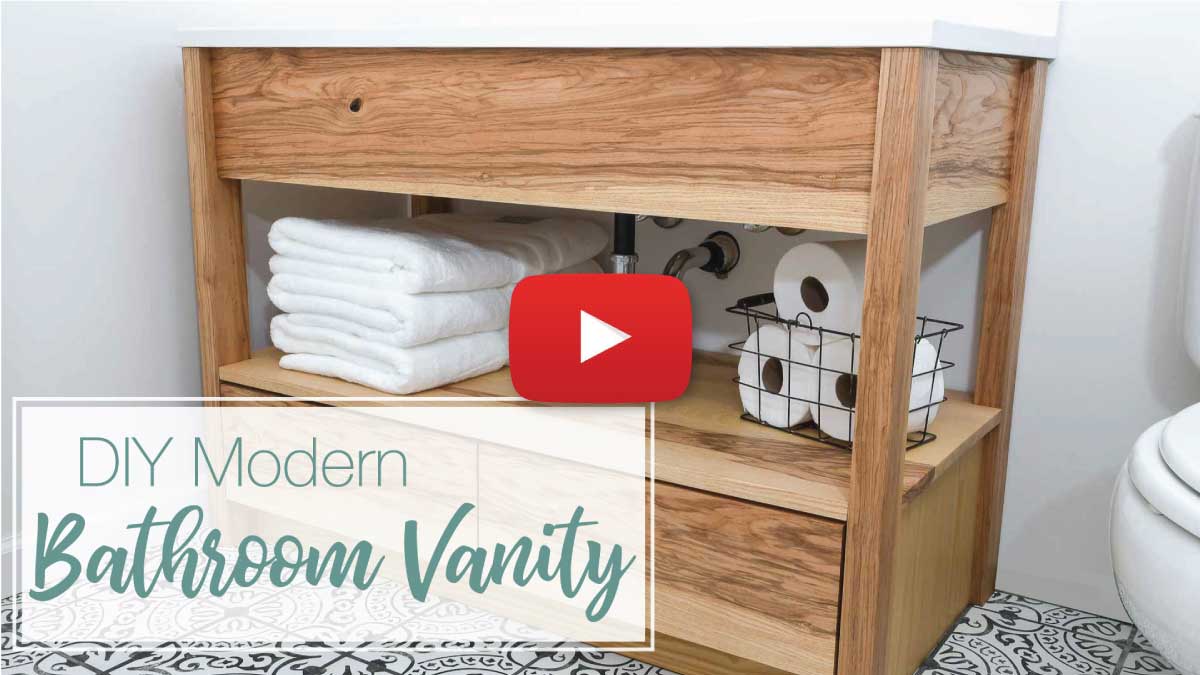
I partnered with Kreg Jig, to share the build plans for this 42″ DIY bathroom vanity with bottom drawers. Now you can build your own bathroom vanity and save money too!
This post may contain affiliate links. As an Amazon Associate I earn from qualifying purchases. Click here to read my full disclosure policy.

Most people wouldn’t dream about building their own bathroom vanity, but after building the kitchen cabinets in our recent kitchen remodel, I learned that cabinets are not as hard as one would think.
The trick to making a bathroom vanity, you need to take your time to be precise.
Cut all your boards straight and ensure everything comes together at a 90 degree angle. Then you will have a wonderful bathroom vanity that you can show off to everyone!

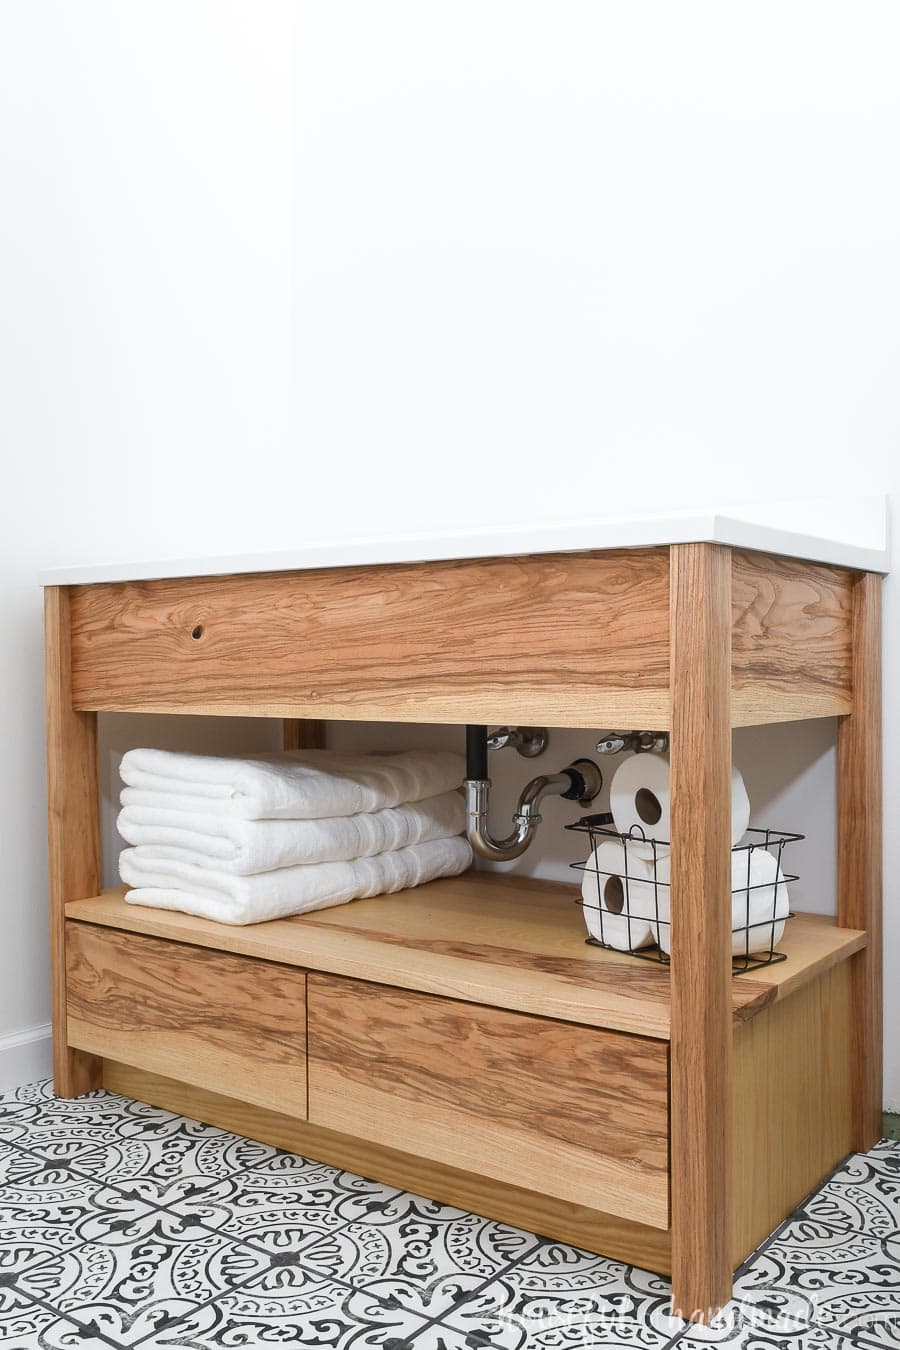
DIY Modern Bathroom Vanity
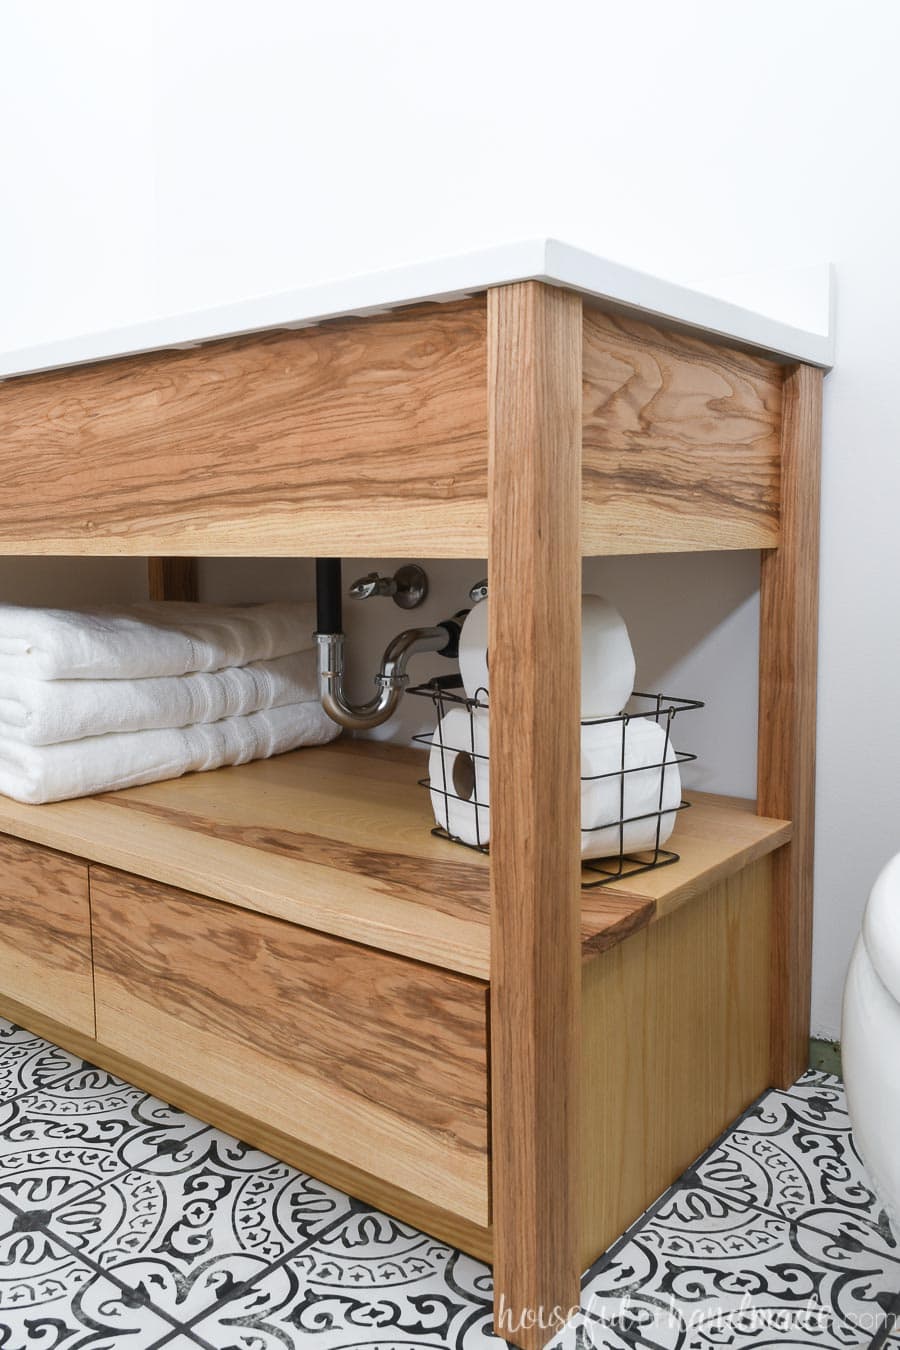
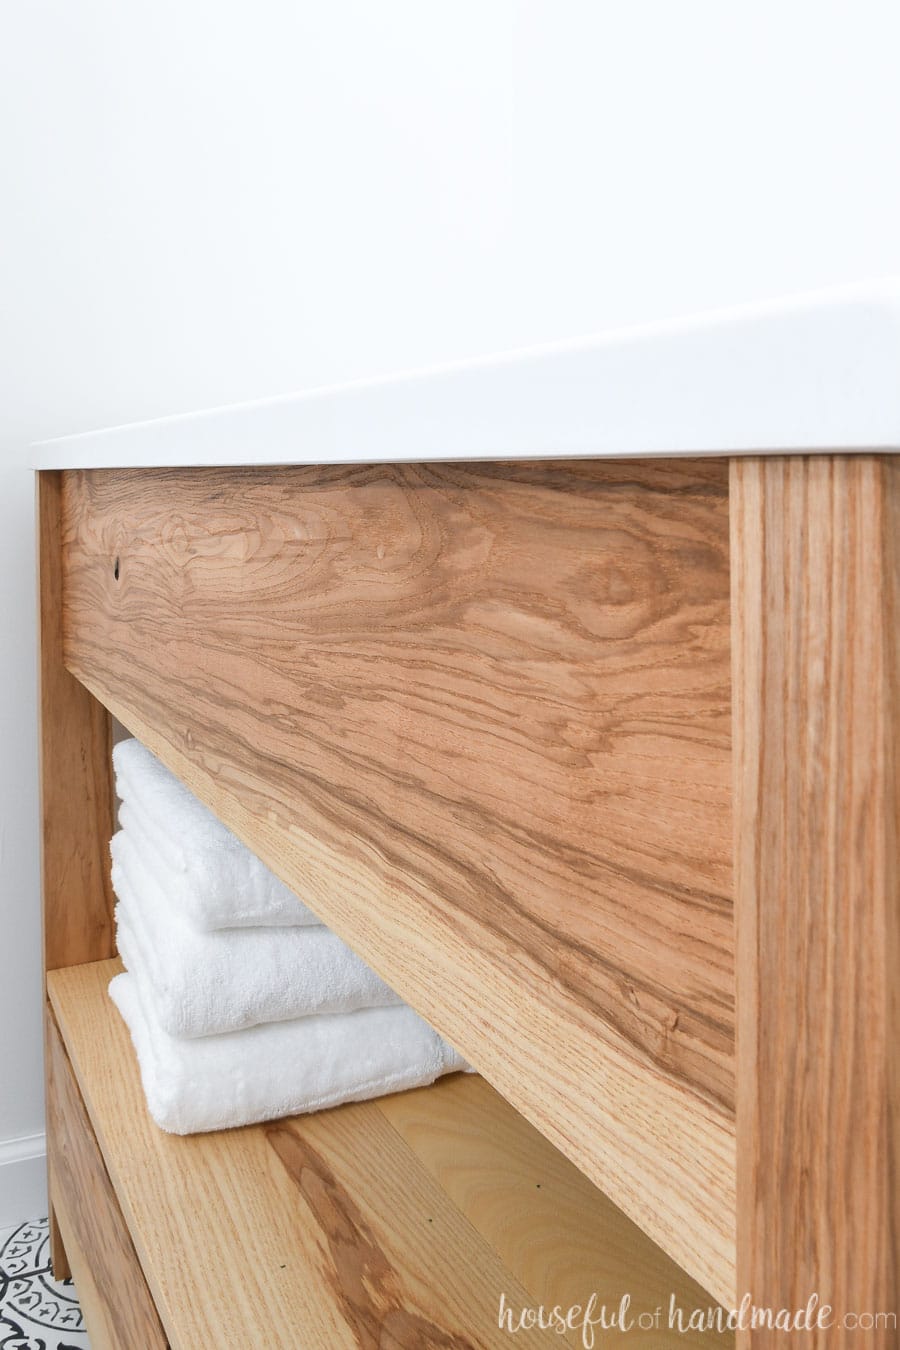
We wanted a space that was clean and modern, with a little rustic goodness thrown in. And what is more modern than open shelves?
Because this bathroom is our guest bathroom, the idea of open shelves is even more amazing than just for looks. You can have towels and other necessities stored in the open so your guests don’t feel weird about going through your drawers.
The other reason I love open shelves in a small bathroom is because they help make the space feel bigger. Instead of a giant closed in cabinet, they allow for more space in the room visually.
But we also needed storage!
Even though it is a guest bathroom, I wanted lots of storage!
Sometimes I use the storage in the guest bathroom to store things I don’t need to use very often. It a bonus spot for those weird things I need a couple times a year!
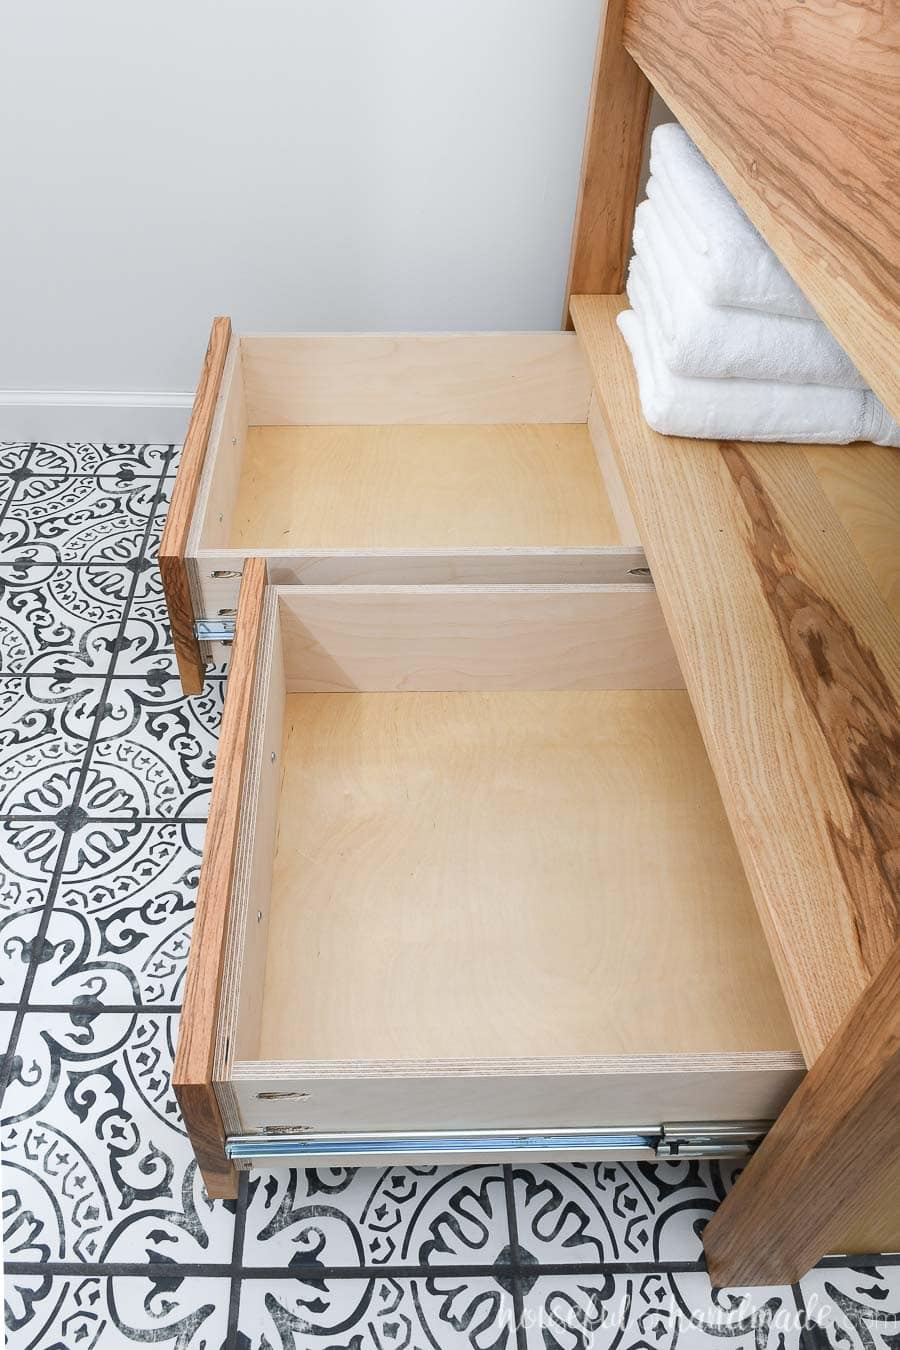
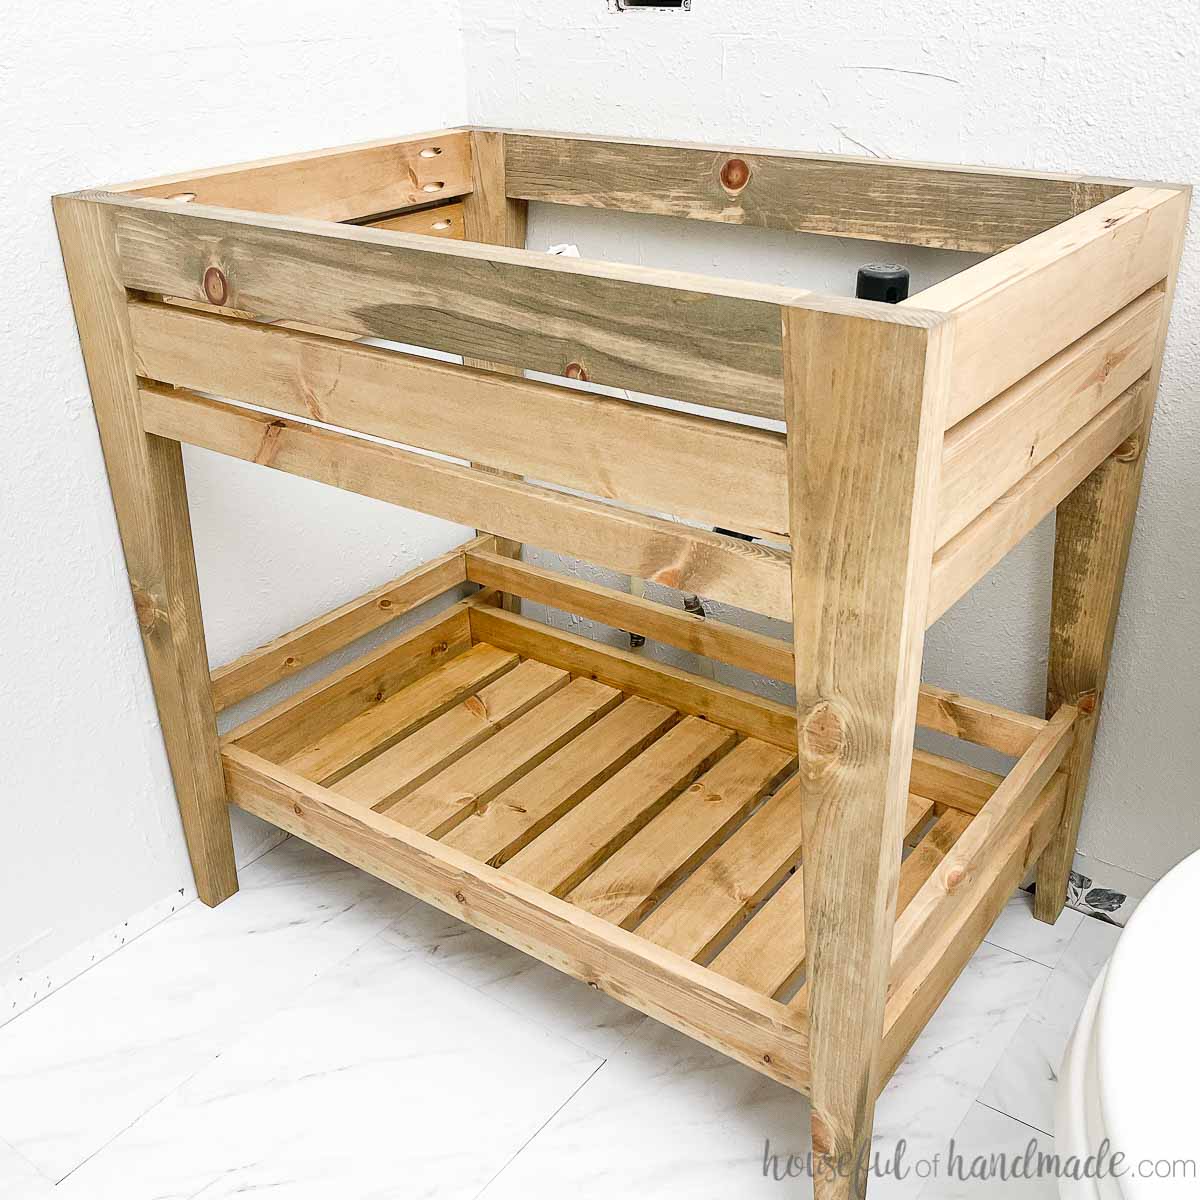
To keep with the modern bathroom vanity feel, we put the drawers on the bottom of the cabinet instead of the top and I love it so much more!
Putting vanity drawers on the bottom means the drawers can be larger because you don’t have to leave room for the sink and plumbing.
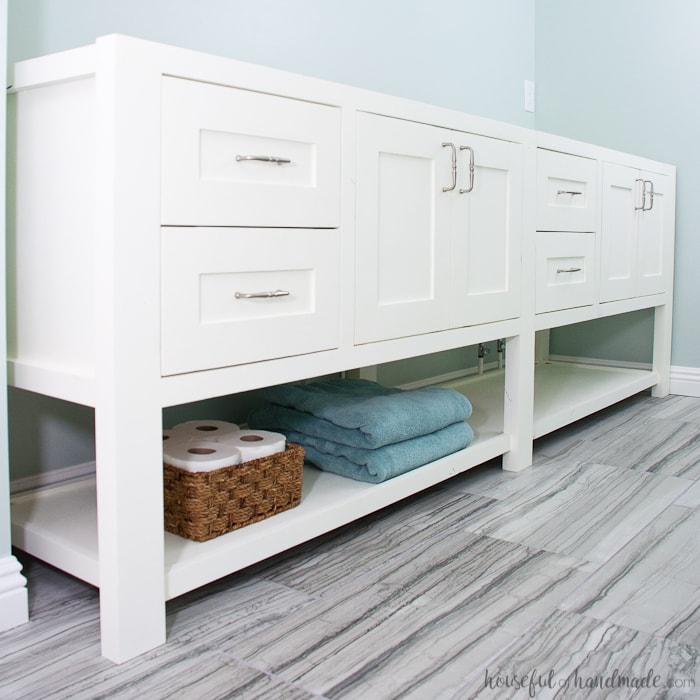
Just look at all that storage space!
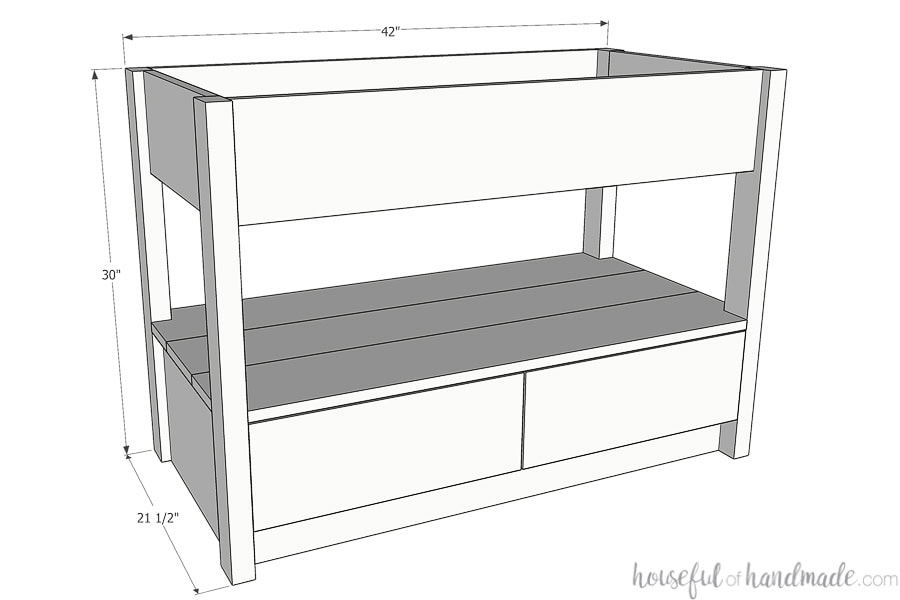
42″ Bathroom Vanity
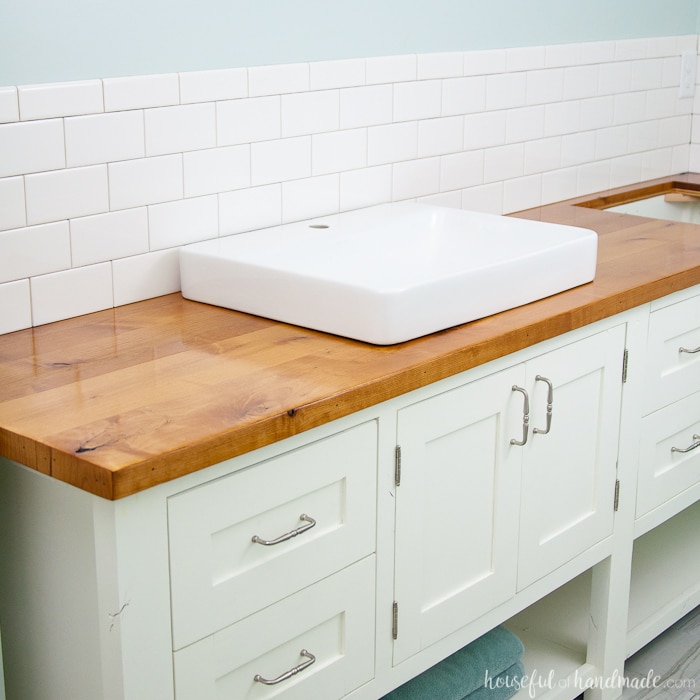
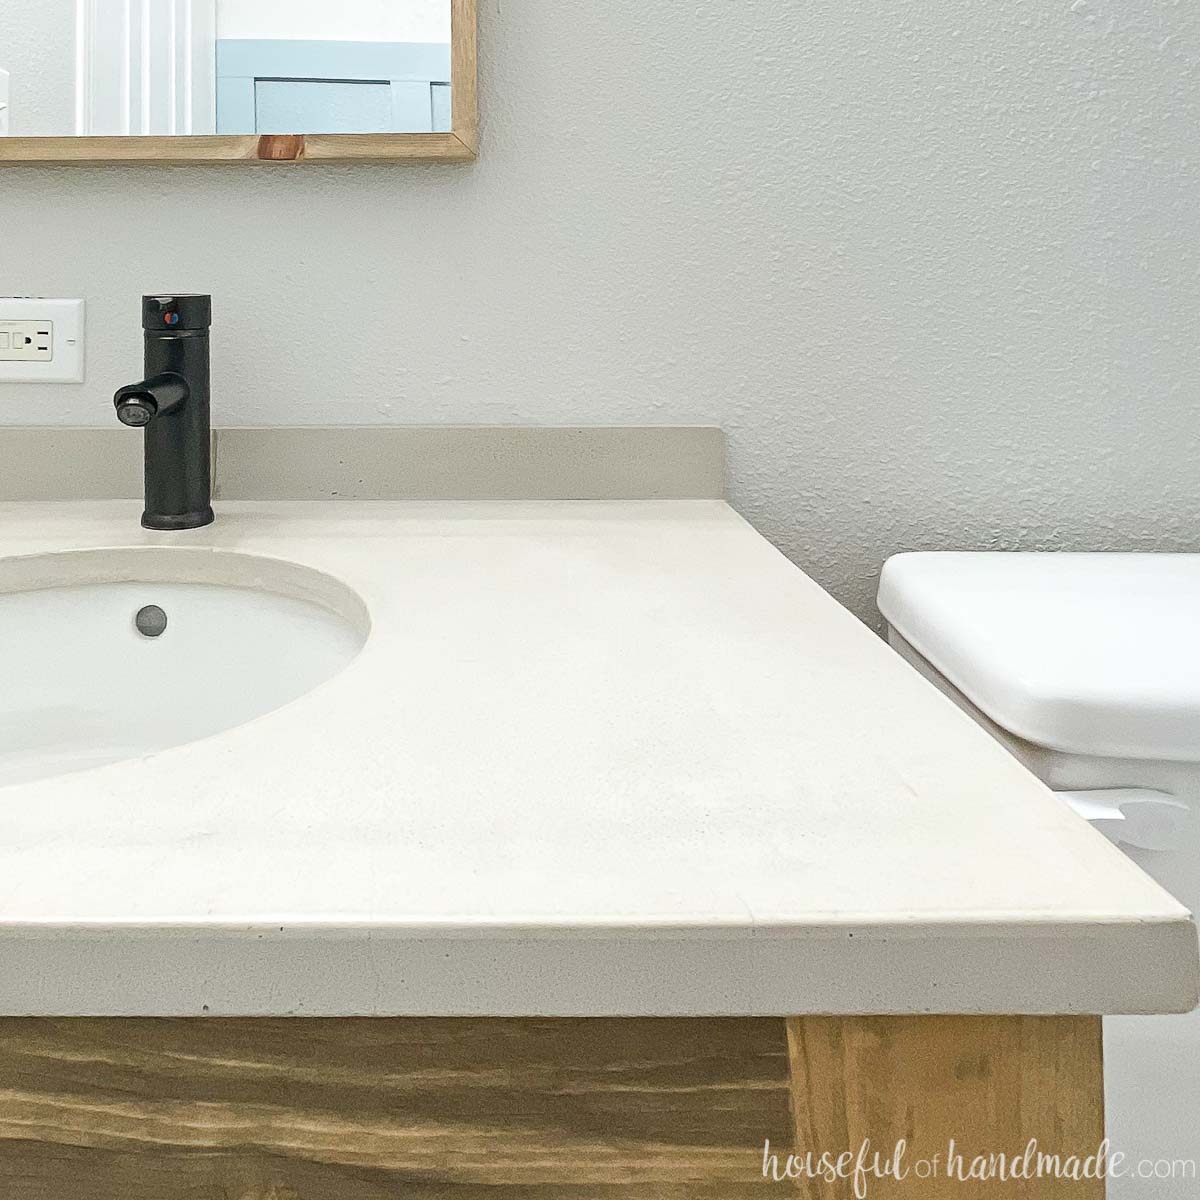
To keep everything on a budget, I designed this DIY bathroom vanity to be a standard 42″ bathroom vanity. That way, it can fit an off-the-shelf vanity top.
The cost saving of buying a pre-made vanity top was great. But I also love that as soon as we finishing installing the bathroom vanity, we can quickly install the sink and be ready to use it.
It makes this bathroom vanity project truly a weekend project!
We chose this simple white vanity top with seamlesss sink. I love the clean lines and it almost disappears into our white walls. So now the beautiful wood of the vanity is the focal point.
Need a different size? Get the PDF build plans for this vanity in 30″, 36″, 48″ and 60″ here.

More Bathrom Remodel DIYs
Here are some more DIY vanities and even vanity tops you can DIY.
How to Build a Bathroom Vanity with Drawers
Tools & Materials
Recommended Tools:
- Miter saw
- I recently upgraded to this sliding miter saw (watch for it to go on sale), but previously used this inexpensive miter saw that I love.
- Circular saw with guide track
- Jig saw
- Pocket hole jig
- Finish nailer
- Drill
- Impact driver (optional, but I love not having to switch bits with the drill)
- Speed square
- Right angle clamp
- Face clamps
- Sander
Supplies:
- Lumber
- 1×8 boards, 8′ long
- 2×3 boards, 6′ long
- 3/4″ thick plywood, 4×4 sheet
- 1/2″ thick plywood, 2×4 sheet
- 1/4″ thick plywood, 2×4 sheet
- 1 1/4″ pocket hole screws
- 1″ pocket hole screws
- Wood glue
- (2 pair) 18″ drawer slides
Overall Dimensions
The finished vanity is 30″ tall and 21 1/2″ deep. The vanity I build is 42″ wide.
I also have plans for a 30″, 36″, 48″ and 60″ vanity.
Cut List
Cut out the pieces according to the build plans. Get the 42″ bathroom vanity plans on Kregtool.com.
Get the PDF build plans for this vanity in 30″, 36″, 48″ and 60″ here.

Because bathrooms tend to have a lot of water in them, I prefer to use hardwoods to build vanities. Hardwoods will hold up better over time, and we all know how much use a bathroom can get.
I found this beautiful ash wood with lots of color variation at a local lumberyard and used an ash plywood.
STEP 1- Build the sides & bottom
Drilling pocket holes set for 3/4″ material in both ends of the skirt and panel pieces.
Attach them to the legs with 1 1/4″ pocket holes so the skirt is flush with the top and inside of the legs and the panel is flush with the bottom and inside of the legs.
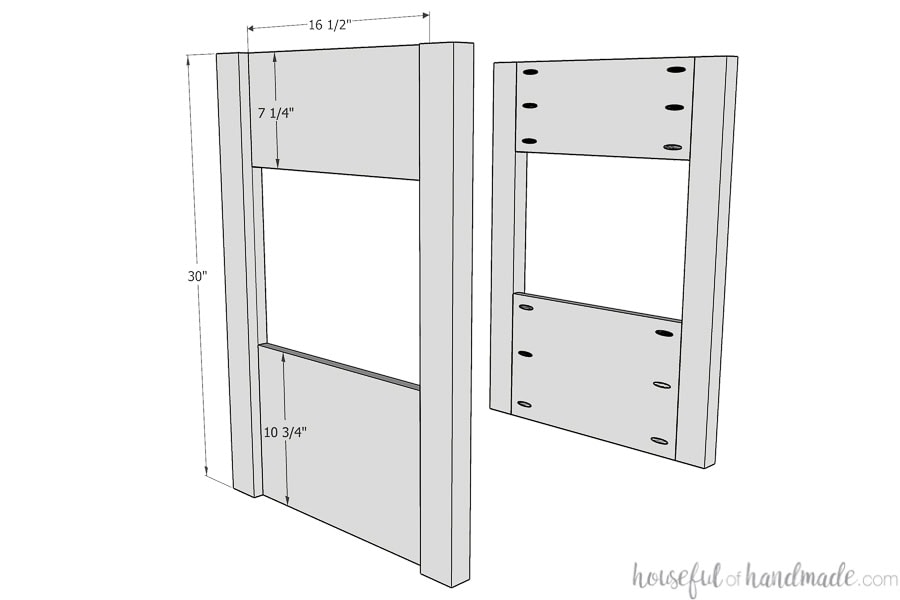
Drill pocket holes in the sides and top of the toe kick.
Attach the toe kick between the assembled sides so it is set back from the front 2 1/2″ (flush with the edge of the side panel) using 1 1/4″ pocket hole screws.
Drill pocket holes set for 3/4″ material in the sides of the base piece. Be aware of where the toe kick will be so you make sure your pocket holes are not in the same spot.
Attach the base piece to the sides so that the back is flush with the back (it’ll be set back from the front 3/4″) using 1 1/4″ pocket hole screws.
Also, attach the base to the pocket holes drilled in the toe kick with 1 1/4″ pocket hole screws.
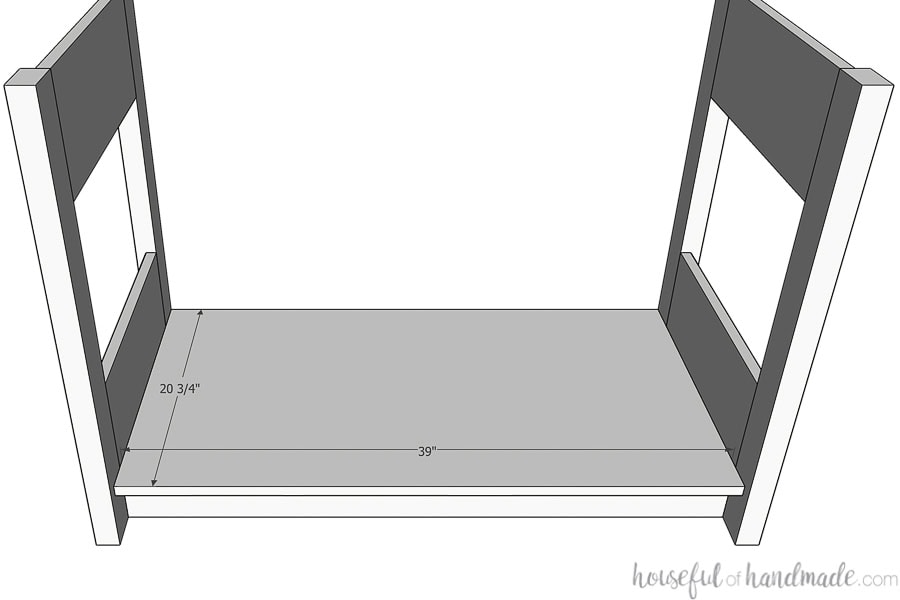
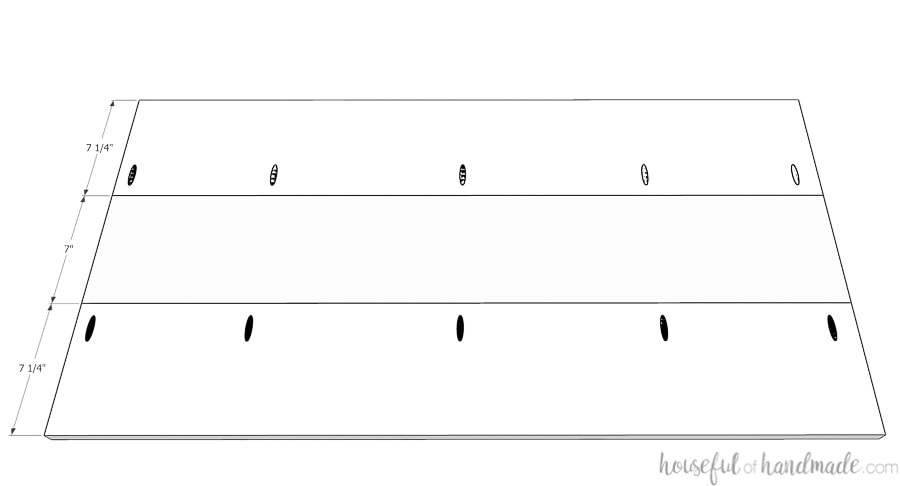
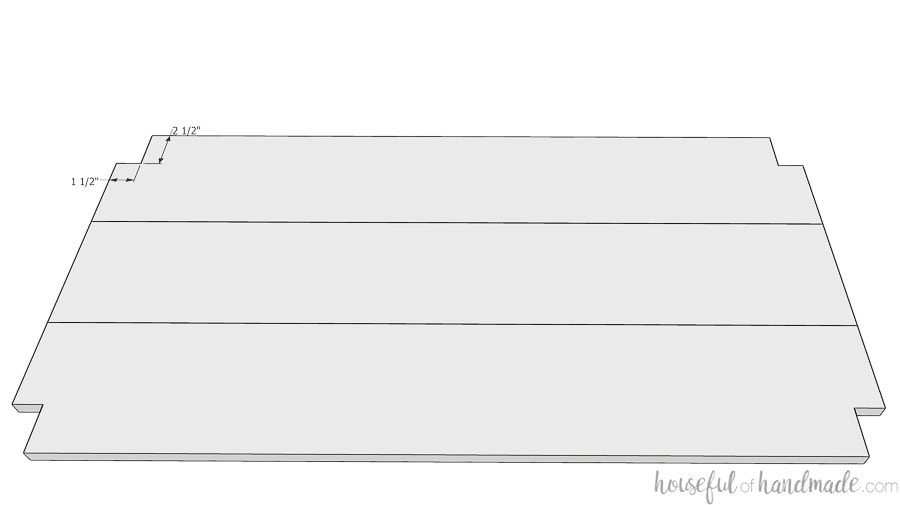
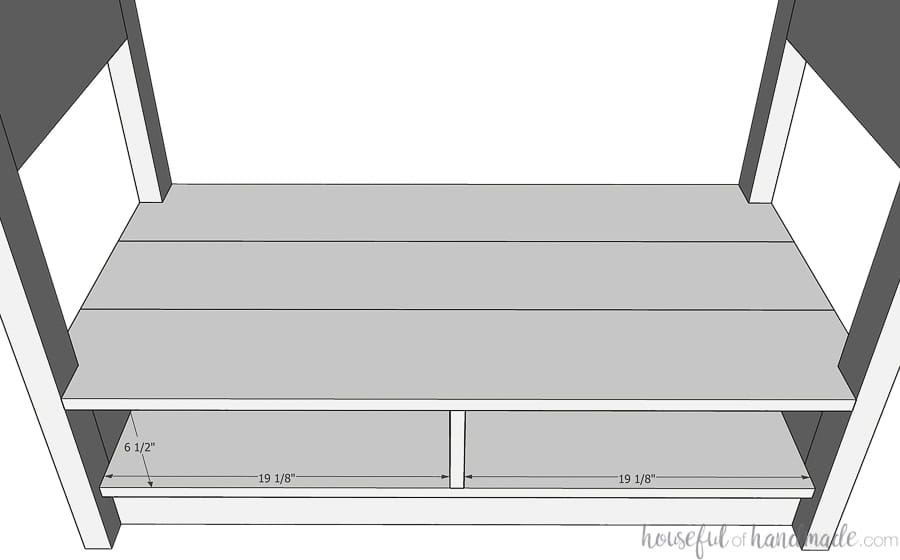
STEP 2- Build & attach open shelf
Rip down one of the shelf slats to 7″ to fit the vanity. Use a table saw or circular saw with a guide track to cut it down.
Drill pocket holes set for 3/4″ material in the edge of the outer shelf slats.
Using wood glue and 1 1/4″ pocket hole screws, attach the 3 shelf slats so they make one large shelf.
To fit the shelf in the vanity, notch out room for the 2×3 legs to fit into the corners with a jigsaw.
Drill pocket holes set for 3/4″ material in the top of the drawer divider. I put 3 pocket holes on one side and two in between them on the other to keep the drawer divider vertical.
Attach it to the center bottom of the assembled shelf with 1 1/4″ pocket hole screws.
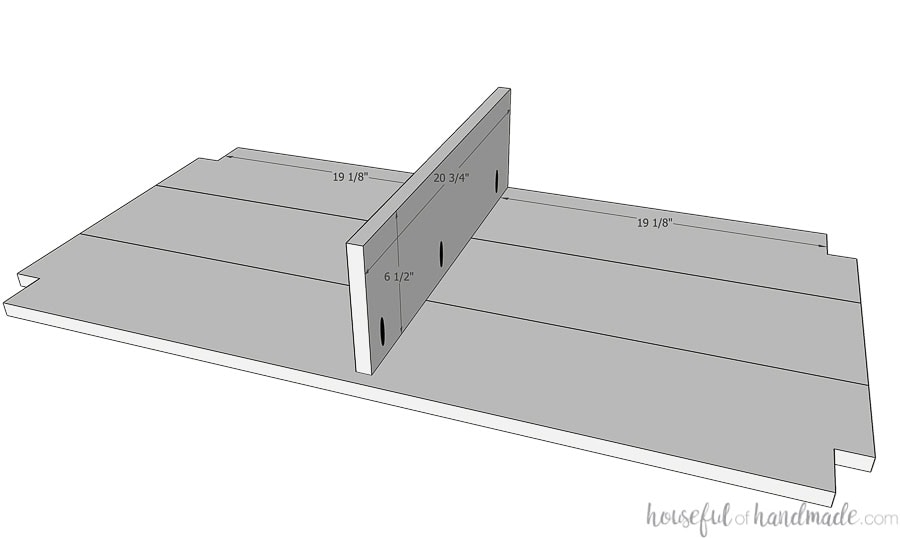
Drill pocket holes set for 3/4″ material in the notched out sides of the shelf (so the screws will go into the legs pieces).
Carefully fit the shelf into the vanity between the sides. Ensure the notches fit snuggly around the legs.
Clamp tight to the side panels and so the drawer divider is snug to the base. Secure with 1 1/4″ pocket hole screws into the legs.
Then secure the drawer divider to the base with screws from the underside. You can use 1 1/4″ pocket hole screws for this if you don’t want to buy other screws.
Make sure the drawer divider is centered on the base.
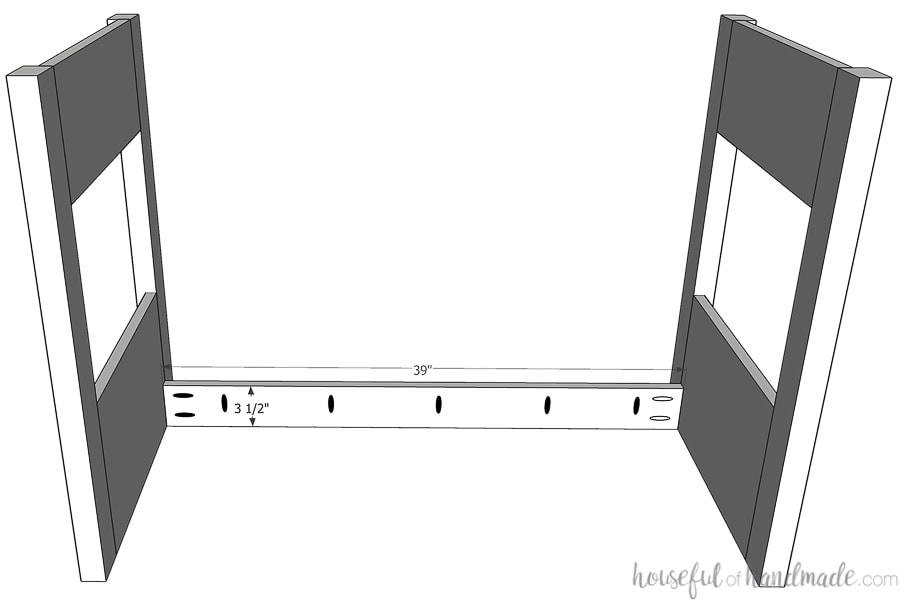
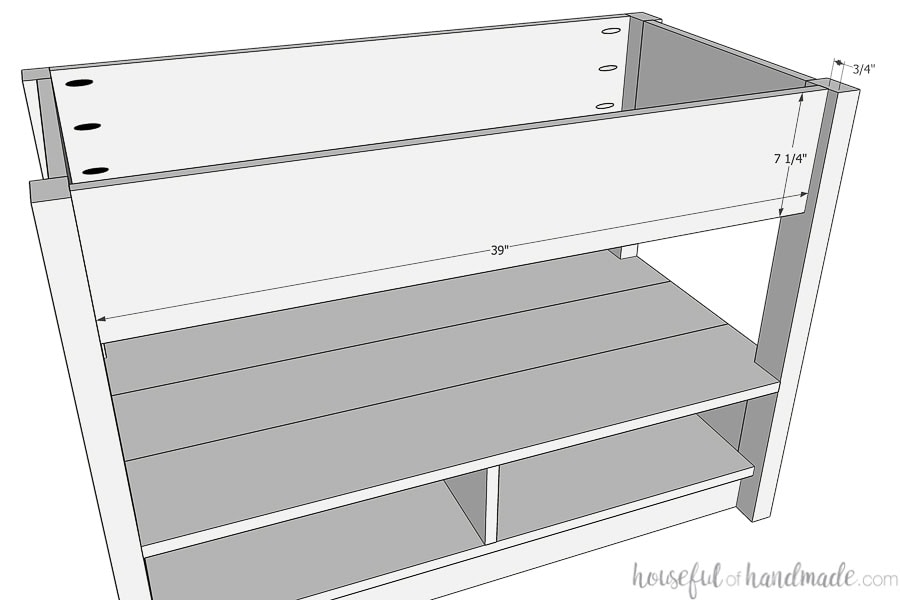
STEP 3- Attach top skirt
Drill pocket holes for 3/4″ material in the sides of the front & back top skirt pieces.
Attach the back piece so it is flush with the back of the legs (also, you can put the pocket holes facing the back since they will be up against the wall).
Attach the front piece so it is set back from the front of the leg by 3/4″. Secure with 1 1/4″ pocket hole screws.
STEP 4- Build drawers
Cut a 1/4″ wide by 1/4″ deep groove in the inside of the front and side drawer box pieces 1/4″ up from the bottom.
If you do not have a way to cut a groove, check out these other easy ways to build drawers.
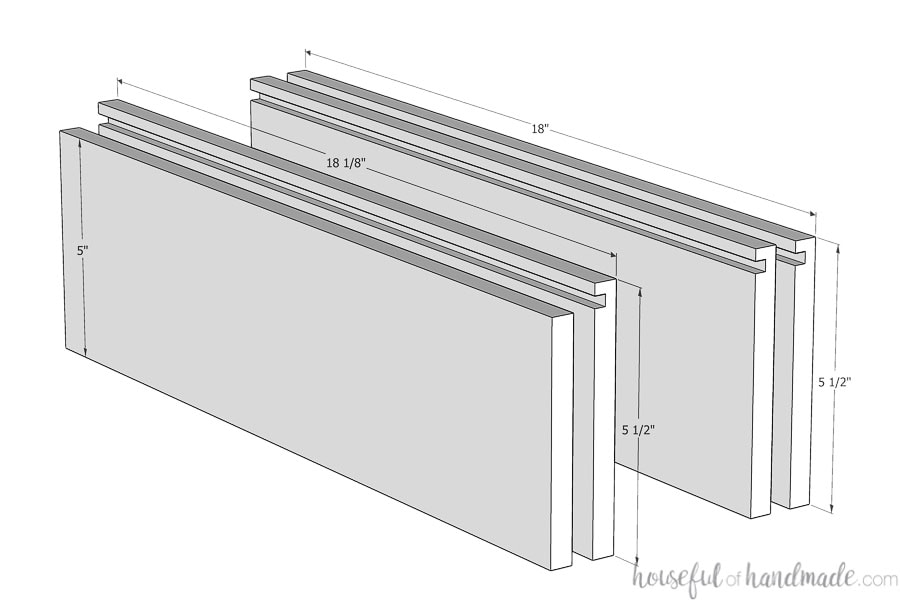
Drill pocket holes set for 1/2″ material in the outside sides of the drawer box side pieces (not the same side as the groove).
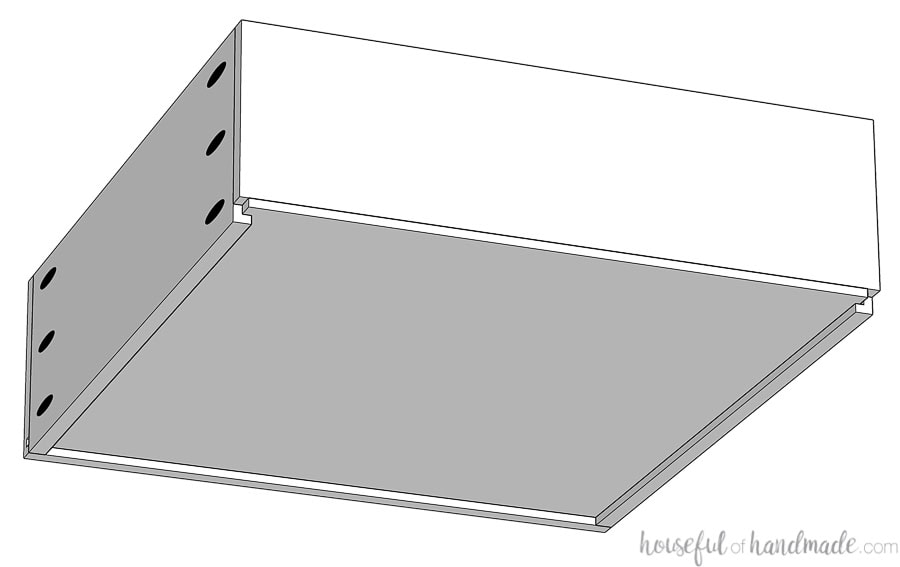
Build the drawer box by securing the side pieces to the front and back pieces with wood glue and 1″ pocket hole screws.
Make sure the top of all the drawer box pieces is flush. The bottom of the drawer box back piece should be flush with the top of the groove.
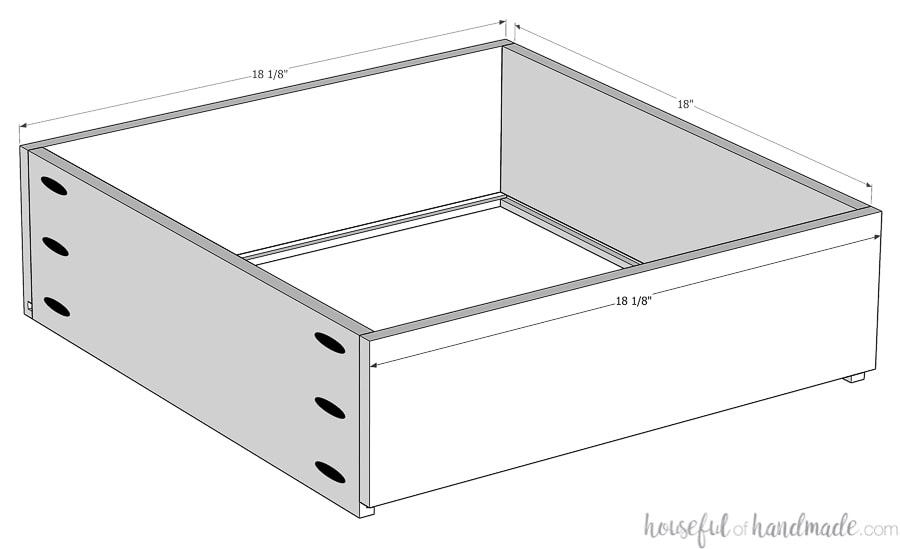
Slide the drawer box bottom piece under the back piece and into the groove on the sides and front.
Ensure the box is square and then secure the drawer box bottom to the back piece with 5/8″ brad nails.
STEP 5- Finish
Install the drawer slides so the front of the drawer box is flush with the front of the drawer divider. Learn to install drawer slides here.
Clamp the drawer fronts to the drawer box so there is an 1/8″ gap on the sides and tops of the drawer fronts. Learn tips for lining up drawer fronts here.
Secure with 1 1/4″ screws through the inside of the drawer.
Sand and finish your complete vanity. Then install the bathroom vanity and add your vanity top and sink.
You did it!
Premium plans include:
- Recommended Tools
- Shopping list
- Easy to read cut list table
- Cut diagrams
- Step-by-step instructions with 3D renderings
- Helpful resources
- BONUS: 3D SketchUp file
Now you can enjoy your new bathroom vanity with all that storage.
Prefer to Watch? Check out the Video Below
Happy building!

Thank you to Kreg Tools and BuildSomething for sponsoring this post. I only recommend products that I use and love and all opinions are 100% my own. Click here to read my full disclosure policy.