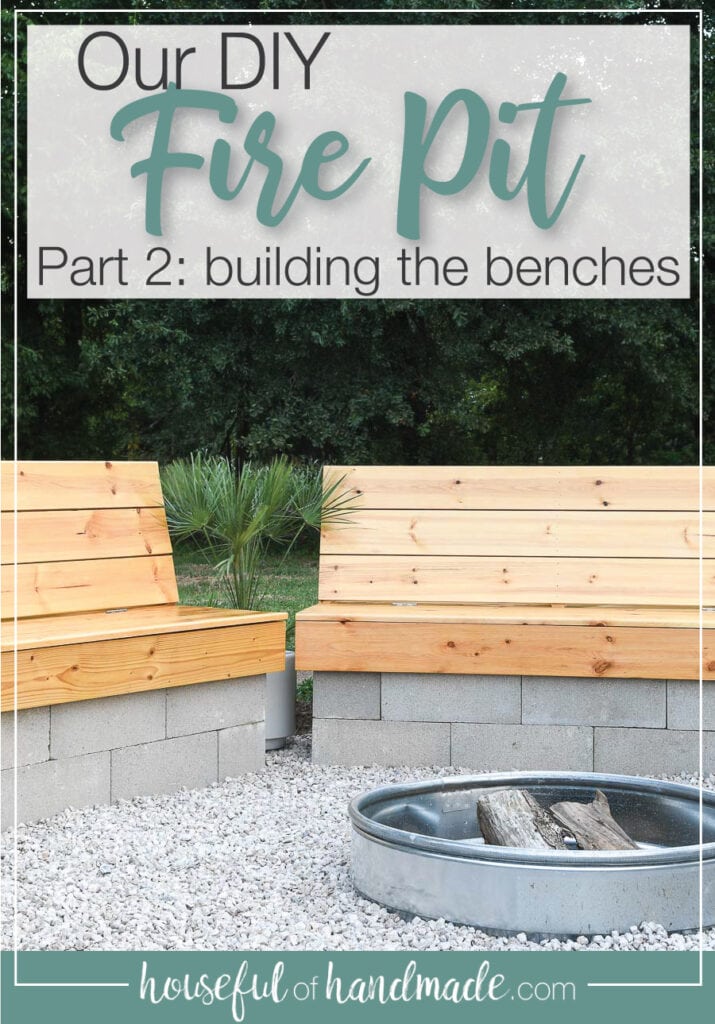
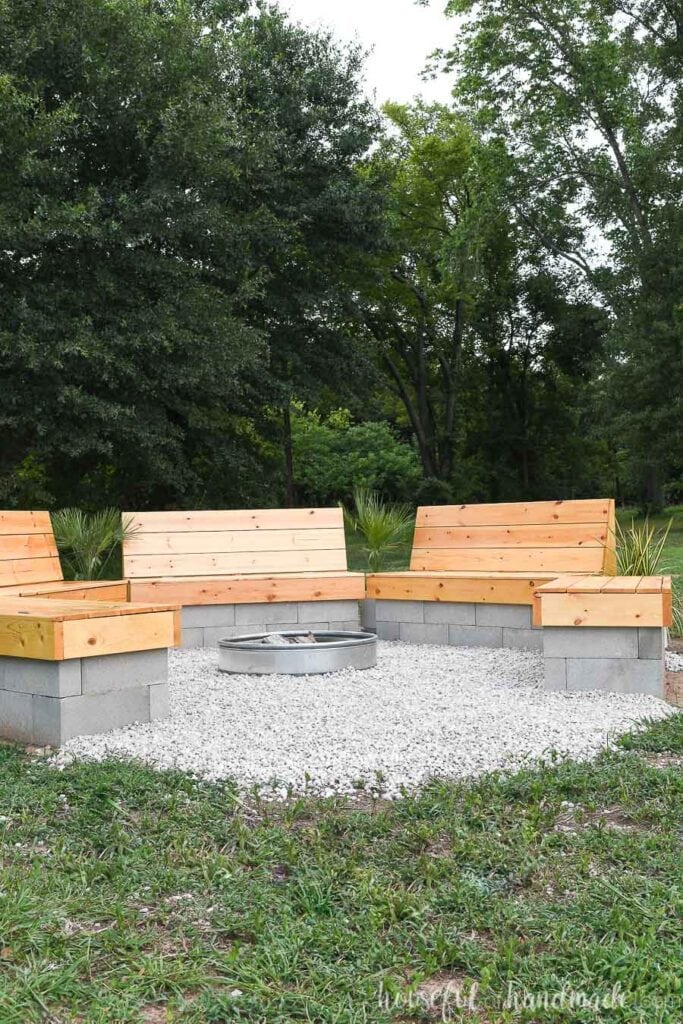
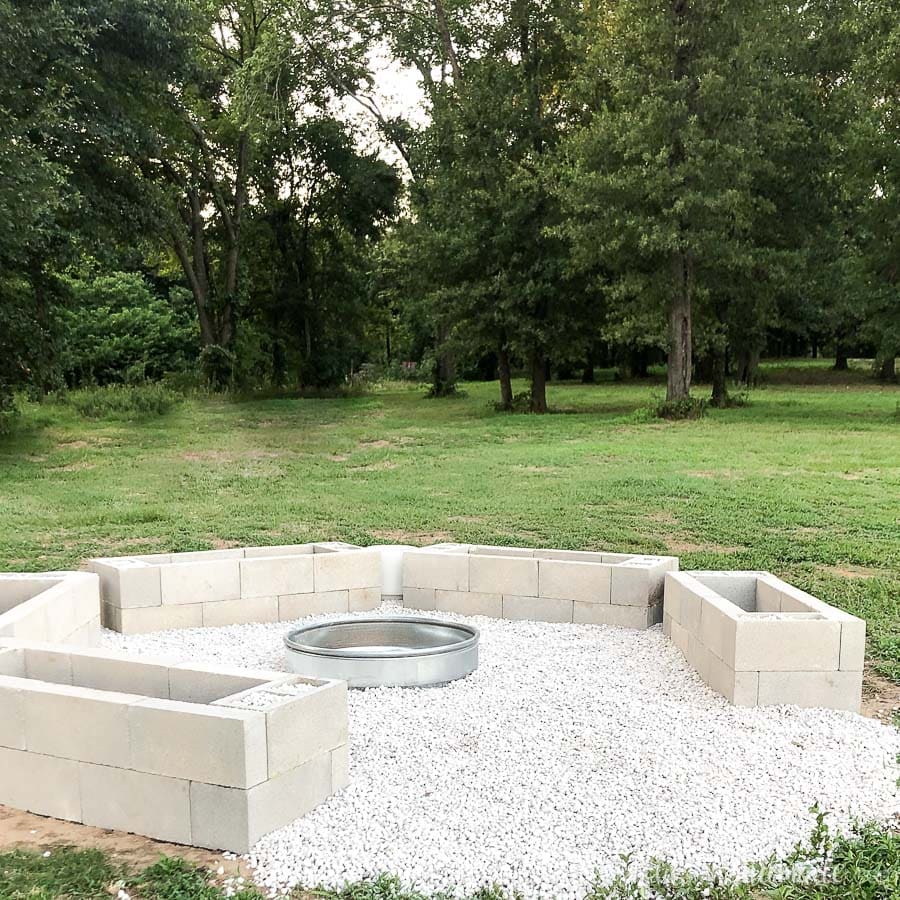
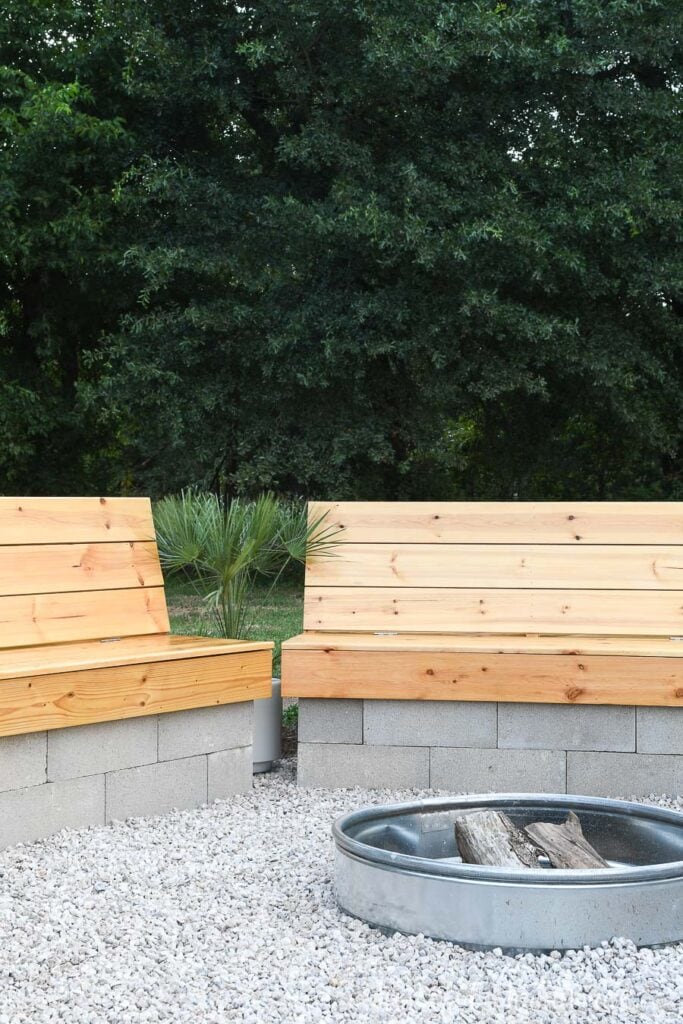
The fire pit with built in benches is done!!! To say we are excited is an understatement.
A fire pit was the perfect DIY to create a gathering space in our backyard. And with 5 benches in a hexagon we have lots seating for big groups.
While the view was pretty awesome before, the beautiful wood and concrete fire pit built in the landscape definitely makes it look amazing.
This post may contain affiliate links. As an Amazon Associate I earn from qualifying purchases. Click here to read my full disclosure policy.
And those beautiful wood benches are going to last a very long time thanks to our partnership with Waterlox and their century old Marine finish.
Ever since I used the Waterlox Original formula on the wood vanity top in our last home’s master bathroom (it was so sad to say goodbye to it), I have been excited to try all the other Waterlox products.
And what better way to give their outdoor sealer, the Marine formula sealer, a test than to use it on the fire pit benches.
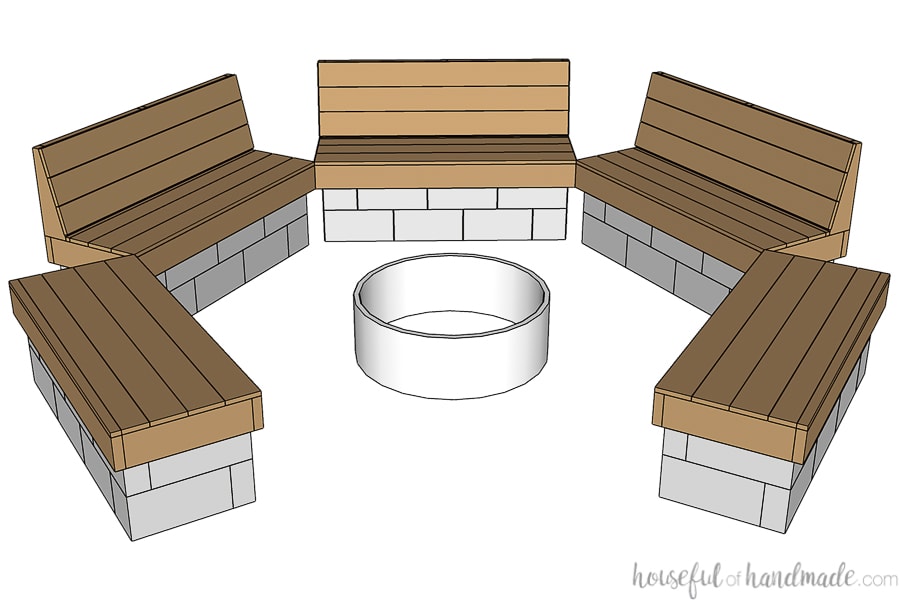
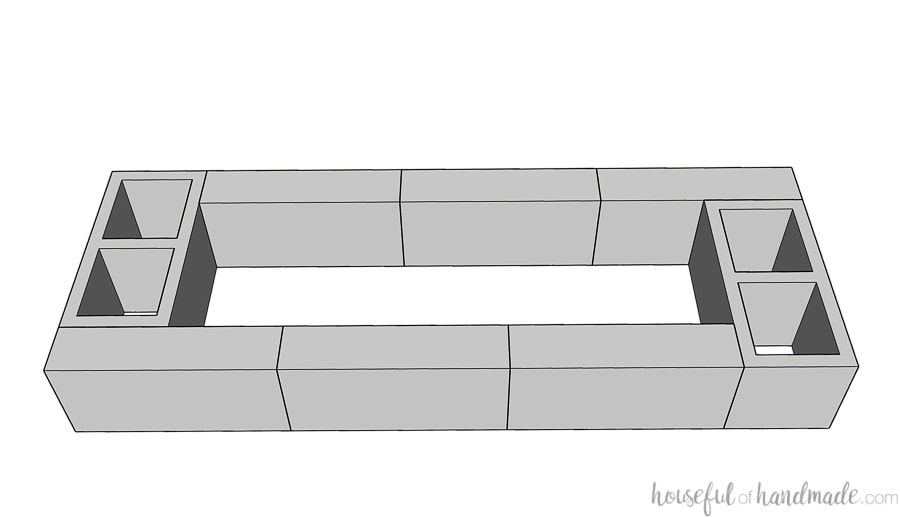
Wood & Cinder Block Benches
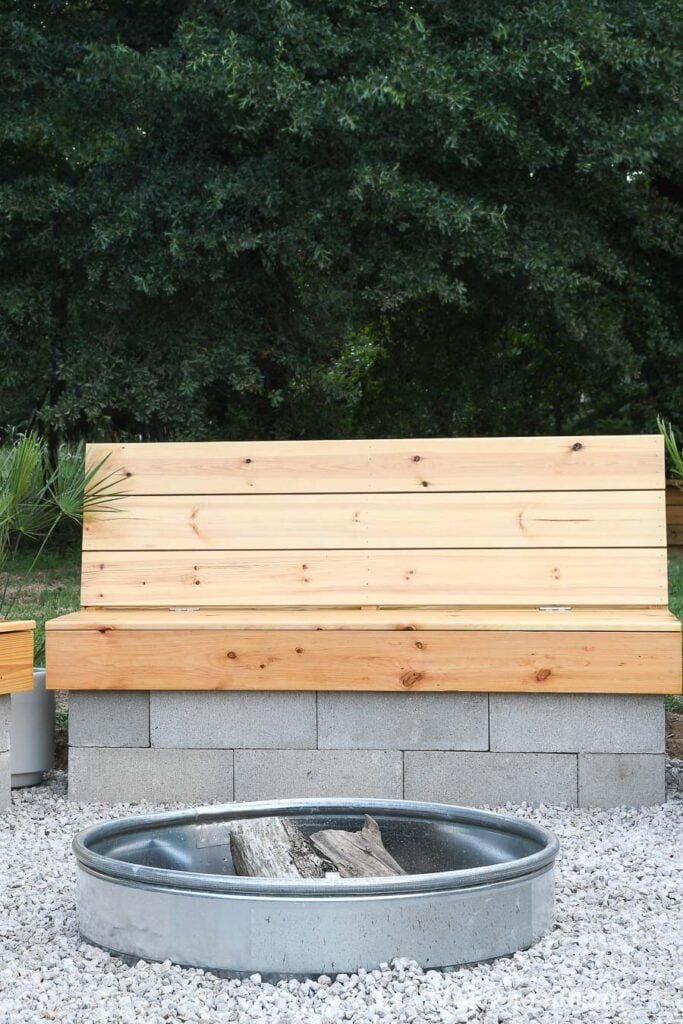
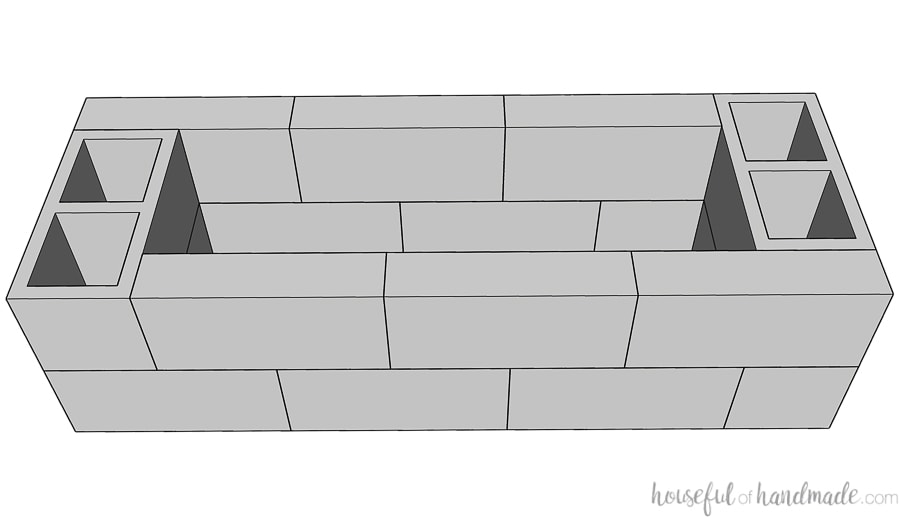
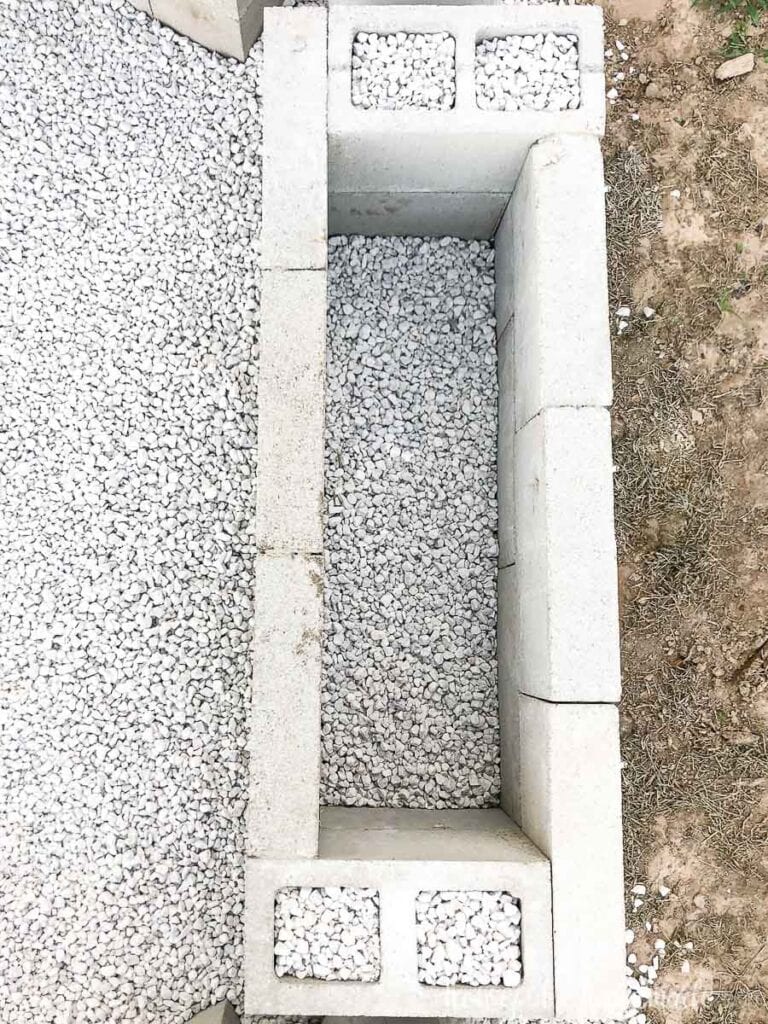
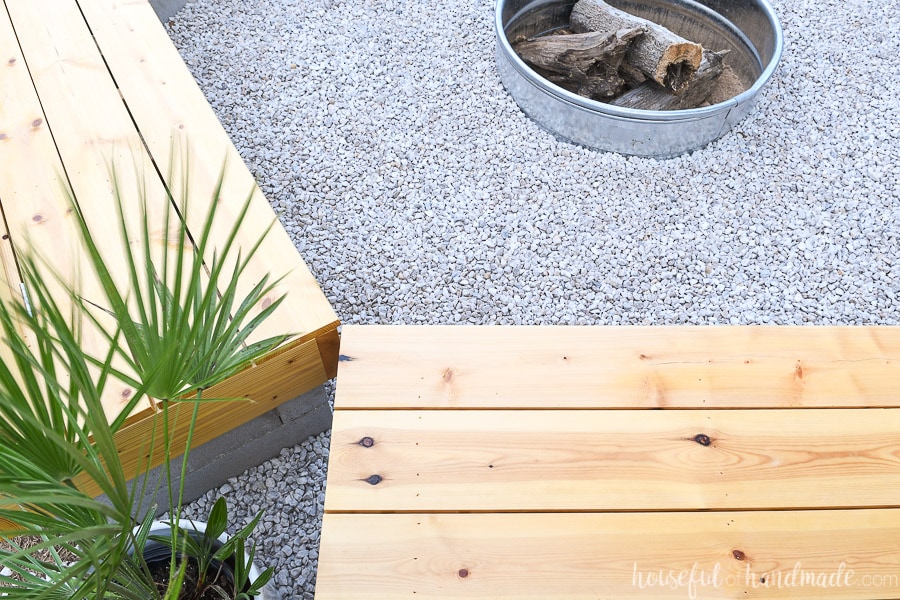
Using cinder blocks to build outdoor benches is not a new concept. But instead of using the holes, we only exposed the flat side to give it a modern sleek look.
I love both modern design and warm rustic elements too. So we paired the cold, gray cinderblocks with a warm, rich wood tone.
The benches are a simple design. And they are quite easy to build, which is great since you have to build 5!
Originally we had planned to put back rests on all 5 benches. But realized the backs on the front two benches got in the way of the view.
So in a last minute design change, we hurried and removed the backs from two of the benches.
Below I share details on how to build the benches with and without backs so you can create the perfect fire pit area for your pwn yard!
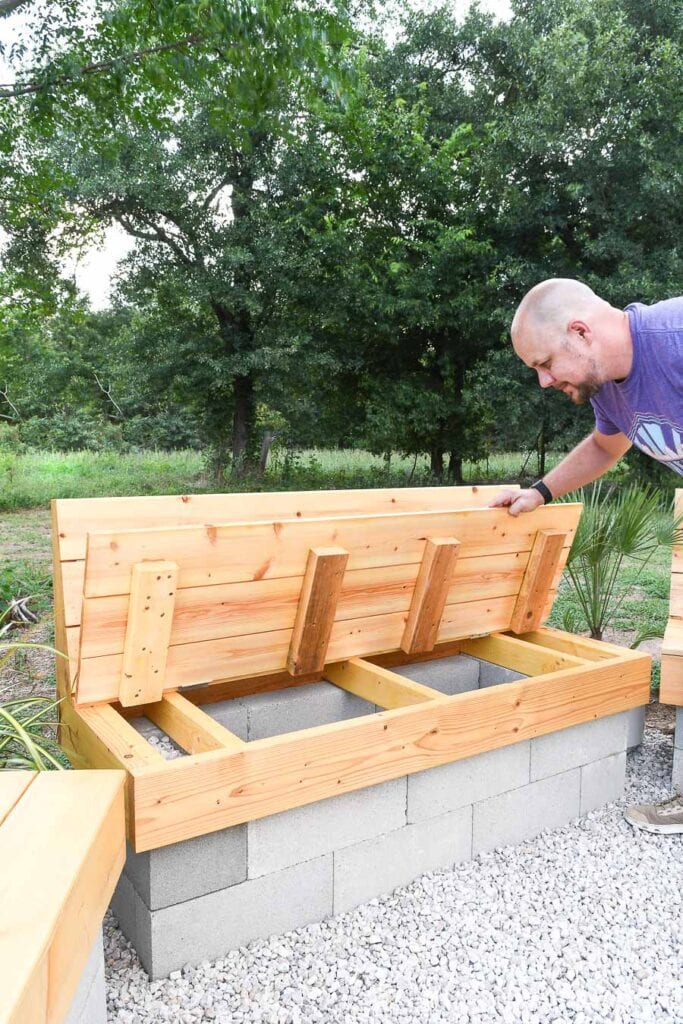
Storage in the Benches
My favorite part of the bench design is the built in storage!
Each of the bench seats lifts up to reveal a compartment inside the cinder block base.
This is the perfect place to store wood and tools for the fire pit as well as anything else you might want to keep close by.
Just remember, the benches are not water-tight so only use them to store things that can get wet or make sure to put them in something.
Fire pits are an amazing way to enjoy time with family and friends. For more ideas, check out these other 21 Amazing DIY fire pit ideas that are easy to build.
How to Build Wood & Cinder Block Benches
Tools & Materials
Recommended Tools:
- Miter saw
- I recently upgraded to this larger sliding miter saw (watch for it to go on sale), but all my projects before were built with this inexpensive miter saw that I loved.
- Table saw or Circular saw
- Pocket hole jig
- Finish nailer
- Drill
- Impact driver (optional, but I love not having to switch bits with the drill)
- Trim router
- Sander
- Measuring tape
- Speed square
- Clamps
- Level
- Large caulk gun
- Shovels
- Optional: tiller
- We rented a large tiler to help break up the ground because it was so dry and hard.
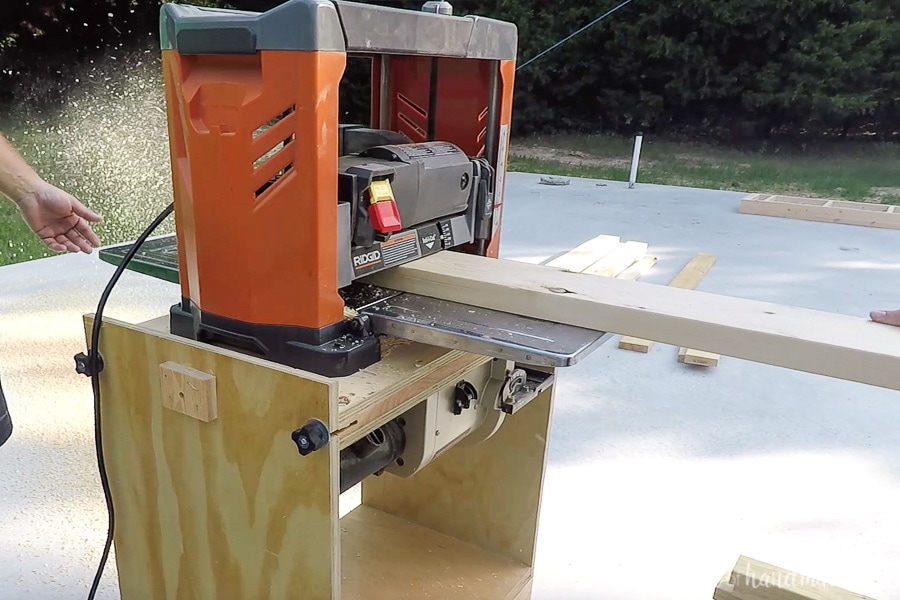
- Optional: planer
- I planed the exposed side of the 1×6 boards to remove the round-over on the edge.
Supplies:
- PDF Woodworking Plans
- Lumber-
- (20) 2×6 boards, 8′ long
- (14) 2×4 boards, 8′ long
- (6) 1×6 boards, 8′ long
- (10) 1×6 boards, 10′ long
- (20) 8″ x 8″ x 16″ cinder blocks
- (60) 4″ x 8″ x 16″ cinder block caps
- (4) 28 oz landscape construction adhesive tubes
- Stakes & twine
- Spray paint
- Weed barrier
- Landscape staples
- Fire ring
- Rocks/sand/gravel
- We used crushed limestone because it was just slightly more expensive than the pebbles and has a sparkle to it in the sun.
- 2 1/2″ outdoor pocket hole screws
- 1 1/4″ outdoor pocket hole screws
- 1 1/4″ finish nails
- 2″ outdoor screws
- Wood glue
- (10) 3″ long stainless steel hinges
- 1″ #8 stainless steel wood screws
- Waterlox Universal Tung Oil Sealer
- For all 5 benches we used most of the 16 ounce bottle
- Waterlox Marine Sealer in Satin
- For all 5 benches we used 3 almost 3 quarts
Prefer to Watch? Check out the Video Below
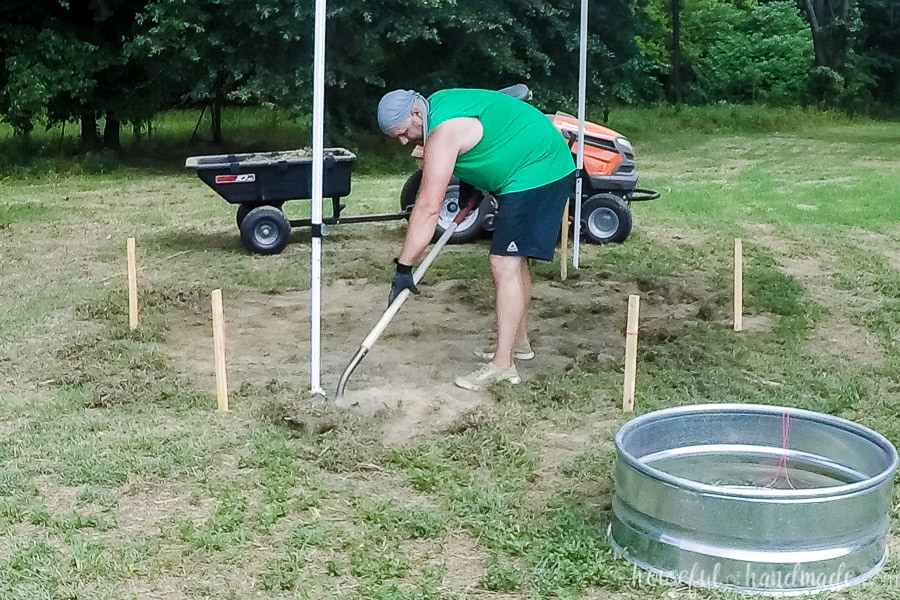
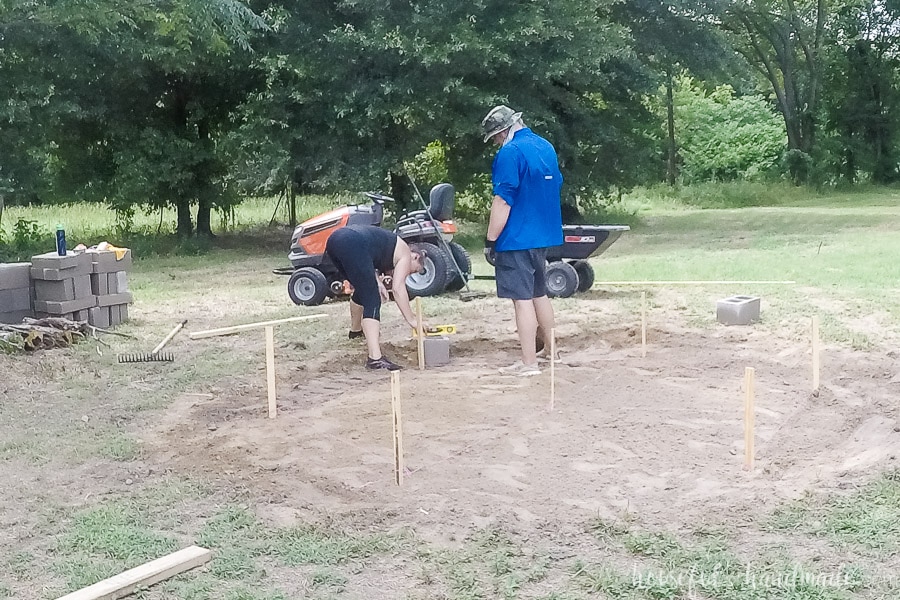
STEP 1- Prepare the Site
Stake out the area
This was surprisingly the trickiest part of the hole process. Staking out a rectangle or square is easy. But to stake out a large hexagon, was a bit more challenging.
The easiest way was to start in the center and measure out from there to the six points of the hexagon.
For the center stake, I used a scrap of dowel that was left over from another project. That way the center was not skewed by the 1×2 stake.
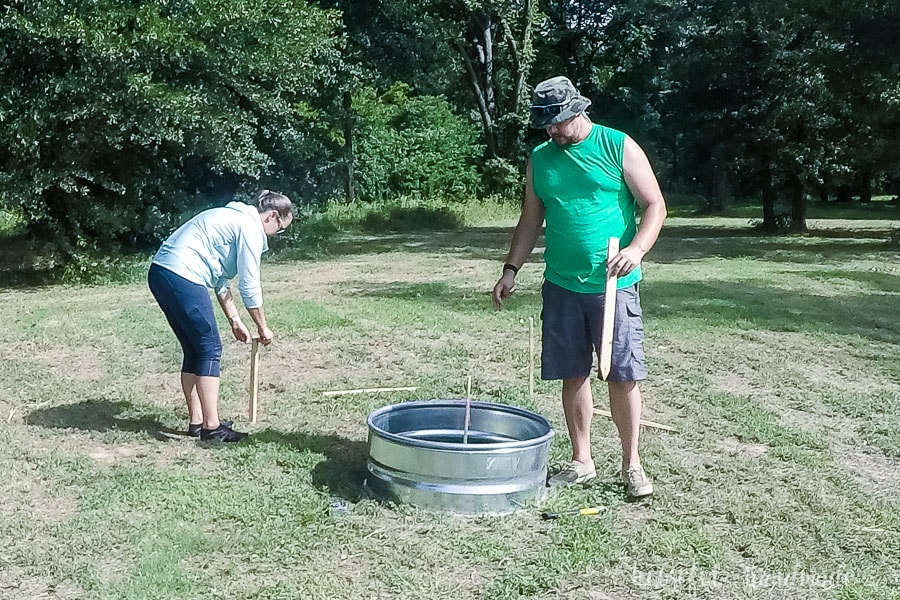
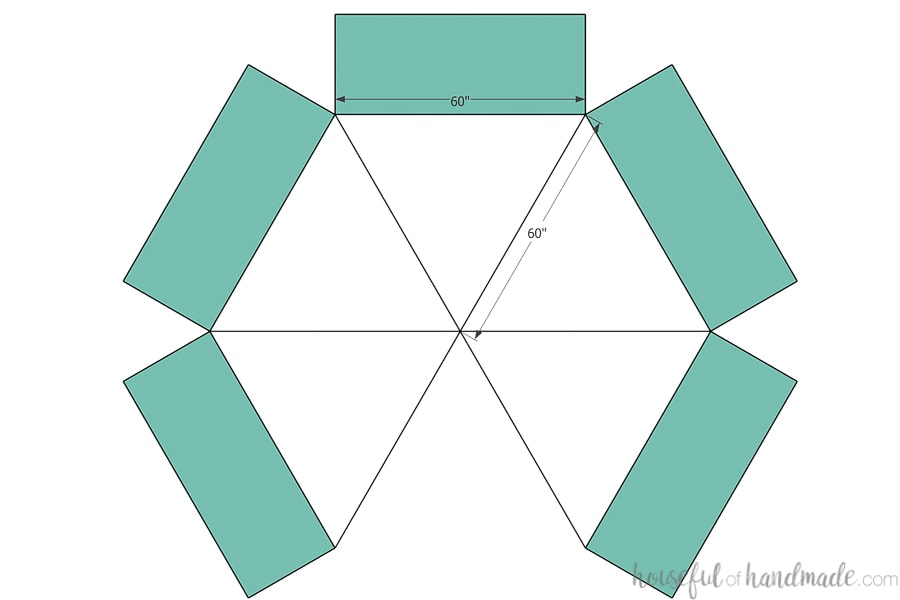
Our bench bases are 54 1/2″ wide and we needed to give space on each side for the bench tops to sit onto them, so we decided to make each edge of the hexagon 60″.
And come to find out, the length of the edges of the hexagon are equal to the length from the center to the corners! So we needed to measure 60″ out from our center point to each corner. I love easy math!
Drive the first stake 60″ away from the center dowel. This will be the starting point.
Then using a measuring tape and your piece of string tied to the center dowel, rotate around until two 60″ marks meet and drive the second stake.
Take a minute to make sure these two stakes are facing the way you want the front of your first bench to face.
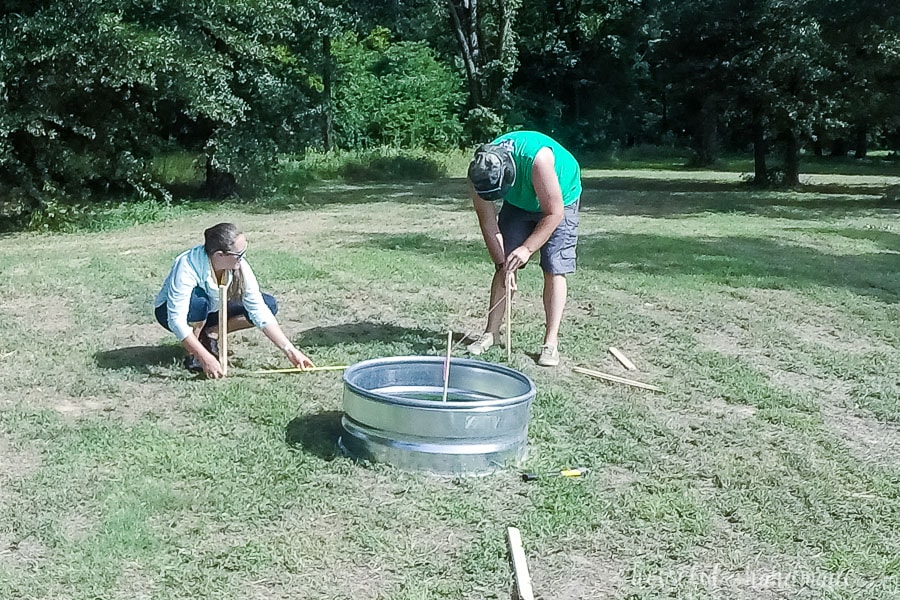
Once these first two stakes are oriented right, it is just a matter of repeating the measuring around the center point until you have all 6 stakes in.
Double check the final opening with a quick measurement. It should be 60″ as well. We gave ourselves a little tolerance on this and were within about an inch. With this large a project, it was not noticeable.
Wrap the twine around the stakes to create the hexagon shape.
EXPERT TIP: If your final measurement is way off, double check all the other ones, sometimes stakes shift as you hammer them in. Also, makes sure you are not pulling too tightly on the string to bend the dowel.
Getting it right too some time. We re-staked our fire pit at a few time. But taking the time to get it right now will mean less issues later.
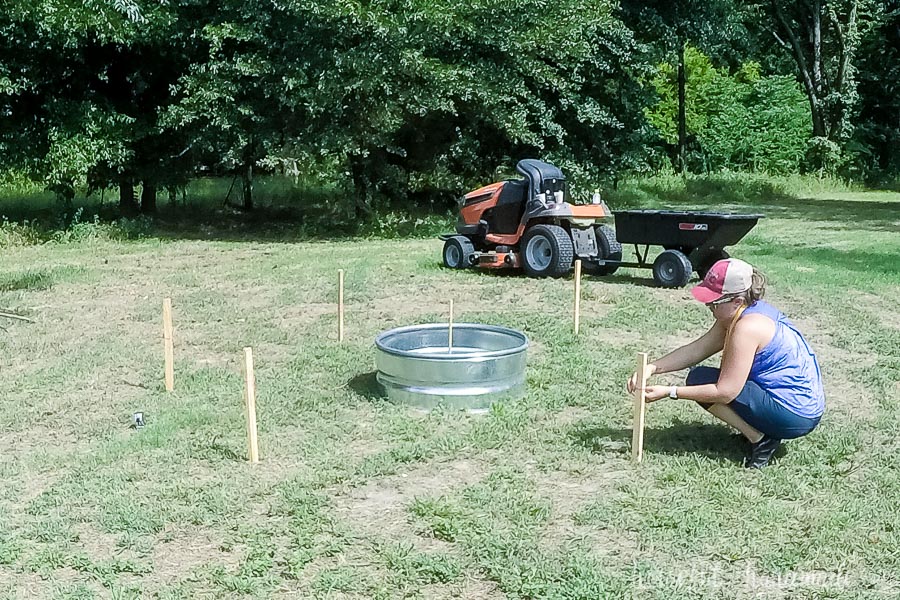
Level the ground
If you build your fire pit and benches on sloped ground, you may feel like you are falling forward or leaning when using them.
We thought we could do some leveling with a few shovels. But since we are right in the heat of summer, our ground was hard and dry.
We used a flat topped shovel to scrape the top layer of soil with the grass/ground cover off. Then after a few too many minutes of struggling, we opted to rent a tiller.
Of course, this meant we needed to remove the stakes (yep, ironic after all that work). But it ended up being great.
I measured back from the stakes 24″ and marked the ground with spray paint. Now we knew exactly what area needed to be tilled up and leveled.
We used the tiller over the entire area and a little past the line to break up the ground.
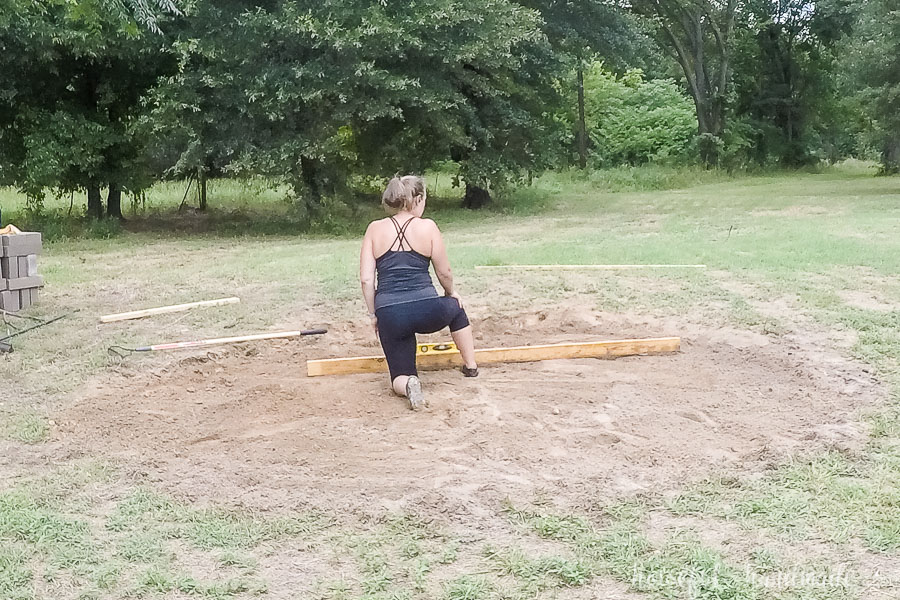
Then I used a left-over 2x4s and a level to get the ground pretty level.
We also made sure to stomp all over the tilled area to help compact it back again.
The next day we got rained out from working with a massive rain storm! But the water worked in our favor to further compact down the area we just leveled.
This meant we did have to do some additional leveling when setting the cinder block bases. But we felt confident that the ground was pretty compact below us.
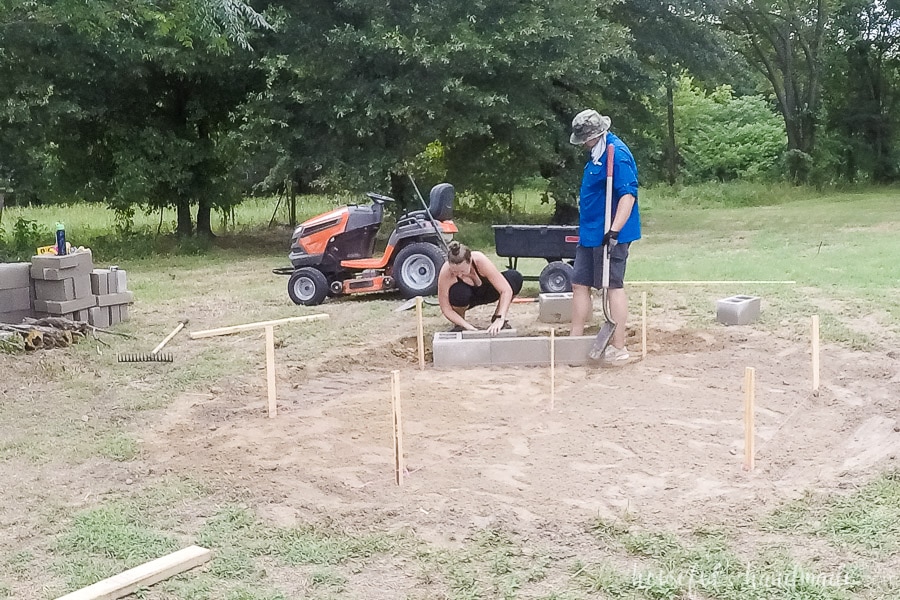
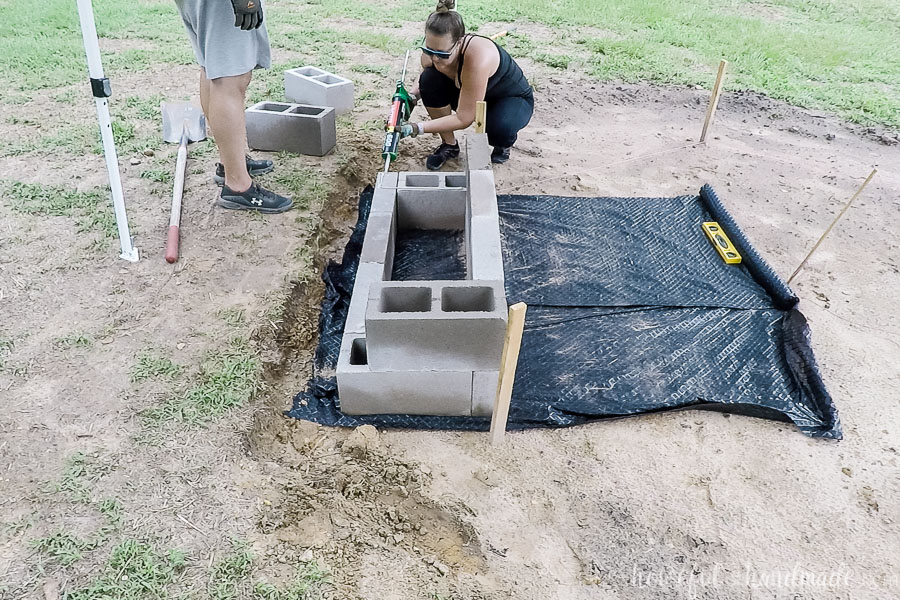
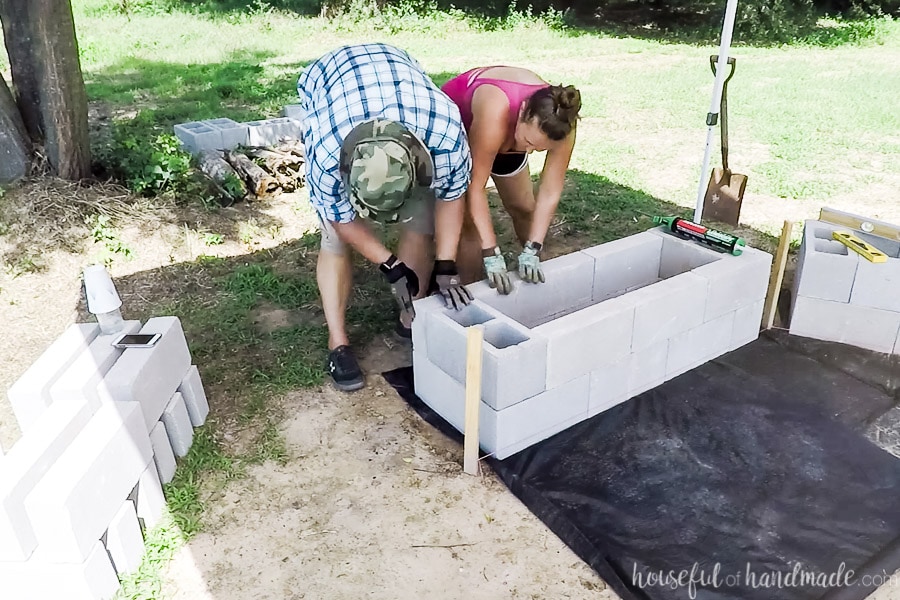
STEP 2- Build the cinder block bases
Dry fit the first row
Now that the area was “mostly” level, we re-staked the hexagon and were ready to get to work.
You need to have the hexagon staked out to lay the cinder blocks because you will use the string to line up the front of the blocks.
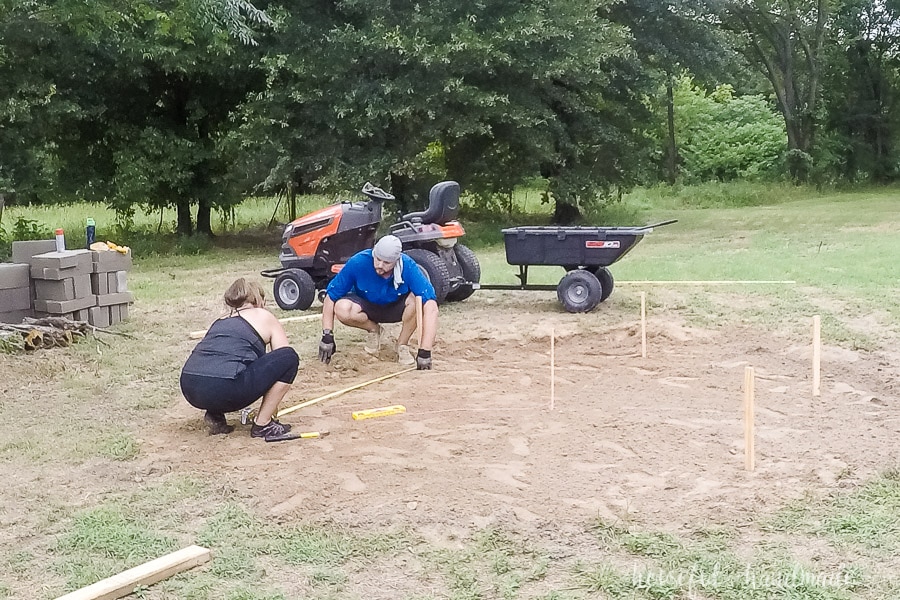
We started building the bases on the back center. That way when we leveled the other bases off the first one it would be easy to do two to each side of the first one and less error going around the hexagon leveling the 5 bases.
We placed the first block cinder block so the short side was up against the twine and it was square to the twine. Make sure it is 2-3 inches in from the stake (remember the hexagon edge is 60″ but the base is only 54 1/2″).
Using the level, we made sure it was level front to back and side to side. If not, we used the flat headed shovel to carefully scrape off the ground until it was.
Then we placed a cinder block cap on it’s side next to it so the long side was up against the twine and the top was flush with the top of the cinder block.
Make sure they are touching tightly. Check for level and adjust as needed.
Continue with the remaining cinder blocks, dry setting the entire base, so the two cinder blocks are in opposite corners with three caps in the front and 3 in the back.
Once the entire first row is level, carefully move them away from the area.
EXPERT TIP: Make sure to remember which cinder block goes in which spot because they might not be exactly the same so you can mess up your level by subbing in a different block.
Roll out weed barrier from the back of the base area to the center of the fire pit and secure with landscaping staples. We overlapped the material in the center to make it fit between the stakes.
Glue together the cinder blocks
Now it is time to put the first row of blocks back in the same manner as before, on top of the weed barrier. Start with the corner cinder block and make sure it’s level and lined up properly.
Then add landscaping construction adhesive to the side of the cap block that sits next to it. Press them together tightly. Make sure to keep them leveled and lined up (things will start to get harder to shift and adjust as you go).
We used a good amount of the adhesive, but tried to not get any squeeze out on the front of the blocks. If we did, I removed it quickly so it didn’t dry there.
Repeat for the rest of the first row of blocks. On the last one, you need to add adhesive to the edge and side to fit agains the first cinder block.
Then repeat for a second row, but this time off-set the first cinderblock.
Start it so it is not touching the front (where the twine is) but flush with the back bottom cap stone.
Also, we added a good amount of adhesive on top of the first row of blocks as well as between them.
Each one of the large tubs of adhesive glued together 1 whole base + just over 1/2 of the next one.
Once all the base pieces are together, double check that the edges are all flush and level and not moving around while the adhesive dries. Once it is dry, it is stuck for good!
Set the first cinder block of the next base
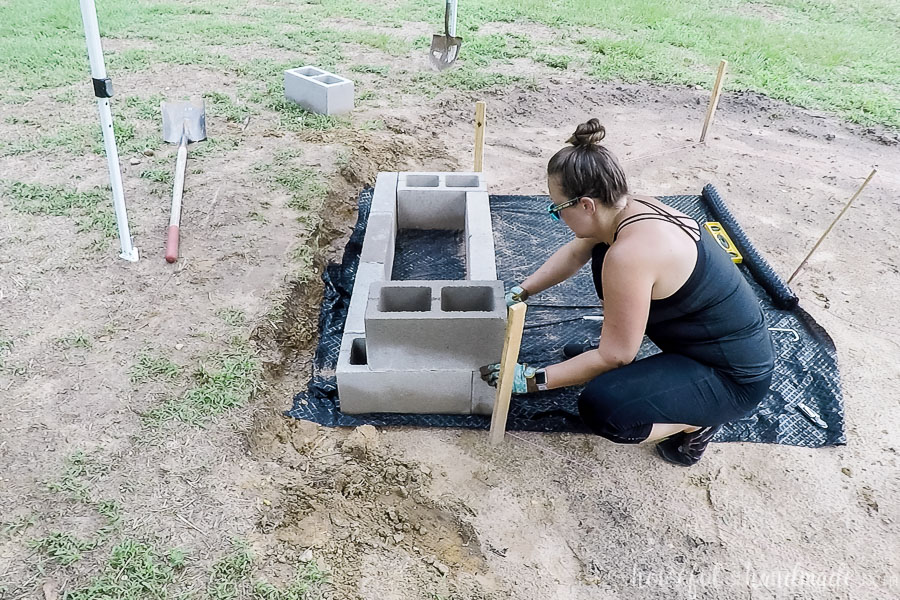
The rest of the bases are assembled the same way, but it is important to level the first cinder block to the completed base before starting. I found the smaller level was great for this.
I held the top of the level next to the top of the bottom row of the completed base. In hindsight, it would have been easier to get the first row of all the bases done first, then add the second row.
But we were so excited to see one base completely done that we just went for it!
Place the first cinder block for the second base the same as the first. Make sure the short side is up agains the twine and it is perpendicular to the twine.
Leave a 2-3 inch gap from the stake to the start of the base.
Make sure it is level front to back and side to side as well as to the first completed base. Scrape off the ground or build it up as needed to get there.
Then proceed by leveling off all the rest of the bottom layer blocks before moving them to add the weed barrier and glueing them together.
Repeat for the other bases till all 5 are done!
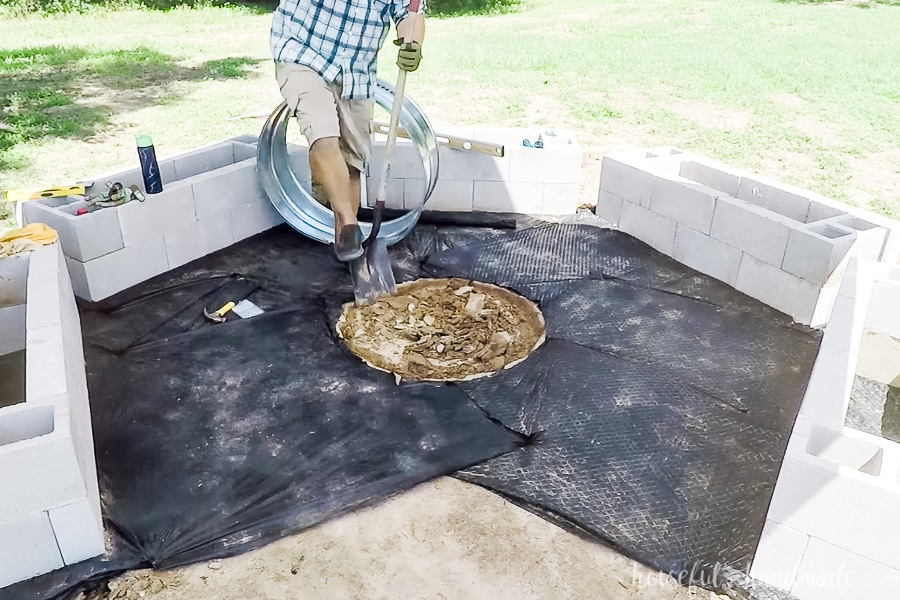
STEP 3- Finish the area around the bases
Set the fire ring
We chose to use a metal fire ring to contain the fire in our fire pit.
We centered the fire ring over the center dowel. Any weed barrier that was under the ring was cut away with a knife. This left a circle template for us to use to dig out the hole for the ring.
Dig out a hole inside the circle template about 2 inches down. Place the fire ring inside the hole.
Using the level, we made sure the ring was level front to back and side to side. If not, I put a little dirt back in the areas needed until it was.
The entire ring was set into the ground about 2 inches.
Add the rocks
Add rock around the bases to finish off the area around the fire pit, cover up the weed barrier, and further secure the fire ring.
We got our crushed limestone from a local landscaping material supply place.
One yard was plenty to fill the entire floor of the fire pit area. We ended up with a covering of about 3 inches deep.
Also, we placed rock inside the holes of the cinder block so no creatures could make it their home (other than a few bugs). And a thin layer of rock inside the bases.
The area inside the bases is going to be used as storage. The rock in the bottom keeps the weed barrier down and helps with drainage from rain.
STEP 4- Build the Bench Frame
Measure the bases
Before building the benches, it is super important to measure your bases. Of course the bases are not going to be perfect to the measurements planned.
Measure them in multiple places front to back and side to side. Then adjust the base if needed to give you 1/8″-1/4″ tolerance.
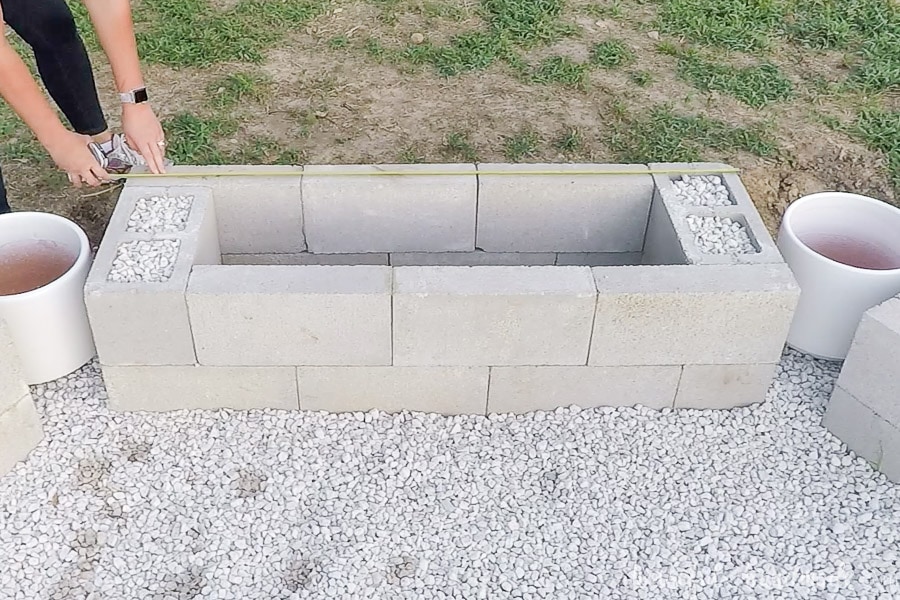
Also, it’s a good idea to check for square.
One of our bench bases (the very first one) was not perfectly square and it caused us a couple headaches. We had build the bench top a bit bigger and chisel out a couple places to fit around the base.
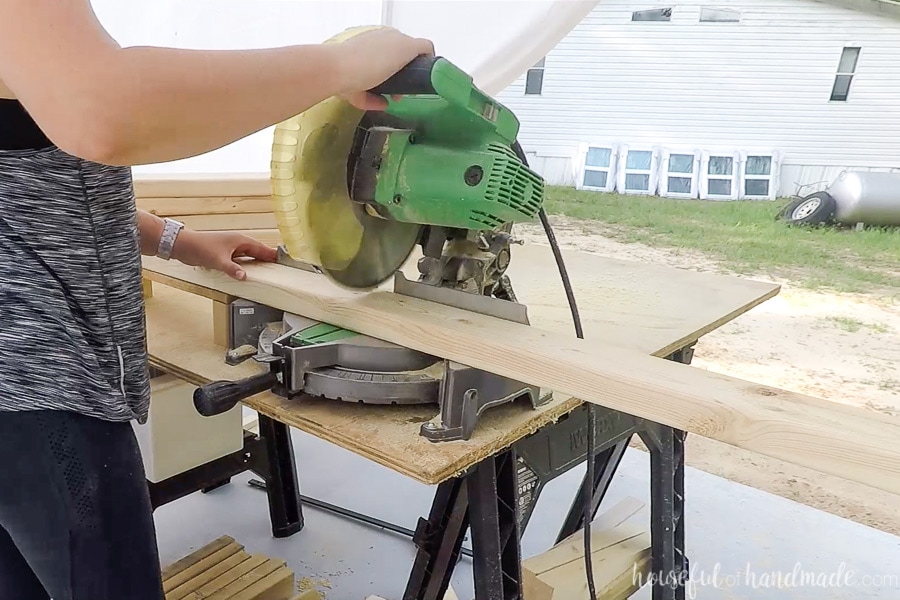
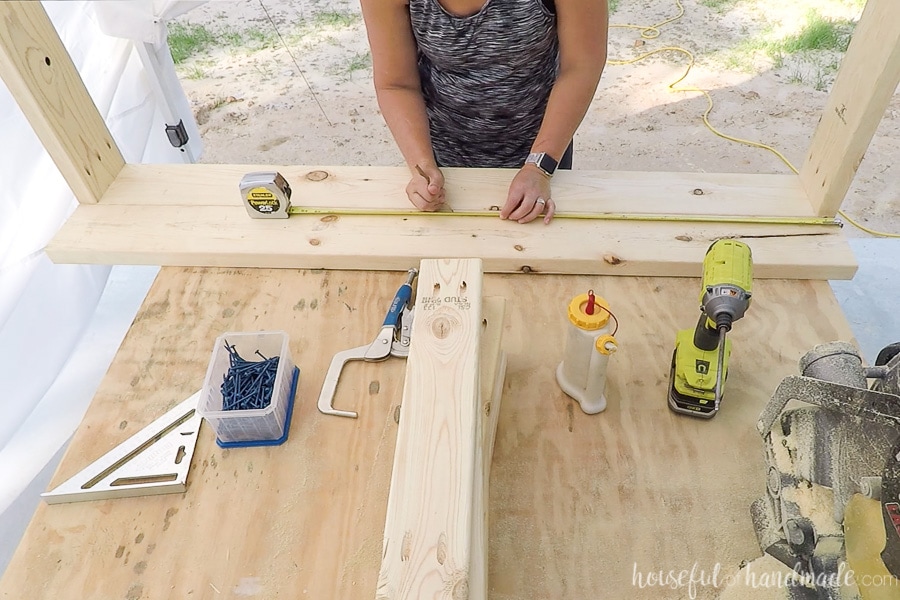
Cut the frame boards
Cut the boards for the frame according to the easy to read table in the PDF plans.

The front & back boards will be the measurement of the base + 2x the width of the boards (2x boards are typically 1 1/2″).
For our fire pit I used Douglas fir 2x4s and 2x6s. Since these typically have rounded edges, I decided to plane one side of the 2×6 boards.
This gave the outside of the benches flat corners and removed any roughness that can come with 2x construction lumber.
Because the boards were planed, the 2x the width measurement had to be adjusted to the measurement after planing instead of the standard 1 1/2″.
Cut the side 2×6 boards and (5) 2×4 boards so they are the width of the widest part of the base + the tolerance.
The 2×4 boards will be used inside the frame to hold the bench on top of the cinder blocks and the 2×6 boards will sit on the outside of the cinder block base.
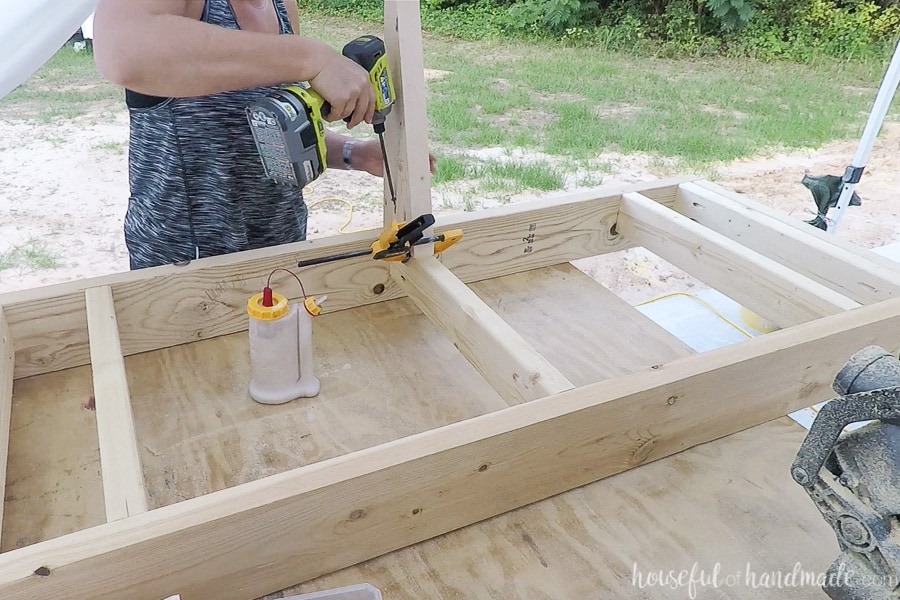
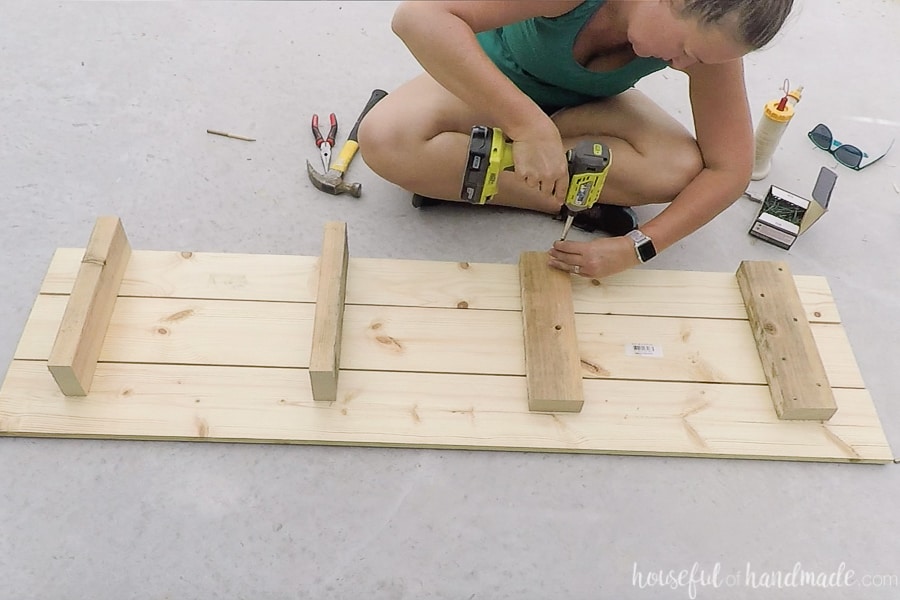
Assemble the bench frames
The bench frames are assembled with pocket hole screws according to the diagram in the plans.
Drill 3 pocket holes set for you material’s thickness in each end of the 2×6 boards (not the planed side). And drill 2 pocket holes in each end of the 2×4 boards.
Start by measuring out the placement of the 2×4 support boards inside the frame.
On the non-planed side, measure and mark (1) 2×4 in the center, and two towards the ends so they will sit right on top of the larger edge cinder blocks of the bases and be flush with the inside.
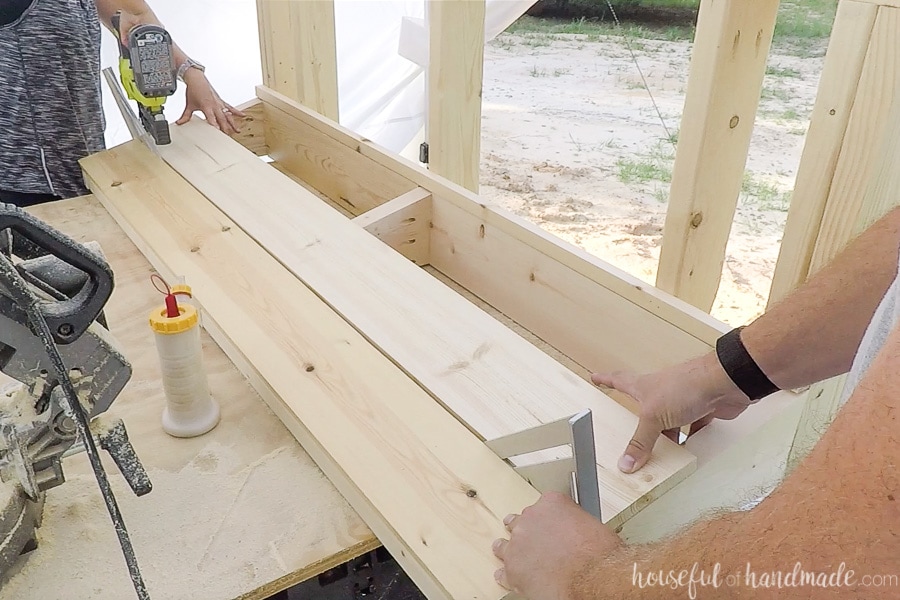
Attach the 2×6 side boards to the edges of one of the front/back boards.
Use wood glue and 2 1/2″ pocket hole screws. Make sure the edges are flush.
Then attach the 2×4 supports to the measurements you marked. Make sure these boards are flush with the top of the front/back board. Secure with 2 1/2″ pocket hole screws.
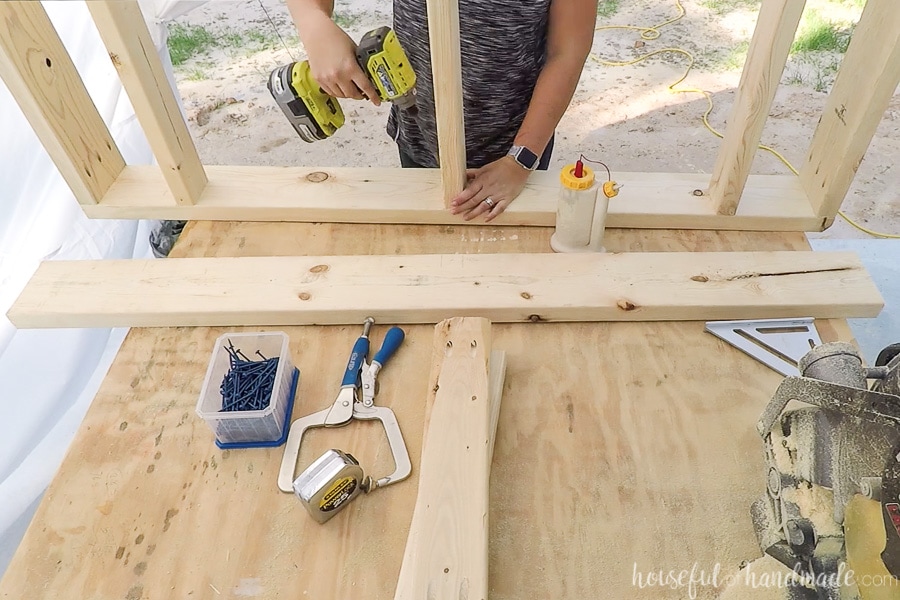
Once the side and 3 of the support boards are attached, attach the other front/back 2×6 board to the other side. Make sure to keep the planed side facing out.
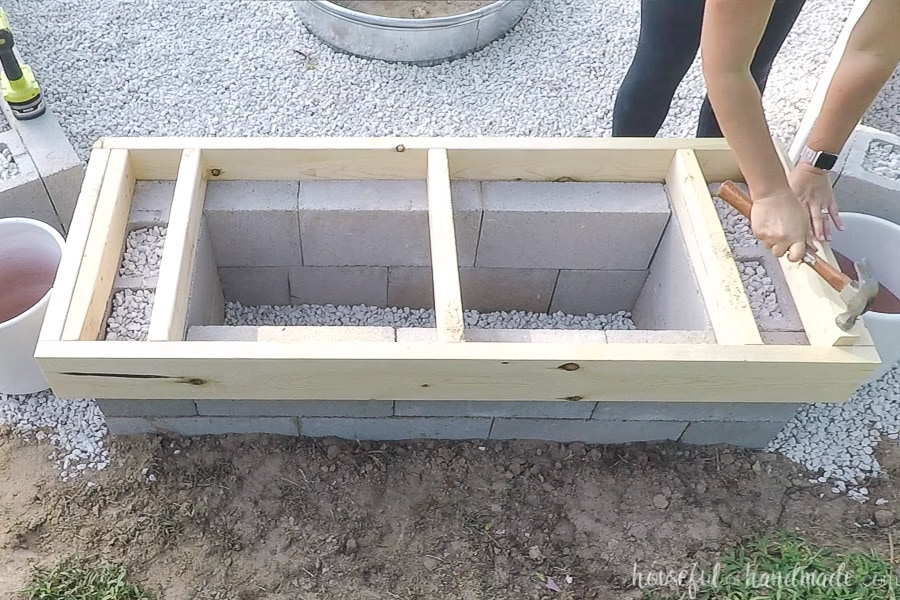
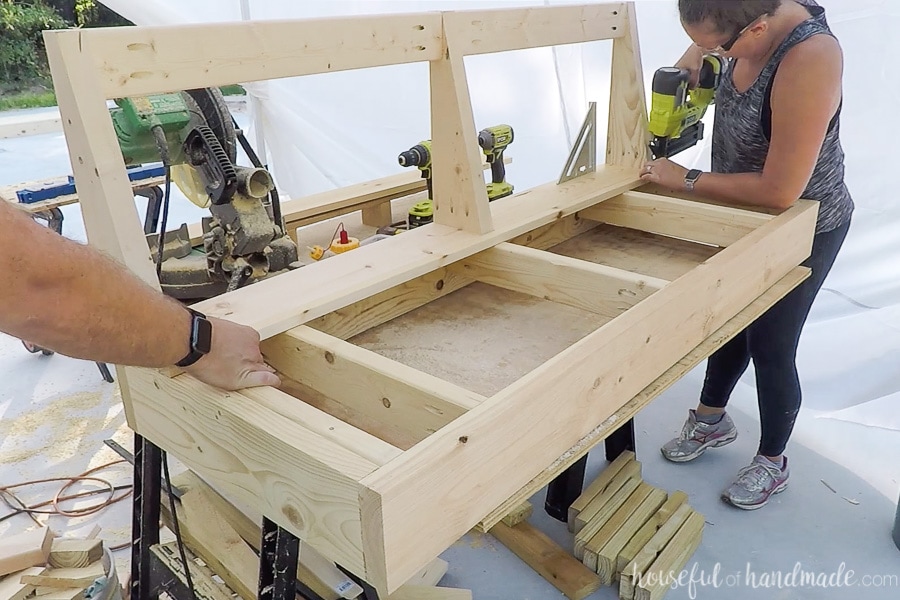
Now before you move on, dry fit the frame to the base. This will let you know if your measurements earlier were correct.

If the frame fits, go ahead and secure the other two 2×4 supports.
These will need to be tapped into place with a hammer or mallet. They should sit right up agains the 2×6 side boards. Make sure the pocket holes are facing out.
Tap them into place on the cinder block base. They can be adjusted slightly to eliminate any rocking that your frame may have from being slightly uneven or having less-than-perfect cinderblocks.
Secure them into place with 2 1/2″ pocket hole screws.
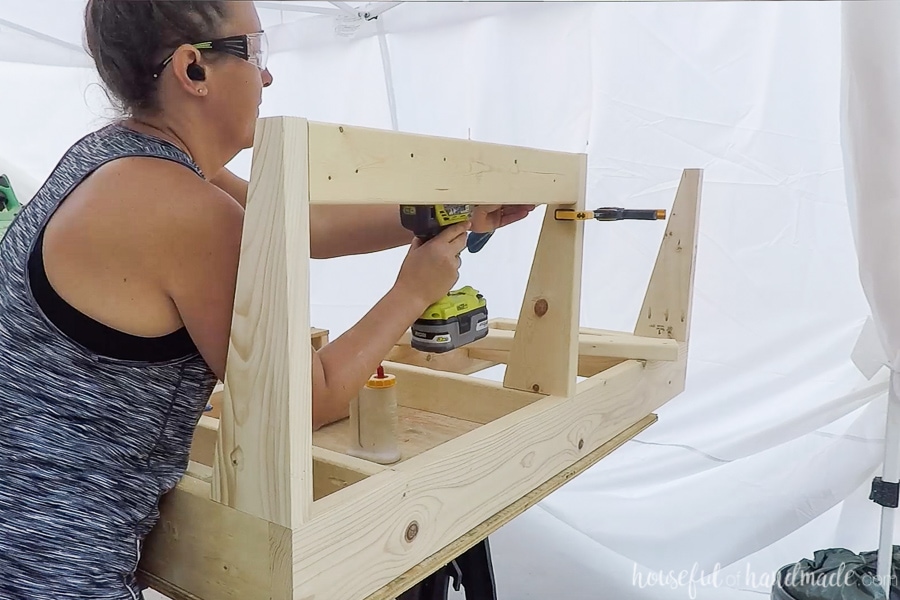
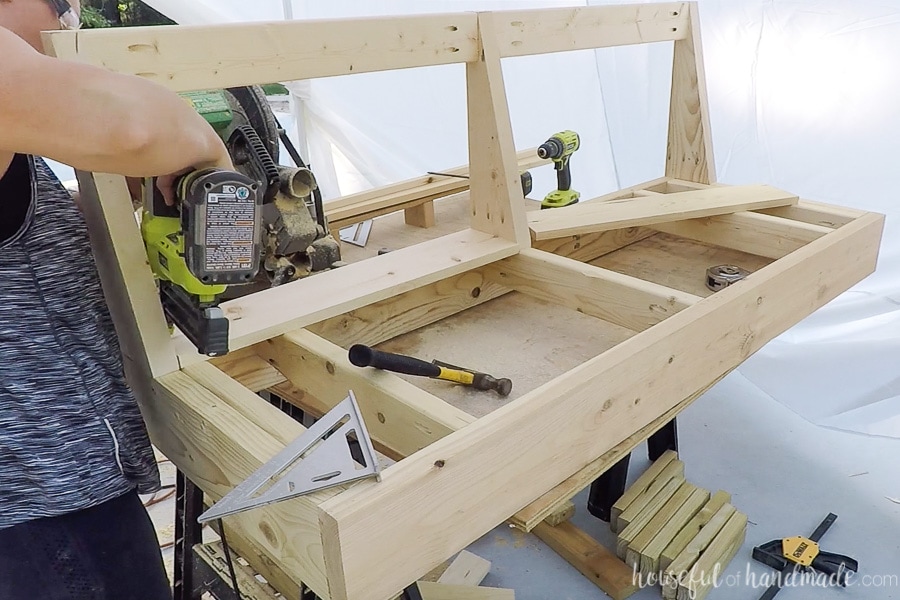
Build the bench backs
For the 3 benches that have backs, you will need to cut (3) 17 1/2″ long 2×6 boards so the top is 1 1/2″ wide and the bottom is the full 5 1/2″ wide.
You could just draw a line and cut them all out with a circular saw, but since you need to 9 total back rests, creating a table saw jig is the fastest way to make these cuts and make sure they are identical.
I adjusted the easy tapered leg jig I made for these DIY nightstands. I love that I can reuse the same jig over-and-over after a couple quick adjustments for the new project.
Using the jig I was able to cut all the back re
I also planed the outside (make sure to mirror these for each bench since the angle cannot work if it is on backwards) of 2 of these to get rid of the roundover edges.

Put 3 pocket holes in the bottom of each back rest and attach them to the top of the bench frame with 2 1/2″ pocket hole screws.
The two outside ones will be flushwith the outside and the middle one should be centered right on top of the middle 2×4 support.
To add the top of the back to the benches, measure the distance between the 2×6 back rests. Make sure to measure at the base where they are attached to the frame.
Cut (2) 2x4s to match those measurements.
Drill pocket holes in each end of the 2x4s and attach them to the top of the back rests so they are flush with the top and back.
Aim the pocket holes toward the front because they will be hidden with the slats when they are installed.
I recommend sanding the benches now before adding the slats. We did not and it made it harder to get into some spots for a good sanding.
STEP 5- Add seat slats to benches
Cut Seat Slats
Measure the final width of the bench and cut your seat slats to that measurement.
- For the benches with backs: you will need 6 slats per bench plus 2 half slats to sit between the back rests. Cut one slat and 1 slat and 1 half slat from the 8′ long boards and the rest from the 10′ long boards.
- For the benches with no backs: you will need 4 slats per bench. These should be cut from 10′ long boards.
Add slats to benches with backs
Since the half slats in the back do not sit on top of the center 2×4 support, you will need to put 1 pocket hole set for 3/4″ thick material on the inside front corner (on the bottom).
Then attach them between the back rests so they are flush with the back of the frame.
Secure the half slats to the frame with wood glue and 1 1/4″ finish nails plus the one 1 1/4″ pocket hole screw to support the inside front corner.
For the hinged slat on the back of the benches with backs, rip a 1″ piece off the one slat.
Attach this piece to the bench frame with a slight gap between the half slats and it according to the diagram in the plans.
Make sure it is flush on both sides. Secure with wood glue and finish nails.
Then flip the bench on its back and attach the (3) back slats. Secure them with wood glue and finish nails.
The top back slat should be flush with the top of the back. Leave a 1/4″ gap between all the slats.
Add slats to benches with no backs
Rip a 1 1/2″ piece from one of the slats for the hinged slat.
Attach this to the back of the frame so it is flush with the back and sides. Secure with wood glue and finish nails.
Build the hinged seats
The remaining seat slats will be used for the hinged seats.
To keep the slats together and spaced with the 1/4″ gap, cut (4) 12″ long pieces of 2x4s for each bench with a back and (4) 17″ long 2x4s for each bench without a back.
Start with the slat that had the smaller pieces ripped off the side. Measure out on it where the 2×4 boards will go so they are not in the same places as the 2×4 supports in the seats. Each bench will get 4 of them.
Attach the 2×4 boards to the first slat board so it is flush to the back of the board and secure with wood glue and 2″ screws according to the diagram in the PDF plans.
Then add the remaining slats making sure to keep them spaced 1/4″ apart.
The final slat will only overlap the 2×4 a couple inches. This will allow it room to hinge open without hitting the bench frame.
These boards are not structural in holding the seat slats, they are fully supported by sitting on top of the frame.
For the benches with backs you will only have 3 slats per hinged seat (one that is ripped narrower). For the benches with no backs you will have 4 slats per seat (one that is ripped narrower).
Premium plans include:
- Recommended Tools
- Shopping list
- Easy to read cut list table
- Cut diagrams
- Step-by-step instructions with 3D renderings
- Helpful resources
- BONUS: 3D SketchUp file
STEP 6- Seal the Outdoor Benches
Give the benches a good sanding with up to 150 grit sandpaper. You don't want to use a super fine grit because the finish will need to have something to grab onto.
After sanding, vacuum or blow off all the dust. Then remove any leftover dust with a tack cloth or rag dampened in mineral spirits.
Apply the Base Coat
Start with a base coat of the Universal Tung Oil Sealer (UTOS). This is necessary to prepare the wood for the Waterlox finishes.
The UTOS is applied with a rag. Just pour a small amount onto the wood and buff it in.
EXPERT TIP: You don't want to leave any excess sealer to dry on the wood, so make sure within 10 minutes to buff off any excess (it will appear shiny).
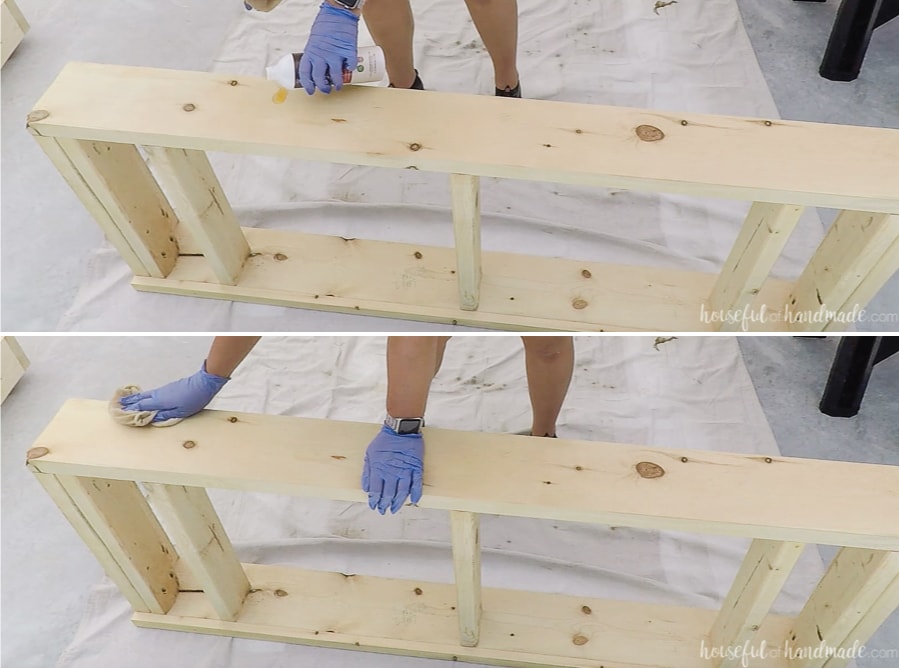
Because these benches are sitting on top of porous blocks, make sure to add sealer even to the underside of frame.
Let the UTOS dry overnight.
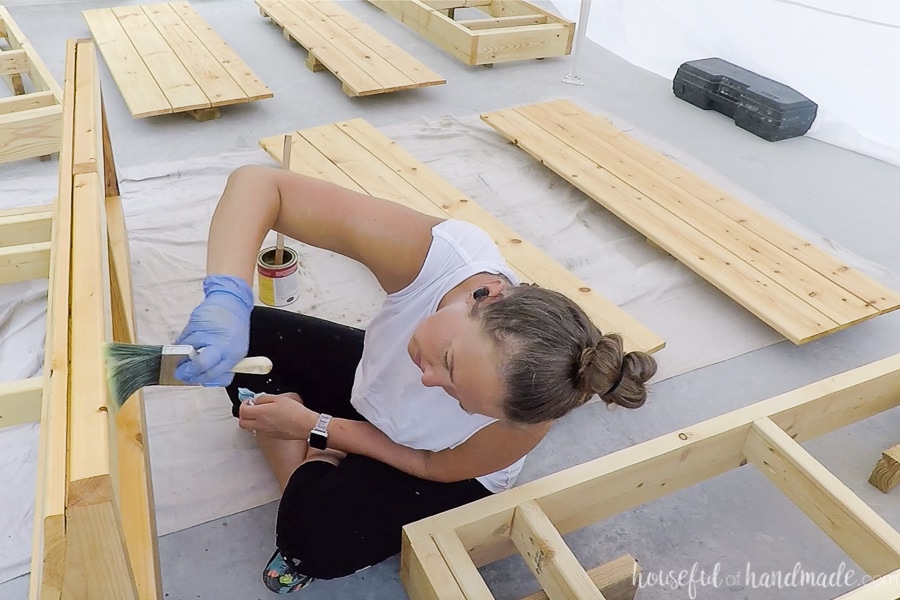
Apply the Marine Finish
The Waterlox Marine finish looks like most other sealers. I has an amber tone to it and will add warmth to your wood.
You want to apply the finish with a paint brush. I found at 2 1/2" angled brush was perfect for the benches because it easily fit into the opening on the top of the quart jar and covered a lot of space on the benches to make quick work of applying the sealer.
Try not to overwork the finish with the brush as you apply it. It will level itself and remove brush strokes if you don't keep touching it while it drys.
Also, make sure to stir the finish frequently while using it. You will be able to tell when it settles and needs to be stirred.
To apply the Marine finish, dip the brush into the stirred finish and apply with long smooth strokes. Make sure to apply a nice solid coat, but not too thick that it drips and pools on the underside of the benches.
This first coat will soak into the wood quite a bit. That is good! Let it dry overnight before applying the second coat.
Clean off any dust on the wood as needed before applying the second coat. Again apply in long smooth brush strokes.
Since the second coat does not soak into the wood like the first, it will appear glossier as you apply it and is more likely to drip so keep an eye on it.
Let dry overnight. If you want you can apply a third coat.

The finish uses air to fully cure so you need a lot of airflow when applying it. We applied the finish outside under a couple 10x10 pop-up tents.

Maintenance of the Outdoor Finish
The sun and weather will eventually breakdown any finish. Outdoor furniture sealed with the Marine finish will need to be maintained.
To help your finish last the longest, cover when not in use.
If you notice water is soaking into the wood at all (you will see a slight darkening of the wood when wet), it is time to reapply.
Clean the surface and then apply another coat of the same finish. No sanding or removing of the previous finish required.
Fire Pit Cost Breakdown
This project looks like it is super expensive. But we used budget friendly materials to make our DIY fire pit and I am so happy with the result.
I like to are share the cost breakdown of everything we bought to help you in planning and budgeting your own fire pit DIY.
Remember, costs can differentiate regionally and change frequently so use this as a guide only.
- Fire ring- $45.00
- Cinder blocks- $30.00
- Cinder block caps- $95.00
- Landscape construction adhesive- $32.00
- Weed barrier- $22.00
- Landscape staples- $4.00
- Crushed limestone- $68.00
- Tiller rental- $55.00
- UTOS and Sealer - $98.25
- 2x6 boards - $145.50
- 2x4 boards- $50.75
- 1x6 boards - $166.00
- 2 1/2" outdoor pocket hole screws - $20.00
- 1 1/4" outdoor pocket hole screws - used some on hand
- 1 1/4" finish nails - used some on hand
- 2" outdoor screws - $5.00
- 3" long stainless steel hinges - $33.00
- 1" #8 stainless steel wood screws - $6.00
Which brings our grand total to $875.50!
Not bad for a spot that will get years of use and create so many family memories.
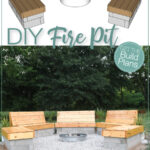
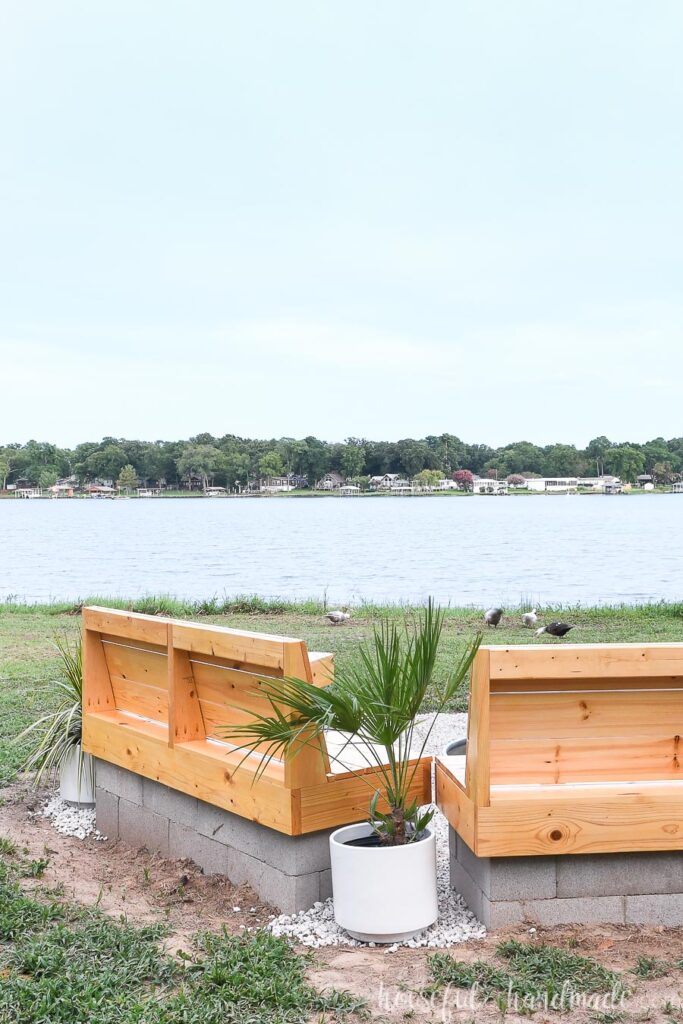
We are already loving the seating area that we created at the lake. It's the perfect place to sit and watch the ducks.
I added a few planters with tropical plants to give our DIY fire pit a tropical vibe and it works perfectly with the warm tone of the wood.
Right now I think we earned a chance to just sit and enjoy our hard work!

Thank you to Waterlox for sponsoring this post. I only recommend products that I use and love and all opinions are 100% my own. Click here to read my full disclosure policy.