

Organize all your spices, oils, and more into one small DIY cabinet.
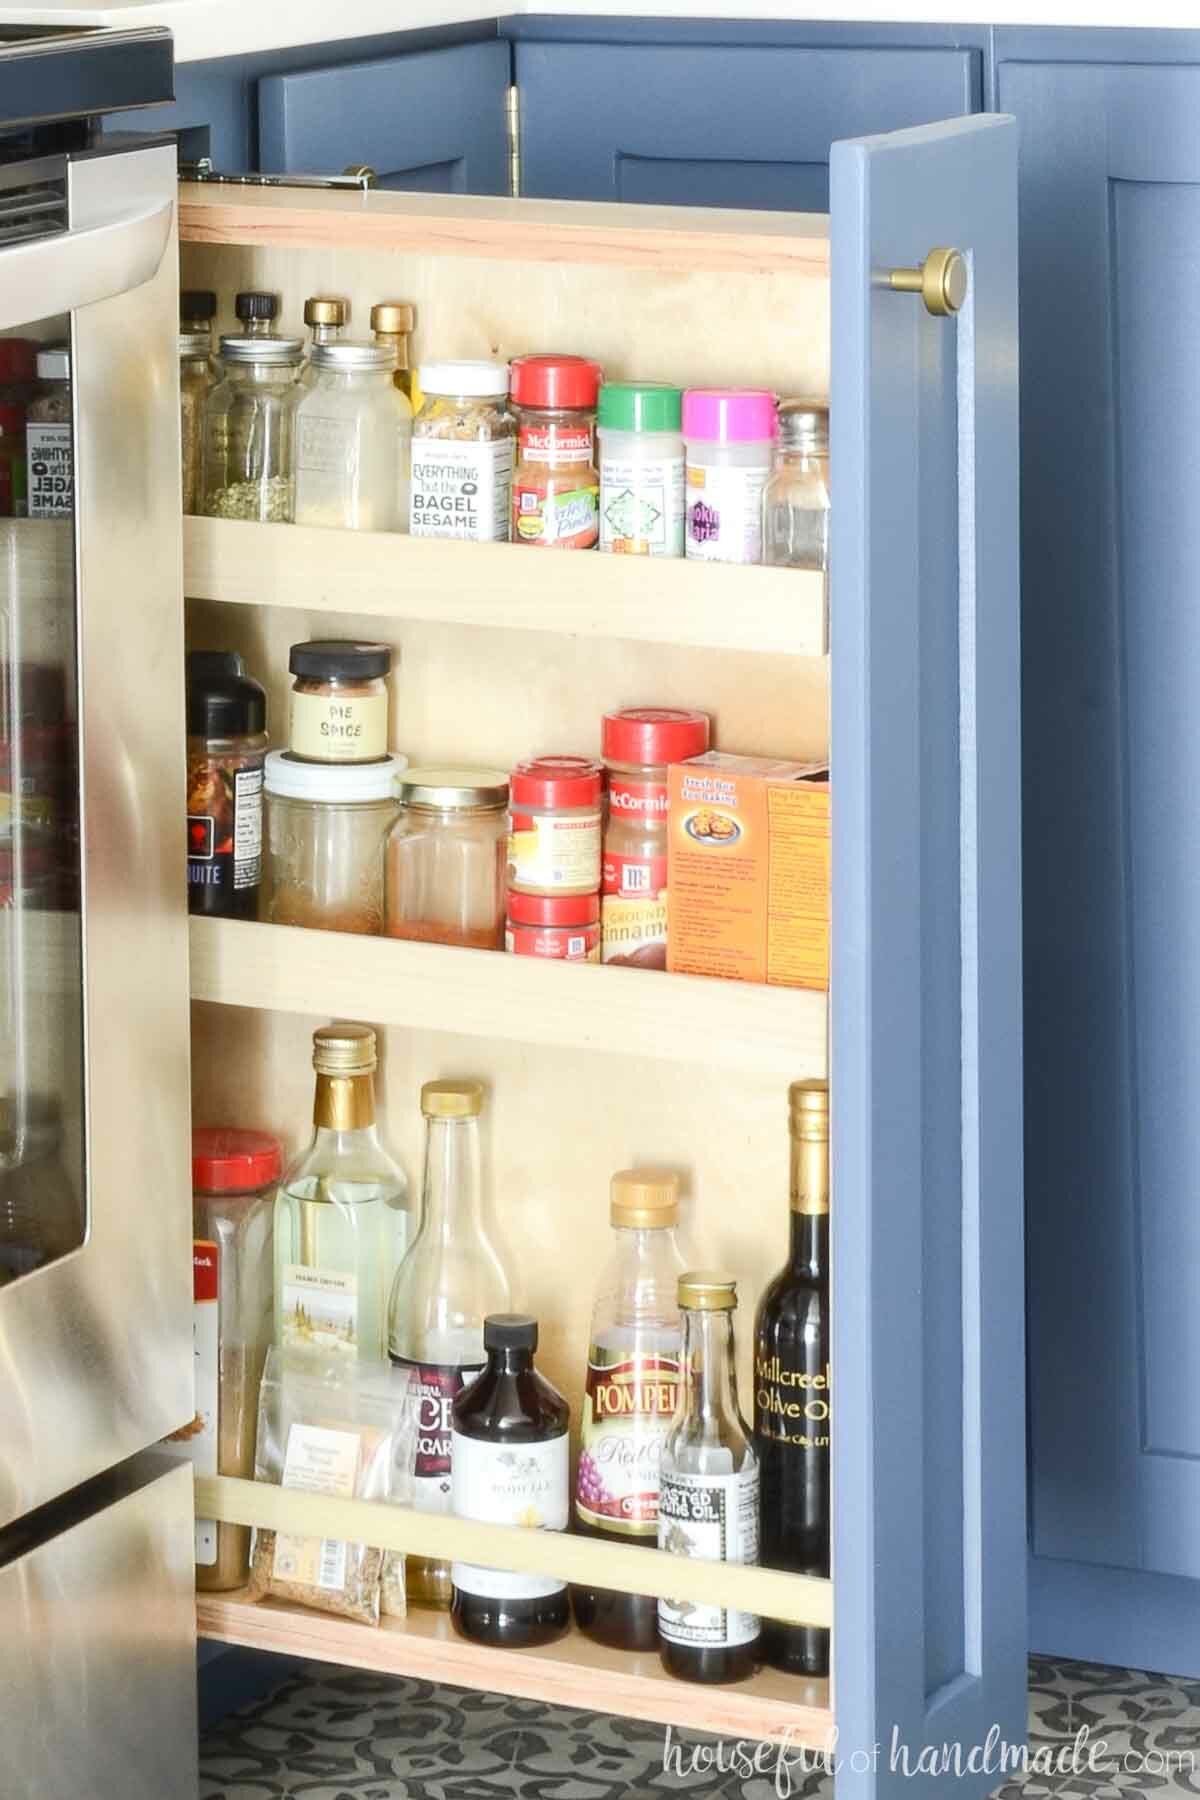
One of my favorite specialty cabinets in the kitchen is the pull-out spice rack cabinet.
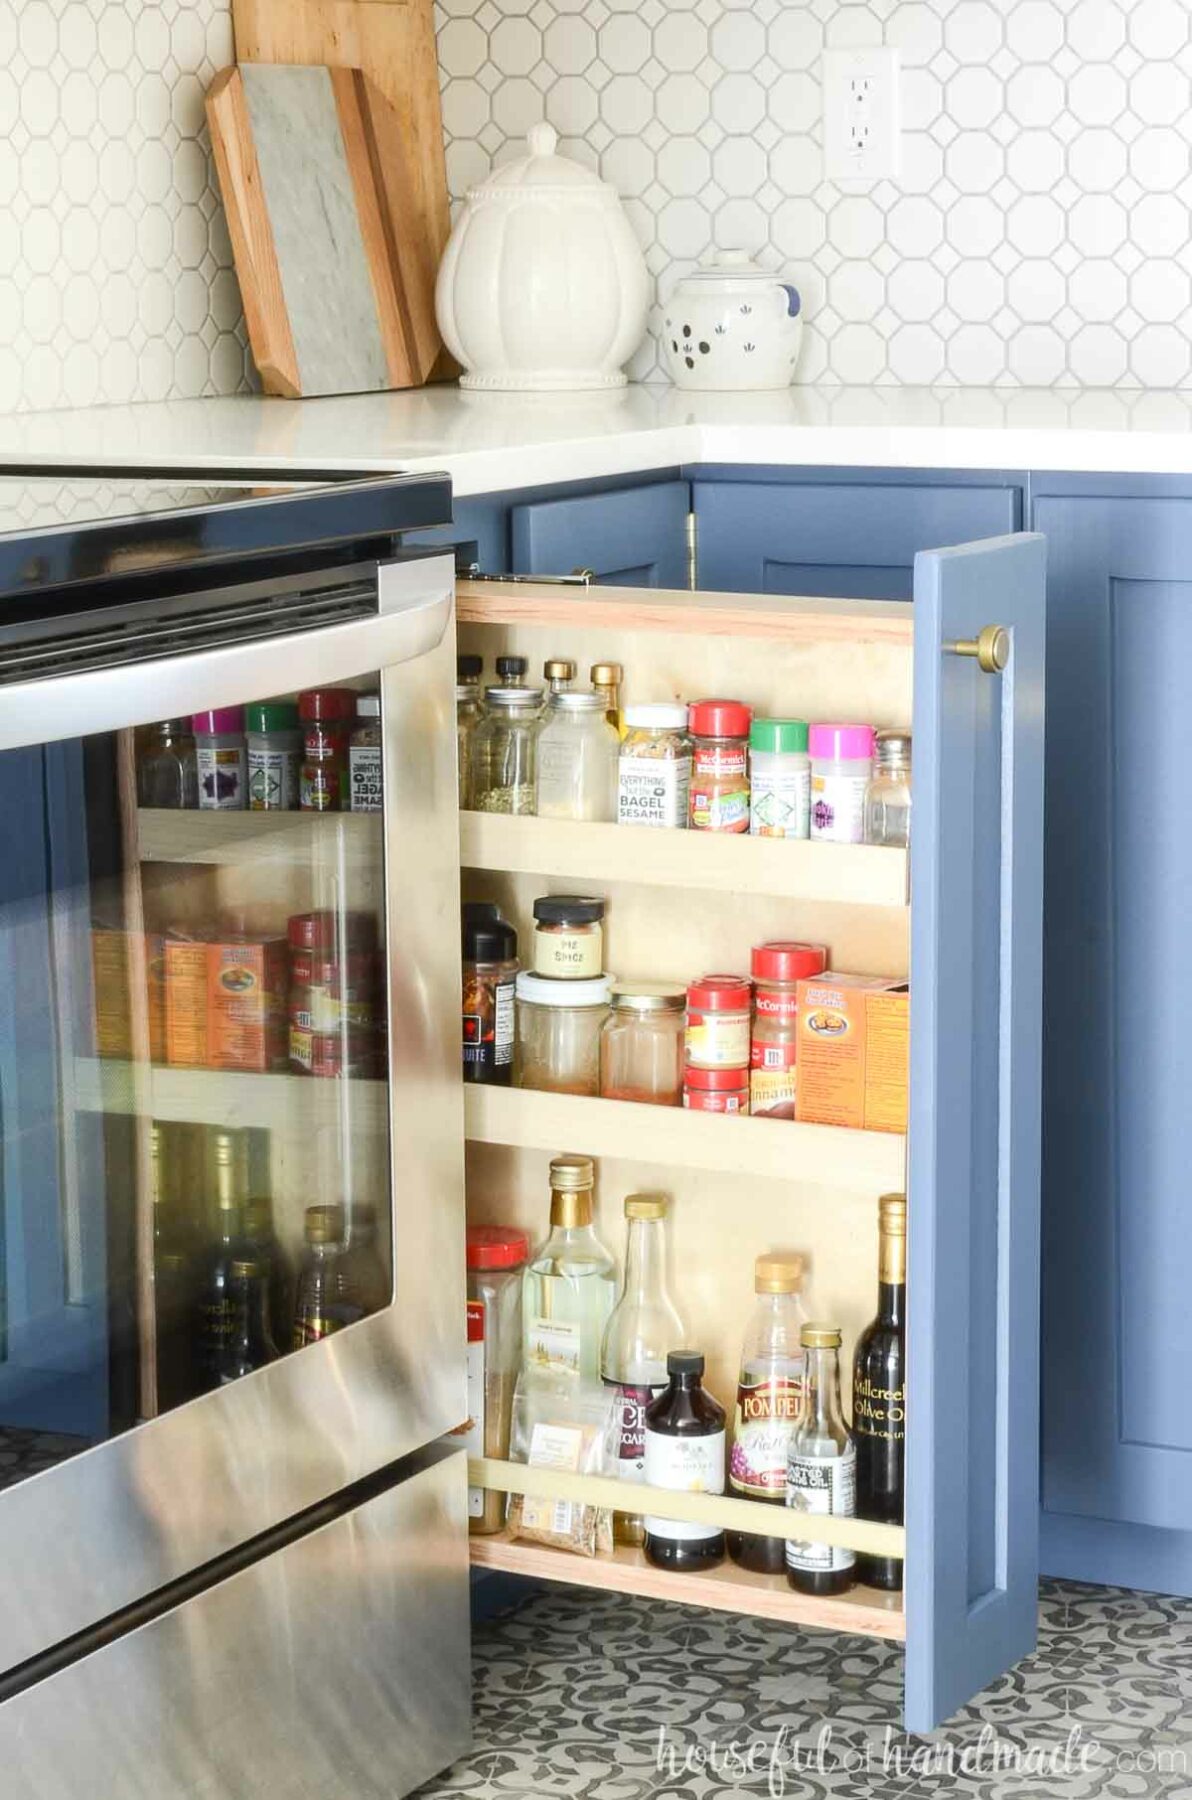
It is a small cabinet, totaling only 8-10 inches in width, but holds a ton of spices. Plus I have room to store things like oils, vinegars, honey and marinades too.
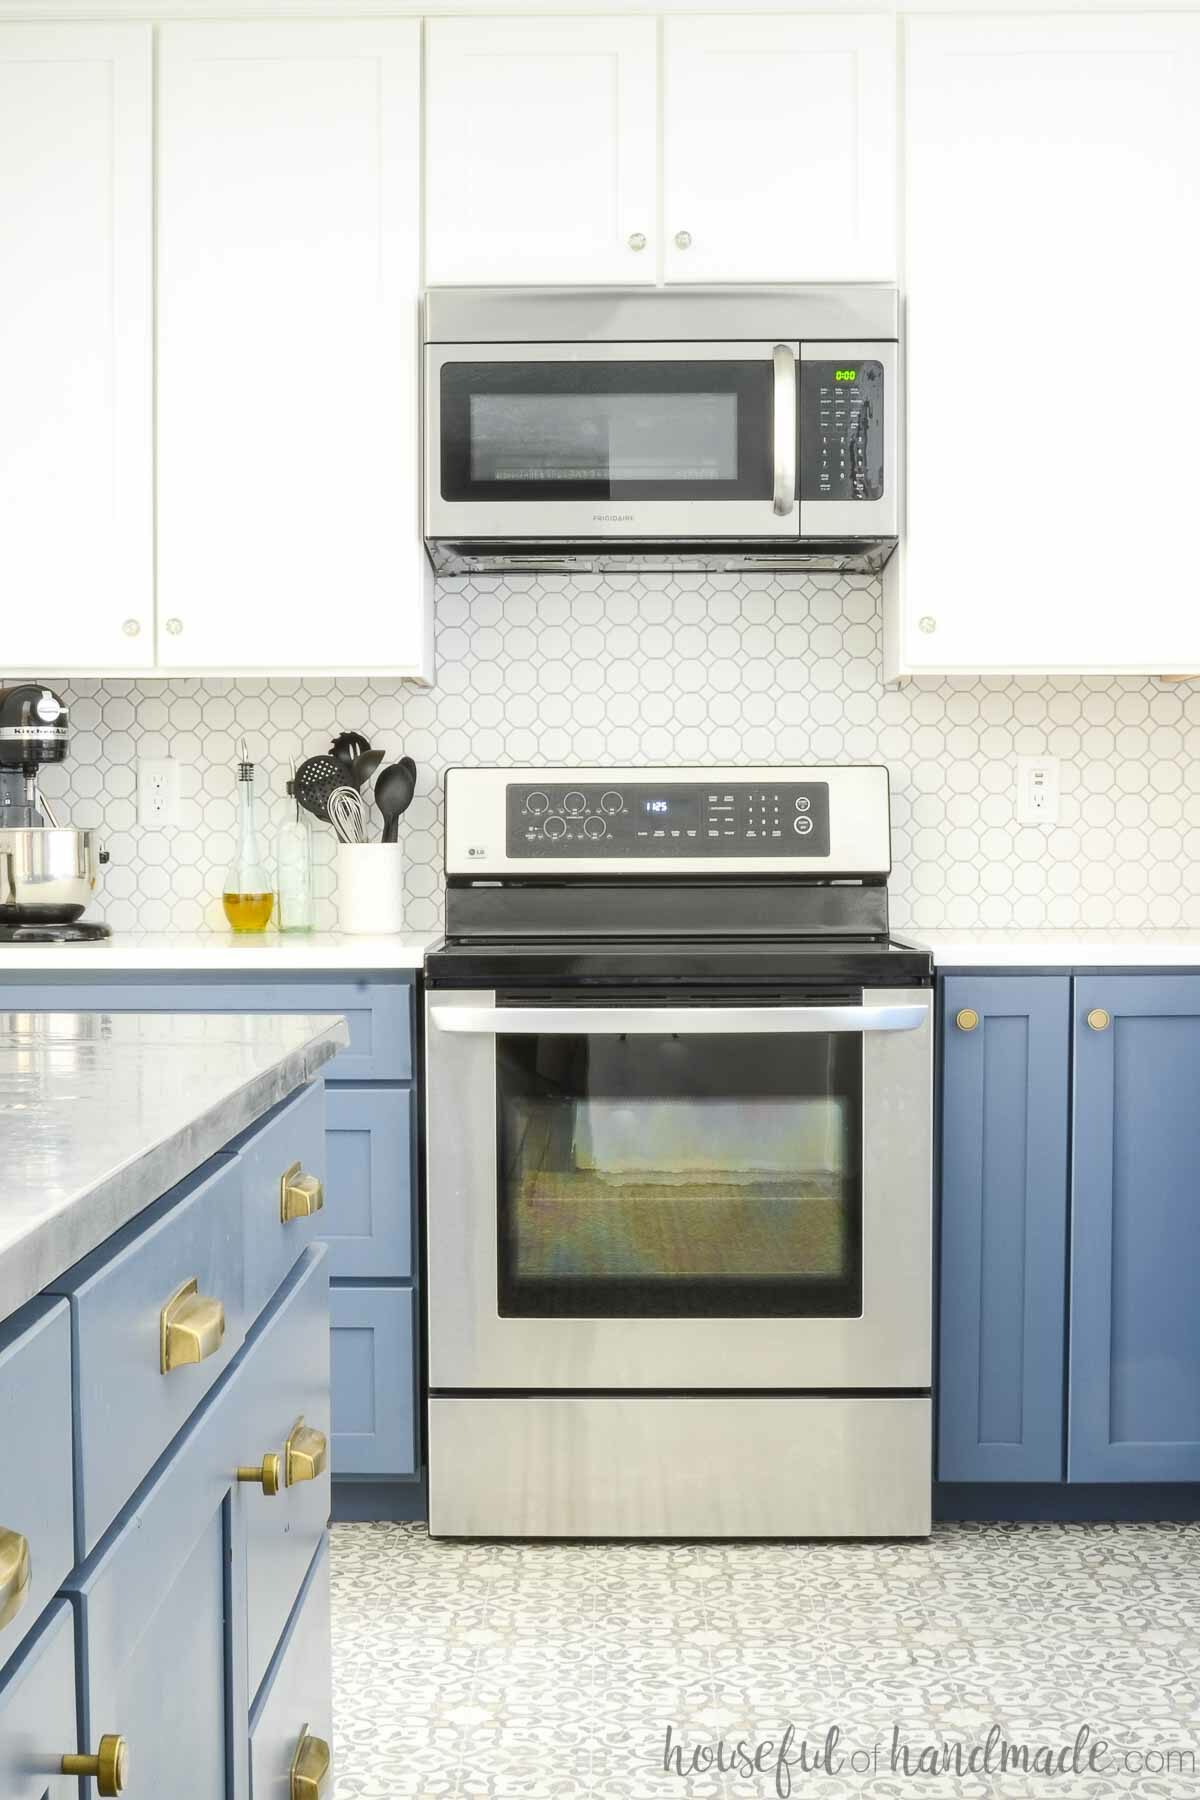
In both DIY kitchen remodels, I put the spice cabinet next to the stove so I can quickly grab the spices I need when cooking.
This post may contain affiliate links. As an Amazon Associate I earn from qualifying purchases. Click here to read my full disclosure policy.
It is so helpful and such a fun cabinet to add to your kitchen.
Make sure to read all about how to build base cabinets in this post to figure out your toe kick and cabinet height and depth. Also, make sure to read the difference between a face frame and frameless (or European) cabinet in the How to Build Cabinets post.
Prefab Spice Rack vs. Building Your Own
There are many different kinds of spice rack cabinet inserts that can be purchased. These can be added to new or existing cabinets.
But I chose to build my own wood spice cabinet for three reasons:
- To save even more money on our kitchen remodels.
- To get the perfect size spice rack for the spices/oils I use.
- To get a high quality spice rack. The drawer slides on prefab inserts I have used at other peoples houses are not as good of quality (especially for the price).
Even if you are not building your own cabinets or remodeling your kitchen, you can use the information in this post to add a pull out spice rack to an existing cabinet.
The amount of wood needed to build an insert with 3-4 shelves of spices is very minimal. Both of the inserts I have built were made out of plywood scraps left over from building the cabinet boxes.
The plywood is strong and easy to work with, but it does leave exposed plywood edges. If you want, you can cover the plywood edges in edge banding. Or you can use scraps of the wood used to build your face frame to make your insert.
What Kind of Drawer Slides do you Need for a Spice Cabinet?
In order to make your spices easy to access, you will use drawer slides on the spice rack insert. The cabinet front will have a standard cabinet door on it, but will open and close like a drawer. I go into depth about drawer slides in this How to Build Drawer Base Cabinets post.
You will need to use full extension drawer slides so that you can access items in the back of your spice rack. Even with full extension drawer slides, the back 3″ or so can be harder to access because they are still inside the cabinet.
Also, countertops usually hang over the front of the cabinets 1 to 1 1/2″ making the back of the spice rack a little more hidden.
To make every last inch of your spice cabinet easy to reach, I suggest using over-extension drawer slides. These slides will pull out up to 1” past the opening of the cabinet.
The over extension slides are a few dollars more expensive than standard full extension slides, so purchase what works best for you and your budget.
Custom Spice Rack Cabinet
The best part of building your own pull out spice cabinet is you can make it any size you want! First decide what spices/oils/etc. you want to store in your cabinet, then build a custom spice rack to fit them.
If you have a lot of spices or things you want to store in your pull out spice cabinet, you can build a cabinet with two spice racks. It will take up more cabinet space.
You can build your spice rack with permanent shelves to work in a specific configuration. Or make adjustable shelves so your cabinet can adjust as you need it.
Also, add as many shelves as you need. I like to keep the bottom taller for oils, vinegars, and other large jars. Then use shelves closer together for spice jars above that.
Have fun configuring your own spice rack and cabinet to work perfectly for your kitchen and how you cook.
Adding a Spice Rack to an Existing Cabinet
If you have a small cabinet (under 12″) with a narrow opening. You can convert it to a pull out spice rack.
To do that, you will build a pull-out shelf as detailed below to fit the opening you have.
For a wider opening (10-12″) you may want to build two spice racks so you do not end up with deep shelves that hide away your spices.
If you do not have a narrow cabinet to convert, you can build a pull out spice rack and add it to the side of any existing base cabinet.
You will need to create a plywood case for the pull out spice rack to sit into. And on the side open to the rest of the cabinet, you can add shelf pin holes so you can still use shelves in the rest of the cabinet.
The front of your cabinet will look exactly the same, but when you open the cabinet, you can pull out the nicely organized spice rack without sacrificing much cabinet space.
Pull Out Spice Rack Cabinet Plans
Once you have determined how you want your spice rack cabinet configured, it it time to create plans for it! I will walk you through how to create plans for your custom spice cabinet and so you will be ready to start building.
Before you can determine the size of cabinet you need for your spices, you will first create a plan for the spice rack insert.
Each spice rack will have the following parts:
- 2 front/back pieces
- 2 top/bottom pieces
- 1 side panel
- 2 or 3 shelves
- Optional: shelf fronts
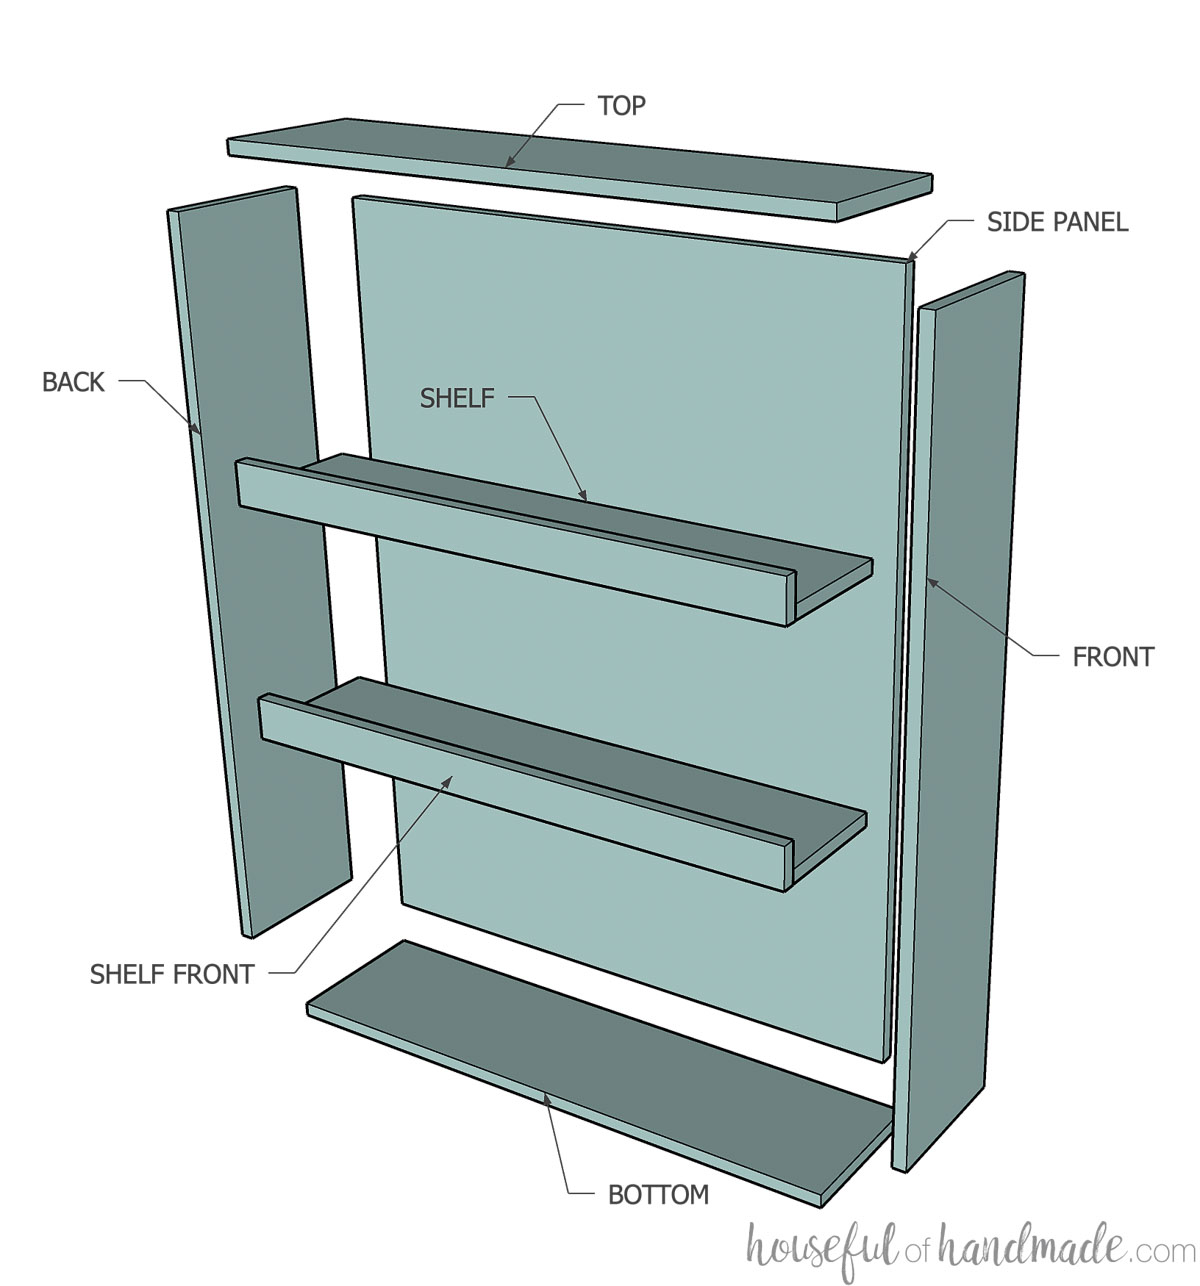
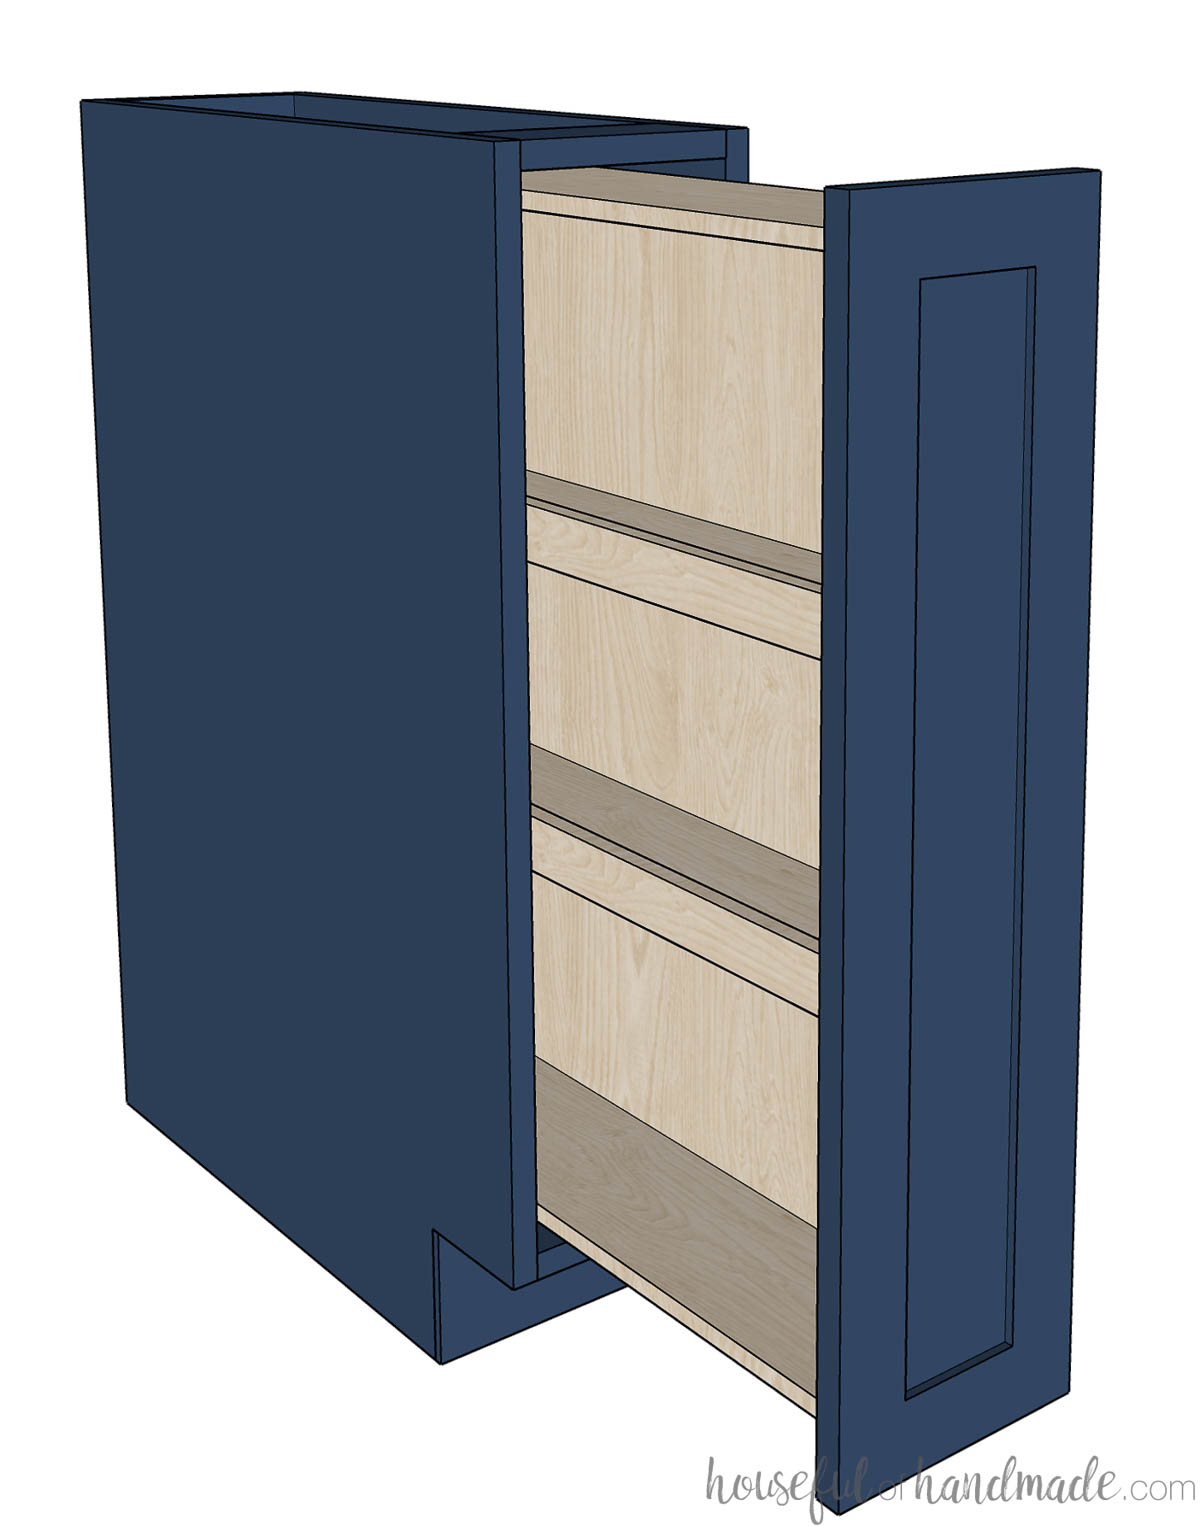
This easy to build spice rack is basically a drawer on its side. I built the entire box out of 1/2″ plywood, including the bottom (or the side in this case).
The thicker side panel (a normal drawer bottom) keeps the pull-out insert square, even when being pulled out of the cabinet.
I like to have the top of the spice rack be the full length of the rack. This makes the top of the insert clean when you pull it out.
Spice Rack Cut List
The width of your spice rack will determine how deep your spice shelves are. If you want a shelf only deep enough for 1 spice bottle, you will make a narrower spice rack.
Make sure to add 1/2″ to the desired shelf depth for the side panel when deciding how wide to make it. Also, if you want a front lip on your shelves to help keep things in place, you will need to add 1/2″ to the width for it.
I like my racks deep enough to hold 2 spice jars. Since my spice jars are 1 7/8″ square, I made a 5″ wide spice rack. Each shelf is 4″ deep after the back and lip.
The depth of your spice rack insert will be equal to the length of your drawer slides. In a standard 24″ deep base cabinet, you will want to use 22″ drawer slides.
The height of your spice rack insert will be equal to the cabinet opening minus 1″. This will allow 1/2″ clearance on the top and bottom of the spice rack when installed in the cabinet.
Use the following chart to determine the exact cut list you need for your own custom spice rack insert:

Tools needed:
- Miter saw
- I recently upgraded to this larger sliding miter saw (watch for it to go on sale), but all my projects before were built with this inexpensive miter saw that I loved.
- Circular saw with guide track or table saw
- Pocket hole jig
- You can build your cabinet boxes the more traditional way with rabbets and dados, but pocket holes are quicker, easier, and very strong. Plus all the pocket holes are completely hidden so no one will ever know you did it the easy way. Find the best Kreg pocket hole jig for you here.
- Drill
- Impact driver (optional, but I love not having to switch bits with the drill)
- Measuring tape
- Squares
- Pneumatic stapler
- If you do not have a pneumatic stapler, you can build your spice rack box with a pocket holed jig.
- Optional: Shelf pin jig for adjustable shelves
Supplies:
- Wood products
- 3/4″ plywood for cabinet box
- 1/2″ birch plywood for spice rack
- 1/4″ plywood for cabinet back
- Optional: 1x boards for face frame
- Optional: Scraps of wood for blocking next to drawer slides
- 1 1/4″ pocket hole screws
- 1 1/4″ long pneumatic staples
- Wood glue
- Drawer slides
- Optional: Shelf pins for adjustable shelves
STEP 1- Build the Spice Rack Insert
Cut all the pieces for your spice rack insert from 1/2″ plywood.
Make sure all the pieces are square. It will ensure a square insert.
EXPERT TIP:
The easiest way to check pieces for square is to measure from corner to opposite corner. Then repeat on the other two opposite corners. If the measurements are the same, the piece is square.
You can build your spice rack (aka, drawer box) with either pocket holes or nails. I prefer the nails because they are quick. But use what you have.
Check out this post for more information on how to build drawer boxes.
Attach the top and bottom pieces to the side panel so they are flush at the edge.
Secure with wood glue and nails every 2-3″. Do not skip the wood glue, it adds a lot of strength.
Add glue to one side and lay the front piece on it. Line it up and secure with staples/nails every 2-3″.
Repeat for the back piece.
If using adjustable shelves, drill shelf pin holes in the front and back pieces. You will need two rows of holes on the front and on the back.
For non-adjustable shelves, measure out where you want them and install with wood glue and nails.

If using a front for the shelves, attach it to the front of your shelf boards so it is flush at the bottom. This will create a lip on the front of the shelf so things do not fall off.
Attach with wood glue and staples/nails. Or if you prefer to have the front clean, pocket holes are a great option.
Another option to keep your spice jars in place is to use a long bar cabinet pull (similar to the front of this DIY cookbook stand. These are more expensive than a small scrap of plywood but look really nice.
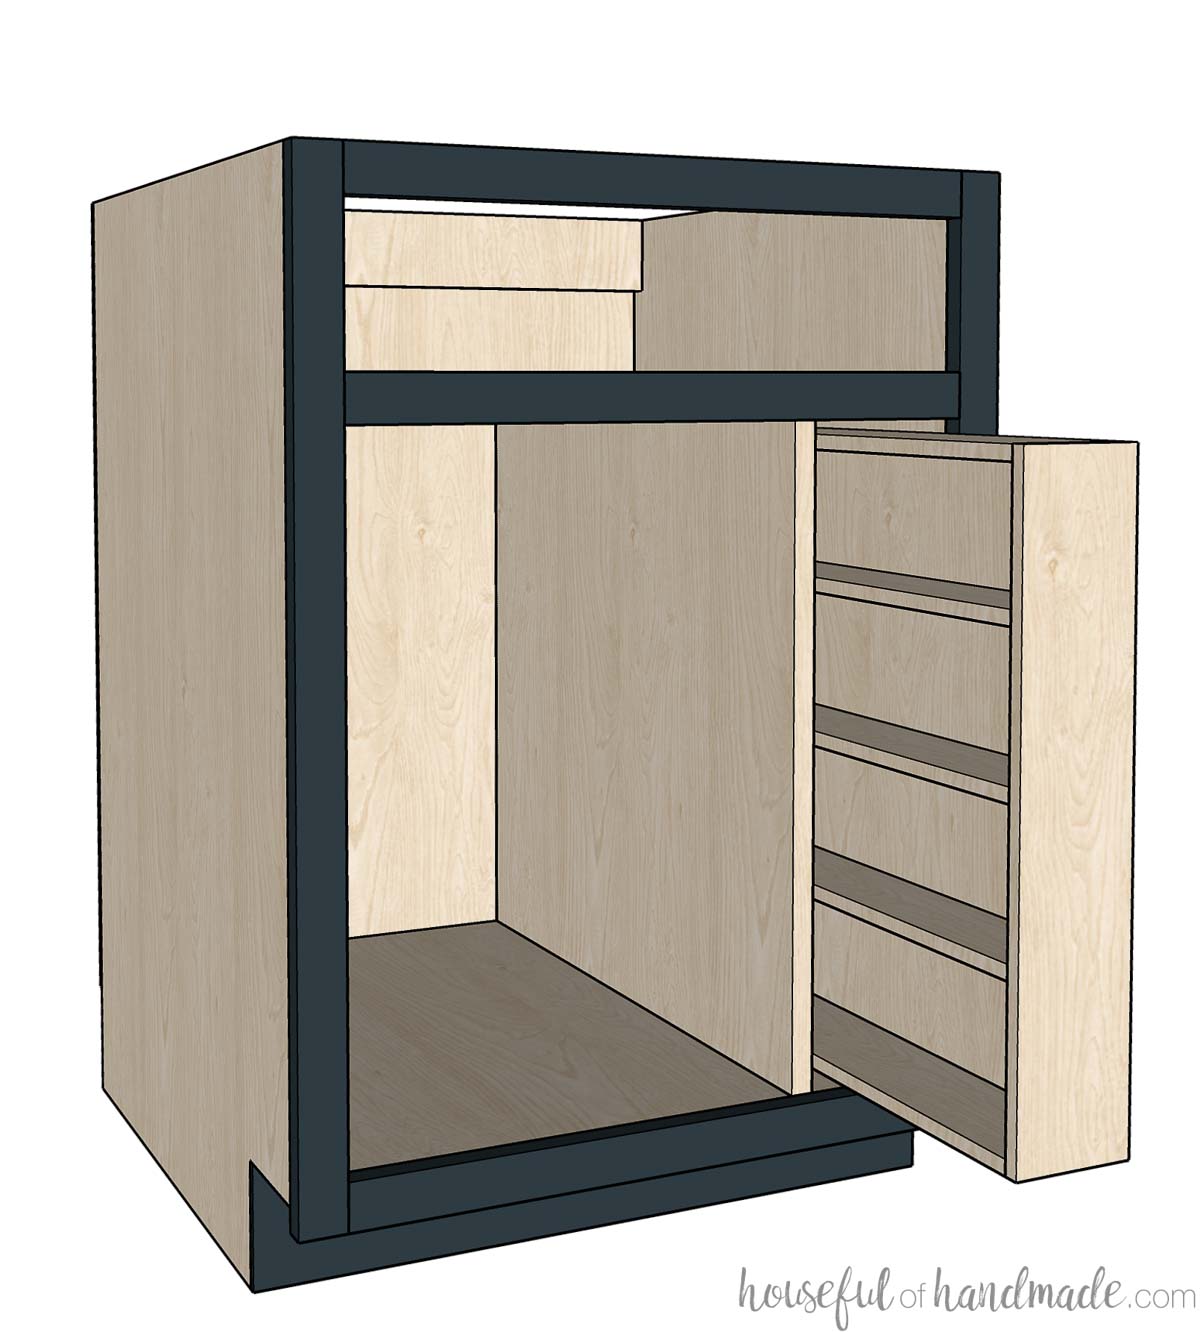
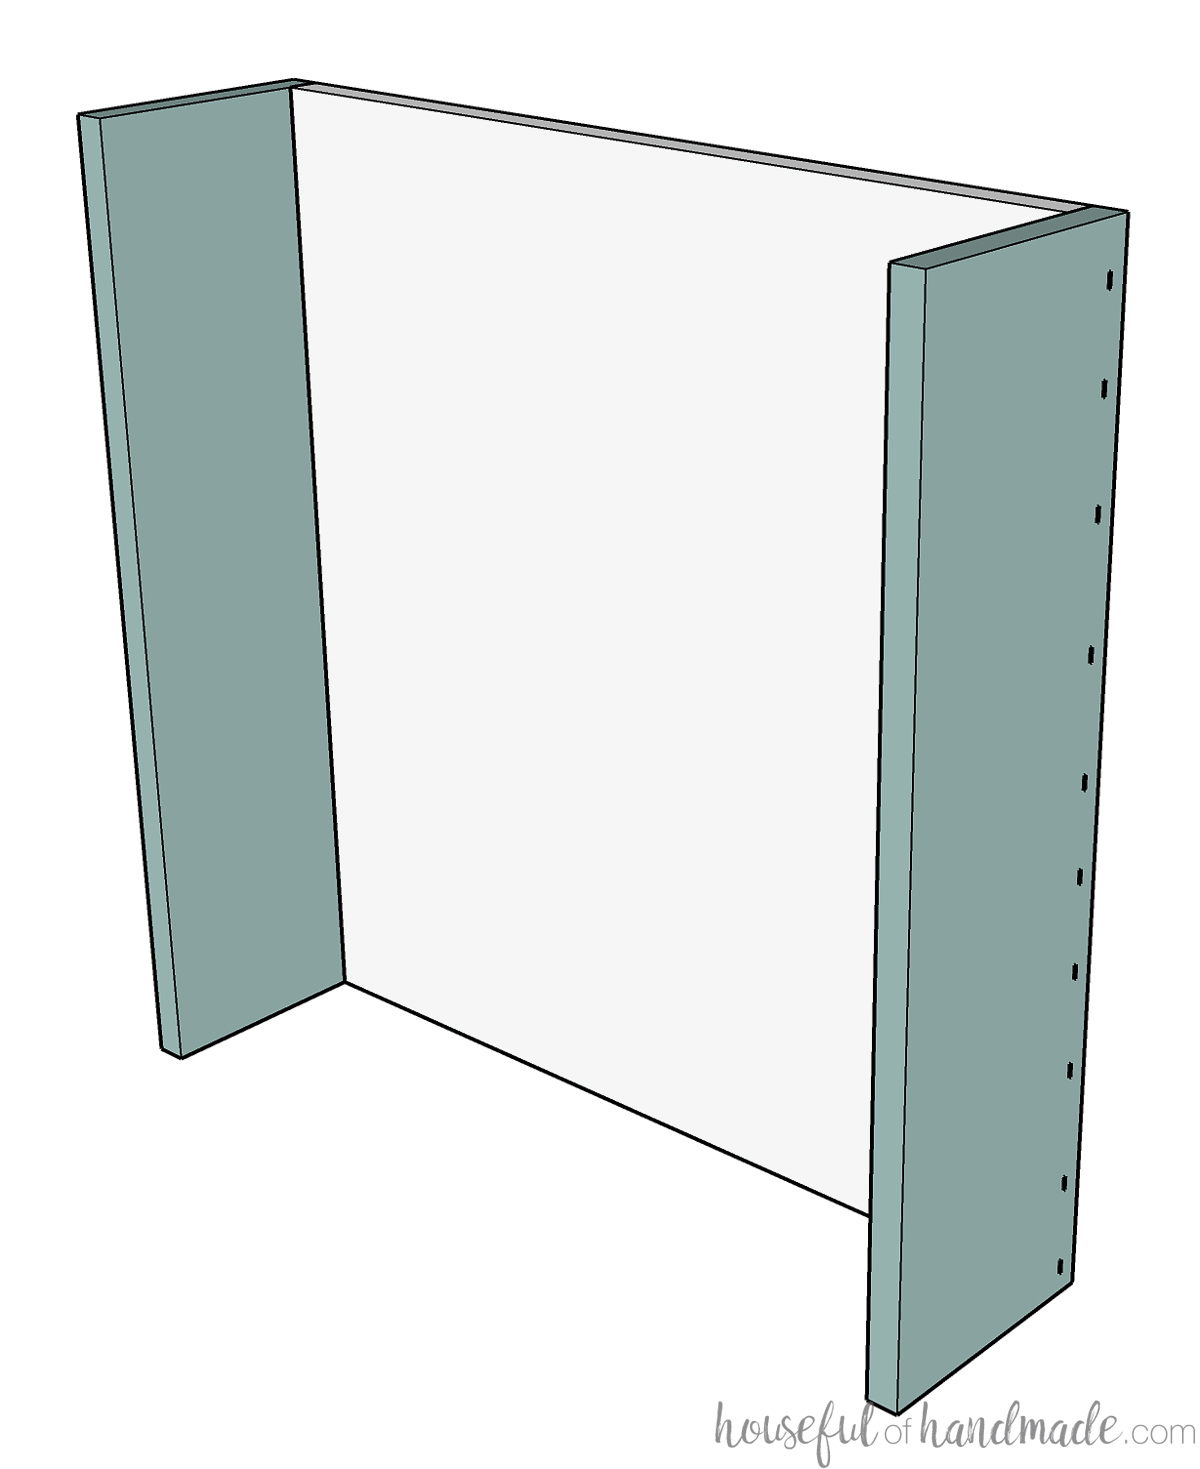
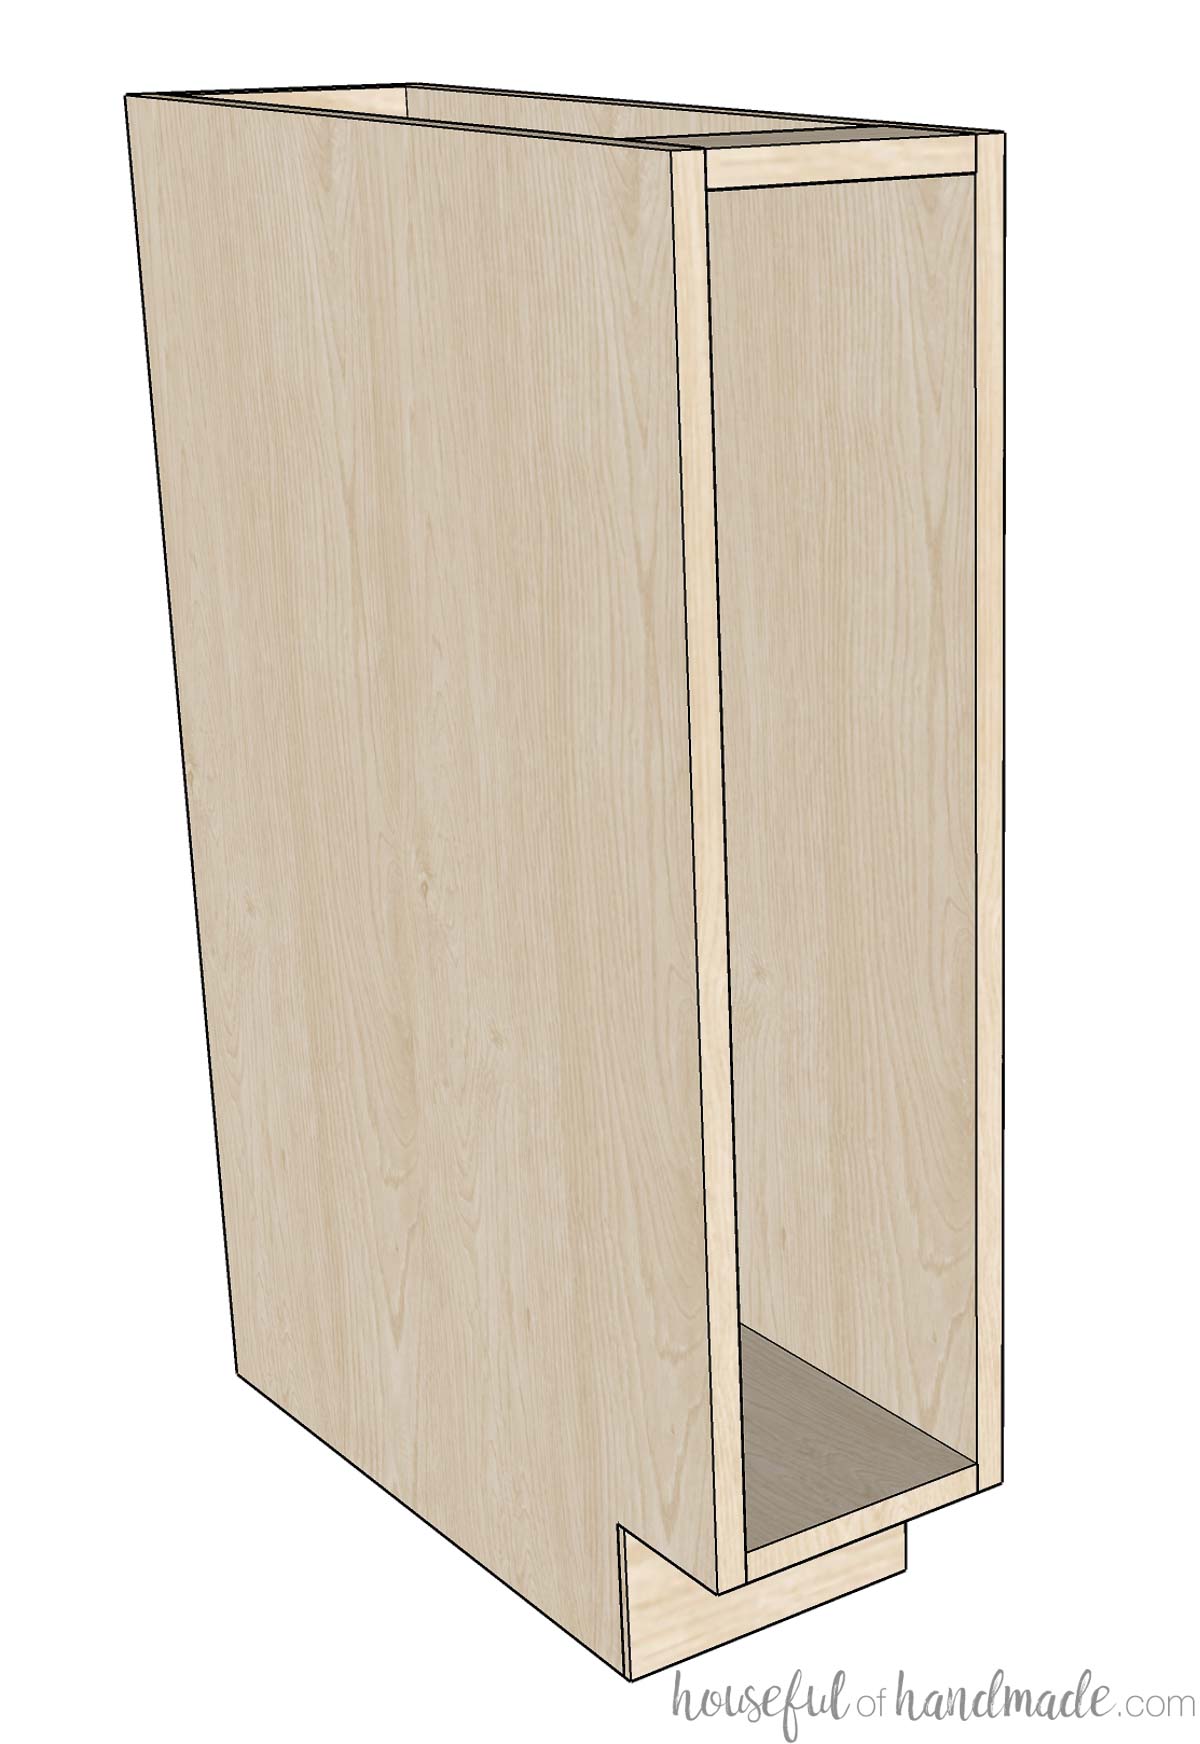
STEP 2- Build the Spice Cabinet
Once you have figured out the spice rack measurements, it is time to determined the size of cabinet you need for it. We will start by determining the opening in the cabinet needed with the following formula:
Width of Spice Rack + (Clearance Required for Drawer Slides x 2) = Cabinet Opening
I used ball bearing drawer slides that require 1/2″ clearance on each side of the drawer. So I added 1″ to the width of the spice rack to determine the cabinet opening.
Now you can take that opening needed and figure out the cabinet width.
- For face frame cabinets: (Face Frame Width x 2) + Cabinet Opening = Cabinet Width
- For frameless cabinets: (Plywood Thickness x 2) + Cabinet Opening = Cabinet Width
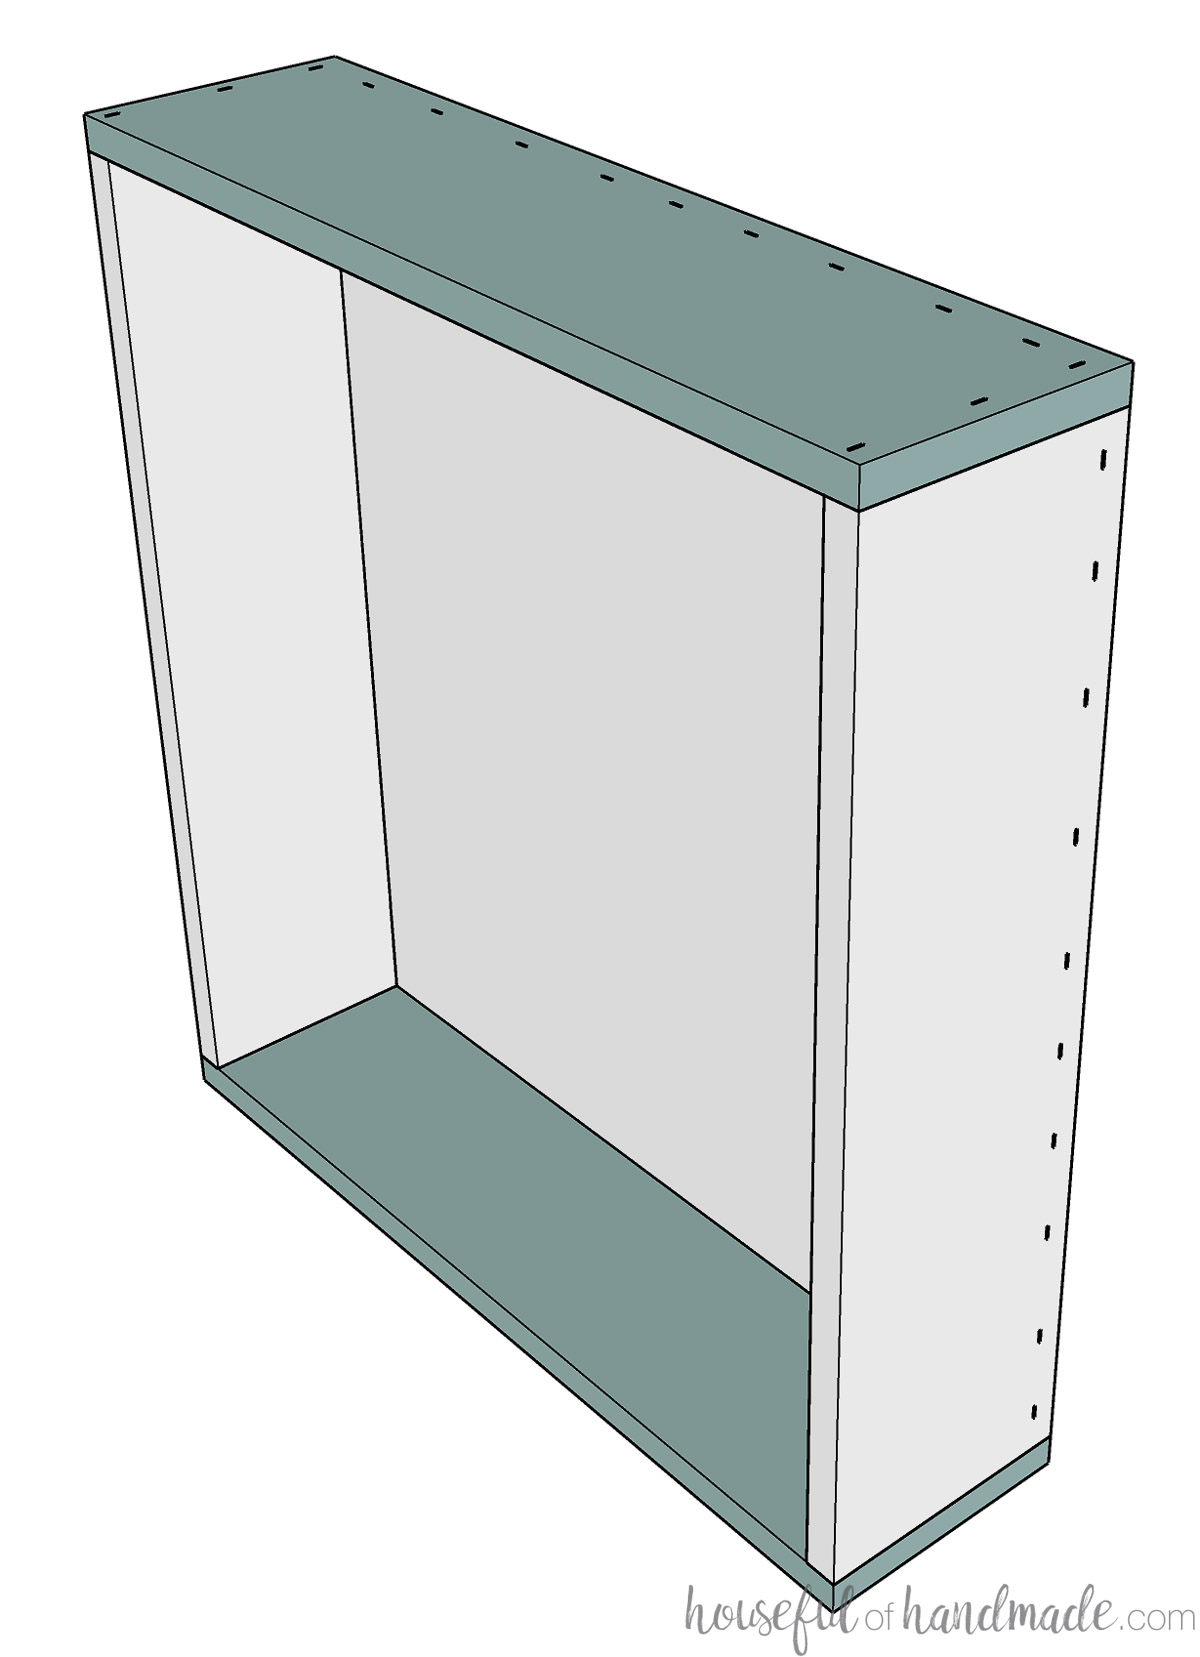
Build a base cabinet to install the pull-out spice rack into. Follow the instructions from the base cabinet build plans. This post also includes formulas for you to determine your cut list for the entire cabinet.
The cabinet will be built the same as all the other base cabinets in your kitchen.
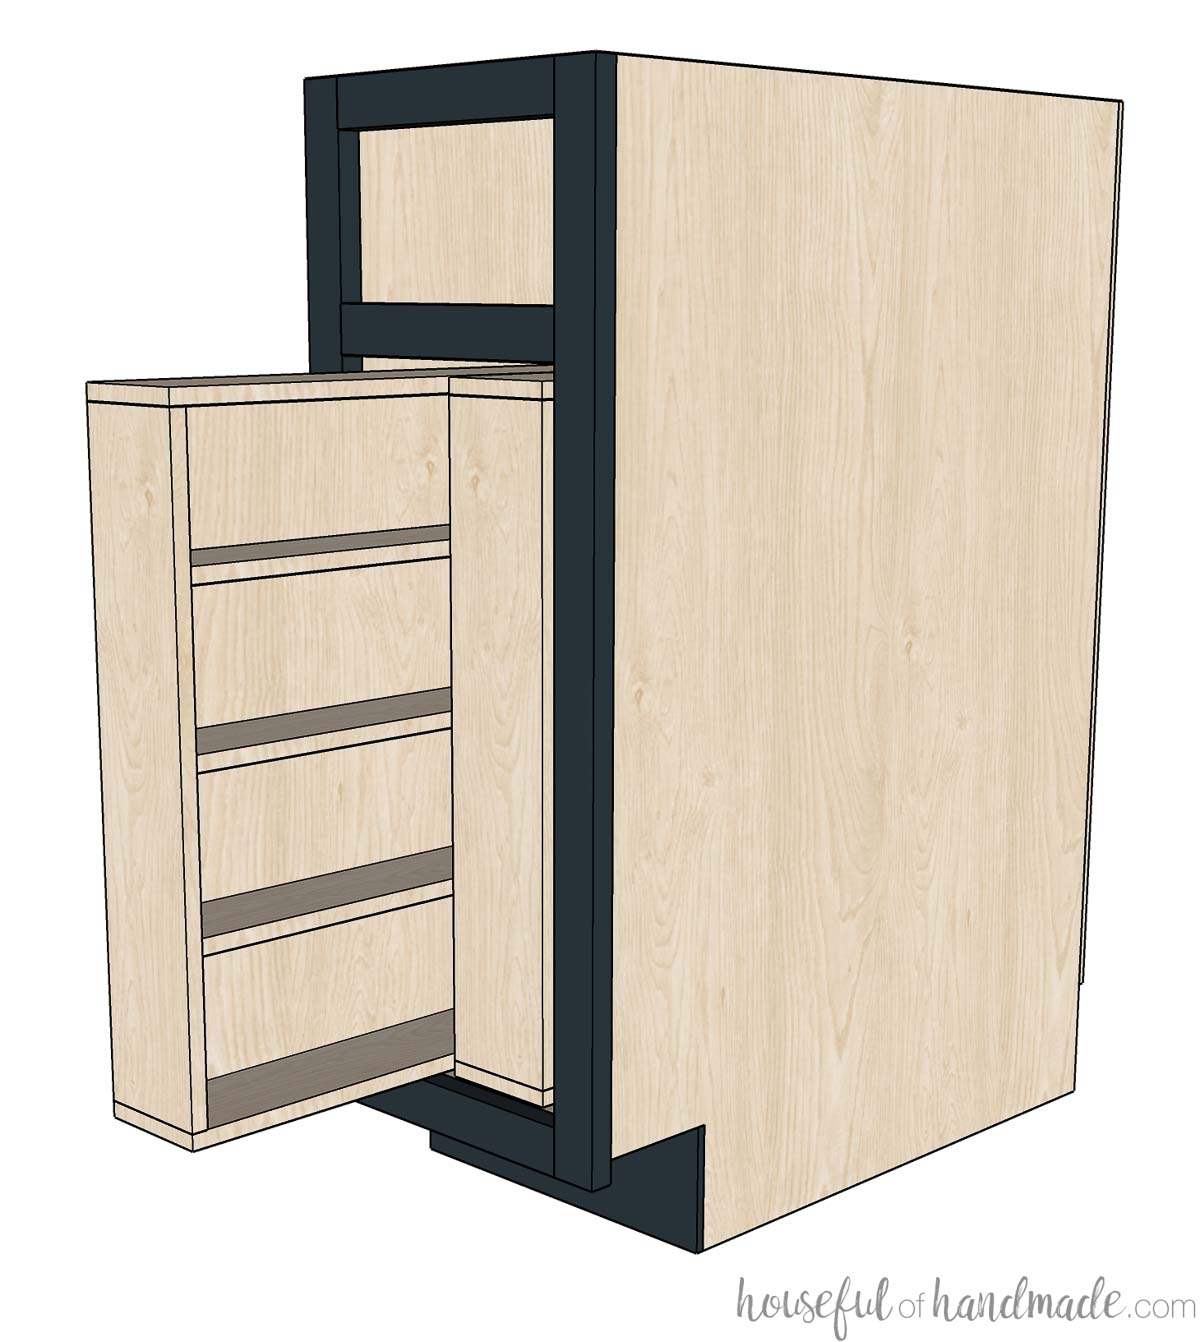
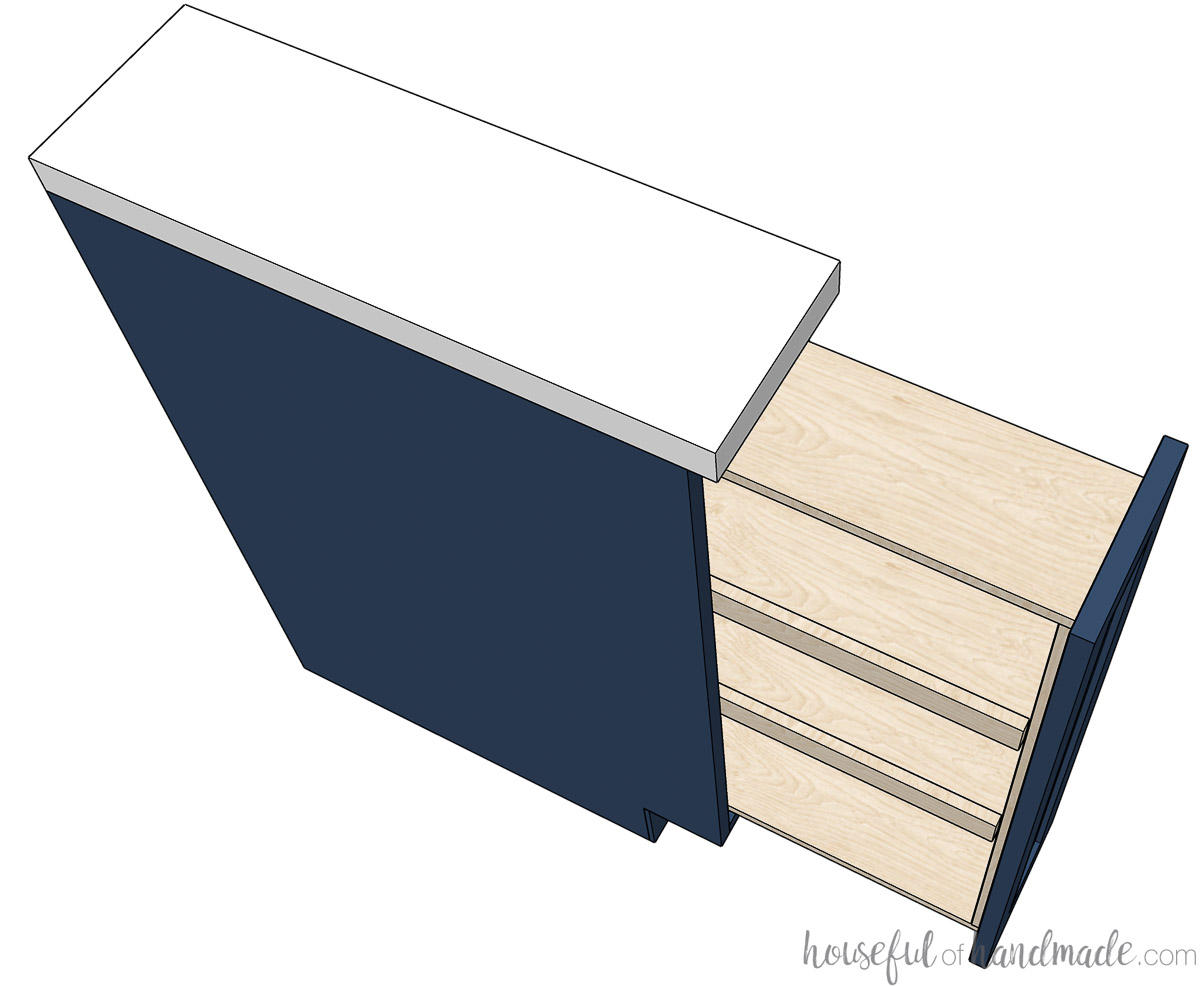
STEP 3- Install the Spice Rack
To install the spice rack, you will install it like you install a drawer, but with both drawer slides on the same side.
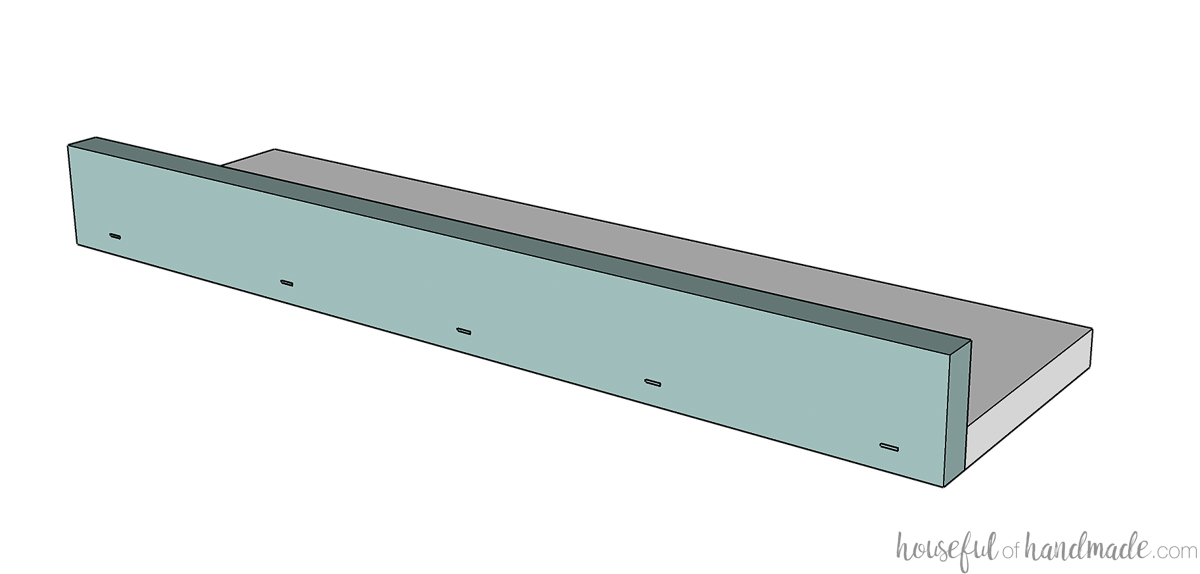
If your cabinet has a face frame, you will need to add blocking to the side of the cabinet where you are installing the drawer slides to make them flush with the face frame.
Measure the depth of the inside of the face frame. Rip scraps of boards to that width. They only need to be 3/4″ thick but should be about as long as the cabinet drawer slide is deep.
You will need one blocking pieces to go behind each drawer slide. Or you can use rear drawer slide clips, but they are plastic and did not have great reviews so I have never tried.
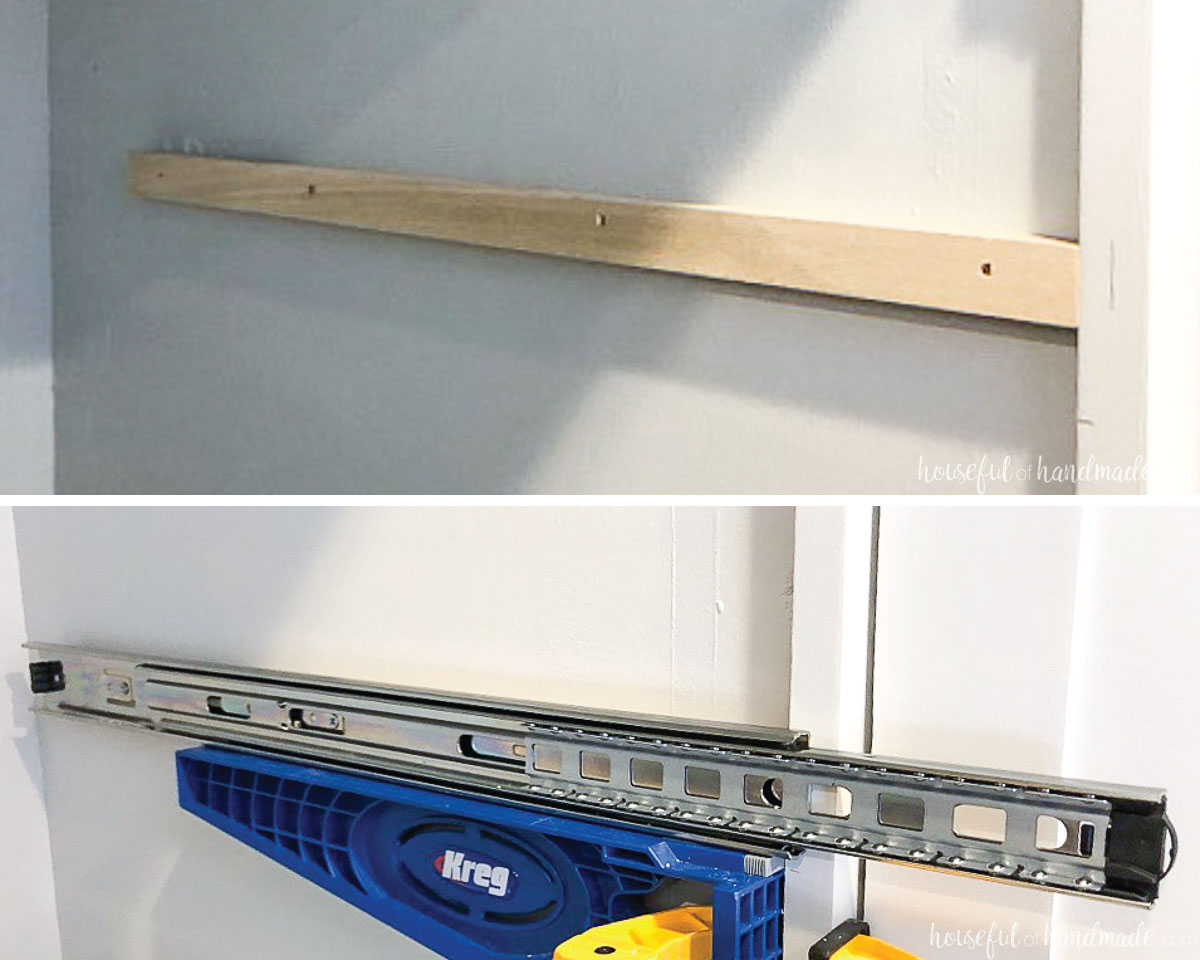
Attach the drawer slides to the side of the cabinet that the back of the spice rack will go up against.
Install one drawer slide so it is approximately 1″ up from the bottom of the cabinet. Install the other so it is approximately 3-4″ from the top.
Install the spice rack so it is centered in the cabinet (1/2″ away from the top frame and the bottom of the cabinet).
Learn how to install drawers with ball bearing drawer slides here.
Then build a DIY cabinet door for your new cabinet. You will attach the cabinet door to the spice rack with wood screws through the front of the insert into the door. Use 4 screws to secure it and keep the door from twisting.
Attach your cabinet pull or knob and you are done!
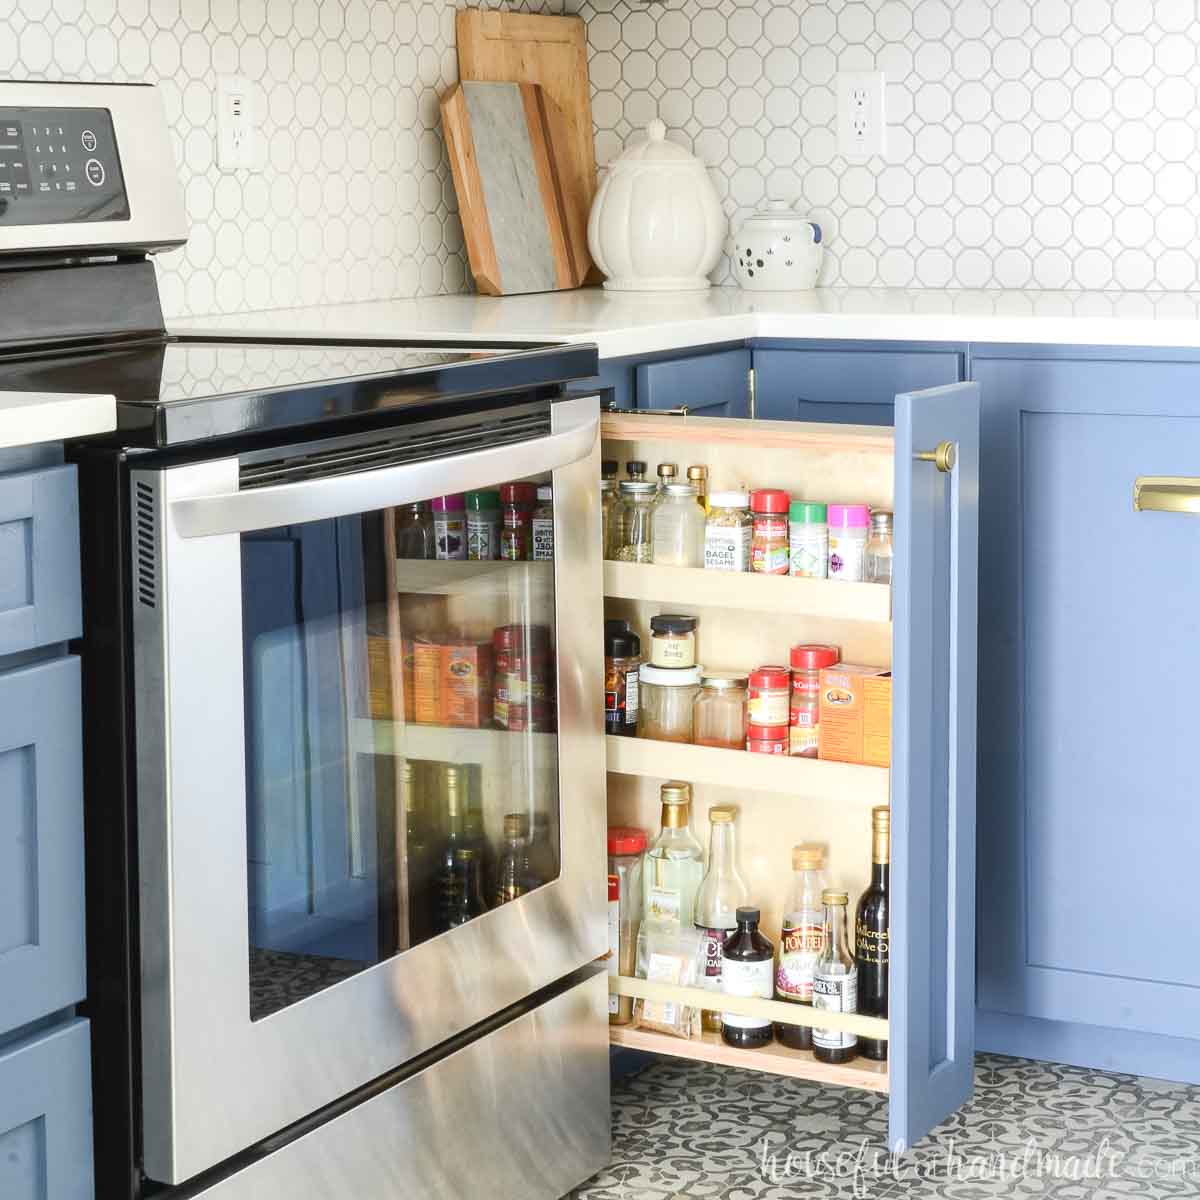
Now you can load up your new spice rack with all your spices and enjoy how much easier it is to find them next time you cook!
And make check out this post to learn all about building your own cabinets for a new kitchen, bath, desk, built-ins and more.
Happy building!
